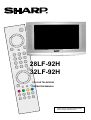
1
R
28LF-92H
32LF-92H
COLOUR TELEVISION
OPERATION MANUAL
Please read this operation manual carefully
before using the colour television.
Contents
Dear SHARP Customer ........................................... 2
Safety Precautions .................................................. 3
Supplied Accessories .............................................. 5
Remote Control Buttons ......................................... 6
Control Panel Buttons ............................................. 7
Antenna Connections .............................................. 7
Preparation ............................................................... 8
Teletext ................................................................... 16
To operate Teletext ......................................................... 16
To select a page of Teletext ............................................ 16
To Select Index Page ..................................................... 16
To Select Teletext with a TV Programme ........................ 16
Searching for a page while watching TV ......................... 16
To Select Double Height Text ......................................... 16
To Reveal concealed Information .................................. 16
To Stop Automatic Page Change .................................... 16
To Select a Subcode Page ............................................. 17
Fastext .......................................................................... 17
To exit Teletext ............................................................... 17
Features .......................................................................... 8
Before Switching on your TV ................................. 8
Power connection ............................................................. 8
Aerial Connections ........................................................... 8
How to connect external equipment ................................ 8
Remote Control Battery Installation .................................. 8
Connecting external equipment .......................... 17
Via the Euro connector .................................................. 17
RGB mode ..................................................................... 17
Via the RCA jacks .......................................................... 17
Via the ANT (aerial) socket ............................................. 17
TV and Video Recoder (VCR) ......................................... 17
NTSC Playback ............................................................. 17
Copy Facility .................................................................. 17
To connect to S-VHS input ............................................. 17
Connecting Headphones ................................................ 17
Switching the TV ON/OFF ....................................... 8
To switch the TV on .......................................................... 8
To switch the TV off .......................................................... 8
Initial Settings .......................................................... 9
Operating with the onset buttons ...................................... 9
Operating with Remote Control ......................................... 9
Menu System ............................................................ 9
Sound Menu ................................................................... 10
Picture Menu ................................................................. 11
Feature Menu ................................................................. 13
INSTALL. (Installation) Menu .......................................... 14
Program. (Programming) Menu ...................................... 15
To start A.P.S (AUTOSTORE) ......................................... 15
Other Features ....................................................... 16
Sound Mute ................................................................... 16
Stereo / Bilingual ............................................................ 16
Information on Screen .................................................... 16
To Display the Time ........................................................ 16
Flash back (
) ............................................................ 16
Connecting external equipment .......................... 18
Typical Connections .............................................. 19
Typical Connections (Continued) ........................ 20
Typical Connections (Continued) ........................ 21
Typical Connections (Continued) ........................ 22
Typical Connections (Continued) ........................ 23
21-pin Euro-SCART and 21-pin Audio/Video ....... 24
Troubleshooting .................................................... 25
Specifications ......................................................... 26
Important Instructions ........................................... 27
-1ENG-2862W-3262W-1548UK-2SCART-FAV-SVHS-AK45-SHARP-TV-1.p65
1
21.01.2004, 08:28
Dear SHARP Customer
Congratulations! You are now the proud owner of a SHARP Colour Television Receiver. To ensure proper operation, please
read this manual carefully. After reading, keep this manual in a safe place for future reference.
TERMS OF GUARANTEE
Subject to the conditions listed below Sharp Electronics (U.K.) Ltd. (Hereinafter called «the Company») guarantee
to provide for the repair of, or at its option replace the Sharp Equipment, or any component thereof, (other than
Batteries), which is faulty or below standard, as a result of inferior workmanship or materials.
The conditions of the guarantee are:
1. This guarantee shall only apply to defects or faults which are notified to the Company, or its approved Service
Facility within one year from the date of purchase of the equipment.
2. This guarantee covers equipment intended for private domestic use only. This guarantee does not apply to
equipment used in the course of a business, trade or profession.
3. This guarantee does not cover any faults or defects caused by accident, misuse, fair wear and tear, neglect,
tampering with the equipment, or any attempt at adjustment or repair other than by an approved Service Facility.
4. In the unlikely event of that your equipment should require repair, please contact the dealer or supplier from whom
it was purchased.
5. The cost of carriage to and from the Dealer, Supplier or Sharp approved Service Facility shall be borne by the
purchaser.
6. No person has any authority to vary the terms or conditions of this guarantee.
7. This guarantee is offered as an additional benefit to the consumers statutory rights and does not affect rights
in any way.
In the unlikely event of this equipment requiring repair during the guarantee period, you will need to provide proof of date
of purchase to the repairing company.
Please keep your invoice or receipt, which is supplied at the time of purchase.
-2ENG-2862W-3262W-1548UK-2SCART-FAV-SVHS-AK45-SHARP-TV-1.p65
2
21.01.2004, 08:28
Safety Precautions
This equipment complies with the requirements of Directives
89/336/EEC, 92/31/EEC and 73/23/EEC as amended by 93/
68/EEC.
This receiver should only be operated from a 220-240V AC,
50 Hz outlet. Ensure you select the correct voltage setting
for your convenience.
Television equipment and cart combination should be moved
with care. Quick stops, excessive force, and uneven surfaces
may cause the equipment and cart combination to overturn.
0DLQV6RFNHW2XWOHW
$&a9+]
$17
(;7
(;7
To prevent fire or electrical shock, do not use the TV set in
an excessively damp place.
To prevent electrical shock, do not subject the AC power cord
to damage by bending or twisting it, or by placing heavy
items on top of it and do not place the AC power cord under
the TV set. If the AC power cord becomes damaged, unplug
it from the wall outlet immediately and call your dealer for
service.
Position the TV set out of direct sunlight and away from heat,
as high temperatures can damage the cabinet, CRT, or other
electronic parts.
Do not place this television equipment on an unstable cart,
stand, or table. The television equipment may fall, causing
serious injury to a child or an adult, and serious damage to
the equipment.
Use only with a cart or stand recommended by the manufacturer, or sold with the television equipment.
Do not cover ventilation slots with objects such as newspapers, tablecloths, curtains, etc.
Do not cover the ventilation holes at the back of the TV set,
this can cause fire or other serious problems. Leave an adequate open space behind the TV set for good ventilation.
In order to ensure that the television is properly ventilated,
leave a space of at least 10 cm around the set.
Do not install this equipment in a confined space such as a
bookcase or a built-in cabinet.
Never remove the back of the cabinet, as there is high voltage in the TV set.
Please call for service.
When replacement parts are required, be sure the service
technician has used replacement parts which are specified
by the manufacturer or have the same specifications as the
original one. Unauthorized substitutions may result in fire,
electrical shock, or other hazards.
-3ENG-2862W-3262W-1548UK-2SCART-FAV-SVHS-AK45-SHARP-TV-1.p65
3
21.01.2004, 08:28
Unplug the power cord from the wall outlet immediately if the
TV set begins to make unusual noises or give off smoke or
an odd smell, then call your dealer for service.
Always disconnect your television from the mains and the
aerial cables during thunderstorms.
Even if your television is switched off, it can still be damaged
by lightning striking the mains and/or aerial cable.
Do not leave your TV set in Stand-by or operating mode when
you leave the house.
Do place the TV set onto an even stand, table or track which
size is bigger than the TV set.
If the TV set is put onto a smaller size or uneven stand, table
or track may cause the TV cabinet distort. Do not put or insert anything between TV set and the stand, table or track.
The tube of your TV has a special coating. Do not knock or
rub on the tube face with sharp or hard surfaces, otherwise
you will damage the coating.
To prevent damaging the surface of the television screen, remove finger prints only with a soft cloth dampened with glass
cleaner. Do not use any abrasive cleaners.
Do not use thinner, benzene or other strong chemical cleaners.
In order to prevent electrical shocks and fires, ensure that
the television is not subjected to splashes or spills of water,
and avoid inserting objects or pouring any type of liquid into
the set.
To prevent fire, never place any type of candle or naked
flames on the top or near the TV set.
If an object or liquid enters the set, disconnect the mains
supply and contact technical service.
Wall or shelf mounting should follow the manufacturers instructions, and should use a mounting kit approved by the
manufacturer.
Warning!
Any intervention contrary to regulations, in particular,
any modification of high voltage or a replacement of the
picture tube may lead to an increased concentration of
x-rays. Any television modified in this way no longer
complies with license and must not be operated.
Instructions for waste disposal:
Packaging and packaging aids are recyclable and
should principally be recycled. Packaging materials,
such as foil bag, must be kept away from children.
Batteries, including those which are heavy
metal-free, should not be disposed of with household
waste. Please dispose of used batteries in an environ
mentally sound manner. Find out about the legal regulations which apply in your area.
CAUTION: For environmental and safety reasons, it is recommended that this television set is not left in stand-by
mode whilst not in use. Switch it off using the main switch. During periods of absence from home it is also
wise to disconnect the set by unplugging the mains plug.
-4ENG-2862W-3262W-1548UK-2SCART-FAV-SVHS-AK45-SHARP-TV-1.p65
4
21.01.2004, 08:28
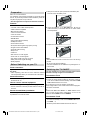
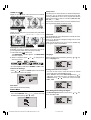
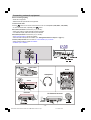
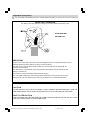
Supplied Accessories
7\SLFDO&RQQHFWLRQV/)+
$HULDOFRQQHF WLRQ79VHWRQO\
%$ &.2)79
/)+
$HULDO
1RW VXSSO LHG
/)+
$
1
7
(
;
7
(
;
7
& 2/ 28 57(/( 9,6,2 1
$ 17
48,&.
67$57
*8,'(
( ; 7
( ;7
$HULDO ,1 $HULDO/HDG
1 RW VXSSOL HG
SXWXVHGEDWWHULHV
HVSHFLDOO\GHVLJQHG
/)+
)RUHDV\LQVWDOODWLRQ
%$ &. 2) 79
IRUWKLVSXUSRVH
)LWWLQJWKHEDWWHULHVLQWRWKHUHPRWHFRQWURO
&RQQHFWLQJWKH DHULDOFDEOH
$ 17
(; 7
/)+
7XQLQJWKH79FKDQQHOV
$ HULDO
1 RWVXSSOLHG
( ;7
$9 7(50,1$/
$9 6 FDUW/HDG
&2/2857(/(9,6,21
1 RWVXSSOLHG
23(5$7,210$18$/
$HULDO/HDG
1 RWVXSSOL HG
%$ &. 2)9 &5
5) 287
8VLQJWKLVLQVWDOODWLRQJXLGH
VKRXOGHQDEOH\RXWRVHWXS\RXU
$ HUL DO /HDG
$XGLR9LGHR
$ HULDO, 1
1RW VXSSOLHG
79LQOHVVWKDQPLQXWHV
5HIHUWR\RXURSHUDWLRQ
PDQXDOIRUPRUHWLSVDQGDGYLFH
3OHDVH UH DGW KLVRS HUDWLR QPDQXDO FDUHIXO O\
EH IR UHX VLQ JWKHFRORXU WHOHYLV LRQ , I S UR E OH P V SH U V LV W F R Q W DF W W K H 6 + $5 3 + H OS OL Q H R IIL F H K R X U V RQ O\ RQ
W H O R U L IWH OH S K R Q LQ J I U R P , UH OD Q G D QG R U
: ( % 6 , 7( Z Z Z V KD U S F R X N V X S S R U W
7\SLFDO
5HPRWH
FRQWURO
&RQQHFWLRQV
2SHUDWLRQ
4XLFN6WDUW
0DQXDO
*XLGH
7\SH5$$$
'U\%DWWHULHV
-5ENG-2862W-3262W-1548UK-2SCART-FAV-SVHS-AK45-SHARP-TV-1.p65
5
5HVSHFWWKH
HQYLURQPHQWDQG
LQDFRQWDLQHUWKDWLV
&RQQHF WLRQV79DQG9&5
$HULDO ,1 21.01.2004, 08:28
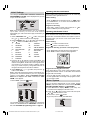
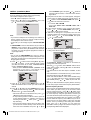
Remote Control Buttons
= Stand By
= Cursor Up
= Cursor Right
OK = OK
= Info (Program Menu)
0 - 9 = Direct Program
-/-- = Double Digit
= Wide mode button
P/CH+ = Program +
+ = Volume +
= TV / Quit Menu
(;7 = EXT button
(EXT-1, RGB, EXT-2, F-AV, SVHS)
Yellow = Feature Menu
Blue = Installation Menu
= Hold
= Update
= Index Page
= Reveal
= Expand
= Mix
= Teletext
= Time
Red = Sound Menu
Green = Picture Menu
= Mute
I-II = Mono/Stereo - Dual I-II
= - Volume
- P/CH = -Program
= Flash back button
M = Menu
= Cursor Down
= Cursor Left
CAUTION
RISK OF ELECTRIC SHOCK
The lightning flash with arrowhead symbol, within an equilateral triangle, is intended to alert the user to the presence of
uninsulated "dangerous voltage" within the product's enclosure that may be of sufficient magnitude to constitute a risk
of electric shock of persons.
The exclamation point within an equilateral triangle is intended to alert the user to the presence of important operating
and maintenance (servicing) instructions in the literature accompanying the appliance.
-6ENG-2862W-3262W-1548UK-2SCART-FAV-SVHS-AK45-SHARP-TV-1.p65
6
21.01.2004, 08:28
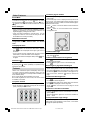
Control Panel Buttons
&+
69,'(2 9,'(2
/6* , 5 '' '
$8', 2
&+
69,'(2 9,' (2
/6*,5'''
$8',2
VIDEO
Speakers (left + right)
AUDIO L (L/S/G/I) = Audio left
= Power On / Off
= Volume -/+
CH
FRONT PANEL
AUDIO R (R/D/D/D) = Audio right
= Headphone 3,6 mm Ø
= Program -/+
S-VIDEO
Antenna Connections
-7ENG-2862W-3262W-1548UK-2SCART-FAV-SVHS-AK45-SHARP-TV-1.p65
7
21.01.2004, 08:28
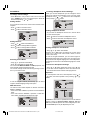
Preparation
Place TV on a solid surface.
For ventilation, leave a space of at least 10 cm free all around
the set. To prevent any fault and unsafe situations, please do
not place any objects on top of the set.
Use this apparatus in tropical and moderate climates.
1. With your thumb nail, pull up the slit as indicated by the
arrow to remove the battery cover.
Features
Remote Control Colour Television
100 UHF / VHF / Cable channel presets
Cable Channel Compatible
Menu Driven functions
2 Euro connector Sockets
Front AV sockets
Front SVHS connector.
NICAM Stereo
Full function teletext (Fastext)
Headphone socket
Direct Channel access
APS (Automatic Programming system) Tuning
Program custom name feature
Automatic search tuning
Sleep Timer
Child lock
Blue mute on no video signals
Audio mute on no video signals
Auto switch of after 5 mins of no signal
WSS (wide screen signal decoding)
NTSC playback
2. Insert two batteries 1.5 V (R03 AAA size). Be sure to
match the battery +/- terminals with the +/- marks inside
the compartment.
9$ $ $5
3. Replace the battery cover.
Notes:
Remove batteries if weak or if the unit is not in use for long
periods.
Do not mix old and new batteries.
Incorrect installation of the batteries may damage the remote control.
Before Switching on your TV
Power connection
Important: The TV set is designed to operate on 220 -240V
AC, 50 Hz.
After unpacking, allow the TV set to reach the ambient
room temperature before you connect the set to the mains.
Aerial Connections
Connect the aerial plug to the aerial input socket located at
the back of the TV.
How to connect external equipment
See Connecting external equipment on page 18.
See the instruction manuals provided with the external devices too.
Remote Control Battery Installation
Before using the TV set for the first time, install the supplied
dry batteries in the remote control.
Switching the TV ON/OFF
You can operate your TV either using the remote control
handset or directly using the TV onset buttons.
To switch the TV on
Your TV will switch on in two steps:
1- Press the power button located on the front of the TV.
Then the TV switches itself to standby mode and the RED
LED located below the TV turns on.
2- To switch on the TV from stand-by mode either:
Press a digit button on the remote control so that a programme number is selected,
or,
Press Power Button and P/CH+ or -P/CH buttons on the
TV or on the remote control respectively, so the TV will
switch on and the RED Led will turn GREEN.
To switch the TV off
Press the stand-by button on the remote control, so the TV
will switch to stand-by mode and the GREEN LED will become RED, or,
Press the power button located on the front of the TV.
-8ENG-2862W-3262W-1548UK-2SCART-FAV-SVHS-AK45-SHARP-TV-1.p65
8
21.01.2004, 08:28
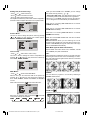
Operating with the onset buttons
Initial Settings
The message PLEASE CHECK ANTENNA CABLE AUTO.
PROGRAMMING SYSTEM will be displayed when you turn
on your TV for the first time.
$8 72 352*5$ 00,1* 6<67(0
(1* /,6+
&28 175<
8.
781,1*02' (
&+$ 11(/
Programme Selecting:
Press CH button to select next programme or CH
button to select the previous programme.
67$57
79 &$1 &(/
Note: If you connect Video Recorder to your TV via antenna
input (ANT socket); to tune the VCR channel
automatically you must set the VCR in play mode before you
start APS.
1- Select LANGUAGE with or button, then press
the or button to select a menu language.
2- Select COUNTRY with or button, then press the
or button to select the correct country.
?
: OTHER
N
: NORWAY
D
: GERMANY
SF
: FINLAND
A
: AUSTRIA
UK
: UNITED KINDOM
CH : SWITZERLAND
NL
: NETHERLANDS
I
: ITALY
P
: PORTUGAL
F
: FRANCE
E
: SPAIN
B
: BELGIUM
TR
: TURKEY
DK : DENMARK
EIR
: IRELAND
S
: SWEDEN
3- Press the or buttons to select Tuning Mode. This
allows you to choose how you run the APS. If you select
Channel Tuning Mode, the APS will run through the channel numbers for your area to locate TV stations. Alternatively if you select Frequency Tuning Mode APS will run
through all the frequencies to locate TV stations.
4- Select START with or button, then press the
button to start A.P.S.
A.P.S., (Automatic Programming System) automatically programmes the received channels in your TVs programme
numbers. During A.P.S., A.P.S. IS RUNNING PLEASE
WAIT will be displayed. After A.P.S. is finalized, the PROGRAM. menu appears.
To cancel A.P.S., press the
Volume Setting:
button to decrease volume or
button
Press
to increase volume, so a volume level scale will be displayed on the screen.
3/($ 6( &+ (&. $ 17(11$ &$% /(
/$1* 8$*(
Volume setting and programme selection can be made using
the buttons on the right side of the TV.
Operating with Remote Control
The remote control handset of your TV is designed to control
all the functions of the model you selected. The functions will
be described in accordance with the menu system of your TV.
Functions which you can use out of menu system are described below.
Volume Setting:
Press
+ button to increase volume.
Press -
button to decrease volume.
Programme Selecting (Previous or next programme):
Press -P/CH button to select the previous programme.
Press P/CH+ button to select the next programme.
Programme Selecting (direct access):
Press digit buttons on the remote control handset to select
programmes between 0 and 9. TV will switch to the selected
program after a short delay.
For a two digit program number press -/-- button. Press
the first digit and then second digit of the programme channel you want to watch.
Menu System
button.
Your TV has been designed with a menu system. Display
MENU (main menu) and enter one of five menus (SOUND,
PICTURE, FEATURE, INSTALL. and PROGRAM.).
1- Press M button to display MENU (main menu). The
menu titles will be displayed in the main menu.
79&$1&(/
&
&
&
&
&
&
2- Press or button to select a menu title, then press
or button to enter the menu.
button.
To exit a menu, press
To go to the previous menu, press M button.
1$0 (
,1 6(57
'(/(7(
$872 6725(
6281'
You can delete a channel, insert a channel into a programme
number, or re-start A.P.S. with the PROGRAM. menu. For details, see PROGRAM. (Programming) menu on page 15.
3,&785(
)($785(
,167$//
352*5$0
-9ENG-2862W-3262W-1548UK-2SCART-FAV-SVHS-AK45-SHARP-TV-1.p65
9
21.01.2004, 08:28
Sound Menu
To Change Headphone Sound Settings:
To change sound settings:
Press M button, now you are in main menu. In the main
menu, SOUND will be the first selected option. Enter the
sound menu pressing or button.
When you connect headphones you can change the sound
settings by entering the headphone menu. To do this, select
headphone using or button then enter headphone
menu pressing or button.
Setting Volume:
92/8 0(
As you enter the sound menu, Volume will be the first selected option.
02 12
:,'(68552 81'
2))
As you enter the Headphone sound menu, Volume will be
the first selected option.
Press button to increase the headphone volume.
Press button to decrease the headphone volume.
(48$/,=(5 21
Setting Balance:
+($' 3+21( 92/8 0(
Using or button select Balance.
Press button to change balance rightward.
Press button to change balance leftward.
628 1'0 2'(
Setting Headphone Sound Mode:
Using
%$/$ 1&(
6281'0 2'(
02 12
:,'(68552 81'
2))
+($' 3+21( (48$/,=(5 21
Selecting Sound Mode
Using
or
02 12
6725 (
92/8 0(
$9/
21
Setting Headphone Volume:
+($' 3+21( $9/
2))
$9/
92/8 0(
6281'0 2'(
0212
:,'(68552 81'
(48 $/,=(5 Press button to decrease volume.
628 1'0 2'(
+($' 3+21( Press button to increase volume.
%$/$ 1&(
%$/$ 1&(
button select Mode.
Press or button to change Mode.
You can choose MONO, STEREO or DUAL (I-II) mode, only
if the selected channel supports that mode.
You can also change sound mode directly pressing I-II button on your remote control.
or
button select Mode.
Pressing or button will change the current sound
mode. (e.g.: If the current sound mode is stereo, it will be
mono or vice versa).
In case of bilingual broadcast, you can select original or
dubbed language again using mode menu. So when somebody listens to the original language from the loudspeakers,
somebody else can listen to the dubbed language from headphone.
To Store the Headphone Settings
Using or button select Store. Press or button to store current headphone volume and sound mode.
The stored values will be valid for all the programmes.
Equalizer
To enter Equalizer sub-menu, select Equalizer using or
button, then enter Equalizer menu pressing or
button.
92/8 0(
%$/$ 1&(
6281'0 2'(
02 12
:,'(68552 81'
2))
+($' 3+21( (48$/,=(5 $9/
21
In case of bilingual broadcast (Dual Sound), you can select
original or dubbed language using mode option.
92/8 0(
Wide Surround:
%$/$ 1&(
628 1'0 2'(
0212
:,'(68552 81'
2))
+($' 3+21(
(48 $/,=(5 The wide surround effect depends on whether the feed is
MONO or STEREO.
If the source feed is MONO, it produces a Pseudo Stereo
effect .
If the source feed is STEREO, it produces a Wide Surround effect, expanding the stereophonic image.
$9/
21
+]
+]
.K]
.K]
.K]
02 '(
)/$7
6725 (
92/8 0(
%$/$ 1&(
6281'0 2'(
02 12
:,'(68552 81'
2))
+($' 3+21( (48$/,=(5 $9/
21
In Mode item there are four predefined and one user defined
options. These are Personal, Music, Speech, Jazz and
Flat. The predefined options can not be changed by the user.
The Personal option may be adjusted by the user.
- 10 -
ENG-2862W-3262W-1548UK-2SCART-FAV-SVHS-AK45-SHARP-TV-1.p65
10
21.01.2004, 08:28
The 5 items below the Mode are available to adjust the
sound settings in 5 frequency values: 120 Hz, 500 Hz, 1.5
kHz, 5 kHz and 10 kHz. To change the values of 5 frequency
options, select one of the options by or button, and
then press to increase the value, or to decrease the
value.
Press button to decrease Brightness.
%5,*+71( 66
&21 75$67
&2/2 85
6+$5 31(66
7,/7
To store the Equalizer settings, press or button on
Store option.
3,&785(02' (
0$ 18$/
&2/2 857(03
125 0$/
Setting AVL
Setting Contrast:
Automatic Volume Limiting (AVL) function normalizes sound
to obtain fixed output level between programs, having different
sound levels. Pressing or button will turn ON and
OFF this feature.
You can change the Contrast setting only when manual picture mode is selected.
Using
or
button select Contrast.
Press button to increase Contrast level.
Press button to decrease Contrast level.
92/8 0(
%$/$ 1&(
6281'0 2'(
02 12
:,'(68552 81'
2))
%5,*+71( 66
+($' 3+21( &21 75$67
(48$/,=(5 $9/
&2/2 85
21
6+$5 31(66
7,/7
To Store the Settings
Press or button on STORE option to store Sound
menu settings or press OK button.
%$/$ 1&(
6281'0 2'(
02 12
:,'(68552 81'
2))
0$18$/
&2/2 857(03
125 0$/
Setting Colour:
You can change the Colour setting only when manual picture
mode is selected.
Using or button select Colour.
Press button to increase Colour level.
Press button to decrease Colour level.
+($' 3+21(
(48$/,=(5 21
$9/
3,&785(02' (
6725 (
Auto Store:
%5,*+71( 66
&21 75$67
Last volume level is stored automatically.
&2/2 85
6+$5 31(66
Picture Menu
7,/7
To change picture settings:
Press M button, now you are in main menu. In the main
menu, select PICTURE using or button, then enter
the picture menu pressing or button.
3,&785(02' (
0$ 18$/
&2/2 857(03
125 0$/
Setting Sharpness:
Using
or
button select Sharpness.
Press button to increase Sharpness level.
Press button to decrease Sharpness level.
6281'
3,&785(
%5,*+71( 66
)($785(
&21 75$67
&2/2 85
,167$//
6+$5 31(66
352*5$0
7,/7
Note: When Picture Mode is not MANUAL, BRIGHTNESS,
CONTRAST and COLOUR options can not be reached by
or buttons.
Factory Settings:
In the picture menu press the flashback (
to the original factory settings.
Using
125 0$/
or
button select Tilt.
Press button to increase Tilt level.
) button to revert
Press button to decrease Tilt level.
%5,*+71( 66
You can change the Brightness setting only when manual
picture mode is selected.
or
0$ 18$/
&2/2 857(03
Setting Tilt
Setting Brightness:
Using
3,&785(02' (
&21 75$67
&2/2 85
6+$5 31(66
7,/7
button select Brightness.
Press button to increase Brightness.
3,&785(02' (
0$ 18$/
&2/2 857(03
125 0$/
- 11 ENG-2862W-3262W-1548UK-2SCART-FAV-SVHS-AK45-SHARP-TV-1.p65
11
21.01.2004, 08:28
Setting Hue (In AV mode only) :
Using or button select Hue.
Press button to increase Hue level.
Press button to decrease Hue level.
Hue adjust is functional only when NTSC 3.58/4.43 is applied in
AV mode. It does not appear when other colour systems used.
When you select ZOOM 14:9 or CINEMA, you can change
the vertical scroll by pressing / .
* Auto mode (VPS code): The VPS signal is sent by some
broadcasting stations with information of the original size.
When the TV is in AUTO mode and receives the VPS signal, it changes the size automatically as indicated below:
When the TV is receiving VPS code 16:9 the TV selects
CINEMA automatically.
%5,*+71( 66
&21 75$67
&2/2 85
6+$5 31(66
When the TV is receiving VPS code 14:9 the TV selects
ZOOM 14:9 automatically.
7,/7
+8(
3,&785(02' (
0$ 18$/
Picture Mode
This item is used to change the picture mode. By pressing
or button you may choose one of these options:
BRIGHT, STANDARD, SOFT, MANUAL.
%5,*+71( 66
&21 75$67
&2/2 85
6+$5 31(66
7,/7
3,&785(02' (
0$ 18$/
&2/2 857(03
125 0$/
When the TV is receiving VPS code 4:3 the TV selects
NORMAL automatically.
When the TV does NOT receive VPS code the TV selects
FULL automatically.
External source: When you are watching the TV set
through the Euro-SCART AV-1 terminal and it receives information of 16:9 format (through the audio-video control pin)
the TV selects FULL automatically.
Wide Mode (Special detail information)
Special detail information about FULL, NORMAL, ZOOM
14:9, CINEMA (16:9) and 16:9ZOOM S.
Colour Temp
Using or button select Colour Temp.
This item is used to change the Colour Temperature. By
pressing or button you may choose one of these options: COOL, WARM, NORMAL.
FULL
With Full Mode you adapt the picture 16:9 format while also
stretching the centre of view. This is an advantage, for example, when watching sports games where there is no real fixed
centre of the picture.
%5,*+71( 66
&21 75$67
&2/2 85
6+$5 31(66
7,/7
3,&785(02' (
0$ 18$/
&2/2 857(03
125 0$/
Wide Mode :
Using or button select Wide Mode.
With this item you can select the width of the picture. By
pressing or button you may choose one of these options : AUTO, NORMAL, ZOOM 14:9, CINEMA, 16:9ZOOM S
or FULL.
Wide mode can be set by
NORMAL
You can watch 4:3 programs in 4:3 format by switching to
NORMAL Mode function.
wide mode button also.
&21 75$67
&2/2 85
6+$5 31(66
ZOOM 14:9
7,/7
3,&785(02' (
0$ 18$/
&2/2 857(03
125 0$/
: ,'(02' (
$872
Each time you press the wide mode button
of the picture changes as indicated:
Adapts the 14:9 broadcast cinema movies to the 14:9 Mode.
, the width
$8721250$/=220&,1(0$=2206)8//
- 12 ENG-2862W-3262W-1548UK-2SCART-FAV-SVHS-AK45-SHARP-TV-1.p65
12
21.01.2004, 08:28
Sleep Timer
CINEMA (16:9)
Adapts the 16:9 broadcast cinema movies to the 16:9 Mode,
thereby getting rid of the black borders.
The sleep timer is used to turn the TV off after a defined period. Press or button to choose a period of time after
selecting this item. The timer can be programmed between
Off and 120 minutes in steps of 10 minutes. (OFF, 010, 020,
030, 040, ......... ,120.)
If sleep timer is activated, at the end of the selected the time,
the TV goes automatically to stand-by mode.
16:9ZOOM S
Adapts up to the wide picture (16:9 aspect ratio) with subtitle
to the full screen.
2))
2))
/$1* 8$*(
(1* /,6+
(;728 7387
79
%/8( %$& .*52 81'
21
Child lock:
You can disable the control panel buttons (except the POWER button) with this item.
Press or button to change the setting to On or Off after selecting this item.
When you set this item to On, the TV can be operated only
by using the remote control handset.
68%7,7/(
Adjusting the visible area of the picture:
If subtitles or the top (or bottom) of the picture are cut off,
you can adjust the visible area of the picture manually.
button once.
1. Press Wide mode
The WIDE MODE indicator appears. The WIDE MODE
will not be changed.
2. While it is displayed, press
sition of the picture.
or
)8//
$872
=220
6/((37,0(5
&+,/'/2&.
to change the po-
6/((37,0(5
2))
&+,/'/2&.
2))
/$1* 8$*(
(1* /,6+
(;728 7387
79
%/8( %$& .*52 81'
21
Language:
Menu Language can be selected by pressing or button on Language item.
1250$/
&,1(0$
=2206
You cannot adjust the visible area in NORMAL or FULL mode.
To Store the Settings
Press or button on STORE option to store Picture
menu settings or press OK button.
&2/2 85
6+$5 31(66
7,/7
3,&785(02' (
0$18$/
&2/2 857(03
125 0$/
: ,'(02' (
$872
6/((37,0(5
2))
&+,/'/2&.
2))
/$1* 8$*(
(1* /,6+
(;728 7387
79
%/8( %$& .*52 81'
21
Setting External Source Output
You can use this menu to select the internal or external
source that will be output at EXT-2 terminal.
In the Feature menu select EXT-2 Output using or
button. Then select the source you want to be output
at EXT.2 pressing or button (one of the sources: TV,
EXT-1, F-AV.
6725 (
Auto Store:
Wide mode is stored automatically.
Feature Menu
Press M button, now you are in main menu. In the main
menu, select FEATURE, using or button. Then enter
the feature menu pressing or button.
6/((37,0(5
2))
&+,/'/2&.
2))
/$1* 8$*(
(1* /,6+
(;728 7387
79
%/8( %$& .*52 81'
21
Blue Background During No-Signal
The Blue Background feature can be set by or button to either On or Off.
6281'
3,&785(
)($785(
6/((37,0(5
2))
&+,/'/2&.
2))
/$1* 8$*(
(1* /,6+
(;728 7387
79
%/8( %$& .*52 81'
21
,167$//
352*5$0
- 13 ENG-2862W-3262W-1548UK-2SCART-FAV-SVHS-AK45-SHARP-TV-1.p65
13
21.01.2004, 08:28
INSTALL. (Installation) Menu
You can store a channel manually, or modify the current settings of a channel (for example, fine-tuning a channel).
You can also change the colour system.
Press M button to display the main menu.
Press or button to select INSTALL. item. Then
or button to display the INSTALL. menu.
6281'
3,&785(
)($785(
,167$//
352*5$0
Note:
If you want to modify the current settings of a channel, select the channel of which you want to modify the setting.
Then display the main menu on screen.
In AV mode, you can change only the COLOUR SYSTEM
item.
1. PROGRAMME is the first selected item as you enter the
INSTALL. menu. Press the or button to select the
programme number where you want the tuned channel to
be stored. (You may also type the programme number using the digit buttons)
Note:
Do not use the PROGRAMME item when you want to
modify the current programme number setting as this may
cause other programmes to be changed that are in the existing programme number.
2. Press or button to select Tuning Mode. By pressing or button , you can select the mode in which
you want the search to be made, "Channel Search"
mode or "Frequency Search" mode.
When you select "Channel Search" ("Channel" will be
displayed in the menu.), the display of the
INSTALL.(Installation) Menu will be as below :
352 *5$00(
3
781,1*02'(
&+$ 11(/
%$1 '
6
&+$ 11(/
&2/2856<67(0
3$/
),1(781 ,1*
6($5&+
3. Press or button to select BAND. Using or
button to select the band in which you want to search a
channel.
4. Press or button to select SEARCH. Press or
button to start searching. (Press button to search
forward. Press to search backwards.)
If the found channel is not the desired one, press or
button to start searching again.
To stop searching before a channel is found, press the
reverse direction button. For example, when the TV is
searching forward with button, press button to
stop searching.
If you know the channel number which you want to find,
you can find the channel directly. Follow the step 5 to
select the correct standard, then press or to
select CHANNEL again, and press or button to
select the channel number, or enter the number with the
digit buttons.
5. If the picture is not clear or no colour appears, change the
colour system to display the picture normally. Press
or button to select COLOUR SYSTEM, then press
or button to choose the correct one.
In TV mode: PAL / SECAM
In AV mode: AUTO / PAL / SECAM / NTSC 3.58 /
NTSC 4.43
6. If the channel reception is poor, fine-tune the channel.
Press or to select FINE TUNING, then press
or button to fine-tune the channel.
7. After the all settings are completed, store the new
channels setting to the programme number which you selected. Press or to select STORE, then press
or button to store it.
781,1*02' (
&+$11(/
%$1'
6
&+$11(/
&2/2856<67(0
3$/
),1(781,1*
6($5&+
6725(
8. When you select "Frequency Search" , the display of the
Tuning menu will be as below :
352*5$0 0(
3
781,1*02' (
)5(4 8(1&<
&2/2 856<67(0
3$/
)5(48(1&<
6($5 &+
6725 (
As "Frequency Search" is selected, TV will search according to the channel frequencies.
With the or button, select Search. Search can be
made either forward, pressing button or backwards,
pressing button.
The search will be done with steps of 0.25MHz. in each
step.
If the tuned station is not the desired one, you can continue
searching pressing or button again.
When the desired station is tuned, select STORE using
or button and store it to the programme number
you selected pressing or button or press OK button.
Now as you had selected the Frequency Search, the tuning
mode of the program is stored as Frequency Search Mode.
Direct Frequency Access
If you know the broadcast band and the channel frequency
of the station you want to tune, you do not need to make
search; select Frequency, using or button in the
Frequency Mode Tuning Menu. You can type the first 3 digits of the frequency using the digit buttons, and then you
can select the decimal part of the frequency by using or
buttons with 250kHz steps. For example if you want to
tune the station at frequency 224.25 MHz; first you can directly type 224. The bar at bottom of the menu will show
224.00 . Then by increasing or decreasing with 0.25 MHz
steps using or buttons, you can select the
224.25MHz .When you type and select the frequency, the
corresponding station will be displayed.
- 14 ENG-2862W-3262W-1548UK-2SCART-FAV-SVHS-AK45-SHARP-TV-1.p65
14
21.01.2004, 08:28
To store the station to the programme number selected, select STORE option using or button and then press
or button or press OK button.
Now as you had selected the Frequency Search, the tuning
mode of the program is stored as Frequency Search Mode.
Note : Channel Search Tuning Mode uses a channel table.
The channels and stations at the table may vary from table to
table and from country to country. Each channel has an exact frequency on the table.
Frequency Search Tuning Mode does not use a channel
table and it is slower than Channel Search Tuning Mode.
Channel Search Tuning Mode is recommended for the
countries which uses standard channel table.
Frequency Search Tuning Mode recommended for the
countries which uses non-standard channel table.
Program. (Programming) Menu
To change the programme number of a channel
(INSERT):
1. Choose the channel you want to change the programme
number.
2. Press the GREEN button to enter the INSERT mode.
3. Press / / / button to choose new
programme number.
4. Press the GREEN button to insert the channel to the chosen programme number.
To cancel this INSERT mode, press the BLUE button.
To start A.P.S (AUTOSTORE)
A.P.S. automatically programmes the received channels in
your TVs programme numbers.
1. Press the BLUE button to enter the AUTOSTORE mode.
A warning message appears.
You can use the Program. (Programming) menu to delete a
channel, to change the programme number of a channel, to
give a channel name to a channel, and to start the A.P.S
(AUTOSTORE) function.
Press M button to display the main menu.
Press or button to select PROGRAM. item, then
or button to display the PROGRAM. menu.
&
&
&
&
&
&
1$0(
,16(57
'(/(7(
$8726725(
To choose a channel in the PROGRAM. menu:
Press / / / button. The programme number
that you choose is high-lighted in the PROGRAM. menu
and you can view the picture of that channel.
Caution:
Using the DELETE or INSERT function it is possible to rewrite the current channel list in the PROGRAM menu. This
can cause other channels to be changed if they were formerly in locations affected by this function.
$// 35(6725(' 352 *5 $00(6
: ,// %( (5 $6('
&28 175<
8.
781,1*02' (
&+$ 11(/
&21 7,18(
79&$1&( /
To cancel the AUTOSTORE mode, press the
button.
2. Press or button to choose the COUNTRY, then
press or button the choose country you are now located.
3. By pressing the up and down buttons, come to the Tuning
Mode item and select the mode at which your TV will run
the APS.
4. Press or button to choose the CONTINUE, then
press button to start A.P.S. The following message appears.
$36 ,6 5811 ,1*
3/($6( :$,7
79 &$1&(/
To cancel the A.P.S., press the
button.
5. After A.P.S. is finalized, the PROGRAM. menu appears
again.
To give a channel name (NAME):
1. Choose the channel you want to give a channel name.
2. Press the RED button to enter the NAME mode.
3. Press or button to choose the position, and press
or button to choose each character of channel
name.
4. Press the RED button to store the channel name.
To cancel the NAME mode, press the BLUE button.
To delete a channel (DELETE):
1. Choose the channel you want to delete.
2. Press the YELLOW button to enter the DELETE mode.
3. Press the YELLOW button to delete it.
To cancel this DELETE mode, press the BLUE button.
- 15 ENG-2862W-3262W-1548UK-2SCART-FAV-SVHS-AK45-SHARP-TV-1.p65
15
21.01.2004, 08:28
To select a page of Teletext
Other Features
Sound Mute
To cut off the sound from the TV press button. To restore
the sound press the button again or use the
+ or buttons, in this case the volume will start from minimum
setting.
Stereo / Bilingual
If the TV channel you are watching broadcasts in two languages (e.g. Eurosport), you can select the dubbed or the
original language, pressing the I-II button.
When the stereo broadcast is received poorly, you can
change from stereo to mono sound so that you can hear
the broadcast more clearly and easily.
Press the appropriate digit buttons for the required Teletext
page number.
The selected page number is displayed at the top left corner
of the screen. The Teletext page counter searches until the
selected page number is located, so that the desired page is
displayed on the screen.
Press button to move the Teletext screen forward one
page at a time.
Press button to move the Teletext screen backward
one page at a time.
Information on Screen
First pressing the
button displays the current status
Programme number,Station name and Sound
mode.
To Display the Time
While watching a TV programme with Teletext transmission
press button. The current time information, captured
from Teletext will be displayed at the upper right corner of
the screen.
If the programme being watched does not have Teletext
transmission, no time information will be displayed.
The time information will disappear after pressing
ton again.
Flash back (
but-
To Select Index Page
To select the page number of the index (generally page
100), press button.
To Select Teletext with a TV Programme
Press button. The text is now superimposed over the
programme on the screen.
)
This button is used to return to the previous viewed preset.
Press
By pressing the " " button repeatedly it is possible to toggle between two presets.
Searching for a page while watching TV
Teletext
Teletext is an information system that displays text on your
TV screen. Using the Teletext information system you can
view a page of information on a subject that is available in the
list of contents (index).
No on screen display will be available in text mode.
No contrast, brightness or colour control, but volume control
is available in text mode.
To operate Teletext
button again to return to the Teletext page.
To search for a specific page whilst viewing the TV picture,
whilst viewing teletext enter the desired Page number,
then press the
button will restore the TV picture. Once
the desired page is found the Header of this page will appear on the screen. Press the button to view the full
page.
To Select Double Height Text
Press button for the top half of the information page to
be displayed in double height text.
Select a TV station on which Teletext is being transmitted.
Press button again for the bottom half of the information page to be displayed in double height text.
Press (TELETEXT) button. Usually the list of contents
(index) is displayed on the screen.
Press button once more for the full page of normal
height text.
To Reveal concealed Information
Pressing button once will reveal answers on a quiz or
games page.
Pressing
swers.
button again will conceal the revealed an-
To Stop Automatic Page Change
The teletext page you have selected may contain more information than can be displayed on one screen, in such cases
the page will uptade periodically.
- 16 ENG-2862W-3262W-1548UK-2SCART-FAV-SVHS-AK45-SHARP-TV-2.p65
16
21.01.2004, 08:29
Press
button to stop the automatic page change.
RGB mode
Press
played.
button again to allow the next page to be dis-
If a piece of equipment outputs RGB signals use the EXT-1
Euro connector as this is RGB ready.
To Select a Subcode Page
Via the RCA jacks
Subcode pages are subsections of long Teletext pages that
can only be displayed on the screen one section at a time.
Select the required Teletext page.
If you have an equipment (such as a Camcorder) which has
the RCA jacks, connect it to the Front AV (F-AV) terminal
with the video and audio cables.
If the equipment has the mono audio jack, connect it to the
AUDIO-L jack.
Press button.
Select the required subcode page number by pressing four
digit buttons (e.g. 0001).
If the selected subcode page is not displayed in a short
time, press button. TV programme will be displayed on
the screen.
Teletext page number will be displayed on the upper left
corner of the screen when the selected page is found.
Press
button to display the selected Teletext page.
Via the ANT (aerial) socket
If your equipment does not have an Euroconnector or RCA
jacks, connect it to the TV with an aerial cable. For details,
see the manual provided with the equipment.
To store the test signal that comes from the equipment,
see INSTALL. Menu on page 14 and store it to the programme number 0. You can watch images from that equipment to select the programme number which you stored the
test signal.
TV and Video Recoder (VCR)
Connect the Video Recorder to the ANT (antenna input)
socket of the TV with the aerial cable.
Connect the Video Recorder to the EXT.1 or EXT.2 terminal
with the SCART cable, or connect it to the Front AV (F-AV)
terminal with the audio and video cables.
NTSC Playback
Fastext
Teletext mode will be selected according to transmission automatically.
Your TV supports the 7 page Teletext system. When the
page number of any of the 7 pages in memory is entered, the
system will not search for the requested page; instead it will
display the page automatically.
Press button to move the Teletext screen forward one
page at a time.
Press button to move the Teletext screen backward
one page at a time.
Connect a NTSC video recorder to a terminal. Then press
(;7 button to select the corresponding AV mode.
NTSC 3.58/4.43 system is detected automatically in AV
mode.
Copy Facility
You can output the video and audio signals which inputs from
TV or EXT.1 (EXT-1) terminal to the video recorder connected
to the EXT.2 (EXT-2) terminal.
To select the output source, see Setting External
Source Output on page 13.
For Fastext
To connect to S-VHS input
The subject-heading for the information may have a particular
colour or can be in a form located in a coloured box.
Press an appropriate RED, GREEN, YELLOW or BLUE button in order to reach the relevant page quickly.
Connect your camera or camcorder at the front or back side
of your TV.
Connect your equipment to the TV via S-VHS input and audio inputs of F-AV inputs by using S-VHS cables.
To exit Teletext
Connecting Headphones
Press 79 button. The screen will switch to TV mode.
Use the stereo headphone socket of your TV, to connect
headphones.
Connecting external equipment
Via the Euro connector
You TV set has two euro connector sockets. If you wish to
connect external equipment (e.g. video recorder, decoder,
etc.) which have Euro connectors, to your TV, use the EXT.1
(EXT-1) or EXT.2 (EXT-2) terminals.
If an external device is connected via Euro connector sockets
the TV will be switched to AV mode automatically.
- 17 ENG-2862W-3262W-1548UK-2SCART-FAV-SVHS-AK45-SHARP-TV-2.p65
17
21.01.2004, 08:29
Connecting external equipment
Before connecting anything
Switch off all equipment.
Read the manuals provided with the equipments.
To select an AV mode
Pressing (;7 button on the remote control selects one of AV modes (EXT-1, RGB, EXT-2, F-AV, SVHS)
To return to the TV mode, repeatedly press (;7 button.
EXT.1 (EXT-1) terminal: Euroconnector (21-pin, SCART)
Video input, Audio L/R inputs and RGB inputs are available.
TV broadcast outputs (Video and Audio L/R) are available.
EXT.2 (EXT-2) terminal: Euroconnector (21-pin, SCART)
Video input and Audio L/R inputs are available.
Video and Audio L/R outputs are available. (see Setting External Source Output on page 13.)
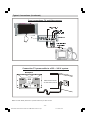
Front AV (F-AV) terminal: RCA connectors x 3 and S-VIDEO (Y/C) connector
Video input and Audio L/R inputs are available.
S-VIDEO input is available.
)5217$9
)$9
( ; 7 &+
69,'(2 9, '(2
( ; 7 /6*, 5'''
$8',2
69+6
9LGHR,QSXW
+HDGSKRQH
7HUPLQDO
$XGLR,QSXW
7HUPLQDO
$QWHQQD
(;7
(;7
&DPFRUGHU
$XGLR
+HDGSKRQH
9LGHR
$17,1
'HFRGHU
)RU6DWHOOLWH5HFHLYHU
- 18 ENG-2862W-3262W-1548UK-2SCART-FAV-SVHS-AK45-SHARP-TV-2.p65
18
21.01.2004, 08:29
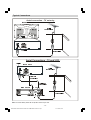
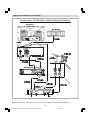
Typical Connections
$HULDOFRQQHFWLRQ79VHWRQO\
%$&.2)79
$HULDO
1RWVXSSOLHG
$1 7
( ;7 ( ;7 $17
(;7 (; 7 $HULDO/HDG
$HULDO,1
1RWVXSSOLHG
$HULDO&RQQHFWLRQV79DQG9&5
$HULDO,1
%$&.2)79
$17
$HULDO
( ; 7 1RWVXSSOLHG
( ; 7 $97(50,1$/
$9
6FDUW/HDG
1RWVXSSOLHG
$HULDO/HDG
1RWVXSSOLHG
%$&.2)9&5
5)287
$HULDO/HDG
1RWVXSSOLHG
$XGLR9LGHR
$HULDO,1
Note: For further details, please refer to operation manual of your VCR.
- 19 ENG-2862W-3262W-1548UK-2SCART-FAV-SVHS-AK45-SHARP-TV-2.p65
19
21.01.2004, 08:29
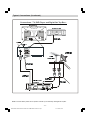
Typical Connections (Continued)
&RQQHFWLRQV79'9'3OD\HU'(&2'(5DQG9&59LGHRUHFRUGHU
%$&.2)79
'9'3/$<(5
$1 7
'(&2'(5
( ; 7 ( ; 7 6FDUW/HDG
1RWVXSSOLHG
$HULDO,1
$97(50,1$/
$9
6FDUW/HDG
1RWVXSSOLHG
$97(50,1$/
$HULDO
$9
1RWVXSSOLHG
6FDUW/HDG
1RWVXSSOLHG
$HULDO/HDG
1RWVXSSOLHG
%$&.2)9&5
5)287
$XGLR9LGHR
$HULDO,1
$HULDO/HDG
1RWVXSSOLHG
Note: For further details, please refer to operation manuals of your DVD Player, DECODER and VCR.
- 20 ENG-2862W-3262W-1548UK-2SCART-FAV-SVHS-AK45-SHARP-TV-2.p65
20
21.01.2004, 08:29
Typical Connections (Continued)
&RQQHFWLRQV79'9'3OD\HUDQG'LJLWDO6HW7RS%R[
%$&.2)79
'9'3/$<(5
$ 17
( ;7 6FDUW/HDG
( ;7 1RWVXSSOLHG
$HULDO,1
$97(50,1$/
$9
$17
( ; 7 ( ; 7 6DWHOOLWHGLVK
1RWVXSSOLHG
$HULDO
1RWVXSSOLHG
6FDUW/HDG
1RWVXSSOLHG
$HULDO/HDG
1RWVXSSOLHG
$HULDO/HDG
1RWVXSSOLHG
',*,7$ /6(7
'LVK/HDG
723%2;
5)287
796&$57
1RWVXSSOLHG
$(5,$/,1
',6+,1
Note: For further details, please refer to operation manuals of your DVD Player and Digital Set Top Box.
- 21 ENG-2862W-3262W-1548UK-2SCART-FAV-SVHS-AK45-SHARP-TV-2.p65
21
21.01.2004, 08:29
Typical Connections (Continued)
&RQQHFWLRQV79'9'3OD\HU9&5DQG'LJLWDO6HW7RS%R[
%$&.2)79
'9'3/$<(5
$1 7
( ; 7 6FDUW/HDG
( ; 7 1RWVXSSOLHG
$HULDO,1
$97(50,1$/
$9
$17
( ; 7 ( ; 7 6DWHOOLWHGLVK
1RWVXSSOLHG
$HULDO
1RWVXSSOLHG
$HULDO/HDG
1RWVXSSOLHG
6FDUW/HDG
1RWVXSSOLHG
%$&.2)9&5
5)287
$XGLR9LGHR
$HULDO,1
6FDUW/HDG
$HULDO/HDG
1RWVXSSOLHG
1RWVXSSOLHG
$HULDO/HDG
1RWVXSSOLHG
'LVK/HDG
1RWVXSSOLHG
',*,7$/6(7
723%2;
5)287
796&$57
$(5,$/,1
',6+,1
Note: For further details, please refer to operation manuals of your DVD Player, VCR and Digital Set Top Box.
- 22 ENG-2862W-3262W-1548UK-2SCART-FAV-SVHS-AK45-SHARP-TV-2.p65
22
21.01.2004, 08:29
Typical Connections (Continued)
)URQWFRQQHFWLRQV79DQG9LGHRFDPHUD
69LGHR<&LQSXW
$XGLR,QSXW7HUPLQDO
OHIW
$XGLR,QSXW7HUPLQDO
ULJKW
)521779
&+
69,'(2
9,'(2
/6*,5'''
$8',2
$XGLR9LGHROHDG
1RWVXSSOLHG
&RQQHFWLRQ79SRZHUFDEOHWRDa9V\VWHP
%$&.2)79
0DLQV6RFNHW2XWOHW
$&a9+]
$ 17
( ;7 ( ;7 Note: For further details, please refer to operation manual of your Video Camera.
- 23 ENG-2862W-3262W-1548UK-2SCART-FAV-SVHS-AK45-SHARP-TV-2.p65
23
21.01.2004, 08:29
21-pin Euro-SCART and 21-pin Audio/Video
REAR TV
RF Input
1. Aerial terminal
( ; 7 21-pin In/Out
( ; 7 2. 21-pin Audio/Video (RGB) (AV-1) With
PAL/SECAM/NTSC Video Input
3. 21-pin Audio/Video (AV-2) With
PAL/SECAM/NTSC Video Input
21-pin Euro-SCART (AV-1) (EXT.1)
1. Audio right output
2. Audio right input
3. Audio left output
4. Common earth for audio
5. Earth for blue
6. Audio left input
7. Blue input
8. Audio-video control
9. Earth for green
10. Not used
11. Green input
12. Not used
13. Earth for red
14. Not used
15. Red input
16. Red/Green/Blue control
17. Earth for video
18. Earth for Red/Green/Blue control
19. Video output
20. Video input (PAL/SECAM/NTSC)
21. Plug shield
21-pin Audio/Video (AV-2) with Input (EXT.2)
1. Audio right output
2. Audio right input
3. Audio left output
4. Common earth for audio
5. Earth
6. Audio left input
7. Not used
8. Audio-video control
9. Earth
10. Not used
11. Not used
12. Not used
13. Earth
14. Not used
15. Not used
16. Not used
17. Earth for video
18. Earth
19. Video output
20. Video input (PAL/SECAM/NTSC)
21. Plug shield
- 24 ENG-2862W-3262W-1548UK-2SCART-FAV-SVHS-AK45-SHARP-TV-2.p65
24
21.01.2004, 08:29
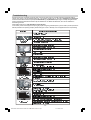
Troubleshooting
If the fault cannot be corrected by using this guide, remove the mains plug from the wall socket and contact the dealer or
supplier from whom it was purchased. Where this is not possible, please visit our web-site at www.sharp.co.uk/support.
Customers without Internet access may telephone 08705 274277 [or (01) 676 0648 if telephoning form Ireland] during office hours.
Certain replacement parts and accessories may be obtained from our Main Parts Distributor, who can be contacted on
the following numbers:
Willow Vale Electronics Ltd. 0121 766 5414 and 0161 205 7531
In the unlikely event of this equipment requiring any repair during the guarantee period, you will need to provide proof of the
date of purchase to the repairing company. Please keep your invoice or Receipt, which is supplied at the time of purchasing.
352%/(06
3266,%/(&$86(65(0(',(6
79QRWSOXJJHGLQ2XWOHWSRZHU2))
0DLQSRZHUEXWWRQRI79QRW21
7XUQ2))XVLQJWKH0DLQ3RZHUEXWWRQWKHQWXUQ21DJDLQDIWHUDPLQXWH
5HPRWHFRQWURO
GRHVQRWZRUN
&KHFNEDWWHULHVLQWKH5HPRWH&RQWURO
7U\DQHZFKDQQHOWRFKHFNIRUSRVVLEOHVWDWLRQWURXEOH
$HULDOQRWFRQQHFWHGWRWHUPLQDODWWKHEDFNRIWKH79VHW
,IRXWVLGHDHULDOLVXVHGFKHFNIRUEURNHQZLUHV
$GMXVW&2/285FRQWURO
&+
6
9,'(
2 9,'(
2/6*, 5
'
''
$8'
,2
1RFRORXU
7U\ILQHWXQLQJWRFRUUHFW
3LFWXUHZHDN
7U\DQHZFKDQQHOWRFKHFNIRUSRVVLEOHVWDWLRQWURXEOH
$HULDOQRWFRQQHFWHGWRWHUPLQDODWWKHEDFNRIWKH79VHW
,IRXWVLGHDHULDOLVXVHGFKHFNIRUEURNHQZLUHV
&+
6
9'
, (2 9,'
(2/6*, 5
'
''
$8
',2
3RRUUHFHSWLRQRQ
&KHFNIRUORFDOLQWHUIHUHQFH
VRPHFKDQQHOV
7U\DQHZFKDQQHOWRFKHFNIRUSRVVLEOHVWDWLRQWURXEOH
$HULDOQRWFRQQHFWHGWRWHUPLQDODWWKHEDFNRIWKH79VHW
,IRXWVLGHDHULDOLVXVHGFKHFNIRUEURNHQZLUHV
&KHFNIRUORFDOLQWHUIHUHQFH
$GMXVW&2/285FRQWURO
&+
69'
, (2 9
,'(2 /6*
, 5
'''
$8
',2
7U\ILQHWXQLQJWRFRUUHFW
6RXQG2.SRRUSLFWXUH
&KHFNLIWKH%ULJKWQHVVRU&RQWUDVWVHWWLQJLQWKHSLFWXUHVHWWLQJPRGHPLJKWEHDOOWKHZD\
WRWKHPLQXVVLGH
7U\DQHZFKDQQHOWRFKHFNIRUSRVVLEOHVWDWLRQWURXEOH
&KHFNIRUORFDOLQWHUIHUHQFH
&+
69,'
(2 9
,'
(2/ 6*
,5'''
$8
',2
,QFUHDVHWKHYROXPH&KHFN$XGLROHYHOV
3LFWXUH2.SRRUVRXQG
7U\DQHZFKDQQHOWRFKHFNIRUSRVVLEOHVWDWLRQWURXEOH
79QRWSOXJJHGLQ2XWOHWSRZHU2))
0DLQSRZHUEXWWRQRI79QRW21
$HULDOQRWFRQQHFWHGWRWHUPLQDODWWKHEDFNRIWKH79VHW
,IRXWVLGHDHULDOLVXVHGFKHFNIRUEURNHQZLUHV
&+
69,'
(
2 9
,'
(2/ 6*
,5'''
$8
',2
7XUQ2))XVLQJWKH0DLQ3RZHUEXWWRQWKHQWXUQ21DJDLQDIWHUDPLQXWH
&KHFNLIWKH%ULJKWQHVVRU&RQWUDVWVHWWLQJLQWKHSLFWXUHVHWWLQJPRGHPLJKWEHDOOWKHZD\
WRWKHPLQXVVLGH
1RSLFWXUHRUVRXQG
,QFUHDVHWKHYROXPH&KHFN$XGLROHYHOV
- 25 ENG-2862W-3262W-1548UK-2SCART-FAV-SVHS-AK45-SHARP-TV-2.p65
25
21.01.2004, 08:29
Specifications
TV BROADCASTING
PAL I/I
RECEIVING CHANNELS
VHF (BANDI/III)
UHF (BAND U)
HYPERBAND
CABLE-TV
Cleaning The Screen
Your TV is fitted with a True Flat" picture tube. The
surface of the screen is covered with a foil. Under
no circumstances may this be damaged.
To clean
NUMBER OF PRESET CHANNELS
100
Clean the laminated screen with a soft cotton
cloth. Only non-alkaline, thinned soapsuds on a
basis of water or alkohol be used to moisten the
cloth. Rub the surface gently with the cloth until
the surface is completely dry.
CHANNEL INDICATOR
ON SCREEN DISPLAY
Under no circumstances...
RF AERIAL INPUT
75 Ohm Unbalanced
may the screen be wiped with conven tional glass
cleaning fluid.
may the screen be brought into contact with abrasive materials.
may soiling be renoved by polishing or scouring.
To clean off sticky substances, the cloth can
be moistened with acetone.
Under no circumstances clean with this acetone cloth the TV-Cabinet.
OPERATING VOLTAGE
220-240V AC, 50 Hz.
POWER CONSUMPTION (W) (28LF-92H)
95 Watt
POWER CONSUMPTION (W) (32LF-92H)
Power Consumption at (Stand-by)
< 3 Watts
Audio Output (RMS):
2x10 W
AUDIO OUTPUT
Nicam Stereo
PICTURE TUBE
28 16:9
32 16:9
Safety
CE - MARK
EMC
CE - MARK
DIMENSIONS (DxLxH) (mm) (28LF-92H)
',0(16,216
'
/
+
:HLJKWNJ
DIMENSIONS (DxLxH) (mm) (32LF-92H)
',0(16,216
'
/
+
:HLJKWNJ
- 26 -
ENG-2862W-3262W-1548UK-2SCART-FAV-SVHS-AK45-SHARP-TV-2.p65
26
21.01.2004, 08:29
Important Instructions
For your own safety read following instruction carefully before attempting to connect this unit to the mains supply.
MAINS (AC) OPERATION
The wires in this mains lead are coloured in accordance with the following code :
BLUE-NEUTRAL
BROWN-LIVE
IMPORTANT
As the colours of the wires in the mains lead of this appliance may not correspond with the coloured
markings identifying the terminals in your plug, proceed as follows:
The wire which is coloured blue must be connected to the terminal which is marked with the
letter N or coloured black.
The wire which is coloured brown must be connected to the terminal which is marked with the
letter L or coloured red.
No connection is to be made to the earth terminal of the plug.
If a 13 Amp (BS 1363) Plug is used a 5 Amp Fuse must be fitted, or if any other type of Plug is
used a 5 Amp Fuse must be fitted, either in the Plug of Adaptor, or on the Distribution Board.
CAUTION
TO PREVENT ELECTRIC SHOCK DISCONNECT FROM THE MAINS BEFORE REMOVING COVER. NO
USER SERVICEABLE PARTS INSIDE. REFER SERVICING TO QUALIFIED SERVICE PERSONNEL.
SAFETY PRECAUTION
THIS EQUIPMENT MUST BE DISCONNECTED FROM THE MAINS WHEN NOT IN USE. DO NOT ALLOW
THIS UNIT TO BE EXPOSED TO RAIN OR MOISTURE.
- 27 ENG-2862W-3262W-1548UK-2SCART-FAV-SVHS-AK45-SHARP-TV-2.p65
27
21.01.2004, 08:29
R
SHARP CORPORATION
SHARP ELECTRONICS (U.K.) LTD.
50048416
12/03
50048416
Sharp House, Thorp Road, Newton Heath,
Manchester M40 5BE