1
ENGLISH
ESPAÑOL
FRANÇAIS
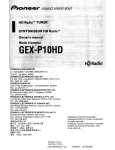
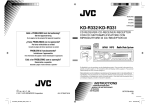
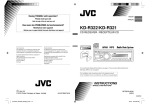
KD-R338/KD-R330
CD RECEIVER / RECEPTOR CON CD /
RÉCEPTEUR CD
For canceling the display demonstration, see page 4. / Para cancelar la demostración en pantalla,
consulte la página 4. / Pour annuler la démonstration des affichages, référez-vous à la page 4.
For installation and connections, refer to the separate manual.
Para la instalación y las conexiones, refiérase al manual separado.
Pour l’installation et les raccordements, se référer au manuel séparé.
INSTRUCTIONS
MANUAL DE INSTRUCCIONES
MANUEL D’INSTRUCTIONS
For customer Use:
Enter below the Model
No. and Serial No. which
are located on the top or
bottom of the cabinet.
Retain this information
for future reference.
Model No.
Serial No.
GET0760-001A
[J]
Thank you for purchasing a JVC product.
Please read all instructions carefully before operation, to ensure your complete understanding and
to obtain the best possible performance from the unit.
INFORMATION (For U.S.A.)
This equipment has been tested and found to comply with the limits for a Class B digital device,
pursuant to Part 15 of the FCC Rules. These limits are designed to provide reasonable protection
against harmful interference in a residential installation. This equipment generates, uses, and can
radiate radio frequency energy and, if not installed and used in accordance with the instructions,
may cause harmful interference to radio communications. However, there is no guarantee that
interference will not occur in a particular installation. If this equipment does cause harmful
interference to radio or television reception, which can be determined by turning the equipment
off and on, the user is encouraged to try to correct the interference by one or more of the
following measures:
– Reorient or relocate the receiving antenna.
– Increase the separation between the equipment and receiver.
– Connect the equipment into an outlet on a circuit different from that to which the receiver is
connected.
– Consult the dealer or an experienced radio/TV technician for help.
Caution:
Changes or modifications not approved by JVC could void the user’s authority to operate the
equipment.
IMPORTANT FOR LASER PRODUCTS
1. CLASS 1 LASER PRODUCT
2. CAUTION: Do not open the top cover. There are no user serviceable parts inside the unit; leave
all servicing to qualified service personnel.
3. CAUTION: (For U.S.A.) Visible and/or invisible class II laser radiation when open. Do not stare
into beam.
(For Canada) Visible and/or invisible class 1M laser radiation when open. Do not
view directly with optical instruments.
4. REPRODUCTION OF LABEL: CAUTION LABEL, PLACED OUTSIDE THE UNIT.
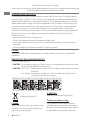
WARNING:
[European Union only]
Stop the car before operating the unit.
Caution on volume setting:
Caution:
Adjust the volume so that you can hear sounds
outside the car. Driving with the volume too
high may cause an accident.
2
ENGLISH
Discs produce very little noise compared
with other sources. Lower the volume before
playing a disc to avoid damaging the speakers
by the sudden increase of the output level.
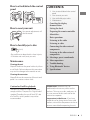
How to attach/detach the control
panel
CONTENTS
3 How to attach/detach the control
panel
3 How to reset your unit
3 How to forcibly eject a disc
3 Maintenance
4
How to reset your unit
Your preset adjustments will
also be erased.
How to forcibly eject a disc
4
5
5
6
7
8
9
[Hold]
9
• Be careful not to drop the disc when it ejects.
• If this does not work, reset your unit.
Maintenance
Cleaning the unit
Wipe off the dirt on the panel with a dry silicon
or soft cloth. Failure to observe this precaution
may result in damage to the monitor or unit.
10
10
13
14
15
Canceling the display
demonstration
Setting the clock
Preparing the remote controller
About discs
Basic operations
Listening to the radio
Listening to a disc
Connecting the other external
components
Listening to the other external
components
Selecting a preset sound mode
Menu operations
Troubleshooting
Using Bluetooth ® devices
Specifications
Cleaning the connector
Wipe off dirt on the connector of the unit and
panel. Use a cotton swab or cloth.
Caution for DualDisc playback:
The Non-DVD side of a “DualDisc” does not
comply with the “Compact Disc Digital Audio”
standard. Therefore, the use of Non-DVD side
of a DualDisc on this product may not be
recommended.
Condensation : When the car is airconditioned, moisture may collect on the
laser lens. This may cause disc read errors. In
this case, remove the disc and wait for the
moisture to evaporate.
Temperature inside the car : If you have
parked the car for a long time in hot or cold
weather, wait until the temperature in the car
becomes normal before operating the unit.
ENGLISH
3
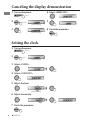
Canceling the display demonstration
1 Turn on the power.
4 Select <DEMO OFF>.
[Hold]
2
5
[Hold]
(Initial setting)
3
6 Finish the procedure.
(Initial setting)
Setting the clock
1 Turn on the power.
[Hold]
2
[Hold]
(Initial setting)
3 Select <CLOCK>.
4 Select <CLOCK SET>.
5 Adjust the hour.
(Initial setting)
6 Adjust the minute.
7 Finish the procedure.
4
ENGLISH
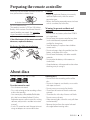
Preparing the remote controller
When you use the remote controller for the first
time, pull out the insulation sheet.
Insulation sheet
For USA-California Only:
This product contains a CR Coin Cell Lithium
Battery which contains Perchlorate Material—
special handling may apply. See www.dtsc.
ca.gov/hazardouswaste/perchlorate
If the effectiveness of the remote controller
decreases, replace the battery.
Replacing the lithium coin battery
CR2025
Caution:
• Danger of explosion if battery is incorrectly
replaced. Replace only with the same or
equivalent type.
• Battery shall not be exposed to excessive heat
such as sunshine, fire, or the like.
Warning (to prevent accidents and
damage):
• Do not install any battery other than CR2025
or its equivalent.
• Do not leave the remote controller in a place
(such as dashboards) exposed to direct
sunlight for a long time.
• Store the battery in a place where children
cannot reach.
• Do not recharge, short, disassemble, heat the
battery, or dispose of it in a fire.
• Do not leave the battery with other metallic
materials.
• Do not poke the battery with tweezers or
similar tools.
• Wrap the battery with tape and insulate when
throwing away or saving it.
About discs
This unit can only play the CDs with:
Discs that cannot be used:
• Discs that are not round.
• Discs with coloring on the recording surface
or discs that are dirty.
• You cannot play a Recordable/ReWritable
disc that has not been finalized. (For the
finalization process refer to your disc writing
software, and your disc recorder instruction
manual.)
• 3-inch CD cannot be used. Attempt to insert
using an adapter can cause malfunction.
Handling discs:
• Do not touch the recording surface of the
disc.
• Do not stick tape etc. on the disc, or use a disc
with tape stuck on it.
• Do not use any accessories for the disc.
• Clean from the center of the disc and move
outward.
• Clean the disc with a dry silicon or soft cloth.
Do not use any solvents.
• When removing discs from this unit, pull them
out horizontally.
• Remove the rims from the center hole and
disc edge before inserting a disc.
ENGLISH
5
Basic operations
Loading slot
Control dial
Display window
Remote sensor
• DO NOT expose to
bright sunlight.
Ejects the disc
Front auxiliary input jack
Detaches the panel
When you press or hold the following button(s)...
Remote
General operation
controller
—
Turns on/off [Hold].
Selects the sources (FM, CD, F-AUX, BT AUDIO or R-AUX or
/ SOURCE
SOURCE BT PHONE, AM).
• “CD” is selectable only when a disc is loaded.
VOL – / + Adjusts the volume level.
Control dial
(turn)
—
Selects items.
Mutes the sound during playback. If the source is “CD,” playback
pauses.
Control dial
• Press the button again to cancel muting or resume playback.
(press)
—
Confirms selection.
Selects the sound mode.
EQ
SOUND • Hold the EQ button on the main unit to enter tone level
adjustment directly. (page 10)
• Selects preset stations.
• Stores the current station into the selected number button
Number buttons
[Hold].
—
(1 – 6)
• Press number button 1 (
) or 2 (
) to enter REPEAT/
RANDOM setting directly. (page 8)
Main unit
—
—
DISP
6
ENGLISH
—
Enters <BRIGHTNESS> menu directly. (page 11)
• Returns to the previous menu.
• Exit from the menu [Hold].
• Changes the display information.
• Scrolls the display information [Hold].
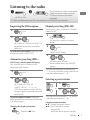
Listening to the radio
~
Ÿ
• [Press] Searches for stations automatically.
• [Hold] Searches for stations manually.
“M” flashes, then press the button
] “FM” or “AM”
repeatedly.
“ST” lights up when receiving an FM stereo broadcast with sufficient signal strength.
Improving the FM reception
1
[Hold]
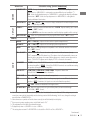
Manual presetting (FM/AM)
You can preset up to 18 stations for FM and 6
stations for AM.
1
2
] <TUNER> ] <MONO> ] <MONO ON>
Reception improves, but stereo effect
will be lost.
To restore the stereo effect, repeat the same
procedure to select <MONO OFF>.
] Tune in to a station you want to
preset.
2
[Hold]
“PRESET MODE” flashes.
3
Automatic presetting (FM)—
SSM (Strong-station Sequential Memory)
You can preset up to 18 stations for FM.
While listening to a station...
1
[Hold]
2
] Selects preset number.
Preset number flashes and “MEMORY”
appears.
• Pressing and holding the number buttons
(1 – 6) can also store the current station to the
selected number buttons (1 – 6).
Selecting a preset station
] <TUNER> ] <SSM> ]
<SSM 01 – 06 / 07 – 12 / 13 – 18>
“SSM” flashes and local stations with the
strongest signal are searched and stored
automatically.
To preset another 6 stations, repeat the
above procedure by selecting one of the other
SSM setting ranges.
Changing the display information
Frequency j Clock
1
or
2
• Pressing the number buttons (1 – 6) can also
select the preset stations (1 – 6).
Using the remote controller
5 / ∞ : Changes the preset stations.
2 / 3 : [Press] Searches for stations
automatically.
[Hold] Searches for stations manually.
ENGLISH
7
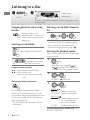
Listening to a disc
~
Ÿ
Playback starts
automatically.
] “CD”
All tracks will be played repeatedly until you change the source
or eject the disc.
Stopping playback and ejecting
the disc
If the ejected disc is not
removed within 15 seconds, it is
automatically inserted into the
loading slot.
Selecting a track/folder
Selects folder of the MP3/WMA
Selecting a track/folder from the
list
• If the MP3/WMA disc contains many tracks,
you can fast search (±10, ±100) through the
disc by turning the control dial quickly.
• To return to the previous menu, press .
Selecting the playback modes
You can use only one of the following playback
modes at a time.
[Press] Selects track.
[Hold] Fast-forwards or
reverses the track.
Using the remote controller
5 / ∞ : Selects folder of the MP3/WMA.
2 / 3 : [Press] Selects track.
[Hold] Fast-forwards or reverses the
track.
1
[Hold]
• Pressing number button 1 (
) or
2(
) can enter REPEAT/RANDOM
setting directly. Then, perform step 3.
2
] “REPEAT” j “RANDOM”
Changing the display information
Disc title/Album name/performer (folder
name)* = Track title (file name)* = Current
track number with the elapsed playing time =
Current track number with the clock time =
(back to the beginning)
* “NO NAME” appears for conventional CDs or if
not recorded.
3
REPEAT
TRACK RPT : Repeats current track
FOLDER RPT : Repeats current folder
RANDOM
FOLDER RND : Randomly plays all tracks
of current folder, then
tracks of next folders
ALL RND
: Randomly plays all tracks
To cancel repeat play or random play, select
“RPT OFF” or “RND OFF.”
8
ENGLISH
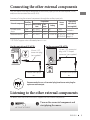
Connecting the other external components
You can connect an external component to the auxiliary input jack on the control panel (F-AUX)
and/or on the rear side of the unit (R-AUX).
Summary of using the external components through the auxiliary input jacks:
Preparation
Connecting
Auxiliary
Source
External component
cable/device
Menu setting Subinput jack
name
Setting
(not supplied)
item
item
Portable audio
Front
SRC SELECT F-AUX ON
F-AUX
See below.
player
Rear
SRC SELECT R-AUX ON
R-AUX
Bluetooth device Rear
SRC SELECT R-AUX BT ADAPTER BT AUDIO/ KS-BTA100
BT PHONE * (page 14)
* ”BT PHONE” appears when a Bluetooth phone is in use.
On the control panel (F-AUX):
On the rear panel (R-AUX):
3.5 mm (1/8”)
stereo mini plug
(not supplied)
Portable audio player,
etc.
3.5 mm (1/8”) stereo mini
plug (with “L” shaped
connector) (not supplied)
Portable audio player,
etc.
Recommended to use a 3-terminal plug head stereo mini plug for
optimum audio output.
Listening to the other external components
For details, refer also to the instructions supplied with the external components.
~
Ÿ
] “F-AUX” or “R-AUX”
Turn on the connected component and
start playing the source.
ENGLISH
9
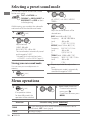
Selecting a preset sound mode
You can select a preset sound mode suitable
for the music genre.
FLAT = NATURAL =
DYNAMIC = VOCAL BOOST =
BASS BOOST = USER = (back
to the beginning)
While listening, you can adjust the subwoofer
and tone level of the selected sound mode.
1
2
] <PRO EQ> ] <BASS/ MIDDLE/
TREBLE>
3
Adjust the sound elements of the
selected tone.
[Hold]
2
Adjust the level:
SUB.W * : 00 to 08
BASS/ MID/ TRE : –06 to +06
The sound mode is automatically stored
and changed to “USER.”
* Subwoofer level is adjustable only when
<L/O MODE> is set to <SUB.W>. (page 11)
Storing your own sound mode
You can store your own adjustments in
memory.
1
4
BASS [Initial: 80 Hz, 00, Q1.0]
Frequency: 60/ 80/ 100/ 200 Hz
Level:
–06 to +06
Q:
Q1.0/ 1.25/ 1.5/ 2.0
MIDDLE [Initial: 1.0 kHz, 00, Q1.25]
Frequency: 0.5/ 1.0/ 1.5/ 2.5 kHz
Level:
–06 to +06
Q:
Q0.75/ 1.0/ 1.25
TREBLE [Initial: 10.0 kHz, 00, Q FIX]
Frequency: 10.0/ 12.5/ 15.0/ 17.5 kHz
Level:
–06 to +06
Q:
Q FIX
Repeat steps 2 and 3 to adjust other
tones.
The adjustments made is automatically
stored and changed to “USER.”
[Hold]
Menu operations
1
2
[Hold]
3
If no operation is done
for about 60 seconds, the
operation will be canceled.
Menu item
10
Repeat step 2 if necessary.
• To return to the previous
menu, press .
• To exit from the menu, press
MENU.
Selectable setting, [Initial: Underlined]
DEMO
ON : Display demonstration will be activated automatically if no operation is done for
about 20 seconds. / OFF : Cancels. (page 4)
CLOCK
For settings, see page 4.
ENGLISH
Menu item
AUTO : Changes the display and button illumination between the Day/Night
adjustments in <BRIGHTNESS> setting when you turn off/on the car headlights. *1 /
ON : Selects the Night adjustments in <BRIGHTNESS> setting for the display and button
illumination. / OFF : Selects the Day adjustments in <BRIGHTNESS> setting for the
display and button illumination.
BRIGHTNESS
DAY [ 31 ] / NIGHT [ 15 ] : Selects the display and button illumination brightness level
[00 — 31] for day and night.
SCROLL *2
ONCE : Scrolls the displayed information once. / AUTO : Repeats scrolling (at 5-second
intervals). / OFF : Cancels.
(Pressing DISP for more than one second can scroll the display regardless of the setting.)
DISPLAY
DIMMER
DIMMER SET
TAG DISPLAY ON : Shows the Tag information while playing MP3/WMA tracks. / OFF : Cancels.
PRO EQ
AUDIO
Selectable setting, [Initial: Underlined]
See page 10.
FADER *3, *4
R06 — F06 [ 00 ] : Adjusts the front and rear speaker output balance.
BALANCE *4
L06 — R06 [ 00 ] : Adjusts the left and right speaker output balance.
LOUD
ON : Boost low and high frequencies to produce a well-balanced sound at a low volume
level. / OFF : Cancels.
VOL ADJUST
–05 — +05 [ 00 ] : Presets the volume adjustment level of each source (except
“FM”), compared to the FM volume level. The volume level will automatically increase or
decrease when you change the source. Before adjustment, select the source you want to
adjust. (“VOL ADJ FIX” appears on the display if “FM” is selected as the source.)
L/O MODE
SUB.W : Selects if the REAR/SW terminals are used for connecting a subwoofer (through
an external amplifier). / REAR : Selects if the REAR/SW terminals are used for connecting
the speakers (through an external amplifier).
SUB.W LPF *5
LOW 55Hz / LOW 85Hz / LOW 120Hz : Frequencies lower than
55 Hz/85 Hz/120 Hz are sent to the subwoofer.
SUB.W LEVEL *5 00 — 08 [ 04 ] : Adjusts the subwoofer output level.
HPF
ON : Activates the High Pass Filter. Low frequency signals are cut off from the front/rear
speakers. / OFF : Deactivates (all signals are sent to the front/rear speakers).
BEEP
ON / OFF : Activates or deactivates the keypress tone.
TEL MUTING *6 ON : Mutes the sounds while using the cellular phone (not connected through
KS-BTA100). / OFF : Cancels.
*1 The illumination control lead connection is required. (See “Installation/Connection Manual.”) This setting may not work
correctly on some vehicles (particularly on those having a control dial for dimming). In this case, change the setting to
any other than <DIMMER AUTO>.
2
* Some characters or symbols will not be shown correctly (or will be blanked) on the display.
*3 If you are using a two-speaker system, set the fader level to “00.”
*4 This adjustment will not affect the subwoofer output.
*5 Displayed only when <L/O MODE> is set to <SUB.W>.
*6 This setting does not work if <BT ADAPTER> is selected for <R-AUX> of the <SRC SELECT>.
Continued...
ENGLISH
11
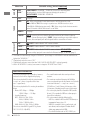
SRC SELECT
TUNER
AUDIO
Menu item
Selectable setting, [Initial: Underlined]
AMP
GAIN *7
LOW POWER : VOLUME 00 – VOLUME 30 (Selects if the maximum power
of each speaker is less than 50 W to prevent damaging the speakers.) /
HIGH POWER : VOLUME 00 – VOLUME 50
SSM *8
See page 7.
AREA
US : When using in North/Central/South America. AM/FM intervals are set to
10 kHz/200 kHz. / EU : When using in any other areas. AM/FM intervals are set to
9 kHz/50 kHz (50 kHz during auto search). / SA : When using in South American countries
where FM interval is 50 kHz. AM interval is set to 10 kHz.
MONO *8
See page 7.
IF BAND
AUTO : Increases the tuner selectivity to reduce interference noises between adjacent
stations. (Stereo effect may be lost.) / WIDE : Subject to interference noises from adjacent
stations, but sound quality will not be degraded and the stereo effect will remain.
AM *9
ON / OFF : Enable or disable “AM” in source selection.
F-AUX *9
ON / OFF : Enable or disable “F-AUX” in source selection.
R-AUX *9
ON / OFF : Enable or disable “R-AUX” in source selection. / BT ADAPTER *10 : Selects if
the rear auxiliary input jack is connected to the Bluetooth adapter, KS-BTA100. (page 9)
*7 The volume level automatically changes to “VOLUME 30” if you change to <LOW POWER> with the volume level set
higher than “VOLUME 30.”
8
* Displayed only when the source is “FM.”
*9 Displayed only when any source other than “AM/ F-AUX/ R-AUX/ BT AUDIO” is selected separately.
*10 When <BT ADAPTER> is selected, source name is changed to “BT AUDIO” from “R-AUX.”
Additional information
• This unit can play back multi-session discs; however,
unclosed sessions will be skipped while playing.
• This unit can play back files with the extension code
<.mp3> or <.wma> (regardless of the letter
case—upper/lower).
• This unit can play back the files meeting the conditions
below:
– Bit rate: MP3: 8 kbps — 320 kbps
WMA: 32 kbps — 192 kbps
– Sampling frequency:
MP3: 48 kHz, 44.1 kHz, 32 kHz
24 kHz, 22.05 kHz, 16 kHz
12 kHz, 11.025 kHz, 8 kHz
WMA: 48 kHz, 44.1 kHz, 32 kHz, 22.05 kHz
• This unit can show WMA Tag and ID3 Tag Version
1.0/1.1/2.2/2.3/2.4 (for MP3).
12
ENGLISH
• The search function works but search speed is not
constant.
• The maximum number of characters for file/folder
names vary depending on the disc format used (includes
4 extension characters—<.mp3> or <.wma>).
ISO 9660 Level 1 and 2, Romeo: 64 characters, Joliet:
32 characters, Windows long file name: 64 characters
• This unit can play back files recorded in VBR (variable
bit rate). (Files recorded in VBR have a discrepancy in
elapsed time indication.)
• This unit cannot play back the following files:
– MP3 files: encoded in MP3i and MP3 PRO format; an
inappropriate format; layer 1/2.
– WMA files: encoded in lossless, professional, and
voice format; not based upon Windows Media®
Audio; copy-protected with DRM.
– Files which have data such as AIFF, ATRAC3, etc.
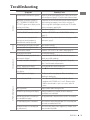
Troubleshooting
Symptom
Remedy/Cause
MP3/WMA playback
Disc playback
FM/AM
General
Sound cannot be heard from the speakers.
Adjust the volume to the optimum level. / Make sure the unit is
not muted/paused. (page 6) / Check the cords and connections.
Check to be sure the terminals of the speaker leads are covered
“MISWIRING CHK WIRING THEN RESET
with insulating tape properly, then reset the unit. (page 3)
UNIT” / “WARNING CHK WIRING THEN
RESET UNIT” appears on the display and no If the message does not disappear, consult your JVC car audio
dealer or a company supplying kits.
operations can be done.
The unit does not work at all.
Reset the unit. (page 3)
“F-AUX” or “R-AUX” cannot be selected.
Check the <SRC SELECT> = <F-AUX / R-AUX> setting.
(page 12)
Sound is sometimes interrupted while
Check to be sure the recommended stereo mini plug is used for
listening to an external component
connection. (page 9)
connected to the auxiliary input jack.
SSM automatic presetting does not work. Store stations manually.
Static noise while listening to the radio.
Connect the antenna firmly.
“AM” cannot be selected.
Check the <SRC SELECT> = <AM> setting. (page 12)
Disc cannot be played back.
Insert the disc correctly.
CD-R/CD-RW cannot be played back and
Insert a finalized CD-R/CD-RW (finalize with the component
track cannot be skipped.
which you used for recording).
Disc sound is sometimes interrupted.
Stop playback while driving on rough roads. / Change the
disc. / Check the cords and connections.
“NO DISC” appears on the display.
Insert a playable disc into the loading slot.
“PLEASE” and “EJECT“ appear alternately
Press 0, then insert a disc correctly.
on the display.
“IN DISC” appears on the display.
The disc cannot be ejected properly. Make sure nothing is
blocking the loading slot.
Disc cannot be played back.
• Use a disc with MP3/WMA tracks recorded in a format
compliant with ISO 9660 Level 1, Level 2, Romeo, or Joliet.
• Add the extension code <.mp3> or <.wma> to the file
names.
Noise is generated.
Skip to another track or change the disc.
“READING” keeps flashing on the display. A longer readout time is required. Do not use too many
hierarchical levels and folders.
Tracks do not play back in the order you
The playback order is determined when the files are recorded.
have intended them to play.
The elapsed playing time is not correct.
This sometimes occurs during playback. This is caused by how
the tracks are recorded on the disc.
The correct characters are not displayed
This unit can only display letters (upper case), numbers, and a
(e.g. album name).
limited number of symbols.
ENGLISH
13
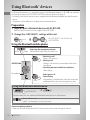
Using Bluetooth ® devices
For Bluetooth operations, it is required to connect the Bluetooth adapter, KS-BTA100 (not supplied)
to the auxiliary input jack (R-AUX/BT ADAPTER) on the rear of the unit. (page 9)
• For details, refer also to the instructions supplied with the Bluetooth adapter and the Bluetooth
device.
• Operations may be different according to the connected device.
Preparation
1 Register (pair) a Bluetooth device with KS-BTA100.
Refer to the instructions manual supplied with KS-BTA100.
2 Change the <SRC SELECT> settings of this unit.
] <SRC SELECT> ] <R-AUX> ]
<BT ADAPTER>
[Hold]
Using the Bluetooth mobile phone
(Low)
(High)
Adjusting the microphone volume
Volume level: High/ Normal (initial)/ Low
• Receiving a call
When a call comes in...
• Making a call
Making a call to the last connected number from
your phone.
• Switching between handsfree and phone
While talking...
KS-BTA100
Microphone
• Ends/rejects call
• Voice dialing
Voice dialing is available only when the connected
mobile phone has the voice recognition system.
[Hold]
Using the Bluetooth audio device
1
(CD receiver)
] “BT AUDIO”
2
If playback does not start, operate the Bluetooth audio player to start playback.
[Press] Selects track.
[Hold] Fast-forwards or reverses the track.
About microphone volume:
• When you turn off the power of the CD receiver, the volume level changes to Normal.
14
ENGLISH
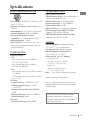
Specifications
AUDIO AMPLIFIER SECTION
Power Output : 20 W RMS × 4 Channels at 4 Ω
and ≤ 1% THD+N
Signal-to-Noise Ratio : 80 dBA (reference: 1 W
into 4 Ω)
Load Impedance : 4 Ω (4 Ω to 8 Ω allowance)
Frequency Response : 40 Hz to 20 000 Hz
Line-Out or Subwoofer-Out Level/
Impedance : 2.5 V/20 kΩ load (full scale)
Output Impedance : ≤ 600 Ω
Other Terminal : Front auxiliary input jack,
Rear auxiliary/Bluetooth adapter input jack,
Antenna terminal
TUNER SECTION
Frequency Range :
FM :
– with channel interval set to 200 kHz :
87.9 MHz to 107.9 MHz
– with channel interval set to 50 kHz :
87.5 MHz to 108.0 MHz
AM :
– with channel interval set to 10 kHz : 530 kHz
to 1 700 kHz
– with channel interval set to 9 kHz : 531 kHz
to 1 611 kHz
FM Tuner :
Usable Sensitivity : 9.3 dBf (0.8 μV/75 Ω)
50 dB Quieting Sensitivity : 16.3 dBf
(1.8 μV/75 Ω)
Alternate Channel Selectivity (400 kHz) :
65 dB
Frequency Response : 40 Hz to 15 000 Hz
Stereo Separation: 40 dB
AM Tuner :
Sensitivity/Selectivity : 20 μV/40 dB
CD PLAYER SECTION
Type : Compact disc player
Signal Detection System : Non-contact optical
pickup (semiconductor laser)
Number of Channels : 2 channels (stereo)
Frequency Response : 5 Hz to 20 000 Hz
Signal-to-Noise Ratio : 98 dB
Wow and Flutter : Less than measurable limit
MP3 Decoding Format (MPEG1/2 Audio
Layer 3) : Max. Bit Rate: 320 kbps
WMA (Windows Media® Audio) Decoding
Format : Max. Bit Rate: 192 kbps
GENERAL
Power Requirement : Operating Voltage :
DC 14.4 V (11 V to 16 V allowance)
Grounding System : Negative ground
Allowable Operating Temperature :
0°C to +40°C (32°F to 104°F)
Dimensions (W × H × D) : (approx.)
– Installation Size :
182 mm × 52 mm × 158 mm
(7-3/16” × 2-1/16” × 6-1/4”)
– Panel Size :
188 mm × 59 mm × 9 mm
(7-7/16” × 2-3/8” × 3/8”)
Mass : 1.2 kg (2.8 lbs) (excluding accessories)
Subject to change without notice.
If a kit is necessary for your car, consult your
telephone directory for the nearest car audio
speciality shop.
Microsoft and Windows Media are either
registered trademarks or trademarks of
Microsoft Corporation in the United States
and/or other countries.
ENGLISH
15
Having TROUBLE with operation?
Please reset your unit
Refer to page of How to reset your unit
Still having trouble??
USA ONLY
Call 1-800-252-5722
http://www.jvc.com
We can help you!
EN, SP, FR
© 2011 JVC KENWOOD Corporation
0811DTSMDTJEIN
KD-R338/KD-R330
GET0760-002A
Installation/Connection Manual
Manual de instalación/conexión
Manuel d’installation/raccordement
0811DTSMDTJEIN
EN, SP, FR
© 2011 JVC KENWOOD Corporation
[J]
ENGLISH / ESPAÑOL / FRANÇAIS
WARNINGS / ADVERTENCIAS / AVERTISSEMENTS
• Necesitará los kits de instalación que corresponden con su vehículo.
• Si tiene alguna pregunta o necesita información acerca de las herramientas
para instalación, consulte con su concesionario de JVC de equipos de audio
para automóviles o a una compañía que suministra tales herramientas.
• La unidad puede instalarse solamente en un automóvil con fuente de
alimentación de 12 V CC, negativo a masa.
• Desconecte el terminal negativo de la batería y realice todas las
conexiones eléctricas antes de instalar la unidad.
• Conecte los altavoces con una potencia máxima de más de 50 W
(impedancia de 4 Ω a 8 Ω). De lo contrario, cambie el ajuste <AMP GAIN>.
(Véase la página 12 del MANUAL DE INSTRUCCIONES).
• Aísle los cables no conectados con cinta de vinilo u otro material
similar. Para prevenir los cortocircuitos, no quite las tapas de los
extremos de los cables o terminales no conectados.
• Si se funde un fusible, asegúrese primero de que los cables no estén
en contacto pues pueden ocasionar un cortocircuito, luego reemplace
el fusible dañados por otro de las mismas características.
• Instale esta unidad en la consola de su vehículo.
• Instale la unidad en un ángulo de montaje de 30° o menos.
• Asegúrese de volver a conectar a masa esta unidad al chasis del
automóvil después de la instalación.
• Después de haber instalado la unidad, compruebe que las luces de
freno, los intermitentes, los limpiaparabrisas, etc. del automóvil
funcionan correctamente.
• No toque la parte metálica de esta unidad durante e inmediatamente
después de usar la unidad. Las partes metálicas tal como el disipador
de calor y la carcasa estarán calientes.
• Vous avez besoin des kits d’installation correspondants à votre voiture.
• Si vous avez des questions ou avez besoin d’information sur des kits
d’installation, consulter votre revendeur d’autoradios JVC ou une
compagnie d’approvisionnement.
• L'appareil peut uniquement être installé dans une voiture avec une
alimentation de 12 V CC, à masse négative.
• Déconnectez la borne négative de la batterie et réaliser toutes les
connexions avant d’installer l’appareil.
• Connectez des enceintes avec une puissance maximum de 50 W
(impédance de 4 Ω à 8 Ω). Sinon, changez le réglage <AMP GAIN>. (Voir
la page 12 du MANUEL D’INSTRUCTIONS.)
• Isolez les câbles non-connectés avec un ruban de vinyle ou d'un autre
matériel similaire. Pour éviter les courtscircuits, ne retirez pas non plus les
capuchons à l’extrémité des câbles non-connectés ou des prises.
• Si un fusible saute, assurez-vous d’abord que les câbles n’ont pas causé de
court-circuit puis remplacez le vieux fusible par un nouveau de même valeur.
• Installez cet appareil dans la console de votre véhicule.
• Monter l’unité de façon à ce que l’angle de montage soit de 30˚ ou moins.
• Assurez-vous de raccorder de nouveau la mise à la masse de cet appareil
au châssis de la voiture après l’installation.
• Après avoir installé l’appareil, vérifiez si les lampes de frein, les indicateurs,
les clignotants, etc. de la voiture fonctionnent correctement.
• Ne touchez pas la partie métallique de cet appareil pendant ou juste
après son utilisation. Les parties métalliques, comme le dissipateur de
chaleur et le boîtier, deviennent chaudes.
PRECAUTIONS on power supply and speaker
connections
PRECAUCIONES sobre las conexiones de la
fuente de alimentación y de los altavoces
PRECAUTIONS sur l’alimentation et la
connexion des enceintes
• DO NOT connect the speaker leads of the power cord to the car
battery; otherwise, the unit will be seriously damaged.
• BEFORE connecting the speaker leads of the power cord to the
speakers, check the speaker wiring in your car.
• NO conecte los conductores de altavoz del cable de alimentación a
la batería de automóvil, pues podrían producirse graves daños en la
unidad.
• ANTES de conectar a los altavoces los conductores de altavoz del cable
de alimentación, verifique el conexionado de altavoz de su automóvil.
• NE CONNECTEZ PAS les fils d’enceintes du cordon d’alimentation à la
batterie; sinon, l’appareil serait sérieusement endommagé.
• AVANT de connecter les fils d’enceintes du cordon d’alimentation aux
enceintes, vérifiez le câblage des enceintes de votre voiture.
• You need the installation kits which corresponds to your car.
• If you have any questions or require information regarding installation
kits, consult your JVC car audio dealer or a company supplying kits.
• The unit can only be installed in a car with a 12 V DC power supply,
negative ground.
• Disconnect the battery’s negative terminal and make all electrical
connections before installing the unit.
• Connect speakers with a maximum power of more than 50 W
(impedance of 4 Ω to 8 Ω). Otherwise, change the <AMP GAIN>
setting. (See page 12 of the INSTRUCTIONS.)
• Insulate unconnected wires with vinyl tape or other similar material.
To prevent a short circuit, do not remove the caps on the ends of the
unconnected wires or the terminals.
• If the fuse blows, first make sure the wires are not touching to cause
a short circuit, then replace the old fuse with one that has the same
rating.
• Install this unit in the console of your vehicle.
• Mount the unit so that the mounting angle is 30° or less.
• Be sure to ground this unit to the car's chassis again after installation.
• After the unit is installed, check whether the brake lamps, blinkers,
wipers, etc. on the car are working properly.
• Do not touch the metal part of this unit during and shortly after
the use of the unit. Metal part such as the heat sink and enclosure
become hot.
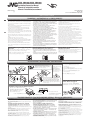
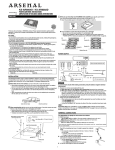
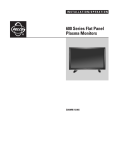
INSTALLATION / INSTALACION / INSTALLATION
In-dash mounting / Montaje en el tablero / Montage encastré
Do the required electrical connections. /
Realice las conexiones eléctricas requeridas. /
Réalisez les connexions électriques.
Install the unit at an angle
of less than 30˚. /
Instale la unidad a un
ángulo de menos de 30˚. /
Installez l’appareil avec un
angle de moins de 30˚.
Bend the appropriate tabs to hold the sleeve
firmly in place. / Doble las lengüetas apropiadas
para retener firmemente la manga en su lugar. /
Tordez les languettes appropriées pour maintenir le
manchon en place.
When installing the unit without using the sleeve / Instalación de la unidad sin utilizar la cubierta / Lors de
l’installation de l’appareil scans utiliser de manchon
Flat head screws—M5 × 8 mm (M5 × 3/8") /
Tornillos de cabeza plana—M5 × 8 mm
(M5 × 3/8 pulgada) / Vis à tête plate—
M5 × 8 mm (M5 × 3/8 pouces) *
Pocket / Compartimiento / Poche
Bracket / Ménsula / Support *
Part list / Lista de componentes / Liste de pièces
A Control panel / Panel de control / Panneau de
commande (×1)
B Sleeve / Cubierta / Manchon (×1)
C Trim plate / Placa de guarnición / Plaque d’assemblage
(×1)
D Power cord / Cordón de alimentación / Cordon
d’alimentation (×1)
E Handles / Manijas / Poignées (×2)
Removing the unit / Extracción de la
unidad / Retrait de l’appareil
Release the rear section first... / Primero libere la
sección trasera... / Ouvrez la section arrière en premier...
* Not supplied for this unit.
* No suministrado con esta unidad.
* Non fourni avec cet appareil.
TROUBLESHOOTING / LOCALIZACION DE AVERIAS / EN CAS DE DIFFICULTES
• The fuse blows. ] Are the red and black leads connected correctly?
• Power cannot be turned on. ] Is the yellow lead connected?
• No sound from the speakers. ] Is the speaker output lead shortcircuited?
• “MISWIRING CHK WIRING THEN RESET UNIT” / “WARNING
CHK WIRING THEN RESET UNIT” appears on the display and
no operation can be done. ] Is the speaker output lead shortcircuited or touches the chassis of the car/head unit? ; Have you reset
your unit?
• Sound is distorted. ] Is the speaker output lead grounded? ; Are
the “–” terminals of L and R speakers grounded in common?
• Noise interfere with sounds. ] Is the rear ground terminal
connected to the car’s chassis using shorter and thicker cords?
• This unit becomes hot. ] Is the speaker output lead grounded? ;
Are the “–” terminals of L and R speakers grounded in common?
• This unit does not work at all. ] Have you reset your unit?
• El fusible se quema. ] ¿Están los conductores rojo y negro
correctamente conectados?
• No es posible conectar la alimentación. ] ¿Está el cable amarillo conectado?
• No sale sonido de los altavoces. ] ¿Está el cable de salida del
altavoz cortocircuitado?
• Aparece “MISWIRING CHK WIRING THEN RESET UNIT” /
“WARNING CHK WIRING THEN RESET UNIT” en la pantalla y
no se puede realizar ninguna operación. ] ¿El conductor de
salida de altavoz está en cortocircuito o en contacto con el chasis del
automóvil/auriculares? ; ¿Reinicializó la unidad?
• El sonido presenta distorsión. ] ¿Está el cable de salida del altavoz
conectado a masa? ; ¿Están los terminales “–” de los altavoces L y R
conectados a una masa común?
• Perturbación de ruido. ] ¿El terminal de tierra trasero está conectado
al chasis del automóvil utilizando los cordones más corto y más grueso?
• Esta unidad se calienta. ] ¿Está el cable de salida del altavoz
conectado a masa? ; ¿Están los terminales “–” de los altavoces L y R
conectados a una masa común?
• Esta unidad no funciona en absoluto. ] ¿Reinicializó la unidad?
1
• Le fusible saute. ] Les fils rouge et noir sont-ils racordés correctement?
• L’appareil ne peut pas être mise sous tension. ] Le fil jaune estelle raccordée?
• Pas de son des enceintes. ] Le fil de sortie d’enceinte est-il court-circuité?
• “MISWIRING CHK WIRING THEN RESET UNIT” / “WARNING CHK
WIRING THEN RESET UNIT” apparaît sur l’affichage et aucune
opération ne peut être réalisée. ] Est-ce qu’un fil de sortie d’enceinte
est court-circuité ou touche le châssis de la voiture/appareil principal? ;
Avez-vous réinitialisé votre appareil?
• Le son est déformé. ] Le fil de sortie d’enceinte est-il à la masse? ; Les
bornes “–” des enceintes gauche et droit sont-elles mises ensemble à la masse?
• Interférence avec les sons. ] La prise arrière de mise à la terre est-elle
connectée au châssis de la voiture avec un cordon court et épais?
• Cet appareil devient chaud. ] Le fil de sortie d’enceinte est-il à la masse? ; Les
bornes “–” des enceintes gauche et droit sont-elles mises ensemble à la masse?
• Cet appareil ne fonctionne pas du tout. ] Avez-vous réinitialisé
votre appareil?
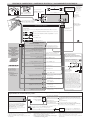
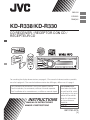
ELECTRICAL CONNECTIONS / CONEXIONES ELECTRICAS / RACCORDEMENTS ELECTRIQUES
Signal cord / Cable de señal / Cordon de signal *1
Reset the unit. / Reinicialice la
unidad. / Réinitialisez l’appareil.
Rear ground terminal /
Terminal de tierra posterior /
Borne arrière de masse
JVC Amplifier /
Amplificador de JVC /
JVC Amplificateur
10 A fuse / Fusible de 10 A / Fusible 10 A
Rear speakers
or subwoofer /
Altavoces traseros
o subwoofer /
Enceintes arrière
ou le caisson de
grave *3
Remote lead /
Cable remoto /
Fil d’alimentation à
distance
Factory wiring harness (vehicle) /
Mazo de cables de fábrica (vehículo) /
Faisceau de câbles de l'usine (véhicule)
Antenna terminal / Terminal de la antena / Borne de l’antenne
Extension lead /
Cable prolongador /
Fil prolongateur *1
Caution / Precaución / Précautions
Join the same color leads together. / Junte los cables del mismo color. / Joignez les fils de même
couleur ensemble.
To join the open-ends of the leads: / Para juntar los extremos abiertos de los cables: / Pour joindre les
extrémités des fils:
Strip lead ends / Pele los extremos de los cables / Dénudez les extrémités des
fils
Twist ends together / Retuerza los extremos conjuntamente / Torsadez les
extrémités ensemble
D Power cord / Cordón
de alimentación /
Cordon d’alimentation
Solder / Suelde / Soudez
Tape / Cinta / Ruban adhésif
Recommended connection / Conexión recomendada /
Connexion recommandée
Vehicle-specific Wiring
Harness (separately
purchased) /
Mazo de cables del vehículo
específico (se vende por
separado) /
Faisceau de câble spécifique
pour le véhicule (vendu
séparément)
Blue: Automatic antenna / Azul: Antena automática /
Bleu: Antenne automatique
Blue (white stripe), 200 mA max. /
Azul (rayas blancas), máx. 200 mA /
Bleu (bande blanche), 200 mA max.
Blue (white stripe): Amp Turn-on /
Azul (rayas blancas): Alimentación amplificador /
Bleu (bande blanche): Mise sous tension de l'amplificateur
Illumination / Iluminación / Éclairage
Orange (white stripe) / Naranja (rayas
blancas) / Orange (bande blanche)
Telephone Muting / Silenc. teléfono /
Sourdine téléphonique
Brown / Marrón / Marron
12 V Battery / Batería 12 V / Batterie 12 V
Yellow / Amarillo / Jaune
Power cannot be turned on? /
¿No se puede conectar la alimentación? /
L'appareil ne peut pas être mis sous tension?
Ignition switch / Interruptor de
encendido / Interrupteur d’allumage
12 V Ignition Switch / Interruptor de encendido 12 V /
Interrupteur d'allumage 12 V
Red / Rojo / Rouge
Ground / Tierra / Masse
Black / Negro / Noir
For more information /
Para más información /
Pour plus d'informations :
Metra Electronics:
www.metraonline.com
Scosche Industries:
www.scosche.com
Fuse block / Bloque de
fusibles / Porte-fusible
Separate red lead /
Cable rojo separado /
Fil rouge séparé
White / Blanco / Blanc
Front speaker (left) / Altavoz delantero
(izquierdo) / Enceinte avant (gauche)
White (black stripe) / Blanco (rayas negras) /
Blanc (bande noire)
Gray / Gris / Gris
Front speaker (right) / Altavoz delantero
(derecho) / Enceinte avant (droit)
Gray (black stripe) / Gris (rayas negras) /
Gris (bande noire)
Green / Verde / Vert
Rear speaker (left) / Altavoz trasero
(izquierdo) / Enceinte arrière (gauche)
Green (black stripe) / Verde (rayas negras) /
Vert (bande noire)
Purple / Púrpura / Violet
Rear speaker (right) / Altavoz trasero
(derecho) / Enceinte arrière (droit)
Purple (black stripe) / Púrpura (rayas negras) /
Violet (bande noire)
If your vehicle factory wiring harness does
not have “12 V ignition switch” lead, connect
the red lead of the supplied power cord, D,
to the vehicle fuse block (through a separate
red lead provided with the fuse tap). / Si el
mazo de cables de fábrica de su vehículo no
incluye el cable del “interruptor de encendido
de 12 V”, conecte el cable rojo del cordón de
alimentación D suministrado, al bloque de
fusibles del vehículo (a través del cable rojo
separado suministrado con la toma de fusible). /
Si le faisceau de câbles de votre véhicule ne possède
pas de fil “Interrupteur d'allumage 12 V”, connectez
le fil rouge du cordon d'alimentation fourni, D, au
porte-fusible du véhicule (un fil rouge séparé est
fourni avec le porte-fusible).
Connecting the Bluetooth adapter or portable audio player / Conexión del adaptador Bluetooth o del reproductor de audio portátil / Connexion de
l’adaptateur Bluetooth ou d’un lecteur audio portable
To the blue (white stripe) lead of the supplied power cord D /
Al cable azul (rayas blancas) del cordón de alimentación D
suministrado / Au fil bleu (bande blanche) du cordon d'alimentation
D fourni
Black / Negro / Noir
Ground / Tierra / Masse
To the brown lead of the supplied power cord D /
Brown / Marrón / Marron
Al cable marrón del cordón de alimentación D suministrado /
Au fil marron du cordon d'alimentation D fourni
– – – – – – – – – – – – – – – – – – – – – – – – – – – – – – – – – – – – – – – or / o / ou – – – – – – – – – – – – – – – – – – – – – – – – – – – – – – – – – – – – – – –
3.5 mm (1/8”) stereo mini plug / Miniclavija estéreo de 3,5 mm
(1/8 pulgada) / Mini fiche stéréo de 3,5 mm (1/8 pouces) *1
Portable audio player, etc. / Reproductor de
audio portátil, etc. / Lecteur audio portable, etc. *1
KS-BTA100
(separately purchased /
se vende por separado /
vendu séparément)
Make the <SRC SELECT> setting accordingly,
see pages 9, 12, and 14 of the INSTRUCTIONS. /
Realice el ajuste <SRC SELECT> de conformidad,
consulte las páginas 9, 12 y 14 del MANUAL
DE INSTRUCCIONES. / Réalisez le réglage
<SRC SELECT> en fonction, voir pages 9, 12 et 14 du
MANUEL D'INSTRUCTIONS.
*1 Not supplied for this unit.
*2 Firmly attach the ground wire to the metallic body or to the chassis
of the car—to the place uncoated with paint.
*3 Make the <L/O MODE> setting accordingly, see page 11 of the
INSTRUCTIONS.
Blue (white stripe) / Azul (rayas
blancas) / Bleu (bande blanche)
*1 No suministrado con esta unidad.
*2 Fije firmemente el cable de tierra a la carrocería metálica o al
chasis—a un lugar no cubierto con pintura.
*3 Realice el ajuste <L/O MODE> de conformidad, consulte la página
11 del MANUAL DE INSTRUCCIONES.
2
*1 Non fourni avec cet appareil.
*2 Attachez solidement le fil de mise à la masse au châssis métallique de la
voiture—à un endroit qui n’est pas recouvert de peinture.
*3 Réalisez le réglage <L/O MODE> en fonction, voir page 11 du MANUEL
D’INSTRUCTIONS.
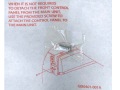
WHE N IT IS NOT REQU IRED
TO DETA CH THE FRO NT CON TRO L
PANE L FRO M THE MAIN UNIT,
USE THE PRO VIDE D SCR EWT O
ATTA CHT HEC ONT ROL PAN ELTO
THE MAIN UNIT.
•
GE40401-001 A
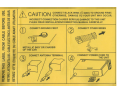
1.\ CAUTION
~
w
0::
0
LL
w
m
w
__,
w
INCORRECT CONNECTION CAUSES SERIOUS DAMAGE TO THIS UNIT
PLEASE READ INSTALLATION/CONNECTION MANUAL CAREFULLY.
c
U)
W
......
~
0
0
Q2
m 1- w
_.
<C 0 a:l
(.) . w <4:
:E
0
0::
LL
....I
CONNECT BLACK WIRE {(f)GND) TO GROUND FIRST.
OTHERWISE, DAMAGE TO YOUR UNIT MAY OCCUR.
....1
w
w
(.)
~
W
~
ffi
c
w
::s
~
w
UJ
~
CONNECT OTHER WIRES
METALLIC BODY OR CHASSIS
OF THE CAR
I=UJ
_.
w
CD
CONNECT GROUND FIRST
m c
~
..
s
w
@
CONNECT POWER CORD TO
THE UNIT
w
a I=
~..... I:U 0w
W
::5
N
--
1-
i=
~ w w
-= e:; a::=
~ ~ ~
'
>
Please do not send products or other
correspondence to this address.
PLEASE
PLACE
STAMP
HERE
JVC AMERICAS CORP.
1700 Valley Road
Wayne, NJ 07470
PO BOX 1189
BEDFORD, TX 76095-1189
11 ... 1.11 •• 11 ••• 1.1 ... 1.1 .... 11 ... 111 •• 1.1.1 •• 1•• 1.1.1 .. 1... 11
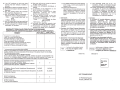
PRODUCT REGISTRATION CARD I QUESTIONNAIRE
USA CUSTOMERS ONLY
Registering your product will allow us to contact you in the unlikely
event a product safety notification is required.
This form is for Product Registration purposes only. Failure to return
this form does not diminish your rights during the warranty period.
THANK YOU FOR PURCHASING THIS JVC PRODUCT
REGISTER ONLINE AT: REGISTER.JVC.COM
Registeronline at REGISTER . JVC.COM
and receive a special offer!
PRODUCT REGISTRATION
First Name:
Last Name:
Address:
Apt.#
City:
State:
Zip Code:
Phone Number:
E-Mail Address:
1) Would you like to receive the JVC Community e-mail newsletter?
Yes
No
2) Would you like to receive special offers from JVC?
Yes
No
3) Have you purchased an extended warranty for this product?
Yes
No
Date of Purchase
Model Number:
Serial Number:
Purchase Price:
Dealer:
On a scale of 1 to 5, with 5 being the best, please rate each of the following attributes about your new
JVC product.
Performance
1
2
3
4
5
Features
1
2
3
4
5
Ease of use
1
2
3
4
5
Design
1
2
3
4
5
Value
1
2
3
4
5
COMMENTS:
Thank You
for completing
this questionnare.
BT-51044-1
(0208)
Instructions: Fold at crease and tape open edge in the middle.
Printed in Indonesia
,...
CANADA
ONLY
,.
JVC
CANADA
SEULEMENT
WAIIANTY
GARANTIE
OWNER'S COPY OF WARRANTY CARD
COPIE D'ENREGISTREMENT DE LA GARANTIE
DU PROPRIETAIRE
(Save sales docket together with this warranty card, as a proof of date of purchase.
La facture et cette garantie sont vos preuves de Ia date d'achat; rangez-les.)
MODEL .
SERIAL NO. .
MODELE . .................... .................................... NO DE SERlE . ........................................ .
Purchase from.
Date purchased .
Achete chez · ............ ............... ........................... .................... Date achete
:..... ...................... .
Dealer's Address .
Adresse du Vendeur· ........................................................................ .................... ................................
No.
Street
Rue
No
JVC CANADA INC.
21 Finchdene Square, Toronto, ON M1X 1A7
TEL: (416) 293-1311 FAX: (416) 293-8208
http://www. jvc.ca
Postal Code
Prov.
City or Town
Code Postal
Ville
Prov.
Owner's Name
.
Nom du Proprietaire :.............................................................................. .............................. .... ,........ .. .
Owner's Address
.
Adresse du Proprietaire·......................................................................:............................... .................
No.
Street
Apt.
Rue
App.
No
City or Town
Ville
~
Prov.
Prov.
........................
~~
........
Postal Code
Code Postal
~
BT-52008-1
(1007)
Detach here.
a decouper ici
Printed in Indonesia
WARRANTY CONTROL CARD
CARTE DE CONTROLE DE LA GARANTIE
IMPORTANT: This warranty control card must be filled in and posted to the address indicated
on the back hereof or register via internet within 7 (seven) days from the date of purchase.
IMPORTANT: Cette carte doit etre renvoyee dument remplie l'adresse indiquee au verso,
dans les 7 jours de Ia date d'achat ou aller sur le site par internet pour !'enregistrement.
a
(PLEASE PRINT/EN LETIRES MOULEES)
MODEL .
SERIAL NO. .
MODELE ·..... ............ ...... ..................................... NO DE SERlE · ..... ...... .. ..
.... .... .. ...... ..... .. .. .
Purchased from .
Date purchased .
·..... ...... ........ ....... .. ... . .
Achete Chez .. . :. .. . . . .. . .. .. . . .. . .. .•. . . .. .. . .. ... .. . . . .. . . .. . .. . .•. . . .. . . .. . . . .. .. . .. . . .. .•. Date achele
Dealer's Address
.
Adresse du Vendeur ·... ... ....... ... ..... ...... ....... .. ....... .... ... ..... ... ..... ....... .... .. ...... ..... ....... ... ..... ... ................ ..... .. .
No.
Street
No
Rue
ciiY ·;;~ :r;;~;;
·················· ··············· ·· ············· ··"Priiv. ············································ ··············p-.;siai ·cCide···········
Ville
Prov.
Code Postal
Owner's Name
.
Nom du Proprietaire · .. ..... .......... ..... ..... ...... ....... ... ... ... ...... .. ... .. .... ................ ... .. .... .. ....... .. ........ ..... ... .. ...... .. .
Owner's Address
.
Adresse du Proprietaire · ....... ... .. .... ..... ...... .... ........... ..... ... ........... .. .... .......... ..... .......... ... ... .... ... ..... .. .. ..... ......
No.
Street
Apt.
No
Rue
App.
ciiY·;;;:r;;.;;;;···················································································································p-.;si&i.CC:ida···········
Ville
Code Postal
You may also register on-line
at:www.jvc.ca
WARRANTY APPLIES ONLY TO PRODUCT
DISTRIBUTED IN CANADA BY JVC CANADA INC.
~
~~
Vous pouvez egalement vous
inscrire par internet a:www.jvc.ca
LA GARANTIE S'APPLIQUE SEULEMENT AUX PRODUITS
DISTRIBUES AU CANADA PAR JVC CANADA INC.
JVC CANADA INC. (hereafter called "JVC") gives
the following express warranty for each new JVC
product distributed in Canada by JVC and sold
by an authorized JVC dealer.
JVC warrants that this JVC product is free, under
normal use and maintenance, from any defects in
material and workmanship subject to the following
terms and conditions:
JVC CANADA INC. ( ci-apres appeh3 "JVC")
enonce Ia garantie expresse suivante pour tout
nouveau produit JVC distribue au Canada par JVC
et vendu par un detaillant JVC autorise.
JVC vous garantit que ce produit est degage, sous
utilisation et entretien normal, de tout defaut
materiel et de fabrication sous reserve des
modalites et conditions suivantes :
1. To Obtain Warranty Service:
1. Pour obtenir un service de garantie :
(a) The JVC Warranty Control Card herein
provided must be completed in full and
posted or registered via internet within 7 days
of date of purchase of the JVC product.
(b) This JVC Warranty Control Card must be
completed in full and presented together
with proof of purchase of the JVC product
requiring service.
(c) The JVC product must be brought in for
service to an authorized JVC Service Centre.
2. Limitation :
This Warranty shall not apply to:
(a) Repair or replacement of any cabinets,
batteries, plates, connection cords, antennas, dust covers, knobs, speaker grills,
speaker cones, projection screens, projection
screen savers, and all accessories.
(b) Any defects caused or repairs required as a
result of misuse, abusive operation, negligence, improper use and/or insufficient care.
(c) Any defect caused or repairs required as
a result of not following the instructions in
the operation manual.
(d) Any JVC product tampered with, adjusted
or repaired by any party other than JVC or
authorized JVC Service Centre personnel.
(a) La carte de controle de garantie JVC ciincluse doit etre completee avec les
renseignements complets et etre postee ou
enregistree via internet dans les 7 jours
suivant l'achat du produit JVC.
(b) Cette carte de controle de garantie JVC doit
etre dOment remplie et etre presentee avec
Ia preuve d'achat du produit JVC
necessitant une reparation.
(c) Le produit JVC doit etre apporte pour
service chez un centre de service JVC
auto rise.
2. Restrictions:
Cette garantie ne s'applique pas aux :
(a) Reparation ou remplacement de tout
cabinet, batteries, panneau avant, cordons
de raccord, antennas, housses de
protection , boutons, couverts de hautparleur, cones de haut-parleur, ecrans de
projection, protecteurs d'ecran de projection
et tous les accessoires.
(b) Tous defauts occasionnes ou reparations
requises suite a une utilisation abusive,
mauvaise, negligente eUou une utilisation
incorrecte.
(c) Tous defauts occasionnes ou reparations
requises suite a !'omission de suivre les
recommandations du manuel d'instruction.
(d) Tout produit JVC altere, ajuste ou repare par
tout autre entreprise que JVC ou un centre
de service d'entretien ou de service
autorise JVC.
(e)
(f)
(g)
(h)
(i)
(j )
(k)
Any JVC products on which the serial
num-ber has been defaced, modified or
removed.
Maintenance, cleaning or periodic check-up
Conversion to foreign or domestic voltage or
frequency.
Any JVC product without the Canadian
Electrical Safety Regulations 10.
Any JVC products used for commercial or
institutional, rental, or display purposes.
Parts ...... 1 year (except video head - 90
days)
Labour ... 90 days
Any JVC product which has been resold and
no longer owned by the original purchaser.
Product purchased from "outside Canada",
"bankruptcy" or "liquidator".
(e) Tout produit JVC dont le numero de serie a
ete altere, modifie ou enleve.
(f) L'entretien, les verifications periodiques et
nettoyage.
(g) La conversion
une frequence ou une
tension etrangere ou domestique.
(h) Tout produit JVC n'ayant pas le sigle
d'identification conforme aux normes
electriques Canadiennes (GSA).
(i) Pour tou t pro d uit utilise
d e s f ins
commerciales, institutionnelles, de location
ou utilise des fins d'etalage.
Pieces. ...... .. .. . 1 An (Excepte les tetes
video- 90 jours)
Main d'oeuvre ... 90 Jours
U) Tout produit JVC ayant ete revendu et qui
n'est plus Ia propriete de l'acheteur original.
(k) Produit achete
"l'exterieur du Canada",
provenant d'une "faillite" ou d'un "liquidateur".
a
a
a
a
WARRANTY TERM (VALID FROM THE DATE OF PURCHASE)
CONDITIONS DE GARANTIE (VALABLE PARTIR DE LA DATE D'ACHAT)
PRODUCT
PARTS (Years)
Labour (Years)
PRODUIT
PIECES (annees) MAIN-D'OEUVER (annees)
a
Projection TV In-Home Service
Colour TV In-Home (25" and above)
D-ILA Rear Projection In-Home Service
~CD TV In-Home Service (25" and above)
Ecrans de projection ·Service a Domicile
Ecrans de TV Couleur Service a Domicile (25" et plus)
TV projection arriere D-ILA Service a Domicile
Ecrans de LCD Service a Domicile (25" et plus)
1
1
• In-home service to be provided where available
Where it is not available, the Purchaser must assume the responsibility and expense for the proper
packing, shipment and all costs associated with the delivery of the equipment to and from the closest
JVC Authorized Service Centre.
* Service a domicile fourni par un detaillant disponible.
S'il n'y a pas de service JVC disponible a proximite, l'acheteur doit assumer Ia responsabilite et les
coOts pour un emballage adequat, !'expedition, ainsi que tous les coOts associes a Ia livraison de
l'equipement chez et depuis le detaillant JVC autorise le plus pres pour un service d'entretien.
Receivers and Home Speakers purchased separately, .Front
Projection and Car Audio "ARSENAL" Series
Recepteurs et Hauts-Parleurs achetes separement, Projecteur
Avant et Audio d'Auto de Serie " ARSENAL ,
AC Adapters, Remote Controls, Headphones, Microphones and
Projector Lamps
Adaptateurs AC, Telecommande, Casque D'ecoute, Microphones
et Lampe de Projecteur
2
( I ) Any defects caused by fire, flood, lightning,
power surge, or other events beyond the
control of JVC.
(m) FOR AUTO PRODUCTS
Warranty does not cover elimination of car
static or electrical interferences, cleaning
of head, adjustments, or labour cost for the
removal or reinstallation of the unit for
repair.
(I) Tout dommage cause par le feu, une
inondation, un eclair, une surtension ou tout
autre evenement hors du contr61e de JVC .
(m) POUR LES PRODU ITS D'AUTOMOBILE
La garantie ne couvre pas !'elimination
d'interferences statiques ou electriques de
Ia voiture, le nettoyage de tete, les
ajustements et les coOts de main d'oeuvre
associes
l'enlevement o u
Ia
reinstallation de !'unite pour reparation.
3 . Standards:
If any defects should be found in a JVC product
within the applicable terms, necessary repairs
shall be made at no cost to the purchaser for
parts or labour when JVC acknowledges that
such defects are due to faulty material or workmanship.
3. Criteres:
Si un produit JVC s'averait defectueux, selon les
conditions
applicables,
les
reparations
necessaires seront effectues sans coOts
additionnels
l'acheteur pour les pieces et Ia
main d'oeuvre lorsque JVC reconnait que de telles
defectuosites sont causees par une defectuosite
de materiel ou de fabrication.
4. Exclusion of All Other Express Warranties:
This warranty constitutes the entire express
warranty given by JVC for JVC products and
no dealer or service centre personnel or his,
its or their agent or employee is, or are authorized to extend or enlarge this warranty on behalf of JVC.
5. Disclaimer of Consequential Damage:
To the extent the law permits JVC disclaims
any responsibility for loss of time or use of its
product, transportation costs , or any other
indirect, incidental or consequential damage or
inconvenience.
a
And mail to the address belo~.
You may also register on-line
at:www.jvc.ca
Detach here.
a
a
a
4 . Exclusion de toutes autres garanties expresses:
Cette garantie constitue l'entiere garantie express
donnee par JVC pour les produits JVC. Nul
representant ou employe d'un detaillant ou d'un
service d'entretien n'est autorise prolonger cette
garantie au nom de JVC.
a
5. Denegation des do m mages indirects :
Dans Ia mesure permise par Ia loi, JVC nie toute
responsabilite pour perte de temps ou d'usage de
ses produits, des coOts de transport ou tout autre
dommage ou inconvenient indirect, accidental et
consequent.
INouveau I
a
Veui llez poster l'adresse ci-dessous.
Vous pouvez egalement VOUS
enregistrer par internet
w ww.jvc.ca
a;
a decouper ici
Place stamp
here
2
Placez votre
t imbre lei
90 DAYS
90 DAYS
90JOURS
90 JOURS
-
JVC CANADA INC.
Wood Cone Speakers
Enceinte a Cone en Bois
5
All Other Categories
Toutes les autres categories
1
5
21 Finchdene Square
Toronto, ON M1X 1A7
1
TO OUR VALUED CUSTOMER-THANK YOU FOR PURCHASING THIS JVC PRODUCT.
WE WANT TO HELP YOU ACHIEVE A PERFECT EXPERIENCE.
NEED HELP ON HOW TO HOOK UP?
NEED ASSISTANCE ON HOW TO OPERATE?
NEED TO LOCATE A JVC SERVICE CENTER?
LIKE TO PURCHASE ACCESSORIES?
JVC®IS HERETO HELP!
TOLL FREE: 1(800)252-5722
http://www.jvc.com
Remember to retain your Bill of Sale for Warranty Service.
- - - Do not attempt to service the product yourself
Caution
To prevent electrical shock, do not open the cabinet.
There are no user serviceable parts inside.
Please refer to qualified service personnel for repairs.
BT-51018-6
(1008)
Printed in Indonesia
******************************************************************************
*
i JVC®
~
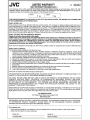
LIMITED WARRANTY
IONLY FOR PRODUCT PURCHASED IN U.S.A. I
1-1
i*
I USA ONLY I
~
* JVC Americas Corp. (JVC) warrants this product and all parts thereof, except as set forth below ONLY TO THE ~
~ ORIGINAL RETAIL PURCHASER to be FREE FROM DEFECTIVE MATERIALS AND WORKMANSHIP from the date of *
* original purchase for the period shown below. ("The Warranty Period")
*
i*
IPARTS
1
YR
I LABOR
1
YR
i*
* THIS LIMITED WARRANTY IS VALID ONLY IN THE FIFTY (50) UNITED STATES, THE DISTRICT OF COLUMBIA AND *
~ IN THE COMMONWEALTH OF PUERTO
RICO.
~ WHAT WE WILL DO:
~ If this product is found to be defective within the warranty period, JVC will repair or replace defective parts with new or
* rebuilt equivalents at no charge to the original owner. Such repair and replacement services shall be rendered by JVC
~ during normal business hours at JVC authorized service centers. Parts used for replacement are warranted only for the
* remainder of the Warranty Period. All products may be brought to a JVC authorized service center on a carry-in basis.
* Color televisions with a screen size of 37"class or greater qualify for in-home service. In such cases, a technician will
~ come to your home and either repair the TV there or remove and return it if it cannot be repaired in your home.
~ WHAT YOU MUST DO FOR WARRANTY SERVICE:
~
~
~
*
~
*
*
~
~
* Please do not return your product to the retailer
~ Instead, return your product to the JVC authorized service center nearest you. If shipping the product to the service
* center, please be sure to package it carefully, preferably in the original packaging, and include a brief description
of
~the problem(s). Please call 1-BOD-252-5722 to locate the nearest JVC authorized service center. Service locations
* can also be obtained from our
http://www.jvc.com. If your product qualifies for in-home service, the service
* representative will require clearwebsite
access to the product.
*
~
*
~
*
*
* WHAT IS NOT COVERED:
*~
*~ If you have any questions concerning your JVC Product, please contact our Customer Care Center at 800-252-5722
. *~
~ This limited warranty provided by JVC does not cover:
*
~
*
*
1. Products which have been subject to abuse, accident, alteration, modification, tampering, negligence, misuse, fAulty*
installation, lack of reasonable care, or if repaired or serviced by anyone other than a service facility authorized by~
JVC to render such service, or if affixed to any attachment not provided with the products, or if the model or serial *
number has been altered, tampered with, defaced or removed;
*
~ 2. Initial installation, installation and removal from cabinets or mounting systems.
~
*
3. Operational adjustments covered in the Owner's Manual, normal maintenance, video and audio head cleaning; *
~ 4. Damage that occurs in shipment, due to act of God, and cosmetic damage;
~
*
5. Signal reception problems and failures due to line power surge;
*
~
6. User Removal Memory Devices/Video Pick-up Tubes/CCD Image Sensors are covered for 90 days from the date of purchase;~
*
7. Accessories;
*
~
8. Batteries (except that Rechargeable Batteries are covered for 90 days from the date of purchase);
*
*
9. Products used for commercial purposes, including, but not limited to rental.
:
* 10. Loss of data resultant from malfunction of hard drive or other data storage device;
*
* There are no express warranties except as listed above.
*
~
~
~ THE DURATION OF ANY IMPLIED WARRANTIES, INCLUDING THE IMPLIED WARRANTY OF MERCHANTABILITY, IS ~
* LIMITED TO THE DURATION OF THE EXPRESS WARRANTY HEREIN.
*
** JVC SHALL NOT BE LIABLE FOR ANY LOSS OF USE OF THE PRODUCT, INCONVENIENCE, OR ANY OTHER **
~DAMAGES, WHETHER DIRECT, INCIDENTAL OR CONSEQUENTIAL (INCLUDING, WITHOUT LIMITATION,
*DAMAGE TO TAPES, RECORDS OR DISCS) RESULTING FROM THE USE OF THIS PRODUCT, OR ARISING OUT
* OF ANY BREACH OF THIS WARRANTY. ALL EXPRESS AND IMPLIED WARRANTIES, INCLUDING THE
~WARRANTIES OF MERCHANTABILITY AND FITNESS FOR PARTICULAR PURPOSE, ARE LIMITED TO THE
~ WARRANTY PERIOD SET FORTH ABOVE.
~
*
*
~
~
~ Some states do not allow the exclusion of incidental or consequential damages or limitations on how long an ~
* implied warranty lasts, so these limitations or exclusions may not apply to you. This warranty gives you specific *
~ legal rights and you may also have other rights which vary from state to state.
~
*
JVC AMERICAS CORP.
1700 ValleyRoad, Wayne, New Jersey 07470
http://www.jvc.com
~
~
*
~
~
********************************************************************~*********
REFURBISHED PRODUCTS CARRY A SEPARATE WARRANTY, THIS WARRANTY DOES NOT APPLY. FOR DETAIL
OF REFURBISHED PRODUCT WARRANTY, PLEASE REFER TO THE REFURBISHED PRODUCT WARRANTY
INFORMATION PACKAGED WITH EACH REFURBISHED PRODUCT.
For customer use:
Enter below the Model No. and Serial No. which is located either on the rear, bottom or side of the cabinet.
Retain this information for future reference.
Model No.:
Serial No.:
Purchase date :
Name of dealer :