1
TV-13140
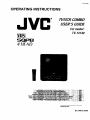
OPERATING INSTRUCTIONS
J
®
TV/VCRCOMBO
USER'S GUIDE
For model:
TV-13140
Ivusl
SQPB
4 HEAD
I
_
IM_!
te_s_
sta_le
!
e_c_
_¢
LDIi
e ir
!an
SerialNumber
Mar.1999 No.51546
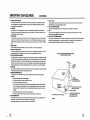
IMPORTANT SAFEGUARDS
The lightning flaSh with arrowhead symbOl,
within an equilateral Idangle is inteuffeq to
alert the user to the presence of
uninsulateq dangerous voltage within the
products enclosure that may be nt
sufficient magnitude to constitute a risk of
electric shock to persons.
CAUTION:
TO REDUCE THE RISK OF ELECTRIC
SHOCK, DO NOT REMOVE COVER (OR
BACK). NO USER-SERVICEABLE PANTS
INSIDE. REFER SERVICING TO QUALIFIED SERVICE PERSONNEL.
l_e
_
exclamation
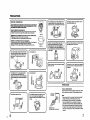
1.
READ INSTRUCTIONS
2.
Atl the safety and operating instructions should be reed before the unit is operated.
RETAIN INSTRUCTIONS
3.
The safety and operating instructions should be retained for future reference.
HEED WARNINGS
4.
All warnings on the unit and in the operating instructions should be adhered to.
FOLLOW INSTRUCTIONS
5.
All operatidg and use instructionsshould be teliowed.
CLEANING
point within an equilateral
presence of imp_kqnt _ecaitng
and
t_ncsie
Is intead_l
_ aleri
the u_r toin _the
maintenance
(servicing)
instruct_ns
literofure ac_mdat_ng
the al_lian_.
Unplug this unit from the wall outist before cleaning. Do not use liquid cleaners or aerosol cleaners.
TO PREVENT FIRE OR SHOCK HAZARD, DO NOT EXPOSE 1;HIS APPLIANCE TO
RAIN OR MOISTURE.
WARNING:
CAUTION:
TO PREVENT ELECTRIC SHOCK DO NOT USE THIS POLARIZED PLUG W_TH AN
EXTENSION CORD, RECEPTACLE OR OTHER OUTLET UNLESS THE BLADES CAN
BE FULLY INSERTED TO PREVENT BLADE EXPOSURE.
6.
Use a damp cloth for cleaning.
ATTACHMENTS
7.
Do not use attachments not recommended by the unit's manufacturer a,s they n_y cause hazards.
WATER AND MOISTURE
8.
Do not use this unit near water. For example, near a bathtub, washbowl, kitchen sink, or laundry tub, in a wet
basement, or near a swimming pool.
PORTABLE
CARTWARNING
ACCESSORIES
(wmbe__
W RETAC)
Do not place this unit on an unstable cart, stand_ tripod, bracket, or table.
The unit may fall, causing sehous injury, and serious damage to the unit.
WARNING:
This equipment has been tested and found to comply with the limJtefor a Class B digital device,
pursuant to Part 15 of the FCC Rules. These limits are designed to provide reasonable protection
against harmful intederence in a residential installation. This equipment generates, uses, and can
radiate radio frequency energy and, if not installed and used in accordance with the instructions,
may cause harmful interference to radiocommunications.
However, there is no guarantee that interference will not occur In a particular installation. If this
equipment does cause harmful interference to radio or telavisk_ reception, which can be
determined by taming the equipment Offand on, the user is encouraged to try correcting the
interference by one or more of the following measures:
"
-
Reohent or relocate the receiving antenna.
Inoraase the saperation between the equipment and receNer.
Connect the equiprnent into an outlet on a circuit dtifereot from that to which the receiver is connected.
Consuit the dealer or an experienced redio/'P4 tachnician fo( holp.
_/1_'_
Use only with a cart, stand, tdpod, bracket, or table recommended by the
rnanufecture_
8A, An appliance and cart combinabon should be moved with care. Quick stops,
9,
excessive force, and uneven sudaces may cause the appUEtnceand cart
combination to overturn.
VENTILATION
S3126A
Slots and openings in the cabinet and in the back or beltom are provided for ventilation, and to ensure reliable
operation of the unit, and to protect it from overheating. These openings must not be bk_xed or covered. The
openings should never be blocked by placing the unit on a bed, sofa, rug, or other similar surface. This unit
should never be placed near or over a radiator or heat source. This unit should not be placed in a buiit-la
installations such as a bookcase or Pack unless proper ventilation is provided or the manufacturer's lastructions
have been adhered to.
10. POWER SOURCES
This unit shouid be operated only from the type of power source indicated on the rating plate. If you are not sure
CAUTION:
Changes or modifications not expressly approved by the party responsible for cOmpliance with the
FCC Rules could void the user's authority to operate this equipment.
of the type of power supply to your home, consuti your appliance dealer or local power compan_ For units
intended to operate from batte,'y power, or other sources, refer to the operating instructions.
11. GROUNDING OR POLARIZATION
This unit is equipped with a polarized altam_ng-currant
line plug (a plug having one blade wider than the othe0.
This plug will fit into the power outlet only one wa_ This is a safety feature. If you are unable to insert the plug
fully into the outlat, try reversing the plug. If the plug should stiUfail to fit, contact your etocthoisn to replace your
obsolete outlet. Do not defeat the safety purpose of the polarizeq plug, if your unit is equipped with a 3-wire
grounding-type plug, a plug having a third (grounding) pin. This plug will only fit into a grounding-type power
ouitet. This too, is a safety feature, If you are ur_ble to insert the plug into the outlet, contact your eleotricisn to
replace your obsolete outlet.
Do not defeat the safety purpe6e of the grounding-type plug.
1
IMPORTANT SAFEGUARDS
(CONTINUED)
12. POWER-CORD PROTECTION
Power-supply COrdsshould be muted _o that they are not likely to be walked on or pinched by items placed
upon or ngaJnal them, paying padiCUtar attentJon to cords at plugs, convenience receptacles, and the point
where they exit from the appliance.
13. LIGHTNING
TO protect your unit from a lightning storm, or when it is Left unattended and unused for tong periods of time,
unplug it from the wall oupot and disconnect the antenna or cable system. This will prevent damage to the unit
due to lightning and power line surges,
14. POWER LINES
An outside antenna system should not be located in the vicinity of overhead power lines or other electdc lightor
power circuits, or where it can fall into such power lines or circuits. When installin_gan outside antenna system,
extreme care should be taken to keep from touching such power lines or circuits, as contact with them might be
fatal.
15. OVERLOADING
21. SAFETY CHECK
Upon completion of any service or repairs to this unit, ask the service technician to pedorm safety checks to
determine that the unit is In proper oporatLngcondition.
22. WALL OR CEILING MOUNTING
The product should be mounted to a wall or ceiling only as recommended by the manufacturer
23, HEAT
The product should be situated away from heat sources such as radiators, heat registers, stoves, or other
products (inCludingamplifiers) that produce heat,
24, NOTE TO CA'P/SYSTEM INSTALLER
This reminder is provided to call the CAW system inalaltsr's attention to Article 820.40 of the NEC that provides
guidelines for prober grounding and, in particular, specifies that the cable ground shall be connected to the
grounding system of the buildtog, as close to the point of cable entry as practical.
DO not overload wall outlets and extension cords, as this can result in a risk of fire or electric shock.
16. OBJECTAND UQUID ENTRY
DO not push objects through any openings in this unit, as they may touch dangerous voltage points or short out
ports that could result in fire or alectric shock. Never splfl or spray any type of liquid into the unit.
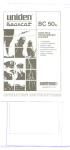
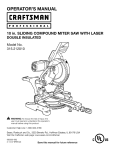
17- OUTDOOR ANI1ENNA GROUNDING
EXAMPLEOF ANTENNAGROUNDINGAS PERTHE
NATIONALELECTRICALCODE
it an outside antenna or cable system is connected to the unit, be sure the antenna or cable system is grounded
so as to provide some protection against voltage surges and built-up static charges, Sec_on 810 of the NaSonal
EI_
Code, ANSI/NFPA 70, provides information with respect to proper grounding of the mast and supporting structure, grounding of the leed-to wire to an antenna discharge unit, size of grounding conductors, ic_.atidn
of antenna discharge unit, connection to grounding electrodes, and requirements for the grounding electrode.
18. SERV]ClNG
LEAD IN
WIRE
DO not attempt to service this unit yourself as opening or removing covers may expose you to dangerous voltage
or other hazards. Refer all servicing to qualified service personnel.
19. DAMAGE REQUIRING SERVICE
GROUND
Z
NTENNA
Unplug this unit from the wall outlet and refer servicing to qualified service personnel under the following
conditions:
a. When the power-supply cord or plug is damaged.
b. it liquid has been spilled, Or objects have fallen into the unit,
DISCHARGE UNIT
(NEC SECTION 810-20)
c. If the unit has been exposed to rain or water.
d. If the unit does not operate normally by following the operating instructidq_. Adjust only those controls
that are covered by the operating instructions,as an improper adjustment of other controls may result in
damage and will often require extensive work by a qualified technician to restore the unit to its normal
_CLAMP
u_
ELECTRIC
SERVICE
"O.NO,NGGONOUC
EC SECTION 810-21)
GROUND CLAMPS
operation.
e. If the unit has been dropped or the Cabinet has been damaged.
h When the unit exhibits a distinct change in performance, this indicates a need for service.
20. REPLACEMENT PANTS
When replacement parts are required, be sure the service technician uses replacement parts spealfied by the
manufacturer or those that have the _me characteristics as the original pod.
Unauthorized substitutions may result in fire, electric shock or other hazards.
o, 2
ANTENNA
-NEC-NATIONAL ELECTRICAL CODE
POWER SERVICE GROUNDING
ELECTRODE SYSTEM
(NEC ART 250, PART H)
S2898A
3
4_
FEATURES
TABLE OF CONTENTS
Color "13/With Video CaSsette Recorder - Unique space saving design combines a 13"color TV and a video
cassette recorder.
it is recommended that you carefully read the descriptions and Operating procedures contained in this
User's Guide prior to operating your new TV/VCR.
High QUality Picture Technofogy - This TV/VCR equipped "HQ ° incorporates VHS High Quality technology, A peiti-in
detail enhancer is used to boost the reCorded signal and provide maximum picture quality dudng playback,
it is compatible with other VHS video cassette recorders,
/
\
SQPB - Tapes recorded in the S-VHS system can be played back simply on this WNCR,
4 Video Heads - Provides optimal picture quality for special effects playback,
Frequency Synthesized Tuner - Eject tonically locks in and memorizes all available channels for pedect reception
with the touch of a button,
181 Channel Tuner - Receives standard VHF and UHF broadcast channels and up to 113 cable channels, The
actual number of channels received depends upon channai reception in your area or your cable system.
Unified I_/NCR Random Access Remote Control - This remote control ailews operating various TV and VCR
functions from the comfort of your favodle viewing position,
Clo_md Caption Decoder With Full Text Mode - Displays text captions or full screen text on the screen for headng
impairedviewers.
8-ProgramrJ 1-Month Programmable Timer With Everyday/Every Week Capability - The balti-in timer allows
automatic ai_enlee recording of up to 8 33/programs within 1 month. It is also possible to record a program which is
broadcast at the same time everyday or every week.
Auto Clock Set - Once your TV/VCR is pluged into the AC outlet, it automatically sets the correct date and time.
On-Screen "rv DiSplay And VCR Programming - When you select a channel or make other changes, the TV willshow
an indicator on the screen for a few seConds. Timer recording can be programmed and confim_ed on the screen.
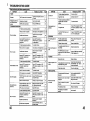
PRECAUTIONS ......................................................................................................................................................
LOCATION OF CONTROLS ...................................................................................................................................
REMOTE CONTROL ..............................................................................................................................................
ANTENNA CONNECTIONS ..................................................................................................................................
CABLE 13/CONNECTLONS .................................................................................................................................
SETTING LANGUAGE ..........................................................................................................................................
AUTO CLOCK SETTING ......................................................................................................................................
MANUAL CLOCK SETTING .................................................................................................................................
6
8
9
11
12
13
14
16
TV OPERATION ....................................................................................................................................................
TO MEMORIZE CHANNELS ................................................................................................................................
PICTURE CONTROL ADJUSTMENTS ................................................................................................................
TO SET THE ON TIMER .......................................................................................................................................
TO SET THE OFF TIMER .....................................................................................................................................
17
21
24
26
27
LOADING AND UNLOADING A VIDEO CASSETTE ............................................................................................
PLAYBACK ...........................................................................................................................................................
SPECIAL PLAYBACK ...........................................................................................................................................
28
29
31
RECORDING ATV PROGRAM ............................................................................................................................
iNSTANT TIMER RECORDING (ITR) ...................................................................................................................
TIMER RECORDING ............................................................................................................................................
OTHER FUNCTIONS FOR THE TIMER RECORDING ........................................................................................
33
35
36
38
USING THE REAL TIME TAPE COUNTER ..........................................................................................................
USING ZERO RETURN ........................................................................................................................................
DUPLICATING A VIDEO TAPE .............................................................................................................................
RECEPTION DISTURBANCES ............................................................................................................................
TROUBLESHOOTING GUIDE ..............................................................................................................................
VIDEO HEAD CLEANING .....................................................................................................................................
SPECIFICATIONS ................................................................................................................................................
40
41
42
43
44
46
47
Picture Adjustments Using The Remote Control - The On-Screen display allows precise remote control adjustment
of BRIGHTNESS, CONTRAST, COLOR, TINT and SHARPNESS.
Automatic Pleybeck/Rewthd-Stop-Eject - When loading a cassette tape without the erase prevention tab, this TV/
VCR will automatically play beck the cassette tape at the Correct speed. When a tape reaches its end dudng playback, recording (except dunng ITR and Timer Record) and last forward, it will au ornaticstly sop, rewind, stop and
ejectthetape,
Programmable ON/OFF Timer - Allews you to automatically turn on or off your TVNCR at a set time.
Programmable 13/Sleep 'Timer-Operablefrom the remotecontroltheTV can be programmed up to 12O minutes
to turn off automatically.
Full Load Tape Transport - Permits rapid access between modes.
Automatic Repeat Play System - When Auto Repeat option is turned on, the TVNCR will automatically play back
the same cassette tape repeatedly.
Instant Timer Recording (rrR - Simply by pressing the REC and PLAY buttons, the TV/VCR can be programmed
for up to 5 hours of record ng with an mmediata stad.
Audle/VIdee Inpot/Oofput Jacks - A VCR or other video device may be hooked up-to this TV/VCR for dubbing or
playback purposes.
2 Speed Picture Sellrch - 3 or 5 times normal speed in SP mode (9X or 15X in EP).
2 Speed Record/Playback
- Records and plays two tape speeds (SP, EP).
Real Time Tape Counter With Zero Return - The counter displays the real tape time and the zero return can be
used to return the tape to a presalectad pesitJon (00:00:(30) while the counter can be used to locate programs.
Ditillel Auto Tracking.
Automatically adjusts tracking during playback for the best posSible picture.
On-Screen 3 Language DlsplBy - YOUcan select one of 3 languages, English, Spanish or French for on-screen
programming.
4
5
PRECAUTIONS
MOISTURE
--De not insert fingers or any other objects into the
cas_etta laading SlOLDo not spray cleaner or w_x
directly on the unit or use forced air to remove dust.
CONDENSATION
DO NOT OPERATE ANy FUNCTIONS ON THIS UNIT FOR AT LEAST _
OR
THREE HOURS WHEN MOISTURE IN THE AIR CONDENSES ON I1: LET THE
UNIT STAND WITH POWER ON (SEE BELOW),
1
1
_Avoid places subject to strong vibration. Use in a
horizontet (flat) I_ition only.
• WHAT IS MOISTURE CONDENSATION?
When a cold liquid is poured into a glass, for exammple,
water vapor in the air will
condense on the surface of the _less. This is called moisture cOndensation.
Head Drum
• MOIETURE WiLL CONDENSE ON THE UNIT IN THE FOLLOWING CASES;
• When you move the unit from a cold to a warm place.
• After heating a cold room or under extremely humid conditions.
• WHEN YOU EXPERIENCE THE ABOVE CONDITIONS,
Plug the power cord into an AC outlet, set the POWER switch to ON and leave the
unit at tcom temperature until moisture condensation disappears,
Depending on the surrounding conditions, this may take two or three hours.
• If you cause a static discharge when touching the _
unit, and the unit fails to function, simply unplug the
unit from the wall ouitet, wait a few minutes, and
p;ug it beck in. The unit should return to normal
operation.
_t
f_Keep the unit away from flower vases, sinks, etc. If
tiquids should be spilled into the unff, serous
damage will result. If you spill any liquids into the
unit, unplug the AC power cord immediately and
cortsultqualified service personnel before attempting
Vkl_ _pe
f
rWhen you finish operating the unit, always unload
the cassette and turn off the power.
Avoid extreme heat.
to use it again.
.._
When you leave your home for a long time, unplug
the AC power cord.
rTo protect the unit from a lightn_g storm, unpfug th_
AC power cord from the wall outlet and diSconneCt
the antenna.
OK
_De not place the unit on or near appliances which
may cause elecbomagnetic interference (e.g.
speakers, etc), 0oicg so may cauee erratic operatiol
of the unit includingpicture and/_r soL_nddistoriio_ or
noise.
rAvold
extreme cold.
•
E
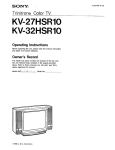
POWER SOURCE
TO USE AC POWER SOURCE
Use the AC pol_Ldzed line cord provided for operation on AC. Insert
the AC cord plug into a standard 120V 60Hz poledzed AC outlet.
The ventilation holes prevent overheating. Do not
block or cover these holes. Especially avoid
covering the hotes wi_ soft materials such as cloth
"-Avoid extreme moisture and dust,
!
.
=
6
J
WIDER HOLE
AND BLADE
PolarizedAC Cord
(One bladeis widerthan the other.)
NOTE:
1. Never connect the AC line cord plug to other than the specified
voltage (120V 60Rz). Use the attached power cord only.
2. If the pelerized AC cord does not fit into a non-polarfzed AC
outlet, do not attempt to file or cut the blade, it is the user's
responsibility to have an electrician replace the obsolete ouheL
3. If you cause a static discharge when touching the unit, and the
unit fails to function, simply unplug the unit, from the AC outlet,
wait an hour, and plug it back in. The unit should rotum to ncrmal
operation.
7
(3)
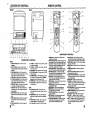
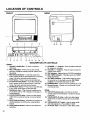
LOCATION
OF CONTROLS
REMOTE
FRONT
CONTROL
REAR
f
f
23
22
2
3
\
4
\
5
6
!
18 19
20
21
/
DESCRIPTION OF CONTROLS
7
8
9
10
11
12
13
14
15
16
17
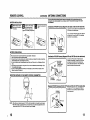
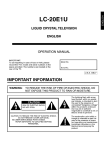
DESCRIPTION OFCONTROLS
FRONT:
1. Cauette Loading Slot - To insert or remove a
videotape.
2. REC I ITR Button. Press once to start normal
recording. Additional presses activate thstant Timer
Recording.
3. REW (Rewind) Button - In the Stop mode. this
button rapidly winds the tape backwards. In the Play
mode, this buttonactivates reverse search.
4, PLAY Button. Press to play a prerecorded tape.
5. FF (Fast Forward) Sutton - In the Stop mode, this
button rapidly winds the tape forward. In the Play
mode, this button activates forward search.
6. STOP/EJECT Button - Press once to stop the tape
in any mode. Press again to eject the tape.
7. Headphone Jack - Plug monaural headphones or
an earphone with an 1/8" miniplug into this jack for
private listening.
8, AUDIO/VIDEO IN Jacks - Audio and video signal
cables from an estemal source can be connected
here.
9. INPUT Selector Button - Switches the program for
viewing between the VCR and an external input
SOurCe.
10, SP/EP Selector Button - Sets the tape speed for
recording,
11. CHANNEL +/- Suttorm - Press to saiect a channel
for viewing or recording,
12, VOLUME + I - Buttons - Press to raise or lower the
volume of the sOUnd.
13. REC Indloator - Lightswhan the "rv/vCR is recordlag,
14, REC TIMER Indicator - This lights when the TIMER
button is pressed,
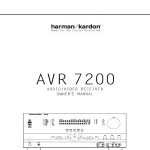
1. TIMER Button - Used to set the TV/VCR to start
recording at a preset lime.
2` INPUT Selector Button - Switches the wograrn tor
viewing between the VCR and extemai inputsources.
3. CALL Button. Displays the present it meJday of the
week, channel, counter, speed Selection (and VCR
rhode if VCR la playing) on the TV screen.
4. W/CAP/TEXT Button - Switches between Caption,
Text and TV modes for Ciosed-Captlondd programs.
5. REW (Rewind) Button - In the Stop mode, this
button rapidly winds the tape backwards. In the Play
mode, this button activates reverse search.
15. ON TIMER Indicator - This indicator lights up when
6. REC sutton - Press once together with the PLAY
the powered up. It also lights up when ON TIMER
button to start normal recording. Additional presses
program is turned ON while power is OFF.
activate InstantTimer Recording.
16. POWER Button. Press to turn the TV/VCR on or off. 7, MUTING Button - Press to rum off the sound. Press
17. Remote Sensor. Signals from the Remote Control
again to turn the sound back on.
are received here.
8, CANCEL Button - Press to canCel existing setups or
to restore default values.
REAR:
9, ENTER Button - Press to enter selected Setup.
10. POWER Button - Press to tam the TV/VCR on.
18. VH F/UHF Antenna Jack - Connect the 75 ohm
Press again to tom the TVNCR off,
coaxial cable from the antenna or Cabie TV service
11. COUNTER RESET Button - Used to reset the
to this jack.
counter to 00:00:00.
19. VIDEO/AUDIO IN Jacks -Audio and video signal
12. RETURN Button - Switches between the present
cables from an external source can be connected
channel and the last channai selected.
hera.
13. FF (Fast Forward) Button - In the Stop mode, this
20. VIDEO/AUDIO OUT Jacks - Used to outpJt audio
button rapidlywinds the tape forward, in the Play
mode, this button activates forward search,
and video signals to a TV, amplifier or VCR.
21, AC Power Cord - Connect to a 120V. 60Hz outlet.
14. PAUSE Button - During recording, this button
temporarily stops the tape. During playback, it stops
the tape aho dlsptays a still image on the TV screen.
15, SLEEP Button - Sets the TV to tam off automatically
after up to 120 minutes.
16, MENU Button - Press to display the On-Screen menu
function.
17. SP/EP Selector Button - Sets the tape speed for
recording.
18. Direct Channel Selection Buttons (0-9) - Allows
direct access to any channel,
19. Digital AUTO TRACKING Buttons - Allows automatic
or manual adjustment of tracking to minimize picture
noise during playback.
20, STOP Button - Press once to stop the tape.
21, CHANNEL + / - Buttons - Press the + button to
change to a higher numbered channel set into rnen_P_
Press the - button to change to a lower numbered
channel set into rnemo_
22. PROGRAM Button - Press to confirm the programmed
timer recording and ON/OFF timen
23. ZERO RETURN Button ° Use to stop the tape when
the counter reaches 00:03:00.
24, pLAY Sutton ° Press to play a prerecorded tape.
25. VOLUME ÷ / - Buttona - Press the + button to
increase, or the - buttc_nto decrease the volume lavai.
26, SET + / - Euttons - Used to select the option in the
menu or set timer recording, ON/OFF t_ner, channel
set, picture adjustment, auto repeat, clock and
language.
9
REMOTE CONTROL
(CONTINUED)
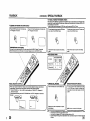
ANTENNA CONNECTIONS
If you are using outdoor antenna (outdoor antenna not included), follow the instructions below that
commpond to your antenna system, If you are using a cable TV service (CAW), see page 13 for Cable
"IV connections.
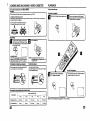
BATTERY INSTALLATION
ment
in thecompartdirection
Slide cover
the pattery
of the arrow.
H
size) batteries,
Install
two =AA"paying
(penlight
attention to the poladty
diagram in the battery compartmenL
Replace
cover,
the compadment
Combination VHF/UHF Antenna (Single 75 ohm cable or 300 ohm twin-lead wire)
Connect the 75 ohm cable from the combination VHF/
If your combination VHF/UHF antenna has a 300 ohm
transformer may be necessary,
75 OHM
COAXIAL
CABLE
_A_IONHGM_
twin-lead wire, the use of the 300-75 ohm matching
I
UHF antenna to the antenna jack.
TRANSFORMER
(not included)
BATTERY PRECAUTIONS
r
The precautions below should be followed when using batteries in this device:
1. Use only the size and type of batteries specified,
2. Be sure to follow the correct pufadty when installing the batteries as indicated in the battery comparirnent.
Reversed bederies may cause damage to the device.
3. Do not mix different types of battebes together (e.g. Alkaline and Carbon-zinc) or old pettebes with fresh
ones,
4, If the device is not to be used for a long period of time, remove the baifer;es to prevent damage or injury
from possible battery leakage.
5. Do not try to recharge batteries not intended to be recharged; they can overheat and rupture. (Folk_w
battery
manufacturer's
Combination
VHF/UHF Antenna (Separate VHF and UHF 300 ohm twin-lead wires)
•
OHM
MATCHING
TRANSFORMER
(not included)
Connect the UHF 300 ohm twin-lead wire to the
combiner (not supp4ied), Connect the VHF 300 ohm
twin-lead wire to the 300-75 ohm matching transformer, Attach the transformer to the combiner, then
attach the combiner to the antenna jack.
directions.)
EFFECTIVE DISTANCE OF THE REMOTE CONTROL TRANSMITTER
VHF 300 ohm
COMBINER
(not included)
UHF 300 ohm
Separate VHF/UHF Antennas (75 ohm VHF cable and 300 ohm UHF twin-lead wires)
COMBINER
(not included)
•
Connect the VHF 75 ohm e_,ble and UHF 300 ohm
twin-lead wire to the combiner. Attach the combiner
to the antenna jack.
0
NOTE: • When them is an obstacle between the TVNCR and the transmitter, the transmitter may not operate.
• When direct sunlight, an incandescent lamp, fluorescent lamp or any other strong light shines on the
Remote sensor of the TV/VCR, the remote operation may be unstable.
10
11
co
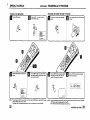
CABLE TV CONNECTIONS
SETTING LANGUAGE
This TV/VCR has an extended tuning range and can tune most cable channels without using a Caele TV converter
box Some cable companies offer "premium pay channels" in which the signal is scrambled Descrambling these
signals for normal viewing requires the use of a descrameler device which is generally provided by the cable company
This TVNCR can display the on =creen language in English, Spanish m French.
Language selection (step 3) will automatically appear on the screen when you press the MENU button
toltlally. Select language to use the other menu options.
FOR SUBSCRIBERS
H
I
TO BASIC CABLE TV SERVICE
PreSs
ress the
the SET
MENU+ or
button
- button to select the
SYSTEM SET-UP option, then press the
ENTER button
SET+
For basic cable service not requiring a converteddescramhler box,
connect the CATV 75 ohm coaxial cable directly to the antenna jack
on the back of the TV/VCR.
75 OHM
COAXIAL CABLE
Press the SEToption,
+ or -then
button
to select
the
LANGUAGE
press
the ENTER
button,
$_¢T÷
VHF
UHF
s_rI
FOR
SUBSCRIBERS
TO SCRAMBLED
CABLE
SET
TV SERVICE
_FF
/ *,_-,,_-,'P o_
• 0A_P_dT _Vl_r_ TI4E
If you subscribe to a cable TV service which requires the use of a converter/descrameler box, connect the incoming
75 ohm coaxial cable to the convett e r/descrarnbler box Using another 75 ohm coaxial cable, connect the output jack
of the converter/descramble r box to the antenna jack on the TVNCR Follow the connections shown below Set the
TVNCR to the output channel of the converter/de.scrambler box (usually channel 3 or 4) and use the converter/
descrambler box to select channels
INCOMING
75 OHM
CATV CABLE
75 OHM CABLE
'I
DESCRAMBLER
CONVERTER/
FOR SUBSCRIBERS
TO UNSCRAMBLED
SCRAMBLED
PREMIUM
CHANNELS
BASIC
I
I
TO TVNCR
CABLE
TV SERVICE
'
(_
VHF
UHF
WITH
If you Subscdbe to a cable TV senrice in which basic channels are unscrambled and premium channels require the
use of a conve rter/descram bier box, you may wish to use a signal splitter and an A/B switch box (available from the
Cable company or an electronics supp4y store). Follow the connections shown below, With the switch in the "B"
position, you can directly tune any nonscrambk3dchannels on your TVNCR. With the switch in the =A" position, tune
your TVNCR to the output of the converte r/descrameler box (usually channel 3 or 4) and use the converter/
descrarnbler box to tune scrameled channels,
Press the SET + or - button to select the
desired language: English (ENGLISH), Spanish
(ESPAi_OL) or French (FRANCAIS), then press
the ENTER button,
H
ress the
iouitontwice to return to
normal
TV MENU
viewing.
/
SET+
b_J4
7_CoO_NG
DESCRAMBLER
CATV CABLE
LITI_R
I
12
,NM,
A/B SWITC
OONVE E
SET-
75 OHM CABLE
TO TVNCR
ESpAK,
OL
m
VHF
UHF
13
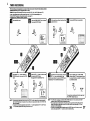
AUTO CLOCK SEI-I'ING
The Auto Clock feature enables the automatic dock selling and updating, and elso to set the Time Zone and Daylight
Saving Time by receiving XDS (Extended Data Sarv_".e) information carried on the channel signal.
YOU must set the antenna connection before the AC cord plug Is Insetted Into the AC outlet.
AUTO CLOCK
SL=I"rlNG
B
WAIT
whenthepower
switch is30
off, MINUTES!
alter the connections
of the
antenna and the power I_ug. Because the Auto
Clock selling feature is activato.
After the clock is set automatically, you may have to set
the Time Zone and Daylight Saving Time.
Press the POWER button to turn on the TVNCR after
the Auto Cleck operation compleated.
• Whe_ shipped from toctoP/, the AUTO CLOCK
option is set to AUTO poaltion.
• If you tum the TVNCR on in Auto Cfock setting, the
ctockis not set.
• Wgh cable box connec_on, if the Auto C_ockSetting
is unsuccessful,please select the PBS channel
carryingthe XDS information, then turn the TV/VCR
off. After 30 minutes, turn the TV/VCR on, and ifthe
clock is not set automa_cally,set the clock manuall_
(sae page 16.)
DAYLIGHT SAVING TIME SEI-rlNG
Youcan setthe Daylightsavingtimeautomatically
or manually.
B
Pre_
MENUthe
button.
Press
the SEToption,
+ or button the
to select
SYSTEM
SET-UP
then press the ENTER button.
___
SET+
Press
the SET
+ or
- button
select
DAYLIGHT
SAVING
TIME
option, to
then
pressthe
the
ENTER button.
SET+
SEt'-
L
TIME
_m
ZONE
SETTING
(STANDARD
PresstheSET÷or-bullonto
Press the MENU bullon.
select the SYSTEM SET-UP
I option, then press
• the ENTER button.
SET_
| TIf4ER _C
| CH_TJJp
TIME)
_r=_l_
to select th_ STANDARD
PresstheSET+or-button_
TIME option, then press the
ENTER button.
SeT*
seleotyour_meZone,
then
UelngtheSET+or-button,'_ml
press the ENTER button. I
Press
MENU
button until the
MENU the
screen
is cleared.
press the SET + or - buttunfo select one of the
optlens, then press the ENTER button. Press the
MENU button untilthe MENU screen is cleared,
$_'r +
{;LOCK
_
0_¢F
SET--
CENTP_L
N_T_:eAllerAutoC_ocksetting_ins_mecasethec_ckrnaydisplaytheothertimez_nels_Y_ucancorreotthec_ck
by selecting your Time Zone setting above.
• When the alock is not set or you set the clock manually, Time Zone setting is not available.
14
for manual setting
(forward one hour)
OFF:
for manual setting
(bock one hour)
AUTO: for automatic setting
(read XDS in the elgnai)
_J
SElf
1_4J_rAm
SET-
=
ON:
l
OFF
_UTO
_ON
When you want to set the Daylight Saving _me manuall,
on the first Sunday in Aprilyou set to =ON', and o_ the last
Sunday in October you set to "OFF_.
NOTE: •WhenshippedfromtactoPJ,
theDAYLIGHTSAVINGTIMEoptionissettoAUTOposition.
• When the clock is not set, Daylight Saving Time setting is not available,
• When there is no Daylight Saving Time in your area, always select OFF position in step 3.
15
MANUAL CLOCK SETTING
TV OPERATION
You must set the date and time manually for timer recordings, ON/OFF Timer and Daylight Saving Time If
the AUto Clock process did not _ them correctly,
EXAMPLE: Setting the clock to _8:30 AM', 23th (SAT) October, 1999.
ill
tose,thosYsTE.
SET
the to
ENTER
button,
Press option,
the SETthen
+ orpress
- bulton
seleut the
CLOCK
U
SET-Up option, then press the ENTER button.
TO
tomthe
on POWER
the TV/VCR,
press
button.
SET+
SET<-
pressingtbethe
Adjust
voiome
VOLUME
leval +by
or button. The volume Level will
be indicated on the screen by green
bar. AS the volume level increases,
so do the number of ber_ If the
volume decreases, the number of
green bar also decreases.
option
Set
thetoTV/CA'rV
the appropriate
menu
position. (See page 21 .)
[ CTVATV_ VHFL_I"FTvCChhaannnnt/_s
I
_ SET
SETi ST_VJ_
T_
-"(d_kTERMENU)
1"/
VHF
2-13
UHF
14-69
CAW
VHF
2-13
STD/HRC/IRC
t4-36
(A) (W)
VHF/UHF/CATV CHANNELS
37-59
/(_'_'-.=J.,_
I
I (_'_)=_
(zzz_I
95-99
(A-S)(A-l)
100-125
(SA)
press the SET + or - budcn
to set the month, then press
the ENTER button.
SET÷
Sat the day, year and time
as in stop 3.
After setting the clock, date an_ time"_
starts functioning automatically.
SEt-+
_
/
W
mode
channel selec0orlbuttonsto
indention Press
the direct
Direct Channel
select the channel.
When the W/CAW menu option is in the TV position,ell channels can be instantlyselected by using two
buttons, (forexample, to select chan,lts2, pre_.s"0", then "2". If you press only "2",channelselection willbe delayed for/
a few seconds.) For channels 10 and above, press the 2 digitsin order.
0
1
2
When the TV/CATV menu optionis in the CAW portion, channels P.anbe sts_t_d as to_iows:
TO SELECT CATV CHANNELS:
1-9
Press "0"twice, than 1-9 as needed. (Example, to select channel 2, press 002.)
10-12
Press "0",then the remaJning2 digits. (Example, toselect channel t 2, press 012,)
100-125
Press the 3 digits in orbed,(Example, to select channel 120, press 120.)
NOTE FOR CHANNELS 1-12:
If only 1 or 2 buttons are pressed, the corresponding channel will be selected in 2 seconds.
NOTE: • After a power lallure or disconnection of the power plug, the time display will be lost. In this case, set the
present grne again if the Auto Clock did not set correctly.
• If you want to conect the digits while setting, press the CANCEL button until the item you want to correct,
then press the SET+ or - buttonto correct the desired setting.
16
NOTE: • If a channel with no broadcast is selected, the sound will automatically be muted.
• If a station being viewed stops broadcasting, the "IV will automatically shut itself oft after 15 minutes.
17
TV OPERATION
(CONTINUED)
•UTING
SLEEP
CHANNEL+AND-
sound willbe silenced and "MUTING" will brieflyappear
on the screen. The sound can be tumed back on by
pressing this button again or one of the VOLUME + or
- buttons.
channel automatically stops at the next channel set
into memory. Press and holdthe button down to
change channels more quickl_
For prOber operation, before selecting channel_, they
should be set into the memory. See pages 21 and 22
"To memorize channels'.
urnoff alter a preset amount of time, press the SLEEP button on the remote control.
The clock will count down 10 minutes for each press of the SLEEP button (120, 110, ...1 O, 0). Alter the sleep
time is programmed, the display will appear bdefly every ten minutes to remind you that the sleep timer is
oberating. To confirm the sleep timer setting, press the SLEEP button and the remaining time will be momentedly displayed. To cancel the sleep timer, press the SLEEP button rebeated_yunti_the display toms to O,
MUTING
SLEEP
CHANNEL
CALL
TV/CAPTION/TEXT
CHANNEL RETURN
_,date, _anne_ number, real time tape counter, tape speed and VCR
operation will be indicated.
Press CALL button again to disappear the call display.
Current thne
F
/
B:47AM_JEU
CALL
F
_L
0_L_
'
01_
VCR operation
Chennel No.
Auto
Repeat
Cassette
_ Tape counter and
tapespeed
VCR operation
_lt_
:Play
<1_ :Rewind
I_
:Fast-toward
•
||
:Eject
:Recorading
: Recoradingpause
•
:Stop
the two closed caption modes (captions and full
screen text). C k_sedcapUoning will display text on th
screen for headng impaired viewers.
W/CAP
/TEXT
you te go back to the last (
(or LINE F/R) selected by pressing the RETURN
button. Press this button again to rstum to the last
channel (or LINE F/R) you were watching.
RETURN
NOTE: The Auto Repeat mark appears when Auto Repeat is selected.
Totistenthr_ughtheheadph_ne_insertahe_`dphone_notsupplied)witha1_8_miniplugint_PH_NESjackonthefr_nt_
The sound from the TV speaker is muted.
4o
I O
NOTE: eifthestationbeingviewedstepsbroadcastin!
theTVwitlshutoffalter15mleutes.
• if using an indoorantenna or if TV reception is very poor, the Closed Caption DeCOder text may not appear.
In this case, adjust the antenna for petter reception or use an outdoor antenna.
• When activating the Closed Captioned Decoder, there will be a short delay before the CLosedCaptioned
text appeam on the screen.
• Closad Captioned TV programs can be recorded and played back on a VCR with the Closed Captioned text
=ntect. The Closed Captioning text will disappear dudng Cue, Rewind and Pause modes or if the VCR
tracking le not adjumed properly.
•
to ,o
o.,y
0lsplayed
le o s.here
lsa.ai e
/
..
TV OPERATION
WHAT IS CLOSED CAPTIONING?
This television has the capability to decode and display
Closed Captioned _evision programs. Ciceed
Captioning witl display toxt on the screen for hearing
impaired viewers Or it will translate and display text in
another isnguage.
CLOSED CAPTiONiNG WITH A VCR
Closed Captioned programs can be recOrded and pioyed
beck on a VCR with the Clased Captioned text intact.
The Closed Captioned text will disapbear during Cue
(Fast Forward Search), Review (Rewind Search) and
Pause Modes or if the VCR tracking is not adjusted
properly.
TO VIEW CLOSED CAPTIONS
Press the W/CAP/TEXT betto_ on the remote control to
switch between normal TV and the two Closed Caption
Modes (C_otions and Full Screen Text).
Captions: This Closed Caption Mode will display text
on the screen in English or another language (depending o11the setting of the Closed Captions CH. Channel 1
or Channel 2).
Generally, Closed Captions in English are transmitted
on Captions Channel 1 and Closed Captions in other
languages are transmitted on Captions Channel 2.
(CONTINUED)TO MEMORIZE
Text: The Text Clased Caption Mode will usually fill the
screen with a programming schedule or other information.
After selecting a Closed Caption Mode, it will stay in
effect until it is changed, even if the channel is changed.
If the Captions signal is lost due to a comrnerciat or a
break in the signal, the Captions will reappear when the
signal is received again.
If the channels are changed, the Captions will be
delayed
approximately 10 seconds.
The Captions will appear in places on the screen where
they will least intedete with the picture, usually on the
bottom of the screen: News programs will usually show
three-line Closed Captions which scroll onto the screen.
Most other shows provide two or three lined Captions
placed near the character who is speaking so the viewer
can follow the dialogue.
Words in italics or underlined describe titles, words in
foreign languages or words requiring emphasis. Words
that are sung usually appear encto_ed by musical notes.
For television programs broadcasting with Closed Captions, look in your TV guide for the Closed Capgons
symbol (CC).
• When selecting Closed Captions, the captioning will ha deisyed approximately 10 seconds.
• If no caption signei is received, no captions will appear, but the television will remain in the Caption Mode.
• Misspellings or unusual characters may occasionally appear during Closed Captioning. This is normal with
Clased Captioning, especially with live programs. This is because dur_g live programs, captions are also
entered rive. These transmissions do not allow time for od_ng.
• "When the on-screen indicator appears during volume adjustment operation, etc., Clcaed Caption text will not
be displayed.
• Some Cable systems and copy protection systems may interfere with the Closed Captioned signal.
• If using an indoor antenna or if TV reception is very poor, the Closed CaplJonDecoder may not appear or
may appear withstrange characters or misspelled words. In this case, adjust the antenna for better reception
or use an outdoor antenna.
CHANNELS
This TV/VCR is equipped with a channel memory feature which allows channels to skip up or down to the next
channel set into memory, skipping over unwanted channels. Before selecting channels, they must be programmed
into the TV/VCR's memory. In apdidon to ngrmal VHF and UHF channels, this I"V/VCR can receive up to 11_3Cable
TV channels. To use this TV/VCR with an antenna, set the W/CAW menu option to the TV mode. When shipped
from the factory, this menu option is in the CATV mode.
W/CAW
SELECTION
D
Press the MENU button.
_=_
ress themode,
SET +then
or - press
button
to ENTER
select the
CH "_
SET-UP
the
button.
SET+
SET-
| TNERRECeel
W S_p
CH_IJJp
_IV4R0 _EF_J_T0,_F
__|
Press the SET + or - button
to select the TV/CATV mode.
Sy511_U_TJJp
Press the ENTER button
to select the TV or CA'rV
mode. The arrow indicates
the selected mode.
SET+
_MENU
20
21
TO MEMORIZE CHANNELS
AUTOMATIC
(CONTINUED)
TO ADD/DELETE
MEMORY TUNING
PresstheMENUbutton.
Press the SET + or - buttonto select the CH
SET-UP mode, then press the ENTER button.
B
CHANNELS
Pressthe MENUbutton.
to
select
CH+ SET-UP
press
thethe
SET
or - button
mode, then press the ENTER
button.
SET+
to
select
ADD/DELETE
Press
thethe
SET
+ or - butto_
mode, then press the
ENTER button.
SET+
_MENU
_MENU
| Tp,,_ RECSF"
MENU
Press the SET + or - button to sektct the
AUTO CH MEMORY mode, then press the
ENTER button. The TV will begin memorizing
all the channels available in your area.
_J
ress the MENLJ button untilthe MENU
screen is cleared.
--m Select
to be memorized
the desiredorchannel
deleted
using SET + or - button, or
using the Direct Channel Selection
buttons (10 keys, 0-9), or CHANNEL
+ or - button.
SET+
CH $E1_P
Press the ENTER buttonto
s_ect the ADD or DELETE. It Ill
youselect an unrnemo_ized
channel, the Channel indicationwill be
_ed.If you seioct the ADD mode, the
Channe_indicationchanges f_om red to
greenand thecbennelwillbe memorized.
If youselect a memorized channel, the
Channel indica_ wig be green. If you
setectthe DELETE mode, the Cbennei
indication charges from green to red
aed the channet will be beleted from the
rll_Smo/'J"
_I_Ei_1E
l
_e
Press
the
MENU
the MENU
screenbutton
is cleared.
until'
_MENU
r=ecl
SET-
22
23
PICTURE
CONTROL
ADJUSTMENTS
Picture controls are factory preset but you can adjust them individually as fallows:
COLOR
the MENU button.
Todisplaythepictureadjustrnentscreen,
prass _===_
PresstheSET+or-buttontosalectthe
PIC_TUREopUon,then
press the ENTER button.
Press the SET + or - button to select the TV
SET-UP option, then press the ENTER button.
SET÷
SET+
TINT
)utton until =COLOR"
the screen, then press the SET + or - button to
adjust the co_or intensity of the pioture. The control
should be set when calors appear norrnal in intensity
and bdlliance.
screen, then press the SET ÷ or - button to adjust the
tint of the picture. This determines how accurately the
colors are reproduced by the TV. Adjusting the tint for
natural fac_ tone is the best method of obtaining
accurate color reproduction of the entire picture.
SELF+
SET+
_MENU
SET-
O:,..-"
SET-
BRIGHTNESS
CONTRAST
SHARPNESS
RESET
rassthe
• Press the ENTER button until "BRIGHTNESS"
ENTER button until "CONTRAST _ appears _
on the screen, then press the SET + or - button toadjust
the contrast of the picture. Pictures look sharpest in
the daytime (bdght Jight) by increasing the contrast. At
night (dim light), the sharpest picture is obtained b
reducing the contrast.
_'T_
appears on the screen, then press the SET + or button to adjust the brightness of the picture. When
the SET + button is pressed, the darker portions of
the picture become lighter.
SET+
SET-
PICTURES
(CANCEL)
the CANCEL button while makin
appears on the screen, then press the SET + or button to adjust the sharpness of the picture.
adjustments will return all adjustments to the factory
preset levels.
SET+
CANCEl.
%
NOTE: TPe CONTRAST default
settingis set to rna_imum
•
at the facts_y.
NOTE: The On-screen display will disappear 6 seconds after finishing an adjustment or by pressing the MENU
button three times. The settings can only be adjusted when they are displayed on the TV screen.
24
25
TO SET THE ON TIMER
TO SET THE OFF TIMER
This festure allows you to have the TV automatically torn =ON" at predetermined time. If you program the .ON" timer
once the timer will turn "ON" the TV daily at the same time and to the same channel.
This feature allows you to have the TV turn "OFF" automatically at a predetermined time. If you program the OFF
TIMER once, the TV will be automatically tumed off at the same time daily.
EXAMPLE: Turning on the TV to channel 12 at 7:00 AM, MONDAY-FRIDAY.
EXAMPLE: Tumiog off the TV at 11:30 PM.
I
Press the SET + or - button
_
Press
SET + or
- button
ress the
the MENU
button.
to select the TV SET-UP
opflon, tben press the ENTER button.
SET+
O
to
select
ON/OFF
ER
Press
thethe
SET
+ or - TIM
button
option, then press the
ENTER button.
SET+
to°, :oaio.
ofl:
pO,
e"s:'thti
Press
- button to _m_
ress the
the SET
MENU+ or
button.
select the TV SET-UP option,
then press the ENTER button.
H
_1)_,_
ENTER button.
SET
SET
+
4-
toress
select
thethe
SETON/OFF
+ or - button
TIMER option, then press
the ENTER button.
SET+
|h
_ iTM _P
SET-
•
SET_
",I_RFE
_Et,
Press the SET + or - button
to set the desired hour, then
press the ENTER button.
8L=T+
Set the desired minute,
Press the SET + or - button •
channel and day of the week
•
to select the SET mode, then
_[e'l
press the MENU button until
as in step 4, then press the
ENTER button.
the MENU screen is cleared.
SET+
SET+
toress
select
OFF
thethe
SET
+ orTIMER
- button"
option, then press the
ENTER button.
SET+
_j
I_'R
Ul
J
SE T -
FJ resstho0ET.or-0utton
ressthe0ET+o
igI -butt
to set the desired hour, then
press the ENTER button,
SET+
Press the SET ÷ or - button_
to select the SET mode, the_
press the MENU button until
the MENU screen is cleared,
to set the desired minute, then
press the ENTER button.
SET+
_,
_.-j./
SET-
_
SET-
_ _1__c_°1_
O_r_
SeT-
_gr
_
_-M-
NOTE: "The TV will automatically turn off approximately 1 hour later after the ON TIMER toms on the TV. If you
wish to continue watching the IV, press any button to cancel the one hour automatic shut off. This shut off
feature prevents the TV lrom playing continuously if no OFF TIMER is set.
• To cancel the ON TIMER function; To cancel ON timer, follow above steps 1-6, then press the ENTER
button to select the CANCEL position. Press the MENU button to return to the "rv.
• After setting the ON TIMER, "ff" of the OFF TIMER will flash on and off. If you wish to set the OFF TIMER,
press the ENTER button then fellow the steps 4-6 on peg• 27.
• If yoo want to correct the digits whPe setting, press the CANCEL button until the item you want to
con,=, then press the SET + or - button to correct the desired setting.
6
ENU
SET-
_m
_ER
_x
NOTE: • If a station being viewed stops broadcasting, the TV will automatically shut itself off after 15 minutes.
• To cancel the OFF TIMER function:
To cancel OFF timer, follow above step 1-5, then press the SET + or - button to select the CANCEL position.
Press the MENU button to rstum to the TV.
• TO ¢onltrm the ON/OFF TIMER:
Press the PROGRAM button twice to indicate the programes on the sccreen.
27
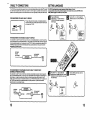
LOADING AND UNLOADING A VIDEO CASSETTE
PLAYBACK
Use only video cassette tapes marked _
To play a prerecordedtape.
and S_.
LOADING
TO START PLAYBACK
Push the center of the tape until it is automatically retractsd into the TVNCR.
AUTOMA'RC POWER ON AND PLAY
When loading a cassette tape without the erase prevention tab intact, the TV/VCR will turn on automatically
and p_aybackwill start immediately.
Totorn ontheTVNCR, pressthe POWERbutton,
cassette
Load
a prerecorded
tape without
tape.
the erase
(Whenprevention
loading a tat
playback will start automaticaity.)
Insert the cassette with its labeled side facing you.
An inverted video cassette cannot be inserted.
UNLOADING
Pull the cassette out.
EJECT
button
on the
TVNCRpress
twice.
first
o unload
a video
cassette,
theThe
STOP/
mr..iD!
press will stopthe tape in any mode. "me second
press wiJI eject the tape.
_1
S_Op/EJECt"
AUTOMATIC EJECT
If the TVNCR automatically rewinds thetape to the
beginning (AUTO REWIND FEATURE), the tape will
be ejected automatically. (See NOTE on page 34.)
TO PREVENT
ACCIDENTAL
NOTE: • Always eject the tape when not in use.
• The cassette tape can be ejected even if the
POWER is "OFF".
TO RECORD AGAIN
ERASURE
rafter recording, break off the erase prevention tab if
you do not wish to record over the tape.
Cover tbe hole with vinyl tape.
Be careful the tape does not extend past the edges of
the video cassette housing.
TO STOP
Press the PLAY buifon th beg_ playt_d_
=I_ "wiUabpear _ _,_eso'cert.
PLAYBACK
press the STOP button once. The ta
remain fully loaded and ready to play.
%
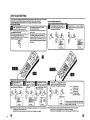
TAPE
SPEED
AND
MAXIMUM
RECORDING
_r
TIME
VIDEO CASE3"FE TAPE
%160
T-120
T-90
T-60
T-30
2-2/3 hours
2 hours
1-1/2 hours
1 hour
30 minutes
8 hours
6 hours
4-1/2 hours
3 houm
1-1/2 hours
NOTE: This TV/VCR selects the tape speed SP or EP automatically.
SP (Standard Play)
LEP (Extended Play)
28
29
PLAYBACK
(CONTINUED)
SPECIAL PLAYBACK
TO REWIND OR FORWARD THE TAPE RAPIDLY
rPressthe REW(Rewind)buttonin theStopmode.
* <4" will appear on the screen,
TO VISUALLY
SEARCH
FOR DESIRED
POINTS
When either the FF or REW button is pressed in the PLAYBACK mode, the speed search picture will appear. When
pressed twice, the search picture will increase speed. Speed search time depends upon the speed used (SP or EP)
during recording. See chart below.
To rewind or fast forward a tape, press the STOP button, and then press the REW or FF button.
PresstheFF (FastFoP_/ard)
buttonin theStopmode. •
To visually
"_." will appear on the screen.
once or twice
search
backward,
press the REW
in the PLAYBACK
To visually search forward, press the FF buSon once
or twice in the PLAYBACK mode.
button
mode,
%
FORWARD/REVERSE PICTURE SEARCH
If you want to see the tape dudng REW (FF) mode, press and hold the REW (FF) button. The backward
_forward)
%
Press the PLAY button to resume normal viewing
speed.
Press the PLAY button to resume normal viewing
speed.
visual search picture will be seen on the screen. Release to return to the REW (FF) mode.
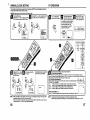
SPEED
SEARCH
_'_
TIMES
\
PICTURESEARCHSPEED
_
PRESS
ONCE
SP (Standardplay)
3X
_P (Extended
Play)
9X
PRESS
TWICE
\
5X
,0x
•
o
_
TO WATCH
STILL
PICTURE
j;
x
ACK)
/
igital AutoTracking system automatically adjusts the 1_king to obtain the best
pessil_e picture. If noise bars appear during playback, adjust the tracking manuatiy as follows:
• Press the TRACKING + or - buttonfo obtain the pest possible picture. "MANUAL TR." will appear for 4
second6 on the screen.
To resume automatic tracking, press the AUTO TRACKING buban. =AUTO TR." will appear for 4 seconds on
the screen.
Press the PAUSE button in the PLAYBACK mode.
You can play back the video casseSe tape recorded
in the S-VHS system. However the played back
picture does not have the high resolution of S-VHS
system.
--&UTO
Press the PLAY buSon or PAUSE buttonto resume
nom_al pdayback.
30
NOTE: °
•
•
•
NOTE: You can not record in S-VHS system,
Best resultsduringspeed search and still playbackcan be obtained with video cassettes recorded in the "EP"mode.
The audio output is muted during Speed Seamh and Still.
A few noise bars willappear on the 1_/screen duringSpeed Search and Still.
To wevent damage to the tape, Stql aod Speed Search mode is automatically changedto tbe Playbackmode atter
5 mioutes.
31
SPECIAL PLAYBACK
(CONTINUED)
RECORDING A TV PROGRAM
RECORDING AND VIEWING THE SAME TV PROGRAM
TO WATCH A TAPE REPEATEDLY
U
PresstheMENUbutton.
Press the
SET +option.
or = button to select the
AUTO
REPEAT
I;11
To tom on the TV/VCR, press the POWER
button,
""
Load a cassette tape with the erase prevention
tab intact.
SET+
f.......
l
MENU
SET-
-ii_L.CH
A_0SETUP
REP_J_TO_ bOFF
(*/_IENTEP_IENU>
i_
PresstheENTERbutton
to selectthe ON
position,
_J
Press the
button.
youand
press
theuntil
PLAY
button,
theMENU
tape will
play If
over
over
the •
repeat mode is canceled.
Press the SP/EP button to select the desired
tape speed (SP or EP). =SP" or "EF_ will
appear on the screen for 4 seconds.
Set the TV/CA'P,/option to the appropdata
position. (See page 21 .]
SP/EP
MENU
S 1_4ERRECSET
I/vs_r_Jp
-|
%
RE.AT _0N OFF
NOTE: _T_cancelrepeatm_de_fo"_wab_ves_eps1and2_then_resstheENTERbutt_ntosetectthe_FFp_siti_n_NOTE: u _fp_werisswtiched_dutingrec_rding_theTVsetg_es_andtheVCRc_ntinuesto_ec_rd_Pressthe
pressthe MENUbuttonto returnto theTV.
STOPbuttonto haltthe recordingandtom off theVCR,
• The repeatfunctionis canceledautomatically
whentheunitLsswitchedoffor thetapei_ejected.
• TheTV/VCRChannelcannotbe changedduringrecording.
32
CONTINUE
NEXT
PAGE
33
RECORDING
A TV PROGRAM
(CONTINUED)INSTANT
TIMER RECORDING
(ITR)
The Instant Timer Recording feature provides a elmF4e and convenient way to make a Umed recording.
EXAMPLE: Instant diner recording for 30 minutes.
select
the channel
to be recorded.
ress the
Direct Channel
Selection buttons to
(Example: Channel 12)
Or press the CHANNEL + or - button to select
the channel to be recorded.
m_
O
1
2
Ill
Press the REC and the PLAY button
simultaneously.
The REC indicator will light.
B
POWER
button
toress
tom the
on the
TVNCR.
Loadthe
a video
with
erasecassette
prevention
tab intact.
select
Press the
theSP/EP
desired
button
tape
to"
speed (SP or EP). SP or EP
will appear on the screen for 4
seconds. (See page 28 for more
information on tope usage.)
%%
SP/EP
%
nOm
/\
[]
TO STOP RECORDING
TEMPORARILY
TO STOP
unwantedmaterial.
"II" wilt appearontheScreenand theRECindicatorwilJblinkonand off
Pressthe PAUSE buttonto continuetherecording.
RECORDING
"_Pressthe STOP button to stop
recording.
•
Set the W/CAW option
to the appropriate setting.
STOWEJECT
Press the Direct Channel
Selection buttons to select
the channel to be recorded,
(Exampto: Channel 12) Or press and
release the CHANNEL + or - button.
(See page 17.)
I CATV
TV
- CABLE
VHF/UHFTV channels
channels
/
buttons
simultaneously
to •
ress the
REC and PLAY
begin recording. Press the
both buttons again to stop recordin!
after 30 minutes. Each additional
press of the both buttons wifl
increase recording time as shown
below, up to a maximum of 5 hours
"ITR" will appear on the screen.
_11
•
NOTE:
The PAUSE mode will be changed to STOP mode after live minutes to
_ prevent damage to tha tape.
#
NOTE: • AUTO REWIND FEATURE
ThLs"rVNCR will automatically rewind the video cassette when the tape has ended (except during ITR and
$
34
• If the erase preventio_ tab is removed, the tape will eject when beth the REC button and PLAY button are
pressed for recording.
NOTE:
_
• Press both the RECbuttonandthePLAYbuttontoincreasetheltmeneeded
below.)
_
NORMAL REC
0:30
1:00
1:30
2:00
• To cancel Instant "limer Recording, press the STOP button.
• The TVNCR charnel cannot be changed during recording.
3:00
for recording,(Seethechatt
4:00
5:00
NORMAL REC
O_
°
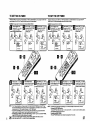
TIMER RECORDING
Timer record_g can be ixogrammed on-screen with the remote control. The butit-ln timer agow$ automtlc
unattended recording of up to 8 programs within 1 month.
EXAMPLE: Program a timer recording for 23th day, channel 007 (CATV), 7:00 - 9:30 PM (Tape speed : EP)
• Load a video cassette with the erase prevention tab intact. The TV/VCR wtil automatioally tom on.
• Set the "iV/CATV sek_tion to the appropriate position. (see page 21 .)
• See page
U
9 and 10, REMOTE
Press the
MENU
CONTROL
Operation.
Checkpress
the TIMER
REC button.
SET option is seleced
then
the ENTER
burton.
D
Set the start time, end time, channel and tape
speed as in step 4.
[,1
Press the ENTER burton to accept them.
SET+
_ENU
_
ENU
I CHS_T_P
| AUT0 RE.AT
_'/"_
_
P._SET
O_ =0_-
| 8YSlTM _T_
Press the SET + or - button to select the
PROGRAM position, then press the ENTER
burton.
SET+
_J
resspress
the SET
or - button
to select the date
then
foe +
ENTER
button.
See page 38 for the Daffy/Weekly Timer.
SET÷
To
foruntil
another
program,
SETset÷ the
or -timer
button
the position
Of press
foe the
second program blinks, then press the ENTER burton,
Repeat steps 4 to 6 to set the second program,
Press the TIMER burton. The REC TIMER
indicator will light. The Timer isprogramed, when
the programmed time is reached, the recording
is automatically started.
TIMER
TI4EA REC _=T
SET-
_TE -_
RECTIMER
_0_
/\
To cancel timer recording, press the burton agsJn and
REC TIMER indicator willgo out.
NOTE:
fJl_
OO
• If programming is pedormed without a tape in the "rv/VCR, or with a tape without an erase prevention
tab, the "rimer Recording is not possible. If a tape without an erase prevention tab is in the TVNCR, the
tape will be ejected.
• To record from the extema_ equipment press the SET ÷ or - burton repeatedly until "L-F" (Line-Front) or
"L-R" (Line-Rea_) appears when setting the channel _nstep 5.
NOTE: • The VCR sec6on cannot be used while the REC TIMER indicator is lit. If you want to use the VCR
operation, press the TIMER button to deactivate foe timer.
• After a power fa_ure or disconnection of the power piog, all programmed recordingserting and time
display will be lost ugo_ resumption of power. In this case, reset the clock (see poges 14-16.) and
reprograrn any timer recordings.
4rob
IIR!
If yOU want to correct the digtis while setting, press the CANCEL burton untilthe item you want to
_'_/"
correct, then press the SET + or - button to correct the desired setting.
OTHER
FUNCTIONS
TO SET DAILY/WEEKLY
FOR THE TIMER RECORING
TO CANCEL
TIMER
PWhen seffing the Pate in the step 4 on page 36, press the SET - button repeatedly when the current pay IS
displayed.
The setting changes as follows;Example
The currentday (Friday)
--*
A PROGRAM
Press the SET + or - button to select the TIMER REC SET option in the MENU, then press the ENTER button. •
Press the SET + or - button to selid the unnecessary program, and press the CANCEL button to cancel the
program.
SUN-SAT (Sunday to Saturday)
One monthliter minusone day
MON-SAT (Monday to Saturday)
WKL-WED (Weekly Wednesday)
MON-FRI
WKL-TUE (WeeklyTuenday)
WKL-THU (WeeklyTbursday)
WKL-MON (Weekly Monday)
WKL-FRI
CANCEL
(Monday to Fdday)
%
(Weekly Friday)
t
WKL-SUN (Weekly Sunday)
<--
WKL-SAT (Weekly Saturday)
Alter setting, press the ENTER button.
TO CONFIRM
THE
IF THE PROGRAM
SEI-rlNGS
{PROGRAM CONFIRM) button once. The TV screen displays the timer program list.
Press the PROGRAM button again. The TV screen displays the ON/OFF timer setting,
PROGRAM
(once)
(twice)
%
press the PROGRAM button 3 times. The screen returns to the norrnaJscreen,
(3 times)
[
OVERLAPS
ANOTHER
_NOTE: Donot overlap programsas portionsofthe conflicting
programswillbe lost. The firstrecordingtime has*
priorityoverthenextrecording_meas shownin the diagram.
1
8:00
9:00
-'F==t
Program2
_
I
Recording
Program3 _
CentroJSettings
_
_
10:00
I
11:00
I
Deleted Psrts
Prog_2
NoeRecorded
P0_tlon
Pa.'=Prog_3
NOTE: • The everyday/every week recording can be made continuously until the recording is canceled or the tape
reaches the end.
• During timer recording, the automatic rewinding mechanism does not function.
• You can correct or cancel the programmed set_ng in program confirm mode.
38
39
I%1
USING THE REAL TIME TAPE COUNTER
USING ZERO RETURN
The Co-Screen Real "rimeTape Counter shows the tape running t_ne in Hours, Minutes and Seconds.
You can easily determine how long the tape has been running or how much time is le0 on the tape.
The zero reture function provides a convenient method of rapidly returning to the starting point of recording or
playback. The starting point can be indexed for any location on the tape by pressing the COUNTER RESET button
and COUNTER ZERO RETURN button.
TO VIEW
B
THE
COUNTER
DISPLAY
ressCounter.
the CALL butthnto display the Real T_me
Tape
B
CALL
COUNTER
RESET
button to set
the the
counter
Before playback
or recording,
press
to "00:00:00".
___
CALL
RESET
%
Press the CALL button to display the counter.
%
COUNTER --_
RESET
COUNTER --_
1B
Begin Playback or Recording to start the tape,
the counter will display the elapsed time.
Press the STOP button.
_J
henpress
you wish
to make
the countar
disap*
pear,
the CALL
burton
once again.
Begin playback or recordiog.
_,g_ll
button.the
Press
TheZERO
tape will
RETURN
rewind•
and automatically stop at
the "00:00:00" position.
ZERO
%or%÷%
NOTE:
40
CALL
%
%
COUNTER
_u
• If you rewind the tape from "00:00:00", a minus sign (=-") will be displayed in front of the time.
• When you load a tape, the counter will reset to "00:00:00 _.
• The counter does not function on nonrecorded (blank) sections of the tape. When you rewind,
fast forward or play tapes through blank sections, the counter stops.
41
DUPLICATING
A VIDEO TAPE
RECEPTION
If you connect the TV/VCR to another VCR or CAMCORDER,
Mako all conneoflons before turning on the power.
you can duplicate a previously recorded tape.
_i_
PresstheINPUTbuttontwiceselectAUDIO/
VIDEO
input position, The "LINE P' will appear
on the screen.
Insertablankcassettewiththeeraseprevention
tab intact into the TVNCR.
Insert a previously recorded cassette into the
playback VCR or Camcorder.
_
BEackspots or horizontal streaks may appear, the picture may flutter or
drift. Usually caused by intedemnce from automobile ignition systems,
neon lamps or AC powered tools and appliances such as drills or hair
dryers.
NOTE: You can also use the rear AUDIONIDEO IN
Jacks. Select "UNE R" by pressing the INPUT
button.
TO ANOTHER
VCR
RECORDING
_/NCR
GHOSTS
#
CONNECTION
TO CAMCORDER
ForduplicaUnga previouslyrecordedtape from 8 camcorder.
follow the carncordermanufacturer's instructions. A typical
camcorder dubbing hookup is shownbak)w.
RECORDING
_
AUDI_3/tD
VIOE ,
I_
AUOIO
IN
EO CORD
_To
AV JaCl_
i
I
AUDIO/VIDEO
SNOW
If the T'V/VCR is located far from the TV station, in a fringe reception
area where the signal is weak, small dots may appear in the picture.
If the signal is extremely weak, the installation of a larger external
antenna may be necessary.
VIDEO
OUT|
CORD
(NOT
SUPPUED)
_OE_AU_OIN
PLAY button simultaneousl _r_
on the remote control or the
REC button
Press on
the the
REC TV/VCR,
buttonandthen
th
the PAUSE button.
playback
Press the VCR.
PLAY Button on tba
_1
Press
on
the the
TVNCR
PAUSE
to begin
button _
the duplicating process.
%
NOTE:
• It is recommended that the tape speed be set to the SP mode on the TVNCR for best results.
• Unauthorized recording of copyrighted television programs, films, video cassettes and other materials may
infringe the rights of copydght owners and be contrary to copyright laws.
42
Ghosts are caused by the television signal following two paths. One is the
direct path and the other is reflected by tall buildings, hills or other large
objects. Changing the direction or position of the antenr_ may improve the
r(_cepfion.
W/VCR
pLAyBACK
CAMCOROER
I_PLAYBACKAuDtO
ouTVCR
Most types of television Interference can he remedied by adjusfing the height end poaltion of the VHF/UHF
antenna. Outdoor antennas are recommended for best resulth. The most common types of talevlalon interference are shown helow. If one of these symptoms appear when the WNCR is connectad to a Cabta TV sy_em,
the disturbance may he caused by the local Cable W company broadcast.
IGNITION
INPUT
CONNECTION
DISTURBANCES
RADIO FREQUENCY INTERFERENCE
(RFI)
Caused by two-way radios, this type of interference produces moving
ripples or diagonal streaks in the picture. Some cases may cause a loss of
contrest in the picture. Changing the direction and position of the antenna
or installing an RFI filter may improve the picture.
PICTURE SIZE VARIATION
A slight picture size variation is normal when you adjust the CONTRAST or
BRIGHTNESS settings.
CARE AND MAINTENANCE
To prevent fire or shock hazard, disconnect the TVNCR from the AC power source before cleaning.
The finish on the cabinet may be cleaned with mild soap and a soft, damp cloth and cared for as ether furniture. Use
caution when cleaning or wiping the plastic parts.
43
TROUBLESHOOTING
Check the following
chart
SYMPTOMS
POWER
GUIDE
before requesting
I
service.
CAUSE
J
POSSIBLE SOLUTIONS
JPAG_
•
SYMPTOMS
CAUSE
POSSISLE SOLUTIONS
PAGE
TV station stopped broadcasting.
Tune new channel.
17
Sleep timer is set.
Set Sleep "nmer to "0".
19
TV shuts off.
No power.
The AC power cord is not connectsd.
Although the power is on,
the TV/VCR does not
operate.
11/BROADCAST
Poor or no color.
Picture wobbJesor drifts,
NO CA.IV reception,
NO reception above
channel 13.
•
44
7
Cassette is not insetted.
Insert a video cassette.
28
TIMER button is depressed.
Press the TIMER button.
37
RECEPTION
Poo_ror no picture,
Poor or no sound,
Connect the AC power cord to the
AC ouUet.
Closed caption is not
activated.
TV station experiencing problems.
Try another channel.
Ploture control is not adjusted.
Check picture contral adjustments.
Possible local interference.
Check for source of reception
disturbance.
43
Antenna (CATV) connector is not
connected or possible local
interference,
Check CATV connection or
VHF/UHF antenna, reposition
or rotate antenna.
11,12
TV station expadencing pvobalms.
Try another channel,
Picture control is not adjusted.
Check picture control adjustments. :24, 25
Possible local interference,
disturbance.Check
for source of reception
Antenna (CA.IV) connector is not
connected or possibts local
interference,
Check CA.IV connection or VHF/
UHF antenna, repostiion or rotata
antenna.
TV station expahencing problems.
Try another channel.
Antenna (CATV) connector is not
connected or possible tscal
interference,
Check CAW connection or VHF/
UHF antenna, repocitionor rotate
antenna.
Cabis "iV channel is scrambled.
Try another channel.
17
CA.IV connector is not connected.
Check aJl CA.IV connections.
12
.IV/CAW Mode menu option is set to
the TV mode,
Set the .IV/CA.IV Menu option
to the CATV mode.
21
Cable TV service interrupted.
Contect your Cable "rv company.
12
.IV/CAW Mode menu option is not
set to the appropriate mode.
Make sure .IV/CA.IV menu option
is in the appFopdats mode.
21
UHF entenna is not connected.
Check UHF antenna.
11
"iv station experiencing probisms,
Try another channel.
Antenna (CA.IV) connector is not
connected or edssibis local
interference,
Check CATV connection or VHF/
UHF antenna, repositionor rotate
antenna.
Possible k_al interference.
Check for source of reception
disturbance.
MUTING button is depressed.
Check that MUTING button has
not been pressed.
TV station experiencing problems or
program tuned is not closed
captions.
Try another channel.
17, 1.¢
TV signal is weak.
Check CA.IV connection of VHF/
UHF antenna, repoaltion or rotate
antenna.
11, 1;
The TV/CAP/TEXT button is not
dspmssed.
Press the W/CAP/TEXT button to
turn on the closed caption.
1g, 2C
The video cassette's erase
_revention tab is broken off.
Place a piece of vinyl tape over
the hole,
The time is not set correctly.
Reset the present time.
14-16
The recording stsrt/end time is not
set correctl)_
Reset the sfart/end time.
36, 37
The TIMER button has not been
pressed (the REC TIMER indicator is
not lit-).
Press the TIMER button {the REC
TIMER indiCatOr is lit.).
37
Tape is o_dor worn,
Reptsce the tape.
--
Tracking adjustment is beyond range
Adjust tracking manually usthg
the TRACKING + and - buttons
on the remote control
30
of automatic tracking circuit,
Video heads are dirt_
Clean the video heads.
46
The remote control is not aimed at
the sen_',of.
Aim the remote control at the
remote sensor.
10
17
24,2_
RECORDING
"rv recording does not
work.
t7
Timer recording does not
work.
43
11, 12
17
28
PLAYBACK
Noise bars appear on the
=screen.
11, 12
REMOTE CONTROL
Distance is too far or too much light
in the room.
Remote control does
not oparats.
17
Operate within 15 feet or reduce
! the light of the room.
10
There is an obstacts in the path of
the beam.
Clear the path of the beam.
10
The battedes are weak.
Reptsce the batteries,
10
The batteries am not inserted
coneofly.
insert correctly,
10
11, 12
43
18
•
45
VIDEO HEAD CLEANING
SPECIFICATIONS
VIDEO HEAD CLOGGING
The video heads are the means by which the TVNCR reads the picture from the tape during playback. In the
unlikely event that the heads become dirty enough to be clogged, no picture will be played beck. This can easily be
determined if, during playback of a known good tape, there is good sound, but no picture (picture is extremely
snowy). If this is the case, have the TV/VCR checked by qualified seP..tcepersonnel.
TELEVISION
PictureTube:
Tuner Type:
Receiving Channels:
Antenna Input:
Speaker:
Audio Output Power:
Good Picture
13" (measured diagonally)
Quartz PLL Frequency Synthesized
VHF
2-13
UHF
14-69
CATV
14-36 (A)-(W)
37-59 (AA)-(WW)
60-85 (AAA)-(ZZZ)
86-94 (86)-(94)
95-99 (A-5)-(A-1)
100-125 (100)-(125)
01 (5A)
VHF/UHF In 75 ohms coaxial
1.5" x 2,5", 8 ohms x 1
1.5W
Snowy Picture
VIDEO HEAD CLEANING
AUTO HEAD CLEANING system cleans the video heads automatically when a cassette is inse_ed or ejected to
prevent dirt from accumulating on the heads. However, manual head cis_niog is needed if the picture on playttack is
still unclear althOugh the picture on program is normal. This failure signifies that the head is getting dirty and occurs
when playing poor quality or damaged tapes. If the heads require cleaning, use a high qualify head cleaning system
or have them cleaned professionally.
VCR
Video System:
Video Signal:
Cassette Tape:
Audio Track:
Tape Speed:
F.FWD/REW 13me:
Speed Search:
NOTE: • DO NOT ATTEMPT TO CLEAN THE VIDEO HEADS OR SERVICE THE UNIT BY REMOVING THE REAR
COVER.
• Video heads may eventually wear out and should be replaced when they fail to produce clear pictures.
• To help prevent video head clogging, use only good quality VHS tapes. Discard worn out tapes.
GENERAL
Power Source:
Power Consumption:
Dimensions:
Weight:
Inputs/Outputs:
Storage Temperature:
Operating Temperature:
VHS, 4 Rotary Heads Helical Scanning System.
NTSC Color
VHS
1 Track
SP: 33,35 mm/sec
EP: 11.12 mm/cec
F,FWD: Approx. 2 minutesand 15 seconds
REW: Approx. 1 minuteand 48 seconds
(T-120 Cassette)
SP 3 & 5 x Normal Speed
EP 9 & 15 x Normal Speed
AC 120V 60Hz
70 Watts
W 14 1/4" x D 14 1/2" x H 15 1/16"
26 Ibs
Video:
In (RCA) 1Vp-p 75 ohm
Out (RCA) 1Vp-p 75 ohm
Audio: In (RCA) 300 mV/50K ohm
Out (RCA) 300 mV/1K ohm
-20°C to 60°C (-4°F to 140°F)
5°C to 40°C (41°F to 104°F)
Accessories:
Remote Control
Batteries (AA) X 2
Specificationsare subject to change without notice.
46
47
LOCATION
OF
CONTROLS
FRONT
REAR
\
f
2
3
4
5
\U
/l
L
/
8
9
10
11
12
13 14
6
20
21
/
15
16
DESCRIPTION
FRONT:
1. Cassette Loading Slot - To insertor remove a
video tape.
2. REC / ITR Button - Press once to start normal
recording. Additional presses activate Instant "13mer
Recording.
3. REW (Rewind) Button -'In the Stop mode, this
button rapidly winds the tape backwards. In the Play
mode, this button activates reverse search.
4. PLAY Button - Press to play a prerecorded tape.
5. FF (Fast Forward) Button - In the Stop mode, this
button rapidly winds the tape forward. In the Play
mode, this buttonactivatesforward search.
6. STOP/EJECT Button - Press once to stop the tape
in any mode. Pressagain to eject the tape.
7. Headphone Jack - Plug monauralheadphones or
an earphone with an 1/8" miniplug intothis jack for
privatelistening.
8. AUDIO/VIDEO IN Jacks -Audio and video signal
cables from an extemal source can be connected
here.
9. INPUT Selector Button - Switches the programfor
viewing between the VCR and an external input
SOUrCe.
10. SP/EP Selector Button - Sets the tape speed for
recording.
26
18 19
17
OF CONTROLS
11. CHANNEL +/- Buttons - Pressto select a channel
for viewingor recording.
12. VOLUME +/- Buttons - Pressto raise or lowerthe
volumeof the sound.
13. REC Indicator- Lightswhen the'I'VNCR is recording.
14. REC TIMER Indicator - This lightswhen the TIMER
buttonis pressed.
15. ON TIMER Indicator -This indicatorlightsup when
the powered up. It also lights up when ON TIMER
program is turned ON while power is OFF.
16. POWER Button - Pressto turn theTV/VCR on or off.
17. Remote Sensor - Signalsfrom the Remote Control
are received here.
REAR:
18. VHF/UHF Antenna Jack - Connect the 75 ohm
coaxial cable from the antenna or Cable TV service
to this jack.
19, VIDEO/AUDIO IN Jacks -Audio and video signal
cables from an external sourcecan be connected
here.
20. VIDEO/AUDIO OUT Jacks - Used to output audio
and video signals to a "I-V,amplifier or VCR.
21. AC Power Cord - Connect to a 120V, 60Hz outlet.
REMOTE
CONTROL
2
3
20
?
21
8
15
9
16
DESCRIPTION
1. TIMER Button - Used to set the TVNCR to start
recordingat a preset time.
2. INPUT Selector Button - Switches the program for
viewingbetween the VCR and externalinputsoumes.
3. CALL Button - Displaysthe presenttime/day of the
week, channel,counter,speed selection(and VCR
mode if VCR is playing)on the "IV screen.
4. TV/CAPFFEXT Button - Switches between Caption,
Textand TV modes for Closed-Captionedprograms.
5. REW (Rewind) Button - In the Stop mode, this
button rapidlywinds the tape backwards. In the Play
mode, this button activates reverse seamh.
6. REC Button - Press once togetherwith the PLAY
button to start normal recording.Additionalpresses
activate InstantTimer Recording.
7. MUTING Button - Press to turn off the sound. Press
again to turn the sound back on.
8, CANCEL Button - Press to cancel existingsetupsor
to restoredefault values.
9. ENTER Button - Press to enter selected setup.
10. POWER Button - Press to turnthe TV/VCR on.
Press again to turnthe TV/VCR off.
11. COUNTER RESET Button - Used to resetthe
counterto 00:00:00.
12. RETURN Button - Switchesbetween the present
channel and the last channel selected.
13. FF (Fast Forward) Button - In the Stop mode, this
button rapidlywindsthe tape forward. In the Play
mode, this buttonactivatesforward seamh.
OF CONTROLS
14. PAUSE Button - During recording,this button
temporarilystops the tape. Duringplayback, it stops
the tape and displaysa stillimage on the "IV screen.
15. SLEEP Button - Sets the TV to turn off automatically
alter up to 120 minutes.
16, MENU Button - Press to display the On-Screen menu
function.
17. SP/EP Selector Button - Sets the tape speed for
recording.
18. Direct Channel Selection Buttons (0-9) - Allows
directaccess to any channel.
19. Digital AUTO TRACKING Buttons - Allowsautomatic
or manualadjustmentof trackingto minimizepicture
noiseduring playback.
20. STOP Button - Press once to stop the tape.
21. CHANNEL + / - Buttons - Pressthe + buttonto
changeto a highernumberedchannelset intomemory.
Press the - buttonto change to a lower numbered
channel set into memory.
22. PROGRAM Button - Pressto confirmthe programmed
timer recordingand ON/OFF timer.
23.ZERO RETURN Button - Use to stopthe tape when
the counterreaches 00:00:00.
24. PLAY Button - Pressto play a prerecordedtape.
25.VOLUME + I - Buttons - Press the + button to
increase, or the - buttonto decrease the volume level.
26. SET + / - Buttons - Used to selectthe optionin the
menu or set timer recording,ON/OFF timer, channel
set, picture adjustment, auto repeat, clock and
language.
27
JVC °
JVC COMPANY OF AMERICA
Division
of U.S.JVC CORP.
1700 ValleyRoad
Wayne, New Jersey07470
5500101A
[]
99/03
28
JVC CANADA, INC.
21 Finchdene Square
Scarborough, Ontario
Canada M1X 1A7
O
PRINTED IN THAILAND