1
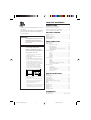
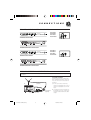
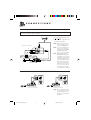
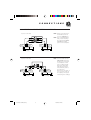
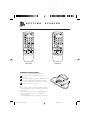
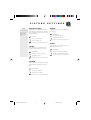
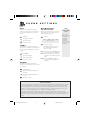
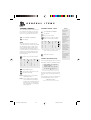
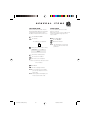
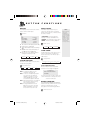
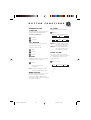
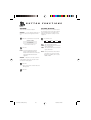
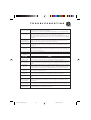
COLOR TELEVISION AV-21D33 AV-20N33 AV-14F33 AV-21D13 AV-20N13 AV-14F13 INSTRUCTIONS LCT1205-001A-H 0702-NV-JMT LCT1205-001A-H_Cover 3 2002 VICTOR COMPANY OF JAPAN, LIMITED 15/7/2002, 11:37 TABLE OF CONTENTS 2 CONNECTIONS Thank you for purchasing this JVC color television. To ensure your complete understanding, please read this manual thoroughly before operation. WARNING: TO PREVENT FIRE OR SHOCK HAZARD, DO NOT EXPOSE THIS APPLIANCE TO RAIN OR MOISTURE. CAUTION: TO ENSURE PERSONAL SAFETY, OBSERVE THE FOLLOWING RULES REGARDING THE USE OF THIS TV. 1. Operate only from the power source specified on the TV. 2. Avoid damaging the power plug and power cord. 3. Avoid improper installation and never position this TV where good ventilation is unattainable. When installing this TV distance recommendations must be maintained between the floor and wall, as well as installment in a tightly enclosed area or piece of furniture. Adhere to the minimum distance guidelines shown for safe operation. 15 cm Front & Rear Panel Diagrams ............................... 3 Indoor Antenna Connection.................................. 3 Connecting the Antenna and VCR ........................ 4 Connecting other External Devices ....................... 4 GETTING STARTED Remote Controls .................................................... 6 Power ................................................................... 7 Adjusting Volume ................................................... 7 Changing Channels ............................................... 7 SETUP TOUR ......................................................... 8 MENU FUNCTIONS Using the Menu ...................................................... 9 Initial Setup Auto Tuner Setup ..................................... 10 Background ............................................. 10 Closed Caption ........................................ 10 Language (for on-screen menus) ........... 10 Noise Muting ............................................ 10 Picture Settings Tint ........................................................... 11 Color ........................................................ 11 Picture ...................................................... 11 Bright ....................................................... 11 Detail ........................................................ 11 Sound Settings Bass ......................................................... 12 Treble ....................................................... 12 Balance .................................................... 12 MTS (Multi-channel TV Sound) ................ 12 Some Sound Advice ................................ 12 General Items Set Clock ................................................. 13 On/Off Timer ............................................ 13 Channel Summary ................................... 14 Set Lock Code ......................................... 15 Child Lock ................................................ 15 BUTTON FUNCTIONS 10 cm 10 cm 15 cm 4. Do not allow objects or liquid into the cabinet openings. 5. In the event of a fault, unplug this TV and call a service technician. Do not attempt to repair it by yourself or remove the rear cover. * When you do not use this TV for a long period of time, be sure to disconnect the power plug from the AC outlet. Display ................................................................. 16 Closed Caption .................................................... 16 Video Status ......................................................... 16 Sleep Timer .......................................................... 16 Hyper Surround ................................................... 16 Number Buttons (10 Key Pad) ............................ 17 100+ ................................................................. 17 Muting ................................................................. 17 Menu Buttons ....................................................... 17 TV/Video ............................................................... 17 Color System ........................................................ 17 Return+ ................................................................ 18 Picture Booster .................................................... 18 APPENDICES Troubleshooting ................................................... 19 Specifications ....................................... Back cover LCT1205-001A-H (02-10) 2 15/7/2002, 11:39 C O N N E C T I O N S 3 FRONT & REAR PANEL DIAGRAMS V L / MONO R IN ( VIDEO-2 ) MENU CHANNEL OPERATE VOLUME EXIT ON TIMER POWER ON TIMER POWER AV-21D33 AV-20N33 AV-14F33 Rear Panel AV-21D33 Front Panel AV-20N33/AV-14F33 Front Panel MENU VIDEO AUDIO IN CHANNEL OPERATE VOLUME EXIT AV-21D13 AV-20N13 AV-14F13 Rear Panel AV-21D13 Front Panel AV-20N13/AV-14F13 Front Panel INDOOR ANTENNA CONNECTION For models AV-14F13 and AV-14F33 you can attach the supplied indoor antenna for better reception. To Install rod aerial: TV VHF/UHF indoor Antenna (supplied) Illustration of AV-14F13 LCT1205-001A-H (02-10) 3 Matching adaptor (supplied) Install into the top-rear aerial holder. Once installed, it cannot be removed. You can connect an indoor antenna included. 1) Connect the indoor antenna to the Matching adaptor and connect the Matching adaptor to the TV RF input. ❒ You will receive the best reception,or best picture, if you use connect your TV to an outdoor antenna of a cable output. 15/7/2002, 11:39 4 C O N N E C T I O N S CONNECTING THE ANTENNA AND VCR • For further details, refer to the manuals provided with the devices you are connecting. • Connecting cables are not supplied. VHF/UHF outdoor antenna Illustration of AV-21D33 Note: When connecting monaural audio to the TV, use the L/MONO jack. Note: The sound and picture that you are watching are output from VIDEO/ AUDIO (L/R) output jacks on the rear panel. Note: The front and rear AUDIO/VIDEO input jacks are directly connected so that input to either jack is output through both. You cannot provide input to both the front and rear jacks at the same time. Disconnect one input, or use one of the jacks as an output jack only (for monitoring or recording). 1 3 2 To video output VCR To audio output To RF output To antenna input If not connecting a VCR, do 1. If connecting a VCR, proceed 1 2 3. • You can view images from the VCR without doing 3. 1 CONNECTING OTHER EXTERNAL DEVICES To video output To audio output V Headphones L / MONO R IN ( VIDEO-2 ) Camcorder To video output Camcorder or TV game To audio output or TV game MENU MENU Illustration of AV-21D33 VIDEO AUDIO IN Headphones Illustration of AV-21D13 Note: Use headphones with a stereo mini jack. When using headphones, the speaker sound output is disabled. LCT1205-001A-H (02-10) 4 15/7/2002, 11:40 C O N N E C T I O N S 5 CONNECTING OTHER EXTERNAL DEVICES Illustration of AV-21D33 To video output Note: When connecting monaural audio to the TV, use the L/MONO jack. Note: The sound and picture that you are watching are output from VIDEO/ AUDIO (L/R) output jacks on the rear panel. To audio input To audio output VCR (for playing) To video input VCR (for recording) Illustration of AV-21D13 To video output To audio input To audio output VCR (for playing) LCT1205-001A-H (02-10) To video input Note: The front and rear AUDIO/VIDEO input jacks are directly connected so that input to either jack is output through both. You cannot provide input to both the front and rear jacks at the same time. Disconnect one input, or use one of the jacks as an output jack only (for monitoring or recording.) VCR (for recording) 5 15/7/2002, 11:40 6 G E T T I N G S T A R T E D REMOTE CONTROLS RM-C373GY RM-C372GY CHANGING THE BATTERIES Be sure to use only size AA/R6/UM-3 batteries. 1 Raise the latch on the remote's back cover to remove it. 2 Insert the two supplied batteries, carefully notice the “+” and “–” markings on the batteries and remote control. To avoid a short circuit, insert “–” end first. 3 Snap the cover back into place. ❒ If the remote control acts erratically, replace the batteries. Typical battery life is usually about six months to one year. ❒ We recommend that you use the supplied batteries initially and replace them as soon as operation becomes erratic. The supplied batteries are for testing, not regular use. LCT1205-001A-H (02-10) 6 15/7/2002, 11:40 G E T T I N G S T A R T E D 7 POWER ) on the TV front panel. The Power lamp will light red. ❒ Press the Power button ( ❒ If the TV will not be turned on even if you press the POWER button, the TV is in the stand-by mode. Press the POWER button on the remote control to turn on the TV. ❒ To turn the power off, press the POWER button on the remote control. The Power lamp will light red. ❒ The On Timer lamp will light when the On/Off Timer is set, even when the TV power is off. ❒ When you do not use the television for a long period of time, turn the power off by pressing the Power button ( ) on the TV front panel. The Power lamp will go out. ❒ There are two methods to turn the power on after turning it off by pressing the POWER button on the remote control or by using the On/Off Timer function: 1) Press the POWER button on the remote control. 2) Press the CHANNEL n button or CHANNEL , button on the TV front panel. ❒ When the On-Timer function is set, the On-Timer lamp will light. Even if you turn the power off by pressing the POWER button on the remote control, if the On-Timer function is active the OnTimer lamp stays lit. See page 13 to set On/Off Timer. ADJUSTING VOLUME 1 Press the VOLUME button on the front panel or remote control. The volume level bar will appear. VOLUME 13 ||||||| - - - - - - - - - - - - - - - - - - - 2 Press the MUTING button to instantly turn the volume off to zero. To restore the volume to your previous level, simply press the MUTING button again. CHANGING CHANNELS 1 10 key direct access. Press the numbers on the remote’s 10 key pad. For single-digit channel numbers press 0 then the number. For channels above 100, press the 100+ button plus the 2-digit number. 2 CHANNEL M button. Press the CHANNEL m button, it will scan the channels in order. ❒ NOTE: After you operate the Auto Tuner Setup (page 10), all of the blank or empty, channels will be removed from scanning so that there is no noise or channel snow when you scan, only active channels. 3 Return. Press the release of the RETURN+ button to return to the previous channel. First, select a channel (game #1). Then, select another channel (game #2) with the 10 key pad and push the RETURN+ button to flip directly back and forth. 4 Return+. Press and hold down the RETURN+ button for three seconds. The message, “RETURN CHANNEL PROGRAMMED !” will appear and you can scan as you wish with the CHANNEL m button. Press RETURN+ again and you will go back to the Return+ channel you programmed. To cancel the Return+ channel, press and hold down the RETURN+ button for another three seconds and the message, “RETURN CHANNEL CANCELED !” appears. ❒ Pressing any number key or turning the TV off will also cancel a Return+ channel. LCT1205-001A-H (02-10) 7 15/7/2002, 11:40 8 G E T T I N G S T A R T E D SETUP TOUR When the TV is first turned on it enters the SETUP TOUR mode, and the JVC logo is displayed. Follow the instructions on the on-screen display to perform the SETUP TOUR. ❒In case of resetting that the reason for such as removal, you can set the SETUP TOUR function on the menu. For datails, see page 10. 1 Press the Main power button on the TV. The POWER lamp or POWER/ON TIMER lamp lights. After the JVC logo has been displayed, the TV automatically switches to the langage setting mode. 2 Press the MENU buttons to select the on-screen language. 3 Press the MENU button. The SET CLOCK screen will appear. To set the hour (AM/PM) To move to minutes To set the minutes To move to START CLOCK when done with settings SETUP TOUR SETUP TOUR LANGUAGE ENGLISH NEXT 4 5 Press the MENU buttons to start the clock. The TUNER MODE screen will appear. To choose CABLE or AIR To move to NEXT Press the MENU buttons. The AUTO PROGRAMMING function will start and the indicator blinks. ❒To stop the AUTO PROGRAMMING function, buttons. press the MENU When all the TV channels that can be received on your TV have been preset, the display gose out and the AUTO PROGRAMMING function operation is completed. LCT1205-001A-H (02-10) 8 SETUP TOUR SET CLOCK --:-START CLOCK SETUP TOUR TUNER MODE CABLE NEXT SETUP TOUR NOW PROGRAMMING 333 333 SETUP TOUR THANK YOU! SET IS NOW COMPLETE 15/7/2002, 11:41 U S I N G T H E Throughout this guide there are certain symbols we use as shorthand to show you what to do. When you see them, keep these factors in mind: Up and down arrows mean press the MENU UP or MENU DOWN buttons. Pressing the up or down buttons allows you to: • Move vertically in the main menu screen • Move through a submenu, or • Move to the next letter, number, or other choice in a submenu, or • Back up to correct an error ▼ INITIAL SETUP ITEMS USING THIS GUIDE: POR BY BY SPA ENG EXIT BY EXIT ▼▲ TINT COLOR PICTURE BRIGHT DETAIL -------------||-------------------------||-------------------------||-------------------------||-------------------------||------------- SELECT OPERATE BY BY EXIT BY EXIT ▼▲ SOUND SETTINGS (AV-21D33/AV-20N33/AV-14F33 Only) BASS TREBLE BALANCE MTS SMALL CAPITAL LETTERS are used when we refer to buttons … this is important because some menu functions have the same name. -------------||-------------------------||-------------------------||------------STEREO SAP MONO ON AIR THE ONSCREEN MENUS: SELECT OPERATE ↑ BY BY EXIT BY EXIT ▼▲ GENERAL ITEMS ▼ To bring up the onscreen menu, press any of the 4-way cursor control (MENU) buttons on the remote, and the menu will appear on the screen. The item that appears yellow is the selected item. When you use the menu buttons, the Picture Settings menu will appear first. However, since Initial Setup is so important, this guide begins here. ON OFF BLACK CLEAR PICTURE SETTINGS The “Press Button” means you should press that button on the remote control Important information, or a note, about a feature follows a cube like this one. AUTO TUNER SETUP NOISE MUTING BACKGROUND CLOSED CAPTION LANGUAGE SETUP TOUR SELECT OPERATE Left and right arrows mean press the MENU LEFT or MENU RIGHT button to: • Select the highlighted item, or • Select the options in a submenu ❒ 9 M E N U SET CLOCK ON/OFF TIMER C HAN N E L S U MMARY S E T LOC K C ODE CHILD LOCK ON OFF SELECT BY OPERATE EXIT BY EXIT BY ❒If you use the Menu button on the TV’s front panel, an additional menu indicating the current channel and the TV/Video status will appear before the picture settings screen. ❒In the Picture screens menu, the "Tint" option only appears if the TV signal is NTSC. LCT1205-001A-H (02-10) 9 15/7/2002, 11:41 10 I N I T I A L S E T U P AUTO TUNER SETUP CLOSED CAPTION During Auto Tuner Setup, the TV will automatically scan through all available channels and memorize the active ones so that when you scan, you do not pick up weak or noisy channels. If they are included in a program, you can view closed captions or text information. To CLOSE CAPTION To operate and select a caption or text channel To AUTO TUNER SETUP CAPTION: CC1 CC2 CC3 TEXT : T1 T2 T3 FINISH To operate TUNER MODE : CABLE CC4 T4 AIR To FINISH START To save settings EXIT when finished To choose CABLE or AIR To move to START To start Auto Tuner Setup NOW PROGRAMMING ! 333 333 08 The Programming takes approximately 1 to 2 minutes PROGRAMMING OVER! Note: Noise Muting will not work while Auto Tuner Setup is working. Note: Captions are usually found on CC1 and text on T1. The other caption and text channels are workable but are for future purposes. Note: See page 16 for complete details on how to access captioning with the CLOSED CAPTION button. NOTE: During Initial Setup, the TV will be programmed to only receive active channels. Once the channels are activated by the Auto Tuner Setup they will be included in Scan. Some weak channels may be included or omitted during this procedure. You can add or delete any channels for scanning in the Channel Summary, page 14. LANGUAGE Choose from English, Portuguese, or Spanish on-screen menus and displays. To LANGUAGE To activate LANGUAGE POR SPA ENG BACKGROUND Turn the background color of the on-screens to black or clear. NOISE MUTING To BACKGROUND Eliminates noise from channels that are not broadcasting or are too weak. To operate BACKGROUND BLACK Exit when finished CLEAR To NOISE MUTING To turn ON/OFF Exit when finished Exit when finished Note: Noise Muting will not work when you operate Auto Tuner Setup or Channel Summary. LCT1205-001A-H (02-10) 10 15/7/2002, 11:42 P I C T U R E NOTE: To exit the Picture Settings menu, press the Exit button at any time. S E T T I N G S 11 TINT (NTSC ONLY) BRIGHT Tint allows you to adjust the levels of red and green in the picture. The tint option appears only when the TV color system is NTSC. Adjust the degree of light and dark in the picture. To TINT To accentuate green To accentuate red To BRIGHT To lighten the picture To darken the picture To move to the next or previous To move to the next or previous DETAIL Detail allows you to adjust the level of detail within the picture. COLOR Color allows you to adjust both the vividness and subtlety of the color. To COLOR To make colors more vivid To subdue colors To DETAIL To make the picture sharper To make the picture smoother To move to the next or previous To move to the next or previous PICTURE Picture allows you to adjust the range between black and white in the picture. To PICTURE To increase contrast To decrease contrast To move to the next or previous LCT1205-001A-H (11-19) 11 15/7/2002, 11:42 S O U N D BASS The Bass level adjustment feature allows you to increase or decrease the level of lower frequencies in the TV’s sound. S E T T I N G S MTS (Multi-Channel Television Sound) NOTES: MTS technology gives you a choice among stereo, mono, and Second Audio Programs (SAP). To emphasize bass MTS To reduce bass STEREO SAP ↵ To MTS To BASS ↵ 12 ON AIR MONO ON AIR To move to next Select the mode TREBLE The Treble level adjustment feature allows you to increase or decrease the level of higher frequencies in the TV’s sound. To TREBLE STEREO MODEL ONLY!! Bass, Treble, Balance, and MTS are available on: • AV-21D33 • AV-20N33 • AV-14F33 MTS has no effect on normal sound broadcasts. (The ON AIR arrow tells you if the current signal contains Stereo or SAP) Note: Keep the TV in STEREO mode to get the fullest sound quality. Note: SAP will allow you to hear an alternative soundtrack, if available. To increase treble To decrease treble Note: Choose MONO to reduce excess noise in a program or channel. To move to next BALANCE The Balance adjustment feature allows you to center the TV’s sound to your needs. To BALANCE To shift the speaker balance to the right To shift the speaker balance to the left To move to next Some Sound Advice You can tell if a program is broadcast in stereo by the position of the ON AIR arrow in the MTS menu. Unfortunately, it is common for some cable companies to squash the transmission of stereo programs to mono because they only have mono equipment. If connected to a cable system, the sound is at the mercy of that cable company — if they broadcast in mono, you receive mono sound regardless of the original stereo programming. Fortunately, most programs that are broadcast in stereo are aired on the major television networks. If you connect your TV to an antenna instead of cable, and set the tuner mode in the Auto Tuner Setup to “Air” instead of “Cable,” you will be able to pick up stereo broadcasts in stereo. LCT1205-001A-H (11-19) 12 15/7/2002, 11:43 G E N E R A L I T E M S 13 SET CLOCK ON/OFF TIMER The Clock is the heart of all timer functions. You must set the clock before any timer functions will work. Use the On/Off Timer as an alarm to wake up, as a program reminder, or as a decoy when you’re out of the house. To SET CLOCK To ON/OFF TIMER To operate To operate TIME 12:34 AM START CLOCK ON TIME OFF TIME CHANNEL MODE ON/OFF TIMER 12 : 00 AM 1 : 00 AM 07 ONCE EVERYDAY YES NO FINISH To set the hour (AM/PM) To move to minutes To set the minutes To move to START CLOCK when done with settings To start the clock THANK YOU !! To set the hour (AM/PM) you want the TV to turn on To move to minutes To set the minutes To set ON TIME and to move to OFF TIME (set time for TV to turn off) To move to CHANNEL If you want to synchronize the TV clock with another clock or time signal, press Left or Right Menu arrow at the appropriate time, and the clock will start. Note: If the TV is unplugged or you experience a power outage, you must reset the clock in order for any of your timer functions to work. CLOCK SET MESSAGE: If you do not set the clock but attempt to use a timer function anyway, you will get the following message: PLEASE SET CLOCK FIRST !! TIME ––:–– –– To select channel To move to MODE Choose ONCE or EVERYDAY To ON/OFF TIMER Choose YES for on, NO for off To FINISH To save settings THANK YOU !! Note: In order for ON/OFF Timer to work, the clock must be set. After a power interruption it will be cancelled. Note: ON/OFF Timer cannot be set to locked or guarded channels. START CLOCK LCT1205-001A-H (11-19) 13 15/7/2002, 11:43 14 G E N E R A L I T E M S CHANNEL GUARD - LOCK CHANNEL SUMMARY You can add or delete channels from the channel scanning. You can also lock out any “unauthorized” viewers from one or up to all 181 channels. NOTES: There are two sections in Channel Summary. To CHANNEL SUMMARY To operate To the Lock column To CHANNEL SUMMARY The access code zero (0) to lock or unlock that channel To operate ADD You can manually set channels to scan that were too weak to be picked up during Auto Tuner Setup. (If you have not performed the Auto Tuner Setup described on page 10, do so now.) Conversely, if a channel was too weak to receive a good picture but was picked up anyway, delete it by removing the X. CH 01 02 03 04 05 ADD X X X X X – – – – – : : : : : : CH 06 07 08 09 10 ADD X – – X X – – – Use the Channel m button to go to any other channel you want to lock ADD X X – X X – – – – : : : : : : CH 06 07 08 09 10 ADD X – – X X To move from item to item (e.g. from channel number to add to lock) use the arrow up/down keys. Noise Muting will not work while you operate the Channel Summary. Exit when finished CHANNEL m to select the channel CH 01 02 03 04 05 To move up and down a column (e.g. from channel to channel) use the Channel m button. CHANNEL GUARD MESSAGE: – – – – – To the ADD column This message appears when a viewer attempts to watch a guarded channel: THIS CHANNEL IS LOCKED BY CHANNEL GUARD. PLEASE ENTER LOCK CODE BY 10 KEY PAD TO UNLOCK IT. NO. ––– To include or delete from scan Exit when finished Note: Channels set to scan will be marked with an X. Note: Some cable systems experience interference from radio frequencies on Cable Channel 95. If you like, you can delete this channel from scanning by removing the X. LCT1205-001A-H (11-19) 14 To watch a channel you have locked, enter the lock code using the 10 key pad. If the wrong lock code is entered, this message will flash on the screen: INVALID LOCK CODE ! 15/7/2002, 11:44 G E N E R A L I T E M S 15 SET LOCK CODE CHILD LOCK The Lock Code locks and unlocks Channel Guard. Write this three digit number down and keep it where would-be viewers will not look for it! You can disable the front control buttons of the TV. When this function is set to ON, the TV can be operated using only the remote control. To SET LOCK CODE To CHILD LOCK To operate To turn ON/OFF The padlock icon appears Zero (the access code is zero) LOCK CODE Exit when finished Note: The Child Lock is canceled when you turn the TV’s main power off. 000 FINISH To the first number place To choose the number To move to the next place Continue to follow these directions for all three numbers To FINISH To save settings and exit Note: If you forget the Lock Code you can set another one this same way. Note: After a power interruption you must reset the lock code. LCT1205-001A-H (11-19) 15 15/7/2002, 11:44 16 B U T T O N F U N C T I O N S DISPLAY VIDEO STATUS The Display screen shows the current status of timers and inputs. The Video Status button lets you select the settings when you play a game, watch a movie, or want to reset to factory settings. DISPLAY 07 NOW SLEEP TIMER ON/OFF TIMER ON TIME OFF TIME “STANDARD” resets the picture settings to factory standard levels. “CINEMA” for a film-like look to video. “GAME” enhances video graphics. 12:20 PM OFF EVERYDAY 7:00 PM 10:00 PM NOTE: Please note that if the clock, SleepTimer, or On/Off Timer are not set, the initial Display screen will state “Clock Not Set,” “Sleep Timer Off,” and “On/Off Timer Off,” respectively. VIDEO STATUS ❑ The channel or AV input (Channel 07) ❑ Current time (12:20 PM) ❑ Sleep Timer status minutes remaining (Off) ❑ On/Off Timer status (Everyday, on at 7:00 PM, off at 10:00 PM) ❑ Each press of the Display button changes the display mode: > DISPLAY > TIME > CHANNEL > OFF > > CINEMA > GAME > STANDARD > SLEEP TIMER Sleep Timer turns off the TV for you in case you fall asleep. Program it to work in intervals of 15 minutes up to 180 minutes. Sleep Timer CLOSED CAPTION View the closed captions or text when included in a program. > TEXT < < < SLEEP TIMER MESSAGE: CLOSED CAPTION > CC 0 15 30 45 60 75 90 105 120 135 150 165 180 > OFF > Note: To change caption or text channels see page 10. Note: To access a captioning option or to turn one off, allow the display to remain on screen until it disappears. In a few seconds the captions will start. Note: CC2, CC3, CC4, T2, T3, and T4 are functional, however, they are for future purposes. Note: If a large black box covers 80% of your screen, the Text Mode is probably set. Press CLOSED CAPTION to turn it off. 20 seconds prior to the automatic shut-off, this message will appear: GOOD NIGHT ! ! PUSH SLEEP TIMER BUTTON TO EXTEND. You then have 20 seconds to press the SLEEP TIMER button to delay turn off for another 15 minutes. HYPER SURROUND AV-21D33/AV-20N33/AV-14F33 ONLY. Creates a deep, 3-dimensional sound effect by channeling the sound through the TV’s front firing speakers. HYPER SURROUND LCT1205-001A-H (11-19) 16 15/7/2002, 11:45 B U T T O N F U N C T I O N S NUMBER BUTTONS 10 KEY PAD TV / VIDEO Press two of the number buttons to move to single and double digit channels. To move to Channel 7: 0 (zero) 7 (seven) 100 + BUTTON The 100+ button accesses all channels above Channel 99. To move to Channel 124: 100+ 2 (two) 4 (four) MUTING The MUTING button turns the sound off completely when you press it. 17 TV/Video selects the input mode. TV/VIDEO AV-21D13/AV-20N13/AV-14F13 > TV > VIDEO > AV-21D33/AV-20N33/AV-14F33 > TV > VIDEO-1 > VIDEO-2 > VIDEO-1: The video signal input to the input terminal on the rear panel is selected. VIDEO-2: The video signal input to the input terminal on the front panel is selected. COLOR SYSTEM The color system is automatically selected, but if the picture not clear or no color appears, slect the color system manually. COLOR SYSTEM MUTING The sound will turn off completely. > AUTO > PAL-M > PAL-N > NTSC > Note: To return the original volume press the MUTING button again. MENU BUTTONS The MENU buttons allow you to control the options located in the menu screens. A complete discussion on these buttons and on the menu system is located on page 9. LCT1205-001A-H (11-19) 17 15/7/2002, 11:45 18 B U T T O N F U N C T I O N S RETURN+ PICTURE BOOSTER There are two kinds of Return. When the picture is unclear because the reception level of the TV signal is low, activating the Picture Booster improves the picture clarity in some situations. Return+ — Set a “Return Channel” to return to after scanning with CHANNEL m. RETURN+ and hold for 3 seconds PICTURE BOOSTER > OFF RETURN CHANNEL PROGRAMMED ! Scan with CHANNEL m RETURN+ Note: To cancel a Return channel, press and hold the RETURN+ button for another 3 seconds until “Return Channel Canceled !” appears. > HIGH > LOW > OFF: The Picture Booster off. HIGH: The Picture Booster is functioning at maximum. LOW: The Picture Booster is functioning at minimum. Note: If the picture becomes abnormal when you set the Picture Booster to HIGH, then set it to LOW or OFF. Return — Return to the last channel viewed after moving to another channel via the 10 key pad. RETURN+ Move to another channel with the 10 key pad. RETURN+ LCT1205-001A-H (11-19) 18 15/7/2002, 11:45 T R O U B L E S H O O T I N G PROBLEMS There is no power 19 CHECK • See if the power cord became unplugged. • Perhaps you have experienced a blown circuit breaker or fuse or a power outage. There is no picture • The antenna could be disconnected. or no sound • The input mode (TV or Video) could not be set properly, refer to page 17. • The tuner mode (in the Auto Tuner Setup) could be set improperly, refer to page 10. • The station may be having difficulties, check to see if other channels are operating normally. Remote control is • Check that the batteries are still working and properly installed. not operating or • Make sure there are no objects blocking a clear path from the remote to the TV. operating properly • Maybe you are too far from the TV, you must be within 7m. You cannot select • Make sure the channels are programmed. See Channel Summary, page 14. a certain channel • Perhaps the channel is locked, select it with the 10 key pad and follow instructions, on page 14. The power turns off • Perhaps the On/Off Timer is set, press the POWER button, check page 13. by itself • The power was interrupted or the power cord unplugged. Reset the clock, check page 13. • The Sleep Timer may be set. The clock is wrong • The power was interrupted and the clock not reset. Reset the clock, check page 13. On Timer lamp is blinking • There is a problem with the TV. Unplug the set and call for service. PICTURE The picture color quality is poor CHECK • Tint and color may be improperly adjusted. Check page 11. • Video Status mode may be set to an inappropriate setting. Check page 16. There are lines • There could be interference from another energy consuming appliance, such as a across the picture computer, another TV or VCR. Move any other such appliances farther away from the TV. The picture is spotted • There could be interference from a running high wattage appliance such as a hair-dryer, vacuum cleaner, or neon sign. You will have to move the antenna away from the source of the interference or change it to a coaxial cable which is less prone to interference. Double picture (Ghosts) • A building or airplane can reflect the original signal producing a second, delayed one. Adjust the antenna position. Snowy picture/ Image noise • The antenna may be damaged, disconnected or turned. Check the antenna connection, page 3 and page 4. If it is damaged, you will have to replace it. Screen is 80% black • Closed Caption Text Mode in on. Press the CLOSED CAPTION button until you select Off. SOUND CHECK Bilingual or stereo programs • Make sure the MTS mode is properly set. Refer to page 12 for details on setting can not be heard MTS Modes. NOT A PROBLEM DON’T WORRY ABOUT THIS, IT’S NORMAL Static electricity • It is normal to feel a surge of static electricity if you brush over or touch the screen. You hear occasional • It is normal for the TV to emit crackling sounds when turned on or off. Unless the crackling sounds sound or picture become abnormal, this is fine. LCT1205-001A-H (11-19) 19 15/7/2002, 11:46 20 S P E C I F I C AT I O N S MODEL Color systems AV-21D33/AV-20N33/AV-14F33 PAL, NTSC AV-21D13/AV-20N13/AV-14F13 PAL, NTSC TV RF systems M, N M, N Channels VHF 2 to 13, VHF 14 to 69 Sub Mid, Super, Hyper and Ultra bands VHF 2 to 13, VHF 14 to 69 Sub Mid, Super, Hyper and Ultra bands Sound-multiplex system BTSC (Multi Channel Sound) Audio output (Rated power output) 1.5 W + 1.5 W 2 W (monaural) Speakers AV-21D33/AV-20N33: (5 cm × 12 cm) oval × 2 (stereo) AV-21D13/AV-20N13: (5 cm x 12 cm) oval x 2 (monaural) AV-14F33: (5 cm × 9 cm) oval × 2 (stereo) AV-14F13: (5 cm x 9 cm) oval x 2 (monaural) External input/output VIDEO-1/VIDEO-2: VIDEO input (RCA) AUDIO L/R input (RCA) VIDEO output (RCA) AUDIO L/R output (RCA) VIDEO input (RCA) AUDIO input (RCA) VIDEO output (RCA) AUDIO output (RCA) Headphone jack Stereo mini jack (dia. 3.5 mm, sound is stereo) Stereo mini jack (dia. 3.5 mm, sound is monaural) Accessories AV-21D33/AV-20N33: Remote control unit; RM-C373GY × 1 AA/R6/UM-3 dry cell battery × 2 AV-21D13/AV-20N13: Remote control unit; RM-C372GY × 1 AA/R6/UM-3 dry cell battery × 2 AV-14F33: Remote control unit; RM-C373GY × 1 AA/R6/UM-3 dry cell battery × 2 Indoor antenna × 1 Matching adaptor × 1 AV-14F13: Remote control unit; RM-C372GY × 1 AA/R6/UM-3 dry cell battery × 2 Indoor antenna × 1 Matching adaptor × 1 Design and specifications subject to change without notice. LCT1205-001A-H_Cover 2 15/7/2002, 11:36