1
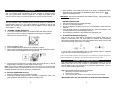
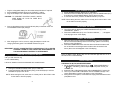
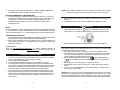
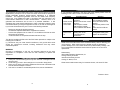
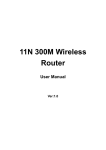
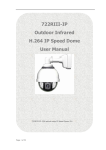
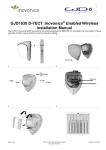
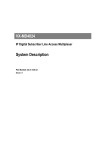
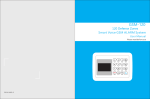
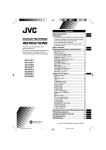
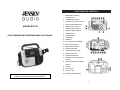
FUNCTIONS AND CONTROLS
MODEL MR-720
SELF-POWERED AM/FM WEATHER BAND CLOCK RADIO
1.
BAND SELECT SWITCH
2.
LIGHT SWITCH
3.
CHARGING INDICATOR
4.
LCD DISPLAY with BACK LIGHT
5.
RADIO POWER INDICATOR
6.
SIREN ON-OFF SWITCH
7.
POWER SOURCE SWITCH
8.
DYNAMO CRANK HANDLE
9.
TUNING KNOB
10. VOLUME KNOB
11. LAMP HEAD
12. SPEAKER
13. 360° TELESCOPIC ANTENNA
14. BACK LIGHT BUTTON
15. MINIUTE SET BUTTON
16. HOUR SET BUTTON
17. ALARM ON-OFF BUTTON
18. TIME SET BUTTON
19. ALARM SET BUTTON
20. SWAP RADIO/CLOCK DISPLAY
BUTTON
21. PRESET WHEATHER CHANNEL
SWITCH
22. HANDLE
23. AUX-IN JACK
24. DC 6V IN JACK
25. BATTERY COMPARTMENT
Please read this Instruction Manual carefully before
using the unit and retain it for future reference
1
SPECIAL NOTE
To prevent any scratching or damage to your furniture, we strongly recommend
that you purchase small self-adhesive felt pads, available at hardware stores
and home improvement centers everywhere, and apply these pads to the
bottom of the unit before you place the product on any fine wooden furniture.
3. When batteries were installed, the power of the build-in rechargeable battery
pack will be cut off after setting the POWER SOURCE Switch (#7) to
(DRY CELL Battery) position.
POWER SOURCE
This unit operates using DYNAMO power (manual charge by cranking), on
optional battery power (3 x “AA” (UM-3) batteries–not included) or with an AC
adaptor (not included). The specification of the AC adaptor is: 6V DC 200mA with
center positive “+” plug.
BATTERY PRECAUTIONS
i. Use only the size and type of battery specified.
ii. Do not mix old and new batteries.
iii. Do not mix alkaline, standard (carbon-zinc) or rechargeable (nickel-cadmium)
batteries.
iv. If the unit is not used for an extended period of time, remove the batteries. Old
or leaking batteries can cause damage to the unit.
v. Do not dispose of batteries to fire, batteries may explode or leak.
A. “DYNAMO” POWER OPERATION
1. A DC 3.6V rechargeable battery is included with MR-720. When first time
using the unit, open the battery compartment and plug the rechargeable
battery into the socket as shown.
2. Replace the Battery Door.
3. Set the POWER SOURCE Switch to the “PWR OFF” position.
4. Lift the Crank Handle (#8) outward until it is fully extended. Rotate the Crank as
shown below. The CHARGING Indicator (#3) will light.
IMPORTANT: Be sure that the batteries are installed correctly. Wrong polarity may
damage the unit.
C. AC ADAPTOR OPERATION (Optional)
This unit may also be used with an AC adapter (not included). When the AC
adapter is connected to the DC JACK (#24), the batteries are automatically
disconnected. Please make sure to use an AC adapter with a rating of 6V DC, 200
mA with the following center positive (+) polarity.
If you are using a universal adapter with an output polarity switch or polarized
plugs, be sure to set the center plug polarity to “+”.
Note: The CHARGE Indicator will light once the AC Adaptor is plugged into the AC
outlet regardless of the setting of the POWER SOURCE SWITCH (#7).
5. Continue turning the Crank for 3 minutes, about 2 turns per second, to achieve
approximately 10 minutes of power (Radio reception only).
Note: The frequency reading will disappear from the LCD in 2 to 3 minutes after
radio reception mode. This phenomenon is normal. The clock will resume once the
POWER SOURCE SWITCH has returned to “POWER OFF”.
B. BATTERY OPERATION (Optional)
1. Remove the Battery Door on the back of the radio.
2. Following the polarity diagram shown in the battery compartment, insert 3 ‘AA'
(UM-3) batteries (Not included) and replace the battery door.
2
CHARGING THE INTERNAL BATTERIES
This Self-Powered Crank Radio contains a rechargeable Lithium Ion (Li-ion)
battery pack that can be fully charged in approximately 12 hours with an
external adaptor. After fully charged the unit will hold approximately 1 hour or
more of power (Radio reception only).
Note:
i.
ii.
iii.
Rechargeable batteries should be recharged:
When they are used for the first time,
They are low in power.
They have not been used for a long period of time (over 60 days).
IMPORTANT: ONLY USE THE OPTIONAL AC ADAPTOR FOR CHARGING.
3
1. Plug the rechargeable battery into the socket as describe above if required
2. Set the POWER SOURCE Switch to the “PWR OFF” position.
3. Plug the AC adaptor into a standard 120VAC household outlet.
CAUTION: TO PREVENT ELECTRIC SHOCK, MATCH
WIDE BLADE OF PLUG TO WIDE SLOT,
FULLY INSERT.
4. Connect the adaptor’s plug to the DC IN Jack (#24) on the back of the unit.
The CHARGE Indicator (#3) will light.
5. After charging the unit for 12 hours, unplug the adaptor to avoid overcharging the battery pack. The CHARGE Indicator will go off.
IMPORTANT: DO NOT CHARGE BATTERY CONTINUOUSLY FOR 16 HOURS
OR MORE. DOING SO CAN CAUSE THE PERFORMANCE OF
THE RECHARGEABLE BATTERY TO DETERIORATE.
DISPOSAL OF LITHIUM ION BATTERY
Bring the Lithium Ion batteries to an RBRC participating retailer. To find a retailer
near you visit: www.rbrc.org
or call: 1-800-8-battery
TO SET OR RESET ALARM TIME
1. Set the POWER SOURCE Switch (#7) to “PWR OFF”.
2. Press and hold the ALARM SET Button (#19), press the HOUR Button (#15)
to set the hour and the MINUTE Button (#16) to set the minutes.
3. To view the alarm time, press the ALARM SET Button (# 19) once.
NOTE: When setting the time, make sure to correctly set for AM or PM in order
for the Alarm to function properly.
TO ACTIVATE THE ALARM
1. Set the current and alarm time as describe in the above procedures.
2. Turn off the radio by sliding the POWER SOURCE Switch (#7) to the
“POWER OFF” position
3. Press the ALARM Button (#17) once. The Alarm Indicator, “ “, will appear
in the top right corner of the display.
TO SHUT THE ALARM OFF
1. When the alarm sounds, press the ALARM Button (#17) once. The alarm
will turn off and automatically reset for the next day. (Alarm icon will keep
showing in the LCD display.)
2. Press the ALARM Button twice when the alarm sounds and the alarm will
turn off and will not sound again when the alarm time is reached in the
future. (Alarm icon will disappear in the LCD display.)
BACK LIGHT OPERATION
Press the BACK LIGHT Button (#6) once and the back light will turn on for 2
seconds and turn off automatically.
RADIO OPERATION
Lithium Ion batteries can also be discarded with household trash.
TO SET OR RESET CURRENT TIME
1. Setting the POWER SOURCE Switch (#7) to “PWR OFF”.
2. Press and hold the TIME SET Button (#18), press HOUR (#15) to set hour
and MINUTE (#16) to set minute.
NOTE: When setting the time, make sure to correctly set for AM or PM in order
for the Alarm to function properly.
4
LISTENING TO AM, FM, OR WEATHER BAND
1. Set the POWER SOURCE Switch (#7) to
(Rechargeable Battery)
or
(Dry Cell Battery) position depending on the power source you
choose to use.
2. Select AM, FM or WB (Weather Band) with the BAND SELECT switch (#1).
3. Tune to your favorite AM or FM stations with the TUNING knob (#9). The
current radio station frequency will appear on the LCD Display.
4. During AM or FM reception, to view the time simply press the RADIO/CLOCK
(# 20) Button once.
5
5. Select your local NOAA channel with the 7 position PRESET WEATHER
CHANNEL Switch (#21) located on the back of the unit.
NOTE: When WAKE TO RADIO is chosen, make sure the radio station and the
volume level are set correctly otherwise the alarm may not be heard.
RECEIVING EMERGENCY WEATHER ALERT
6. To receive emergency weather alert warnings, turn the unit on, tune to the
strongest local NOAA channel, adjust the volume control to a level that you
will hear when an alert is received. Set the BAND Switch (#1) to the
WEATHER ALERT position. The radio remains silent until an “alert”
broadcast occurs.
EMERGENCY SIREN AND BLINKING
1. Set the SIREN Switch (#6) to the “SIREN” position for siren tone and light
blinking.
2. To disable the siren function, set the SIREN Switch (#6) back to “OFF”.
NOTE:
The NOAA Weather Service broadcasts a test alert every Wednesday between
11 am and Noon. To receive the broadcasts, the radio must be within the range
of the local broadcast site, 10 - 40 miles, depending on terrain and obstructions.
TIPS FOR BEST RECEPTION
1. To insure maximum FM or WEATHER band reception, the Telescopic Antenna
(#1) should be fully extended to obtain the best possible signal.
2. When tuning in AM stations, be sure to place the unit in a vertical position. To
insure best AM reception, try repositioning the unit until the best signal
reception is obtained.
To learn more:
Click on http://www.nws.noaa.gov/nwr/ for NOAA (National Oceanic &
Atmospheric Administration) and http://www.ec.gc.ca/ for Environment Canada.
TO WAKE TO BUZZER OR RADIO
1. Press the ALARM Button (#17) once. The Alarm Icon will appear in the right
top corner of the LCD Display indicating that the alarm function is enabled.
Press the ALARM Button (#17) once again to disable.
2. Tune to your favorite radio station.
3. Set the POWER SOURCE Switch (#7) to the “PWR OFF” position.
4. To wake to Alarm turn the VOLUME Knob (#10) counter-clockwise until a
click is heard. The alarm will sound when the preset alarm time is reached
and last for 3 minutes then stop automatically. The alarm remains set and
will turn the alarm on again at the same time on the following day.
5. To wake to radio set the VOLUME Knob (#10) at a position of 50% of the
total volume traveling. The radio will sound when the preset alarm time is
reached and last for approximately 60 minutes then stop automatically. The
alarm remains set and will turn the unit on again at the same time on the
following day.
6
LIGHT SELECTION
1. Set the LIGHT Switch (#2) to
position for flashlight.
2. Set the LIGHT Switch (#2) to
position for reading light, then lift up the
LIGHT HEAD (11) and adjust the head angle for the best reading position.
3. Set the LIGHT Switch (#2) to the OFF position to turn the flashlight off.
AUX IN OPERATION
This Radio provides an AUX IN jack that allows you to connect your iPod, MP3
or other digital music player to the radio.
1. Flip open the socket cover on the back. Connect the headphone jack of
your external device and the AUX IN Jack (#23) located on the back of MR720. (The connection cable is not included). The radio will enter the AUX
function mode once the AUX IN jack is plugged.
2. Set the POWER SOURCE Switch (#7) to
(Rechargeable Battery)
or
(Dry Cell Battery) position depending on the type of power source
you use.
3. Start to play your iPod, MP3 player or other audio device.
4. Slowly adjust both the volume controls on your MR-720 and the external
device.
5. Turn off your iPod, MP3 player etc. when finish listening. Turn MR-720 off
and unplug the AUX IN jack.
Remark: Once the AUX IN Jack is plugged, MR-720 will enter the AUX mode
automatically no matter what position the BAND Selector Switch (# 1) is in AM,
FM, WB or WEATHER ALERT mode. Remember to disconnect the connection
cable from the radio after use in order to be able to listen to the broadcast again.
7
COMPLIANCE WITH FCC REGULATIONS
This equipment has been tested and found to comply with the limits for a Class B
digital Device, pursuant to Part 15 of the FCC Rules. These limits are designed to
provide reasonable protection against harmful interference in a residential
installation. This equipment generates uses and can radiate radio frequency
energy and, if not installed and used in accordance with the instructions, may
cause harmful interference to radio communications. However, there is no
guarantee that interference will not occur in a particular installation. If this
equipment does cause harmful interference to radio or television reception, which
can be determined by turning the equipment off and on, the user is encouraged to
try to correct the interference by one or more of the following measures:
-
Reorient or relocate the receiving antenna.
Increase the separation between the equipment and receiver.
Connect the equipment into an outlet on a circuit different from that to which
the receiver is connected.
Consult the dealer or an experienced radio technician for help.
This device complies with Part 15vof the FCC Rules. Operation is subject to the
following two conditions:
(1) This device may not cause harmful interference, and (2) this device must
accept any interference received, including interference that may cause
undesired operation.
WARNING:
Changes or modifications to this unit not expressly approved by the party
responsible for compliance could void the user’s authority to operate the
equipment.
CARE AND MAINTENANCE
1. Clean your unit with a damp (never wet) cloth. Solvents or detergents should
never be used.
2. Avoid leaving your unit in direct sunlight or in hot, humid or dusty places.
3. Keep your unit away from heating appliances and sources of electrical noise
such as fluorescent lamps or motors.
4. If the unit is not used for an extended period of time, remove the batteries.
TROUBLESHOOTING GUIDE
If you experience difficulties in the use of this music system please check the
following or call 1 800 777 5331 for Customer Service.
Symptom
No/low sound
when power
on the radio
Power is not
on
Possible Cause
VOLUME Control is set to
minimum.
Station has not been tuned
properly.
FM reception is weak.
AM reception is weak.
Unit in Weather Alert Mode
The built-in rechargeable
battery pack is low
The batteries are
exhausted
Solution
Adjust the VOLUME control.
Tune the station properly.
Extend and rotate the FM
antenna.
Relocate the position of the
unit.
Select AM, FM or WB as
desired
Recharge the built-in
rechargeable battery pack.
Replace all the batteries.
SERVICE
Please refer to the instructions on the enclosed warranty card for returning your
unit for service. When returning the unit, please remove any batteries to
prevent damage to the unit in transit and/or from possible battery leakage. We
are not responsible for batteries returned with the product or for the cost of
replacement.
Distributed by:
Spectra Merchandising International, Inc.
Chicago Industry Tech Park
4230 North Normandy Avenue
Chicago, IL 60634, U.S.A.
Please have model number ready, for Customer Service, call 1-800-777-5331
Printed in China
8
9