1
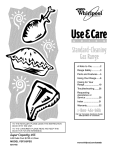
JENN-AIR
Use and Care Manual
MODEL
Gas-Electric
SEG196
Grill-Range
WARNING:
If the information
in this manual
is not followed exactly, a fire or explosion may
result causing
property
damage,
personal
injury or death.
--Do
not store or use gasoline
or other
flammable vapors and liquids in the vicinity
of this or any other appliance.
WHAT
TO DO IF YOU
SMELL
GAS
•
Do not try to light any appliance.
•
Do not touch any electrical switch;
use any phone in your building.
•
Immediately
call your gas supplier from a
neighbor's phone. Follow the gas supplier's
instructions.
do not
• If you cannot reach your gas supplier, call
the fire department.
Installation
a qualified
and service must be performed by
installer, service agency or the gas
supplier.
-- SAVE THESE
INSTRUCTIONS
FOR
FUTURE
REFERENCE
--
IMPORTANT
SAFETY NOTICE AND WARNING
The California Safe Drinking Water and Toxic Enforcement Act of 1986 (Proposition
65) requires the Governor of California to publish a list of substances known to
the State of California to cause cancer or reproductive harm, and requires businesses
to warn customers of potential exposures to such substances.
Users of this appliance are hereby warned that when the range is engaged in
the self-clean cycle, there may be some low level exposure to some of the listed
substances, including Carbon Monoxide. AdditionaLly, users are also hereby warned
that the burning of gas can result in low-level exposure to some of the listed
substances,
including
benzene, formaldehyde
and soot, due primarily to the
incomplete combustion
of natural gas or liquid petroleum (LP) fuels. Properly
adjusted
burners will minimize
incomplete
combustion.
Exposure to these
substances can be minimized by properly venting the range to the outdoors.
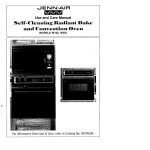
About
Your
Jenn-Air
Congratulations on your choice of a Jenn-Air Gas-Electric Grill-Range. The
indoor grilling of meats, fish or fowl is one of the most attractive and succulent
methods of preparing these foods . . . a unique flexibility made possible
by Jenn-Air's patented integral ventilation system.
Your Jenn-Air self-cleaning oven combines the best of two cooking
convection and radiant bake (conventional) baking or roasting.
methods,
The Jenn-Air convection oven is actually a conventional oven that circulates
heated air within the oven. As both bake and broil heating elements cycle
on and off with the thermostat, a fan keeps the heated air circulating around
the food.
The constantly recirculating
heated air in the convection oven strips away
the layer of cooler air that surrounds food. Consequently, many foods cook
more quickly. Distributed
heat makes multiple rack cooking
possible.
Convection roasted meats retain their natural flavor and juiciness with less
shrinkage than radiant bake roasting.
In addition to the many exclusive benefits of convection cooking,
Air oven is also a fine full featured "bake and broil" oven.
your Jenn-
Before you begin cooking with your new grill-range, please take a few minutes
to read and become familiar with the instructions in this book. On the following
pages you will find a wealth of information regarding all aspects of using
your new grill-range. By following the instructions carefully, you will be able
to fully enjoy and properly maintain your grill-range and achieve excellent
results with the food you prepare.
Should you have any questions about using your Jenn-Air grill-range or
need a use and care manual for your cooktop cartridge, write to us. Be
sure to provide the model number.
Consumer Relations Department
Jenn-Air Company
3035 Shadeland Avenue
Indianapolis, IN 46226-0901
Appliance Usage
Cleaning Other Parts of your Range .............................................................................
Other Hints on Caring for your Range
Access Door ..............................................................................................................
Oven Light Bulb Replacement ...................................................................................
Oven Temperature Knob Adjustment .........................................................................
Removing Range .......................................................................................................
Safety Precautions ........................................................................................................
Service Information ......................................................................................................
Using the Cooktop and Grill
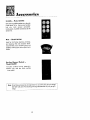
Accessories .......................................................................................................................
Cleaning Other Parts of Your Range ............................................................................
Cooktop and Grill Operations ............................................................................................
Cookware Selection ...........................................................................................................
22-23
45
48
47
45
2,5-8
50-51
48
22-23
12
15
Ducting Information ...........................................................................................................
Grill
47
Cleaning .....................................................................................................................
Grilling Guide ..............................................................................................................
Grilling Tips ................................................................................................................
21
19
20
Installing, Removing ...................................................................................................
Usage .........................................................................................................................
How a Surface Burner Works ..............................................................................................
17
18
9
How to Operate in the Event of a Power Failure ..........................................................
9
Air Shutter Adjustrnent ...............................................................................................
10
Low Flame Adjustment .........................................................................................
10-11
Surface Burner Module ......................................................................................................
16
Surface Controls ................................................................................................................
14
Ventilation System .............................................................................................................
13
Using the Oven
Baking
Baking Charts ............................................................................................................
31
Convection Baking ................................................................................................
32-34
Frozen Convenience Foods .......................................................................................
33
General Recommendations .......................................................................................
30
Broiling .........................................................................................................................
38-39
Oven Cleaning
Auto-Clean .................................................................................................................
41
Self-Cleaning Process ..........................................................................................
Oven Operation
Clock Controls ...........................................................................................................
Clock Controlled Baking or Roasting ....................................................................
Clock Setting .............................................................................................................
MinuteTimer ..............................................................................................................
Oven Controls ............................................................................................................
Rack Positions ...........................................................................................................
Roasting
General Recommendations
.......................................................................................
Convection Roasting .............................................................................................
40.45
26
28-29
26
27
24
25
35
36-37
SAFETY
PRECAUTIONS
Read before operating your range
All appliances
-- regardless of the manufacturer
-- have the
potential through
improper
or careless use to create safety
problems. Therefore the following safety precautions should be
observed:
1. Be sure your appliance is properly
by a qualified technician.
installed
and grounded
2. Never use your appliance for warming or heating the room.
This warning is based on safety considerations.
3. Children should not be left alone or unattended
in area
where appliance is in use. They should never be allowed
to sit or stand on any part of the appliance.
4. Wear proper apparel. Loose-fitting
or hanging garments
should never be worn while using the appliance.
5. Do not repair or replace any part of the appliance unless
specifically recommended
in this manual. All other servicing
should
be referred to an authorized
Jenn-Air Service
Contractor.
6. Do not store combustible
materials,
gasoline
or other
flammable vapors and liquid near range, This also applies
to aerosol sprays and aerosol spray cans.
7. Do not use water on grease fires. Smother fire or flame
or use dry chemical or foam-type extinguisher.
8. Use only dry potholders,
Moist or damp potholders on hot
surfaces may result in burns from steam. Do not use a
towel or other bulky cloth.
9. Select cookware large enough to properly contain food and
avoid boil overs or spillovers. This will save on cleaning
and prevent hazardous accumulations of food, since heavy
splattering
or spillovers left on a cooktop can ignite. Pan
size is especially important in deep fat frying.
10. Never leave cooktop unattended at Hi heat settings. Boil
over causes smoking and greasy spillovers that may ignite.
11. TYPE OF COOKWARE-- Avoid pans that are unstable
andeasilytipped.In choosingpans,lookfor easily-grasped
handlesthat will stay cool. Pansthat are too heavywhen
filled with food can also be a hazard.If pan handlestwist
andcannotbe tightened,discardthe pan.
12. HANDLES-- Alwaysturn pan handlesto the side or back
of the cooktop -- not out into the room where they are
easilyhit. COOKWAREHANDLESSHOULDBETURNED
INWARD AND NOT EXTENDOVER ADJACENT SURFACEBURNERSto minimizeburns,ignition of flammable
materials,and spillage due to unintentionalcontact with
the cookware.
13. Glazed cookware -- only certain types of glass, glassceramic,ceramic, earthenware,or other glazedcookpots
are suitable for range top surface without breaking due
to the sudden change in temperature. Use only such
cookwareasyou knowhavebeenapprovedfor this purpose.
14. Always allow hot pansto cool in a safe place out of the
reachof smallchildren.
15. If a gas odor is detected,cut off the gas supply to the
range.Call your installer or local gas company to have
the possible leak checked.
to locate a gas leak.
16. Keep all controls
Never use a match or other flame
"OFF" when unit is not in use.
17. Keep vent ducts unobstructed.
18. GREASE -- Grease is flammable and should be handled
carefully. Never leave any cooking operation unattended.
Let fat cool before attempting to handle it. Do not allow
grease to collect around the cooktop or in the vents. Wipe
up spillovers immediately.
19. If the range is installed near a window, proper precautions
should be taken to prevent curtains from blowing over
burners creating a FIRE HAZARD.
20. Avoid placing the range in a main "traffic path" or in an
isolated location with no counter space nearby. Visualize
the oven in use before selecting a location. Remember that
open oven doors may block a passageway
and create a
hazard.
21.
Do not use aluminum foil to line aeration tray or burner
basin. Restriction of normal air flow may result in unsafe
operation.
22. Do not use cookware on the grill section of this appliance.
23.
Do not use oven for storage space.
24. CAUTION-- Do not store itemsof interestto children in
cabinets above range -- children climbing on the range
to reachitemscould be seriouslyinjured.
25. Do not touch grill andsurfaceburnerareas,perimetertrim
around cooktop or interior surfacesof oven. During and
after use,theseareasmay be hot enoughto causeburns.
Avoid contact with these areas by clothing or other
flammablematerialsuntil they havehad sufficienttime to
cool. Other surfaces may become hot enough to cause
burns-- among thesesurfacesare the upper door frame
andglass,ovenventopeningandsurfacesnearthe opening,
andthe top edge of the control panel.
26. Use care when opening oven door. Let hot air or steam
escapebeforeremovingor replacingfood.
27. Do not heatunopenedfood containers.Build-upof pressure
may causecontainerto burst andresultin injury.
28. Always place oven racks in desired location while oven
is cool. If rack must be movedwhile oven is hot, do not
let potholdercontacthot heatingelementin oven.
29. Do not clean door gasket. The door gasket is essential
for a good seal.Careshould be taken not to rub, damage
or movethe gasket.
30. Do not use oven cleaners. No commercial
oven cleaner
or oven liner protective coating of any kind should be used
in or around any part of the oven.
31. Clean only parts listed in this manual and use procedures
recommended.
32. CAUTION:
BEFORE
SELF-CLEANING
THE
OVEN,
REMOVE BROILER PAN, FOOD, AND OTHER UTENSILS.
33. Always
remove
soiled
broiler
pan from
the broiler
compartment
after cooking for grease left in the pan may
become hot enough to ignite.
34. Listen for fan. A fan noise should be heard during the broil
and cleaning cycles. If not, call a serviceman
before selfcleaning again.
35. Before servicing your appliance, disconnect
power to the
range at the main fuse or circuit breaker panel and at the
electrical receptacle.
36. Do not allow aluminum
foil or meat probes to contact
heating elements.
37. WARNING: To reduce the risk of tipping of the appliance,
the appliance must be secured by properly installed antitip devices. To check if devices are installed
properly,
remove the access panel and verify that the anti-tip devices
are engaged.
39.
PREPARED FOOD WARNING:
Follow food manufacturer's
instructions. If a plastic frozen food container and/or its film cover
distorts, warps or is otherwise damaged during cooking, immediately discard the food and its container.
The food could be
contaminated.
40.
This appliance has been tested for safe performance using conventional cookware. Do not use any devices or accessories that
are not specifically recommended in this manual Do not use eyelid
covers for the surface units, stovetop grills, or add-on convection
systems. The use of devices or accessories that are not expressly
recommended in this manual can create serious safety hazards,
result in performance
problems, and reduce
the life of the
components of the appliance
Flame size should be adjusted so it does not extend beyond the
edge of the cookware. This instruction is based on safety consideration.
41.
IMPORTANT SAFETY NOTICE AND WARNING
The California Safe Drinking Water and Toxic Enforcement Act of 1986
(Proposition 65) requires the Govemor of Califomia to publish a list of
substances known to the State California to cause cancer or reproductive harm, and requires businesses to warn customers of potential
exposures to such substances.
Users of this appliance are hereby
wamed that when the range is engaged in the self-clean cycle, there
may be some low level exposure to some of the listed substances,
including Carbon Monoxide. Additionally, users are also hereby warned
that the burning of gas can result in low - level exposure to some of the
listed substances, including benzene, formaldehyde
and soot, due
primarily to the incomplete combustion of natural gas or liquid petroleum
(LP) fuels. Properly adjusted burners will minimize incomplete combustion. Exposure to these substances can be minimized by properly
venting the range to the outdoors.
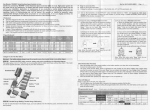
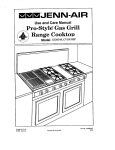
How a Surface
Burner
Works
When
the
surface
burner
valve
is turned
on, gas enters
with air. This air and gas mixture
from the solid state igniter.
flows
to the
A properly
clean
ports
adjusted
burner
with
burner
will
the
head
light
mixer
and
within
tube
is lighted
a few
and
mixes
by a spark
seconds.
The
cone-shaped
flame will be clear blue in color with a clearly defined inner cone. There
should
be no trace of yellow
in the flame. A yellow
flame
indicates
an improper
mixture
of air and gas. This wastes fuel so have a serviceman
adjust the air and
gas mixture
by adjusting
the air shutter
The variable surface controls
in heat setting selection,
llow
to Operate
Failure
Surface
if a yellow
for the surface
in tile
flame
burners
ever occurs.
and grill
Event
burner
provide
flexibility
of a Power
I_urncrs
In case of prolonged power failure, you can manually light the surface burner by
holding a lighted match near the burner ports and slowly turning the control knob
counterclockwise
(after depressing) until the gas ignites. There is no fan so smoke
and condensation can gather,
IN CASE OF POWER
WiLL NOT OPERATE.
FAILURE,
IF THE VENTILATION
OPERATE
GRILL.
SYSTEM
DO
NOT
USE
GRILL.
IS INOPERABLE
FOR
VENTILATION
ANY
REASON,
SYSTEM
DO
NOT
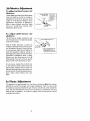
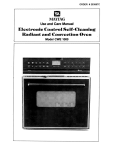
Air Shunt
To adjust
shutters:
At |ustment
surface
Loosen fastening
driver and rotate
burner
air
screw with a phillips screw
air shutter
to increase
or
"_
"-
SURFACE
AIR
BURNER
SHUTTER
SCREW
decrease the size of the air opening.
As the
shutter
is turned
observe
change
in flame
appearance.
Adjustment
is satisfactory
when
a clearly
defined,
even blue flame
results
at the Hi flame
setting.
After
adjustment,
tighten screw.
To adjust
shutters:
The
left
hand
grill
air
burner
shutter
controls
AIR SHUTTER
AIR (
air
shutter
backward
the
rear
GRILL BURNER
or forward
the air shutter
to become soft
AIR SHUTTER
to
increase or decrease the size of the air opening. Air shutters fit snugly on the grill burner,
so a screwdriver
blade may be required
to
make this adjustment.
Observe
change
in
flame appearance
as the air shutter is moved.
Adjustment
is satisfactory
when a clearly
defined,
even blue flame results at the Hi
flame setting. The snug fit of the air shutter
assures it will remain positioned
correctly.
On any burner,
closing
far will cause the flame
TO
OPEN
air
half of the grill burner. The right hand shutter
controls the front half.
Slide
ROTATE
AI'_
SHUTTER
ON
MFXER HEAD TO
MAKE AIR
ADJUSTMENT
INSERT SCREWDRIVER
8LADE
IN SLOT AND TWIST
WiTH
SLIGHT
PRESSURE
TO ALLOW
AIR SHUTTER
TO SLIDE EASILY
too
and
yellow
tipped.
Opening
the air shutter
too
wide will cause the flame to blow away from
the burner ports. Proper adjustment
will produce a sharp,
clearly
defined,
even, blue
flame.
Lo Flame
Adjustment
This appliance
has been shipped
from the factory
with Lo and Med flame settings
adjusted
for use with natural
gas and average
installations.
There is a wide variety
of conditions
caused by altitude
and gas mixtures
controlled
by utility companies,
which will vary and affect the gas flame
made at time of installation.
If conditions
to adjust the Lo setting.
and performance.
change,
follow
10
Adjustments
should
be
the procedures
outlined
To
adjust
the
b_
setting:
1. Light burner and set control
knob for low flame.
2. Remove control
knob from valve stem.
CAUTION:
Never use a metal blade to pry knob off.
tuck the folds of a cloth dishtowel
under
upward with steady, even pressure.
If knob cannot
the knob skirt
3. Insert a slender, thin-blade
screwdriver
into the recess at center
of valve stem
and engage
screw.
blade
with
slot
knob
when
adjustment
at the Lo setting,
FLAME
VALVE
STEM
SIZE
_'C_ J'_'
--
/
Proper adjustment
will produce
a stable, steady
final adjustment
should
be checked
by turning
without
extinguishing
the flame.
This adjustment,
at Med setting.
removed,
the towel
TO INCREASE
FLAME
COUNTERCLOCKWISE
SIZE
in adjusting
4. Turn center stem adjusting screw slightly
to set flame size. Note; Turn clockwise
to reduce
or counterclockwise
to increase flame size.
5. Replace control
is completed.
be easily
and pull
will
blue
knob
automatically
11
flame
from
provide
of minimum
size. The
Ni to Lo several times
the proper
flame
size
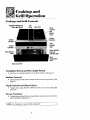
Cooktop
and
Grill
Operation
Cooktop
and
Grill
Controls
Ventilation System and
Oven Light Switch
Air
Grille
Clock
Controls
Minute
Timer
Surface
Surface
Controls
Oven
licator
Light
Grease
Container _.
Clean Indicator
and Lock
Indicator Light
Oven Selector
Temperature
Knob
Door Lock Lever
Ventilation
•
Surface
•
Oven
Light
Switch
system or oven light manually.
(See page 13.)
Controls
Controls
and
Minute
Features time of day, MINUTE
26 and 27.)
Grease
•
and
Use to provide variable heat to cooktop
page 14,)
Clock
•
System
Use to turn on ventilation
surface burners or grill burner. (See
Timer
TIMER
and oven clock controls.
(See pages
Container
Collects grease when grilling or using griddle or spillovers when using surface
burner accessory. (See page 21 .)
I NOTE:
For information
on oven controls, see page 24.
12
I
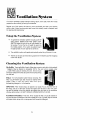
Ventilation
System
The built-in ventilation
system removes cooking
vapors,
prepared on the cooktop,
grill and grill accessories.
odors
and smoke
from
foods
Regular
use of this system will insure a more comfortable
and less humid kitchen
which is free of heavy cooking
odors and fumes that normally
create a frequent
need
for cleaning and redecorating.
Using
tile
Ventilation
System
To operate the ventilation
system manually,
push the
three position
VENTILATION
AND OVEN LIGHT
SWITCH
located in front of the air grille toward the
fan symbol.
To turn the fan off, push the switch to
the middle position.
If the switch
is pushed toward
the light symbol, the oven light will be turned on.
•
The ventilation
•
The fan can be used to remove strong odors from the kitchen as when chopping
onions near the fan.
Cleaning
system
the
will operate
automatically
Ventilation
when
the grill burner
is in use.
System
Air Gx411e:
The air grille lifts off easily. Wipe clean or wash in sink with mild household
'etergents.
May be cleaned
in dishwasher.
NOTE:
The oven vent is located under
e grille. When using or cleaning
the oven, hot and moist
_'ir may be noticed in this area. Be careful not to spill anything
into this vent.
Filter:
Turn off ventilation
system before removing.
The
filter is a permanent
type and should
be cleaned
when
soiled.
Clean
in sink
with
warm
water
and liquid
dishwashing
detergent
or in dishwasher.
IMPORTANT:
Filter should always
be placed at an angle. As you face the front of
the range, the top of the filter should
rest against the left side of the vent opening and the bottom
of the filter should rest against the right side of the ventilation
chamber
at the bottom.
DO NOT OPERATE
SYSTEM
WITHOUT
FILTER.
V_ntilation
4_hamb_r:
This area, which houses the filter, should be cleaned in
the event of spills or whenever it becomes coated with a film of grease. May be cleaned
with paper towel, damp cloth or sponge and mild household detergent.
13
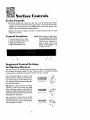
Surface
To Set
Controls
Controls
• Since the controls are a push-turn type, they must be pushed down before
turning. To set (from the OFF position), push down on control knob and immediately turn counterclockwise
to the LITE position until burner ignites. After
ignition, turn knob clockwise to desired setting.
• Igniter will continue to spark until
Hi position on knob.
Control
1.
2.
3.
4.
knob is turned
Locations
Control
Burners
back to or past
NOTE: When using an AG200 surface
burner assembly with control
locations #1 and #2, the control
knob may be turned to a
position lower than the Lo
setting. (The Lo detent is set
for the grill burner.)
Left rear surface burner or grill
Left front surface burner or grill
Right rear surface burner
Right front surface burner
Suggested
for Surface
clockwise
Settings
The size and type of cookware and the amount and type of food being cooke
will influence the setting needed for best cooking results. The setting indicate,J--should serve as a guide while you become familiar with your cooktop.
Use the Hi flame setting to quickly bring
foods to a boil or to begin a cooking operation. Then reduce to a lower setting to continue cooking. Never leave food unattended
over a Hi flame setting.
Med setting is used to continue a cooking
operation. Food will not cook any faster
when a Hi flame setting is used than that
needed to maintain a gentle boil. Remember,
water boils at the same temperature whether
boiling gently or vigorously.
Use Lo setting to keep food at serving
temperatures without further cooking. You
may find that some cooking may take place
if the cookware is covered.
14
/
\
Cookware
Size
Selection
of Cookware
Flame size should be adjusted so it does not extend beyond the edge of the cookware.
This instruction is based on safety considerations.
Adjusting the size of the flame
to fit the size of the cookware also helps to save fuel.
CAUTION: Leave a minimum of 1V2" between side of pan and surrounding surfaces,
such as countertop
backsplash or side walls, to allow heat to escape and avoid
possible damage to these areas.
Cookware
Materials
Stainless steel, porcelain enamelware, glass, and glass ceramic cookware designed
for surface cooking usually heat slowly and conduct heat poorly when a large flame
size is used. Turn the knob to adjust the flame size to extend only halfway between
center and edge of the cookware bottom for better cooking results. Aluminum cookware
conducts heat more evenly; therefore, a slightly larger flame size can be used. The
flame can be adjusted so it comes to the edge of the cookware. The flame should
NEVER be adjusted so that it extends beyond the bottom of the cookware.
Covered
Cookware
If the cookware
can be used.
is covered,
NOTE:
less fuel will be needed; therefore,
a lower flame size
Food will not cook any faster when more than the amount
to maintain a gentle boil is used.
15
of heat needed
Surface
Module
Burner
I
Io
Install
1. Be sure control
Burner
knobs
Module
are turned
off.
2. If the grill burner and grill grates are in place, remove before installing
a surface
burner module. Clean burner basin of any grease accumulation.
(See page 21 fc
cleaning recommendations.)
3. Position the burner assembly with the mixer tube openings toward the orifices
Slide
the burner assembly toward the orifices until opening for igniter is over the igniter.
Lower into place until side openings are resting on the burner supports and igniter
is centered between the two flash tubes.
4. Install the aeration tray by inserting the prong at the end of the pan into the opening
in the end of the burner basin. Lower the opposite end into the range top.
To
l{cn.ovc
llurncr
1. Control knobs should
2. Remove the aeration
the left side) until the
3. Hold aeration tray by
and clear the surface
Module
be in the OFF position and the range top should be cool.
tray by lifting up the front end on the right side (back end on
top clears the opening of the range top by about 5 inches.
the sides and slide away to remove the prong from the opening
burners.
4. Lift up on the sides of the surface burner assembly bracket about 2 inches. Slide
away from the orifices.
5. A storage tray, Model AG350, is available and can be used for storing a surface burner
module.
Note:
Optional surface burner assembly, Model AG200, can replace the grill burner
assembly. Model AG200 air shutters have been adjusted for compatibility
on
the left side.
I
Note:
Do not disassemble
__
the surface
burner
16
assembly.
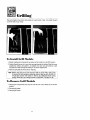
Grilling
The grill consists of two black
on the left side of your range.
grill
To
Module
Install
Grill
1. Before installing
grates
grill components,
and a grill
be certain
control
burner.
Note:
only
install
the grill
knobs are in the OFF position,
2. Position the grill burner with mixer tube openings towards the orifices. Slide the burner
towards the orifices until igniter is in between front and rear grill sections.
Lower
into place until side openings are resting on the burner support pins.
3. Place the grill grates on the top of the range top.
Note-
To
Before using the grill for the first time. heat the E-yen Heat TM grill burner
to remove the black protective
shipping
coating. Heat the grill on Hi for 10
minutes and use the vent system to remove any additional
smoke during
cooling, When the E-ven Heat grill burner is a dull black, it is ready to use.
Remove
Grill
1. Remove
position.
grill
components
2, Remove
grill grates.
3. Remove
grill burner.
Module
once they are cool.
17
Be sure control
knobs
are in the OFF
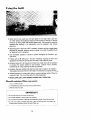
Using
•
the
Grill
Before the first use, wash your new grill grates in hot soapy water, rinse and
dry. Then "season" the surface by wiping on a thin coating of cooking oil. Remove
excess oil by wiping again with another paper towel. This procedure should be
repeated after cleaning in the dishwasher since the detergent may remove
seasoning.
• Seasoning prior to each use is NOT necessary. However anytime a sugar-based
marinade (for example, barbecue sauce) is going to be used, the grates should
be "seasoned" prior to reheating.
•
Use nonmetallic
grate finish.
spatulas or utensils to prevent damaging
the Excalibur®
grill
• Preheat grill on Hi setting for 5 minutes. Preheating improves the flavor and
appearance of meats and quickly sears the meat to help retain the juices.
• Excessive amounts of fat should be trimmed from meats. Some fat is necessary
to produce the smoke needed for that smoked, "outdoor" flavor. However,
excessive fat can create cleaning and flare-up problems.
• Excessive flare-ups indicate that either the grill interior needs to be cleaned r
that excessive amounts of fat are in the meat or the meat was not properly trimmec,....
• Grease drippings will occasionally ignite to produce harmless puffs of flame for
a second or two. This is a normal part of the cooking process.
• NEVER LEAVE GRILL UNATTENDED
Should
sustained
flare-up
DURING GRILL OPERATION.
occur:
1. Turn on FAN manually.
2. Immediately turn grill heat control knob to OFF position.
3. Remove meat from grill.
IMPORT_LYT
• DOnot use aluminum foil insidethe grill area_
• Do not use charcoal or wood chips in the grill area.
• Do not allow burner basin to become overloaded with grease. Clean after each use.
• Do not cover grates completely with meat. Leave air space between each steak, etc.
to allow proper ventilation as well as prevent flare-ups.
18
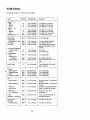
Grill
Preheat
Guide
grill on Hi, 5 or 10 minutes,
Type
Setting
I
Steak (t_. ¾,,)
Rare
Medium
Well
Steak (1 - 1'_ ")
Rare
Medium
Well
Hamburgers (_,,_- %")
Pork Chops
Fully-cooked
Smoked Pork Chops
Ham Slices
Pork Ribs
Fully-cooked Sausages'
Hot Dogs, Brats,
Polish
Fresh Sausage
Links
Patties (3-inch
diameter)
Italian Sausage
:
Hi
Hi
Hi
for best flavor.
Cooking
Time
6 to 10 minutes
10 to 16 minutes
12 to 24 minutes
24
30
34
25
minutes
minutes
minutes
minutes
I Procedure
Turn after 3 to 5 minutes.
Turn after 5 to 8 minutes.
Turn after 6 to t2 minutes.
Hi
Hi
Hi
Med
14 to
18 to
24 to
20 to
' Turn
Turn
Turn
Turn
after
after
after
after
7 to 12 minutes.
9 to 15 minutes.
12 to 17 minutes.
half the time
Med
20 to 30 minutes
Turn occasionally.
Mad
Med
Med
10 to 15 minutes
15 to 20 minutes
50 to 65 minutes
Turn once. Glaze if desired.
Turn after half the time.
Turn occasionally.
Brush with
barbecue sauce during last 15
Hi
HI
7 tO 12 minutes
13 to 16 minutes
Turn once.
Turn occasionally.
Mad
15 to 25 minutes
Turn occasionally.
Med
Med
15 to 20 minutes
25 to 30 minutes
Turn after half the time.
Pierce casing with a fork. Turn
once.
Lamb Chops
Hi
20 to 30 minutes
Turn occasionally.
glaze, if desired.
Turn
Turn
Turn
Turn
Brush with
, Chicken
Pieces: Bone-in
Boneless Breasts
Wings
Cornish Hen (halved)
Med
Med
Med
Mad
35
25
25
35
Fish
Small, Whole (1")
Med
15 to 20 minutes
Salmon Steaks (1")
Med
20 to 25 minutes
Fillets (1/2"')
(with skin on)
Med
10 to 15 minutes
Lobster Tails
(_ lb. uncooked)
Med
30 to 35 minutes
Brush with butter. Turn
occasionally.
Shrimp
(skewered
Med
10 to 20 minutes
Turn and brush with butter or
marinade frequently.
to
to
to
to
50
35
35
45
minutes
minutes
minutes
minutes
- uncooked)
Garlic Bread
Hot Dog,
Hamburger
Buns
occasionally.
occasionally.
occasionally.
occasionally.
Brush with butter. Turn after half
the time.
Brush with butter. Turn after half
the time.
Start skin side down. Brush with
butter.Turn
after ha!f the time.
Mad
4to
6 minutes
Turn after half the time.
Med
1 to
2 minutes
Turn after half the time.
19
Grilling
Tips
With your Jenn-Air grill literally any food you've considered "at its best" when prepared
outdoors can now be prepared indoors with great flavor and less fuss.
The following suggestions
of the equipment.
are good rules to follow and will increase your enjoyment
Be sure to follow directions on page 18 for using the grill,
Suggested
cooking
times and control settings are approximate
due to variations
in meats. Experience
will quickly
indicate cooking
times as well as which settings
work best.
For best results,
buy top grade
Score fat on edges
cooking.
of steak,
meat.
but do not cut into
meat,
to prevent
curling
while
For the attractive
"branded"
look on steaks, be sure grill is preheated.
Allow
one side of meat to cook to desired aloneness,
or until juices appear on the
top surface,
before turning.
It takes fewer minutes
to cook the second
side.
Turn
steaks and hamburgers
just once.
Manipulating
food
causes
loss of juices.
When basting
meats or applying
sauces to foods,
remember
that excessive
amounts
wind up inside your grill and do not improve
the food flavor. Apply
sauces during the last 15 to 20 minutes of cooking
time unless recipe specifies
otherwise.
Plus, anytime a sugar-based
marinade
(for example,
barbecue
sauce)
is going to be used, the grates should be "seasoned"
prior to preheating
(see
page 18).
There are many meat marinades
of meat for cooking
on the grill.
Certain
foods,
such as poultry
with oil or melted
butter
which
will
and non-oily
occasionally
while
help tenderize
less expensive
fish, may need some
cuts
extra fat. Brusl_""
grilling.
Use tongs with long handles or spatulas for turning
as these pierce the meat, allowing juices to be lost.
meats. Do not use forks
• To help retain meat juices, salt after turning meat or after cooking is completed.
2O
Cleaning
the
Grill Grates:
nonstick finish.
Grill
These are made from
cast aluminum
which
are coated with the Excalibur®
• After the grill grates have cooled, wipe off grates with a paper towel. Wash cool grates
(DO NOT IMMERSE HOT GRILL GRATES IN WATER) with soap or detergent in hot
water in the sink or wash them in the dishwasher.
Be sure to remove all food residue
before cooking
•
on the grill grates again.
Remove
stubborn
cleaning
products
surfaces.
spots with a plastie
mesh puff or pad. For best results,
use only those
which
state they are recommended
for use when
cleaning
nonstick
• If grates were washed in the dishwasher,
season with oil prior to grilling.
• Do not use metal brushes or abrasive scouring
pads or other scrubbers intended to
clean outdoor charcoal grills. These will remove the finish as well as scratch the grates.
Do not clean in the self-cleaning
oven or use oven cleaners on the grates.
Grill Burlier:
The grill burner should
a soapy S_O.£, pad or in the dishwasher.
heavy soil;b,?rder
should be cleaned first
it can be clea_d in a self-clean oven for 2
be cleaned after each use. It can be cleaned with
Rinse and dry thoroughly
before using again. For
with a soapy SOS. pad, rinsed and dried. Then
hours.
Nole: Check to be sure all ports are open. To open clogged
directly into each port.
Porcelal.
Burner
This area should
Basin:
ports, insert a toothpick
be cleaned after each use of the grill.
• To remove light soil, clean area with soapy water or spray with cleansers such as 409
or Grease Relief. For easier clean-up, lay paper towels in grill basin, spray with a
household cleanser, and soak for at least a half-hour or longer,
• To remove moderate
scrubber.
• To remove stubborn
soil, scrub with Comet, Bon Ami, a soft scrub cleanser
or plastic
soil, spray with an oven cleaner such as Easy-Off; let soak overnight,
wipe clean, rinse and dry.
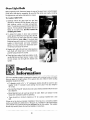
!;.rea_sc !{;o.tainer:
This container collects grease and other liquids created while grilling or using some of the accessories; or spillovers while using the surface burner accessory. Empty when grease
is noticeable through container window.
s Check the container periodically to prevent grease from spilling
over. If this should happen, the grease will flow over the front
of the container thus alerting you to empty the container. The
container is made from polypropylene
and can be washed in
hot, soapy water, A few tablespoons of dishwashing liquid and
water added to a clean container will make it easier to empty
when full. May be washed in dishwasher.
21
Cleaning
of Your
Control
The knobs
Other
Range
Parts
Knobs
on the control
panel can be removed
with
the controls
in the OFF
position.
Pull each knob straight from the shaft. Wash knobs in warm soapy water or dishwasher;
do not use abrasive
cleansers
or materials.
To replace each knob, match flat part
of knob
opening
with the flat of the shaft,
returning
in OFF position.
IMPORTANT:
Never use a metal blade to pry knob off. If knob cannot
tuck the folds of a cloth dishtowel
under the knob skirt and pull
with steady,
even pressure.
Control
Dial
Area
Use mild cleansers,
such as soapy water, glass cleaners
as 409. Wipe with sponge,
damp cloth or paper towel.
pads or abrasive cleansers.
Clock
be easily removed,
the towel upward
Control
or mild liquid sprays, such
Do not scrub
with S.O.S.
Surface
Wipe with paper towels dampened
with
with S.O.S. pads or abrasive cleansers.
soapy
water
or glass
cleaner.
Do not
scrub
Igniters
• It
is important
obstructions
are blocked,
• The
igniter
to
keep
igniter
to avoid ignition
use a toothpick
cap and
scrubber.
The wire
Rinse and dry.
Surface
stem
can
electrode
Burner
port
openings
on
burners
failu re and possible gas buildup.
to remove food particles,
be cleaned
inside
the
with
warm
soapy
cap can be cleaned
clear
and
free
of
If the port openings
water
and
with
a small
a plastic
brush-.-.
Assennl)ly
The surface burner assembly can be cleaned with mild detergents
and a plastic scrubber,
or washed
in the dishwasher.
To prevent
scratching
the burner
heads, do not use
abrasive cleansers or scrubbing
pads. Do NOT clean in a self-clean
oven.
--Note:
Check_-_-_obep_orts
sure all
are o_pen. T_0 open clo_ge-d ports, insert-----a -1
toothp ck d rect y nto each port.
Glass
on
Use any suitable
Oven
Door
line
Oven
glass cleaner
Door
or soapy
Front
water.
Trim
SlightLy dampen
a cloth or paper towel with a nonabrasive
cleanser,
such as Bon
Ami, soapy water or glass cleaner.
Do not use excessive
amounts
of water or allow
water to run down through
the air vents in the door since this will cause streaks
which will be visible through the glass door.
22
Stainless
Steel
The top of the range
stainless steel.
Areas
(the trim area around
the burner
basin areas),
is made of
• To clean light soil, wipe with soapy cloth or nonabrasive cleanser, such as Soft
Scrub. Rinse, buff with soft cloth; polish with glass cleaner if necessary.
• To clean moderate soil or discoloration of the surface (excessive heat will cause
a golden discoloration), clean with Zud, Bar Keepers Friend, or Luneta (JennAir Model A912, Part No. 712191). With a sponge or cloth, rub cleanser with
the grain to avoid streaking the surface. Rinse well, buff dry; polish with a glass
cleaner if necessary to remove cleanser residue and smudge marks.
•
Heavy soil, such as burned on food soil, can be removed by first cleaning as
per the instructions for moderate soil. Stubborn stains can be removed with
a damp Scotch-Brite scour-pad; rub evenly with the grain to avoid streaking
the surface. Rinse well, buff with dry cloth; polish with glass cleaner if necessary
to remove cleanser residue and smudge marks. Scotch-Brite is also useful in
buffing and removing minor scratches.
•
Stubborn food stains may also be removed by spraying with Easy-Off oven
cleaner, Allow to set overnight, then rinse. If stains remain, clean with recommended cleansers such as Zud, Luneta (Jenn-Air Model A912, Part No. 712191),
or Scotch-Brite scour-pad. CAUTION: When using Easy-Off, avoid spraying areas
other than the stainless steel such as the air grille, control knob area, areas
around cooktop. Immediately wipe up any spray from these areas with a damp
cloth. Read the manufacturer's precautions on using oven cleaners. The caustic
materials in these products will discolor materials such as aluminum, brushed
or chrome plate. Hint: Easy-Off can be used to clean the porcelain burner basin
area.
23
Oven
Owen
Operation
Controls
Ventilation
(pictured on page 12)
System
and
Oven
Light
Switch
• The oven light automatically
comes on whenever
the oven door is opened.
When
the door is closed, the oven light may be turned on by pushing the three position
switch toward the light symbol.
To turn oven light off, push switch to the middle
position.
Light cannot be turned on during the self-cleaning
process.
If the switch
is pushed toward the fan symbol, the ventilation
system will be turned on.
Clean
Indicator
Light
• Indicates
when all controls
have been properly
Light will remain
on during
the entire cleaning
advanced through the set cleaning time.
l_ck
indicalor
set for the self-cleaning
process.
process and until the timer has
L|ght
• Will glow after the oven door has been automatically
temperature
is over 550°F). Door cannot be opened until
below 550°F and the lock indicator
light goes off.
Selector
Knob
• Th_s knob controls the oven operation.
To operate
and turn TEMPERATURE
knob to desired setting.
The
settings
setting
are:
The oven will not operate when knob is on this setting. Keep knob
on this position when oven is not is use,
BAKE
Use for radiant
30, 32 and 35.)
TIME BAKE
Use with clock controls for automatically starting and stopping oven
when baking or roasting in the radiant bake oven. (See pages 28-29.)
bake (conventional)
baking
or roasting.
(See pages
CONVECT
Use for convection
TIME CONVECT
Use with clock controls for automatically
when baking or roasting in the convection
BROIL
Use for top browning
or oven broiling of foods. (See pages 38-39.)
CLEAN
Use for self-cleaning
process. (See pages 40-45.)
Lock
Oven
baking or roasting, (See pages 31-37.)
starting and stopping oven
oven. (See pages 28-29.)
laver
• Use to lock over) for self-cleaning
knob is on CLEAN setting.)
Indicator
process.
(Can only
be locked
when
temperature
Light
Indicates when oven is turned to an operating
position other than the CLEAN setting.
Light will glow until the desired temperature
is reached.
It will cycle on and off
as this temperature
is maintained
during cooking.
Temperature
•
the oven, turn to desired
OFF
Door
•
locked
(after the oven
oven temperature
drops
Knob
Use to set oven temperature.
Be sure the indicator
line is in line with
temperature
desired. This knob is used with all oven operation
settings
the SELECTOR
knob.
24
the exact
noted on
Oven Operation
Baking
or Roasting
1. Locate oven racks on proper rack positions.
2. Turn TEMPERATURE knob to desired temperature.
3. Turn SELECTOR knob to BAKE or CONVECT setting. When the OVEN INDICATOR LIGHT cycles off, the oven is preheated to the selected temperature. Place
the food in the oven. The OVEN INDICATOR
LIGHT will cycle on and off
throughout the baking process. Preheat only when necessary. Refer to baking
and roasting sections as to when preheating is recommended,
4. After baking, turn both TEMPERATURE and SELECTOR knobs to OFF position.
Rack
Positions
The rack positions noted are generally recommended for the best browning results
and most efficient cooking times. For many food items, excellent results can be
achieved when using one of several different rack positions. Refer to baking and
roasting sections for recommendations
for specific foods.
Different
Racks:
Two flat racks and one offset rack were packaged with your oven. The use of the
offset rack is denoted in the list below and the charts as an "o" after the rack number.
rack)
(flat rack)
Use
Rack
Position
=1:
Large cuts of meat and large poultry, angel food cake, loaves of bread, custard
pie, dessert souffle.
Use
Rack Position
#20 (offset
rack
on #2)=
Roasting small cuts of meat, loaves of bread, angel food cake.
Rack
Position
#2:
Roasting small cuts of meat, cakes (tube, bundt or layer), frozen fruit
pie shell, large casseroles.
Use
Rack Positiun
#3o (offset
rack on #3):
Most baked goods on cookie sheets, frozen convenience
pie, cream pie, layer cakes, main dish souffle.
Use lack
PosiUon
#tJ:
pie,
Use
Most baked goods on cookie sheets, cakes (sheet and layer).
Use
Rack
Position
Most broiling.
#40
(offset
rack
on
#4):
Multiple
Rack
Cooking:
Two rack, use #20 and #4. Three racks, use #1, #3o, and #4.
25
foods,
fresh fruit
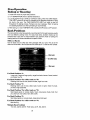
Clock
Controls
INDICATOR
DISPLAY
WORDS
/
\
12 HOUR
TIME
KEY:
• DOl means
OF
DAY
WINDOW
MINUTE
CLOCK
AND
SECOND
TIMER
to push.
Dash means to hold.
Clock
Setting
IMPORTANT: The clock is a 12 hour clock. When oven is first supplied
power is interrupted, the display will show "00:00".
To set time
of day
power or
on clock:
1. Turn SET dial counterclockwise
until theword
TIME appears in the Display Window.
Then, turn the SET dial in either direction until the correct time appears in window.
2. Push ENTER button.
To change
time
of day
set
on clock:
Repeat
above sequence.
To check
time of day when
timer
is in use:
Push ENTER button.
of day will be displayed briefly, then display will return to timer function.
26
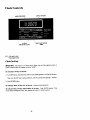
Time
Minute
Tinier
IMPORTANT: This interval timer can be used to remind you when a period, up
to 99 minutes and 00 seconds, expires. It can be used independently
of any other
oven activity and can be set while another oven function is operating. The timer
does not control the oven.
To set
MINt_FE
TIMER:
1. Turn SET dial clockwise
in the Display Window.
until desired number
of minutes and seconds
appear
EXAMPLE: Turn the dial to 5 for 5 seconds or to 5:00 for 5 minutes.
IMPORTANT:
This is the only function where time entered is in minutes
seconds. Minutes are to the left of colon and seconds to right of colon.
and
DISPLAY
5 SECONDS
2. Push
ENTER
5 MINUTES
button,
The indicator word TIMER will remain in Display Window during countdown. Countdown will have display precedence over anything else programmed, such as TIME
BAKE. At end of time set, the indicator word TIMER will blink and timer will
beep. Beeping will continue every 10 seconds for 15 minutes unless the CANCEL
button is pushed once. After CANCEL button is pushed, Display will return to
time of day or whatever is programmed on control panel.
fo cancel
MIN[TFE TIMER:
Push CANCEL button once. Pushing
button twice will cancel a!l programming
(time bake or self-clean).
27
CANCEL
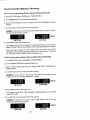
Clock-Controlled
To set oven
Baking
t_ start
1. Turn SELECTOR
or
immediately
Roasting
and
shut
off automatically:
knob to TIME BAKE or TIME CONVECT.
2. Turn TEMPERATURE
knob to desired temperature.
3. Hold in STOP TIME button until the indicator words STOP TIME appear in Display
Window.
4. Turn SET dial to time you want food to stop cooking.
EXAMPLE: If time of day is one o'clock and the roast needs to cook for 3 hours,
the stop time would be four o'clock.
DISPLAY
TIME OF DAY
STOP TIME
5. Push ENTER button to enter stop time.
The indicator word AUTO will appear in the Display Window and oven will start
heating. The oven indicator light will glow until the desired temperature is reached.
When stop time is reached, the oven shuts off and the indicator word AUTO
will begin to blink and timer will beep. Beeping will continue every 10 seconds
for 15 minutes unless the CANCEL button is pushed twice.
To set
oven
to start
1. Turn SELECTOR
at future
t/me
and
shut
off automatically:
knob to TIME BAKE or TIME CONVECT.
2. Turn TEMPERATURE
knob to desired temperature.
3. Hold in START TIME button until the indicator
Display Window.
words START TIME appear
in
4. Turn SET dial to time you wish food to start cooking.
EXAMPLE:
If time of day is 11:30 and the roast needs
o'clock,
turn dial until numbers
1:00 appear in display.
to start
cooking
at one
DISPLAY
TIME OF DAY
START TIME
5. Push ENTER button to enter start time,
The indicator words STOP TIME will appear
to set STOP TIME.
in Display Window
as a reminder
6. Turn SET dial to time you want food to stop cooking.
EXAMPLE: If start time is one o'clock
the stop time would be four o'clock.
and the roast needs to cook for 3 hours,
DISPLAY
START TIME
STOP TIME
28
7. Push
ENTER
button
to enter
stop time.
The indicator word AUTO will blink in the Display Window. When
is reached, the indicator word AUTO will remain in Display Window.
indicator light will glow until the desired temperature is reached.
start time
The oven
When stop time is reached, the oven shuts off and the indicator word AUTO
will begin to blink and timer will beep. Beeping will continue every 10 seconds
for 15 minutes unless the CANCEL button is pushed twice.
To check
button
until
will
ST,_T
TIME
before
the words START TIME
be displayed
To change
briefly,
START
then
Display
TIME
before
Cooking
begins:
appear in the Display
will
return
cooking
Hold in START
TIME
Window.
The start time
to time of day.
begins:
1. Hold in START TIME button until the words START TIME appear in the Display
Window.
2. Turn SET dial to desired time.
3. Push ENTER
programmed.
button
twice to enter new start time and stop time previously
To check
STOP TIME:
Hold in STOP TIME button until the words STOP TIME
appear in the Display Window. The stop time will be displayed briefly, then Display
will return to on-going program.
To change
STOP
TIME:
1. Hold in STOP TIME button
Window.
until the words
STOP TIME appear
in the Display
2. Turn SET dial to desired time.
_. Push
ENTER
button
to enter
stop
time.
To C_ncel
function
programmed:
Push CANCEL button
function, during programmed time or after time has expired.
baking, turn SELECTOR
twice to cancel
NOTE:
After clock-controlled
to OFF position.
and TEMPERATURE
knobs
NOTE:
Since food continues to cook if left in the oven, it is suggested that the
clock controls be used primarily to start the oven when no one is in the
kitchen. Provisions should be made to have the food removed as soon
as the signal has sounded.
NOTE: If more than 7 seconds elapses between holding in START TIME button
or STOP TiME button and turning the SET dial, the display window
will automatically return to on-going program.
NOTE:
If more
than
1 minute
elapses
between
turning
SET
dial
to a new time
and entering
new START TIME and STOP TIME, the entire
will be cancelled and display will return to time of day clock.
29
program
Baking
General
Baking
Recommendations
• When cooking foods for the first time in your new oven, use recipe cooking
times and temperatures as a guide.
• Use tested recipes from reliable sources.
• Preheat the oven only when necessary. For baked foods that rise and
for richer browning, a preheated oven is better. Casseroles can be started
in a cold oven. Preheating takes from 5 to 9 minutes; place food in oven
after OVEN INDICATOR LIGHT cycles off.
• Arrange oven racks before turning on oven. Follow suggested
tions on page 25 and in the various baking charts.
rack posi-
• Allow about 1 to 1V2inches of space between the oven side walls and
pans to allow proper air circulation.
• When baking foods in more than one pan, place them on opposite corners
of the rack. Stagger pans when baking on two racks so that one pan
does not shield another unless shielding is intended. (See above photo.)
• To conserve energy, avoid frequent or prolonged door openings.
end of cooking, turn oven off before removing food.
• Always test for doneness (fingertip, toothpick, sides pulling
pan). Do not rely on time or brownness as only indicators.
At the
away from
• Use good quality baking pans and the size recommended
in the recipe.
• Dull, dark, enameled or glass pans will generally produce
crust. Shiny metal pans produce a light, golden crust.
a brown, crisp
• Frozen pies in shiny aluminum pans should be baked on a cookie sheet
on rack 2 or be removed to a dull or glass pan.
30
Convection
Baking
Recommendations
• As a general rule, when using recipes or prepared mixes developed for a radiant
bake oven, set the oven temperature 25°F lower than the recipe recommended
temperature. Times will be similar to or a few minutes less than recipe recommended times. The chart on page 32 compares times and temperatures
of
many baked foods. Use this as a reference.
• For better browning, large pans such as cookie sheets, or rectangular baking
pans should be placed lengthwise, front to back, on the rack. This centers
the food in front of the convection fan for better air circulation which gives
better overall browning.
• Cookie sheets should be without sides and made of shiny aluminum. The
best size to use for cookie sheets is 151_ x 12-inches (overall size, includes
handles).
Causes
of Cake
Failure
Problem
Possible Cause
Cake Falls
Oven not hot enough
Insufficient baking
Opening oven door during baking
Too much or too little leavening, liquid or sugar
Peaks in center or
cracks on top
Oven too hot at start of baking or overbaking
Pan size too small
Too little or too much flour or leavening
Overmixing
Flat Cake
Pan too large
Overmtxing or undermixing
Too much or too little liquid
Old or too little baking powder
Uneven cakes
Range not level
Batter uneven
Cake pans too close to oven walls or each other
Sticks to pan
Cake cooled in pan too long
Pan not greased and floured
|
Cracks and falls apart
Removed from pan too soon
Too much shortening, leavening or sugar_
Excessive shrinkage
from sides of pan
Oven too hot or overbaking
Overmixing
31
]
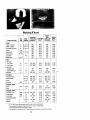
Baking
Chart
CAKE
1
Yet|ow - 2 layers
White - 2 layers
Chocolate _ 2 layers
9"
2, 30, or 3
325 °
9"
2, 30, or 3
325 °
9"
'2,3o,
or3
25-30
40-45
350 °
33-38
50-65
375 °
325 °
325 °
15-20
350 °
325 °
17-22
3500
45-60
400°-425
°
45-60
40-65
400°-425
°
40-65
tube
2
325 _
325 °
Angel Food
Pound Cake
tube
9" loaf
1, 20, or2
2
350 `=
3000
Cupcakes
Sheet Cake
30
15x10'"
3
Fruit, fresh
9"
30
375 °-400°
Fruit, frozen
One Crust
9"
2
J
.
30-35
25-30
30-.35
40-53
33-38
55-70
15-25
20-25
350 °
350 °
350 °
Bundt
25-30
22_30
PIES
Two Crust
375°-400
°
I
40-50
fresh
9"
1
325 °
40-50
Cream!Meringue
Pie Shell
9"
3o
375 °
8-12
350 °
400 °
9"
2
400o-425 °
8-12
4250-450
°
8-!2
350°-375
°
350o-375
°
8-12
8-12
3500-375
°
Custard,
8-12
COOKIES
3o
325 °
8-12
8-12
8-12
30-35
1 or 20
3o
350 °
375 °
20-25
10-15
3750-400
°
20-30
10-20
40-60
350o-375
°
50-70
25-30
350 °
25-35
15-30
400 °-450 °
10-15
400 °
15-30
10-20
Chocolate Chip
Peanut Butter
30, or 3
30, or 3
325°-350
325°-350
°
°
Sugar
Brownies
3o, or 3
325°-350
°
I 9x9"
350 °
8-12
33-38
!
BREADS,
Loaf
YEAST
loaf
Rolls
BREADS,
375 °
QUICK
Loaf, Nut, Fruit
Gingerbread
Cornbread
Cornbread
Muffins
loaf
9x9"
8x8"
Biscuits
Muffins
• An "o" after a rack number
1,2o, or2
30
30
30
30 or3
3o
3250-350
°
325 °
3750-400
°
375 _
i
375°.-400 °
8-12
375 °
10-15
4000-425
°
400 °
implies that the offset rack should be used.
** The times given are based on specific brands of mixes or recipes tested.
Actual times will depend on the ones you bake.
**" The CONVECT temperature
is 25°F lower than recommended
on package
32
mix or recipe.
Convection
Baking
Frozen
Convenience
of
Foods
• Preheating the oven is not necessary.
• Follow package recommendations for oven temperature, foil covering and use
of cookie sheets. Baking times will be similar. See chart below for some exceptions and examples.
• Center foods in the oven. If more than one food item is being baked or if
foods are being baked on multiple racks, stagger foods for proper air circulation.
• Most foods are baked on rack position #3o.
• For multiple rack baking, use racks #1, 3o and 4. However, pizzas should be
placed on cookie sheets and baked on rack position #2o, 3 and 4.
Here
are
a few
!
FROZEN
CONVENIENCE
FOODS
examples
RACK
POSITION
of times
and
temperatures:
CONVECTION
OVEN
NOT PREHEATED
Minutes
Temp.
_F
RADIANT BAKE
PREHEATED
Minutes
Tem_
°F
Chicken, fried
30
35
375 °
35-40
375 °
Donuts, glazed
3o
7
300 °
6-7
300 °
Fish, batter fried
3
25
375 °
25-30
375 °
French fries
3
18
450 °
16-20
450 °
(28 oz.)
30
47-50
375 °
45-50
375 °
Pot Pies
3o
35-40
400 °
35-40
400 °
3
17-20
400 °
15-17
425 °
30
55-60
375 °
6O
375 °
Macaroni & Cheese
Pizza
Turkey, slices with
gravy (TV dinner)
(28 oz.)
33
Convection
Cooking
on Multiple
Racks
For best results, bake foods on one rack at a time as described in this manual.
However, very good results can be obtained when baking quantities of foods on
muJtiple racks. Quantity cooking provides both time and energy savings.
The convection oven is suggested for most multiple rack cooking, especially three
rack cooking, because the circulating heated air results in more even browning
than radiant. For two rack cooking, the radiant bake oven provides very good baking
results especially when pans can be staggered, as with layer cakes and fresh pies.
Many foods can be prepared on three racks at the same time. These are just a
few examples: cookies, cupcakes, rolls, biscuits, muffins, pies, frozen convenience
foods, pizzas, appetizers, and snack foods.
To obtain the best results in multiple
• Use temperature
rack cooking,
follow these suggestions:
and times in this manual as a guide for best results.
• For two rack baking, rack positions #2o and 4 are best for most baked products
but positions #2 and 4 also provide acceptable results.
• For three rack baking
(See page 33)
use positions
#1, 3o and 4. One exception
is pizza.._...
Since foods on positions #1 and 4 will usually be done before foods on
position #30, additional cooking time wil_ be needed for browning foods on
the middle rack. An additional minute is needed for thin foods such as cookies.
For foods such as biscuits, rolls, or muffins, allow 1 to 2 more minutes.
Frozen pies and pizzas, which should be baked on a cookie sheet, need
about 2 to 4 more minutes.
• Stagger small pans, such as layer cake pans, in the oven.
• Frozen pies in shiny aluminum pans should
baked on rack positions #1, 3o and 4,
• Cookie sheets should be placed lengthwise,
fan for more even browning.
• Oven meals are recommended
#1 and 30 or #20 and 4.
be placed on cookie sheets and
front to back, in front of the
for energy conservation.
34
Use rack positions
Roasting
General
Roasting
Recommendations
•
•
Preheating is not necessary.
For open pan roasting, place meat or poultry on the slotted portion of the
two-piece pan included with the oven. Do not add water to the pan. Use
open pan roasting for tender cuts of meat. Less tender cuts of meat need
to be cooked by moist heat in a covered pan.
• For best results, a meat thermometer
is the most accurate guide to degree
of doneness. The tip of the thermometer should be located in the thickest
part of a roast, not touching fat, bone, or gristle. For turkeys and large poultry
products, insert the tip of the thermometer into the thickest part of the inner
thigh.
• Place roast fat side up to allow self basting of meat during roasting.
•
Since meats continue to cook after being removed from the oven, remove
roast from oven when it reaches an internal temperature about 5 degrees
below the temperature desired.
•
For less loss of juices and easier carving, allow about 15 minutes "standing
time" after removing meat from oven.
•
For best results in roasting poultry, thaw completely.
of poultry, partially thawed poultry will cook unevenly.
Radiant
•
•
Bake
Roasting
Due to the structure
Recommendations
If preferred, tender cuts of meat can be roasted in the radiant bake oven
by following the general recommendations
given above. However, meats will
roast more quickly in the convection oven.
Radiant bake is best for less tender cuts of meat that require a longer, moist
heat method of cooking. Follow your recipe for times and temperatures for
covered meats.
•
Meats cooked in cooking bags, dutch
best cooked in the radiant bake oven.
•
Use meat roasting charts in standard cookbooks for recommended
and temperatures for roasting in a radiant bake oven.
35
ovens, or covered
roasting
pans are
times
Convection
Roasting
Recommendations
• Tender cuts of meat and poultry can be roasted to a rich golden brown
in the convection oven. Follow general recommendations
for roasting.
•
Refer to convection meat roasting chart for recommended cooking temperature and time, The chart can serve as a guide to help plan meal serving
time.
Minutes per pound will vary according to the size, shape, quality, and initial
temperature of meat as well as the electrical voltage in your area. Times
are based on refrigerator cold meat.
A large cut of meat will usually
than a smaller cut of meat.
Do not use a roasting
require
fewer minutes
per pound
pan with high sides; use pan provided
Do not cover meat. Allow the circulating
seal in the juices.
to roast
with oven.
hot air to surround
the meat and
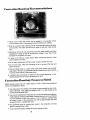
Since the breast meat on a large turkey cooks more quickly than the thigh
area, place a "foil cap" over the breast area after desired brownness is reachec ...-_
to prevent overbrowning.
(See above photo.)
A stuffed turkey will require an extra 30 to 60 minutes
Stuffing should reach an internal temperature of 165°F.
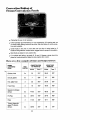
Convection
Meats (except poultry)
for the most satisfactory
Roasting:
may be roasted
results.
Frozen
frozen
depending
on size.
to Finish
to finish.
Follow
these guidelines
Use temperatures for roasting fresh meats as recommended by most cookbooks. Generally, most meats are roasted at 325°F. For best results do not
use temperatures below 300°F.
Use times for roasting fresh meats given in your favorite cookbooks as approximate guides for roasting frozen meats. Roasting times will vary due to factors
such as coldness of meat, size, quality, or cut. In general, roasting times
for frozen to finish in the convection oven will be approximately
the same
as fresh to finish in a radiant bake oven.
• The guidelines given for roasting
apply to roasting frozen meats.
•
Insert meat thermometer
fresh meats in the convection
midway during the cooking
36
process.
oven also
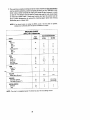
(' onvectlon
Roasting
(Thawed
MeaLs
Only)
Approximate
Weight
va_e_ _d
Cut of Meat
(pounds)
oF
oF
pound)
140 ° (rare)
160 ° (medium)
140 ° (rare)
20-25
160 ° (medium)
140 ° (rare)
25-30
15-20
20-25
BEEF
Rib Roast (outside down)
4to8
325 °
Rib Eye Roast
4to6
325 °
2to3
4to5
400 °
325 °
Roast
3to6
325 °
140 ° (rare)
160 c (medium)
Round Tip Roast
4to6
325 o
140 ° (rare)
25-30
2025
160 _ (medium)
25-30
Loin Tenderloin
Roast
Round Eye Round
Top Sirloin
PORK
Shoulder
Roast
Blade Roast
140 ° (rare)
160 ° (medium)
25-30
20-25
25-30
20-25
4to6
325 °
170 °
30-4O
4to6
325 °
170 °
325 °
325 °
325 °
170 °
170 °
140 °
25-35
30-40
2O-30
5to7
275 °
160 °
20-30
3O-40
5to8
325 °
140 °
20-25
3V2to 5
325 °
160 _ (medium)
170 _ (well)
30-35
35-40
25-30
30-35
Boneless
Shoulder Blade Roast
Loin Blade or Sirloin Roast
Leg (Fresh Ham)
Ham. Half (Fully cooked)
Ham. Half (Cookbefore-eating)
Arm Picnic Shoulder
LAMB
Shoulder
Roast. Boneless
3to4
10 to 16
5to7
Leg, Whole
5to7
325 _
Leg, Shank Half
3to4
325 °
160 ° (medium)
170 ° (well)
fSO ° ,_medium)
325 °
170 ° (well)
160 ° (medium)
25-30
30-35
30-35
170 ° (well)
35-40
325 °
325 °
325 °
170 °
170 °
170°
35-40
35-40
325 °
180o-165 °
180o-185 °
15-17
13-15
325 _
350 °
180_-185 _
18Oo-185 °
170o-175 °
11-13
9-11
325'
375 _
180°
185°
Leg, Sirloin
Half
VEAL
Rib Roast
3to4
Shoulder. Boneless
3to5
4to6
Leg, Half, Boneless
3fo5
35-40
POULTRY
Turkey, unstuffed
Turkey. unstuffed
Turkey, unstuffed
Turkey, unstuffed
Turkey. Whole. Boneless
Turkey, Breast
Chicken. Fryer
Chicken. Roister
Capon unstuffed
Cornish Game Hen
Duck
8to12
12to
16
325 °
325 °
16 tO 20
20 to 24
4to6
3to8
2V2 to 3Vz
375 _
375 °
4to6
5to8
375 °
350 °
1 tolV_
4to
6
37
t85 °
t80°-185 °
180o-185 °
185 _
25-35
25-35
18-22
15-20
15_20
35-45
15-20
Broiling
The broil element provides flexibility
for broiling
foods.
We recommend you use the grill accessory for most of your broiling. There are
some types of foods that do require use of the oven broil element. These include
foods such as stuffed lobsters, meringue pies, or other foods which require top
browning.
To Broil
1. Place oven rack on the rack position suggested in the chart. Distance from broiling
element depends on foods being prepared. Rack position #4o (offset rack in
position #4) is usually recommended unless otherwise stated.
2. Turn SELECTOR
knob to BROIL setting.
3. Turn TEMPERATURE
knob to 550°F.
4. Place food on roasting pan provided with oven. After top broil element is red
place food in oven. Preheating takes a few minutes, or until element glows a
bright cherry red.
5. Leave oven door open at broil stop position
Broiling
• Tender
rib and
or fish.
should
when broiling.
Tips
cuts of meat or marinated meats are best for broiling. This includes
loin cuts of steak, ground beef, ham steaks, lamb chops, poultry pieces
For best results, steaks should be at least 1" thick. Thinner steaks
be pan-broiled.
•
Do not cover broiler grid with foil since this prevents fat drippings
into bottom of pan.
from draining
•
Before broiling, remove excess fat from meat and score edges
not cut into meat) to prevent meat from curling. Salt after cooking.
of fat (do
• To prevent dry surface on fish or lean meats, brush melted butter on top.
•
Foods that require turning should be turned only once during
meat with tongs to avoid piercing and loss of juices.
• Cooking
times given in the chart are to be used only as a guide.
38
broiling.
Turn
• The oven has a variable broil feature which means that the broiling temperature
can be varied by selecting a lower temperature setting on the TEMPERATURE
knob. Using a lower temperature setting will cause the broil element to cycle
on and off. This feature can be used for foods that need to cook more slowly
or need less radiant heat, If foods are broiling too fast, the control can be
set at a lower temperature to reduce the cooking speed rather than moving
the broiler pan to a lower rack.
NOTE"
A fan should come on during the BROIL cycle. If the fan does not operate,
contact your authorized Jenn-Air Service Contractor for repair.
BROILING
CHART
(BROIL, 550°I=,
PREHEATED)
Rack
position
FOODS
BEEF
Steak (1")
Rare
Medium
Well
1st Side
2nd Side
4o
4
6
8
8
11
Rare
Medium
Well
7
9
PORK
Bacon
2
6
t0-11
3
4
1-2
5
9-10
2
3
6
8
6
7
3
9-10
7-10
SEAFOOD
Fish Fillets, Buttered
Fish Steaks, Buttered (1")
4o
40
7-9
7-9
(no turning}
(no turntng)
MISCELLANEOUS
Hot Dogs
Toast
4o
4o
2
I
2
4o
4o
3
4o
40
Chops (_,_")
Chops (1")
Ham Steak
Sausage Patties
LAMB
4o
Chops (t")
Medium
Well
POULTRY
Breast Halves (Bone-in)
NOTE: This chart is a suggested
guide. The times may vary with food being cooked.
39
1
Oven
How
the
Cleaning
Self-Cleaning
Process
Works
When the oven controls are set to CLEAN, the oven heats to temperatures that
are higher than those used for cooking. The high temperatures
cause food soil
to burn off and substantially
disappear. While this occurs, a device in the oven
vent helps to consume normal amounts of smoke. The oven is vented through an
opening under the air grille on the top of the range.
How to Prepare
the Self-Cleaning
Oven Before
Process
Operating
• Remove the broiler pan and grid and any other utensils from the oven. The_
utensils cannot withstand the high temperatures of the cleaning process.
• The oven racks can be cleaned in the oven. However, the oven racks wi
discolor, lose shininess, and become difficult to slide in and out if left
the oven during the cleaning process. REMOVE RACKS FROM OVEN
THIS DISCOLORATION
WILL BE OBJECTIONABLE.
As a suggestion, (
not leave the racks in the oven during each self-cleaning
process if th_
do not need to be cleaned since they will discolor to a dull silver after mar_y
cleanings. Moderately soiled racks can be cleaned with a soapy S.O.S. p_d
or Scotch-Brite
scour-pad. Stubborn stains need to be removed in the se fcleaning process. Be sure to read special tips on page 45 if oven racks are
cleaned during the self-cleaning process.
• Clean spatters and spills from those areas
which will not be cleaned during the selfcleaning process:
--center front of oven and door near opening in door gasket.
--porcelain
oven door liner (area outside
the door gasket).
--stainless steel oven front frame.
NOTE: DO NOT CLEAN serial plate
located on the oven front.
To clean these areas, use hot water and
detergent, nonabrasive cleansers or soap
filled steel wool pads (rub with the brushed
grain on the oven front frame to prevent
scratching). Rinse thoroughly, being careful not to use an excessive amount of water
that would dampen the door gasket. Soil
left in these areas will be more difficult to remove after the self-cleanitTg
process since the high heat will bake on any soil that is present. DO NOT
USE COMMERCIAL OVEN CLEANERS TO CLEAN THESE AREAS.
40
• DONOTATTEMPT
TOCLEAN,
RUB,ORAPPLY
WATER
TOGASKET
ON
OVEN
DOOR.
Thegasket
isessential
foragooddoorseal.Rubbing
orcleaning
willdamage
thegasket
andmayaffecttheseal.
• Wipeupexcess
grease
andfoodspillovers
whichhavenotbakedonthebottom
of theoven.Largeaccumulations
of soilcancauseheavysmokeor fire in
theovenduringthecleaning
process.
Foreaseofcleaning,
theheating
element
canbeliftedslightly.
• Although
smokeor fire intheovenis a normaloccurrence
andthereis no
safetyproblem,
therewill beventingof excessive
smokeandodor.Smoke
andodorcanberemoved
fromthekitchen
byturningontheventilation
system.
Auto
Clean
Feature
This model features AUTO CLEAN to simplify cleaning an average soiled oven.
To use, merely set SELECTOR and TEMPERATURE knobs to CLEAN, LOCK DOOR,
and push ENTER button twice. The oven will clean for 21t_hours (plus cool-down
time). For a heavily soiled oven or to start cleaning at a later time, refer to section
below.
Steps
1, Turn
to Follow
SELECTOR
knob
for
Self-Cleaning
to CLEAN.
% Turn TEMPERATURE knob fully clockwise to
CLEAN until it comes to a full stop. The door
cannot be locked if TEMPERA TURE knob is
not in the CLEAN position.
3. Close oven door (if opened).
4. To lock door, move DOOR
the full right position.
LOCK LEVER to
41
Process
5. Setclockcontrols
tocleanovenusingoneofthefollowing
procedures:
To set
oven
t_ start
cleaning
immediately:
An automatic program of 21/_hours is pre-set for an average soiled oven. For a
heavily soiled oven, program can be extended up to 4 hours.
a. Push ENTER button to enter start time.
The indicator words STOP TIME will appear
2_&hours later than time of day.
in Display and the time will be
b. For an average soiled oven: Push ENTER button to enter stop time. The oven
will beep and indicator word AUTO will appear and remain in the Display Window.
For a heavily soiled oven: Turn SET dial in clockwise direction to desi'red time
(maximum 4 hour clean cycle). Push ENTER button to enter stop time. The
oven will beep and the indicator word AUTO will appear and remain in Display
Window.
To set ovea
to start
cleaning
at a later
time:
An automatic program of 2'/2 hours is pre-set for an average soiled oven. For a
heavily soiled oven, program can be extended up to 4 hours.
a. Turn SET dial to desired start time.
b. Push ENTER button to enter START TIME. The indicator words STOP TIME
will appear in Display and the time will be 2V2hours later than the start time.
C. For an average soiled oven: Push ENTER button to enter stop time. The oveL
will beep and the word AUTO will blink. When start time is reached, the oven "_
will beep and the word AUTO will remain in Display Window during the cleaning
cycle.
For a heavily soiled oven: Turn set dial in a clockwise direction to desired time
(maximum 4 hours cleaning cycle). Push ENTER button to enter stop time. The
oven will beep and the word AUTO will blink. When start time is reached, the
oven will beep and the word AUTO will remain in Display Window during the
cleaning process.
6. The oven CLEAN INDICATOR LIGHT will glow when all steps are completed properly,
except when set for a delayed start. The light goes off when stop time is reached.
7. The cleaning process begins immediately unless the self-cleaning
process has
been set for a delayed start. When the oven temperature
reaches 550°F, the
LOCK INDICATOR
LIGHT will glow and the door cannot be opened until the
temperature drops below 550°F. DO NOT TRY TO UNLOCK THE DOOR WHILE
LOCK INDICATOR LIGHT IS ON. The normal cleaning process takes the time
selected on the clock plus about 45 minutes for the oven to COOl down before
the LOCK INDICATOR LIGHT goes out and the door can be opened.
42
8. Atendoftimeset,ovenwillstopautomatically
andnotbeep.
9. AftertheLOCKINDICATOR
LIGHTgoesout,movetheDOORLOCKLEVER
totheleft.Theovendoorcannowbeopened.
10.TurntheSELECTOR
ANDTEMPERATURE
knobsfromCLEAN
to OFFafter
the door is unlocked.
IMPORTANT"
IF THE TEMPERATURE
KNOB IS TURNED TO OFF BEFORE
THE DOOR IS UNLOCKED,
THE DOOR WILL NOT OPEN. Forcing the lock
will damage the lock mechanism. Return TEMPERATURE knob to CLEAN, unlock
the door, then turn TEMPERATURE knob OFF.
NOTE: A fan comes on whenever the SELECTOR knob is set on CLEAN; therefore, the fan will continue to operate at the end of the cleaning process until
the SELECTOR knob is turned OFF. The fan will also start as soon as the
controls are set for a delayed start of the self-cleaning
process.
To check
START
TIME before
cleaning
begins:
Hold in START TIME
button until the words START TIME appear in the Display Window. The start time
will be displayed briefly, then Display will return to time of day.
To change
START
TIME
before
cleaning
begins:
1. Hold in START TIME button until the words START TIME appear in the Display
Window.
2. Turn
SET dial
to time desired.
Push ENTER button to enter new start time.
The indicator words STOP TIME and a new stop time will appear in Display
Window. The new stop time will be 21/2hours later than the new start time.
For a heavily soiled oven, the stop time will need to be changed
SET dial.
4. Push
ENTER
button
to enter
by turning
the
new stop time.
To check
STOP TIME:
Hold in STOP TIME button until the words STOP TIME
appear in the Display Window. The stop time will be displayed briefly, then Display
will return to on-going program.
To change
S3I_P
TIME
befnre
cleaning
begins:
1. Hold in STOP TIME buton until words STOP TIME appear in the Display Window.
2. Turn SET dial to desired STOP TIME.
43
3. Push
ENTER
NOTE:
button
to enter
new stop
time.
If more than 7 seconds elapse between holding in START TIME button
or STOP TIME button and turning the SET dial, the display window will
automatically
return to on-going program.
NOTE" If more than 1 minute elapses between turning SET dial to a new time and
entering new START TIME and STOP TIME, the entire program will be
cancelled and display will return to time of day clock.
To stop
cleaning
process
before
lock
indlcalor
light
comes
on:
1. Move the DOOR LOCK LEVER to the left.
2. Turn SELECTOR
3. Push CANCEL
To
stop
cleaning
1. Push
CANCEL
2.
and TEMPERATURE
button twice.
process
button
after
oven to cool
up to 45 minutes,
4. After LOCK
the left.
5. Turn
indicator
until
and SELECTOR
the
depending
INDICATOR
SELECTOR
lock
light
comes
on:
twice.
Leave the TEMPERATURE
3. Allow
knobs from CLEAN to OFF.
LOCK
long
goes
and TEMPERATURE
NOTE: When SELECTOR
INDICATOR
on how
LIGHT
knobs
in the CLEAN
LIGHT
the oven
off,
knobs
move
from
goes
position.
out.
This
may take
has been on.
the
DOOR
CLEAN
LOCK
LEVER
to OFF.
knob is turned to CLEAN, a fan comes on. If this fan
is not operating, the oven will go through the self-cleaning
process at a reduced
oven temperature and the oven will not clean effectively. If the fan does not operate,
contact your Jenn-Air Authorized
Service Contractor for service.
44
to
More Information
on the
Self-Cleaning
Process
•
A slight odor may be detected, and if an oven is heavily soiled, some smoke
may be visible. Some smoke and odor during the cleaning process is a normal
occurrence.
Since the oven vent is located under the air grille, vapors,
moisture, etc. may be seen coming from this area. If the odor is strong or
objectionable, turn on the ventilation system to exhaust odors outdoors.
•
During the cleaning process, do not be alarmed if an occasional flame is
visible through the oven window. This is caused by excessive food soil that
was not removed before the oven was set to clean.
SINCE THE
GET WARM
DOOR AND WINDOW
OF THE
DURING THE SELF-CLEANING
OVEN AND
PROCESS,
OVEN
AVOID
VENT WILL
CONTACT.
Some types of soil may disintegrate but leave a light film or heavier deposit
of ash. The amount of ash depends on the amount of soil which was in
the oven. After oven has cooled, this ash may be removed with a damp
sponge. If other dark deposits remain after wiping with a sponge, the time
set for the length of cleaning was not enough. Increase the cleaning time
for future cleanings or clean more frequently. The normal cleaning time is
21/2hours. A maximum of 4 hours may be selected if necessary.
If racks have been left in oven during the cleaning process, they should
be treated as follows. After the cleaning process is completed and the oven
has cooled, buff the underside of rack edges with Scotch-Brite
scour-pad
or rub lightly the underside of rack edges with a coating of vegetable oil.
Use a light application of oil so it does not soil the oven. As a suggestion,
use fingertips to apply oil. This will make the cleaned racks slide more easily.
To remove occasional spillovers between cleanings, use a soap-filled
pad or mild cleanser; rinse well.
It is better to clean the oven regularly
build-up of soil in the oven.
scouring
rather than wait until there is a heavy
During the cleaning process, the kitchen should
eliminate normal odors associated with cleaning.
be well ventilated
to help
Any attempt to force the self-clean DOOR LOCK LEVER to lock or unlock
without electric power applied to the door or with the TEMPERA TURE knob
in any position other than CLEAN may result in damage to the door locking
mechanism.
DO NOT USE COMMERCIAL
CLEANING OVEN AREA.
DO NOT
USE ALUMINUM
OVEN CLEANERS IN OR AROUND THE SELFFOIL
OR OTHER
45
LINERS
IN THE
OVEN.
Other
Caring
for
Hints
on
Your Range
Ilow To Remove
Or Servicing
Range
For
When necessary, follow these procedures
or servicing:
Cleaning
to remove appliance for cleaning
1. Shut-off gas supply to appliance.
2. Disconnect
electrical supply to appliance.
3. Disconnect
gas supply tubing to appliance.
4. Remove screws that secure
appliance from cabinet.
5. Reverse procedures
appliance
to cabinet
or floor.
Remove
to reinstall.
6. Test all joints for gas leaks with soap and water solution.
NEVER USE A MATCH OR OTHER FLAME TO LOCATE A GAS LEAK.
Access
Door
The access door is easily removed to clean under
the range if necessary. To remove door, pull door
down and lift off pivot points. To replace door,
slide door over pivot points; lift up and insert
prongs into holes in the range.
To avoid
the
possibility
of
accidentally
disconnecting
any part of the ventilation
system,
do not use the area behind the access door for
storage.
46
Oven
Racks
To remove, pul! forward to the "stop"
position; lift up on the front of the rack
and pull out.
Oven
Thermostat
Knob
Adjustment
The oven thermostat knob can be adjusted if the oven temperature is too low or
too high and the length of time to cook ALL foods is too long or too short. Do
NOT adjust the thermostat knob if only one or two items are not baking properly.
To aiJLiust the thermostat
knob:
Turn the oven thermostat
knob to OFF.
Remove the knob and turn it to the underneath side. Hold it so that the triangle is
at the top. (See Fig. 1) Loosen the two
screws slightly. Holding the skirt in place,
move the top screw by rotating the knob
one notch, as noted by one click, in direction
necessary.
If notch indentation
is not
apparent, tighten screws until clicking is
heard. There are five notches in each
direction. One notch equals approximately
IO°F.
)[AMPLE:
Triangle
_--Top
\\
\\
If the oven temperature is too
cool and
ALL foods
are
requiring a longer time period
to cook, the knob shou/c/ be
rotated to move the top screw
toward the word "'HOTTER':
(See Fig. 2)
Tighten the screws while tightly holding
knob to skirt. To replace knob, match flat
part of knob opening with spring on the
shaft, returning to OFF position.
Screw
o,,
o_ _ _
_o,-%
"#o#-cH EO,D_,
_IG.
2
IMPORTANT: The oven thermostat knob should be adjusted one notch and then
the oven should be tested. (We recommend baking 2 -- 9" yellow layer cakes using
a purchased box mix.) If the oven temperature is still too low or too high, repeat
the procedure described above.
If the knob is rotated too far or in the wrong direction, rotate the knob in the opposite
direction until the center of the screw is directly under the triangle, which is the
starting point. Initiate the procedure again until the desired temperature is reached.
47
Oven
Before
Light
replacing
Bulb
bulb,
disconnect
power
panel and at the electric
receptacle.
the light bulb is cool before attempting
To
rephlec
light
to oven
at the main
Be sure that
to remove.
the
fuse or circuit
entire
oven
cavity
breaker
including
bulb:
1. Carefully
remove
the glass light lens and lens
retainer
by removing
the two screws
in the light
lens
retainer
using
a phillips
screwdriver.
Note: The light lens is separate from the light lens
retainer. The two pieces will drop down into your
hands
at the same time.
Do NOT remove
the
remaining
two screws.
2. To obtain
firm grasp
on
rubber gloves. Remove by
Do not touch a hot oven
cloth as bulb will break.
bulb,
wear protective
turning
bulb to the left.
light bulb with a damp
Note:
If the bulb does
break and you wish to remove it, be certain power
supply
is disconnected
and wear
protective
gloves.
You may contact
your authorized
JennAir Service Contractor
for service.
3. Replace bulb with a 40 watt oven-rated
appliance
bulb. Bulb with brass base is recommended
to
prevent
fusing
of bulb into
socket.
4. Place light lens inside of light lens retainer.
Holding the light lens and lens retainer in place, insert
the two screws
into the light lens retainer
and
tighten.
Ducting
Information
Jenn-Air's
from any
installation
ventilation
system is designed
to capture
both cooking
place on the grill surface.
If the system does not, these
situations
to check:
fumes and smoke
are some ducting
• 6" diameter
round or 3W' x 10" rectangular
ducting
should
be used for duct
lengths
10'-60'. 5" diameter
round ducting
must be used if the duct length is
10' or less.
• No more than three
be at least 18".
90 ° elbows
should
be used. Distance
• Recommended
Jenn-Air
wall
freely when ventilation
system
cap should
is operating.
• There
wall.
clearance
should
be a minimum
be
used.
between
Make
of 6" for cooktop
sure
elbows
should
damper
moves
installed
near
a side
If there is not an obvious
improper
installation,
there may be a concealed
problem
such as a pinched
joint, obstruction
in the pipe, etc. Installation
is the responsibility
of the installer and questions
should be addressed
first by the installer.
The installer
should very carefully
check the ducting
installation
instructions.
48
Accessories
Griddle
-- Model
Self-draining
foods easier
lets
you
hamburgers,
same time.
Wok
AG302
griddle makes many favorite
to fix. Family-sized surface
cook
several
pancakes,
or grilled sandwiches at the
-- Model
AG340
Ideal for stir-frying, steaming, braising,
and stewing. Wok has nonstick finish,
wood handles, cover, steaming rack, rice
paddles, cooking tips, and a special wok
cradle.
Surface
Burner
Model
AG200
Module
--
Includes
surface
burner
assembly,
aeration tray, and two black surface
Jrner grates.
q
Nole:
Only these accessories are approved for use with your gas grill-range.
DO NOT USE Jenn-Air electric grill-range accessories on your gas grillrange.
49
|
Before
You
for Service
Call
Check the following
list to be sure a service call is really necessary.
A quick reference
of this manual,
as well as reviewing
additional
information
on items to check,
may
prevent an unneeded
service call.
If nothing
on
• check
• check
fall
check behind
disconnected.
If grill
or
operates:
does
lower
surface
• check
• check
•
•
•
•
range
for a blown circuit
if range is properly
If veotilation
does:
•
the
fuse or a tripped
main circuit
connected
to electric
circuit
not
operate
access
door
buroer
fails
but
cord
surface
shutter
ports
If grill
or
tile
assembly
range
has been
are not clogged.
fuel.
is uneven:
• burner ports may be clogged.
• flame setting may need to be adjusted
or
to blower
on
to be sure unit is properly
connected
to power supply.
for a blown circuit fuse or a tripped
main circuit
breaker.
tlame
If grill
else
light:
check to be sure burner
ports or ignition
ports
check to be sure regulator
is set for the correct
check to be sure inlet pressure
is adequate,
clean igniter (see p. 22).
If the
•
ever_xl,lnn_
if power
to
breaker,
in house.
burner
on the mixer
tube
ilame
lifts
(see pp. 10-11).
off
needs
to be closed
flame
is yellow
the
until
ports:
flames
settle
on the burn
(see p, 10).
surface
burner
in color:
• shutter on the mixer tube needs to be opened
p. 10)1
If ventilation
system
is not
capturing
smoke
until yellow
disappears
(see
efficiently:
• check on cross ventilation
in room or make up air.
• excessive
amount
of smoke
is being created;
check
instructions
for grilling,
trimming
meats (see p. 18).
• outside wall cap may be trapped
shut.
• range may be improperly
installed;
check ducting
information
(see p. 48).
• air filter may be improperly
installed
(see p. 13).
if oven
does
not
• the SELECTOR
• clock controls
If the
oven
light
heatand/or TEMPERATURE
may be set for delayed
does
not
knobs may be set incorrectly,
start of oven.
work:
• the light bulb is loose or defective.
• oven light does not work during
self-cleaning
50
process,
If ovell
will
not
go
tlnrougln
self-cleaning
• controls
may be improperly
• door may not be locked.
• check the clock controlled
If" nv_n
did
not
clean
process:
set.
settings
and the current
time
of day on the clock.
pr_perly:
• oven may need longer cleaning
time.
• excessive
spills were not removed
prior to self-cleaning
process.
• one or several controls
may have been turned from CLEAN to another
after self-cleaning
process started.
If oven
door
will
not
position
nnlnek:
• oven may not have cooled to safe temperature
after self-cleaning
process.
• TEMPERATURE
knob may have been switched
from CLEAN
position.
• electric current
coming
into the oven may be off.
if
fort€Is
do
n_Dt broil
l_rOl,erl)':
• the SELECTOR
and/or TEMPERATURE
• check rack position.
• voltage into house may be low.
!1 baked
food
is burned
or
too
knobs
brown
on
may not be set properly.
top:
• the SELECTOR
knob may be in the BROIL position.
• food may be positioned
incorrectly
in oven.
• oven not preheated
properly.
If foods
bake
nnex,
enly:
* the range may be installed
improperly,
• check the oven rack with a level.
• stagger
pans; do not allow pans
• check instructions
for suggested
If oven
baking
results
• the pans being
best results.
used
are
less
may
not
• there may not be sufficient
tion in the oven.
to touch each other or oven wall.
placement
of pans on oven rack.
than
be
room
around
• check instructions
for preheating,
• oven vent may have been blocked
if baking
results
differ
from
expected:
of the
size
sides
or material
of the pans for proper
rack position
or covered.
previons
recommended
for
air circula-
and oven temperature.
oven:
• oven thermostat
calibration
may differ
between
old and new ovens. Follow
recipe and use and care directions
before calling for service since the calibration
on the previous
oven may have drifted
to a too high or too low setting.
If You
Need
Sen_ce
• call the dealer from whom your appliance
was purchased
Jenn-Air
Service Contractor
listed in the Yellow Pages.
or the authorized
• your Jenn-Air
Service
Contractor
can provide
better and faster service
if
you can accurately
describe
problems
and g_ve model
and serial number
of the appliance,
Be sure to retain proof of purchase
to verify warranty
status.
Refer
to WARRANTY
for
further
information
of owner's
responsibilities
for warranty
servuce.
NOTE:
Complete
service and parts literature
orized Jenn-Air
Parts Distributor.
All specifications
subject
to change
are available
by manufacturer
51
without
from
any auth-
notice.