1
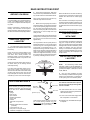
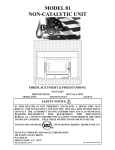
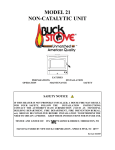
Countertop
Lavatories
Instruction Guide
Caution:
Read all instructions carefully before starting
the installation.
Save this manual for future reference.
EASY-TO-FOLLOW GUIDE FOR OLD LAVATORY
REMOVAL, HOME INSTALLATION, AND MAINTENANCE.
HOW THIS GUIDE WILL HELP YOU
This guide describes everything you need to know about installing your new lavatory. It
includes drawings and descriptions of its parts. Before you begin examine all parts and the
drawings in this guide. If you read the instructions first, you will know what tools and
materials you should have ready during installation.
Please handle all parts carefully to prevent scratches and breakage.
READ INSTRUCTIONS FIRST
BEFORE YOU BEGIN
If you are installing your countertop lavatory in
a new or remodeled bathroom, make sure
that you are in compliance with all local plumbing codes.
Rough-in information is included with your
lavatory. This information will be helpful in
placing the lavatory, water supply piping, shutoff valves, and drains in their proper positions.
REMOVING YOUR OLD
LAVATORY
1. Turn off the water supply. This is done by
closing the two shut-off valves located under
the lavatory.
If there are no shut-off valves leading to the
lavatory, you must turn off the water at the
main valve. This is usually located in the
basement, garage, or near the foundation on
the outside of the house. It may also be near
the water meter.
2.
Disconnect the drain pipes. Take off as
many sections as possible between the lavatory and the wall or floor to facilitate removal.
Place a basin under work area to catch any
water that may still be in the drain.
3. Before removing anything else, check to
see how the lavatory is supported. If the pipes
in the wall are providing support for the lavatory, use care in removing the faucet connections. The lavatory may fall once the faucet is
disconnected, so have a helper hold it up
while you work.
Look under the lavatory to see if there are lugs
holding it to the countertop. Do not remove the
lugs until you have first braced the lavatory
against falling.
You may be able to shore it up with pieces of
lumber from below. Or you can rig the support
as shown in Figure 1. This support consists of
a strong wire or cord draped over a 2" x 4".
Drop the wire through the drain and tie it to a
block of wood. Twist the cord until the block of
wood is snug against the tailpiece and provides a sure support for the lavatory. You may
then unscrew the lugs and lower the lavatory
by carefully untwisting the block of wood.
Check to be sure the water is off by turning on
the faucet where you are working until the
water stops flowing.
If the connection is corroded you may need to
cut off the nut with a hacksaw. If there is no nut
or shut-off valve, use a tube cutter or hacksaw
to separate the faucet from the water supply
tubes.
Keep the basin and sponge handy for water
that remains in the pipe and faucet.
CAUTION: HANDLE
WITH CARE
Your new lavatory is finished to an attractive
high gloss. It may also be heavy and difficult
to lift. To protect the finish and avoid possible
damage before and after installation, please
handle your lavatory with care. Place the
lavatory on a thick bed of newspapers when
working on it before installation. Also, line the
inside of your lavatory with newspapers until
the job is done.
INSTALLING YOUR NEW
LAVATORY
NOTE:
For self-rimming models follow
steps 4, 5, 6, 8, 9, 11, 12, 14, 15, and 16; for
models requiring a metal mounting frame (not
provided) use steps 4, 7, 8, 9, 10, 11, 12, 13,
14, 15, and 16.
If you have shut off the main valves in a twostory house or greater, you should open another faucet on the same or lower level. Water
will then drain from the entire line. This will
help avoid spills. Be sure and close the faucets before you turn on the main valve again.
TOOLS AND MATERIALS
Detach the faucet from the shut-off valves by
unscrewing the compression nut at the joints
between the valves and the water supply
tubes.
Figure 1
4. Once you have completed your bathroom countertop and determined the general
location of your new lavatory, you are ready to
cut the opening into which it will be placed.
hacksaw
The materials listed below are optional.
They are only necessary if existing matebasin wrench rials are unusable:
You can determine which tools and materiadjustable
als are necessary by reading the complete
wrench (10")
installation instructions and examining the
job you have to do. These are normally
Two shut-off valves with 1/2" I.P.S. outlet,
tube cutter
needed:
optional (check house piping to determine
pipe wrench (12")
sponge
valve inlet dimension)
basin or pail
tape measure
1/2" I.P.S. hot and cold water supply tubes
flat blade screwdriver
with compression nut and ferrule
emery cloth
hammer
Drain tail pipe, trap, and additional drain pipe
metal mounting frame with four screw clips
saber saw or keyhole saw
as required
(for non-self rimming lavatories only) prodrill
vided by others. Be sure to select a frame that
adhesive sealant with rust inhibitor
fits the dimensions of your lavatory
(included)
a 3-foot piece of 2" x 4"
heavy wire or cord (see step 3)
cardboard, newspapers or a dropcloth
SABER SAW
13. Place the four screw clips around the
lavatory so that the clips lock onto the metal
mounting frame as shown in Figure 5. Tighten
the screws on the clips evenly all around.
Check the edges for additional sealant and
remove it immediately with a damp cloth.
5. A template has been provided with your
lavatory. This will help you cut an accurate
opening. Place the template on the countertop.
Normally you will want your lavatory to be
centered between the front edge of the counter
and the backsplash. If your counter is more
than 24" front to back, you may place the
lavatory 2" to 3" from the front counter edge.
The minimum distance from the lavatory to
the front of the counter should be 1-1/2". Be
sure to take the lavatory rim into account
when making your measurements.
6. If your template is paper, fold it in half to
create a centerline. If your template is cardboard, measure the length and width of the
template to locate the center and draw a line.
Move the template to the desired position and
mark the location of the centerline. Measure
the distance from the centerline to the nearest
side wall or the end of the counter. Then
measure the same distance from the side wall
to locate the centerline at the back of the
lavatory template. Now trace the outline of the
Figure 2
HOLE FOR
STARTING CUTOUT
Line up the frame with the centerline and
move it forward or back to its final location.
Place a pencil against the outside of the frame
as shown in Figure 2. Trace the outline of the
frame accurately onto the countertop. The
metal frame may have sharp edges. Handle it
carefully.
8. Drill a hole in the line you have drawn.
The hole should be large enough to take the
blade of a key hole or saber saw. Carefully
saw along the line. See Figure 3. Support the
piece you are cutting out to prevent splitting
when the cut is nearly complete.
COUNTERTOP
9. It is best to mount the pop-up drain and
faucet before installing your lavatory. Be sure
to place the lavatory on a thick bed of newspapers while working on it to prevent scratches.
Figure 5
Put in the pop-up drain first. Clean around the
drain hole with a damp cloth to remove any
dust or other particles that may interfere with
a good seal. Remove the washers, nuts, and
flange from the top of the pop-up. Coat the
underside of the flange with sealant (included
with your lavatory) and push it firmly into the
drain opening. Following the manufacturer's
instructions, tighten the flange firmly into place.
SEALANT
SCREW CLIP
14. Connect the drain tailpiece to the bottom
of the pop-up, then fasten the trap and drain
extension to the wall stub-out in the wall. See
Figure 6. You may use metal or plastic drain
pipe and trap, following the directions provided by the manufacturer.
The excess sealant that oozes out around the
flange should be cleaned off immediately with
a damp cloth.
Next, attach the faucet according to the
manufacturer's instructions. Most of the faucet installation is normally done with the lavatory upside down. When the faucet is securely
in place, attach the new hot and cold water
supply tubes to the faucet lines.
template accurately onto the countertop.
7. Measure across the metal mounting
frame from side to side to locate its center.
Mark this on the front of the frame. Move the
frame to the desired position and mark the
location of the centerline on the countertop.
Measure the distance from the centerline to
the nearest side wall or the end of the counter.
Then measure the same distance from the
side wall to locate the centerline at the back of
the counter.
METAL MOUNTING FRAME
Figure 3
10. Put the metal mounting frame around
the lavatory. Bend the tabs in the frame toward the lavatory, so that the frame is held to
the edges all the way around. See Figure 4.
11. Clean the countertop surface around the
BENT TAB
LAVATORY
TOP
METAL MOUNTING
FRAME
OVERFLOW
FLANGE
CONTROL
CLEVIS
WASHER
WASHER
DRAIN
PIVOT ROD
SLIP NUT
DRAINPIPE
DRAIN TAILPIECE
T DRAIN
SLIP NUT
SLIP NUT
RUBBER OR PLASTIC
WASHER
Figure 6
P TRAP
15. Use a tube cutter to trim the free ends of
the hot and cold supply tubes to at least 1/4"
longer than necessary to reach into the inlets
of the shut-off valves. It is better to cut the
tubes longer than needed, then trim them
again. Remove any burrs or sharp edges with
an emery cloth.
Join the hot and cold water supplies to the
shut-off valves as instructed by the faucet
manufacturer.
Figure 4
hole with a damp cloth. Apply a continuous
bead of sealant (included with your lavatory)
to the surface around the hole.
12. Carefully place the lavatory into the hole.
A helper may be necessary to lift it into position. Align the lavatory in the hole, then push
downward at intervals all around the edge.
This will cause some of the sealant to ooze
out. Wipe off the excess immediately with a
damp cloth. It will be difficult to remove if
allowed to dry.
16. Turn on the main water supply then open
the shut-off valves. Check all connections for
leaks. A slight tightening of about 1/4 turn will
normally stop any leaks.
CARE & CLEANING TIPS
Enameled Cast Iron
For general cleaning, use a mild, nonabrasive
soap and warm water. Do not use abrasive
cleaners. Such cleaners contain sand or silica
and will eventually scratch the enamel finish.
Stains, surface specks, and pot marks should
be removed without scrubbing by applying a
paste of such cleaners as BARKEEPERS
FRIEND or ZUD.
Surface roughness or "gritty feel" in a new
cast iron product can be eliminated by lightly
rubbing with a dry #600 sandpaper.
Rev. 11/98
LIMITED WARRANTY
JACUZZI WHIRLPOOL BATH (“Jacuzzi Whirlpool Bath”, “we”, “us”, “our”), warrants to the original consumer/
purchaser for the applicable warranty period set forth below, that the products we sell are free from defects in
material and workmanship, except as otherwise indicated below.
PRODUCTS
WARRANTY PERIOD
(commences upon date originally installed for its intended purpose)
• All cast iron sink products with porcelain enamel
finish.
Limited lifetime vessel warranty to the original consumer/purchaser only. The porcelain enamel finish is
warranted for one (1) year.
• 1.6 gpf/6 ltr. china toilets.
Five (5) years.
• All other china products and kitchen sink accessories.
Two (2) years.
• All toilet seats.
One (1) year.
ANY IMPLIED WARRANTY OF MERCHANTABILITY OR FITNESS FOR A PARTICULAR PURPOSE ON
THESE PRODUCTS IS LIMITED IN DURATION TO THE WARRANTY PERIOD SPECIFIED ABOVE. SOME
STATES DO NOT ALLOW LIMITATIONS ON HOW LONG AN IMPLIED WARRANTY LASTS, SO THE ABOVE
LIMITATIONS MAY NOT APPLY TO YOU.
This limited warranty does not cover:
(a) damage to any products based on or resulting from improper installation or repair, misuse or abuse
(including but not limited to excessive operating conditions), or alteration or adjustment other than in
conformity with our specifications or instructions, whether performed by a contractor, service company
or yourself;
(b) damages resulting from failure to reasonably clean, care for or maintain a product in accordance with
our instructions/recommendations; or,
(c) any products we sell that have been moved or removed from their original installation site.
If you believe that a product fails to meet the above limited warranty, you should notify us in writing prior to
expiration of the applicable warranty period set forth above at the following address: Jacuzzi Whirlpool Bath,
PO Box 702168, Dallas, TX 75370-2168. Notification should include a description of the product, model number
and how the product fails to meet the above warranty. Upon receipt of a written claim under this limited warranty
and evidence of the date of purchase or installation, and after inspection by an authorized Jacuzzi Whirlpool Bath
representative, at our option and in our sole discretion, we will either repair or replace the product with a Jacuzzi
Whirlpool Bath product of the same or similar type and size; provided, however, that we will not pay any costs (labor
or otherwise) associated with either removing a previously installed product; installing a replacement product; or
transportation or return of a product.
JACUZZI WHIRLPOOL BATH WILL NOT BE LIABLE FOR ANY OTHER LOSS OR EXPENSE(S) NOT
SPECIFICALLY DESCRIBED ABOVE, AND DISCLAIMS ANY LIABILITY FOR CONSEQUENTIAL OR
INCIDENTAL DAMAGES.
SOME STATES DO NOT ALLOW THE EXCLUSION OR LIMITATION OF INCIDENTAL OR CONSEQUENTIAL
DAMAGES, SO THE ABOVE EXCLUSION MAY NOT APPLY TO YOU.
THIS WARRANTY GIVES YOU SPECIFIC LEGAL RIGHTS AND YOU MAY ALSO HAVE OTHER RIGHTS
WHICH VARY FROM STATE TO STATE.