1
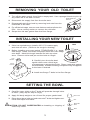
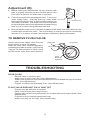
1.6 GALLON
ONE PIECE TOILET
INSTALLATION INSTRUCTIONS
Installer: Leave this manual for homeowner.
Homeowner: Read this manual and keep for future reference.
Save These Instructions for Future Use.
Owner's Record
Date Purchased _________________________________________
Purchased From _________________________________________
Installed By _____________________________________________
Serial Number ___________________________________________
Model __________________________________________________
©2004 Jacuzzi Whirlpool Bath Products BK83000 09/04
BEFORE YOU BEGIN
READ AND FOLLOW ALL INSTRUCTIONS
! Observe all local plumbing and building codes.
! Carefully inspect the new toilet for damage.
! If the existing toilet does not have a supply shut-off valve below the tank, you
will install one before installing the new toilet.
! Rough-in information is included with your toilet. The rough-in information shown
will be helpful in placing the toilet, water supply piping, shut-off valves and drain
in their proper positions.
CAUTION: Your new toilet is finished to an attractive high gloss. It may also be heavy
and difficult to lift. To protect the finish and avoid possible damage before and after
installation, please handle your toilet with care. Place the toilet on a thick bed of
newspapers when working on it before installation.
TOOLS AND MATERIALS
You can determine which tools and materials are necessary by reading the
complete installation instructions and examining the job you have to do.
These are normally needed:
5/16" T-bolts w/nuts and washers
flat blade screwdriver
drill
saber saw or keyhole saw
emery cloth
dropcloth
basin or pail
putty knife
metal file
square
cardboard, newspapers or a
sponge
Level
Hacksaw
Safety Glasses
Pipe Wrench
(12")
Tubing Cutter
Wax Ring
Adjustable Wrench
(10")
Tape Measure
The following materials are optional, in case existing materials are unusable:
Two (2) shut-off valves with 1/2" I.P.S. outlet, (check house piping to determine
valve inlet dimension.),
1/2" I.P.S. hot and cold water supply tubes with compression nut and ferrule,
drain tail pipe and trap,
additional drain pipe as required,
2" x 4" board
2
REMOVING YOUR OLD TOILET
1. Turn off the water supply, then flush to empty tank. Use a sponge & basin to pick up
any water left in the tank or bowl.
2. Disconnect the supply line from the toilet tank.
Scrape off the old
wax seal
3. Disassemble tank from bowl by removing lock nuts from the
underside of the tank.
4. Pry off the bolt caps, remove nuts that secure the toilet to the
floor. Use a rocking motion to remove the old toilet.
5. Scrape the old wax gasket from the floor flange.
INSTALLING YOUR NEW TOILET
1. If this is a new bathroom, install a 3/8" I.P.S. water supply
and shut-off valve. (Refer to the rough-in drawing).
T-Bolt
2. Before installing new wax gasket, TEMPORARILY in- Closet
stall flange T-bolts, set toilet, and place discs and nuts Flange
onto bolts. Mark bolt length needed for bolt cap clearance. Remove toilet and pre-cut the bolts to length.
WAX
GASKET
TOILET
OUTLET
3. Carefully turn the toilet bowl
upside down onto a thick layer
of newspaper to protect the finish. Place a new wax gasket
on toilet outlet. A bead of setting compound may be applied
to the base if desired.
4. Install two flange T-bolts in the floor flange.
SETTING THE BOWL
1. Carefully lower toilet so the T-bolts will protrude through holes
in base. (May require help to align).
2. Apply full body weight to rim of bowl for proper gasket seal.
BOLT CAP
3. Place discs (bevel side up) and nuts onto T-bolts and tighten nut.
Press bolt caps onto discs.
NUT
CAUTION: DO NOT OVERTIGHTEN as breaking or chipping of
china may result.
BEVELED
DISC
BOLT
3
WATER CONNECTION
1. Before connecting the water supply, flush the line into a bucket to remove any debris.
2. Place the coupling nut, friction washer and universal washer onto the plain end of
supply tube as shown.
NOTE: The same universal washer will be used to
make the flanged slip-joint connection for a 1/2" O.D.
or 3/8" flexible, or a 3/8" I.P.S. supply.
3. Temporarily make connection to tank supply shank,
finger-tight. Mark at shut-off valve the tube length
needed and add 1/4". (This will insert down into shutoff valve).
4. Remove supply tube and cut to length including the
extra 1/4". Remove any burrs from inside the cut
end. Slip compression nut and ring (ferrule) onto the
shut-off valve end of the tubing.
SUPPLY
SHANK
UNIVERSAL
WASHER
FRICTION
WASHER
SUPPLY
TUBE
COUPLING
NUT
COMPRESSION
NUT
FERRULE
1/2" SHUT-OFF
VALVE
5. Connect supply tube to supply shank once more and
finger-tighten. Tubing may be pushed up into tank
supply to allow the extra 1/4" to be inserted into shut-off valve.
6. Tighten both the coupling nut at the tank and the compression nut at the shut-off
valve. Make sure float valve does not rotate while tightening the coupling nut. The
float ball must not contact the tank walls.
7. Turn on water supply and shut-off valve. Check for leaks. An additional tightening
adjustment on leaking connections normally will stop the leak.
Adjustment (A)
WATER LEVEL
ADJUSTMENT
SCREW
1. WATER LEVEL IN TANK
Turn the water level adjustment screw clockwise to
lower or counter-clockwise to raise the water level
to the waterline mark on the tank.
FLOW CONTROL
SCREW
REFILL
TUBE
2. TANK REFILL
Turn Flow Control screw clockwise to slow or
counter-clockwise to speed-up the rate of tank fill.
NOTE: If either screw is turned clockwise too far, the
float valve may not activate.
3. FLAPPER ADJUSTMENT
The length of the chain that connects the lever arm to the flapper may need to be
adjusted. (Move the hook to another link)
A) TOO MUCH SLACK may not permit the flapper to lift far enough to properly
activate the flush valve.
B) NOT ENOUGH SLACK in the chain may keep the flapper from closing properly.
3. REFILL TUBE
Make sure the refill tube is properly inserted in the top of the flush valve.
4
Adjustment (B)
1. Before making any adjustments, be sure that the refill
tube is properly inserted into the overflow pipe on the
flush valve to provide full water seal in the bowl.
2. Fill the float cup before operating the valve. Turn on the
water supply valve. Hold the float cup under water
during the first full fill cycle to fill the bottom half of cup
with water for ballast. The water level can be adjusted
by squeezing the water level adjustment clip and moving
float cup up or down along stainless steel link.
Float Cup
Adjustment Clip
3. Be sure that the water level in the tank is always to the water level line marked on the
overflow pipe on the flush valve. This is necessary in order for the unit to consistently
operate on 1.6 gallons of water and maintain satisfactory bowl performance.
TO REMOVE FLUSH VALVE
Gently remove the flapper arms from the
hinge pins to remove the flapper.
Insert the flush valve removal apparatus,
contacting the tabs as shown, and turn the
"ring nut" counterclockwise 1-1/2 to 2 turns
and lift out the entire flush valve reservoir.
Refill Tube
(Top View)
Hinge Pin
Insert
Removal
Apperatus
TROUBLESHOOTING
POOR FLUSH
-
Shut-off valve is not fully open.
Water level in tank is too low. (See Adjustments)
Water level in bowl too low (refill tube blocked or not installed into top of overflow
tube) (See Adjustments)
Flapper not lifting and activating flush. (See Adjustments)
FLOAT VALVE DOES NOT FULLY SHUT OFF
-
Flapper may be defective or warped.
Parts in top of float valve may be worn.
Flapper may not be closing completely due to obstruction or too tight a chain. (See
Adjustments)
Float ball may be lodged against tank wall.
Water level may be too high. (See Adjustments)
5
CARE AND CLEANING
For general cleaning, use a mild, nonabrasive soap and warm water. Do not use abrasive
cleaners. Such cleaners contain sand or silica and will eventually scratch the surface.
Common bowl cleaners may be used on the china surface of the bowl.
Take care in using in-tank bowl cleaners. Some in-tank cleaners contain calcium
hydrochloride which may be harmful to tank components. Use of a metal brush will create
metal marks in the bowl.
IMPORTANT!
USE OF ANY TOILET CLEANERS THAT ARE APPLIED IN THE TOILET TANK VOID
THE WARRANTY. In-tank cleaners can damage the rubber, metal and/or plastic
components of tank parts causing leaks and hindering toilet performance.
PARTS
Parts Policy
In order to avoid unnecessary delay or uncertainty in the satisfaction of warranty
claims, buyers are advised to return alleged defective parts to the place of
purchase. Sellers are authorized to address and resolve all warranty claims on
fixtures directly with buyers.
Your limited warranty is packed in with your toilet.
QUESTIONS? / PROBLEMS?
Please review the Installation Instructions in this manual to ensure correct
installation. For additional assistance, please call:
Jacuzzi Whirlpool Bath
Service Support Department
1-800-288-4002.
If you need assistance with operation or maintenance related questions, please call our
Service Support Department at 1-800-288-4002. For service agent listing, visit our web
site at http://www.jacuzzi.com/.
6
LIMITED WARRANTY
JACUZZI WHIRLPOOL BATH (“Jacuzzi Whirlpool Bath”, “we”, “us”, “our”), warrants to
the original consumer/purchaser for the applicable warranty period set forth below, that
the products we sell are free from defects in material and workmanship, except as
otherwise indicated below.
PRODUCTS
WARRANTY PERIOD
(commences upon date originally installed for its
intended purpose)
•
All cast iron sink products with porcelain enamel finish.
Limited lifetime vessel warranty to the original consumer/purchaser only. The porcelain enamel finish is warranted for one (1)
year.
•
1.6 gpf/6 ltr. china toilets.
Five (5) years.
•
All other china products and kitchen
sink accessories.
Two (2) years.
•
All toilet seats.
One (1) year.
ANY IMPLIED WARRANTY OF MERCHANTABILITY OR FITNESS FOR A PARTICULAR PURPOSE ON THESE PRODUCTS IS LIMITED IN DURATION TO THE WARRANTY PERIOD SPECIFIED ABOVE. SOME STATES DO NOT ALLOW LIMITATIONS ON HOW LONG AN IMPLIED WARRANTY LASTS, SO THE ABOVE LIMITATIONS MAY NOT APPLY TO YOU.
This limited warranty does not cover:
(a) damage to any products based on or resulting from improper installation or
repair, misuse or abuse (including but not limited to excessive operating
conditions), or alteration or adjustment other than in conformity with our
specifications or instructions, whether performed by a contractor, service
company or yourself;
(b) damages resulting from failure to reasonably clean, care for or maintain a
product in accordance with our instructions/recommendations; or,
(c) any products we sell that have been moved or removed from their original
installation site.
7
LIMITED WARRANTY (cont'd)
If you believe that a product fails to meet the above limited warranty, you should notify us
in writing prior to expiration of the applicable warranty period set forth above at the
following address:
Jacuzzi Whirlpool Bath
Warranty Service Department
P.O. Box 702168
Dallas, TX 75370-2168
Notification should include a description of the product, model number and how the
product fails to meet the above warranty. Upon receipt of a written claim under this limited
warranty and evidence of the date of purchase or installation, and after inspection by an
authorized Jacuzzi Whirlpool Bath representative, at our option and in our sole discretion,
we will either repair or replace the product with a Jacuzzi Whirlpool Bath product of the
same or similar type and size; provided, however, that we will not pay any costs (labor or
otherwise) associated with either removing a previously installed product; installing a
replacement product; or transportation or return of a product.
JACUZZI WHIRLPOOL BATH WILL NOT BE LIABLE FOR ANY OTHER LOSS OR
EXPENSE(S) NOT SPECIFICALLY DESCRIBED ABOVE, AND DISCLAIMS ANY
LIABILITY FOR CONSEQUENTIAL OR INCIDENTAL DAMAGES.
SOME STATES DO NOT ALLOW THE EXCLUSION OR LIMITATION OF INCIDENTAL
OR CONSEQUENTIAL DAMAGES, SO THE ABOVE EXCLUSION MAY NOT APPLY TO
YOU.
THIS WARRANTY GIVES YOU SPECIFIC LEGAL RIGHTS AND YOU MAY ALSO HAVE
OTHER RIGHTS WHICH VARY FROM STATE TO STATE.
Thank You For Choosing Us
We appreciate your commitment to Jacuzzi Whirlpool Bath quality products.
©2004 Jacuzzi Whirlpool Bath BK83000 09/04
Printed in the U.S.A.
Printed on Recycled Paper