1
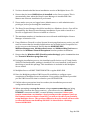
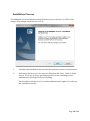
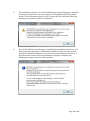
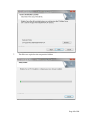
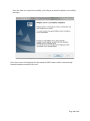
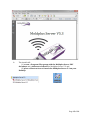
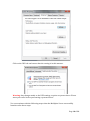
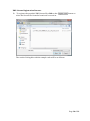
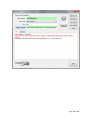
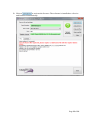
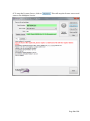
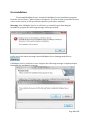
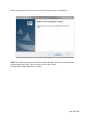
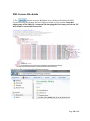
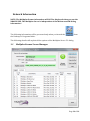
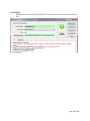
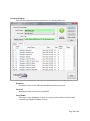
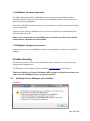
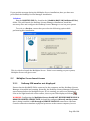
Moldplus Server V5.3
User Guide
Revision date: August 26, 2012
TABLE OF CONTENTS
INTRODUCTION ................................................................................................................................................... 3
PRODUCTS SUPPORTED BY MOLDPLUS SERVER V5.3 ................................................................................. 4
WHAT’S NEW IN VERSION 5.3 ........................................................................................................................... 5
SUPPORT FOR MULTIPLE IP ADDRESSES............................................................................................................... 5
SUPPORT FOR SERVER NAME IN ADDITION TO IP ADDRESS .................................................................................. 5
WHAT’S NEW IN VERSION 5.2 ........................................................................................................................... 5
WHAT’S NEW IN VERSION 5.0 ........................................................................................................................... 6
CUSTOMER REQUIREMENTS: ............................................................................................................................ 8
INSTALLATION PROCESS.................................................................................................................................. 10
FOLDER LOCATIONS ......................................................................................................................................... 16
AFTER INSTALLATION ...................................................................................................................................... 17
WINDOWS 2003 SERVER RX AND SERVER 2008 RX CONFIGURATION ..................................................................... 17
MOLDPLUS SERVER CONFIGURATION .................................................................................................................... 19
XML License Registration Process: ............................................................................................................. 20
UN-INSTALLATION ............................................................................................................................................ 25
CLIENT COMPUTER LICENSE CONFIGURATION ........................................................................................... 27
Moldplus, Moldplus Professional, CATIA Translator and ProDrill V4 MR1 Software ............................... 27
XML LICENSE FILE DETAILS ............................................................................................................................. 28
NETWORK INFORMATION ............................................................................................................................... 29
1.1
MOLDPLUS LICENSE SERVER MANAGER .................................................................................................. 29
1.2 Moldplus Licenses Operation ................................................................................................................ 34
1.3 Moldplus Temporary Licenses .............................................................................................................. 34
TROUBLE-SHOOTING ........................................................................................................................................ 34
2.1
NETHASP LICENSE MANAGER NOT INSTALLED......................................................................................... 34
2.2
MOLDPLUS SERVER LAUNCH ISSUES ....................................................................................................... 35
2.2.1
Nethasp SIM number not displayed ............................................................................................. 35
2.3
MOLDPLUS CLIENT LAUNCH ISSUES ........................................................................................................ 38
2.3.1
Moldplus Floating License Message ............................................................................................. 38
2.3.2
Exceeded Rights Message ............................................................................................................. 38
CONCLUSION ....................................................................................................................................................... 39
Page 2 of 39
Introduction
This document is designed to assist you in properly installing and configuring
Moldplus Server Version 5.3 on your Mastercam Network system. You will find stepby-step instructions to guide you through the proper installation and configuration of
Moldplus Server.
The installation program for Moldplus Server is designed to install the required files
for Moldplus Server to function smoothly along with the Aladdin HASP License
Manager for Mastercam. It performs several checks to ensure that the Mastercam
NetHasp SIM is correctly installed and configured and that the Aladdin License
Manager is properly installed on your system. It will warn the user if it finds that
certain conditions are not met.
It is highly recommended that you READ THIS DOCUMENT before proceeding with
the installation. If your answers are not found here, you can email us at
[email protected] with your questions.
Moldplus Server is designed to work along with the Aladdin HASP License Manager.
The Moldplus Server executable enables users to use Moldplus in a network
environment. The number of licenses you purchase for Moldplus products limit the
number of licenses you can run at any given time. The license information is stored in
an XML file that is provided by Moldplus SA.
The concept behind using Moldplus products in a network environment is to enable
multiple users to use the relevant Moldplus product from different work-stations,
using only one software protection module from a station that is called the Moldplus
Server.
This installation should be performed on the system that has the HASP SIM
physically installed and the same location where the HASP License Manager is
installed.
Page 3 of 39
Products supported by Moldplus Server V5.3
The following products are supported to run under the Moldplus Server Manager.
Note that these products can run under Mastercam X6 and below up to Version 9.1
Moldplus 10.5 MR3 with Maintenance*
Moldplus 10.5 MR3 Professional/Electrode with Maintenance*
Moldplus 5-Axis Design Toolkit 10.5 MR3 with Maintenance*
Moldplus 10.5 MR3 STL Utilities with Maintenance*
Moldplus 10.0 with Maintenance*
Moldplus 10.0 Professional/Electrode with Maintenance*
Moldplus CATIA V5 Read with Maintenance*
Moldplus CATIA V5 Solids with Maintenance*
Moldplus CATIA V5 FTA/GD&T with Maintenance*
Moldplus CATIA V5 CGR Reas with Maintenance*
Moldplus CATIA V4 Read with old codes and Maintenance*
Moldplus CATIA V4 Write with old codes and Maintenance*
Moldplus CATIA V4 Solids with old codes and Maintenance*
ProDrill 4.0 MR1 with Maintenance*
Moldplus 9.2 with Maintenance*
Moldplus 9.2 Professional/Electrode with Maintenance* (will need the Moldplus 9.2 code
also to function)
ProDrill 3.0, 2.0 and 1.2
Moldplus 9.2.035
Moldplus 9.2.035 Electrode (will need the Moldplus 9.2 code also to function)
* - Moldplus Maintenance dates are independent of the Mastercam maintenance dates.
The dates displayed in the Moldplus Server manager will indicate when the Moldplus
maintenance will expire.
Page 4 of 39
What’s new in Version 5.3
Few key enhancements have been made to the Moldplus Server as well as the client
versions.
Support for multiple IP addresses
Support for using multiple IP addresses has been added. A client can now access the
Moldplus Server from different locations and use different IP addresses to check out the
licenses.
Support for Server name in addition to IP address
This change has been made from the client/product side. Moldplus products can now be
configured using the Server name instead of the IP address alone. For Servers that have
the IP address change frequently, the Server name can be used as the reference name
and the IP address ignored.
In the example below, the IP address is set to 0 and the only reference is the Server
name. This file is stored on the client system at c:\moldserv\moldserv.dat file.
A bug in releasing the client license after exiting the product was also resolved in this
vesion.
What’s new in Version 5.2
Functionality with Windows XP was resolved. A memory handles leak was fixed in this
version. The handles would populate the physical memory usage and create a resource
limitation.
Page 5 of 39
What’s new in Version 5.0
1. Complete interface has been re-written from the prior version 4.12.
The above image displays the new Moldplus Server Manager interface. The
display has been simplified to be easy and straightforward to use and configure.
There are only 2 tabs - the event log and the licenses display. Visual icons display
if the server is active or not running.
button only. If an old
2. The license registration is done through the
license is found, it is automatically backed up to a "\licensesBackup" folder. The
XML license file, log file and moldserv.ini file are stored to the \Public
Documents\Moldplus\Moldserv\ folder.
3. The Server Manager checks for administrator rights before launching. If the user
is not an administrator, a warning is presented and the server is not launched.
Page 6 of 39
4. Service is installed only when you click on
. There is no need to
configure the Service with specific user names and passwords anymore for different
operating systems. The Service is also uninstalled when you click on
default, Moldplus Server is always run as a Windows Service.
. As
5. If the Mastercam registry key does not exist for the SIM setting, the Server
automatically forces the SIM setting to NetHasp and Local upon launching. If the SIM
is not a HASP SIM, the user is warned. Also if the SIM is unplugged, the Server is
automatically stopped till the SIM is plugged in again.
6. This document (PDF Help) file can be viewed by clicking on the
button.
7. A new License Server diagnostics tool has been included. This utility will help test
the license functionality. The utility can also be placed on client systems to test the
license server access.
8. A new LOG file is created that keeps track of the Server use. This file is stored in
the same directory as the XML license and the INI file. The INI file keeps track of the
Server IP and port, the XML license file used and the DLL used to access the SIM.
9. Most new Windows Operating systems are supported including the latest Server
versions and service packs.
Page 7 of 39
Customer Requirements:
1. Mastercam NetHasp SIM must be connected to the system that has the Aladdin
Hasp Licenses Manager installed. The Mastercam NetHasp SIM setting needs to
be set to Local and NetHasp.
2. If you haven’t installed the Aladdin Hasp License Manager software, please
perform the installation. (Installation software LMSETUP.EXE also provided
with the Moldplus Server 5.3 installation from the \Program Files\Aladdin\HASP
LM\Additional Files\ folder). To verify that the Nethasp License Manager is
installed and running on your system, you will notice an icon on the bottom right
for NetHasp License Manager 8.32
Page 8 of 39
3. You have downloaded the latest installation version of Moldplus Server 5.3.
4. Ensure that the latest HASP driver is installed on the Server system. This is
automatically done when the Hasp License Manager is installed OR if the
Mastercam software installation is performed.
5. Please make sure you are logged on as Administrator or with administrative
privileges, before performing the installation.
6. The Hasp License Manager should be installed as a Windows Service. You will be
prompted by the Hasp License Manager installation if you wish to install as a
Service or Application. Choose to install as a Service.
7. The maximum number of simultaneous users allowed with Moldplus License
Manager is limited to 100.
8. If any Windows Firewall or other System Security applications are active, you will
need to ensure that the installed applications are included in the Exceptions List
to give access to the Network. Ensure that the NHSRVICE.EXE,
MoldservManager.exe, MoldservService.exe and MoldservDiagTool.exe are
added in the Windows Firewall Exceptions list after product installation.
9. Ensure that the Windows DEP (DataExecutionSettings) option is set to function
for "Essential Windows programs only".
10. During the installation process, the installation will check to see if Visual Studio
2008 SP1 Redistributable package is installed. If it is not installed, it will launch
the dialog to install this package. This installation is included in the Moldplus
Server install.
11. Moldplus Server will NOT FUNCTION WITH a regular HASP SIM!
12. Have the Moldplus products XML license file available to configure upon
completion of Moldplus Server installation. Your reseller should have provided
you the XML license file that is related to your NETHASP SIM.
13. If all the above precautions have been taken, the installation process and
configuration should be smooth.
14. When attempting to set up the server using a remote connection not being
physically present at the Server station) – you will need to use a REMOTE
CONSOLE connection and NOT a remote desktop connection! Unless your
remote connection can simulate a local presence at the computer (such as
ILo Remote connect software from HP), you will not be able to successfully
setup Moldplus Server. The quickest indication that the install will not work
is when the Mastercam NetHasp SIM ONLY is identified as a Nethasp,
Network SIM ONLY.
Page 9 of 39
Installation Process
The Moldplus Server installation runs as follows (version reference is V5.2 for the
images even though actual release is V5.3):
1.
2.
Launches the installation and presents the welcome screen as shown above.
Performs a check to see if the system is Windows XP, Vista, , 2003 or 2008
Server. If it is one of these operating systems, issues a warning to have
administrator privileges before proceeding.
The install also checks to see if you have administrative rights. If you do not,
the installation aborts!
Page 10 of 39
3.
The installation checks to see if the Aladdin Hasp License Manager is installed
on the system (checks to see the \Program Files\Aladdin\HASL LM\ folder
exists). If the information doesn’t exist, it warns the User with the following
message and continues with the installation.
4.
Next, if the HASP License Manager is installed the installation checks to see if
the Hasp License Manager is installed as a Windows Service on the system
(checks the Windows Registry to see if it exists in the Windows Services). If
the information doesn’t exist in the Windows registry, it displays the
following message to the user and continues.
Page 11 of 39
5.
Displays the Moldplus License Agreement. Click on Yes, after reading the
License agreement to continue.
6.
If the Hasp License Manager installation was found, the directory
automatically defaults to \Program Files\Aladdin\HASP LM\ folder. A new
sub-folder \Moldplus Server 5.0\ will be created under the \HASP LM\
folder to install the Moldplus Server program files. Another folder called
\Additional Files\ will also be created under the \HASP LM\ folder to install
other relevant files. The following dialog will be presented at this stage.
Page 12 of 39
7.
The files are copied to the respective folders.
Page 13 of 39
Once the files are copied successfully, you will get an install complete successfully
message.
Once this screen is displayed, this document in PDF format will be automatically
launched and presented to the user.
Page 14 of 39
8.
The install will:
(1) create a Program Files group with the Moldplus Server PDF
document and a shortcut to launch the Moldplus Server 5.3 and
(2) place a Shortcut icon to launch the Moldplus Server 5.3 on your
Desktop.
Page 15 of 39
Folder Locations
The Moldplus Server product is installed to the following location (Windows 7 64
example):
The Additional Files is installed to the following location (Windows 7 64 example):
After launching the Moldplus Server and registering the license, the files are stored to
the following location (Windows 7 64 example):
Page 16 of 39
After installation
Once the installation is completed successfully, you can perform the following
operations to ensure that Moldplus Server 5.3 is up and running.
Windows 2003 Server Rx and Server 2008 Rx Configuration
Ensure the following:
1 Installation is done from the local system itself - by someone physical present at
the Server! If not, by using a software that simulates physical presence at the server
(such as the HP Ilo Remote Connect software).
2. If the Server still fails to launch after installing the above solution, update the
Server to the latest Windows files (by running the Windows Update software while
connected to the Internet). Install the latest .NET updates also.
3. Ensure that DEP settings are set as follows:
The DEP (Data Execution Prevention) application could affect the launch of the
executable or as a Service. In this case, set it to only run for essential windows
programs.
This can be accessed from Control Panel, System, Advanced tab and clicking on the
Performance Settings button.
The following Window is an image capture from a Windows 7.0 64 bit system.
Page 17 of 39
Click on the DEP tab and ensure that the setting is in this manner:
Warning: Any changes made to the DEP settings, requires a system reboot. Please
warn your users before performing a system reboot!
You can continue with the following steps when the Moldplus Server successfully
launches after these steps.
Page 18 of 39
Moldplus Server Configuration
1. Launch the Moldplus Server 5.3 Manager from the icon
created on your
desktop. The following dialog is presented. Your NetHasp SIM number will be
displayed in the “Serial number” field. The example SIM number used here is
987654321. (If a warning is presented, then you will need to take the necessary
measures to check and ensure that the SIM is properly identified).
Page 19 of 39
XML License Registration Process:
2. To register the provided XML license file, click on the
select the license file from the location it is stored at.
button to
The result of doing this with the sample code will be as follows:
Page 20 of 39
Page 21 of 39
3. Click on
to activate the licenses. The software is installed as a Service
and launched automatically.
Page 22 of 39
4. The Licenses tab is automatically displayed if everything is functional. The
licenses displayed will depend on what products you purchased from
Moldplus SA! In this sample case, 2 licenses of all our products are displayed.
5. ONCE MOLDPLUS SERVER IS RUNNING and the licenses are displayed as shown
in the previous image in the Moldplus Server Manager dialog, you can launch
versions of Moldplus products from Client stations. If Moldplus products were
not installed on the client stations, you can perform the regular product
installation on those systems before proceeding.
Page 23 of 39
8. To stop the License Server, click on
remove the Moldplus Service.
. This will stop the license server and
Page 24 of 39
Un-installation
To uninstall Moldplus Server, launch the Moldplus Server installation program
from the Control Panel, “Add or Remove Programs”. If it detects that an installed version
exists on the system, it will provide the option to perform an uninstall.
Warning: If the Moldplus Service is still active or installed, upon launching the
installation program the following message will be presented:
In the case of the above message, launch Moldplus Server Managerand click on
.
If Moldplus Service and Server were stopped, the following message is displayed upon
launching the installation program.
Page 25 of 39
When the program has been removed the following message is displayed.
NOTE: The XML license file, the LOG file and the INI files will not be removed upon
uninstalling the product. They will still reside in the \Public
Documents\Moldplus\Moldserv\ folder.
Page 26 of 39
Client Computer License configuration
Products that run under Moldplus Server are configured in different ways. The
common requirements for all of them however are the Server IP address and Server port
number. The Server IP address is the IP address displayed on the Moldplus Server
Manager. The following are the processes to configure the different Moldplus products.
Moldplus, Moldplus Professional, CATIA Translator and ProDrill V4
MR1 Software
The latest versions of Moldplus and CATIA Translator will automatically detect the
Moldplus Server and configure the IP and Port number. This data is stored in the
c:\moldserv\moldserv.dat file.
Once the data is stored in the C:\moldserv\moldserv.dat file, you will be able to use
Moldplus and the CATIA translator to the maximum licenses allowed.
NOTE: If this file does not exist on the system, create the c:\moldserv\ folder and
then create the moldserv.dat file within that folder. That will ensure that the
Moldplus Server is identified.
Page 27 of 39
XML License File details
button from the Moldplus Server dialog will display the XML
1. The
license file using the default Internet Explorer found on your system. Note that
editing any of the XML file’s contents OR changing the file name prefix from “M-”
will result in an invalid license file!
The license file is stored in the following location:
Page 28 of 39
Network Information
NOTE: The Moldplus license information will NOT be displayed when you run the
NHASPX.EXE. The Moldplus Server is independent of the Mastercam SIM dialog
information!
The following information will be presented only when you launch the
the Desktop or Programs folder.
from
The following details will explain all the options of the Moldplus Server 5.3 dialog.
1.1
Moldplus License Server Manager
Page 29 of 39
Serial Number:
The Mastercam Nethasp SIM number is displayed as the Serial Number. If a serial
number of 0 is displayed, refer to the SIM not found section of this document to
ensure that Moldplus Server can access the Mastercam SIM.
IP# to use:
The Moldplus Server functions properly by the use of one or multiple IP address
(pre-assigned or user-configured). If there is more than 1 IP address on the system,
you will be allowed to check the relevant IP addresses to use with Moldplus Server.
The IP address is the same as the one used by the Hasp License Manager. The IP
addresses that are checked are displayed in the field.
Hint: Multiple IP Addresses are useful when you use an IP address to access the Server
from the office and a different IP address from a remote location. By having both
IP addresses checked, you can access the Server from either location.
Port:
The communication of the license is effected by the UDP ports, which are defined
by default for each machine (server: 897). You can modify the UDP ports if there
are conflicts with another application.
Allows you to select the Moldplus Server XML license file to register the licenses.
You have to use this button to properly register the XML license file! This file
is provided by your Mastercam reseller to configure all your Moldplus product
licenses.
WARNING:
1. Editing any of the XML file’s contents OR changing the file name prefix from
“M-” will result in an invalid license file!
Page 30 of 39
Log Display:
Displays the Server event log. This file is stored in the same folder as the license
file.
Page 31 of 39
Licenses Display:
This tab is displayed whenever the Server is running and active.
Numbers
A number count of the different Moldplus products licensed.
Level Id
Moldplus product reference ID number.
Level Name
The name of any Moldplus or other 3rd party product that is licensed and
controlled using the Moldplus Server.
Page 32 of 39
Date
This date indicates the maintenance expiration date for any given Moldplus
product. As long as the maintenance date has not expired, the client can
always use the latest releases and versions provided by Moldplus SA. If
the date has expired, only functionality prior to the Maintenance expiry date
will be active within a 12 month period. Moldplus temporary licenses are also
displayed in the same field.
Type
Type of code, either Maintenance, Temporary or Educational .
#Used Seats
The number of licenses of the listed products that are actively being used by
a client at any given time.
#Seats
The total number of registered licenses for the listed product.
This button installs the Moldplus Service and launches the Moldplus Server
licenses for immediate use of the product.
This button will stop the Moldplus Server AND remove the Moldplus Windows
Service.
This button allows you to view the provided XML license using the default
Internet browser.
View the Log history for the Moldplus Server using Windows notepad.
Open this PDF help document.
This button will close the Moldplus Server Manager dialog. Closing this dialog
will not stop the licenses from running if they are active.
Page 33 of 39
1.2 Moldplus Licenses Operation
Normally, when the number of Moldplus users arrives at the maximum number
permitted by the license all new requests to use Moldplus will be refused until one
person stops using Moldplus.
Each time a Moldplus license is open on one machine it is counted as another floating
license being used.
Upon correctly leaving a Moldplus Level, a license for this level is immediately and
automatically released.
If the user is required to leave Moldplus due to a fatal error the license will be
released after a minimum of 60 seconds.
1.3 Moldplus Temporary Licenses
Temporary licenses to try Moldplus products are normally provided for a period of
30 days.
Trouble-shooting
The following section refers to the installation issues and how to verify the proper
settings and configuration.
For Windows Server editions, please check the configuration section above.
The basic checks are: Firewall, Windows DEP settings and Antivirus software to
ensure that the Moldplus Server properly launches.
2.1
NetHasp License Manager not installed
Problem:
Page 34 of 39
If you got this message during the Moldplus Server installation, then you have not
performed the NetHasp License Manager Installation.
Solution:
Run the LMSETUP.EXE file, found in the \Aladdin\HASP LM\Additional Files\
folder. This will launch the NetHasp License Manager installation, install the
necessary files and configure the NetHasp License Manager to run on your system.
To set it as a Service, ensure that you select the following option while
performing this installation:
This is critical to launch the Moldplus Server. If this is not running on your system,
Moldplus Server will give errors.
2.2
Moldplus Server launch issues
2.2.1
Nethasp SIM number not displayed
Ensure that the NetHASP SIM is connected to the computer and the NetHasp License
Manager is installed and running. Normally, the NetHasp License Manager will launch
upon startup before the Moldplus Server. If it is running, you will see a minimized
icon on the right hand side of the toolbar, close to your time display as follows:
WARNING: Configuring the Moldplus Server should NOT BE PERFORMED USING A
REMOTE DESKTOP CONNECTION. It should be configured directly on the system
that is being installed on OR through a REMOTE CONSOLE connection. A Remote
Console connection simulates a physical presence at the remote computer/server.
Page 35 of 39
Problem:
If the SIM is not identified, the following message will be displayed with a list of
possible solutions. This is the main error displayed for any of the described problems
below:
The Moldplus Server Manager will most likely display a SIM number of 0 and/or
display an incorrect SIM number.
If you do not see the NetHasp SIM number displayed when you either start the
computer or launch Moldplus Server, check the following:
Problem: Windows Firewall Issue
Windows Firewall does not have the NetHasp License Manager and Moldplus Service
and executable in the Firewall Exceptions.
Page 36 of 39
Solution:
Verify the Windows Firewall (or other equivalent Firewall software) to ensure that
the 3 products are added to the Exceptions list or given permission to access the
Network.
Go to Control Panel, Windows Firewall:
This is the main Firewall window that indicates that the status of the Firewall. In this
case, it is active/ on:
Click on the Exceptions tab and ensure that the following are included in the Firewall
Exceptions list:
C:\WINDOWS\SYSTEM32\NHSRVICE.EXE
C:\Program Files\Aladdin\HASP LM\Moldplus Server
\MOLDSERVMANAGER.EXE
C:\Program Files\Aladdin\HASP LM\ Moldplus Server \MOLDSERVSERVICE.EXE
C:\Program Files\Aladdin\HASP LM\Moldplus Server
\MOLDSERVDIAGTOOL.EXE
Adding the 3 files to the EXCEPTIONS list will ensure that these products have access
to the network.
WARNING: The NetHASP SIM must be identified by the NHASPX.exe when you
check it as NetHasp, Local! To ensure this behaviour, make sure you login with
full administrative privileges and be physically present at the server!
Page 37 of 39
2.3
Moldplus Client Launch Issues
2.3.1
Moldplus Floating License Message
Problem:
Upon launching Mastercam, if you get this error message when you launch a Moldplus
product, there is good chance that Moldplus Server is not running OR your
Workstation does not have access to through the Firewall.
Moldplus error message:
Solution:
1. Ensure that Moldplus Server is running on the Server and that the licenses are
active.
2. The correct Server name, IP address and UDP are defined in the dialog above.
If you are prompted for the Server name, IP address and Server port number,
enter the IP address and Port number that is displayed on the Moldplus
Server Manager window.
3. Ensure that Mastercam.exe and any other Moldplus application that needs
access to the network to verify the licenses have access through the Firewall!
2.3.2
Exceeded Rights Message
Problem:
Page 38 of 39
Solution:
If you get this error message, it means that you are running the maximum number of
licenses available for use. Please verify and make sure that idle licenses are freed up,
before attempting to launch Moldplus again.
Conclusion
We hope you found this document useful to help configure Moldplus Server 5.3
seamlessly and with minimal effort.
Questions or feedback, please email [email protected]
Moldplus Server is developed with open source software. Licenses for all open source
software components are available in the file "Open Source Software Licenses.docx"
which is provided with this installation.
Thank you
Moldplus SA
Revision date: August 26, 2012
Page 39 of 39