1
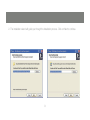
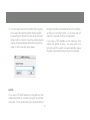
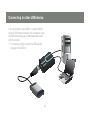
Installation Guide
USB Auto Printer Sharing Switch
1
GUB211
PART NO. M1327
2
Table of Contents
Introduction
04
Features
05
Package Contents
06
System Requirements
07
Windows Installation
08
Mac Installation
13
Set Up the Control Center Application
18
Connect to other USB device
22
Troubleshooting
24
Federal Communications Commission CC) Statement
25
CE Saftey Statement
27
Limited Warranty
28
Contact
29
3
Introduction
Thank you for purchasing the IOGEAR GUB211 USB Printer Auto Sharing Switch (hereafter referred to as
“Switch”). This Switch is designed to enable two computers to share your All-In-One/Multifunction devices,
standard printers, automatically processing print jobs from the two connected computers to send print
jobs.
4
Features
•
•
•
•
•
•
•
•
Automatically switch between two computers when connecting to USB printer or multi-function printer
Print jobs on first come first serve basis, no need to switch manually
USB 2.0 - supports Hi-speed (up to 480 Mbps) and USB 1.1 backward compatible.
Bus Powered - No external power supply needed.
USB devices hot pluggable.
Software enable manual switch
Share different USB devices between two computers
LED Lights indicate active connection
5
Package Contents
Verify that nothing is missing from the package by using the checklist below. Please contact your dealer
if anything is missing or damaged. All packing materials are recyclable. Please confirm the items in the
package below:
•
•
•
•
1 x 2-to-1 USB2.0 Peripherial Sharing Switch
2x 5 ft USB A-B Cable
Application CD
Quick Start Guide
6
System Requirements
PC users
• Win 2000, XP and Vista Compatible
• Available USB Port
Mac Users
• Mac OS X 10.3.9 or greater
• Requires OS 10.3 or greater for USB 2.0 support
• Available USB 2.0 Port
7
Windows Installation
NOTE: Please ensure your printer driver is installed
PRIOR to installing the drivers for IOGEAR Auto
Printer Sharing Switch.
For XP/2K
1. Insert the software CD into the CD-ROM of your
computer. An auto-run screen should appear
with a menu of options. Click on “Install Auto
Printer Sharing Software” to begin the setup
of the control center software. The installation
wizard will start the installation process, click on
Next to continue.
For Vista
Upon inserting the software CD into the CD-ROM of
your computer, the auto-run screen will spear with
a menu of options. Click on “Install Auto Printer
Sharing Software” to begin the setup of the control
center software. Vista will prompt a “User Account
Control” window, and click on Allow to continue.
The installation wizard will start the installation
process, click on Next to continue.
The rest of the installation will be the same as the
XP/2K installation, just follow procedures starting
from Step 2.
8
2. The installation wizard will guide you through the installation process. Click on Next to continue.
9
3. The installation wizard will place a shortcut
icon on the desktop. Make sure the “Create
a desktop icon” box is checked and click on
Next to continue.
10
4. Click on Install to install the application, then Finish to complete the setup
11
5. Once the installation is completed, you will
see a GREEN bubble showing up on your
task bar to indicate the software is ready and
correctly installed.
12
Mac Installation
NOTE: Please ensure your printer driver is installed PRIOR to installing the drivers for IOGEAR
Auto Printer Sharing Switch.
1. After inserting the installation CD, browse to the content of the CD and double click on “IOGEAR
Printer Sharing Switch” to begin the installation.
13
2. Click on Continue to proceed with the installation.
14
3. Please select the preferred location to install the application. We recommend installing the application
to your hard driver for optimal performance
15
4. Click on Install to continue.
5. You may be prompted by the Authenticate
window to ask for password to continue.
Type in your password of the account
that you used for this computer and click
on OK to continue.
16
6. When the installation finishes, click on Close to complete the installation process.
17
Hardware Installation
1. Connect a USB printer to the USB port shown
as above, and turn on the power of your USB
printer.
2. Connect any two computers (Windows or Mac)
to one of the USB ports shown below with the
included USB cable.
18
Set Up the Control Center Application
2. When the application window shows up, you
will be able to select the printer that’s already
setup on your computer from the drop-down
list by clicking on the down arrow. Click on
OK to confirm your selection. Make sure you
select the correct printer on both computers
that are connected to the GUB211.
Important Note:
The IOGEAR Auto Printer Sharing Switch
application needs to be activated on your
computer in order for the switch to function.
Windows
1. After installation, you will see an icon “IOGEAR
Auto Printer Sharing Switch” placed on your
desktop. Double click on the icon to launch the
application.
19
NOTE:
Mac
If you see a YELLOW bubble on the task bar, that
means the printer is currently occupied by another
computer. You may still send your print job without
having the printer connected back to the computer
that you are trying to print, or you may click on
Switch to manually connect to the printer.
1. After installation, you will see the GREEN bubble
showing up on the task bar at the bottom.
Click on the GREEN bubble to launch the
application.
If you see a RED bubble on the task bar, that means
the printer is busy. You may send your print job and
the switch will automatically queue the print job and
finish the print job momentarily.
20
2. You can select and set the printer that is going
to be used through the printer sharing switch
by selecting the printer from the drop down list.
Click on OK to confirm. Now the printer sharing
switch will automatically determine the printing
order on first come first serve basis.
having the printer connected back to the computer that you are trying to print, or you may click on
Switch to manually connect to the printer.
If you see a RED bubble on the task bar, that
means the printer is busy. You may send your
print job and the switch will automatically queue
the print job and finish the print job momentarily.
NOTE:
If you see a YELLOW bubble on the task bar, that
means the printer is currently occupied by another
computer. You may still send your print job without
21
Connecting to other USB device
You may choose to use GUB211 to share different
types of USB devices between two computers, such
as USB external storage or multimedia device with
USB connection.
1. For instance, simply connect the USB external
storage to the GUB211.
22
2. On Windows or Mac OS, launch the application
and click on Switch to manually connect to the
USB external storage device.
3. Once it is connected, you will see GREEN
bubble showing up on the task bar, and now
you should be able to access the USB external
storage device.
23
Troubleshooting
Problems
Solutions
The Switch does not detect my computer
1. Check the cable between the Switch and
the computer is securely connected
2. Try to connect the computer to a different
USB port on the Switch
My USB device is not detected by the Switch
application
1. Make sure the application is properly
installed and the USB device supports the
operation syste
2. Make sure the connected computer and the
USB device is no further than 15 feet away
The USB device is not working properly
Remove and re-install the application
The USB device can not be switched to another
computer
Unplug and re-plug the USB cable between the
Switch and the host computer.
24
Federal Communications Commission (FCC) Statement
15.21
You are cautioned that changes or modifications not expressly approved by the part responsible for
compliance could void the user’s authority to operate the equipment.
15.105(b)
This equipment has been tested and found to comply with the limits for a Class B digital device, pursuant
to part 15 of the FCC rules. These limits are designed to provide reasonable protection against harmful
interference in a residential installation. This equipment generates, uses and can radiate radio frequency
energy and, if not installed and used in accordance with the instructions, may cause harmful interference
to radio communications. However, there is no guarantee that interference will not occur in a particular
installation. If this equipment does cause harmful interference to radio or television reception, which can be
determined by turning the equipment off and on, the user is encouraged to try to correct the interference
by one or more of the following measures:
-Reorient or relocate the receiving antenna.
-Increase the separation between the equipment and receiver.
-Connect the equipment into an outlet on a circuit different from that to which the receiver is connected.
-Consult the dealer or an experienced radio/TV technician for help.
25
Operation is subject to the following two conditions:
1) this device may not cause interference and
2) this device must accept any interference, including interference that may cause undesired operation of
the device.
FCC RF Radiation Exposure Statement:
This equipment complies with FCC radiation exposure limits set forth for an uncontrolled environment. End
users must follow the specific operating instructions for satisfying RF exposure compliance. This transmitter must not be co-located or operating in conjunction with any other antenna or transmitter.
26
CE Safety Statement
This device has been tested and found to comply with the requirements set up in the council directive on
the approximation of the law of member states relating to EMC Directive 89/336/EEC, Low Voltage
Directive 73/23/EEC and R&TTE Directive 99/5/EC.
The product has been approved for LVD and covered the following countries:
Belgium, Denmark, France, Germany, Italy, Portugal, U.K., Spain, Sweden
27
Limited Warranty
IN NO EVENT SHALL THE DIRECT VENDOR’S LIABILITY FOR DIRECT, INDIRECT, SPECIAL,
INCIDENTAL OR CONSEQUENTIAL DAMAGES RESULTING FROM THE USE OF THE PRODUCT, DISK
OR ITS DOCUMENTATION EXCEED THE PRICE PAID FOR THE PRODUCT.
The direct vendor makes no warranty or representation, expressed, implied, or statutory with respect to
the contents or use of this documentation, and especially disclaims its quality, performance, merchantability, or fitness for any particular purpose.
The direct vendor also reserves the right to revise or update the device or documentation without obligation to notify any individual or entity of such revisions, or updates. For further inquires please contact your
direct vendor.
28
Contact
IOGEAR, INC.
23 Hubble
Irvine, CA 92618
P 949.453.8782
F 949.453.8785
Visit us at: www.iogear.com
©2007 IOGEAR. All Rights Reserved. M0060
IOGEAR, the IOGEAR logo, are trademarks or registered trademarks of IOGEAR, Inc. Microsoft and
Windows are registered trademarks of Microsoft Corporation. IBM is a registered trademark of
International Business Machines, Inc. Macintosh, G3/G4 and iMac are registered trademarks of Apple
Computer, Inc. All other brand and product names are trademarks or registered trademarks of their
respective holders. IOGEAR makes no warranty of any kind with regards to the information presented in
this document. All information furnished here is for informational purposes only and is subject to change
without notice. IOGEAR, Inc. assumes no responsibility for any inaccuracies or errors that may appear in
this document.
29
About Us
FUN
IOGEAR offers connectivity solutions that are innovative, fun, and stylish,
helping people enjoy daily life using our high technology products.
GREEN
IOGEAR is an environmentally conscious company that emphasizes the
importance of conserving natural resources. The use of our technology
solutions helps reduce electronic waste.
HEALTH
IOGEAR supports healthy and fit lifestyles. By integrating products with
the latest scientific developments, IOGEAR’s solutions enhance the life of
end-users.
© 2008 IOGEAR, INC.