1
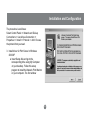
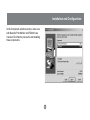
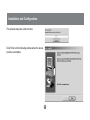
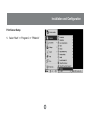
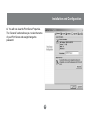
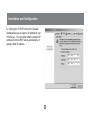
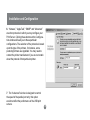
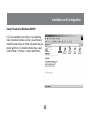
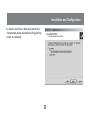
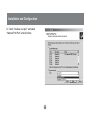
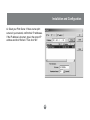
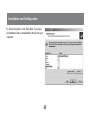
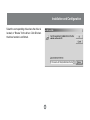
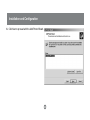
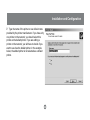
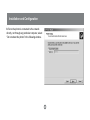
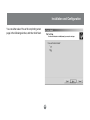
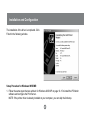
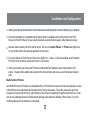
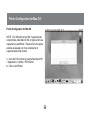
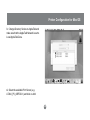
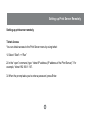
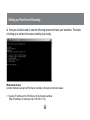
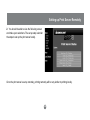
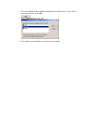
USB Print Server
User Manual (GPSU01)
®
Welcome
Thank you for purchasing this 1-port USB Print Server that allows any networked computer to share a USB
printer. It complies with USB 1.1 specifications, and provides users with an auto-sensing 10/100Base-T port. It
works with either 10BaseT or 100BaseT networks. This unit also supports multiple protocols and multiple
operating systems, and it integrates Internet Printing Protocol (IPP) to allow users to print from any computer
over a LAN/WAN or the Internet by specifying the device’s URL. The built-in web management feature
provides more convenience by allowing the user to configure, monitor and even reset the print server via a
web browser. This eliminates the need to place the printer right next to the computer. Print jobs can be sent to
a printer in another country just as easily as to a printer in the same office. Why bother sending a degraded
fax image while you can print an original at the destination?
We hope that you will enjoy using your Print Server and find it to be a useful solution.
©2003 IOGEAR. All Rights Reserved. PKG-M0045v1
IOGEAR, the IOGEAR logo, MiniView, VSE are trademarks or registered trademarks of IOGEAR, Inc. Microsoft and Windows
are registered trademarks of Microsoft Corporation. IBM is a registered trademark of International Business Machines, Inc.
Macintosh, G3/G4 and iMac are registered trademarks of Apple Computer, Inc. IOGEAR makes no warranty of any kind with
regards to the information presented in this document. All information furnished here is for informational purposes only and is
subject to change without notice. IOGEAR, Inc. assumes no responsibility for any inaccuracies or errors that may appear in
this document.
Table of Contents
Package Contents.................................................................................................................................. 02
Features.................................................................................................................................................. 03
System Requirements............................................................................................................................ 04
Installation and Configuration................................................................................................................. 05
Windows 2000/XP Setup....................................................................................................................... 16
Windows 98SE/ME Setup...................................................................................................................... 27
Mac OS Setup........................................................................................................................................ 29
Setting up the Print Server Remotely..................................................................................................... 32
Glossary................................................................................................................................................. 35
Technical Support.................................................................................................................................. 36
Limited Warranty.................................................................................................................................... 37
Package Contents
This package contains:
(1) Print Server
(1) External AC Power Adapter
(1) Driver CD
(1) User Manual
(1) Warranty Registration Card
* If any items are damaged or missing, please contact your dealer.
2
Features
• Easily connects your USB printer to a network
• Allows multiple computers to share one USB printer on the network
• Print from any computer on your network or from across the Internet
• Supports DHCP Client and multiple network protocols
• 10/100Mbps auto-sensing
• Supports Telnet and Web Management software
3
System Requirements
This USB print server supports:
• Windows 98SE/ME/NT/2000/XP
• Novell(iBindery/NDS)
• Mac OS 8.6 or Later
• Unix/Linux
• Printer with USB connection
4
Installation and Configuration
Hardware Setup
1. Connect the USB cable from the USB printer to the USB port on the print server;
2. Connect one end of the CAT5 patch cable to the CAT5 port on the print server;
3. Connect the other end of the CAT5 cable to the network. This print server works with various
networks such as LAN, WAN, or Internet. It can be plugged into various type of ports, such as:
• Network switch/hub;
• Router;
• Network outlets;
• Bridges, such as the HomePlug Ethernet bridge.
4. Connect the AC adapter to the print server.
Software Installation
1. Turn off the printer power.
2. Install protocol in Windows 2000/XP (if necessay)
Note: Although multiple protocols can be installed, it is preferred to install only one. The three most used
network protocols are IPX/SPX, TCP/IP or NetBEUI (see glossary for further information on these
protocols). TCP/IP has become the most commonly used protocol today.
5
Installation and Configuration
The procedure is as follows:
Select Control Panel >> Network and Dial-up
Connections >> Local Area Connection >>
Properties >> Install >> Protocol >> Add. Choose
the protocol that you need.
3. Install driver for Print Server in Windows
2000/XP
a: Insert Setup disk and go to the
corresponding drive using My Computer
on your desktop. Follow this setup
program to install the Network Print Monitor
on your computer. The first window
6
Installation and Configuration
Click Next on the following window to proceed
to the Component Selection window:
7
Installation and Configuration
At the Component selection window, make sure
both Network Print Monitor and PSAdmin are
checked. Click Next to proceed to start installing
these components.
8
Installation and Configuration
This process may take a few minutes.
Click Finish on the following window when the above
process is complete.
9
Installation and Configuration
Print Server Setup
1. Select “Start” >> “Programs” >> “PSAdmin”
10
Installation and Configuration
2. Your computer will search for the Print Server
3. Select your Print Server and double click on it.
11
Installation and Configuration
4. You will now view the Print Server Properties.
The “General” section allows you to view the name
of your Print Server and assign/change the
password.
12
Installation and Configuration
5. Clicking the “TCP/IP” button in the General
window allows you to view the IP address of your
Print Server. You can either obtain a dynamic IP
address from the DHCP server automatically, or
assign a fixed IP address.
13
Installation and Configuration
Note: If you don’t know the gateway address, you can contact the network administrator, or use the
following procedure to find the Gateway address: click “Start” >> “Programs” >> “Accessories”>>
“Command Prompt,” then type “ipconfig”;you will be able to see the default Gateway address from a
window similar to the following:
14
Installation and Configuration
6. “Netware,” “AppleTalk,” “SNMP” and “Advanced”
are other protocols in which you may configure your
Print Server. Clicking these buttons at the Configuration window will lead you to these particular
configurations. The selection of the protocols is based
upon the type of the printers, for instance, some
postscript printers use Appletalk. You may need to
contact the printer manufacturer if you are not certain
about the protocol of that particular printer.
7. The “Advanced” window is designed to control
the speed of the parallel port only; this option
would not affect the performance of the USB print
servers.
15
Installation and Configuration
Setup Procedure for Windows 2000/XP
1. If you are adding a new printer, or just allowing
more computers to share a printer, you will have to
install the printer driver on all the computers that you
wish to print from. To install the printer drive, select
Control Panel >> Printers >> select “Add Printer.”
16
Installation and Configuration
Follow the “Add Printer Wizard.”
17
Installation and Configuration
2. Select Local Printer. Make sure that the box:
“Automatically detect and install my Plug and Play
printer” is unchecked.
18
Installation and Configuration
3. Check “Create a new port,” and select
“Network Print Port,” and click Next,
19
Installation and Configuration
4. Select your Print Server. If there are two print
servers in your network, confirm their IP addresses.
If the IP address is incorrect, type in the correct IP
address and click “Refresh.” Then click “OK.”
20
Installation and Configuration
5. Select the printer. Click “Have Disk” if you have
an installation disk, or download the driver onto your
computer.
21
Installation and Configuration
Select the corresponding drive where the driver is
located, or “Browse” for the driver. Click OK when
the driver location is confirmed.
22
Installation and Configuration
6. Click Next to proceed with the Add Printer Wizard.
23
Installation and Configuration
7. Type the name of the printer or use default name
provided by the printer manufacturer. If you have only
one printer on the network, you should select this
printer as the default printer. If you are adding a
printer on the network, you will have to decide if you
want to use it as the default printer. In the example
below, the added printer is not selected as a default
printer.
24
Installation and Configuration
8. Since the printer is connected to the network
directly, not through any particular computer, select
“Do not share this printer” in the following window.
25
Installation and Configuration
You can either select Yes or No on printing a test
page in the following window, and then click Next.
26
Installation and Configuration
The installation of the driver is completed. Click
Finish in the following window.
Setup Procedure for Windows 98SE/ME:
1. Follow the same steps that are outlined for Windows 2000/XP on page 10-15 to install the PS Admin
software and configure the Print Server.
NOTE: If the printer driver is already installed on your computer, you can skip the 2nd step.
27
Installation and Configuration
2. Install your printer per the instructions from the manufacturer with the printer connected directly to your computer.
3. Once the installation is completed and the printer driver is installed connect the printer to the Print
Server and the Print Server to your existing network as instructed on page 5 under hardware setup.
4. Now we need to add a port to the printer driver. Go to your Control Panels >> Printers and right-click
on your printer driver and select properties from the menu.
5. Go to the Details or Ports Tab and click on the ‘Add Port...’ button. In the next window select ‘Network
Print Port’ from the Other section and click the ‘OK’ button.
6. In the next window you will see the Print Server listed with its IP address, select it and click the ‘OK’
button. The port will be added and selected in the driver window and now you are finished and ready to
print.
Multi-Function Printers
Not all Multi-Functions Printers are compatible with our Print Server however with the ones that are we have
noticed that a some adjustment to the printer driver may be necessary. To do this you need to go to the
properties of your printer driver by right-clicking on the driver and selecting Properties from the menu. Then
look for any setting that refers to Bi-directional printing under either the Details or Ports Tabs. If you find
anything make sure it is disabled or unchecked.
28
Printer Configuration for Mac OS
Printer Configuration for Mac OS
NOTE: The USB print server ONLY supports postscript printers under Mac OS 8.6 or higher which are
supported by LaserWriter. Please refer to the Apple
website www.apple.com for a complete list of
supported post-script printers.
1. Go to the Print Center by going to Macintosh HD
> Applications > Utilities > Print Center.
2. Click on Add Printer.
29
Printer Configuration for Mac OS
3. Change Directory Service to AppleTalk and
make sure that the AppleTalk Network is set to
Local AppleTalk Zone.
4. Select the available Print Server (e.g.
ATALK_PS_40EFOD-1) and click on Add.
30
Printer Configuration for Mac OS
5. A list of post-script printers will appear. Select
the appropriate printer and click on Add.
6. The necessary files will be installed. The
process may take a few minutes.
7. Congratulations! The printer setup for your Mac is now complete.
31
Setting up Print Server Remotely
Setting up print server remotely
Telnet Access
You can obtain access to the Print Server menu by using telnet:
1. Select “Start” >> “Run”
2. In the “open” command, type: “telnet IP address (IP address of the Print Server)”. For
example, “telnet 192.168.1.110”.
3. When the prompt asks you to enter a password, press Enter.
32
Setting up Print Server Remotely
4. Now you should be able to view the following screen and make your selections. The steps
of setting up is similar to the steps of setting it up locally.
Web-based Access
Another method to set up the Print Server remotely is through an Internet browser.
1. Type the IP address of the Print Server in the browsers window
(http://IP address, for instance, http://192.169.1.110)
33
Setting up Print Server Remotely
2. You should be able to view the following screen
and make your selections. The set up step is similar
the steps to set up the print server locally.
Once the print server is set up remotely, printing remotely will be very similar to printing locally.
34
Glossary
IPX/SPX: Internetwork Packet Exchange (IPX) is a networking protocol used by the Novell NetWare operating
systems. It is a datagram protocol used for connectionless communications. Sequenced Packet Exchange
(SPX) is a transport layer protocol (layer 4 of the OSI Model) also used in Novell NetWare networks. The SPX
layer sits on top of the IPX layer (layer 3) and provides connection-oriented services between two nodes on
the network. SPX is used primarily by client/server applications. Whereas the IPX protocol is similar to IP,
SPX is similar to TCP. Therefore, IPX/SPX together provides a connection services similar to TCP/IP. It is
routable and can be used to create large professional networks. Usually, it is not used in home-networks,
unless explicitly required by some computer games.
TCP/IP: Transmission Control Protocol/Internet Protocol (TCP/IP) is the suite of communications protocols
used to connect hosts on the Internet. It utilizes several protocols (the two main ones being TCP and IP).
TCP/IP is built into the UNIX operating system and is used by the Internet, making it the de facto standard for
transmitting data over networks.
NetBEUI: NetBios Enhanced User Interface is an enhanced version of the NetBIOS protocol used by
network operating systems such as LAN Manager, LAN Server, Windows 95/NT and Windows for
Workgroups. This is considered to be a very fast protocol as long as the computer name and workgroup are
defined correctly and is a good choice for small home-networks. However it is not routable, it can not be used
to connect networks in different locations and it is not supported by Microsoft on Windows XP.
35
Technical Support
If you need technical support, please check out our IOGEAR Tech Info Library (T.I.L.) at
www.iogear.com/support for the latest tips, tricks, and troubleshooting. The IOGEAR T.I.L.
was designed to provide you with the latest technical information about our products. Most of
the answers to your questions can be found here, so please try it out before contacting
technical support.
Technical support is available Monday through Friday from 8:00 am to 5:00 pm PST and can
be reached at (949) 453-8782.
36
Limited Warranty
IN NO EVENT SHALL THE DIRECT VENDOR’S LIABILITY FOR DIRECT, INDIRECT,
SPECIAL, INCIDENTAL OR CONSEQUENTIAL DAMAGES RESULTING FROM THE USE OF
THE PRODUCT, DISK OR ITS DOCUMENTATION EXCEED THE PRICE PAID FOR THE
PRODUCT.
The direct vendor makes no warranty or representation, expressed, implied, or statutory with
respect to the contents or use of this documentation, and especially disclaims its quality,
performance, merchantability, or fitness for any particular purpose.
The direct vendor also reserves the right to revise or update the device or documentation
without obligation to notify any individual or entity of such revisions, or updates. For further
inquires please contact your direct vendor.
37
®
Contact info.
23 Hubble
•
Irvine, CA 92618
•
(P) 949.453.8782
•
(F) 949.453.8785
•
www.iogear.com
GPSU01 Product Manual Addendum Rev. 01
Setup Procedure for Windows 98/ME/2000/XP
NOTE: Under Windows 98/ME, you must initially install your Printer being
hooked up locally, before you run it through the Print Server
1. Turn off the printer.
2. Install any protocols (if necessary) in Windows 98/ME/2000/XP
NOTE: Although multiple protocols can be installed, it is preferable to install
only one. The three most used network protocols are IPX/SPX, TCP/IP or
NetBEUI (see glossary for further information on these protocols).
TCP/IP has become the most commonly used protocol today. Please refer the
Glossary to see the detailed definition of each protocol.
The procedure is as follows: (Windows 2000/XP)
1. Open Control Panel
2. Open Network and Dial-up Connections
3. Select Local Area Connection
4.
5.
6.
7.
Click File, then click Properties
Click Install
Select Protocol, then click Add
Choose the protocol that you wish to use, then click Ok.
The procedure is as follows: (Windows 98/ME)
1. Open the Control Panel
2. Open Network
3. A list of installed network adapters and protocols will be listed. If you wish to
add a specific one, click Add.
4. Select Protocol, then click Add.
5. You will be presented with a list of protocols to install.