1
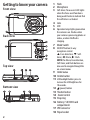
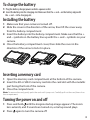
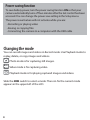
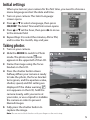
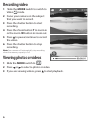
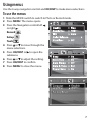
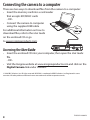
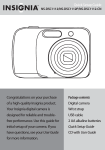
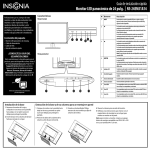
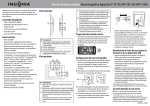
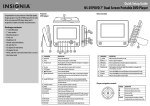
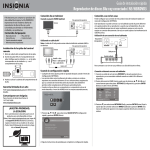
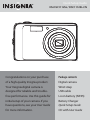
Quick Setup Guide NS-DSC1112SL / DSC1112SL-CN Congratulations on your purchase Package contents of a high-quality Insignia product. Digital camera Your Insignia digital camera is Wrist strap designed for reliable and trouble- USB cable free performance. Use this guide for Li-ion battery (NP45) initial setup of your camera. If you Battery Charger have questions, see your User Guide Quick Setup Guide for more information. CD with User Guide 1 Getting to know your camera Front view 1 Flash 2 Microphone 3 Self-timer / focus assist LED: lights when the focus assist function is being used. Flashes to indicate that the self-timer is activated. 4 Lens 5 LCD 6 Operation lamp: lights green when Back view the camera is on. Flashes when your camera is processing photos or videos, or when the flash is charging. 7 Mode Switch 8 OK/DISP button/4-way Top view navigation control: : Face detection, : Selftimer, : Macro, : Flash NOTE: the Macro, Face detection, Self-Timer, and Flash buttons are also used to navigate through the on-screen menus 9 MENU button 10 Delete button 11 LCD backlight button: press to Bottom view increase the LCD brightness for 10 seconds. 12 (power) button 13 Shutter button 14 Zoom Control 15 Strap ring 16 Battery / SD/SDHC card compartment 17 USB connector 18 Tripod socket 2 To charge the battery 1 Plug the battery charger power cord into a power outlet. 2 Insert the battery into the charging slot. Make sure that the + and – on the battery align with the + and – in the charging slot. Installing the battery 1 Make sure that your camera is turned off. 2 Slide the cover in the direction of the arrow, then lift the cover away from the battery compartment 3 Insert the battery into the battery compartment. Make sure that the + and – symbols on the battery line up with the + and – symbols on your camera. 4 Close the battery compartment cover, then slide the cover in the direction of the arrow to lock it in place. Inserting a memory card 1 Open the memory card compartment at the bottom of the camera. 2 Insert the SD or SDHC memory card into the card slot with the metallic part facing the front of the camera. 3 Close the compartment. Note: To remove the card, gently push the card until it pops out. Carefully pull out the card, then close the compartment. Turning the power on and off 1 Press and hold until the Insignia startup image appears. The zoom lens extends, and if sounds are turned on, a startup sound plays. 2 Press again to turn the camera off. 3 Power-saving function To save battery power, turn the power saving function ON so that your camera automatically turns off two minutes after the last control has been accessed. You can change the power save setting in the Setup menu. The power save feature will not activate while you are: • Recording or playing video • Erasing or copying files • Connecting the camera to a computer with the USB cable Changing the mode You can record images and videos in Record mode. Use Playback mode to replay, delete, or copy images and videos. Photo mode is for capturing still images. Video mode is for capturing video. Playback mode is for playing captured images and videos. Slide the MODE switch to select a mode. The icon for the current mode appears in the upper-left of the LCD. 4 Initial settings 1 2 3 4 When you turn on your camera for the first time, you need to choose a menu language and set the date and time. Turn on your camera. The Select Language screen opens. Press or to select a language, then press OK/DISP. The Select Time and Date screen opens. Press or set the hour, then press to move to the minute field. Repeat Step 3 to select the minutes, AM or PM, and to enter the month, day, and year. Taking photos 1 Turn on your camera. 2 Slide the MODE to switch to Photo mode. The photo mode icon appears in the upper-left of the LCD. 3 Frame the image using the focus bracket on the LCD. 4 Press the shutter button down halfway.When your camera is ready to take the photo, the focus bracket turns green, and the aperture value, shutter, speed, and ISO setting are displayed. If the shake warning icon appears on the LCD, hold the camera steady, with your arms at your sides, or use a tripod to stabilize the camera in order to prevent blurred images. 5 Fully press the shutter button to capture the image. Note: Be sure not to block the lens with your fingers or the wrist strap. 5 Recording video 1 Slide the MODE switch to switch to Video mode. 2 Focus your camera on the subject that you want to record. 3 Press the shutter button to start recording. 4 Press the Zoom button T to zoom in or the zoom W button to zoom out. 5 Press to pause/continue to record the video. 6 Press the shutter button to stop recording. Note: Your camera will automatically stop recording when the memory capacity is full. Viewing photos or videos 1 Slide the MODE switch to . 2 Press or to select a photo or video. 3 If you are viewing videos, press to start playback. 6 Using menus Use the 4-way navigation control and OK/DISP to make menu selections. To use the menus 1 Slide the MODE switch to switch to Photo or Record mode. 2 Press MENU. The menu opens. 3 Press the Navigation control left or right . Record Setup 4 5 6 7 8 Tools Press or to move through the menu selections. Press OK/DISP or to open the submenu. Press or to adjust the setting. Press OK/DISP to confirm. Press MENU to close the menu. 7 Connecting the camera to a computer There are two ways to download files from the camera to a computer: • Insert the memory card into a card reader that accepts SD/SDHC cards - OR • Connect the camera to computer using the supplied USB cable For additional information on how to download files, refer to the User Guide on the enclosed CD or go to www.insigniaproducts.com. Accessing the User Guide • Insert the enclosed CD into your computer, then open the User Guide file. - OR • Visit the Insignia website at www.insigniaproducts.com and click on the Digital Camera link under Products. © 2010 BBY Solutions, Inc. All rights reserved. INSIGNIA is a trademark of BBY Solutions, Inc. Registered in some countries. All other products and brand names are trademarks of their respective owners. 8 ENGLISH 10-0423