1
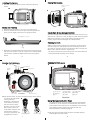
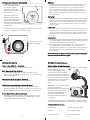
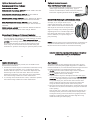
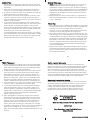
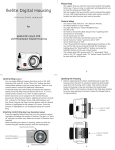
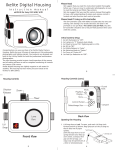
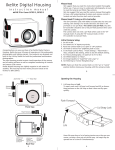
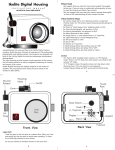
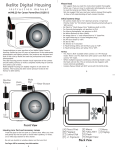
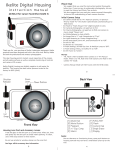
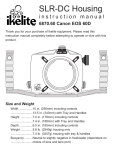
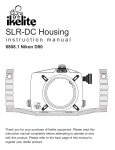
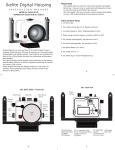
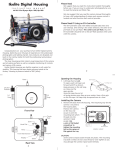
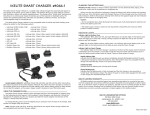
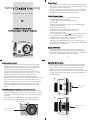
Please Read
We suggest that you read this instruction booklet thoroughly
before use. If you are new to underwater photography be sure
to read the General and Photo Tips.
We also suggest that you read the camera manual thoroughly
to have a full understanding of where each camera control is
located and what function each control provides.
Ikelite Digital Housing
instruction manual
Initial Camera Setup
for
#6242.95 Canon S95
ULTRAcompact Digital Housing
-
-
Set camera mode switch to “Av” Aperture Priority.
Set White Balance to auto “AWB”.
Set Light Metering to “Center-Weighted Avg.”.
Set ISO to 80.
Set Flash to forced ON (flash always fires) “Lightning Bolt”.
Set Review to “5 Seconds”.
Set AF-assist beam to “Off”.
Set Red-Eye Correction and Red-Eye Lamp to “Off”.
Set AF Frame to “Center” and Servo AF to “Off”.
Set AF-Point Zoom to “Off”.
If the "Shortcut/Print" button is not assigned, functions of the
rear control dial can be accessed through the housing by
holding down the "Shortcut/Print" button and using the
left/right buttons of the rear control cluster.
The camera does NOT operate with TTL “automated” flash
when in the “M” manual mode. “M” manual mode should NOT
be used with the AF35 strobe.
Canon S90 Note:
The Canon Powershot S90 camera body varies slightly by
camera thickness and pushbutton placement. Rear and top
pushbutton controls will be slightly off-center but operational
when using the S90 camera in the S95 housing.
2
Camera Setup (cont.)
Opening the Housing
-
1. Depress opposing latch buttons simultaneously to open the
housing. Once the latch is unlocked, rotate the latch handle
away from the housing until it stops. This motion will also
break the housing o-ring seal and open the housing back
slightly. NOTE: Latch must be rotated to the fully open position
to assure easy opening of the back. Rotate the hinged back to
it’s open position.
You can assign different camera functions such as ISO, WB,
Metering, AEL, and AFL to the “Short Cut” button and then
change those settings using the arrow buttons. Refer to your
camera owner’s manual for additional information.
- In Manual mode, the Control Ring will operate the aperture
setting. Press the Ring Function button and set to +/- / Tv to
change shutter speed; set to “STD” to adjust aperture.
- Camera functions can be assigned to the Control RIng by
pressing the Ring Function button. Additional functions include
ISO, +/-Exp./Tv, MF Manual Focus, WB white balance, and
Step Zoom. Depress the Ring Function button until the desired
function is highlighted in the camera LCD screen. Once the
function is highlighted, it can be adjusted using the Control
Ring.
Latch in “open”
position
Attaching Control Ring Gear (see illustration below)
Press the supplied Control Ring Gear over the camera’s control
ring before installing the camera in housing. The gear is a “press
fit” and goes on either way. Make sure to test it’s function once
installed.
When installling the camera in housing, make sure that the
Control Ring gear meshes properly with the housing gear.
Ring Function Button
Latch Button
Latch Button
Latch Button
S90
Canon
Canon
Latch in “closed”
position
Control Ring Gear
“properly installed”
S90
3
Camera Illustration
Latch Button
4
Closing the Housing
Installing the Camera
1. Place the camera face down into the front housing ribs as
shown.
Latch in “locked”
position
Camera in Housing Front
Canon
Latch Button
Latch Button
Made in USA
ULTRAcompact
IKELITE
Latch Button
Canon
Latch Button
Camera in Housing Front
IKELITE
ULTRAcompact
Made in USA
Closing the Housing
1. Place housing face down in your lap or on a flat surface.
2. Check to see that there is an o-ring on the housing back and
that it is clean, lightly lubed, and in its proper location.
Check Main O-ring Seal and Controls
Once the housing has been closed, look at the main housing o-ring
seal from the “top view” as seen on page 4. Rotate the housing 360
degrees and note the o-ring seal by looking through the clear
housing. A good seal should appear as a solid black line.
Housing Back - Top View
Housing Controls
o-ring
3. Rotate the hinged back onto the housing front. Close the latch
and make sure it locks. Latch will “click” into it’s locked position.
Latch buttons will NOT be depressed when latch is properly
locked.
5
Make sure the housing controls line up with the camera controls.
Turn the camera on and operate each of the housing controls to
get a feel for using the camera in the housing. Take a few pictures
above water with the camera in the housing.
- All camera controls are accessed except the rear Control Dial.Use
arrow pad instead to change menu settings.
6
Housing Controls (cont.)
Housing Controls (cont.)
Back View
[3] +/[2] Playback
[1] Short Cut
Control Ring
Front View
Tray Mount
Mode Dial
[6] Flash
[9] Menu
[5] FUNC./SET [8] Display
[4] Macro/MF [7] Single Erase
Made in USA
ULTRAcompact
IKELITE
8 9
7
4 5 6
3
1 2
Lens Port
Lanyard
Latch
Button
Shutter
Ring Function
Lever
Zoom
Power Button
Mode Dial
Zoom
Lever
Latch
Power Button
Shutter
Button
Ring Function
2
3
4 5 6
7
8
9
1
Lens Port
Lanyard
IKELITE
ULTRAcompact
Made in USA
Control Ring
[1] Short Cut
[2] Playback
[3] +/-
Tray Mount
Front View
Zoom Control: After you have used the housing's zoom control,
it must be returned to the
center position to
disengage. If the housing
zoom control is pushing
the zoom lever in either
direction, you may not be
able to take a picture or
access other functions. This
is because the camera is
receiving a signal from the
engaged zoom control.
“Center Position”
Zoom Control Disengaged
-
+
Zoom Control Engaged
-
+
[4] Macro/MF
[5] FUNC./SET
[6] Flash
[7] Single Erase
[8] Display
[9] Menu
Back View
Using the Camera’s Built-in Flash
-
+
Zoom Control Disengaged
“Center Position”
7
-
+
Zoom Control Engaged
For the best results, we recommend using an external Ikelite
Substrobe. If you do not have an external flash, the camera’s
built-in flash can be used. This use is limited due to the housing
port blocking a porion of the built-in camera flash. See
Diffuser/Deflector Installation (page 9).
NOTE: The camera’s built-in flash cannot be used with optional
Wide-Angle or Accessory lenses.
8
Diffuser and Deflector Installation
Diffuser
Diffuser/Deflector Material
A diffuser and deflector are
included with the housing.
The diffuser is white
transparent plastic. The
deflector is also white but is
not transparent.
To install the diffuser or
deflector, simply push the
Cut-out Section into the port
groove until it stops. The
white plastic should be placed
in front of the camera flash as
shown below.
The diffuser should be installed when using the camera’s built
in flash. When shooting with the camera’s built-in flash at
approximately 2 feet (0.6 m) or less, the lens port on the
housing will block a portion of the light from the camera’s
built-in flash, creating a shadow in the lower right area of the
photo. Zoom the lens to eliminate the shadow (You can test
this above water).
Deflector
Cut-out
Section
Small Hole
The deflector should be installed when using an external strobe
such as the AF35, DS51, DS160, DS161 or DS200 Substrobe with
an EV Controller. The deflector will redirect the camera’s flash
to the slave unit or EV Controller which controls the external
strobe’s output.
Lens Port
Note the Small Hole. To avoid losing the diffuser/deflector, you
can attach a fishing line or string to this hole.
Lens Port
Treat the glass in the lens port as a camera lens. After use, rinse
and gently dry the outside lens port to avoid water spotting. To
clean, use a mild soap solution or lens cleaner. Do not rinse the
inside port glass. Do not use alcohol or window cleaner on the
Lens Port.
Lubricants
Housing shown with
Deflector installed.
Lens Port
9
Optional Accessories
1. Ikelite provides silicone lubricant with the housing. We recommend
you use only Ikelite lubricant on Ikelite products. Other brands may
cause the o-ring to swell and not seal properly.
2. Use only enough lubricant to lightly cover the main housing
o-ring. Wipe off any excess lubricant with a clean cloth.
Lubricant is not a sealant, it is used to reduce friction. Excessive
lubricant can collect sand and dirt which may interfere with
proper sealing.
CAUTION: Never use spray lubricants as the propellant ingredient
can cause the plastic housing to crack.
10
Optional Accessories (cont.)
Ikelite Lube #5020 (4 - 1cc tubes)
Ikelite Digital Strobe Packages
For the best photo results in all shooting conditions, Ikelite highly
recommends that you use an
external digital strobe. Ikelite
strobes are much more powerful,
recycle more quickly, and eliminate
backscatter created by the camera's
built-in flash. Strobe packages come
complete with the strobe, arm, and
slave unit (to sense the camera
flash).
Additional Control Ring Gear #0099.23
Backup Control Ring Gear for the camera lens.
UR/Pro Filter (Blue Water) #6441.41 (3” port)
The UR/Pro underwater color correcting filter is designed to
restore some of the warm colors filtered out by the water. For
available light use only; not recommended for use with flash.
Green Water Filter #6441.81 (3” port)
Enhances contrast and alters the color of green water to give
your subject a rich, natural tone. For available light use only.
Not recommended for use with flash.
ASH
TO
FL
ikelite
AU
O-rings last for several years if properly maintained (See
maintenance). Always carry a spare in case your housing o-ring
becomes damaged or lost.
ikelite
Main Housing O-ring #0132.45
AF3
5
53F
A
A
HS
U
OT
LF
i
etilek
A
etileki
For light lubrication of the main housing o-ring.
The addition of an external strobe to
your housing will help
eliminate particles in the water that
are “lit-up” by the camera flash,
commonly called backscatter. A
second strobe will eliminate
shadows and add more depth to
your subjects.
The #4035 AF35 AutoFlash Kit strobe package is designed specifically for the Ikelite Compact and ULTRAcompact Digital housings.
AF35 AutoFlash Kit includes:
11
- AF35 strobe
- Handle with rubber grip
- Flex arm
- Tray (single or dual)
- AutoFlash sensor
- Mounting hardware
12
Optional Accessories (cont.)
Optional Accessories (cont.)
Recommended Strobe Packages
Tray with Release Handle #9523.31
AF35 Autoflash Kit #4035.
DS51 Substrobe Flex Package #3944.49 includes #4087.1 Flex Arm
System with EV Manual Controller.
Tray and Release Handle is required to mount external
Ikelite Digital Substrobes (except AF35) - page 13.
Contact an Ikelite dealer to order and receive additional
information regarding all Ikelite strobe packages.
DS51 Substrobe Deluxe Package #3944.54 includes #4086.61
SA-100 Arm System with EV Manual Controller.
DS160 Substrobe Package #3944.91 includes #4086.61 SA-100 Arm
System and 1.5 hour Smart Charger with EV Manual Controller.
DS161 Movie Substrobe Package #3945.03 includes #4086.61
SA-100 Arm System and 1.5 hour Smart Charger with EV Manual
Controller.
DS200 Substrobe #4062.2 can be used with #4100.6 EV Manual
Controller. Also recommended is Smart Charger #4066.1.
Please Read If Using an EV-Manual Controller
The EV-Manual Controller used with Ikelite DS Substrobes has
two user settings. One setting is for strobe selection, the other
is for pre-flash or non pre-flash. Your camera model uses
pre-flash in all shooting modes except “M manual mode. The
EV-Controller should be set to the pre-flash position except
when using “M” manual mode. We recommend setting the
Controller for “pre-flash” and using “Av” aperture priority mode.
Ikelite W-20 Wide-Angle Conversion Lens #6420
An external wide angle conversion lens increases angle of
coverage, so you can get closer to your
subject while still fitting everything in the
frame. Add an Ikelite W-20 or other 67mm
wide-angle conversion lens to improve your
angle of coverage in any shooting situation.
Vignetting will occur at widest angle camera
lens setting with these lenses. Zoom in 2 or 3
times to eliminate, or crop the image in
post-processing.
NOTE: Accessory 67mm macro lenses designed for underwater use
may also be attached directly to the front of the housing's port.
Bayonet mount lenses cannot be used with this housing.
Complete information regarding strobe packages and optional
accessories is available at www.ikelite.com
13
14
Control Maintenance
Maintenance
Ikelite controls are designed to provide years of reliable service
with minimal maintenance.
1. Push button controls require no maintenance other than rinsing
in fresh water after saltwater use. If a push button control
becomes difficult to push, or if it sticks when depressed, soak
the housing in luke warm fresh water. After a few minutes
operate the push button. If this does not correct the problem,
return the housing to Ikelite for routine maintenance.
2. If a housing control shaft becomes “sticky” and hard to operate,
return the housing to Ikelite for routine maintenance.
The Ikelite Digital Housing should be given the same care and
attention as your other photographic equipment. In addition to
normal maintenance, we recommend that the housing be returned
to Ikelite periodically to be checked and pressure tested.
1. Do Not leave the camera and housing in direct sunlight for
prolonged periods. Heat may damage the camera.
2. Do Not ship the camera in the housing.
3 Keep the back o-ring clean and lightly lubricated. Only apply
enough lubricant to make the o-ring feel slick. Do Not stretch
the o-ring. This light coating of lubricant will help to keep the
o-ring from drying out, and will also reduce friction when
opening and closing the housing. Keep the area where the
o-ring fits and the sealing surface of the housing clean.
4 Rinse the housing exterior thoroughly in fresh water after each
salt water use. Dry with a soft cloth. Dry lens port to eliminate
water spotting.
After several uses in salt water, soak the housing exterior in a
mild soap solution, then rinse and dry before storage. When
storing the housing, remove the back o-ring, lightly lubricate,
and place in a plastic bag. Place the plastic bag with o-ring
inside the housing for safe keeping.
15
16
General Tips
1. Due to the power required to operate the camera, flash, and
LCD screen, it is a good idea to start each dive with a fresh set
of batteries.
2. Some cameras reset their flash to AUTO when the camera is
turned on. If you prefer another setting be sure to select it.
3. As soon as you enter the water, take a moment and check the
housing to see that it is properly sealed.
4. Next, check to see if there are any bubbles on the face of the
lens port. If there are, take your finger and remove them. If
there are bubbles on the lens port they can produce soft focus
spots in your photographs.
5. If you are shooting with the camera’s built-in flash and the
cameras lens is set to the widest angle, you may need to zoom
the lens slightly or a shadow may appear in the lower left
corner of close-up photographs. The lens port may block some
of the light. Installing the flash diffuser will help to eliminate
the shadow. (You can test this above water)
To shoot photographs closer than 2 feet (0.6m), you need to
use an external strobe such as the AF35, DS51, DS125, or DS160.
With an external strobe you can position it so nothing blocks
the light path between the strobe and the subject.
General Tips (cont.)
6 NOTE: Fogging of the port glass may occur due to a variety of
environmental factors. To prevent fogging issues, always
assemble the housing in a cool, dry area, and keep the housing
out of direct sunlight. If fogging persists, insert a fresh dessicant
packet inside the housing before each day of diving (dessicant
packages are not available from Ikelite, however most camera
stores carry them).
7. Before placing your camera in the housing, it is a good idea to
immerse the closed housing in a bucket or rinse tank to make
sure it is watertight.
Photo Tips
1. The number one rule in underwater photography is to eliminate
as much water between the camera and subject as possible. Get
as close as you can to the subject, then use the zoom if
necessary. If you are using flash, subjects beyond 6 feet (1.8m)
will not have much color regardless of strobe power.
2. The camera’s built-in flash is very close to the camera lens. The
flash can light up any suspended particles in the water and they
can be recorded in your picture. This effect is called backscatter.
To eliminate as much backscatter as possible, photograph close,
photograph in clear water, and do not stir up the sand or silty
bottom. If backscatter becomes a problem in the environment
you are photographing, an external flash will help eliminate
much of the backscatter.
3. Digital cameras have a slight lag time between when you press
the shutter release button and the camera actually takes the
picture. Hold the camera steady a second or two after pressing
the shutter release button.
18
17
Photo Tips (cont.)
4. Do not shoot down on subjects as they will quite often blend
into the background and be difficult to see in the photograph.
Shoot subjects straight on or shoot up at a slight angle using
the blue water as a contrasting background.
5. Underwater flash is used to restore the warmer colors filtered
out by the water as well as to illuminate the subject. When
photographing underwater, set the camera to use flash on
every shot. If the camera’s flash is set to AUTO and the sun is
behind your subject, the camera may see enough light that it
does not fire the flash. With the sun behind the subject, the
subject is shaded (dark) and needs flash for a good exposure.
6. If over-exposure occurs, enable macro setting. If over-exposure
continues, zoom in and back away from the subject.
7. If your camera consistently over or underexposes the image
when using daylight or flash, you may want to adjust your
camera’s exposure compensation settings (if offered on your
model). Many cameras allow you to adjust both available light
and flash exposure with an EV “Exposure Compensation”
control in the camera’s menu.
8. Many photographers transfer their images to the computer
where they can fine tune the appearance of the image. Many
of the image manipulation programs make you think you can
magically correct any image taken and make a good picture.
Note that if the image is overexposed, much of the color is
missing. If the color is missing you cannot adjust it. If images
are slightly underexposed, the color is there, and you can adjust
exposure to some degree. So, if you error in exposure, it is
better to have the image slightly underexposed rather than over
exposed.
19
Ikelite Limited Warranty
All Ikelite products are warranted against any manufacturing
defects for a period of one year from the original date of purchase.
Defective products should be returned prepaid to Ikelite. Ikelite
will, at its discretion, repair or replace such products, and will
return to customer prepaid. All other claims of any nature are not
covered. Housing is pressure tested and warranted to 200’ (60m)
maximum underwater depth. Except as mentioned above, no other
warranty expressed or implied, applies to this Ikelite product.
Returning Products for Service
Ikelite is most interested in preforming any service to assure that
all products perform as intended. For repair or service, return the
product to the address below with your name, address, phone
number and a brief description of the problem. Evidence of
purchase date must be provided to obtain warranty service.
Normal service turnaround time is approximately 2-3 weeks.
Ikelite Underwater Systems
50 W 33rd Street
Indianapolis, IN 46208 USA
When returning products send “attn. Repair Dept.”
317-923-4523
“general questions” e-mail: [email protected]
www.ikelite.com
#6242.95_Canon_S95-01-0810