1
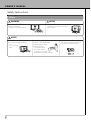
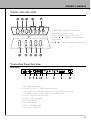
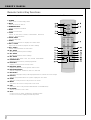
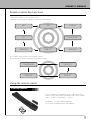
<English>
26” TFT LCD TV
OWNER’S MANUAL
HLT-2672
English
OWNER’S MANUAL
Please read this manual carefully before operating
your set.
Retain it for future reference.
Record model number and serial number of the set.
See the label attached on the back of the set and
quote this information to your dealer when you require
service.
Table of Contents
Important Safety instructions
3
First step
Safety instructions
5
LCD TV Overview
Front and side view
Connection Panel Overview
Remote Control Key Functions
Using the remote control
Accessories
11
11
12
13
14
Equipment Connections and Setup
VCR Setup
Cable Box Setup
DTV Setup
DVD Setup
PC Setup
DVI Setup
15
16
17
18
18
19
Basic Features Setup and Operation
Turning on the TV
Checking features
21
21
Sleep Timer
Setting Sleep Timer
22
Picture & Sound
Adjusting picture control
Adjusting picture appearance
Auto Sound Control
Adjusting Sound: Balance
23
23
24
24
Setting up TV stations
Auto programme tuning
Manual programme tuning
25
25
Special Features
Selecting language for the menus
Selecting COLOUR TEMP. for the menus
Selecting CLOSED CAPTION for the menus
Selecting PARENTAL CONTROL for the menus
Selecting 3D COMB FILTER for the menus
Selecting PC CONTROL for the menus
Selecting CLOCK for the menus
Setting picture format
Picture In Picture(PIP) function
Twin picture function
Multi PIP
27
27
28
28
31
32
32
34
34
35
36
Others
Troubleshooting check list
Product specifications
Maintenance Guide
37
38
39
OWNER’S MANUAL
Important Safety Instruction
1)
2)
3)
4)
5)
6)
7)
8)
Read all of these instructions.
Save these instructions for later use.
Follow all warnings and instructions marked on the product.
Follow all instructions.
Do not use the TV near water.
Clean only with dry cloth.
Do not block any ventilation openings. Install in accordance with the manufacturerís instructions.
Do not install near any heat sources such as radiators. heat registers, stoves, or other apparatus
(including amplifiers) that produce heat.
9) Do not defeat the safety purpose of the polarized or grounding-type plug. A polarized plug has two blades
with one wider than the other. A grounding type plug has two blades and a third grounding prong.
The wide blade or the third prong are provided for your safely. If the provided plug does not fit into your
outlet. Consult an electrician for replacement of the obsolete outlet.
10) Protect the power cord from being walked on or pinched particularly at plugs, convenience receptacles,
and the point where they exit from the apparatus.
11) Only use attachments/accessories specified by the manufacturer.
12) Do not place the TV on an unstable cart, stand or table. The TV may fall, causing
serious damage to the TV.
13) Unplug this apparatus during lightning storms or when unused for long periods of time.
14) Refer all servicing to qualified service personnel. Servicing is required when the
apparatus has been damaged in any way, such as power-supply cord or plug is damaged, liquid has been
moisture, does not operate normally, or has been dropped.
15) The apparatus shall not be exposed to dripping or splashing and that no objects filled with liquids, such as
vases, shall be placed on the apparatus.
Shock Hazard Marking and Associated Graphical Symbols
CAUTION
RISK OF ELECTRIC SHOCK DO NOT OPEN
Explanation of Safety Related Symbols
CAUTION
RISK OF ELECTRIC SHOCK DO NOT OPEN
WARNING : To Reduce The risk of fire or electric shock, do not
expose this the TV to rain or moisture.
CAUTION : TO REDUCE THE RISK OF ELECTRIC SHOCK,
DO NOT REMOVE COVER (OR BACK). NO USERSERVICEABLE PARTS INSIDE. REFER SERVICING
TO QUALIFIED SERVICE PERSONNEL.
This symbol is intended to alert the user to the presence of uninsulated “dangerous voltage”
within the product’s enclosure that may be of sufficient magnitude to constitute a risk of electric
shock to persons.
This symbol is intended to alert the user to the presence of important operating and
maintenance(servicing) instructions in the literature accompanying the appliance.
WARNING : To Reduce The risk of fire or electric shock, do not expose this the TV to rain or moisture.
OWNER’S MANUAL
Important Safety Instruction
FCC INFORMATION (U.S.A.)
Note: This equipment has been tested and found to comply with the limits for a Class B digital device, pursuant
to part 15 of the FCC Rules. These limits are designed to provide reasonable protection against harmful
interference in a residential installation. This equipment generates, uses and can radiate radio frequency energy
and, if not installed and used in accordance with the instructions, may cause harmful interference to radio
communications. However, there is no guarantee that interference will not occur in a particular installation. If this
equipment does cause harmful interference to radio or television reception, which can be determined by turning
the equipment off and on, the user is encouraged to try to correct the interference by one or more of the
following measures:
• Reorient or relocate the receiving antenna.
• Increase the separation between the equipment and receiver.
• Connect the equipment into an outlet on a circuit different from that to which the receiver is connected.
• Consult the dealer or an experienced radio/TV technician for help.
This device complies with part 15 of the FCC Rules. Operation is subject to the following two conditions:
(1) This device may not cause harmful interference, and (2) this device must accept any interference received,
including interference that may cause undesired operation.
OWNER’S MANUAL
Safety Instructions
Indoor Installation
WARNING
Do not place the TV in direct sunlight or near heat
sources such as radiators, fires and
stove etc.
NOTES
Do not place inflammable materials
beside the TV
• This may cause a fire hazard !
• This may cause a fire hazard !
NOTES
When unpacking or moving the TV
two people will be necessary to lift it
safely.
Do not place the TV where it
might be exposed to dust.
• This may cause a fire hazard !
NOTES
Ensure good ventilation around the TV. The
distance between the TV and the wall
should be more than 10cm.
Do not cover the ventilation of the TV.
• This may cause a fire hazard !
• It makes internal temperature
increaseand causes a fire.
* Safety instructions have two kinds of information as illustrated below.
WARNING
The violation of this instruction may cause serious
injuries and even death.
NOTES
The violation of this instruction may cause light injuries or
damage of the product.
• Take care of danger that may happen under specific condition.
NOTES
Disconnect from the main and
remove all connections before
moving.
Do not place the TV close to sources
of steam or oil such as a humidifier.
• This may cause a fire hazard
or an electric shock hazard !
NOTES
When installing the monitor on a table, be careful not
to place it near the edge.
Only use the TV on a level and stable
surface.
• This may cause the monitor to fall
causing serious injury to a child or adult
and serious damage to the monitor.
• Surely use a fitting table or rack.
• It may fall down or be upset.
NOTES
Do not place the TV directly on a carpet, rug or place where ventilation is restricted.
• This would cause its internal temperature to increase and might cause a fire hazard !
Safety Instructions
Outdoor Installation
WARNING
Do not use the TV in a damp place such as a bathroom where
it is likely to get wet.
• This may cause a fire or an electric shock hazard !
WARNING
In case of using a receiver (VCR,
Digital Set Top Box), do not place an
antenna in the vicinity of power lines.
• This may cause an electric shock.
In case of using a receiver (VCR, Digital
Set Top Box), contact your service center
to construct an antenna because it needs
skilled man.
• This may cause an electric shock.
Power
WARNING
Earth wire should be connected.
• If the earth wire is not connected,
there is possible a danger of
electric shock caused by the
current leakage.
• If grounding methods are not
possible, a separate circuit breaker should be
employed and installed by a qualified electrician.
• Do not connect ground to telephone wires, lightning
rods or gas pipe.
The main plug should be inserted fully into the
power outlet to avoid a fire hazard !
• This may cause a fire hazard !
NOTES
In case of using a receiver (VCR, Digital Set Top Box), Bend antenna cable
between inside and outside building to prevent rain from flowing in.
• This may cause water damaged inside the TV and could give an electric shock.
NOTES
In case of using a receiver (VCR, Digital Set Top Box), there should be enough distance
between an outside antenna and power lines to keep the former from touching the latter
even when the antenna falls.
• This may cause an electric shock hazard.
OWNER’S MANUAL
Safety Instructions
Power
NOTES
Do not place heavy
objects on the
power cord
• This may cause a
fire or an electric
shock hazard !
Do not use too
many plugs on
the main multioutlet.
Never touch the power
plug with a wet hand
• It may result in overheating
of the outlet and causes a fire hazard !
• This may cause
an electric
shock hazard !
NOTES
Hold the plug firmly when unplugging. If you pull the cord the
cord may be damaged.
Prevent dust collecting on the power plug pins or
outlet.
• This may cause a fire hazard !
• This may cause a fire hazard !
Female End
3-prong
Power Cord
Male End
3-prong
Power Cord
(option)
Power Outlet
Using
WARNING
Do not place anything containing liquid on top of the TV such as
flowerpot, cup, cosmetics or candle.
• This may cause a fire hazard !
WARNING
If water is spilt into the monitor unplug it
from the main supply outlet immediately
and consult your Service Agent.
• This may cause an electric shock
hazard !
Dispose of used batteries carefully and
safely.
• In the case of a battery being
swallowed by a child please
consult a doctor immediately.
NOTES
Do not plug in when the power cord
or the plug is damaged or the
connecting part of the power outlet
is loose.
• This may cause a fire or an
electric shock hazard !
Ensure the power cord does not
come into contact with sharp or hot
objects such as a heater.
• This may cause a fire or an electric
shock hazard !
OWNER’S MANUAL
Safety Instructions
Using
NOTES
In case of impact shock or damage
to the monitor switch it off and
unplug it from the outlet and
contact your service center.
Do not allow any objects to fall
into the TV.
• This may cause an electric shock
hazard !
• This may cause a fire or an electric
shock hazard !
NOTES
Do not drop the TV or allow impact shock.
• This may cause mechanical failure or injury !
WARNING
In the event that an image does not appear on the screen please switch it off
and unplug it from the main supply and contact your Service Centre.
• This may cause a fire or an electric shock hazard !
Cleaning
WARNING
Do not use water while cleaning the TV
• This may damage to the TV
or an electric shock hazard.
In the unlikely event of smoke or a
strange smell from the TV, switch it
off ,unplug it from the wall outlet and
contact your dealer or service centre.
• This may cause a fire or an
electric shock hazard !
Others
WARNING
Do not attempt to service the TV yourself.
Contact your dealer or service center.
• This may cause damage to
the TV and could give an
electric shock as well as invalidating the
warranty !
In the event of a lightning or thunder
storm unplug the TV and aerial from
the wall outlet.
• This will prevent damage to the
monitor and possible electric shock.
OWNER’S MANUAL
Safety Instructions
Others
WARNING
Do not watch the TV while
driving or walking.
• This may cause an accident.
NOTES
Do not place heavy objects on the TV.
• This may cause serious injury to a
child or adult.
NOTES
The distance between eyes and
the screen should be about
1.5m.
• If not, eyes will
strain.
Unplug the TV from the wall outlet
when it is left unattended
and unused for long
periods of time.
• Accumulated dust
may cause a fire or
an electric shock from
deterioration or electric leakage.
Only use the specified batteries.
• This make cause damaged the TV
or could give an electric shock.
OWNER’S MANUAL
*FRONT AND SIDE VIEW
1. POWER button : Switches TV set on or off.
2. MENU button : Displays a menu.
3. SELECT button : Selects the A/V source.
4. VOLUME (▲ / ▼) : Adjusts the volume / Adjusts
menu settings.
5. PR (▲ / ▼) : Selects a programme or menu item.
*Connection Panel Overview
Back Panel
1. DVI IN : Digital Video Interface.
2. RGB-DTV / PC INPUT : PC OR DTV Video Source Input.
3. PC AUDIO IN : Connect the audio cable from the PC to the PC AUDIO IN of the set.
4. L. R : Audio(L / R) Input in case of S-VIDEO or COMPONENT mode.
5. Y, Pb, Pr : Component video signal input.
6. S-VIDEO : S-VIDEO signal input.
7. AV2 : Composite input.
8. AV1 : Composite input.
9. TUNER : RF ANTENNA INPUT.
10. A.C POWER : CORD INPUT.
OWNER’S MANUAL
Remote Control Key Functions
- When using the remote control aim it at the remote control sensor on the TV
1. POWER
Turns on TV or off from st/by mode.
2. MUTE
Turns the sound on and off.
3. NUMBER buttons
Selects programme numbers.
4. MENU
Displays a main menu.
5. TV/AV
Selects TV, AV1, AV2, S-VIDEO, COMPONENT, RGB-DTV,
RGB-PC, RGB-DVl mode.
6. SLEEP button
Sets the sleep timer.
7. ENTER
Accepts your selection or displays the current mode.
8. VOL+/- button
Adjusts the sound level./ Adjusts the menu settings.
9. PR+/- button
Selects next programme or menu items.
10. APC button
Recalls your prefered picture settings.
11. ASC button
Recalls your prefered sound settings.
12. ARC button
Selects a screen mode- 16:9, 14:9, ZOOM, PANORAMA
13. REVIEW button
Returns to the previously viewed programme.
14. PIP button
Displays a PIP(Picture In Picture) screen.
15. MULTI PIP button
Displays a still picture of TV signal on main screen.
16. MULTI MEDI button
Selects component, RGB-DTV, RGB-PC, RGB-DVI.
17. MTS button
Selects the language during dual language broadcast, selects the sound output.
18. PIP CH+/Selects a programme when RF signal is displayed in PIP mode.
19. SWAP
Switches a main picture for sub picture in PIP mode.
20. INPUT
Selects the AV source of sub picture in PIP mode.
21. SIZE
Selects the size of sub picture(Double Window or Small Window).
22. POSITION
Selects a position of PIP screen.
23. STILL
In case of non PIP mode, Displays the still main picture.
In case of PIP mode, Displays the still sub picture.
OWNER’S MANUAL
Remote Control Key Functions
TV/AV select button on the remote control
Each press of this button changes the mode as shown below
AV1
AV2
TV
S-VIDEO
COMPONENT
RGB-DVI
RGB-PC
RGB-DTV
MULTI MEDI select button on the remote control
Each press of this button changes the mode as belows.
COMPONENT
RGB-DTV
RGB-DVI
RGB-PC
Using the remote control
Installing batteries
• Open the battery compartment cover on the back of the
remote control and insert the batteries with correct polarity,
match “+” with “+”, and match “-” with “-”.
• Install two 1.5V “AAA” alkaline batteries.
Don’t mix used batteries with new batteries.
OWNER’S MANUAL
Using the remote control
Notes for using the remote control
Make sure these are no objects
between the remote control and
its sensor.
Don’t place the remote control
near a heater or damp place.
Strong impact on the remote
control may cause operation
failure.
Signal from the remote control
may be disturbed by sun light or
other strong light. In this case,
turn the set to other direction.
Accesories
Accesories
Remote control
Owner’s Manual
Power cord
Alkaline batteries
Speaker
Option
D-sub 15 pin cable
AUDIO cable
HDMI cable
PC sound cable
S-VIDEO cable
Wall Mount Bracket
Component cable
Universal Remote Control
OWNER’S MANUAL
VCR Setup
• Connect an antenna or a RCA Cable between the ANTENNA jack on the rear of the TV and the ANTENNA
OUT jack on the VCR.
• Connect the RCA Jack of the VCR to the RCA AV1 or AV2 of the set.
• Press the PLAY button on the VCR.
• When connecting the S-VIDEO VCR to the S-VIDEO socket, the picture quality will be further improved.
• Connect the S-VIDEO socket of the VCR to the S-VIDEO socket of the set.
• Connect the audio cable from the S-VIDEO VCR to the AUDIO sockets of the set.
• Select the S-VIDEO by pressing the TV/AV button repeatedly.
• Press the PLAY button on the VCR. The VCR playback picture appears on the screen
Connection of external equipment
Tips
• To avoid picture noise (interference), leave an adequate distance (20 inches or more) between the VCR and TV.
To watch VCR
1
Press TV/AV button on the remote control and select AV1 or AV2. (When connecting
with the S-Video, select the S-VIDEO.)
2
Insert a video tape into the VCR and press the PLAY button on the VCR. See VCR
owner’s manual.
OWNER’S MANUAL
Cable Box Setup
• After subscribing to cable TV service from a local provider and installing a converter, you can watch cable TV
programs.
Connection of external equipment
Tips
• For further information regarding cable TV service, contact your local cable TV service proviser(s).
To watch Cable TV
1
Press TV/AV button on the remote control and select VIDEO source.
2
Tune to cable service provided channels using the cable box.
OWNER’S MANUAL
DTV Setup(SET-TOP BOX)
- To watch digital broadcast programs, purchase/connect a digital SET-TOP BOX.
How to connect a DTV
• You can use either the Monitors COMPONENT
(DVD/DTV/INPUT) inputs or the single RGB-DTV/PC
INPUT for video connections, depending on your
Set Top Box connectors.
Then, make the corresponding Audio connections.
• DTV input is available to 480i/p, 720p, 1080i mode.
Connection of external equipment
To watch SET-TOP BOX
1
Press TV/AV button on the remote control to select COMPONENT or RGB DTV.
2
Tune to the digital SET-TOP BOX.
(Refer to the owner°Øs manual for the digital SET-TOP BOX.)
OWNER’S MANUAL
DVD Setup
How to connect a DVD (digital video disk player)
• Connect DVD video inputs to Y, Pb, Pr of COMPONENT (DVD/DTV INPUT) and audio inputs to Audio
jacks of AV INPUT.
• Component Input is available to 480i/p, 720p, 1080i mode.
How to use
• Press TV/AV button on the remote control of the TV to select COMPONENT. Use the DVD player according
to its owner°Øs manual.
•Turn on the DVD player, and insert a DVD.
• Component Input ports
Connect DVD player jacks to TV Component input jacks as indicated below.
Component input jacks on the TV
Y
PB
PR
Video output jacks of DVD player
Y
Y
Y
Y
Pb
B-Y
Cb
PB
Pr
R-Y
Cr
PR
PC Setup
- You can easily connect the Display to your PC for outstanding image and sound.
Setup Instructions to Connect a PC to your TV
• To setup this TV in your PC window environment, select Normal, Standard or Default TV. This TV does not
support Plug and Play function
• The screen does not display when the resolution is over UXGA.
• Connect the signal cable from the TV Output port on the PC to the RGB, DV1 (PC/DTV INPUT) port on the TV.
• Connect the audio cable from the PC to the Audio ports of the TV.
• If your PC computer is equipped with a sound card, adjust the sound output on the PC.
• Select the display resolution of the PC to 1366X768 for the best picture. This TV resolution is 1366X768.
OWNER’S MANUAL
PC Setup
PC Setup
• First, turn on the PC computer and press the ON/OFF button on the TV to apply power to it. Second, turn
on the display by pressing the button on the TV or by pressing the POWER button on the TV remote
control.
• Use the TV/AV button on the remote control to select the RGB-PC input source.
• Set the resolution output of the PC to WXGA or under (1366X768, 60Hz).
Tips
• Avoid keeping a fixed image on the TV screen for a long period of time. The fixed image may become
permanently imprinted on the screen; use a screen saver when possible.
• Change the resolution of PC to displayable mode and connect to RGB1 Input (PC/DTV Input) jacks of the TV.
DVI Setup[Option]
- You can easily connect the Display to your PC for outstanding image and sound.
Setup Instructions to Connect a PC to your TV
• To setup this TV in your PC window environment, select Normal, Standard or Default TV. This TV does not
support Plug and Play function
• The screen does not display when the resolution is over UXGA.
• Connect the signal cable from the monitor Output port on the PC to the DVI-JN port on the Monitor.
• Connect the audio cable from the PC to the Audio ports of the TV.
• If your PC computer is equipped with a sound card, adjust the sound output on the PC.
• Select the display resolution of the PC to 1366X768 for the best picture. This TV resolution is 1366X768.
OWNER’S MANUAL
DVI Setup[Option]
PC Setup
• First, turn on the PC computer and press the ON/OFF button on the TV to apply power to it. Second, turn
on the display by pressing the button on the TV or by pressing the POWER button on the TV remote
control.
• Use the TV/AV button on the remote control to select the RGB-PC input source.
• Set the resolution output of the PC to WXGA or under (1366X768, 60Hz)
Tips
• Avoid keeping a fixed image on the TV screen for a long period of time. The fixed image may become
permanently imprinted on the screen; use a screen saver when possible.
• Change the resolution of PC to displayable mode and connect to DVI-D Input jacks of the TV.
TV Image Display Specifications (RGB-PC, RGB-DVI)
Resolution
Vertical
Frequency (Hz)
Resolution
Vertical
Frequency (Hz)
720*400
70
1024*768
60
640*480
85
70
60
75
67
1280*768
60
72
832*624
75
75
85
800*600
56
60
72
75
Tips
• Synchronization input form : separate
• Dos mode may not work depending on a video card if using a DVI cable.
OWNER’S MANUAL
Turning on the TV
- When using the remote control, aim it at the sensor on the TV.
Turning on the TV just after installation
1
2
Connect power cord correctly. At this moment, the TV is switched to Standby mode.
Press the POWER button on the TV or press the POWER Button or associated with TV button
on the remote control and then the TV will be turn on.
Turning on the TV (power cord is still connected)
1
If the TV is turned off with the remote control button or POWER ON/OFF button on the TV.
Press the POWER button on the TV or press the POWER button on the remote control and then
the TV will be turn on.
Tips
• Adjusting volume level
The volume(+) button increases the sound and the volume(-) button reduces the level of sound.
Checking features
- Use the remote control to make adjustments.
- Select VIDEO input source.
1
2
Press the MENU button.
Press the VOL+/- button.
• Each press will cycle through the menus shown below.
< Sound menu >
< Picture menu >
< Etc menu >
< Clock menu >
< Tuning menu >
OWNER’S MANUAL
Checking features
3
4
Press the PR+/- button.
Press the VOL ( +) button to select a feature to adjust, and then press the PR+/- buttons to
adjust the selected item.
• Press the MENU button to exit.
Setting Sleep Timer
Sleep Timer turns the TV off after a preset time
Press the SLEEP button to set sleep time.
Each time you press SLEEP button, the next preset setting time is changed as follows:
---
▶
10
▶
20
▶
30
▲
▼
240
▲
180
◀
120
◀
90
◀
60
--• To release sleep time setting, press the SLEEP button repeatedly to select ---.
Tips
• To check remaining sleep time after setting, press the SLEEP button just once.
• If you turn the TV off after setting the sleep timer, the setting is erased. The sleep timer will then have to be set again.
OWNER’S MANUAL
Adjusting picture control
Use APC to set the TV for the best picture appearance
APC (Auto Picture Control)
1
2
Press the APC button.
Press the APC buttons to select your desired picture condition.
CUSTOM
• Each press of APC button changes the screen display as shown below.
STANDARD
SOFT
CUSTOM
STRONG
• You can also select STANDARD, SOFT, CUSTOM or STRONG in the PICTURE menu.
Adjusting picture appearance
Press the MENU button and then press the VOL+/- button to select PICTURE menu. Press the PR - button.
1
2
Press the PR+/- button to select Contrast and then press the VOL + button.
Use the VOL buttons to make appropriate adjustments and then press the ENTER button.
• Press the PR+/- buttons to select other items.
• Adjust BRIGHTNESS, COLOUR and SHARPNESS, TINT in the same way.
OWNER’S MANUAL
Auto Sound Control
ASC(Auto Sound Control)
1
2
Press the MENU button and then VOL+/- button to select a SOUND setup.
Press PR- button and then VOL+ button to select a sound setup.
• Each press of ASC or PR+/- button changes the screen display as shown below.
STANDARD
MUSIC
MOVIE
SURROUND
USER
SPEECH
• You can also select SURROUND, STANDARD, MUSIC, SPEECH, MOVIE, USER in the SOUND menu.
Adjusting Sound: Balance
Manual Settings
Press the MENU button and then press the VOL+/- button to select SOUND menu.
Press the PR- button.
1
2
Press the PR- button to select BALANCE and then
press the VOL( + ) button.
Use the VOL(+/- ) buttons to make appropriate adjustments and then press the ENTER button.
OWNER’S MANUAL
Auto programme tuning
Up to 125 TV stations can be stored by programme numbers (1 to 125).
Once you have preset the stations, you will be able to use the PR+/PR- or NUMBER buttons to scan the
stations you programmed.
Stations can be tuned using automatic or manual modes.
Note : In some models up to 181 CH stations can be stored.
All stations that can be received are stored by this method. It is recommended That you use auto
programme during installation of this set.
1
2
3
Repeatedly press the MENU button and then press VOL+/- button to select the TUNING menu.
Press the PR - button to select AUTO.
Press the VOL+ button to begin auto programming.
MANUAL programme tuning
Manual programme lets you manually tune and arrange the stations in whatever order you desire. Also you
can assign a station name with five characters to Each programme number.
1
2
3
Repeatedly press the MENU button to select the Station menu.
Press the PR - button to select MANUAL.
Press the VOL+ button to display the MANUAL programme menu.
OWNER’S MANUAL
MANUAL programme tuning
4
5
6
7
Press the PR+/- button to select the programme number.
Press the VOL+ button to select the ADD and ERASE.
Select the desired programme number (1 to 125) with the PR+/- button.
Press the ENTER button.
Press the PR+/- button to select FINE.
Press the VOL+ button.
Press the VOL+ button to fine tune for the best picture and sound on the Fine pull-down
menu.
Press the VOL+ button.
OWNER’S MANUAL
Selecting language for the menus
Press the MENU button and then press the VOL+/- button to select ETC menu.
Press the PR - button.
1
2
3
Press the PR+/- button to select Language and then press the VOL (+ ) button.
Press the PR+/- button to select the desired language.
Press the ENTER button.
Selecting COLOUR TEMP. for the menus
Press the MENU button and then press the VOL+/- button to select ETC menu.
Press the PR- button.
1
1
3
Press the PR+/- button to select COLOUR TEMP and then press the VOL (+ ) button.
Press the PR+/- button to select the desired COLOUR TEMP.
Press the ENTER button.
OWNER’S MANUAL
Selecting CLOSED CAPTION for the menus
Press the MENU button and then press the VOL+/- button to select ETC menu.
Press the PR- button.
1
2
3
Press the PR+/- button to select CLOSED CAPTION and then press the VOL (+ ) button.
Press the VOL+/- button to select the desired CLOSED CAPTION.
Each press of this button changes the mode as belows.
CC2
CC3
CC4
TEXT1
TEXT2
TEXT3
TEXT4
CC1
OFF
Press the ENTER button.
Selecting PARENTAL CONTROL for the menus
Press the MENU button and then press the VOL+/- button to select ETC menu.
1
Press the PR+/- button to select PARENTAL CONTROL and then press the VOL+ button.
Press the PR+/- button to select PARENTAL CONTROL and then enter your current password
using the number on the remote control.
2
Press the VOL + button and then VOL+/- button to select the desired OFF/ON and then
press the ENER button.
OWNER’S MANUAL
Selecting PARENTAL CONTROL for the menus
3
Press the PR+/- button to select SET PASSWORD and then press the VOL+ button.
Enter your current password using the number
buttons on the remote control. (The default password is 0000)
Re enter the password to confirm.
your new password is active.
Press the ENTER button.
4
Press the PR+/- button to select MPAA and then press the VOL+ button.
Press the VOL+/- button to select the desired ratings.
Press the ENTER button.
5
Press the PR+/- button to select AGE BLOCK and then press the VOL+ button.
Press the PR+/- button to select GENERAL.
Press the VOL+ button to select the desired ratings.
Press the PR+/- button to select other items.
Press the ENTER button and then press the VOL button.
6
Press the PR+/- button to select CONTENT BLOCK and then press the VOL+ button.
Press the VOL+ button and then VOL+/- button to select the desired rating.
Press the ENTER button.
Press the PR+/- button to select other items.
Select the desired rating LANGUAGE,SEX SCENE,VIOLENCE,
F VIOLECE and NORATING in the same way.
Press the VOL+ button.
OWNER’S MANUAL
Selecting PARENTAL CONTROL for the menus
3
Press the PR+ button and then PR+/- button to select AUX CONTROL and then press the
VOL+ button.
Press the VOL+/- button to select the desired rating.
Press the ENTER button.
TV Guidelines
TV-MA Mature audiences only. This program may contain mature themes, profane language, graphic
violence and explicit sexual content.
TV-14 Parents strongly cautioned. This program may contain sophisticated themes, sexual content, strong
language and more intense violence.
TV-PG Parental guidance suggested. This program may contain infrequent coarse language, limited
violence, some suggestive sexual dialogue and situations.
TV-G
General audience. It contains little or no violence, no strong language, and little or no sexual dialogue
or situations.
TV-Y7 Directed to older children. Themes and elements in this program may include mild physical or
comedic violence, or may frighten children under the age of seven.
TV-Y
All children. The themes and elements in this program are specifically designed for a very young
audience, including children from ages two-
MPAA Ratings
G
PG
PG-13
R
NC-17
X
NR
General audience. No restriction.
Children under 13 should be accompanied by an adult.
Parental guidance suggested.
Children under 13 should be accompanied by an adult.
Restricted. Viewers should be 17 or older.
Not classified. Viewers should be 17 or older.
Adults only.
Not rated.
Selecting 3D COMB FILTER for the menus
Press the MENU button and then press the VOL+/- button to select ETC menu.
Press the PR - button.
1
2
3
4
Press the PR+/- button to select 3D COMB FILTER.
Press the VOL+ button to select OFF.
Press the VOL+ button to change the state of ON or OFF.
Press the ENTER button.
• ON/OFF state of 3D COMB FILTER is user choice.
• It is better to select the 3D COMB FILTER “OFF”, when TV Broadcast is sports, action movie.
OWNER’S MANUAL
Selecting PC CONTROL for the menus
Press the MENU button and then press the VOL+/- button to select ETC menu.
Press the PR- button.
1
2
3
Press the PR+/- button to select PC CONTROL and then press the VOL (+) button.
Use the VOL +/- button to make appropriate adjustments and then Press the ENTER button.
Press the PR+/- button to select other items.
The OSD function for this PC control becomes activated, when the sources are available on RGBDTV/
PC INPUT or DVI-IN external connector.
Selecting CLOCK for the menus
Press the MENU button and then press the VOL+/- button to select CLOCK menu.
Press the PR- button.
1
2
Press the PR+/- button to select CLOCK and then press the VOL(+)button.
Press the PR+/- button select time.
Press the ENTER button.
Press the PR+/- button to select OFF TIME and
then press the VOL(+) button.
Press the PR+/- button select time and ON/OFF.
Press the ENTER button.
Selecting CLOCK for the menus
3
4
Press the PR+/- button to select ON TIME and then
press the VOL(+) button.
Press the PR+/- button to select time and PR, VOL, ON/OFF.
Press the ENTER button.
Press the PR+/- button to select AUTO SLEEP and then
press the VOL(+) button.
Press the PR+/- button to select ON/OFF.
Press the ENTER button.
OWNER’S MANUAL
Setting picture format
Press the ARC button to select a desired
picture format.
• Each time you press ARC button, you can select
16:9 or 4:3 or ZOOM or PANORAMA alternatively.
16:9
16:9
4:3
4:3
ZOOM
ZOOM
PANORAMA
Picture in picture (PIP) function
PANORAMA
- PIP PICTURE will let you view two seperate inputs on your TV screen at the same time.
- Color of main picture may be different from PIP°Øs in PIP PICTURE.
- When the main picture is TV/AV1/AV2/S-VIDEO/COMPONENT/RGB-DTV/RGB-PC/ RGB-DVI, the sub picture is input
/ TV/AV1/AV2/S-VIDEO.
How to use the PIP
Press the PIP button.
• It you press the PIP button
again, the function is off.
Moving the sub picture
Press the POSITION button in PIP.
• Each time you press the POSITION button, sub picture Position is
changed as follows.
OWNER’S MANUAL
Picture in picture (PIP) function
Change the main picture and the sub picture
Press the SWAP button in PIP mode.
When the main picture is TV/AV1/AV2/S-VIDEO, the sub picture input is TV / AV1 /AV2 / S-VIDEO.
Twin picture function
How to use twin picture
Press the SIZE button to select twin picture.
Each time you press SIZE button, you can select TWIN or PIP alternatively.
• TWIN PICTURE let you view different inputs on your TV screen at the same time.
- Color of main picture may be different from PIP's in PIP/TWINPICTURE.
- When the main picture is TV / AV1 / AV2 / SVIDEO / the sub picture input is TV / AV1 / AV2 /S-VIDEO.
Input select of the sub picture
Press the BLUE color button to select the input of sub picture.
OWNER’S MANUAL
Twin picture function
Changing the picture of main and sub picture
- PIP/TWIN PICTURE let you view different inputs on your TV screen at the same time.
- Color of main picture may be different from PIP’s in PIP/TWIN
PICTURE.Press the SWAP button in twin picture mode.
- When the main picture input is TV / AV1 / AV2 / S-VIDEO/, the sub picture input is TV/AV1/AV2/S-VIDEO.
MULTI PIP
This function can be operated when input signal is TV signal.
When pressing MULTI PIP button, a still picture of TV signal is displayed on main screen and each still picture of
live signal searched from TV signal is displayed on sub screen.
In case of sub screens, after shortly showing a video of live signal searched from TV signal and displaying the still
picture from first sub screen, it is moving to other sub screen conse quently and displays the still picture of live
signal in the same way.
Troubleshooting Check list
Problem
Check item
No picture on screen and
no sound from speakers.
�Insert the AC power cord plug securely in AC power outlet.
�Make sure the remote control is not in the standby mode
(The POWER/Standby indicator is red.)
�Turn on the MAIN POWER button on the top of the display.
No picture/No picture from
AV terminal.
�Check the brightness setting of the display.
�Lamp may have malfunction.
�Make sure a cable with no VIDEO input signal is connected to the SVIDEO INPUT terminal.
Picture is displayed, but no
sound from the speakers.
�Check the sound setting.
�Make sure the sound is not muted.
�Make sure a pair of headphones is not connected.
�Make sure the connectors of the optional speaker system are
securely inserted.
� Make sure the setting of AV OUTPUT terminal
Picture is too light
�Make sure COLOUR and CONTRAST settings.
Picture is too dark.
�Make sure BRIGHTNESS setting is not set too low.
�Check to see if BRIGHTNESS setting
�Lamp may have malfunction.
Remote control does not
work.
�Change the batteries.
�Make sure the infrared transmitter window is not receiving strong
light such as light from fluorescent lamps.
No picture from AV OUT
terminal.
�Make sure AV INPUT is not set.
�Make sure the input source other than AV
The picture is not sharp.
The picture moves.
�The reception may be weak.
�The state of the broadcast may also be bad.
�Make sure the antenna is facing the right direction.
�Make sure the outside antenna is not disconnected.
The picture is doubled or
tripled.
�Make sure the antenna is facing the right direction.
�There may be reflected electric waves from mountains or buildings.
The picture is spotted.
�There may be interference from automobiles, trains, high voltage
lines, neon lights, etc.
�There may be interference between the antenna cable and power
cable. Try positioning them further apart.
There are stripes on the
screen or colors fade.
�Is the unit receiving interference from other devices?
Transmission antennas of radio broadcasting stations and
transmission antennas of amateur radios and cellular phones
may also cause interference.
�Use the unit as far apart as possible from devices that may cause
possible interference.
OWNER’S MANUAL
Product specifications
Contents
Model Name
Specification
HLT-2672
HLT-3272
Aspect Ratio
16:9
Resolution
1366 X RGB X 768
Receiving channel
Low-CH: E2 - S10
VHF
High-CH: E5 - S41
Input Terminals
UHF
CH: E21 - E69
TV
1,0Vp-p / 75Ϊ
VIDEO
1,0Vp-p / 75Ϊ
S-VIDEO
Y: 1,0Vp-p / 75Ϊ
C: 0,3Vp-p / 75Ϊ
COMPONENT
(DVD. DTV)
Y: 1,0Vp-p / 75Ϊ
Y Pb Pr
(Y Cb Cr)
DVI (Digital)
Pb: 0,7Vp-p / 75Ϊ
Pr: 0,7Vp-p / 75Ϊ
DVI-I 29 Pin
(But analog input is not supported)
PC (Analog)
Mini D-SUB 15 Pin
Input Sound
Stereo RCA (S-VIDEO, Component),
Stereo RCA X 2 (AV1. AV2)
Stereo Jack (DVI & PC)
Speaker
Sound
20W(10W + 10W), 8 ohm
Power Consumption
Approx. 120W
Approx. 150W
Dimensions
814 X 230 X 485.9 (With Stand)
950.6 X 230 X 561.8 (With Stand)
Weight
17Kg (NET)
18,7Kg (NET)
�The specifications shown above may be changed without prior notice for quality improvement.
OWNER’S MANUAL
Maintenance Guide
Cleaning the screen
�Always disconnect your TV from any power source when cleaning.
�Do not use substances such as glass cleaners, solvents, and thinners,.
�Do not apply abrasive or ammonia-based window cleaners.
�The screen of your TV has been specially treated, and can be scratched or damaged easily. Wipe the surface
gently using only a cleaning cloth or a soft, lint-free cloth.
�Do not apply water directly on the screen or any parts of the TV.
�Do not touch or scratch the surface of the screen with any hard objects.
�Do not scratch the surface of the screen with fingers.
Cleaning the exterior of TV
�Always disconnect your TV from ant power source when cleaning
�Keep all vents free of dust.
�Do not drip any water into the vents.
�Do not attempt to clean dust from the inside of your TV.
�Do not use abrasive or solvent cleaners to clean your TV. This can damage the finish and components of your
TV.
�Do not allow ant water or moisture to come onto contact with the surface of your TV. If moisture gets inside
your TV, operating problems and electrical and shock hazards may result.
�Do not scratch or hit the cabinet with any objects
�Do not place objects on or near the cabinet and stands of tour TV.
�Do not throw objects at the TV.
Cleaning the interior of TV
DO NOT ATTEMPT TO CLEAN THE INTERIOR OF YOUR TV. THIS WILL VOID YOUR WARRANTY, AND IS
EXTREMELY DANGEROUS.
OWNER’S MANUAL
MEMO