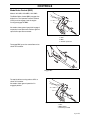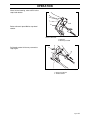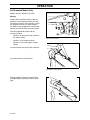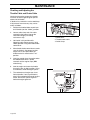
1
Operator's Manual 968999283 / W21K, 968999284 / W21SK, 968999286 / W21SBK, 968999287 / W53SBEK 968999289 / W53SEK, 968999638 / W21KC 968999639 / W21SKC, 968999640 / W21SBKC Please read the operator’s manual carefully and make sure you understand the instructions before using the machine. English OPERATOR’S MANUAL 21" PUSH MOWER Introduction ............................................3 General .................................................3 Driving and Transport on Public Roads 3 Towing ..................................................3 Operating ..............................................3 Good Service ........................................4 Manufacturing Number .........................4 Symbols and Decals .............................5 Safety Instructions ................................7 General Use .........................................7 Operating on Slopes .............................9 Children ..............................................10 Maintenance .......................................10 Transport ............................................12 Customer responsibilities ...................13 Controls ...............................................13 Engine Speed .....................................14 Fuel Shut Off Valve ............................14 Refueling 14 ............................................ Choke Control (All Models) ................15 Throttle Control (All Models) ...............15 Blade Brake Control (BBC) ...............16 Cutting height .....................................17 Ground Drive Bail ...............................17 To Convert Mower ..............................19 To Empty Grass Catcher ....................19 Before Starting Engine .......................20 Transmission Selector ........................22 Self Propelled Models Only ................25 Push Models Only ..............................27 Mowing Tips .......................................28 Mulching Tips .....................................29 Maintenance ........................................ 30 Maintenance Schedule ...................... 31 Before Each Use ............................... 31 Ignition System .................................. 31 Engine's Cooling Air Intake ................ 32 Throttle Cable and Choke Cable ....... 33 Replacing Air Filter ............................ 34 Replacing the Fuel Filter .................... 35 Checking Tire .................................... 35 Drive Wheels ..................................... 35 Checking the V-belts ......................... 36 Checking the Blade ........................... 36 Blade replacement: ............................ 37 Gear Case ......................................... 37 Grass Catcher ................................... 38 Muffler ................................................ 38 Cleaning ............................................ 38 Adjusting the Lawn Mower ................ 39 Engine Adjustment ............................ 40 Cleaning and Washing ...................... 40 Hardware ........................................... 40 Lubrication .......................................... 41 Mower Lubrication Chart ................... 41 Engine Lubrication ............................. 41 Trouble Shooting Guide .................... 44 Storage ................................................ 46 Winter Storage ................................... 46 Service ............................................... 46 Technical Data .................................... 47 Conformity Certificates ...................... 54 USA requirements ............................. 54 EU declaration of conformity ............. 54 Service Journal ................................... 55 Delivery Service ................................. 55 After the First 5-8 Hours .................... 56 25-Hour Service ................................. 57 50-Hour Service ................................. 58 100-Hour Service ............................... 59 300-Hour Service ............................... 60 At Least Once Each Year .................. 61 INTRODUCTION WARNING! Failure to follow cautious operating practices can result in serious injury to the operator or other persons. The owner must understand these instructions, and must allow only trained persons who understand these instructions to operate the mower. Each person operating the mower must be of sound mind and body and must not be under the influence of any mind altering substance. WARNING! Engine exhaust, some of its constituents, and certain vehicle components contain or emit chemicals known to the State of California to cause cancer and birth defects or other reproductive harm. WARNING! Battery posts, terminals and related accessories contain lead and lead compounds, chemicals known to the State of California to cause cancer and birth defects or other reproductive harm. Wash hands after handling. INTRODUCTION Introduction Congratulations Thank you for purchasing a Husqvarna Pro Push Mower. This machine is built for high performance and rapid mowing. This manual is a valuable document. Following the instructions (use, service, maintenance, etc.) can considerably increase the lifespan of your machine and even increase its resale value. If you sell your machine, be sure to give the operator’s manual to the new owner. The final chapter of this operator’s manual comprises a Service Journal. Ensure that service and repair work is documented. A well kept service journal reduces service costs for the season-based maintenance and affects the machine’s resale value. Take the operator’s manual along when the machine is delivered to the workshop for service. General In this operator’s manual, left and right, backward and forward are used in relation to the machine’s normal driving direction. Continuous dedication to improve our products requires that specifications and design are subject to change without notice. Driving and Transport on Public Roads Check applicable road traffic regulations before transporting on public roads. If the machine is transported, you must always use approved fastening equipment and ensure that the machine is well anchored. Towing Do not tow this machine, it may cause damage to the drive system. Operating This machine is constructed only for mowing grass on lawns and other free and even ground without obstacles such as stones, tree stumps, etc. All other types of use are incorrect. The manufacturer’s directions concerning operation, maintenance, and repairs must be carefully followed. Lawnmowers and all power equipment can be potentially dangerous if used improperly. Safety requires good judgement, careful use in accordance with these instructions and common sense. The machine must only be operated, maintained, and repaired by persons who are familiar with the machine’s special characteristics and who are well versed in the safety instructions. Accident prevention regulations, other general safety regulations, occupational safety rules, and traffic regulations must be followed without fail. Unauthorized modifications to the design of the machine may absolve the manufacturer from liability for any resulting personal injury or property damage. English-3 INTRODUCTION Good Service Husqvarna’s products are sold all over the world and only in specialized retail stores with complete service. This ensures that you as a customer receive only the best support and service. Before the product is delivered, the machine has, for example, been inspected and adjusted by your retailer, see the certificate in the Service Journal in this operator’s manual. When you need spare parts or support in service questions, warranty issues, etc., please consult the following professional: This Operator’s Manual belongs to the machine with manufacturing number: Engine Transmission Manufacturing Number The machine’s manufacturing number can be found on the printed plate affixed to the chassis. Stated on the plate, from the top are: • The machine’s type designation (I.D.). • The manufacturer's type number (Model). • The machine’s serial number (Serial no.) Please state the type designation and serial number when ordering spare parts. The engine’s manufacturing number is stamped on one of the valve covers. The plate states: • The engine’s model. • The engine’s type. • Code Please state these when ordering spare parts. English-4 SYMBOLS AND DECALS Symbols and Decals These symbols are found on the machine and in the operator’s manual. Study them carefully so that you know what they mean. WARNING! Xxxxxxx xxxx xxxxxxxx xxx x Xxxxx xxxxxx xx. xx xxxxxxxx xxxxx xxx xx. Used in this publication to notify the reader of a risk of personal injury, particularly if the reader should neglect to follow instructions given in the manual. IMPORTANT INFORMATION Xxxxxxx xxxx xxxxxxxx xxx xxx xxxx xxxxxx xx. Used in this publication to notify the reader of a risk of material damage, particularly if the reader should neglect to follow instructions given in the manual. Used also when there is a potential for misuse or misassembly. Warning! CE conformity marking. Only for European market Power Take Off Fuel Noise emissions to the surroundings in accordance with the European Union’s directive. The machine’s emission is stated in the chapter TECHNICAL DATA and on the decals. Only machines for European market. Use protective glasses Use protective gloves English-5 SYMBOLS AND DECALS Shut off engine and Read Operator´s remove spark plug wire before Manual. performing any maintenance or repair work. Moving sharp blades under cover can sever fingers. English-6 Whole body exposure to thrown objects. Severing of fingers and toes. Do not open or remove safety shields while engine is running. Keep a safe distance from the machine. SAFETY INSTRUCTIONS Safety Instructions These instructions are for your safety. Read them carefully. This cutting machine is capable of amputating hands and feet and throwing objects. Failure to observe the following safety instructions could result in serious injury or death. WARNING! This symbol means that important safety instructions need to be emphasized. It concerns your safety. General Use • Read all instructions in this operator’s manual and on the machine before starting it. Ensure that you understand them and then abide by them. • Learn how to use the machine and its controls safely and learn how to stop quickly. Also learn to recognize the safety decals. • Only allow the machine to be used by adults who are familiar with its use. • Make sure nobody else is in the vicinity of the machine when you start the engine, engage the drive, or run the machine. • Make sure animals and people maintain a safe distance from the machine. • Stop the machine if someone enters the work area. • Clear the area of objects such as stones, toys, steel wire, etc. that may become caught in the blades and thrown out. • Beware of the discharge chute and do not point it at any one. Do not use the machine without the discharge chute in place. • Stop the engine and prevent it from starting before you clean the discharge deck. • Do not operate machine without the entire grass catcher, discharge guard, rear guard, or other safety protective devices in place and working. • Remember that the operator is responsible for dangers or accidents. • Shut down the blades when not mowing. 8019-007 Read the operator’s manual before starting the machine 8019-008 Clear the area of objects before mowing English-7 SAFETY INSTRUCTIONS • Do not put hands or feet near or under rotating parts. Keep clear of the discharge opening at all times • Do not pull mower backwards unless absolutely necessary. Always look down and behind you before and while moving backwards. • Slow down before turning. • Never operate mower in wet grass. Always be sure of your footing and walk, never run. • Be careful when mowing around fixed objects, so that the blades do not hit them. Never drive over foreign objects. • Only use the machine in daylight or in other well-lit conditions. Keep the machine a safe distance from holes or other irregularities in the ground. Pay attention to other possible risks. • Never use the machine if you are tired, if you have consumed alcohol, or if you are taking other drugs or medication that can affect your vision, judgment, or coordination. • Beware of traffic when working near or crossing a road. WARNING! Engine exhaust and certain vehicle components contain or emit chemicals considered to cause cancer, birth defects, or other reproductive system damage. The engine exhaust contains carbon monoxide, which is a colorless, poisonous gas. Do not use the machine in enclosed spaces. 8019-009 Keep children away from the work area WARNING! When using the machine, approved personal protective equipment should be used. Personal protective equipment cannot eliminate the risk of injury but it will reduce the degree of injury if an accident does happen. Ask your retailer for help in choosing the right equipment. • Never leave the machine unsupervised with the engine running. Always stop the engine before leaving the machine. • Never allow children or other persons not trained in the use of the machine to use or service it. Local laws may regulate the age of the user. • Make sure that you have first aid equipment close at hand when using the machine. • Never use the machine when barefoot. Always wear protective shoes or boots, preferably with steel toecaps. • Always wear approved protective glasses or a full visor when assembling or mowing. English-8 8011-670a Personal protective equipment SAFETY INSTRUCTIONS • Always wear gloves when handling the blades. • Never wear loose clothing that can get caught in moving parts. • Use ear protectors to avoid damage to hearing. • Stop the blade when crossing gravel drives, walks, or roads. • Shut the engine off and wait until the blade comes to a complete stop before removing grass catcher. • Disengage the self-propelled mechanism or drive clutch on mowers so equipped before starting the engine. • If the equipment should start to vibrate abnormally, stop the engine and check immediately for the cause. Vibration is generally a warning of trouble. • See manufacturer’s instructions for proper operation and installation of accessories. Use only accessories approved by the manufacturer. Operating on Slopes Operating on slopes is one of the operations where the risk is greatest that the operator will lose control or the machine will tip over, which can result in serious injury or death. All slopes require extra caution. If you feel unsure, do not mow the slope. Do as follows • Remove obstacles such as stones, tree branches, etc. • Watch out for and avoid running over furrows, holes, and bumps. On uneven terrain, the machine can tip more easily. Long grass can hide obstacles. • Mow across the face of slopes: never up and down. Exercise extreme caution when changing direction on slopes. • Mow evenly and slowly. • If the machine stops while going uphill, back down slowly. 8019-002 Mow side to side, not up and down. Do not • Do not make sudden changes in speed or direction. English-9 SAFETY INSTRUCTIONS • Do not drive the mower on terrain that slopes more than 10°. • Do not mow near verges, ditches, or banks. The operator could lose footing or balance. • Do not mow wet grass. Reduced footing could cause slipping • Do not turn on slopes unless necessary, and then, turn slowly and gradually downhill, if possible. • Avoid starting or stopping on a slope. If the tires begin to slip, shut down the blades if so equipped or shut off the engine and move slowly down the slope. Children • Serious accidents may occur if you fail to be on guard for children in the vicinity of the machine. Children are often attracted to the machine and mowing work. Never assume that children will stay where you last saw them. • Keep children away from the mowing area and under close supervision by another adult. • Keep an eye out and shut off the machine if children enter the work area. • Before and during a reversing maneuver, look backward and downward for children. • Never allow children to operate the machine. • Be particularly cautious near corners, bushes, trees, or other objects that block your view. 8019-003 Never allow children to operate the machine Maintenance WARNING! The engine must not be started when any protective plate for the mower deck’s drive belt is removed. • Stop the engine. • Never attempt to make wheel height adjustments while the engine is running. • Only store fuel in containers approved for the purpose. English-10 SAFETY INSTRUCTIONS • Keep the nozzle in contact with the rim of the fuel tank or container opening at all times until fueling is complete. Do not use a nozzle lock-open device. • Never fill containers inside a vehicle or on a truck or trailer bed with a plastic liner. Always place containers on the ground away from your vehicle before filling. • Remove gas-powered equipment from the truck or trailer and refuel it on the ground. If this is not possible, then refuel such equipment with a portable container, rather than from a gasoline dispenser nozzle. • Never fill the fuel tank indoors. • Fuel and fuel fumes are poisonous and extremely flammable. Be especially cautious when handling fuel, as carelessness can result in personal injury or fire. • Never remove the fuel tank cap and never fill the fuel tank while the engine is running. • Allow the engine to cool before refueling. Do not smoke. Do not fill fuel in the vicinity of sparks or open flames. • If leaks arise in the fuel system, the engine must not be started until the problem has been resolved. • Store the machine and fuel in such a way that there is no risk of leaking fuel or fuel vapor leading to damages. • Check the fuel level before each use and leave space for the fuel to expand, because the heat from the engine and the sun may otherwise cause the fuel to expand and overflow. • Avoid overfilling. If you spill fuel on the machine, wipe up the spill and wait until it has evaporated before starting the engine. If you have spilled fuel on your clothing, change your clothing. • Grass catcher components are subject to wear, damage, and deterioration, which could expose moving parts or allow objects to be thrown. Frequently check components and replace with manufacture’s recommended parts, when necessary. 8019-004 Never fill the fuel tank indoors Use protective glasses for maintenance work. WARNING! The engine and the exhaust system, become hot during operation. Risk for burns if touched. 8019-005 Never run unit in an enclosed space. English-11 SAFETY INSTRUCTIONS • Never make adjustments with the engine running. • Ensure that nuts and bolts, especially the fastening bolts for the blade attachments, are properly tightened, torqued and that the equipment is in good condition. • Do not modify safety equipment. Check regularly to be sure it works properly. The machine must not be used with defective or unmounted protective plates, protective cowlings, safety switches, or other protective devices. • Do not change the settings of governors and avoid running the engine with overly high engine speeds. If you run the engine too fast, you risk damaging the machine components. • Never use the mower indoors or in spaces lacking proper ventilation. The exhaust fumes contain carbon monoxide, an odorless, poisonous, and lethal gas. • Stop and inspect the equipment if you run over or into anything. If necessary, make repairs before starting. • The machine is tested and approved only with the equipment originally provided or recommended by the manufacturer. • The blades are sharp and can cause cuts and gashes. Wrap the blades or use protective gloves when handling them. • The mulch blades should only be used in familiar areas when higher quality mowing is desired. • Reduce the risk of fire by removing grass, leaves, and other debris that may have accumulated on the machine. Allow the machine to cool before putting it in storage. Transport • The machine is heavy and can cause serious crushing injuries. Be extra cautious when it is loaded on or unloaded from a vehicle or trailer. • Use an approved trailer to transport the mower. Fasten the machine with approved fastening devices, such as straps, chains, or ropes, when transporting. English-12 8019-006 Clean the unit regularly SAFETY INSTRUCTIONS • Check and abide by local traffic regulations before transporting. • Do not tow this machine, it may cause damage to the drive system. Customer responsibilities • Read and observe the safety rules. • Follow a regular schedule in maintaining, caring for and using your mower. • Follow the instructions under “Maintenance” and “Storage” sections of this owner’s manual. WARNING! This mower is equipped with an internal combustion engine and should not be used on or near any unimproved forest-covered, bush-covered or grass-covered land unless the engine’s exhaust system is equipped with a spark arrester meeting applicable local or state laws (if any). If a spark arrester is used, it should be maintained in effective working order by the operator. A spark arrester for the muffler is available through your authorized Husqvarna dealer. English-13 CONTROLS Controls This operator’s manual describes the Husqvarna Pro Push Mower. The mower is fitted with a Kawasaki engine. 8019-040 Pro Push Mower Control Locations 7 8 9 8 11 8 1, 5, 6 2 3 10 8 4 8019-052 Locations of the controls Page Page 1 Engine speed 14 7 BBC control 16 2 Fuel shut off valve 14 8 Cutting height 16 3 Fuel tank cap 14 9 Ground Speed Bail 17 4 Operator presence control (OPC) 14 10 & 11 Engine shut off 18 5 Choke control 15 6 Throttle control 15 English-13 CONTROLS Engine Speed CAUTION: The engine speed was set at the factory for optimum performance. Speed is not adjustable Federal regulations require an engine control to be installed on this lawn mower in order to minimize the risk of blade contact injury. DO NOT under any circumstances attempt to defeat the function of the operator control. The blade turns when the engine is running. Operator Presence Control (OPC) Models: W21SBK, W53SBEK, W21SBKC Your lawn mower is equipped with an operator presence control (OPC). The engine will start whether the OPC is engaged or not. The blade will not operate unless the OPC is engaged. If blade is engaged, releasing the OPC will stop the blade but will not stop the engine. Models: W21K, W21SK, W53SEK, W21KC and W21SKC 1 Your lawn mower is equipped with an operator presence control (OPC). The engine will not start unless the OPC is pulled rearward. The engine and blade will stop turning when the OPC is released. 8019-042 Handle Bar 1. Operator Presence Control (OPC) (Engaged position) Fuel Shut Off Valve The fuel shut off valve is located under the fuel tank. The valve has two positions; ON and OFF. Refueling Fuel valve “ON” 8019-043 The machine has one fuel tank. The tank volume is 2.1quarts or 0.53 gallon (2.0 liters). The engine will run on a minimum of 85octane unleaded gasoline (no oil mix). Environmentally adapted alkylate gasoline can be used beneficially. See also Technical Data concerning ethanol fuel. Methanol fuel is not recommended. Fuel valve “OFF” 8019-044 English-14 CONTROLS . WARNING! Gasoline is highly flammable. Observe caution and fill the tank outdoors (see the safety rules). IMPORTANT INFORMATION WARNING! Fill to bottom of filler neck. Do not overfill. Wipe off any spilled oil or fuel. Do not store, spill or use gasoline near an open flame. When operating in temperatures below 32° F. (0° C.), use fresh, clean winter grade gasoline to help insure good cold weather starting. Choke Control (All Models) The choke control is used for cold starts in order to provide the engine with a richer fuel mixture. Experience indicates that alcohol blended fuels (called gasohol, ethanol or methanol) can attract moisture which leads to separation and formation of acids during storage. Acidic gas can damage the fuel system of an engine while in storage. To avoid engine problems, the fuel system should be emptied before storage of 30 days or longer. Drain the gas tank, start the engine and let it run until the fuel lines and carburetor are empty. Use fresh fuel the next season. See Storage Instructions for additional information. Never use engine or carburetor cleaners in the fuel tank or permanent damage may occur. For cold starts the throttle lever should be pushed all the way forward past “FAST” position to “CHOKE” position. Once engine has warmed pull throttle lever rearward to “FAST” (run) position. Throttle Control (All Models) The throttle control regulates the engine speed and thereby the rate of rotation of the blades. In order to increase or decrease the engine speed, the control is moved forward or backward respectively. Avoid idling the engine for long periods, as there is a risk of fouling the spark plugs. USE FULL THROTTLE WHEN MOWING, for best mower performance. English-15 Choke/Throttle Control 8019-018 CONTROLS Blade Brake Control (BBC) Models: W21SBK, W53SBEK, W21SBKC The Blade Brake Control (BBC) engages the blade drive. The Operator Presence Control (OPC) must be engaged and the engine running to engage the BBC. 1 3 Illustration shows ground speed bail engaged to operate in transport mode. Release ground speed bail to prevent movement. 2 Operator Presence Control (OPC) 8019-037 1. OPC 2. BBC 3. Ground speed bail To engage BBC, press the control forward as shown in illustration. Engage BBC 8019-021 To stop blade from turning release OPC as shown in illustration. Illustration shows ground speed bail in engaged position. 1 3 2 Stop Blades 8019-023 1. OPC 2. BBC control 3. Ground speed bail English-16 CONTROLS Cutting height 2 The cutting deck height is obtained by raising the wheels for low cut and lowering wheels for high cut, adjust cutting height to suit your requirements. Medium position is best for most lawns. To change your cutting height, squeeze adjuster lever toward wheel. Move wheel up or down to suit your requirements. Be sure all wheels are in the same setting. NOTE: Adjuster is properly positioned when plate tab inserts into hole in lever. Also, 9position adjusters (if so equipped) allow lever to be positioned between the plate tabs. 1 3 8019-038 1. Lever backward to lower mower Lever forward to raise mower 2. Lever 3. Plate Tab 8019-039 Ground Drive Bail The ground drive bail for models so equipped, is used to engage the drive wheels. The ground drive bail is engaged by pressing the bail forward to engage the drive wheels. Release the ground drive bail to stop rear wheels from driving. 8019-045 Ground drive bail, Models: W21SBK, W53SBEK, W21SBKC 8019-029 Ground drive bail, Models: W21SK, W53SEK, W21SKC No ground drive bail, Model: W21K, W21KC English-17 8019-046 CONTROLS Shut Off Engine 2 Models: W21SBK, W53SBEK, W21SBKC To stop engine, release OPC bail to stop blades. Pull back on throttle control to stop engine 1 Stop Engine 8019-047 1. OPC bail 2. Throttle control 2 Models: W21SK, W53SEK, W21SKC Pull throttle control back to slow speed. Release OPC bail to stop engine. 1 Stop Engine 8019-020 1. OPC bail 2. Throttle control 2 Model: W21K, W21KC Pull throttle control back to slow speed. Release OPC bail to stop engine. 1 8019-048 Stop Engine 1. OPC bail 2. Throttle control English-18 CONTROLS Mulching Kits are available separately, containing blade and mulch plug. To Convert Mower Your lawn mower was shipped as a rear discharge mower. To convert to bagging or side discharge: REAR BAGGING • Lift rear door of the lawn mower and place the grass catcher frame hooks onto the door pivot pins. • To convert to mulching or discharging operation, remove grass catcher and close rear door. Rear Bagging 8019-049 SIDE DISCHARGING • Discharge flap must be closed. • Open discharge flap and install discharge deflector under discharge flap. • Mower is now ready for discharging operation. • To convert to mulching or bagging operation, discharge deflector MUST be removed and discharge flap MUST be closed. 1 Rear Discharge SIMPLE STEPS TO REMEMBER WHEN CONVERTING YOUR LAWN MOWER 8019-050 1. Discharge flap CAUTION: DO NOT run your lawn mower without discharge flap closed or approved grass catcher in place. NEVER attempt to operate the lawn mower with the discharge flap removed or propped open. FOR REAR DISCHARGING1. Discharge flap closed. FOR REAR BAGGING1. Grass catcher installed. 2. Discharge flap closed. FOR SIDE DISCHARGE1. Rear door closed. 1 2. Discharge deflector installed. To Empty Grass Catcher • Lift up on grass catcher using frame handle. • Remove grass catcher with clippings from under lawn mower handle. • Empty clippings from bag using both frame handle and bag handle. NOTE: Do not drag the bag when emptying; it will cause unnecessary wear. English-19 Bag Handle 1. Frame handle 8019-049 CONTROLS English-20 OPERATION Before Starting Engine CAUTION: ADD OIL DO NOT overfill engine with oil, or it will smoke on startup. Your lawn mower is shipped without oil in the engine. For type and grade of oil to use see “ENGINE” in the Maintenance section of this manual or the engine manual. 1. Be sure lawnmower is level. IMPORTANT INFORMATION 2. Remove oil dipstick from oil fill spout. Check oil level before each use. Add oil if needed. Fill to full line on dipstick. 3. Engine holds 0.90 qt.(0.85L) of oil. For type and grade of oil to use, see “ENGINE” in the Maintenance section of this manual or the engine manual that comes with the unit. 4. Pour oil slowly. DO NOT overfill. Wait one minute to allow oil to settle. Insert dipstick without tightening, then remove it to check oil level. Change the oil after every 25 hours of operation or each season. You may need to change the oil more often under dusty, dirty conditions. See “TO CHANGE ENGINE OIL” in the Maintenance section of this manual. 1 ADD GASOLINE • Fill fuel tank to bottom of tank filler neck. DO NOT overfill. Use fresh, clean, regular unleaded gasoline with a minimum of 87 octane. DO NOT mix oil with gasoline. Purchase fuel in quantities that can be used within 30 days to assure fuel freshness. 2 8019-041 1. Oil dipstick, oil fill 2. Gasoline fill WARNING! Wipe off any spilled oil or fuel. DO NOT store, spill or use gasoline near an open flame. Alcohol blended fuels (called gasohol or using ethanol or methanol) can attract moisture which leads to separation and formation of acids during storage. To avoid engine problems, the fuel system should be emptied before storage of 30 days or longer. Empty the gas tank, start the engine and let it run until the fuel lines and carburetor are empty. Use fresh fuel next season. See Storage TO STOP ENGINE Instructions for additional • To stop engine, release operator information. presence control bar. CAUTION: NEVER use engine or carburetor cleaner products in the fuel tank or permanent damage may occur. English-20 OPERATION TO START ENGINE NOTE: Due to protective coatings on the engine, a small amount of smoke may be present during the initial use of the product and should be considered normal. 2 3 To start a cold engine, push the throttle control lever to the choke position. 1 Models: W21SBK & W53SBEK, W21SBKC Pull starter cord briskly. It is not necessary to engage OPC control. Do not engage ground speed control bail. When engine starts, move the throttle control to fast position. Do not allow the starter cord to snap back. 8019-014 Pull start, Models: W21SBK, W53SBEK, W21SBKC 1. Starter cord 2. OPC 3. Ground speed bail Models: W21SK, W53SEK, W21SKC Hold Operator Presence Control in engaged position. Do not engage the Ground Speed Control Bail. Pull the starter cord briskly. When the engine starts, move the throttle control to fast position. Do not allow the starter cord to snap back. 2 1 3 8019-015 Pull start, Models: W21SK, W53SEK, W21SKC 1. OPC engaged position 2. Ground speed bail 3. Starter cord Model: W21K, W21KC Hold Operator Presence Control in engaged position. Pull the starter cord briskly. When the engine starts move the throttle control to fast position. Do not allow the starter cord to snap back. 1 2 NOTE: In cooler weather it may be necessary to choke engine. In warmer weather, it may not be necessary to choke the engine. Too much choke may cause engine flooding and prevent the engine from starting. If the engine becomes flooded, wait a few minutes before attempting to start. English-21 8019-016 Pull start, Models: W21K, W21KC 1. OPC engaged position 2. Starter cord OPERATION Transmission Selector BBC Self propelled Models Only Models: W21SBK, W53SBEK, W21SBKC Mowing Prepare the area before mowing. Look for obstacles, remove foreign objects and clear the work area of pets and bystanders. Check the equipment for fuel, oil, loose fasteners etc. Make sure the equipment is in top shape. Correct any defects before using the mower. Select the appropriate speed with the transmission lever. • Position 1 on the transmission selector is the slowest speed. • Position 2 is for moderate speed. • Position 3 is the fastest ground speed setting. 8019-017 Transmission Selector Set transmission lever to the speed required. Set choke control to “ON” position. 8019-018 Choke “ON” Start engine by pulling briskly on starter rope. 8019-014 Pull start English-22 OPERATION Set throttle control to high speed. Engage Operator Presence Control (OPC). 8019-020 Set Throttle to High Speed Engage Blade Brake Control (BBC). 8019-021 Engage OPC then BBC Engage Ground Speed Bail to begin mowing. TIP: To extend clutch life do not engage BBC and start blade while in tall grass. Start the blade in short cut grass or over a hard level surface. Allow the blade to come up to speed (1-2 seconds) before mowing grass. English-23 8019-022 Engage Ground Speed Bail OPERATION When finished mowing, release OPC bail to stop blade rotation. 1 2 Release Ground Speed Bail to stop wheel rotation. 8019-023 Release OPC bail 1. OPC bail 2. Ground speed bail Pull throttle control all the way rearward to stop engine. 1 2 8019-024 1. Ground speed bail 2. Throttle control English-24 OPERATION Self Propelled Models Only Models: W21SK, W53SEK, W21SKC Mowing Prepare the area before mowing. Look for obstacles, remove foreign objects and clear the work area of pets and bystanders. Check the equipment for fuel, oil, loose fasteners etc. Make sure the equipment is in top shape. Correct any defects before using the mower. Select the appropriate speed with the transmission lever. • Position 1 on the transmission selector is the slowest speed. • Position 2 is for moderate speed. • Position 3 is the fastest ground speed setting. Transmission selector 8019-017 Set transmission lever to the speed required. Set choke control to “ON” position. Set choke to “ON” position 8019-018 Engage Operator Presence Control (OPC) and start engine by pulling briskly on starter rope. 8019-015 English-25 OPERATION Set throttle control to high speed. Set throttle to high speed 8019-028 Engage Ground Speed Bail to begin mowing. Engage Ground Speed Bail 8019-029 Release Ground Speed Control to stop. When finished mowing release OPC bail to stop blade rotation and stop engine. 8019-023 English-26 OPERATION Push Models Only Model: W21K, W21KC Prepare the area before mowing. Look for obstacles, remove foreign objects and clear the work area of pets and bystanders. Check the equipment for fuel, oil, loose fasteners etc. Make sure the equipment is in top shape. Correct any defects before using the mower. Set choke control to “ON” position. Choke “ON” 8019-031 1 Engage Operator Presence Control (OPC). Start engine by pulling briskly on starter rope. 2 Start engine 8019-032 1. OPC bail 2. Starter rope Set throttle control to high speed. Set throttle to high speed 8019-033 1 When finished mowing release OPC bail to stop blade rotation and stop engine. Release OPC bail English-27 1. OPC bail 8019-034 OPERATION Mowing Tips Under certain conditions, such as very tall grass, it may be necessary to raise the height of cut to reduce pushing effort and to keep from overloading the engine and leaving clumps of grass clippings. It may also be necessary to reduce ground speed and/or run the lawn mower over the area a second time. • For extremely heavy cutting, reduce the width of cut by overlapping previously cut path and mow slowly. • For better grass bagging and most cutting conditions, the engine speed should be set in the fast position. • Pores in cloth grass catchers can become filled with dirt and dust with use and catchers will collect less grass. To prevent this, regularly hose catcher off with water and let dry before using. • Keep top of engine around starter clear and clean of grass clippings and chaff. This will help engine air flow and extend engine life. WARNING! DO NOT use de-thatcher blade attachments on your mower. Such attachments are hazardous, will damage your mower and could void your warranty. English-28 OPERATION Mulching Mowing Tips • The special mulching blade will recut the grass clippings many times and reduce them in size so that as they fall onto the lawn they will disperse into the grass and not be noticed. Also, the mulched grass will biodegrade quickly to provide nutrients for the lawn. ALWAYS mulch with your highest engine (blade) speed as this will provide the best recutting action of the blades. • Avoid cutting your lawn when it is wet. Wet grass tends to form clumps and interferes with the mulching action. The best time to mow your lawn is the early afternoon. At this time the grass has dried, yet the newly cut area will not be exposed to direct sunlight. • For best results, adjust the lawn mower cutting height so that the lawn mower cuts off only the top one-third of the grass blades. If the lawn is overgrown it will be necessary to raise the height of cut to reduce pushing effort and to keep from overloading the engine and leaving clumps of mulched grass. For extremely heavy mulching, reduce your width of cut by overlapping previously cut path and mow slowly. • Certain types of grass and grass conditions may require that an area be mulched a second time to completely hide the clippings. When doing a second cut, mow across (perpendicular) to the first cut path. • Change your cutting pattern from week to week. Mow north-south one week, then change to east-west the next week. This helps prevent matting/graining of lawn. English-29 IMPORTANT INFORMATION For best performance, keep mower housing free of built-up grass and trash. See "Cleaning" in Maintenance section of this manual. MAINTENANCE Maintenance Maintenance Schedule The following is a list of maintenance procedures that must be performed on the machine. For those points not described in this manual, visit an authorized service workshop. An annual service carried out by an authorized service workshop is recommended to maintain your machine in the best possible condition and to ensure safe operation. Read Safety Instructions section “Maintenance”. Daily maintenance Maintenance Before After Check for Loose Features z Clean/Inspect Grass Catcher* z Check Tires z Check Drive Wheels** z Clean Lawn Mower*** Maintenance interval in hours 10 24 or season 300 z z z z z z Clean under Drive Cover** Check Drive Belt / Pulleys** z Check/Sharpen/Replace Blade z3 Lubrication z Check Engine Oil Level 100 Before Storage z4 Change Engine Oil z1,2 Clean Air Filter z2 Inspect Muffler z Replace Spark Plug z Replace air Filter Paper Cartridge z2 Empty fuel system or add stabilizer z * If so equipped. ** Power-Propelled mowers. ***Use a scraper to clean under deck. 1-Change more often if operating under a heavy load or at high ambient temperatures. 2-Service more often if operating in dirty or dusty conditions. 3-Replace blades more often when mowing in sandy soil. 4-And after each 5 hours of use. WARNING! No adjustments or maintenance to be carried out unless: • The engine is stopped. • Spark plug wire is removed. English-30 MAINTENANCE General Recommendations The warranty on this lawn mower does not cover items that have been subjected to operator abuse or negligence. To receive full value from the warranty, operator must maintain mower as instructed in this manual. Some adjustments will need to be made periodically to properly maintain your unit. At least once a season, check to see if you should make any of the adjustments described in this Maintenance section. • At least once a year, replace the spark plug, clean or replace air filter element and check blade for wear. A new spark plug and clean/new air filter element assure proper air-fuel mixture and help your engine run better and last longer. • Follow the maintenance schedule in this manual. Before Each Use 1. Check engine oil level. 2. Check for loose fasteners. Ignition System The engine is equipped with an electronic ignition system. Only the spark plugs require maintenance. For recommended spark plugs, see Technical Data. 1. Remove the ignition cable boot and clean around the spark plug. 2. Remove the spark plug with a spark plug socket wrench. 3. Check the spark plug. Replace the spark plug if fouled, the electrodes are burned and if the insulation is cracked or damaged. Clean the spark plug with a steel brush if it is to be reused. 4. Measure the electrode gap with a gapping tool. The gap should be .030" (0.75 mm). Adjust as necessary by bending the side electrode. 5. Reinsert the spark plug, turning by hand to avoid damaging the threads. 6. After the spark plug is seated, tighten it English-31 IMPORTANT INFORMATION Fitting the wrong spark plug type can damage the engine. Inadequately tightened spark plugs can cause overheating and damage the engine. Tightening the spark plugs too hard can damage the threads in the cylinder head. 8011-054 Measure the electrode gap MAINTENANCE using a spark plug wrench so that the washer is compressed. A used spark plug should be turned 1/8 of a turn from the seated position. A new spark plug should be turned 1/4 a turn from the seated position. Replace the ignition cable. Checking the Engine's Cooling Air Intake Check that the engine’s cooling air intake is free from leaves, grass, and dirt. If the cooling air intake is clogged, engine cooling deteriorates, which can lead to engine damage. 8011-719 Check and clean the cooling air intake English-32 MAINTENANCE Checking and Adjusting the Throttle Cable and Choke Cable Check that the engine responds to throttle increases and that a good engine speed is attained at full throttle. If doubts arise, contact the service workshop. If adjustments are necessary, they can be made as follows: 1. Position the throttle/choke control lever to full throttle (not the “Choke”) position. 2. Loosen cable clamp and slide cable rearward to the internal stop on the carburetor linkage (until strong resistance is felt). 3. Hold cable in this position while tightening cable clamp securely. Verify choke operation using the throttle/choke control lever. 4. Move throttle choke control lever to make sure the choke is disengaged and the engine runs at full speed when the throttle control is moved to the “Fast” position. 5. Verify the control slows the engine when the throttle/choke lever is pulled rearward and the engine stops (BBC models only). 6. Start the engine and move the throttle lever to the fast (or high) position. Using a tachometer, check the engine speed. 7. The carburetor and engine rpm is not field adjustable. If out of specification, take it to an authorized Kawasaki engine dealer. Do not over speed engine or defeat the engine governor. 3 2 1 8019-027 1. Choke lever 2. Throttle/choke cable 3. Cable clamp Carburetor English-33 8019-030 MAINTENANCE Replacing Air Filter If the engine seems weak or runs unevenly, the air filter may be clogged. If run with a dirty air filter, the spark plugs can become fouled, disturbing operation. 1 For this reason, it is important to replace the air filter regularly (see the heading Maintenance Schedule for the proper service interval). To clean/replace the air filter: 2 3 WARNING! Allow the exhaust system to cool before performing service. Risk for burns. IMPORTANT INFORMATION Operating the engine without an air filter, or with a damaged air filter, will allow dirt to enter the engine, causing rapid engine wear. This type of damage is not covered by the Distributor’s Limited Warranty. Air Filter Assembly 1. Air filter cover 2. Paper filter 3. Foam filter 8019-019 Inspection Push up latches on the sides of the air cleaner case. Remove the air cleaner cover and inspect the filter elements. Clean or replace dirty filter elements. Always replace damaged filter elements. 1. Remove the paper and foam elements. 2. Inspect both air filter elements and replace them if they are damaged. Always replace the paper filter element at the scheduled interval (200 hours). 3. To clean the foam element wash in detergent and warm water, and let the element air-dry thoroughly before installing it. 4. To clean the paper element, tap it gently on a flat surface to remove dust. 5. Clean the housing with detergent and water and dry thoroughly. IMPORTANT INFORMATION Do not use compressed air to clean the paper element. Do not oil the paper or foam elements English-34 MAINTENANCE Replacing the Fuel Filter Replace the line-mounted fuel filter every 100 hours (once per season) or more regularly if it is clogged. Replace the filter as follows: 1. Move the hose clamps away from the filter. Use flat-nosed pliers. 2. Pull the filter loose from the hose ends. 3. Push the new filter into the hose ends. Position the filter with the “FLOW” arrow pointing up toward the fuel pump. If necessary, a soap solution can be applied to the filter ends to ease mounting. 4. Move the hose clamps back toward the filter. Checking Tires • Keep tires free of gasoline, oil, or insect control chemicals which can harm rubber. • Avoid stumps, stones, deep ruts, sharp objects and other hazards that may cause tire damage. Drive Wheels Check rear drive wheels each time before you mow to be sure they move freely. The wheels not turning freely means trash, grass cuttings, etc. are in the drive wheel area and must be cleaned to free drive wheels. If necessary to clean the rear drive wheels, be sure to clean both front wheels. 1. Remove hubcaps, locknuts and washer. 2. Remove wheels from wheel adjusters. 3. Remove any trash or grass cuttings from inside the dust cover, pinion and/or drive wheel gear teeth. 4. Put wheels back in place NOTE: If after cleaning, the drive wheels do not turn freely, contact a qualified service English-35 8011-729 Fuel filter MAINTENANCE Checking the V-belts Check every 100 hours of operation. Check for severe cracking and large nicks. NOTE: The belt will show some small cracks in normal operation. The belts are not adjustable. Replace belts if they begin to slip from wear. Checking the Blade In order to attain the best mowing effect, it is important that the blade is well sharpened and not damaged. Always use protective gloves when handling the blade. A bent or cracked blade or blade with large nicks should be replaced. Check the blade mounts. 8019-035 IMPORTANT INFORMATION The sharpening of the blade should be carried out by an authorized service workshop. Check the blade A damaged blade should be replaced when hitting obstacles that result in a breakdown. Let the service workshop decide whether the blade can be repaired/ground or must be replaced. English-36 MAINTENANCE Blade replacement: WARNING! The blade is sharp. Protect your hands with gloves and / or wrap the blade with a heavy cloth when handling. 3 2 • Remove blade bolt by turning counterclockwise. IMPORTANT INFORMATION To ensure proper assembly, center hole in blade must align with star on cutter housing. • Install new or resharpened blade with stamped “GRASS SIDE” facing towards ground/grass (down) or “THIS SIDE UP” facing deck and cutter housing. • Install and tighten blade bolt securely. Torque blade bolt to 45-55 ft/lbs (60-75 Nm). IMPORTANT INFORMATION Special blade bolt is heat treated. Replace with Husqvarna bolt if required. Do not use lower grade hardware than specified. Gear Case • To keep our drive system working properly, the gear case and area around the drive should be kept clean and free of trash build-up. Clean under the drive cover twice a season. • The gear case is filled with lubricant to the proper level at the factory. The only time the lubricant needs attention is if the service has been performed on the gear case. English-37 1 5 4 6 Blade assembly 1. Blade 2. Blade Adapter 3. Key 4. Lockwasher 5. Blade Bolt 6. Hardened Washer 8019-036 MAINTENANCE Grass Catcher • The grass catcher may be hosed with water, but must be dry when used. • Check your grass catcher often for damage or deterioration. Through normal use it will wear. If catcher needs replacing, replace only with approved replacement catcher shown in the Repair Parts section of this manual. Give the mower model number when ordering. WARNING! Disconnect spark plug wire from spark plug and place wire where it cannot come in contact with plug. Muffler Inspect and replace corroded muffler as it could create a fire hazard and/or damage. Cleaning IMPORTANT: FOR BEST PERFORMANCE, KEEP MOWER HOUSING FREE OF BUILTUP GRASS AND TRASH. CLEAN THE UNDERSIDE OF YOUR MOWER AFTER EACH USE. • Clean the underside of your lawn mower by scraping to remove build-up of grass and trash. • Clean engine often to keep trash from accumulating. A clogged engine runs hotter and shortens engine life. • Keep finished surfaces/wheels free of gasoline, oil, etc. • We do not recommend using a garden hose to clean lawn mower unless the electrical system, muffler, air filter and carburetor are covered to keep water out. Water in engine can result in shortened engine life. WARNING! Disconnect spark plug wire from spark plug and place wire where it cannot come in contact with plug. Clean Under Drive Cover Clean under drive cover at least twice a season. Scrape underside of cover with putty knife or similar tool to remove any build-up of trash or grass on underside of drive cover. English-38 MAINTENANCE Adjusting the Lawn Mower WARNING! Before performing any service or adjustment: 1. Release control bar and stop engine. 2. Make sure the blade and all moving parts have completely stopped. 3. Disconnect spark plug wire from spark plug and place where it cannot come in contact with plug Adjusting Cutting Height See “TO ADJUST CUTTING HEIGHT” In the Operation section of this manual. Rear Deflector The rear deflector, attached between the rear wheels of your mower, is provided to minimize the possibility that objects will be thrown out of the rear of the mower into the operator’s mowing position. If the deflector becomes damaged, it should be replaced. To Remove Drive Belt 1. Remove drive cover. Remove belt from gearcase pulley by pushing down on pulley and rolling belt off it. 2. Turn mower on its side (air filter and carburetor up). 3. Remove blade. 4. Remove shaft support. 5. Remove belt from engine pulley on crankshaft. Replace drive belt by reversing above steps. NOTE: Always use factory approved belt to assure fit and long life. To Adjust Handle The handle can be mounted in a high or low position. The mounting holes in the bottom of handle are off center for raising or lowering the handle. 1. Remove handle and all wire tie(s) securing cable(s) to handle. 2. Remove bolts and nuts from handle bracket mounting. 3. Squeeze lower handle in to remove from mounting brackets. 4. Move handle to mounting holes in bracket to raise or lower handle. 5. Replace bolts and nuts, tighten securely. Re-attach cables to handle with wire ties. English-39 MAINTENANCE Engine Adjustment Engine Speed Your engine speed has been factory set. Do not attempt to increase engine speed or it may result in personal injury. If you believe that the engine is running too fast or too slow, take your lawn mower to an authorized service center for repair and adjustment. Carburetor Your carburetor is not adjustable. If your engine does not operate properly due to suspected carburetor problems, take your lawn mower to an authorized service center for repair and/or adjustment. IMPORTANT: NEVER TAMPER WITH THE ENGINE GOVERNOR, WHICH IS FACTORY SET FOR PROPER ENGINE SPEED. OVERSPEEDING THE ENGINE ABOVE THE FACTORY HIGH SPEED SETTING CAN BE DANGEROUS. IF YOU THINK THE ENGINE-GOVERNED HIGH SPEED NEEDS ADJUSTING, CONTACT YOUR NEAREST AUTHORIZED SERVICE CENTER, WHICH HAS PROPER EQUIPMENT AND EXPERIENCE TO MAKE ANY NECESSARY ADJUSTMENTS. Cleaning and Washing Regular cleaning and washing, especially under the mower deck, will increase the machine’s lifespan. Make it a habit to clean the machine directly after use (after it is cooled), before the dirt sticks. Do not spray water on the top of the mower deck. Use compressed air to clean the top side of mower deck. Use protective glasses when cleaning and washing. Hardware Check daily. Inspect the entire machine for loose or missing hardware. English-40 MAINTENANCE English-41 LUBRICATION Lubrication Keep unit well lubricated (See “LUBRICATION CHART”). IMPORTANT: DO NOT OIL OR GREASE PLASTIC WHEEL BEARINGS. VISCOUS LUBRICANTS WILL ATTRACT DUST AND DIRT THAT WILL SHORTEN THE LIFE OF THE SELF-LUBRICATING BEARINGS. IF YOU FEEL THEY MUST BE LUBRICATED, USE ONLY A DRY, POWDERED GRAPHITE TYPE LUBRICANT SPARINGLY. Mower Lubrication Chart Grease self-propelled only 968999284, 968999286, 968999287, 968999289, 968999639, 968999640 8019-051 IMPORTANT INFORMATION Use minimal lubrication and remove excess lubricant so that is does not come into contact with belts or belt pulley drive surfaces. Engine Lubrication Use only high quality detergent oil rated with API service classification SG-SL. Select the oil’s SAE viscosity grade according to your expected operating temperature. NOTE: Multi-viscosity oils (5W30, 10W30, etc.) improve starting in cold weather, and you should check your engine oil level frequently to avoid possible engine damage from running low on oil. English-41 LUBRICATION Change the oil after every 25 hours of operation or at least once a year if the lawn mower is not used for 25 hours in one year. WARNING! Check the crankcase oil level before starting the engine and after each five (5) hours of continuous use. Tighten oil plug securely each time you check the oil level. Engine oil can be very hot if it is drained directly after stopping the engine. Allow the engine to cool first. To Change Engine Oil NOTE: Before tipping lawn mower to drain oil, empty fuel tank by running engine until tank is empty. 1. Disconnect spark plug wire from spark plug and place wire where it cannot come in contact with plug. 2. Remove engine oil cap; lay aside on clean surface. 3. Tip lawn mower on its side as shown and drain oil into a suitable container. Rock lawn mower back and forth to remove any oil trapped inside of engine. 4. Wipe off any spilled oil from mower or side of engine. 1 8019-041 5. Oil Fill 1. Oil Fill Replace engine oil cap. The engine holds 0.90 qt.(0.85L) 6. Slowly pour oil down the oil fill spout, stopping every few ounces to check the oil level with the dipstick. 7. Stop adding oil when you reach the FULL mark on the dipstick. Wait a minute to allow oil to settle. 8. Continue adding small amounts of oil, rechecking the dipstick until oil level settles at FULL. DO NOT overfill, or engine will smoke heavily from the muffler on startup. 9. 8009-159 The dipstick markings Always be sure to retighten oil dipstick before starting engine. 10. Reconnect spark plug wire to spark plug. English-42 LUBRICATION 6. Changing the Oil Filter 1. Drain the engine oil in accordance with the work description under the heading Engine Oil/Change Engine Oil. 2. Remove the oil filter. If necessary, use a filter remover. 3. Wipe new, clean engine oil onto the seal for the new filter. 4. Mount the filter by hand with + 3/4 turn. 5. Run the engine warm, then check that there are no leaks around the oil filter seal. 6. Check the oil level in the engine, fill if necessary. The oil filter holds 0.2 qt (0.2 liters) of oil. English-43 8011-734 Changing the oil filter TROUBLE SHOOTING GUIDE Trouble Shooting Guide Problem Cause The engine will not start. • Dirty air filter. • Out of fuel. • Stale fuel. • Water in fuel. • Spark plug wire is disconnected. • Bad spark plug. • Loose blade or broken blade adapter. • Control bar in released position. • Control bar defective. • Fuel valve lever (if equipped) in OFF position. • Rear of lawn mower housing or cutting blade Loss of Power dragging in heavy grass. Poor cut - uneven Excessive vibration Starter rope hard to pull • Cutting too much grass. • Dirty air filter. • Buildup of grass, leaves and trash under mower. • Too much oil in engine. • Walking speed too fast. • Worn, bent, or loose blade. • Wheel heights uneven. • Buildup of grass, leaves and trash under mower. • Worn, bent or loose blade. • Bent engine crankshaft. • Engine flywheel brake is on when control bar is released. • Bent engine crankshaft • Blade adapter broken. • Blade dragging in grass. English-44 TROUBLE SHOOTING GUIDE Grass catcher not filling (if so equipped) Hard to push • Cutting height too low. • Lift on blade worn off. • Catcher not venting air. • Grass is too high or wheel height is too low. • Rear of lawn mower housing or cutting blade dragging in heavy grass. Loss of drive or slowing of drive speed English-45 • Grass catcher too full. • Handle height position not right for you. • Belt wear. • Belt off of pulley. • Drive cable worn or broken. 112280 R2 03/06/07