1
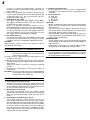
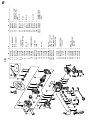
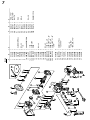
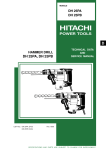
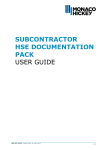
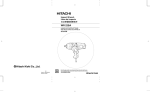
Disc Sander
日立牌圓形砂紙磨光機
S 18SB • S 15SB
HANDLING INSTRUCTIONS
使用說明書
S18SB
Read through carefully and understand these instructions before use.
使用前務請詳加閱讀-
1
2
1
2
1
3
15° – 30°
4
5
3
8
6
7
4
9
43
6mm
17mm
1
2
3
4
5
6
7
8
9
0
Wrench
Tighten
Washer nut
Sanding disc
Rubber pad
Spindle
Lock lever
Air cover
Wear limit
No. of carbon brush
0
2
GENERAL SAFETY RULES
WARNING!
Read all instructions
Failure to follow all instructions listed below may result in
electric shock, fire and/or serious injury.
The term “power tool” in all of the warnings listed below
refers to your mains operated (corded) power tool or battery
operated (cordless) power tool.
SAVE THESE INSTRUCTIONS
1) Work area
a) Keep work area clean and well lit.
Cluttered and dark areas invite accidents.
b) Do not operate power tools in explosive
atmospheres, such as in the presence of flammable
liquids, gases or dust.
Power tools create sparks which may ignite the
dust of fumes.
c) Keep children and bystanders away while operating
a power tool.
Distractions can cause you to lose control.
2) Electrical safety
a) Power tool plugs must match the outlet.
Never modify the plug in any way.
Do not use any adapter plugs with earthed
(grounded) power tools.
Unmodified plugs and matching outlets will reduce
risk of electric shock.
b) Avoid body contact with earthed or grounded
surfaces such as pipes, radiators, ranges and
refrigerators.
There is an increased risk of electric shock if your
body is earthed or grounded.
c) Do not expose power tools to rain or wet conditions.
Water entering a power tool will increase the risk
of electric shock.
d) Do not abuse the cord. Never use the cord for
carrying, pulling or unplugging the power tool.
Keep cord away from heat, oil, sharp edges or
moving parts.
Damaged or entangled cords increase the risk
of electric shock.
e) When operating a power tool outdoors, use an
extension cord suitable for outdoor use.
Use of a cord suitable for outdoor use reduces
the risk of electric shock.
3) Personal safety
a) Stay alert, watch what you are doing and use
common sense when operating a power tool.
Do not use a power tool while you are tired or
under the influence of drugs, alcohol or medication.
A moment of inattention while operating power
tools may result in serious personal injury.
b) Use safety equipment. Always wear eye protection.
Safety equipment such as dust mask, non-skid safety
shoes, hard hat, or hearing protection used for
appropriate conditions will reduce personal injuries.
c) Avoid accidental starting. Ensure the switch is in
the off position before plugging in.
Carrying power tools with your finger on the
switch or plugging in power tools that have the
switch on invites accidents.
d) Remove any adjusting key or wrench before
turning the power tool on.
A wrench or a key left attached to a rotating part
of the power tool may result in personal injury.
e) Do not overreach. Keep proper footing and balance
at all times.
This enables better control of the power tool in
unexpected situations.
f) Dress properly. Do not wear loose clothing or
jewellery. Keep your hair, clothing and gloves
away from moving parts.
Loose clothes, jewellery or long hair can be caught
in moving parts.
g) If devices are provided for the connection of dust
extraction and collection facilities, ensure these
are connected and properly used.
Use of these devices can reduce dust related
hazards.
4) Power tool use and care
a) Do not force the power tool. Use the correct
power tool for your application.
The correct power tool will do the job better and
safer at the rate for which it was designed.
b) Do not use the power tool if the switch does not
turn it on and off.
Any power tool that cannot be controlled with the
switch is dangerous and must be repaired.
c) Disconnect the plug from the power source before
making any adjustments, changing accessories, or
storing power tools.
Such preventive safety measures reduce the risk
of starting the power tool accidentally.
d) Store idle power tools out of the reach of children
and do not allow persons unfamiliar with the
power tool or these instructions to operate the
power tool.
Power tools are dangerous in the hands of
untrained users.
e) Maintain power tools. Check for misalignment or
binding of moving parts, breakage of parts and
any other condition that may affect the power
tools operation.
If damaged, have the power tool repaired before
use.
Many accidents are caused by poorly maintained
power tools.
f) Keep cutting tools sharp and clean.
Properly maintained cutting tools with sharp cutting
edges are less likely to bind and are easier to
control.
g) Use the power tool, accessories and tool bits etc.,
in accordance with these instructions and in the
manner intended for the particular type of power
tool, taking into account the working conditions
and the work to be performed.
Use of the power tool for operations different from
intended could result in a hazardous situation.
5) Service
a) Have your power tool serviced by a qualified
repair person using only identical replacement
parts.
This will ensure that the safety of the power tool
is maintained.
PRECAUTION
Keep children and infirm persons away.
When not in use, tools should be stored out of
reach of children and infirm persons.
3
PRECAUTIONS ON USING DISC SANDER
1.
2.
3.
4.
Keep away from a revoling sanding disc.
Pay strict attention to sparks.
Hold the disc sander firmly.
Do not leave the revolving disc sander unattended
on the floor.
5.
6.
7.
Be careful those around one while operating.
Follow the procedures of these handling instructions on sanding disc replacement.
Never mount a depressed center wheel on this
tool and attempt to use it as a disc grinder.
SPECIFICATIONS
Model
S18SB
Voltage (by areas)*
S15SB
(110V, 115V, 120V, 127V, 220V, 230V, 240V)
Power Input*
705W
No-Load Speed
4500/min.
Rubber pad outer dia.
180 mm
Weight (only main body)
150 mm
2.0 kg
*Be sure to check the nameplate on product as it is subject to change by areas.
STANDARD ACCESSORIES
Model
PRIOR TO OPERATION
S18SB
S15SB
180 mm Sanding disc*1
1
—
150 mm Sanding disc*1
—
Rubber Pad
1
1
Wrench
1
Side Handle
1
*1 Grain size : P50
Standard accessories are subject to change without
notice.
OPTIONAL ACCESSORIES (sold separately)
<For Model S18SB>
䡬 180 mm Sanding disc
There are eleven different kinds of sanding disc,
having grain sizes of P16, P20, P24, P30, P36, P40,
P50, P60, P80, P100, P120. When placing your order,
please specify the grain size of the disc desired.
<For Model S15SB>
䡬 150 mm Sanding disc
There are eleven different kinds of sanding disc,
having grain sizes of P16, P20, P24, P30, P36, P40,
P50, P60, P80, P100, P120. When placing your order,
please specify the grain size of the disc desired.
Optional accessories are subject to change without
notice.
APPLICATIONS
䡬 Sanding metal surfaces.
䡬 Preliminary sanding of metal surfaces before painting,
rust removal, removing old paint before repainting.
䡬 Finishing woodwork, correcting projections of timbers
from joints or assemblies.
䡬 Preliminary sanding of wood surfaces before applying
paint.
1. Power source
Ensure that the power source to be utilized conforms
to the power requirements specified on the product
nameplate.
2. Power switch
Ensure that the power switch is in the OFF position.
If the plug is connected to a receptacle while the
power switch is in the ON position, the power tool
will start operating immediately, inviting serious
accident.
3. Extension cord
When the work area is removed from the power
source, use an extension cord of sufficient thickness
and rated capacity. The extension cord should be
kept as short as practicable.
CAUTION:
Damaged cord must be replaced or repaired.
4. Attaching sanding disc
For attachment/removal of the sanding disc, refer to
“ATTACHMENT/REMOVAL OF SANDING DISC”.
Many types of sanding discs are available; select one
appropriate to the work.
5. Fixing the side handle
Screw the side handle into the housing.
6. Confirm the lock lever
Confirm that the lock lever is disengaged by pushing
lock lever two or three times before switching the
power tool on (See Fig. 2)
7. Install the air cover on the air vent on the side where
the side handle is attached to divert the cooling air
flow of the motor during operation as much as
possible. Hook tab of the air cover to the air vent and
push in the tab when installing. Use a screwdriver
etc. to pull as shown in Fig. 3 when removing.
PRACTICAL SANDER APPLICATIONS
1. Do not heavily push the sanding disc to the surface to
be ground. Grinding operation can be achieved with
the weight of the machine alone, so maintain the
sanding disc to an extent that it lightly touches the
surface to be ground. When the sanding disc is pushed
4
heavily, its revolving speed drops, creating an
unevenly finished surface and causing motor seizure
from overload.
2. Rather than applying the entire disc surface to the
metal surface to be gorund, use the sander by inclining
it approximately 15° – 30° to grind with the disc
peripheral portion. (Fig. 1)
3. Switching on the sander
The switch is of the quick-break trigger system. When
the trigger is pulled, the switch turns on; and when it
is released, the switch turns off.
When it is desired to keep the power on for a
prolonged period in continuous use, the stopper can
be used to keep the switch on even after the trigger
has been released. (First pull the trigger, and then
press the stopper.) To turn the switch off, first pull
the trigger again to disengage the stopper.
4. Precaution after use
Do not lay the sander down immediately after using
on a place where there are many shavings, much dirt
and dust until it has completely stopped revolving.
CAUTION
When the disc sander is not in use, the pwer source
should be disconnected.
4. Replacing carbon brushes
Disassemble the brush caps with a slotted-head
screwdriver. The carbon brushes can then be easily
removed.
5. Service parts list
A: Item No.
B: Code No.
C: No. Used
D: Remarks
CAUTION
Repair, modification and inspection of Hitachi Power
Tools must be carried out by a Hitachi Authorized
Service Center.
This Parts List will be helpful if presented with the
tool to the Hitachi Authorized Service Center when
requesting repair or other maintenance.
In the operation and maintenance of power tools, the
safety regulations and standards prescribed in each
country must be observed.
MODIFICATION
Hitachi Power Tools are constantly being improved
and modified to incorporate the latest technological
advancements.
Accordingly, some parts (i.e. code numbers and/or
design) may be changed without prior notice.
ATTACHMENT/REMOVAL OF SANDING DISC (Fig. 2)
CAUTION: Be sure to switch power OFF and disconnect
the attachment plug from the receptacle to
avoid serious trouble.
(1) Attach wahser, rubber pad and sanding disc on the
spindle, in that order.
(2) While pushing the lock lever with one hand, lock the
spindle by turning the rubber pad slowly with the
other hand.
Tighten the wheel washer by using the supplied
wrench.
䡬 Remove the sanding disc in the reverse order to
attachment.
CAUTION: Confirm that the lock lever is disengaged by
pushing lock lever two or three times before
switching the disc sander on.
MAINTENANCE AND INSPECTION
1. Inspecting the mounting screws
Regularly inspect all mounting screws and ensure
that they are properly tightened. Should any of the
screws be loose, retighten them immediately. Failure
to do so could result in serious hazard.
2. Maintenance of the motor
The motor unit winding is the very “heart” of the
power tool. Exercise due care to ensure the winding
does not become damaged and/or wet with oil or
water.
3. Inspecting the carbon brushes (Fig. 4)
The motor employs carbon brushes which are
consumable parts. Since an excessively worn carbon
brush could result in motor trouble, replace the carbon
brushes with new ones which have the same carbon
brush No. shown in the figure when they become
worn to or near the “wear limit”. In addition, always
keep carbon brushes clean and ensure that they slide
freely within the brush holders.
NOTE
Due to HITACHI’s continuing program of research
and development, the specifications herein are subject
to change without prior notice.
5
6
1
2
1
2
1
3
15° – 30°
4
5
3
8
6
7
4
9
43
6mm
17mm
1
2
3
4
5
6
7
8
9
0
扳手
緊
墊片螺帽
砂盤
椽膠墊圈
主軸
鎖定桿
空氣保護罩
磨損極限
碳刷號
0
2
一般安全規則
警告!
請通讀本說明書
若不遵守下列注意事項﹐可能會導致電擊﹑火災及/或
嚴重傷害下述警告中的術語「電動工具」﹐指插電 (有線) 電
動工具或電池 (無線) 電動工具請妥善保管本說明書
1) 工作場所
a) 工作場所應打掃乾淨﹐並保持充分的亮度雜亂無章及光線昏暗容易導致事故b) 請勿在易爆炸的環境中操作電動工具﹐如存在
易燃液體﹑氣體或粉塵的環境中電動工具產生的火花可能會點燃煙塵c) 操作電動工具時﹐孩童與旁觀者勿靠近工作場
所工作時分神可能會造成工具失控2) 電氣安全
a) 電動工具插頭必須與插座相配不得以任何形式改裝插頭不得對接地的電動工具使用任何轉接插頭原裝插頭及相配插座將會減少電擊的危險b) 應避免身體與大地或接地表面﹐如管道﹑散熱
器﹑爐灶﹑冰箱等的接觸若身體接觸大地或接地表面﹐更會增加電擊的
危險c) 電動工具不可任其風吹雨打﹐或置於潮濕的環
境中水進入電動工具也會增加電擊的危險d) 要小心使用電線-不要用電線提拉電動工具﹐
或拉扯電線來拆除工具的插頭電線應遠離熱源﹑油液﹐並避免接觸到銳利邊
緣或轉動部分電線損壞或攪纏在一起會增加電擊的危險e) 在室外操作電動工具時﹐請使用專用延伸線使用專用延伸線可降低電擊的危險3) 人身安全
a) 保持高度警覺﹐充分掌握情況﹐以正常的判斷
力從事作業疲勞狀態或服藥﹑飲酒後﹐請勿使用電動工
具操作電動工具時﹐一時的疏忽都可能造成嚴重
的人身傷害b) 使用安全設備-始終配戴安全眼鏡在適用條件下﹐使用防塵面罩﹑防滑膠鞋﹑安
全帽或聽覺保護裝置等安全設備﹐都會減少人
身傷害-
c) 謹防誤開動-插接電源前﹐請先確認開關是否
已切斷搬移電動工具時指頭接觸開關﹐或接通開關狀
態下插上電源插座﹐都容易導致事故d) 開動前務必把調整用鍵和扳手類拆除下來扳手或鍵留在轉動部分上﹐可能會造成人身傷
害e) 要在力所能及的範圍內進行作業-作業時腳步
要站穩﹐身體姿勢要保持平衡這樣在意外情況下可以更好地控制工具f) 工作時衣服穿戴要合適-不要穿著過於寬鬆的
衣服或佩帶首飾-頭髮﹑衣角和手套等應遠離
轉動部分鬆散的衣角﹑首飾或長髮都可能會捲入轉動部
分g) 如果提供連接除塵和集塵的設備﹐請確認是否
已經連接好並且使用正常使用這些設備可降低粉塵引起的危險4) 電動工具的使用和維護
a) 不要使勁用力推壓-應正確使用電動工具正確使用才能讓工具按設計條件有效而安全地
工作b) 如果電動工具不能正常開關﹐切勿使用無法控制開關的電動工具非常危險﹐必須進行
修理c) 進行調整﹑更換附件或存放工具前﹐請拆除電
源插頭此類預防安全措施可減少誤開動工具的危險d) 閒置不用的工具﹐應存放在孩童夠不到的地
方;不熟悉電動工具或本說明書的人員﹐不允
許操作本工具未經培訓的人員使用電動工具非常危險e) 妥善維護工具-檢查轉動部分的對準﹑連接﹐
各零件有無異常﹐及其他足以給工作帶來不良
影響的情況如有損壞﹐必須修理後才能使用許多事故都是因工具維護不良引起的f) 保持工具鋒利﹑清潔正確維護工具﹐使其保持鋒利﹐作業順暢﹐便
於控制g) 請根據本說明書﹐按照特殊類型電動工具的方
式﹐使用本工具﹑附件及鑽頭﹐並考慮作業條
件及具體的作業情況電動工具用於規定外的作業﹐可能會導致危險
狀況5) 維修
a) 本電動工具的維修必須由專業人員使用純正配
件進行這樣才能確保電動工具的安全性-
3
注意事項:
不可讓孩童和體弱人士靠近工作場所應將不使用的工具存放在孩童和體弱人士伸手不及的
地方-
使用圓形砂紙磨光機時的注意事項
1. 請遠離正在旋轉的砂盤2. 嚴密注意打火花-
3. 使用時握牢砂紙機4. 請勿將正在旋轉的圓形砂紙磨光機放在無人看管的
地板上5. 操作時當心周圍的人6. 更換砂盤時﹐請遵循有關使用說明書上所規定的
順序7. 切勿將磨輸裝在本工具上而將本工具當作磨光機來
使用-
規 格
型號
電壓(按地區)*
輸入工具*
額定輸出功率
無負荷速度
橡膠墊圈外徑
重量(僅限於本體)
S18SB
S15SB
(110V, 115V, 120V, 127V, 220V, 230V, 240V)
705W
360W
4500 轉/分
180 mm
150 mm
2.0 kg
*當須改變地區時應檢查產品上的銘牌-
標 準 附 件
型式
180 mm 砂盤*1
150 mm 砂盤*1
橡膠墊圈
扳手
側柄
S18SB
1
—
S15SB
—
1
1
1
1
*1 粒度大小:P50
標準附件可能不預先通告而徑予更改-
選購附件(分開銷售)
〈用於 S18SB 機型〉
䡬 180 mm 砂盤
砂盤共有11種﹐粒度分別為P16﹑P20﹑ P24﹑
P30﹑P36﹑P40﹑P50﹑P60﹑P80﹑P100和
P120-定購時﹐請指明所需砂盤的粒度〈用於 S15SB 機型〉
䡬 150 mm 砂盤
有十一種砂盤可供選購﹐其粒度大小分別為 P16﹑
P20﹑P24﹑P30﹑P36﹑P40﹑P50﹑P60﹑P80﹑
P100 及 P120-訂購砂盤時﹐請指定您所需要的
粒度大小選購附件可能不預先通告而徑予更改-
用 途
䡬 固定金屬表面
䡬 涂漆﹑除鏽前先固定金屬表面﹐除去舊漆後再重新
涂漆䡬 完成木工工作後﹐修正木材接縫或匯合處的突出部
分䡬 涂漆前先固定木材表面-
作 業 之 前
1. 電源
確認所使用的電源與工具銘牌上標示的規格是否相
符2. 電源開關
確認電源開關是否切斷-若電源開關接通﹐則插頭
插入電源插座時電動工具將出其不意地立刻轉動﹐
從而招致嚴重事故-
4
3. 延伸線纜
若作業場所移到離開電源的地點﹐應使用容量足
夠﹐鎧裝合適的延伸線纜﹐並且要盡可能地短些注意:損壞和導線一定要更換或修理4. 安裝砂盤
安裝或拆卸砂盤時﹐請參照“砂盤的安裝/拆卸”
一節的內容-有多種砂盤可供選購﹐請選擇最適合
於您的研磨工作的砂盤5. 固定側柄
把側柄旋進罩中6. 檢查鎖定桿
在打開電源開關之前按兩三下鎖定桿﹐檢查它是否
已被釋放(參照圖 2)7. 將空氣護罩安裝到側面裝有手柄的通風口﹐從而在
運轉期間盡可能轉移電動機的冷風氣流-將空氣護
罩凸起掛到通風口﹐然後在安裝時將其推入-取出
時﹐請按照圖 3所示用螺絲刀等工具將其拉出-
圓形砂紙磨光機的實際應用
1. 請勿用力將砂盤壓在打磨表面﹐只要依靠圓形砂紙
磨光機本身的重量即可達到打磨目的-因此﹐操作
時﹐只要將砂盤輕觸打磨表面即可-用力壓砂盤的
話﹐砂盤的轉速會降低﹐同時會使打磨表面粗糙不
平-另外﹐馬達也會因過載而發生故障2. 不必將砂盤的整個表面壓在要打磨的金屬表面上﹐
請將砂盤稍微傾斜一點﹐使其與打磨表面約成 15
—30°(圖 1)3. 圓形砂紙磨光機的開關
本工具中﹐採用子快斷式扳機來開關圓形砂紙磨光
機-拉起扳機時﹐開關便被打開﹐而松開扳機時﹐
開關便被關上-若想使開關長時間開著以便於連續
操作﹐可使用停止銷-使用停止銷的話-即使松開
扳機﹐開關也不會被關掉(先拉起扳機開關﹐然後按下停止銷-)若想關掉
開關﹐請再一次拉起扳機-這樣停止銷便會被松
開4. 使用須知
使用本工具之後﹐在砂盤沒有完全停止之前﹐請勿
將其立即放在有許多細層﹑髒物和灰塵的地方注意:圓形砂紙磨光機不用時﹐應將電源關掉-
砂盤的安裝/拆卸(圖 2)
注意:確認開關已斷開並且從電源插座中拔去附件
的電源插頭以避免嚴重事故(1) 將墊片﹑橡膠墊圈及砂盤依次裝在主軸上(2) 用一只手按鎖定桿﹐同時用另一只手慢慢轉動橡膠
墊圈鎖住主軸用附帶的扳手旋緊輪狀墊片䡬 請按與上述相反的順序來拆卸砂盤注意:確認鎖定桿被解除鎖定;可在打開圓形砂
紙磨光機之前通過撳兩三下鎖定桿進行
檢查-
維 護 和 檢 查
1. 檢查安裝螺釘
要經常檢查安裝螺釘是否緊固妥善-若發現螺釘鬆
了﹐應立即重新扭緊﹐否則會導致嚴重的事故2. 電動機的維護
電動機繞線是電動工具的心臟部-應仔細檢查有無
損傷﹐是否被油液或水沾濕3. 檢查碳刷(圖 4)
馬達使用碳刷﹐它是消耗部品﹐因為使用過久的碳
刷將會導致馬達故障﹐用具有相同碳刷號的新碳刷
去更換舊的﹐碳刷編號用數字表示碳刷何時用舊或
接近於磨損極限此外﹐要經常保持碳刷清潔以及保
証它在刷握裡能自由滑動4. 更換碳刷
用無頭螺絲刀卸下碳刷蓋﹐然後可以很容易地取下
碳刷5. 維修部件目錄
A: 項目號碼
B: 代碼號碼
C: 所使用號碼
D: 備注
5
注意:
日立電動工具的修理﹑維護和檢查必須由日立所認
可的維修中心進行當尋求修理或其他維護時﹐將本部件目錄與工具一
起提交給日立所認可的維修中心會對您有所幫助在操作和維護電動工具中﹐必須遵守各國的安全規
則和標准規定改進:
日立電動工具隨時都在進行改進以適應最新的技術
進步因此﹐有些部件(如﹐代碼號碼和/或設計)可能
未預先通知而進行改進注: 為求改進﹐本手冊所載規格可能不預先通告而
徑予更改-
1
1
1
1
1
1
1
1
1
2
1
1
1
1
1
1
1
1
2
2
1
1
2
1
1
1
D5 × 45
220V-230V “21, 26”
240V “21, 26”
220V-230V “21, 26”
“EUROPE, CHN”
D5 × 35
220V-230V
240V
6000DDCMPS2L
D5 × 55
“16”
“EUROPE”
6201DDCMPS2L
M14 “EUROPE”
D16
D14 “EUROPE”
C D
21 930-703 2
22 315-877 1
23 608-VVM 1 608VVC2PS2L
24 325-492 1 “35, 44-46”
25 ––––––––––– 1
26 980-063 1
27 ––––––––––– 1
28 325-481 1
29 305-499 2 M3.5 × 6
30 980-063 1 “EUROPE, CHN”
31 959-140 1 “INA, SIN”
32 305-409 1
33 945-161 2
34 999-043 2
B
953-381
953-246Z
953-255
953-247Z
944-005
325-501
325-502
620-1DD
939-542
309-778
325-499
325-498
600-0DD
325-477
360-758E
360-758F
325-474
994-322
323-209
937-033
325-500
325-483
992-509
340-656E
340-656F
340-656G
A
1-1
1-2
2-1
2-2
3
4-1
4-2
5
6
7
8
9
10
11
12-1
12-2
13
14
15
16
17
18
19
20-1
20-2
20-3
S18SB
984-750
937-631
953-327
–––––––––––
938-477
995-662
315-069
325-489
301-653
325-490
325-491
314-090
314-084
40
41
42
43
44
45
46
47
48
49
501
502-1
502-2
B
958-900
980-063
930-039
938-307
A
35
37
38
39
2
1
1 “EUROPE, CHN”
1 “EUROPE, MAL,
CHN”
2 D4 × 16
1
1 D8.8
1
2 M5 × 8
1
1
1
7 D4 × 20
1
1
1 180MM C-P50
1 180MM C-P16
“ESP”
C D
6
1
2
3
4
5
6
7
8
9
10
11
12-1
12-2
12-3
13
14
15
16
17
18
19
20-1
20-2
20-3
20-4
1
1
1
1
1
1
2
1
1
1
1
1
1
1
1
1
2
2
1
1
2
1
1
1
1
D5 × 45
110V “21, 26”
220V-230V “21, 26”
240V “21, 26”
220V-230V “21, 26”
“CHN”
D5 × 35
110V
220V-230V
240V
6000DDCMPS2L
D5 × 55
“16”
6201DDCMPS2L
C D
21 930-703 2
22 315-877 1
23 608-VVM 1 608VVC2PS2L
24 325-492 1 “35, 44-46”
25 ––––––––––– 1
26 980-063 1
27 ––––––––––– 1
28 325-481 1
29 305-499 2 M3.5 × 6
30 980-063 1 “CHN, TPE”
31 959-140 1 “INA, SIN, TPE”
32 305-409 1
33 945-161 2
34 999-043 2
35 958-900 2
37 980-063 1
B
953-381
935-652
944-005
325-501
620-1DD
939-542
309-778
325-499
325-498
600-0DD
325-477
360-758C
360-758E
360-758F
325-474
994-322
323-209
937-033
325-500
325-483
992-509
340-656D
340-656E
340-656F
340-656G
A
S15SB
A
38
39
40
41
42
43
44
45
46
47
48
49
501
502
B
930-039
938-307
984-750
937-631
953-327
–––––––––––
938-477
995-662
315-069
325-489
301-653
325-490
325-491
314-079
1
1
2
1
1
1
2
1
1
1
7
1
1
1
150MM C-P50
D4 × 20
M5 × 8
D8.8
“CHN, TPE”
“MAL, CHN”
D4 × 16
C D
7
8
Hitachi Koki Co., Ltd.
601
Code No. C99143931
Printed in Malaysia