1
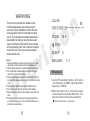
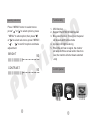
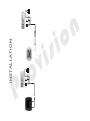
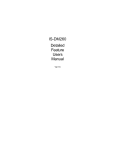
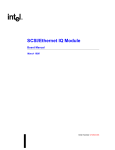
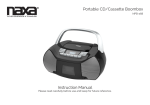
n
o
i
TFT LCD CAR MONITOR
o
r
P
s
i
v
Operating instructions
NOTICE:Please read the user manual carefully before
using this product
Specification
Type:TFT LCD
Screen size:7.0"
Display format : 16:9
Pillow Model:GMSP-007VS、GMSP-007AO
Pillow Specification:GS-10/130-180mm(Suitable
Tube / 12mm / 12.7mm)
GS-12/130-180mm(Suitable
Tube / 12.7mm / 14mm)
Power consumption: 8.5W
Power supply : DC 12V
Brightness:250 nits
System:PAL/NTSC/SECAM
Video input:V1/V2
Operation Temperature:-10℃~+60℃
Storage Temperature:-20℃~+70℃
Resolution:480(W)R/G/B×234(H)
o
r
P
Accessories
Manual
1 PC
Remote controller
1 PC
Installing tube
1 Pair
Packing cable
1 PC
Inserted piece
1 Pair
8
n
o
i
Dear User
Thanks a lot for your support and purchasing of our
TFT LCD headrest monitor. We appreciate your
purchase of our product. For maximum enjoyment
and prolonged life of this unit, we strongly recomm
-end you read this owner's manual in detail before
attempting to operate the unit. Please retain this
manual for future reference.
s
i
v
The unit you have purchased has the following
advantages
1、Radiation shielded
2、Power saving
3、High clarity of LCD screen
4、High Brightness/contrast
5、Wide view angle
6、Quick response time
7、On Screen Display (OSD) and Infrared Remote
Control
8、Multiple video/audio cabling options i.e.: VCD
/DVD, portable video camera, webcam, GPS
and portable electronic games
1
WARNING
o
r
P
50
--- - - -
s
i
v
Caution:
1. Please read these instructions carefully before oper
-ating the unit and observe the relevant warnings.
2. Please keep away from moisture and direct sunlight.
3. Do not attempt to disassemble or remodel the unit
yourself to avoid electric shock.
4. Please clean the display with a dry and soft cloth.Do
not clean the display with any alcohol or chemical clea
-nser.
5. Please ask a qualified engineer to install the unit.
6. Do not try to recharge the remote control battery.
7 Please keep the remote control battery away from chil
-dren.
8. The display may sometimes show pixels (light dots
or dark dots) during use. This isnormal and does not
indicate any malfunction.
2
n
o
i
COLOR
-
This unit is not intended for installation in the
front driver/passenger area where it may be
seen by the driver. Installation of this unit where
it may impair the driver's concentration is dang
-erous. The manufactureror retailer assumes no
responsibility for failing to obey the above warn
-ings.To reduce the risk of electric shock, please
do not exposethis unit to rain, moisture or attempt
to open the unit. There are no userserviceable
parts inside the unit.
ZOOM
16:9
SYSI
SLEEP
ENGLISH
0
中文
IR function
1. Audio IR Transmitter function: left transmi
-tter frequency: 2.3MHZ, right transmitter
frequency: 2.8MHZ
2.When the monitor is on, choose the visual
-audio channel to activate IRfunction. You
can control the volume by the earphone
■ Notice: IR function is optional
7
n
o
i
Functionality
operating instruction
Press " MENU" button to select menu:
press " " or " " to select options, press
"MENU" to enter option,then press " "
or " " to select sub-menu,press " MENU"、
" " 、 " " to confirm option and make
adjustment.
BRIGHT
s
i
v
50
------
-
o
r
P
CONTRAST
1、OSD function
2、Support PAL/NTSC/SECAM system
3、Blue panel function: if no signal, the panel
will be auto-shift to blue mode
4、Up down/ left right revolving
5、When the unit has no signal, the monitor
will auto-shift blue screen and in few minu
-tes, the monitor will shut down automati
-cally
Control panel
50
-
------
6
1
4:3
2
5
3
4
11 7 9
6 12 8 10
2
3 5 6 1 4 7 8 9 10
3
2
3 5 6 4 7
9 10
Method of wiring
Fuse 2A
s
i
v
Red to battery +12V
Black to grounding
o
r
P
Yellow to video1
Yellow to video2
White to audio1
Red to audio1
Remote control
LCD REMOTE
VIDEO
SELECT
Volume-
MENU
Reverse
MODE
SELECT
n
o
i
1.Power:Press this button for power On or Off.
2.Video Select:Press this button to switch
Video 1 or Video 2 inputs.
3.Menu:Enter to function menu.
4." " and " ":Navigate through the various
menu options.
5.Reverse:up down/left right revoling
with diagram.
▲
2、IR
4、Menu
6、Power switch
8、Remote window
10、Earphone
12、Reverse
▲
1、PI Power indicator
3、Function5、Function+
7、V 1 / V 2
9、Audio/Video Input
11、Screen display format
Guide for pole adjustment
1. take apart the screw
2. adjust the steel pipes
(left or right)
Power
Video Select
Volume+
Menu
4
3. fix the screw
4. connect the cable
for complete
5
-
+
+12V
BETTER
Fuse2A
Black to grounding
Red to 12V( +)
Yellow
White
Red to audio1
4:3
Red White
Red
Yellow to video2
Fuse2A
+
-
+12V
BETTER
o
r
P
Black to grounding
Red to 12V(+)
Yellow to video1
Yellow to video2
Red to audio1
4:3
Yellow
White
Red White
Yellow
White to audio1
Red
INSTALLATION
Yellow
White to audio1
Yellow to video1
s
i
v
n
o
i