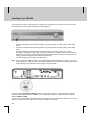
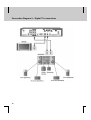
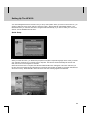
1
ATSC Digital TV Receiver
HFA100
Operating Manual
**
**
**
**
**
Important Information
**
Dolby Digital is a registered trademark of Dolby Corporation.
Digital Light Processing and DLP are registered trademarks of Texas Instruments Corporation.
**
Repairs and Warranty Service
**
Should your HFA100 require warranty service, please contact Humax first to obtain authorization. You can
reach us at 866.humax.usa, 17501 Von Karman Avenue, Irvine, CA 92614, or by visiting our website at
http://www.humaxusa.com/support.html.
**
**
**
**
**
**
**
**
**
**
1
**
**
**
**
**
Important Information
**
**
THIS SYMBOL IS INTENDED TO ALERT THE USER TO THE PRESENCE OF
UNINSULATED “DANGEROUS VOLTAGE” WITHIN THE PRODUCTS ENCLOSURE THAT
MAY BE OF SUFFICIENT MAGNITUDE TO CONSTITUTE A RISK OF ELECTRIC SHOCK TO
PERSONS.
**
THIS SYMBOL IS INTENDED TO ALERT THE USER TO THE PERSENCE OF INPORTANT
OPERATING AND MAINTENANCE (SERVICING) INSTRUCTIONS IN THE LITERATURE
ACCOMPANYING THE APPLIANCE.
**
WARNING: TO REDUCE THE RISK OF FIRE OR ELECTRIC SHOCK. DO NOT
EXPOSE THIS APPATATUS TO RAIN OR MOISTURE.
**
1. Read these instructions.
2. Keep these instructions.
**
**
3. Heed all warnings.
4. Follow all instructions.
5. Do not use this apparatus near water.
6. Clean only with dry cloth.
7. Do not block any ventilation openings. Install in accordance with the manufacturer’s instructions.
8. Do not install near any heat sources such as radiators, heat registers, stoves, or other apparatus
(including amplifiers) that produce heat.
9. Do not defeat the safety purpose of the polarized or grounding-type plug. A polarized plug has two
blades with one wider than the other. A grounding type plug has two blades and a third grounding
prong. The wide blade or the third prong are provided for your safety. If the provided plug does not fit
into your outlet, consult an electrician for replacement of the obsolete outlet.
10. Protect the power cord from being walked on or pinched particularly at plugs, convenience receptacles,
and the point where they exit from the apparatus.
11. Only use attachments/accessories specified by the
manufacturer.
12. Use only with the cart, stand, tripod, bracket, or table specified
by the manufacturer, or sold with the apparatus. When a cart is
used, use caution when moving the cart/apparatus combination
to avoid injury from tip-over.
13. Unplug this apparatus during lightning storms or when unused
for long periods of time.
**
**
**
**
**
**
**
**
2
**
**
**
**
**
**
**
14. Refer all servicing to qualified service personnel. Servicing is required when the apparatus has been
damaged in any way, such as power-supply cord or plug is damaged, liquid has been moisture, does
not operate normally, or has been dropped.
15. The apparatus shall not be exposed to dripping or splashing and that no objects filled with liquids, such
as vases, shall be placed on the apparatus.
**
This device complies with part 15 of the FCC Rules. Operation is subject to the following two
conditions:
**
INFORMATION TO THE USER
This equipment has been tested and found to comply with the limits for a Class B digital device, pursuant to
part 15 of the FCC Rules. These limits are designed to provide reasonable protection against harmful
interference in a residential installation. This equipment generates, uses and can radiate radio frequency
energy and, if not installed and used in accordance with the instructions, may cause harmful interference to
radio communications. However, there is no guarantee that interference will not occur in a particular
installation. If this equipment does cause harmful interference to radio or television reception, which can be
determined by turning the equipment off and on, the user is encouraged to try to correct the interference by
one more of the following measures:
- Reorient or relocate the receiving antenna.
- Increase the separation between the equipment and receiver.
- Connect the equipment into an outlet on a circuit different from that to which the receiver is connected.
**
- Consult the dealer or an experienced radio/TV technician for help.
**
**
(1) This device may not cause harmful interference, and
(2) This device must accept any interference that may cause undesired operation.Caution
**
Caution: FCC regulations state that any unauthorized changes or modifications to this equipment may void
the user’s authority to operate it.
**
**
**
**
**
**
**
**
3
**
**
**
**
**
HUMAX HDTV Tuner Limited Warranty
**
We thank you for having bought this Humax product and hope you will enjoy it for many years. In order to
avoid any unnecessary inconvenience on your part, we suggest reading the instruction manual carefully
before contacting our customer care department. Also keep the original box and packing material in case you
need to return or repair your product.
**
Limited 90 Days Warranty
**
Humax warrant the product to be free from defects in materials and workmanship, Humax warrant this product
against defects in materials or workmanship for a period of ninety (90) days after the date of original retail
purchase. During this period Humax will repair or replace a defective product or part, at its discretion, with a
new or refurbished product or part without charge to you. You are responsible for all shipping and insurance
charges for the unit to the Authorized Service Center. Upon receipt we will at our option exchange the unit with
a new or refurbished unit.
**
Limited One (1) Year Warranty
**
Humax warrant the product to be free from defects in materials and workmanship, Humax warrant this product
against defects in materials or workmanship for a period of one (1) year after the date of original retail
purchase. During this period Humax will repair or replace a defective product or part without charge to you,
except that if a defective part is replaced after ninety (90) days from the date of the original retail purchase
you shall pay labor charges involved in the replacement. You are responsible for all shipping and
insurance charges for the unit to the Authorized Service Center. Upon receipt we will at our option exchange
the unit with a new or refurbished unit.
**
**
**
Conditions
**
1. This warranty will be granted only when the original invoice or sales receipt (indicating the date of
purchase, product type and dealer’s name) is presented together with the defective product. Humax
reserves the right to refuse free-of-charge warranty service if the above document cannot be presented
or if the information contained in it is incomplete or illegible.
2. This warranty will not reimburse nor cover the damage resulting from adaptations or adjustments which
may be made to the product, without the prior written consent of Humax, in order to conform to the
national or local technical or safety standards in force in any country other than the ones for which the
product was originally designed and manufactured.
3. This warranty will not apply if the type or serial number on the product has been altered, deleted,
removed or made illegible.
**
**
**
**
**
**
**
**
4
**
**
**
**
**
**
**
4. This warranty covers none of the following:
**
•
Periodic maintenance and repair or replacement of parts due to normal wear and tear;
•
Any adaptation or changes to upgrade the product from its normal purpose as described in the
instruction manual, without the prior written consent of Humax;
•
Transport costs, home service transport cost and all risks of transport relating directly or indirectly
to the guarantee of the product;
•
Damage resulting from: (i) misuse, including but not limited to (a) failure to use the product for its
normal purpose or in accordance with Humax’ instructions on the proper use and maintenance, and
(b) installation or use of the product in a manner inconsistent with the technical or safety standards
in force in the country where it is used and (c) improper or incorrect installation of software; (ii)
repair done by non-authorized service stations or dealers, or the customer himself; (iii) accidents,
lightning, water, fire, improper ventilation or any cause beyond the control of Humax; (iv) defects of
the system into which this product is incorporated.
5. This warranty does not affect the consumer’s statutory rights under applicable national laws in force,
nor the consumer’s rights against the dealer arising from their sales/purchase contract.
6. THERE ARE NO EXPRESS WARRANTIES OTHER THOSE LISTED AND DESCRIBED ABOVE. AND
NO WARRANTIES WHETHER EXPRESS OR IMPLIED, INCLUDING, BUT NOT LIMITED TO, ANY
IMPLIED WARRANTIES OF MERCHANTABILITY OR FITNESS FOR A PARTICULAR PURPOSE,
SHALL APPLY AFTER THE EXPRESS WARRATY GIVEN BY ANY PERSON, FIRM, OR
CORPORATION WITH RESPECT TO THIS PRODUCT SHALL BE BINDING ON Humax.
7. Humax shall not be liable for loss of revenue or profits, failure to realize saving or other benefits, or any
other special, incidental or consequential damages caused by the use, misuse or inability to use this
product, regardless of the legal theory on which the claim based, and even if Humax has been advised
of the possibility of such damages. Nor shall recovery of any kind against Humax be greater in amount
than the purchase price of the product sold by Humax and causing the alleged damage. Without
limiting the foregoing, purchaser assumes all risk and liability for loss, damage to purchaser and
purchaser’s property and to others and their property arising out of the use, misuse or inability to use
this product sold by Humax not caused directly by the negligence of Humax. This limited warranty shall
not extend to anyone other than the original purchaser of this product, is nontransferable and states
your exclusive remedy.
**
**
**
Where states do not allow limitation on how long an implied warranty lasts, or the exclusion or limitation of
incidental or consequential damages, the above limitations or exclusions may not apply to you. In this case
this warranty gives specific legal rights and you may also have other rights which vary from state to state.
**
To obtain warranty service, please contact HUMAX at:
**
17501 Von Karman Avenue, Irvine, CA 92614 HUMAX USA, Inc.
Tel: 866.humax.usa
Http://www.humaxusa.com
**
**
**
**
**
**
**
**
5
**
**
**
**
**
Contents
**
Humax HFA100 Digital TV Receiver
7
**
What Is Digital Television?
8
**
Installing Your HFA100
9
**
Connection Diagram 1 – Analog TV connections
11
**
Connection Diagram 2 – Digital TV connections
12
**
Setting Up The HFA100
13
**
HFA100 Menus
16
**
How To Use The Menus
17
**
Remote Control Operation
21
**
Remote Control Functions
22
**
Troubleshooting
24
**
Frequently Asked Questions (FAQs)
25
**
**
IR Codes For Compatible TVs
26
**
**
Specifications
**
**
**
29
**
**
**
**
**
6
**
**
**
**
**
HUMAX HFA100 Digital TV Receiver
**
**
The HFA100 is a fully featured, ATSC-compliant digital television (DTV) receiver. It will decode and display
free, over-the-air digital TV broadcasts that use the VSB modulation standard.
**
These broadcasts include both standard-definition television (SDTV) and high-definition television (HDTV)
programs with digital audio, multiple language tracks, and electronic program guide (EPG) information.
**
The HFA100 can be used with both HDTV-ready and analog TVs that accept the 480i, 480p, 720p, and 1080i
DTV display formats.
**
Input Connections:
•
F-type connector for antenna input
**
Output Connections, Video:
**
•
Analog component YPbPr and RGB video outputs
•
Analog composite and S-video outputs
•
HDMI (High-Definition Multimedia Interface)
**
**
Output Connections, Audio:
•
Two pairs of RCA jacks for stereo analog audio
•
Optical (SPDIF) and coaxial digital audio
**
Features:
•
Automatic channel scan and mapping
•
Selectable picture aspect ratios for 4:3 and 16:9 TV screens
•
Support for electronic program guide (EPG) *
•
Support for closed-caption information *
•
Auto-resolution circuit for HDMI-compatible TVs
**
* Where available
**
**
**
**
**
**
**
**
7
**
**
**
**
**
What Is Digital Television?
**
Digital television (DTV) is a new way of transmitting high-quality video and audio to your TV set. Using DTV,
broadcasters can transmit high-definition TV (HDTV) images, Dolby Digital surround audio, and services such
as multicasting (more than one program on the same channel) and datacasting (electronic program guides
and interactive television). Several of these services can be combined into a single digital broadcast.
**
DTV programs are broadcast in both standard definition television (SDTV) or high definition television (HDTV)
formats.
**
SDTV programs are available either as 480-line interlaced (480i) or progressive-scan (480p) video.
Widescreen SDTV programs in the 480p format are similar to progressive-scan DVD movies and have
improved image detail over 480i programs.
**
HDTV programs are broadcast either in the 1080-line interlaced (1080i) or 720-line progressive (720p)
formats, always in widescreen. Both formats offer much higher picture quality than SDTV.
**
With DTV, you can listen to both Dolby Digital 2.0 stereo and Dolby Digital 5.1 surround audio through your
audio system, as well as multiple language tracks.* In addition, DTV will allow you to interact with your
television, choosing programs from a detailed electronic guide or accessing ancillary data about a program.
**
* Where available
**
**
**
**
**
**
**
**
**
**
8
**
**
**
**
**
Installing Your HFA100
**
Follow these instructions to install your HFA100 digital television receiver.
**
**
Input Connections
**
Connect an antenna to the F-type connector on the rear of the HFA100. This antenna can be mounted on a
roof, in an attic, or another appropriate location. It should be aimed towards local DTV broadcast stations for
best results.
DTV stations broadcast on both VHF (2-13) and UHF (14-69) channels. Make sure to use an antenna that
works at the desired frequencies so the HFA100 can pick up any DTV broadcasts on those channels. (See
appendix for local DTV broadcast channel information.)
**
**
**
Output Connections
**
First, see if your TV has an HDMI input connector, a special all-digital interface that provides the highest
picture quality. If so, you will want to connect an optional HDMI interface cable from the HFA100 to your TV's
HDMI input.
If an HDMI input connector is not present, then connect an analog component video cable from the output
jacks on the rear of the HFA100 to your TV's component video inputs. You may use either a three-wire
(YPbPr) cable or a five-wire RGB cable, depending on which connectors are available on your TV.
If you are using a standard analog TV that does not have component video inputs, connect either a S-video or
composite (yellow) cable from the HFA100 to your analog TV.
For digital audio connections, use either the coaxial RCA or optical Toslink connector to bring Dolby Digital
audio to your TV or AV receiver. If digital audio connections are not available, use either of the pair of stereo
RCA jacks to connect audio to your TV.
**
**
**
**
**
**
**
**
9
**
**
**
**
**
Installing Your HFA100
**
The next step is to set the output resolution, using the front panel buttons on the HFA100. First, turn on the
HFA100 and wait until the green POWER ON indicator lights up.
**
**
•
For HDTV-ready direct-view and rear-projection TVs using cathode ray tubes (CRTs), select 1080i
output.
•
For EDTV-ready direct-view and rear-projection TVs using cathode ray tubes (CRTs), select 480p
output.
•
For plasma and large LCD flat panel TVs and rear-projection TVs using LCD, LCoS, or DLP
technology, select 480p or 720p output. Check your TV's owner's manual to find its native resolution
specification, and use the output format that is closest. (Some new flat-panel and rear-projection TVs
coming to market will support 1920x1080 native resolution.)
•
For older analog TVs (non-HDTV), use 480i output.
**
**
Note: If you are using the HDMI connection and AUTO RESOLUTION is turned on in the menu, you do not
need to specify an output resolution. Your HMDI-equipped TV will automatically configure the HFA100
for the optimum output resolution. Refer to page 16 for more details.
**
**
**
Set the rear panel DTV OUTPUT SELECT switch to match your connection. For a three-wire component
video connection, slide the switch to YPbPr. For a 15-pin RGB connection or HDMI connection, slide the
switch to HDMI and RGB.
Turn on your TV and select the appropriate video input where you have connected the HFA100. You are now
ready to set up the receiver to watch free, over-the-air digital TV broadcasts.
**
**
**
**
**
**
**
**
10
**
**
**
**
**
Connection Diagram 1 – Analog TV connections
**
**
**
**
**
**
**
**
**
**
**
11
**
**
**
**
**
Connection Diagram 2 – Digital TV connections
**
**
**
**
**
**
**
**
**
**
**
12
**
**
**
**
**
Setting Up The HFA100
**
Your HFA100 digital television receiver is easy to set up and operate. When you first turn the receiver on, you
will see a Welcome menu screen with two choices for setup – QUICK SETUP and GUIDED SETUP. Use
QUICK SETUP if you want the HFA100 to configure itself automatically. If you want to make your own menu
choices, use the GUIDED SETUP menu.
Quick Setup
**
**
**
When you enter this menu, you will first be prompted for English or Spanish language menus. After you make
your selection and enter OK, no further action is required. The HFA100 will automatically set the time and
date, then scan for active digital TV channels.
**
When this channel scan is complete, the SETUP COMPLETED menu will appear. This menu will show you
the time zone and daylight savings selections as well as the total number of digital TV programs detected and
saved into memory. Select DONE to leave this menu and start watching digital TV broadcasts.
**
**
**
**
**
**
**
**
**
13
**
**
**
**
**
Setting Up The HFA100
**
Guided Setup
**
When you enter this menu, you will first be prompted for English or Spanish language menus. After you make
your selection and enter OK, you will be asked for your time zone. Scroll through the available choices to
highlight your time zone and push OK.
The next menu will ask you if Daylight Savings Time is observed in your area. Select ON or OFF as required
(or select AUTO if you aren’t sure), then press OK.
Now you are ready to scan for active digital TV broadcasts. The SCAN CHANNELS menu will appear. Make
sure your antenna is connected to the RF input jack on the rear of the HFA100, select START, and push OK.
**
**
**
**
The HFA100 will scan channels 2 through 69 and save any active DTV channels it finds into memory, along
with electronic program guide (EPG) information for each channel. This process will take several minutes and
a progress bar will show you when it is complete.
Push OK to step to the Channel Edit menu. Here, you can save or delete channels as you wish from the
previous channel scan. Push OK when done.
You will now see the SETUP COMPLETED menu. This menu will show you your time zone and daylight
savings selections as well as the total number of digital TV programs detected and saved into memory. Select
DONE to leave this menu and start watching digital TV broadcasts.
**
**
**
**
**
**
**
**
14
**
**
**
**
**
**
**
The HFA100 lets you customize its settings for your particular TV. By pressing the MENU button, you can
choose between four sub-menus: SETUP, OPTION, CAPTION, and PARENT.
**
**
The SETUP menu is where you will set your time zone, turn daylight savings time on or off, scan for active
DTV channels, add other channels manually, edit the list of your scanned and memorized channels, and
check the signal strength of any channel.
**
**
**
**
The OPTION menu is where you will choose the picture aspect ratio to match your TV, pick a screen format
for showing programs that do not match the shape of your TV screen, turn the AUTO RESOLUTION feature
on or off for an HDMI connection (see page 10), choose the default audio language track,* and set the digital
audio output format.
**
* Where available
**
**
**
**
**
**
**
**
15
**
**
**
**
**
HFA100 Menus
**
**
The CAPTION menu is where you can activate closed-caption services* and customize how that text will
appear on your TV screen.
**
**
**
**
The PARENT menu contains information on TV ratings and allows you to pass or block TV programs and
movies based on specific ratings.
This menu is password protected and the default password setting is 0 0 0 0.
**
* Where available
**
**
**
**
**
**
**
**
16
**
**
**
**
**
How To Use The Menus
**
**
SETUP Menu
**
Menu Language
Choose between English or Spanish. Default setting is ENGLISH.
**
Time Zone
**
**
Select your local time zone from the list provided. Default setting is EASTERN (-5:00).
**
Daylight Savings Time
Turn Daylight Savings Time on and off as needed, or select Auto if you aren't sure. Most DTV stations
transmit System Timetable (STT) data that will automatically update the time and date information in the
HFA100. Default setting is OFF.
**
Scan Channels
This menu will start a complete scan from channels 2 through 69. The HFA100 will save any active DTV
channels it finds into memory, along with electronic program guide (EPG) information for each channel. This
process will take several minutes and a progress bar will show you when it is complete.
**
Manual Channel Add
Selecting this menu will bring up a graphic of all available digital TV channels. Active DTV channels found
during a scan will appear in blue. If you believe an active channel has not been scanned by the HFA100,
simply highlight that channel and push the OK button on the remote. If a signal is present, the HFA100 should
find it and save it into memory.
**
Edit Channel List
Use this menu to add or skip DTV channels from your channel list as you wish.
**
Signal Strength
This menu displays the relative signal quality of the channel being viewed.
**
**
**
**
**
**
**
**
17
**
**
**
**
**
How To Use The Menus
**
OPTION Menu
**
TV Aspect Ratio
Select either 4:3 or 16:9 to match the shape of your TV screen. Default setting is 16:9.
**
Screen Format
This menu lets you choose how programs will appear when they do not match the shape of your TV screen.
Choices include Pillar Box, Letter Box, Full, or Zoom. Default setting is FULL.
**
Auto Resolution
When turned on, the HFA100 will automatically configure the optimum output resolution to match your
connected HDMI-compatible TV. Default setting is OFF.
**
HDMI Video Out
This menu lets you configure the default video signal format (RGB/YPbPr) through HDMI output. If Auto is
selected, the HFA100 will automatically configure the optimum output (RGB or YPbPr) signal to match your
connected HDMI-compatible TV. Default setting is AUTO.
**
TV Offset
**
This menu lets you adjust the horizontal position of the image when using the RGB or HDMI output connectors
only. It does not work in component (YPbPr) mode. Default setting is 0.
**
**
Audio Language
Some broadcasters transmit more than one language track. If multiple language tracks are available, you can
set default audio language by the menu.
Default setting is ENGLISH.
**
Digital Out
This menu lets you choose between PCM and Dolby Digital AC-3 audio formats. The DTV standard is Dolby
Digital. You can also select AUTO if you are not sure. Default setting is AUTO.
**
**
**
**
**
**
**
**
18
**
**
**
**
**
**
**
CAPTION Menu
**
Display
This function turns closed captioning on or off. Default setting is OFF.
**
Set By Program
The HFA100 will automatically detect captioning styles from channel to channel this option is selected. Default
setting is OFF.
**
Font Size
Select smaller or larger text font sizes for captions. Default setting is LARGE.
**
Font Style
Change the type font style for captions. Default setting is FONT 3.
**
Foreground Color
Choose a color for the caption text. Default setting is WHITE.
**
**
Background Color
**
Choose a color for the background. Default setting is BLACK.
**
Digital Option
Choose one of six digital closed-captioning options.* Default setting is SERVICE 1.
**
* Where available
**
**
**
**
**
**
**
**
19
**
**
**
**
**
How To Use The Menus
**
PARENT Menu
**
Lock System
You can lock out the parental controls menu here if you wish. Default setting is OFF.
**
Change Password
Change the four-digit password to access the PARENT menu. Default setting is 0 0 0 0.
**
Movie Rating
Select movie ratings you wish to allow or block. Default setting allows viewing of movies with ratings to “R”.
**
TV Rating
Select TV program ratings you wish to allow or block. Default setting is TV-14.
**
TV Rating Of None
Viewing of programs transmitted with a rating of ‘None’ (none, blank, or not available) can be allowed or
blocked with parental controls. Note that programs carrying ‘No Rating’ data cannot be blocked.
Default setting is ALLOW.
**
**
**
**
**
**
**
**
**
**
20
**
**
**
**
**
Remote Control Operation
**
**
**
**
**
**
**
**
**
**
**
21
**
**
**
**
**
Remote Control Functions
**
MUTE
Push to mute audio on your TV if controlled by the HFA100 remote.
**
FORMAT
This button lets you change the picture aspect ratio, depending on the program format.
**
CH ADD/SKIP
Add a channel you are watching to memory, or delete it from memory.
**
SIGNAL
Check signal quality of the program you are watching.
**
TV/INPUT
Change input of your TV if controlled by the HFA100 remote.
**
TV/STB
Toggle between control of the HFA100 and your TV. Use IR programming codes on pages
**
INFO
**
Push this button to find out a DTV station's virtual channel (such as 3-1) and callsign. Depending on how
much EPG information the station is transmitting, you may also see the program name, rating, current time,
and program interval. Pushing INFO a second time will show a description of the program* as well as the
video format, audio format, and whether multiple language tracks are present.
**
**
MENU
Push this button to access the HFA100 menus (described on pages 14-18).
**
CH LIST
Push this button to see a list of DTV channels saved into memory. You can select any channel by scrolling to
it and pushing the OK button.
**
GUIDE
This button brings up an electronic program guide window. The current program is displayed in a small
window, while information on the station, the current time and date, the program name and description, and
program interval appear to the left.
If the broadcaster is providing detailed program guide information,
INFO button to view the detailed information.
will appear at the bottom. Press
**
* Where available
**
**
**
**
**
**
**
**
22
**
**
**
**
**
**
**
BACK
Returns you to the previous channel or menu selected.
**
FREEZE
Freezes the image on the screen when pushed. Push again and normal display mode returns.
**
AUDIO
Push to select alternate audio language tracks. Available track choices will be displayed.
**
EXIT
Push to exit any menus at any time.
**
VOL +/Push to change volume on your TV if controlled by the HFA100 remote.
**
CH +/Push to change channels on the HFA100 (STB mode) or on your TV set (TV mode).
**
Closed Caption
**
**
This button toggles closed caption on or off.
**
**
**
**
**
**
**
**
23
**
**
**
**
**
Troubleshooting
**
If you experience difficulty with your HFA100 DTV receiver, there are several possibilities you should
investigate before calling for service.
**
1. Problem: Intermittent signal or no signal at all.
Possible Solutions: Try another channel. Make sure the antenna is connected. If using a powered
antenna, turn the power boost on. You may also want to rotate the antenna for a stronger signal, using
the signal strength menu as a guide.
**
2. Problem: Poor sound quality or no sound heard at all.
Possible Solutions: Make sure audio connections are correct. Try another channel to see if it is a
broadcaster problem. Make sure the MUTE button on your TV is off. Try both analog and digital
(coaxial, optical) audio connections.
**
3. Problem: No color is seen, or wrong colors appear.
Possible Solutions: Make sure you have connected the HFA100 correctly to your DTV-ready or
analog TV set. For a three-wire component connection, match the red, green, and blue cables from the
HFA100 to your TV.
**
4. Problem: Remote control doesn't work correctly.
Possible Solutions: Make sure you have fresh batteries installed correctly in your remote. Also, push
the STB button on the remote.
**
**
**
**
**
5. Problem: The HFA100 won't turn on.
Possible Solutions: Make sure the HFA100's power plug is installed and that the AC outlet is working.
Check the batteries in the remote control to make sure they are fresh and installed correctly.
**
**
**
**
**
**
24
**
**
**
**
**
Frequently Asked Questions (FAQs)
**
1. Do I need a different antenna for DTV reception?
Over-the-air (OTA) digital TV broadcasting uses the same channels as analog TV and should work with
existing TV antennas. However, DTV broadcast channels are different from analog channels. You
should find out whether your local DTV broadcasts are on VHF (channels 2-13) or UHF (channels
14-69) to see if you need a different antenna.
**
**
If your DTV channels are on UHF and you already have good UHF reception, your present antenna
may work fine. The same holds true for VHF DTV reception. In some markets, both VHF and UHF
channels are used for DTV broadcasts.
**
You can find out the current DTV channel assignments for your area on any of these web sites:
**
•
www.titantv.com
•
www.transmitter.com
•
www.100000watts.com
•
www.nab.org
•
www.tvradioworld.com
**
2. How difficult is it to get indoor DTV reception?
This depends on whether your local DTV stations are running full power, and how close you are to the
transmission tower. DTV receivers do not require as much signal as analog TV receivers to produce
high-quality images and sound.
**
**
**
Once the DTV signal level exceeds a certain threshold at the receiver, the digital video and audio data
are decoded at the same quality they were originally encoded for broadcast. This is a big advantage for
DTV over analog TV, since there is no noise, ghosting, static, or scratchy audio.
**
**
3. How can I put up an antenna in my townhouse?
The Telecommunications Act of 1996 allows residents of condominiums or townhouses, or members of
neighborhood associations to put up outside antennas for reception of broadcast TV signals as long as
those antennas are not located in common areas and are less than 12' in height.
**
**
Residents of rental units (apartments, etc.) are not covered by these rules and must use indoor
antennas (powered or not) to receive DTV broadcasts. If you live in an apartment, check to see if
over-the-air DTV reception is possible from a master antenna system (MATV).
**
4. Can I connect the HFA100 to watch digital cable TV?
Cable TV systems use a different method for transmitting digital TV programs that is not compatible
with the HFA100. Only an outdoor or indoor antenna will receive compatible DTV programs.
**
**
**
**
**
**
**
**
**
25
**
**
**
**
**
IR Codes For Compatible TVs
**
To program the HFA100 remote control for your TV, locate the appropriate three-digit code from the following
list. You may have to try more than one code for your brand of TV to enable the remote.
**
**
1. Push the TV button on the remote and hold. The TV LED indicator will flash once.
2. After three seconds, the TV LED indicator will turn on. Continue to push the TV button.
3. While pushing the TV button, enter the three-digit IR code for your TV from the table.
4. After you have entered the last digit, release the TV button. The TV LED will blink twice to confirm your
entry.
5. If you have entered the correct code, your TV will turn on or off.
6. If your TV does not respond, repeat steps #1 through #3 until it does.
**
**
**
**
**
**
**
**
**
**
**
26
**
**
**
**
**
IR Codes For Compatible TVs
**
**
**
**
**
**
**
**
**
**
**
27
**
**
**
**
**
IR Codes For Compatible TVs
**
**
**
**
**
**
**
**
**
**
**
28
**
**
**
**
**
Specifications
**
Frequency Range:
Channels 2-13 (VHF), 14-69 (UHF)
**
Compatible input signals:
ATSC format (VSB modulation) digital TV signals
**
Input connections:
(1) F-type RF input, 75 ohms
**
Output connections:
3x RCA jacks, YPbPr component video (480i/p, 720p, 1080i)
15 Pin D-Sub jack, RGB video (480i/p, 720p, 1080i)
HDMI connection (480p, 720p, 1080i)
1x RCA jack, composite video (480i)
4 Pin Mini-DIN jack, S-video (480i)
**
Supported Output Signal Formats:
720x480i/p, 1280x720p, 1920x1080i
**
Dimensions:
**
Size: 12.2" x 9.3" x 2.4" (WDH)
**
Weight: Around 4.09 Lbs
**
Power:
AC 120V~ (60Hz), 18W
**
**
**
**
**
**
**
**
29
HHFA100.300
17501 Von Karman Avenue, Irvine, CA 92614
tel: 866.humax.usa
http://www.humaxusa.com