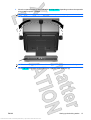
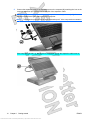
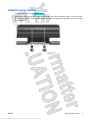
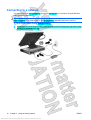
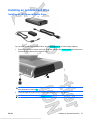
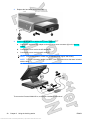
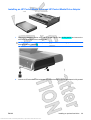
1
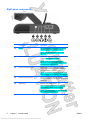
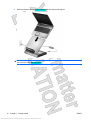
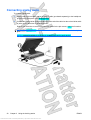
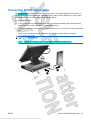
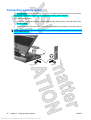
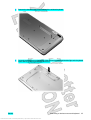
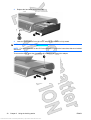
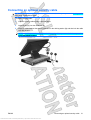
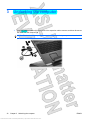
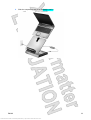
HP xb4000 Media Notebook Docking Station
User Guide
Antenna House XSL Formatter (Evaluation) http://www.antennahouse.com/
© Copyright 2008 Hewlett-Packard
Development Company, L.P.
Microsoft and Windows are U.S. registered
trademarks of Microsoft Corporation.
The information contained herein is subject
to change without notice. The only
warranties for HP products and services are
set forth in the express warranty statements
accompanying such products and services.
Nothing herein should be construed as
constituting an additional warranty. HP shall
not be liable for technical or editorial errors
or omissions contained herein
First Edition: April 2008
Document Part Number: 463778–001
Antenna House XSL Formatter (Evaluation) http://www.antennahouse.com/
Table of contents
1 Getting started
Identifying components ........................................................................................................................ 2
Front panel components ...................................................................................................... 2
Bottom components ............................................................................................................. 3
Rear panel components ....................................................................................................... 4
Right panel components ...................................................................................................... 6
Left panel components ........................................................................................................ 7
Setting up the docking station .............................................................................................................. 8
Step 1: Adjusting the docking station ................................................................................... 8
Step 2: Connecting to AC power ....................................................................................... 10
Step 3: Docking the computer ........................................................................................... 11
2 Using the docking station
Docking station guidelines .................................................................................................................. 16
Adjusting the volume .......................................................................................................................... 17
Connecting to a network ..................................................................................................................... 18
Connecting video ................................................................................................................................ 19
Connecting analog audio .................................................................................................................... 20
Connecting S/PDIF digital audio ........................................................................................................ 21
Connecting auxiliary audio ................................................................................................................. 22
Connecting a wireless mouse and keyboard ...................................................................................... 23
Connecting a secondary computer to the docking station .................................................................. 26
Installing an optional hard drive .......................................................................................................... 27
Installing an HP Personal Media Drive .............................................................................. 27
Installing an HP Pocket Media Drive and HP Pocket Media Drive Adapter ....................... 29
Connecting an optional security cable ................................................................................................ 31
3 Undocking the computer
4 Troubleshooting
Solving common problems ................................................................................................................. 34
General use and connection problems .............................................................................. 34
Audio problems .................................................................................................................. 35
Video problems .................................................................................................................. 36
ENWW
Antenna House XSL Formatter (Evaluation) http://www.antennahouse.com/
iii
Getting more information .................................................................................................................... 36
Contacting technical support .............................................................................................................. 37
Index ................................................................................................................................................................... 38
iv
Antenna House XSL Formatter (Evaluation) http://www.antennahouse.com/
ENWW
1
Getting started
NOTE: The docking station may have features that are not supported by your computer. For
information on supported signals that are transmitted through your computer expansion port, refer to
your computer user guides.
ENWW
Antenna House XSL Formatter (Evaluation) http://www.antennahouse.com/
1
Identifying components
Front panel components
(1)
Component
Description
Power button
Provides hibernation and restores full power to a docked
computer.
After the computer is docked, the power button on the
docking station acts just like the computer power button,
utilizing the computer power management settings.
(2)
Power status light
On: The docking station is connected to AC power.
(3)
Volume mute button
Mutes and restores docking station sound.
(4)
Volume scroll zone
Adjusts speaker volume.
Slide your finger to the left to decrease volume and to the
right to increase volume. You can also tap the minus sign
on the scroll zone to decrease volume, or tap the plus
sign on the scroll zone to increase volume.
(5)
2
Speakers (2)
Produce stereo docking station sound.
Chapter 1 Getting started
Antenna House XSL Formatter (Evaluation) http://www.antennahouse.com/
ENWW
Bottom components
Component
Description
(1)
Vent
Enables airflow to cool internal components.
(2)
Subwoofer
Produces docking station low-audio frequency sound.
ENWW
Antenna House XSL Formatter (Evaluation) http://www.antennahouse.com/
Identifying components
3
Rear panel components
Component
Description
(1)
Power connector 1 light
On: The docking station is on.
(2)
Power connector 1
Connects the docking station to a Smart AC
adapter.
(3)
Power connector 2 light
On: The docking station is on.
(4)
Power connector 2
Connects the docking station to a standard AC
adapter.
(5)
USB ports (4)
Connect optional USB devices.
Power is always on to all USB ports when the
docking station is connected to AC power.
NOTE: There are 2 additional USB ports on the
right panel of the docking station.
4
(6)
RJ-45 (network) jack
Connects an Ethernet network cable.
(7)
External monitor port
Connects an optional external VGA monitor or
projector.
(8)
S/PDIF (Sony/Philips Digital Interface)
digital audio jack
Connects an optional compatible audio/video
receiver through a digital coaxial cable (purchased
separately).
(9)
Hard drive power connector
Connects an optional HP Personal Media Drive to
additional external AC power, if desired.
Chapter 1 Getting started
Antenna House XSL Formatter (Evaluation) http://www.antennahouse.com/
ENWW
Component
Description
(10)
Expansion cable
Docks a computer.
(11)
Good dock connection light
On: The computer is correctly docked.
(12)
Security cable slot
Attaches an optional security cable to the docking
station.
NOTE: The security cable is designed to act as a
deterrent, but it may not prevent the docking station
from being mishandled or stolen.
(13)
Hard drive carrier screw
ENWW
Antenna House XSL Formatter (Evaluation) http://www.antennahouse.com/
Secures the hard drive carrier for the optional
internal hard drive.
Identifying components
5
Right panel components
(1)
Component
Description
PC port
The (USB type B) PC port connects an optional
secondary computer to the docking station.
NOTE: Do not use the PC port as a printer
connection.
(2)
Auxiliary audio jack
Connects an optional MP3 player or other audio
device to docking station speakers.
NOTE: When an auxiliary audio device is
connected, control docking station speakers with
the audio device volume controls.
(3)
Audio-out (headphone) jack
Produces sound when connected to optional
external powered stereo speakers, headphones,
ear buds, headset, or television audio.
NOTE: The docking station speakers are muted
when a device is connected to the headphone jack.
(4)
Audio-in (microphone) jack
Connects an optional computer headset
microphone, stereo array microphone, or monaural
microphone.
(5)
USB ports (2)
Connect optional USB devices.
Power is always on to all USB ports when the
docking station is connected to AC power.
NOTE: There are 4 additional USB ports on the
rear panel of the docking station.
6
Chapter 1 Getting started
Antenna House XSL Formatter (Evaluation) http://www.antennahouse.com/
ENWW
Left panel components
Component
Description
Hard drive bay
Holds an optional internal HP Personal Media Drive or
HP Pocket Media Drive.
ENWW
Antenna House XSL Formatter (Evaluation) http://www.antennahouse.com/
Identifying components
7
Setting up the docking station
Step 1: Adjusting the docking station
The docking station must be upright before a computer can be docked. To adjust the docking station to
an upright position:
1.
Lower the lever (1) located on the left side of the docking station upper panel to the down position.
2.
Grasp the upper panel (2) with both hands, and tilt the panel toward you.
3.
Lift the lever (3) to the up position to lock the upper panel position.
To lower the docking station:
8
1.
Lower the lever (1) located on the left side of the docking station upper panel to the down position.
2.
Grasp the upper panel (2) with both hands, and tilt down.
Chapter 1 Getting started
Antenna House XSL Formatter (Evaluation) http://www.antennahouse.com/
ENWW
3.
Lift the lever (3) to the up position to lock the upper panel position.
ENWW
Antenna House XSL Formatter (Evaluation) http://www.antennahouse.com/
Setting up the docking station
9
Step 2: Connecting to AC power
WARNING! To reduce the risk of electric shock or damage to your equipment:
Plug the power cord into an AC outlet that is easily accessible at all times.
Disconnect power from the product by unplugging the power cord from the AC outlet.
If provided with a 3-pin attachment plug on the power cord, plug the cord into a grounded (earthed) 3pin outlet. Do not disable the power cord grounding pin, for example, by attaching a 2-pin adapter. The
grounding pin is an important safety feature. It is possible to receive an electric shock from a system
that is not properly grounded.
NOTE: Both a Smart AC power connector and a standard AC power connector are provided. Choose
the connector that corresponds to the computer AC power adaptor being used.
Connect the docking station to an AC power source using the computer AC adapter and power cord:
1.
Identify the correct power connector on the docking station.
NOTE: Power cords and AC outlets vary in appearance by region and country.
NOTE: The AC adapter is included with the computer or purchased separately.
10
2.
Connect the computer AC adapter to the corresponding power connector on the docking station
(1).
3.
Connect the AC power cord to the AC adapter (2).
4.
Connect the AC power cord to the AC outlet (3).
Chapter 1 Getting started
Antenna House XSL Formatter (Evaluation) http://www.antennahouse.com/
ENWW
Step 3: Docking the computer
1.
Open the computer.
ENWW
Antenna House XSL Formatter (Evaluation) http://www.antennahouse.com/
Setting up the docking station
11
2.
Slide the computer into the docking station with the keyboard facing you.
NOTE: The computer is held in place by a buffer pad, which prevents the computer from shifting
out of position in the docking station.
12
Chapter 1 Getting started
Antenna House XSL Formatter (Evaluation) http://www.antennahouse.com/
ENWW
3.
4.
Move the expansion cable to either side of the docking station, depending on where the expansion
port on your computer is located.
NOTE:
The location of the expansion port on your computer varies by computer series and model.
NOTE:
It is important to position the cable correctly, so that the cable can move freely.
Press and hold the buttons on the sides of the expansion cable connector (1).
ENWW
Antenna House XSL Formatter (Evaluation) http://www.antennahouse.com/
Setting up the docking station
13
5.
Connect the expansion cable to the expansion port on the computer (2), matching the icon on the
computer expansion port with the icon on the end of the expansion cable.
CAUTION: To prevent damage to the expansion port, be sure that you correctly align the
expansion cable with the expansion port on the computer.
NOTE: The expansion port may also be called “expansion port 3” in the computer documentation.
If the computer is already on, the good dock connection light on the expansion cable turns on.
14
Chapter 1 Getting started
Antenna House XSL Formatter (Evaluation) http://www.antennahouse.com/
ENWW
6.
If the computer is off, press the power button on the docked computer.
NOTE:
The power button location on the docked computer varies by computer series and model.
The power status light on the front of the docking station turns on.
NOTE: After the computer is docked, the internal computer speakers are disabled and the
docking station speakers are activated.
ENWW
Antenna House XSL Formatter (Evaluation) http://www.antennahouse.com/
Setting up the docking station
15
2
Using the docking station
Docking station guidelines
●
Operating systems—For optimal performance, use the docking station with HP or Compaq
computers running Microsoft® Windows® XP or later.
●
Power—To use docking station features, AC power must be connected to the docking station. You
do not have to connect power to the computer while it is docked.
●
Computer docking and undocking—The computer can be docked to or undocked from the
docking station, regardless of whether they are on or off. The good dock connection light on the
expansion cable shows a successful docking connection and turns on only when the computer is
turned on. The power status light on the docking station turns on when the docked computer is
turned on.
●
External devices—When the computer is docked, you may attach external devices to the ports
on the rear and right panels of the docking station or to the ports on the computer.
NOTE: When the computer is docked, the external monitor port on the computer is disabled. Use
the external monitor port on the docking station instead.
16
Chapter 2 Using the docking station
Antenna House XSL Formatter (Evaluation) http://www.antennahouse.com/
ENWW
Adjusting the volume
To adjust the volume on the docking station:
Slide your finger to the left to decrease volume and to the right to increase volume. You can also tap
the minus sign (1) on the scroll zone to decrease volume, or tap the plus sign (2) on the scroll zone to
increase volume.
ENWW
Antenna House XSL Formatter (Evaluation) http://www.antennahouse.com/
Adjusting the volume
17
Connecting to a network
You can connect your docked computer through the docking station to a network using an Ethernet
cable (purchased separately).
CAUTION: To prevent performance issues, only one network jack (either the network jack on the
docked computer or the network jack on the docking station) should be used at any one time.
18
1.
If you haven’t already done so, dock the computer.
2.
Connect one end of the Ethernet cable to the RJ-45 jack on the docking station (1) and the other
end to an RJ-45 network jack (2).
Chapter 2 Using the docking station
Antenna House XSL Formatter (Evaluation) http://www.antennahouse.com/
ENWW
Connecting video
The external monitor port connects an external VGA display device, such as an external monitor or a
projector, to the docking station.
NOTE:
The external monitor port on the computer is disabled when the computer is docked.
To connect an external VGA display device:
1.
Connect the device cable to the external monitor port on the rear panel of the docking station.
2.
Press fn+f4 on the docked computer one or more times to switch the screen image to the external
display device.
ENWW
Antenna House XSL Formatter (Evaluation) http://www.antennahouse.com/
Connecting video
19
Connecting analog audio
To connect analog audio:
1.
Connect the single-connector end of an audio Y-cable (purchased separately) to the headphone
jack (1) on the right panel of the docking station.
2.
Connect the red and white connectors (2) on the other end of the cable into the red and white audioin jacks on your television or stereo equipment .
Refer to your television or stereo equipment user guide for the jack names, colors and locations.
NOTE: The docking station speakers are muted when a device is connected to the headphone
jack.
NOTE: Volume is controlled using controls located on the analog audio device.
20
Chapter 2 Using the docking station
Antenna House XSL Formatter (Evaluation) http://www.antennahouse.com/
ENWW
Connecting S/PDIF digital audio
The docking station provides an S/PDIF digital audio jack for an optional digital audio connection. A
coaxial digital audio cable (purchased separately) and an audio receiver (television or stereo) with a
coaxial digital audio port is required to fully enable this feature.
To connect digital audio:
1.
Connect one end of a coaxial digital audio cable (purchased separately) to the orange S/PDIF
digital audio jack on the rear panel of the docking station (1).
2.
Connect the other end of the cable to the digital audio jack on your television or stereo equipment
(2).
Refer to your television or stereo equipment user guide for the jack name and location.
NOTE:
jack.
The docking station speakers are muted when a device is connected to the digital audio
NOTE:
Volume is controlled using controls located on the digital audio device.
ENWW
Antenna House XSL Formatter (Evaluation) http://www.antennahouse.com/
Connecting S/PDIF digital audio
21
Connecting auxiliary audio
The docking station provides an auxiliary audio jack for an optional auxiliary audio device connection.
This connection allows the device to play through the to docking station speakers.
To connect auxiliary audio:
1.
Connect one end of the audio-inline cable to the auxiliary audio jack (1) on the right panel of the
docking station.
2.
Connect the other end of the cable to the audio-out (headphone) jack (2) on your auxiliary device.
NOTE: When an auxiliary audio device is connected, control docking station speakers with the audio
device volume controls.
22
Chapter 2 Using the docking station
Antenna House XSL Formatter (Evaluation) http://www.antennahouse.com/
ENWW
Connecting a wireless mouse and keyboard
If you are connecting a wireless mouse and keyboard to the docking station, use this procedure to
establish a wireless mouse and keyboard connection (select models only).
1.
Locate an open USB port (1) on the docking station and insert the wireless receiver (2).
To establish a wireless mouse connection:
ENWW
Antenna House XSL Formatter (Evaluation) http://www.antennahouse.com/
Connecting a wireless mouse and keyboard
23
2.
Remove the insulation tape on the bottom of the mouse.
3.
Press the reset button on the bottom of the wireless mouse until the blue light on the mouse starts
flashing, indicating a wireless connection.
To establish a wireless keyboard connection:
24
Chapter 2 Using the docking station
Antenna House XSL Formatter (Evaluation) http://www.antennahouse.com/
ENWW
4.
Remove the insulation tape on the bottom of the wireless keyboard.
5.
Press the connect button on the bottom of the wireless keyboard until the blue light on the keyboard
starts flashing, indicating a wireless connection.
ENWW
Antenna House XSL Formatter (Evaluation) http://www.antennahouse.com/
Connecting a wireless mouse and keyboard
25
Connecting a secondary computer to the docking station
A secondary computer connected to the docking station through the PC port has access to the optional
docking station internal hard drive, and to any USB devices connected to the docking station.
NOTE: Certain devices such as printers or external webcams may require device drivers or software
to be loaded onto the secondary computer.
1.
Connect the USB cable to the PC (USB type B) port located on the right panel of the docking station
(1) .
2.
Connect the other end of the cable to a USB port (2) on the secondary computer.
3.
Turn on the secondary computer.
NOTE: When a secondary computer is connected to the docking station through the PC port, the
docked computer will not be able to access the optional docking station hard drive, or any USB devices
connected to the docking station.
26
Chapter 2 Using the docking station
Antenna House XSL Formatter (Evaluation) http://www.antennahouse.com/
ENWW
Installing an optional hard drive
Installing an HP Personal Media Drive
You can insert an HP Personal Media Drive into the docking station for extra storage capacity.
1.
Remove the hard drive carrier screw (1) on the rear panel of the docking station and remove the
hard drive cover (2) from the hard drive bay.
CAUTION: To reduce the possibility of damaging the hard drive cover, grasp the hard drive cover
from the bottom to remove it.
2.
Insert the hard drive (1) into the hard drive bay until the drive is fully seated.
NOTE:
If the hard drive light (2) does not turn on, reseat the hard drive.
ENWW
Antenna House XSL Formatter (Evaluation) http://www.antennahouse.com/
Installing an optional hard drive
27
3.
Replace the hard drive carrier screw (3).
4.
Connect the hard drive to additional AC power, if desired:
a.
Connect the hard drive AC adapter to the hard drive power connector (1) on the docking
station.
b.
Connect the power cord to the AC adapter (2).
c.
Connect the power cord to the AC outlet (3).
NOTE:
Power cords and AC outlets vary in appearance by region and country.
NOTE: For more information on the hard drive, refer to the instructions that were included
with the drive.
To remove the Personal Media Drive, reverse the installation procedures.
28
Chapter 2 Using the docking station
Antenna House XSL Formatter (Evaluation) http://www.antennahouse.com/
ENWW
Installing an HP Pocket Media Drive and HP Pocket Media Drive Adapter
1.
Remove the hard drive carrier screw (1) on the rear panel of the docking station and remove the
hard drive cover (2) from the hard drive bay.
CAUTION: To reduce the possibility of damaging the hard drive cover, grasp the hard drive cover
from the bottom to remove it.
2.
Insert the HP Pocket Media Drive Adapter (1) into the hard drive bay until the adapter is fully seated.
ENWW
Antenna House XSL Formatter (Evaluation) http://www.antennahouse.com/
Installing an optional hard drive
29
3.
Replace the hard drive carrier screw (2).
4.
Insert the Pocket Media Drive (1) into the adapter until the drive is fully seated.
NOTE:
If the hard drive light (2) does not turn on, reseat the hard drive.
NOTE: For more information on the HP Pocket Media Drive, refer to the instructions that were included
with the kit.
To remove the drive, press the eject button (3) located on the front of the adapter.
30
Chapter 2 Using the docking station
Antenna House XSL Formatter (Evaluation) http://www.antennahouse.com/
ENWW
Connecting an optional security cable
NOTE: The security cable is designed to act as a deterrent, but it may not prevent the docking station
from being mishandled or stolen.
To install a security cable:
1.
Loop the security cable around a secured object.
2.
Insert the key (1) into the cable lock (2).
3.
Insert the cable lock into the security cable slot on the docking station (3), and then lock the cable
lock with the key.
NOTE: Installing a security cable to the docking station will not prevent a docked computer from
being mishandled or stolen.
ENWW
Antenna House XSL Formatter (Evaluation) http://www.antennahouse.com/
Connecting an optional security cable
31
3
Undocking the computer
1.
Press and hold the buttons (1) on the sides of the expansion cable connector, and then disconnect
the cable from the computer (2).
NOTE: The location of the expansion port on the computer varies by computer series and model.
32
Chapter 3 Undocking the computer
Antenna House XSL Formatter (Evaluation) http://www.antennahouse.com/
ENWW
2.
Slide the computer up and out of the docking station.
ENWW
Antenna House XSL Formatter (Evaluation) http://www.antennahouse.com/
33
4
Troubleshooting
Solving common problems
The following tables list possible problems and the recommended solutions.
General use and connection problems
Problem
Possible cause
Solution
The connection indicator light is
not on.
The computer is not powered on.
Turn on the computer.
The docking station is not
connected to AC power.
Connect the AC adapter to the
docking station and to an AC
outlet.
The expansion cable on the
docking station is not fully
connected to the expansion port
on the computer.
Disconnect the expansion cable
from the computer, and then
reconnect the cable to the
expansion port on the computer.
The computer is in sleep, standby Exit sleep, standby or hibernation.
or hibernation.
The computer shuts down
unexpectedly.
The docking station is not
connected to AC power, draining
the computer battery.
Connect the AC adapter to the
docking station and to an AC
outlet.
The ports or jacks on the docking
station are not working.
The docking station is not
connected to AC power.
Connect the AC adapter to the
docking station and to an AC
outlet.
The computer is not docked
correctly.
Redock the computer.
The wireless receiver is not
connected to a USB port.
Connect the wireless receiver to a
USB port.
The wireless receiver and
keyboard or mouse have not been
synchronized.
Synchronize the devices by
pressing the appropriate buttons.
The wireless keyboard or mouse
has no battery power.
Be sure that batteries are inserted
correctly in the wireless keyboard
or mouse and that the batteries
are functional.
The optional wireless keyboard or
mouse does not work.
34
Chapter 4 Troubleshooting
Antenna House XSL Formatter (Evaluation) http://www.antennahouse.com/
ENWW
Audio problems
Problem
Possible cause
Solution
The docking station speakers
have little or no volume.
The docking station speakers are
muted or the volume is set too
low.
Adjust the volume using the
volume scroll zone.
The docking station is not
connected to AC power.
Connect the AC adapter from the
docking station to an AC outlet.
Headphones or other audio
device is connected to the
headphone jack of the docking
station or computer, muting the
docking station speakers.
Unplug the headphones or other
audio device connected to the
headphone jack of the docking
station or computer.
The computer is not docked
correctly.
Redock the computer.
The volume scroll zone is not
being used correctly.
When increasing volume, slide
your finger from left to right on the
volume scroll zone, or tap the plus
sign.
The volume level does not
increase or decrease.
When decreasing volume, slide
your finger from right to left on the
volume scroll zone, or tap the
minus sign.
Headphones or other audio
device connected to the docking
station do not produce sound.
Headphones or other audio
device is connected to the
headphone jack on the computer.
Using the headphone jack on the
computer mutes docking station
sound.
Disconnect the headphones or
other audio device from the
headphone jack on the computer.
A microphone connected to the
computer does not work.
A microphone is connected to the
docking station. While a
microphone is connected to the
docking station, the microphone
jack on the computer is disabled.
Either use the microphone
connected to the docking station
or disconnect it.
A connected home entertainment
system does not have audio.
Audio is not connected properly.
Be sure that the docking station is
properly connected to the home
entertainment system.
A connected home entertainment
system does not experience
surround sound.
The home entertainment system
may not support digital audio.
Be sure that your home
entertainment system is S/PDIF
compatible.
ENWW
Antenna House XSL Formatter (Evaluation) http://www.antennahouse.com/
Solving common problems
35
Video problems
Problem
Possible cause
Solution
A connected home entertainment
system does not have video.
The video cable is not connected
correctly.
Disconnect and reconnect the
video cable.
The screen image is displaying on
the computer.
Press fn+f4 on the computer to
switch the image from the
computer to the external display.
The docking station is not
connected to AC power.
Connect the AC adapter to the
docking station and to an AC
outlet.
The computer is not docked
correctly.
Redock the computer.
Getting more information
36
●
For comprehensive information about your computer, as well as governmental agency and safety
information about the use of your computer, access Help and Support by clicking Start, and then
clicking Help and Support.
●
See the HP Web site at http://www.hp.com for product news and software updates.
Chapter 4 Troubleshooting
Antenna House XSL Formatter (Evaluation) http://www.antennahouse.com/
ENWW
Contacting technical support
If you cannot solve a problem using the troubleshooting tips in this chapter, contact technical support.
Click Start, click Help and Support, and then click Contact Support to start a chat session with a
support specialist.
For the fastest possible resolution of your problem, have the following information available when you
call or e-mail:
●
The computer and docking station model types
●
Serial numbers for the computer and docking station
●
Dates the computers and docking station were purchased
●
Conditions under which the problem occurred
●
Error messages that have been displayed
●
Hardware configuration of the computer
●
Hardware and software you are using
●
The manufacturer and model of the printer or other accessories connected to the computer and
docking station
●
Configuration settings, including contents of the system files
●
Operating system version number and registration number
To display the operating system version number and registration number, click Start, click Help
and Support, and then click System Information. (On some models, the registration number may
be identified in the Operating System table as the Product ID).
ENWW
Antenna House XSL Formatter (Evaluation) http://www.antennahouse.com/
Contacting technical support
37
Index
A
adjusting docking station 8
analog audio 20
audio connections
analog 20
audio 22
digital 21
troubleshooting 35
audio-in (microphone) jack 6
audio-out (headphone) jack 6,
20
auxiliary audio 22
auxiliary audio jack 6, 22
B
buttons
mute 2
power 2, 15
C
cable, expansion
connecting 13
disconnecting 32
identifying 5
computer, docking 12
computer, undocking 32
connectors
hard drive power 4, 28
power 4, 10
D
digital audio 21
E
expansion cable
connecting 13
disconnecting 32
identifying 5
expansion port 14
external devices 16
38
external monitor port 4, 19
G
getting help
36
H
hard drive bay 7
hard drive carrier screw 5
hard drive power connector 4,
28
headphone (audio-out) jack 6,
20
J
jacks
audio jack 6
audio-in (microphone) 6
audio-out (headphone) 6, 20
auxiliary 22
RJ-45 (network) 4, 18
S/PDIF 4, 21
L
lights
good dock connection 2
power 2, 4, 15
lock, security cable 5, 31
M
microphone (audio-in) jack 6
monitor port, external 4, 19
mute button 2
N
network (RJ-45) jack 4, 18
O
operating systems supported 16
Index
Antenna House XSL Formatter (Evaluation) http://www.antennahouse.com/
P
ports
expansion 14
external monitor 4, 19
USB 4, 6
power
docking station,
connecting 10
guidelines 16
hard drive, connecting 28
power button 2, 15
power connector 4, 10
power connector light 4
power light 2, 15
R
RJ-45 (network) jack 4, 18
S
S/PDIF audio jack 4, 21
security cable slot 5, 31
security cable, connecting 31
slot, security cable 5, 31
speaker 2
subwoofer 3
T
technical support 37
troubleshooting 34
U
USB ports, identifying 4, 6
V
VGA connection 19
video connections
troubleshooting 36
VGA 19
volume scroll zone 2
volume, adjusting 17
ENWW
Antenna House XSL Formatter (Evaluation) http://www.antennahouse.com/