1
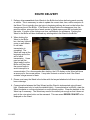
Single Trak System
SUPER WAND
ROUTE DRIVER
USER MANUAL
11/11/08
TABLE OF CONTENTS
AUDIT WAND........................................................................................................... 3
FUNCTIONS.......................................................................................................... 3
ROUTE DELIVERY ................................................................................................4
PRI KEY................................................................................................................. 5
COLLECTION WAND .............................................................................................. 6
MAINTENANCE WAND ........................................................................................... 7
FUNCTIONS.......................................................................................................... 7
ERROR MESSAGES............................................................................................. 8
INSTALLING DATA WIZARDS.............................................................................. 10
TROUBLESHOOTING ........................................................................................... 11
11/11/08
2
AUDIT WAND
An Audit Wand (Route Driver Wand) collects, stores and transfers data between the Data Wizard
and the Buffer. Data stored in the Buffer is later downloaded to the computer. When the Wand is
docked to the Buffer, information is exchanged that updates the current date, time, price and
edition in the Wand. When the Wand is docked to a rack, this same information is relayed to the
Data Wizard. The Data Wizard begins to collect sales information which it transfers to the Wand
at the next docking. The Wand can store data for more than 10,000 sales. The Route driver may
also enter Dealer draw and returns information into the Wand using the keypad.
Wands must be carried in the accompanying holster to protect them from damage. The Wands
are water-resistant but not water proof. The same care should be given them that is given other
portable electronic devices such as cell phones, CD or MP3 players and Pocket PCs. Exposure
to prolonged periods of heat or cold can damage the LCD display.
FUNCTIONS
Press the FN key to display the Wand functions.
Press the Enter key to toggle through the available functions.
Press the SEL key to select the function displayed
Press the CLR key to exit the function menu or cancel a selected function.
Display Totals displays the number of draws and returns that have been entered into the Wand
since it was last docked to the Buffer.
Display Type displays the Wand type.
Version displays the version of firmware programmed into the Wand.
Talk to Buffer prepares the Wand to communicate with the Buffer for reprogramming or
reinitializing.
Set Mech ID prompts the user to program the internal ID number into a Data Wizard.
Display Mech ID displays the current ID number that is programmed into the Data Wizard.
11/11/08
3
ROUTE DELIVERY
1. Delivery drivers must dock their Wands to the Buffer box before delivering each new day
or edition. This is necessary in order to update the current date, time, edition and price in
the Wand. This is typically done just prior to beginning delivery but must not be before the
changeover time in the Buffer. If the Wand is docked before the changeover time, the
previous edition, price and day of week remain in Wand memory and will be loaded into
the racks. If unsure of the change over time, call Bellatrix for assistance. Docking the
Wand to the Buffer will also download any existing data in the Wand to the Buffer.
2. When docking the
Wand to the Buffer
box, the busy light will
come on and remain
lit until data
transmission is
completed. The
Wand will beep at the
beginning and at the
end of each
transmission. Users
must not pull the
Wand away from the
Buffer until they hear
the second beep to
avoid interruption in
communication. For a few seconds after docking, the LCD display on the Wand will show
an acronym for the current edition. It may take a minute or more to dock if the Wand
contains a large amount of data.
3. Drivers must carry the Wand in the holster with the lanyard attached at all times to prevent
loss or damage.
4. Communication between the Data Wizard and the Wand is implemented using infrared
light. Wands need only to touch the datalink lightly. If communication is difficult, rotate the
Wand clockwise or counter-clockwise to a more optimal position. Clean the datalink or the
Wand cap if necessary. The Wand may need to be rotated just enough so that it does not
push in the coin return button on the newsrack. This can cause ERROR COIN RET to be
displayed on the Wand.
11/11/08
4
5. Drivers can use the Wand to enter draws and returns for Dealer accounts. Pressing the
DLR key on the Wand will prompt the user for the assigned Dealer number. Returns
records can be entered for the past 7 days.
6. After delivery, the data in the Wand should be downloaded to the Buffer for storage until it
can be read into the database. When docking the Wand to the Buffer box, the amber busy
light will come on and remain lit until data transmission is completed. The Wand will beep
at the beginning and at the end of each transmission. Users must not pull the Wand away
from the Buffer until they hear the second beep to avoid interruption in communication. If
the Wand is pulled away from the Buffer prematurely it may become unresponsive. If this
happens, soft reset the Wand by swiping the short side of the Wand past the tip of the
datalink on the Buffer. The Wand will beep. Press the red reset button on the front panel
of the Buffer. Dock the Wand to the Buffer again. If communication is successful, the
Wand will display the current edition. If not, the display will likely show ERROR COM.
PRI KEY
The PRI key, on the lower right corner of the Wand keypad, is used to set prices and/or editions
in a rack that are secondary to the default price and edition loaded into the Wand when docked to
the buffer. The PRI key on the Wand will only be activated if the Buffer that it has been docked to
has been programmed with this option. Uses for the PRI key include but are not limited to
special promotional prices, one time pricing and Sunday only pricing
To set the special price, press and hold the PRI key until the Wand beeps continuously. Dock the
Wand to the rack to set the special price. This will set the special price and edition in one rack
only. To set the special price in additional racks, repeat the process at each location.
11/11/08
5
COLLECTION WAND
The Collection Wand is used to collect cash information from each location. Collection Wands
must be docked to the Buffer each day before they are used to upload the current date, time and
edition into them. After docking to the Buffer or a rack, the LCD will display COLLECT. Collectors
must dock the Wand to each rack that they collect money from. Collection/Recovery Wands offer
the option of entering additional draw or subtracting existing draw from individual racks. A
Collection/Recovery wand will display DRAW= on the display when docked to a rack. Enter the
draw amount and press the ENTER key. If removing papers from the rack, enter a negative
number by pressing the – (minus) key and the number of papers being subtracted.
Collection reports are dependent on data from both the Collection Wands and Audit Wands to be
accurate. Before running a collection report for a given day, make sure that the Audit Wands
have been downloaded for that delivery day.
Racks do not need to be collected in a specific order and can be collected as frequently as
required. Multiple routes may be collected at the same time with the same Wand.
For additional information on collection reports and procedures, refer to the SC2000+ manual.
NOTE: The newsrack door unlocks when the Collection Wand is docked. The door must
be opened then closed to reset the lock.
11/11/08
6
MAINTENANCE WAND
The Maintenance Wand is used to assist rack maintenance personnel with trouble shooting and
setting up new Data Wizards. When docked to a functioning rack, the Wand will display the
internal ID number of the Data Wizard. If the Data Wizard is not operational, an error message
will be displayed. The Maintenance Wand is used to program new ID numbers into Data Wizards,
initialize them with the current edition, date, time and price and read or write data in or out of Data
Wizard memory.
FUNCTIONS
•
Set Mech ID. Select this function to set the Internal ID number into the Data Wizard. This
number must match the Counter/Dealer number assigned to this location in the SC2000
database. This number can be from one to five digits in length and between one and 32, 767.
Do not begin a number with a zero as leading zeros will be ignored. Reset the Data Wizard
before programming the new ID Number into it. Refer to the user manual for instructions on
how to reset each specific model of Data Wizard. Press the FN key. Press the ENTER key to
scroll through the functions. Press the SEL key when SET MECH ID is displayed on the LCD.
The display will change to MECH ID =. Enter the desired ID number and press the ENTER
key. The Wand will emit a continuous beep. Dock the Wand to the datalink. When
communication is complete, the Wand will beep and the solenoid will fire resulting in an
audible click. Press the CLR key to exit the function menu or cancel a function.
•
Init Mech. This function will initialize the Data Wizard with the current date, time, edition and
price. Reset the Data Wizard. Press the FN key. Press the ENTER key to scroll through the
functions. Press the SEL key when INIT MECH is displayed on the LCD. The Wand will emit
a continuous beep. Dock the Wand to the datalink. When communication is complete, the
Wand will beep and the solenoid will fire resulting in an audible click.
•
Read/Write Data. When troubleshooting a Data Wizard it may be advantageous to make a
copy of the sales data that it contains and replace it after repair or replacement. If the Data
Wizard is able to communicate with the Wand, a copy of the sales data can be read from it
into Wand memory. The Data Wizard can then be repaired and tested or replaced. When
finished with repairs, the data can be written from Wand memory, back into the Data Wizard
memory, overwriting information from additional sales and cash that may have been added
due to testing. To read the data from the Data Wizard, press the FN key. Press the ENTER
key to scroll through the functions. Press the SEL key when READ DATA is displayed on the
LCD. When the Wand beeps continuously, dock the Wand to the datalink. The Wand will
make a chirping sound while copying the data. To write the data back into the Data Wizard,
press the FN key. Press the ENTER key to scroll through the functions. Press the SEL key
when WRITE DATA is displayed on the LCD. When the Wand beeps continuously, dock the
Wand to the datalink. The Wand will make a chirping sound while copying the data.
•
Wand Type. Select WAND TYPE from the function list to display the type of Wand and the
version of firmware. Press the CLR key to exit the function menu or cancel a function.
11/11/08
7
ERROR MESSAGES
If there is more than one error with a Data Wizard, the error with the highest priority, in
accordance with the list below, will be displayed first. When the initial error has been resolved,
the error with the next highest order of precedence will be displayed.
Edition 7
Group ID (Maintenance Wand only)
Timeout
Coin Door
Coin Return
Coin Detect
Photo LED
Slug Detect
Error Comm
ERROR EDITION 7: The Wand was pulled away before communication with the Data Wizard
was complete. The Wand was docked past the point of getting the Error Comm message, but not
long enough to complete Communication. Dock the Wand again.
ERROR GROUP ID: The Wand did not successfully program the ID number into the Data
Wizard. This error will only appear on a Maintenance Wand. Try to set the ID number again.
ERROR TIMEOUT: The Wand has not been docked to the Buffer within the Timeout period.
Timeout is a security feature that prevents the Wand from communicating with the Data Wizard if
the Timeout period has passed. Most Timeout periods are set to 24 or 36 hours. To reenable
the Wand, dock it to the Buffer. No data will be lost if the Wand times out. Timeout periods are
defined for all wands by a microchip in the Buffer. Timeout periods can be changed by replacing
this chip.
ERROR COINDOOR: The coin door may not be closed properly. Damage and/or objects,
including coins may keep the door from closing properly. The accept reed switch may be broken.
The magnet on the accept arm may be missing, misaligned or not engaging the reed switch due
to proximity. The coin return button may be sticking or it may be too long. Ensure that the cash
door spring is attached on both ends and functioning properly.
ERROR COIN RET: The coin return door may not be closed properly. Damage and/or objects,
including coins may keep the door from closing properly. Verify that the coin path housing closes
completely. Remove foreign materials that may prevent it from closing. Make sure that the return
bellcrank is not pushed back by a coin return button that is too long. Check all springs from the
bellcrank.
ERROR COIN DET: The Data Wizard is not detecting coins. Remove dust, dirt or other objects
from the coin path. Open the reader assembly to clean the coin path. Use a damp Q-Tip, small
brush or compressed air, paying particular attention to the edges where the coin sensors are
located.
11/11/08
8
ERROR PHOTOLED: The Data Wizard is not reading coins. The coin path may be obstructed or
a coin read sensor may be faulty. Clean dirt or debris from the coin path with a cloth,
compressed air or small brush. If a sensor is defective, the Data Wizard must be returned for
repair.
ERROR SLUG: The slug detect reed switch is open. Make sure that the slug detect magnet is in
place with the proper polarity. Insert a coin into the Data Wizard and press the coin return button
in case the slug detect reed switch is stuck open.
ERROR COMM: The Wand is unable to communicate with the Data Wizard. The Wand may
have been pulled away from the datalink before Communication was complete. Re-dock the
Wand to try again. Clean the nose of the Wand to remove dirt or debris. Shield the datalink
(front and back) from direct sunlight or bright lights. Close the rack head if open. The datalink
may need to be replaced. If the Wand communicates with other racks, the problem likely lies
with the Data Wizard. If the Wand will not communicate with other racks or the Buffer, the fault is
presumably with the Wand.
11/11/08
9
INSTALLING DATA WIZARDS
Each Rack and Dealer is assigned a Counter/Dealer number in the SC2000 database when the
account is set up. The Counter/Dealer number represents a location, rather than a specific rack
or Data Wizard itself. Sales data is generated for specific locations. If a rack is moved to a new
location, it should be assigned a new Counter/Dealer number. By assigning a new number, the
historical data from the old location is retained and history for the new location will begin.
This number can be from one to five digits in length and between one and 32, 767. Do not begin
a number with a zero as leading zeros will be ignored.
Reset the Data Wizard before programming the new ID Number into it. Refer to the user manual
for instructions on how to reset each specific model of Data Wizard. Press the FN key. Press the
ENTER key to scroll through the functions. Press the SEL key when SET MECH ID is displayed
on the LCD. The display will change to MECH ID =. Enter the desired ID number and press the
ENTER key. The Wand will emit a continuous beep. Dock the Wand to the datalink. When
communication is complete, the Wand will beep and the solenoid will fire resulting in an audible
click. To read the ID number that was programmed, dock the Wand to the Data Wizard. The ID
number will be displayed on the Wand LCD. If the number is not correct, reset the Data Wizard
and repeat the above steps again.
If the Data Wizard returns an error, refer to the Error Table in the previous section of the manual.
The Data Wizard must be initialized with the current date, time, edition and price. Reset the Data
Wizard. Press the FN key. Press the ENTER key to scroll through the function. Press the SEL
key when INIT MECH is displayed on the LCD. The Wand will emit a continuous beep. Dock the
Wand to the datalink. When communication is complete, the Wand will beep and the solenoid will
fire resulting in an audible click. Test the rack and Data Wizard to ensure that they are operating
correctly.
11/11/08
10
TROUBLESHOOTING
Wand does not communicate with the Buffer.
If other Wands do not communicate with the Buffer, the problem may be with the Buffer.
Press the red reset button on the Buffer for about 5 seconds, and then redock the Wand. If the
Buffer still does not respond, initialize or read the Buffer.
If other Wands do communicate with the Buffer, first try rotating the Wand clockwise or counter
clockwise and redocking in an alternate clock position.
Clean the transceiver cap inset on the nose of the Wand with a soft cloth.
Check the Wand for low batteries. If low, replace them.
Wand display is dim
Batteries may be low.
Wand does not display correct edition
The Buffer may not have the correct date and time in it.
Wand does not communicate with a Data Wizard
If other Wands do not communicate with the Data Wizard, the problem may lie with the Data
Wizard. Otherwise, rotate the Wand clockwise or counter clockwise and redock in alternate clock
positions.
Clean the transceiver cap inset on the nose of the Wand with a soft cloth.
Make sure the Wand does not press down on the coin return button while docking to the Data
Wizard.
Shield the Data Wizard datalink from the sun or bright light and redock.
Return the Wand to Bellatrix for if it has physical damage or broken parts that cannot be
replaced on site.
Enclose a note with all Wands returned for repair that provides as much detail as possible about
the problem the Wand is experiencing. Detailed information helps the repair technicians to focus
more quickly on repair needs and to track recurring problems.
Leave the original batteries in the Wand if possible in order for the technician to attempt to
recreate the problem described.
11/11/08
11
AUDIT WAND INSTRUCTIONS FOR
1.
RACKS
Dock the wand to the rack. Wait until the wand beeps and the rack
Unlocks. The solenoid will fire with and audible click. Pull the wand away from the rack.
If an error message is displayed, refer to the ERROR TABLE below.
2.
Enter the draw, and then press the ENTER key.
(Maximum of 3 digits, including minus [-] key) If using Autodraw, do NOT
enter draw. If adjusting draw, enter adjustment only. Press ENTER.
DRAW =
30
3.
Enter the number of returns, and then press the ENTER key.
(Maximum of 3 digits)
RETURNS =
12
4.
Press YES to enter more returns. Press NO or Enter to quit.
MORE
RTNS?
If YES, go to STEP 5, otherwise ENTER to quit.
5.
Press SEL to select the returns edition, and press ENTER to accept it.
If the Wand is programmed to bypass this step, go to step 6
and select the day of week.
RTNS ED?
DLY
6.
Press SEL to select the return day of week.
Press ENTER to accept.
Repeat STEP 4.
RTNS DAY?
MON
7.
RECOVERY runs, follow same steps. Be sure to enter [-] draw number if papers are removed from rack or dealer.
AUDIT WAND INSTRUCTIONS FOR DEALERS
1.
Press the DLR key, and then enter the dealer number on the keypad.
Press the ENTER key to accept the number. (4 digits maximum)
DEALER #
999
2.
Enter the number of draw, and then press the ENTER key.
(Maximum of 3 digits, including minus [-] key) If using Autodraw, do NOT
enter draw. If adjusting draw, enter the adjustment only. Press ENTER.
DRAW =
30
3.
Press SEL to select the returns edition, and press ENTER to accept it.
If the Wand is programmed to bypass this step, go to step 4
and select the day of week.
RTNS ED?
DLY
4.
Press SEL to select the return day, and press ENTER to accept it.
RTN DAY?
MON
5.
Enter the number of returns, and then press the ENTER key.
(Maximum of 3 digits)
RETURNS =
12
6.
Press YES to enter more returns, or press NO or ENTER to quit.
If YES, go to STEP 3.
MORE RTS
Y/N?
ERROR TABLE
Error in Rack Communications
Redock Wand to rack.
ERROR
COMM
Error with Photo LED
Clean coin path insert coin.
ERROR
PHOTOLED
Error with the Coin Door
Check for broken parts.
ERROR
COINDOOR
Coin Jammed in the Rack
Clear coin path.
ERROR
COIN JAM
Error Detecting Coins
Clean coin path.
ERROR
COIN DET
Error with Coin Return Door
Check for broken parts.
ERROR
COIN RET
Error Detecting Slugs
Check for center magnet.
ERROR
SLUG
Wand has Timed Out
Dock to buffer to enable.
ERROR
TIMEOUT
11/11/08
12
EDITING INFORMATION FOR
RACKS
NOTE: Only the most recent record entered can be edited.
1.
Press the EDIT key to edit the rack record.
2.
Press CLR to edit the draw, or ENTER to accept the draw displayed.
If CLR was pressed, enter the new draw followed by the ENTER key.
(Maximum of 3 digits, including minus [-] key)
3.
Press the CLR key to edit the returns or ENTER to accept the returns displayed.
If the CLR key is pressed, enter the new returns and press the ENTER key.
(Maximum of 3 digits)
DRAW =
30
RETURNS =
12
EDITING INFORMATION FOR DEALERS
NOTE: Only the most recent record entered can be edited.
1.
Press the EDIT key to edit the dealer record.
2.
Press the CLR key to edit the dealer number, or press the ENTER
key to accept the number displayed. (Maximum of 4 digits)
DEALER #
999
If CLR was pressed, enter the new dealer number followed by the ENTER key.
3.
Press CLR to edit the draw, or ENTER to accept the draw displayed.
If CLR was pressed, enter the new draw followed by the ENTER key.
(Maximum of 3 digits, including minus [-] key)
DRAW =
30
4.
Press CLR to edit the returns or ENTER to accept the number displayed.
DLY
12
Press SEL to select the new returns edition, and press ENTER to accept it.
RTNS ED?
DLY
5.
If the Wand is programmed to bypass this step, go to step 6
to select the day of week.
MON
6.
Press SEL to select the new return day of week and press ENTER to accept.
RTN DAY?
MON
7.
Enter the new returns number and press the ENTER key.
(Maximum of 3 digits)
RETURNS =
8.
Repeat ALL STEPS to edit more draws and/or returns for the same dealer.
11/11/08
13