1
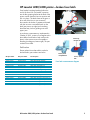
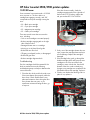
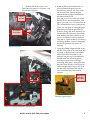
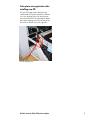
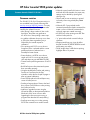
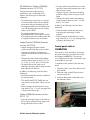
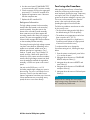
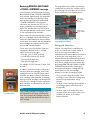
HP LaserJet printer product update
March 2004 • Volume 23
hp
Spring is arriving in HP LaserJet Land! As the world economies
improve, we are confident that sales and the resulting need for
quality support will increase. We feel that this year more
customers will adopt color in the office. Excitement over our new
line of HP Color LaserJet printers grows as we continue working
to develop new products. Thank you for your continued support!
Inside . . .
HP LaserJet 4200 printer—torn fuser film service note .................................................................. 2
HP LaserJet 4200/4300 printer—broken fuser latch.................................................................... 3
HP Color LaserJet 3500/3700 printer updates ........................................................................... 4
10.92.XX error ................................................................................................................... 4
Noisy black toner cartridge drive clutch ................................................................................. 6
Causes of wear on the image transfer belt .............................................................................. 6
41.7 errors ........................................................................................................................ 6
Color plane mis-registration after installing new ITB.................................................................. 7
HP Color LaserJet 9500 printer updates ..................................................................................... 8
Firmware revision................................................................................................................ 8
Control panel stuck at CALIBRATING ..................................................................................... 9
59.E0 error...................................................................................................................... 10
Poor fusing after PowerSave ............................................................................................... 11
Recurring REMOVE AND SHAKE <COLOR> CARTRIDGE message.......................................... 12
DSS (Digital Sending Services) updates ................................................................................... 13
DSS Workflow version 1.1 update ...................................................................................... 13
Firmware and DSS compatibilities ....................................................................................... 14
How to access HP LaserJet training.......................................................................................... 15
For Public Distribution
HP LaserJet 4200 printer—torn fuser film service note
Some users of the HP LaserJet 4200 series
printer have experienced printing problems
caused by delaminated or torn film on the
product’s fuser and occurring before the end of
the fuser’s 200,000-page life. The cause of the
tearing film is a flange component set at an
excessively angled position on some units. This
issue has been corrected, and all fusers
produced subsequently will have a proper
flange component in place.
Below is an example of print quality problems
associated with the torn film. Other indications
that the film is torn include pieces of the film
coming out with the printed output or the fuser
area of the product.
To determine if the fuser film is torn, lift the fuser
tray guide and examine the film. Film in good
condition appears as a solid gray roller, film in
poor condition exhibits the film sleeve shifting to
the left and shredded film pieces. If the film is
torn, replace the fuser. When this issue occurs
before the end of the fuser’s 200,000-page life,
customers are not charged for the fuser
replacement.
For more information
Please see service note number Q2425A-03.
Torn fuser film
Affected fusers are listed below.
Product
numbers
Q2425A
Q2426A
Q2427A
Q2428A
Q2446A
Q2447A
Serial number range
Replacement
part numbers
110 V models
USBNL00001-99999
USBNM00001-99999
USBNN00001-99999
USBNP00001-99999
USBNS00001-99999
USBNX00001-99999
USDNL00001-19672
USDNM00001-20855
USDNN00001-21009
USDNP00001-20810
USDNS00001-20698
USDNX00001-21024
RM1-0013-040
220 V models
USDF00001-99999
RM1-0014-040
Poor print quality caused by torn fuser film
HP LaserJet 4200 printer—torn fuser film service note
2
HP LaserJet 4200/4300 printer—broken fuser latch
Fuser latches have been breaking before the
end of the fuser’s life. The latches in question
are the blue grasping latches at the back of the
printer used to insert the fuser into position and
lock it in place. The latch closest to the gear or
drive side of the fuser is most commonly
discovered to be broken. Symptoms associated
with this issue are a noticeable crack on the
latch (see picture, top right) and a resulting
break that may cause a grinding noise and
paper jams.
A production countermeasure, implemented in
October of 2003, consists of a triangular tab in
the middle of each latch to help reinforce the
plastic in the stress area most susceptible to
breaking (see diagram, bottom right). The part
numbers have rolled.
Cracked fuser latch
Reinforcing
triangular rib
Field action
Please replace fusers that exhibit cracked or
broken latches; part numbers are below:
Old part number
New part number
Part description
Q2425-69006
Q2425-69007
Q2429-67902
Q2429-69002
Q2430-67902
Q2430-69002
Q2431-69009
Q2431-69010
Q2436-67903
Q2436-69003
Q2437-67903
Q2437-69003
RM1-0013-010CN
RM1-0014-010CN
RM1-0101-050CN
RM1-0102-050CN
Q2425-69009
Q2425-69010
Q2429-67903
Q2429-69003
Q2430-67903
Q2430-69003
Q2431-69011
Q2431-69012
Q2436-67904
Q2436-69004
Q2437-67904
Q2437-69004
RM1-0013-040CN
RM1-0014-040CN
RM1-0101-070CN
RM1-0102-070CN
4200
4200
4200
4200
4200
4200
4300
4300
4300
4300
4300
4300
4200
4200
4300
4300
110 V fusing assembly
220 V fusing assembly
110V maintenance kit
110V exchange maintenance kit
220V maintenance kit
220V exchange maintenance kit
110 V exchange fusing assembly
220 V exchange fusing assembly
110V maintenance kit
110V exchange maintenance kit
220V maintenance kit
220V exchange maintenance kit
110 V fusing assembly
220 V fusing assembly
110 V fusing assembly
220 V fusing assembly
HP LaserJet 4200/4300 printer—broken fuser latch
Former, breaksusceptible latch
Current, reinforced
latch
Fuser latch countermeasure diagram
3
HP Color LaserJet 3500/3700 printer updates
10.92.XX error
Some customers have experienced a 10.92.XX
error at power on. The error refers to a
cartridge not engaging correctly, and “XX”
corresponds to the print cartridge causing the
error:
•
00 = Black print cartridge
•
01 = Cyan print cartridge
•
02 = Magenta print cartridge
•
03 = Yellow print cartridge
If the door closes normally, check the
cartridge engaging tab on the right side of
the front door. If it is broken, replace the
tab, part number RC1-1247-000CN
There are several issues that can cause this
error, including:
•
One or more cartridges not seated properly
•
Broken cartridge engaging tab on the right
side of the front door
•
Damaged shutter arm on a cartridge
•
Missing or out of place left rail guide
•
Broken left arm drum lock
•
ITB gears not aligned, broken, or disengaged
•
Broken ITB gear train
•
Broken cartridge alignment knob
Troubleshooting
First, the cartridges should be reseated. If this
does not resolve the issue the following
troubleshooting steps can help to determine the
cause of the error.
1 Close the door slowly and look inside to see
if the toner shutters open properly while the
door closes. Check whether there is any
abnormal resistance when closing the door.
If any shutter does not open, or you
experience resistance shutting the door, go
to step two.
Print cartridge engaging tab
2 If only one of the cartridge shutters does not
open, inspect the cartridge shutter and wire
arm for damage. Replace the cartridge if
damaged.
3 If the cartridge looks good, go through the
disable cartridge check and swap out toner
cartridges to see if the issue follows the
cartridge or stays with the slot. Use the XX
element of the error code to identify any
changes once cartridges are swapped. If the
XX identifier follows the cartridge, replace it.
4 Check to see whether the left rail guide is in
place. If not, replace it.
Left rail guide
Position of left rail guide
HP Color LaserJet 3500/3700 printer updates
4
5
Check the left arm drum lock in the
upper left of the printer. If it is broken, it will
be in the down position.
Left arm
drum lock
Tip of lock that
may be broken
Left arm drum lock
6 Reseat the ITB. Ensure that the levers are
down and that the shipping locks are
removed if the printer is new. If the printer
still shows the error, measure the gap
between the belt and the metal bracket on
the bottom end of the ITB.
If the gap is 1 to 2 mm (.04 to .08 inches),
then the ITB is in the correct position; if the
gap is 5 to 6 mm (.2 to .23 inches), then the
ITB is alienated and in mono printing mode.
If there is a wide gap, try rotating the large
white gear on the bottom-right of the ITB
clockwise. It may offer some resistance, but
the belt of the ITB should move closer to the
metal bracket. If the gear is broken or will
not turn, the ITB may need to be replaced.
If the gear is in good condition, but opening
and closing the door causes it to disengage,
then the ITB gear train may need to be
replaced.
7 Check the cartridge alignment knobs on the
left side of the printer. If the small white latch
is missing, or the black piece immediately
behind it is broken, the printer must be
replaced. This part may not be replaced in
the field due to the delicate alignment
necessary to ensure correct cartridge
positioning. If the piece is missing, the door
may have some difficulty in closing and all
of the cartridge shutters may not shut. If all
the other steps have been taken and this
piece is identified, the printer must be
replaced.
Black piece that
holds white
latch in place
Cartridge alignment knob
Location of cartridge alignment knob and detail
C
HP Color LaserJet 3500/3700 printer updates
5
Noisy black toner cartridge drive
clutch
Causes of wear on the image
transfer belt
The black toner cartridge drive clutch (CL2) may
make a chattering sound that can occur early in
a printer’s life expectancy. In order to stop the
chattering noise, insert the washer
countermeasure as depicted below. The
washer’s part number is XD1-1108-229CN.
While the fuser’s life is not dependant on media
size or type (one page of any size or type is
considered one page of life), media size, type,
and printing mode can affect the life
expectancy of the ITB.
Clutch shaft
In addition, use of the following media types
and printing modes decrease the life of the ITB:
90-tooth gear
Washer
countermeasure
For the ITB, letter-sized media or smaller is
considered to be the same size. Media sizes
larger than letter, such as legal-sized media,
decrease the life of the ITB due to the additional
rotations required.
Electromagnetic
clutch
Black toner cartridge drive assembly
•
Best Gloss 1
•
Gloss 2
•
Gloss film
•
Best Heavy 1
•
Best Heavy 2
•
Best Label
•
OHT
41.7 errors
A 41.7 error may be displayed later in the life
of some printers. This error may be caused by
several different factors; please consider the
following:
•
Ensure that the printing media complies with
HP specifications. Refer to the paper media
guide:
http://h20015.www2.hp.com/hub_search/
document.jhtml?lc=en&docName=bpr01395
•
Separation pads can wear with age and use,
especially with rough media use.
Replacement part numbers are:
–
–
–
•
–
HP Color LaserJet 3500/3700 printer updates
RC1-0939-000CN
RC1-0954-000CN
RM1-0827-000CN
Pick-up rollers can also wear with age and
normal and rough media use. Replacement
part numbers are:
–
Drive clutch location
Tray 1:
Tray 2:
Tray 3:
Tray 1:
Trays 2 and 3:
RC 1-1535-000CN
RM1-0731-000CN
6
Color plane mis-registration after
installing new ITB
If a new ITB (image transfer belt) has been
installed and color plane registration problems
occur, the shipping locks may not have been
removed from the ITB. The photo below depicts
the orange shipping lock on the left side of the
ITB—there is another lock on the right side.
Left ITB shipping lock
HP Color LaserJet 3500/3700 printer updates
7
HP Color LaserJet 9500 printer updates
•
When the control panel lock function is set to
MAX with HP Web Jetadmin, the paper tray
settings may be altered by opening and
closing a tray.
•
The 20040113 05.004.2 firmware revision is
now available from HP at the following URL:
www.hp.com/go/clj9500_firmware. You may
see improvements to the following issues after
installing the updated firmware:
Objects and/or text are missing or printed
incorrectly when using a third-party DIMM
solution.
•
After storing a large number of jobs on the
hard drive, the printer may generate a
49.4C06 error when printing a menu map.
When the PCL 5 pre-punched media
command precedes the duplex command, the
output is correct. When the commands are
reversed, pages are rotated incorrectly.
•
49.0E00 error when printing some PDF files
with the PostScript driver.
•
“µ” prints italicized with certain PostScript
typefaces.
•
Images printed from tray 4 may be offset
beyond what the SET REGISTRATION control
panel setting can adjust.
•
CMYK images have a difficult time printing
highlights below 10 percent.
Firmware datecode: 20040113 05.004.2
Firmware revision
•
•
•
An endless calibration loop may occur when
a CPR (color plane registration) retry is
followed by an internal request for
calibration.
Slow printing with PCL 5c occurs when a
foreground color is selected and the current
palette at the time of selection has a
DirectByPixel raster format.
•
Printer displays a 49.FF06 error when a
single user has 10 or more private stored
jobs and selects to print ALL PRIVATE JOBS.
•
Certain PostScript® files generate a 49.4C02
error.
•
Bold PostScript text from Macintosh systems
does not render properly.
•
Using the Multifunction Finisher and printing
Face-Up or Face-Down the job flips
orientation within the first couple of pages or
after an internal calibration.
•
Some PDF files placed in Quark Xpress may
cause a PostScript error.
•
Sending a large number of fonts to the hard
drive causes a 49.0508 error when printing
the PostScript font list.
•
Inability to upgrade firmware using the
HP LaserJet Utility on the Macintosh platform.
(Resolution of this issue will occur after
upgrading this firmware version using a
program other than the HP LaserJet Utility.)
•
PostScript errors may occur when printing
DCS2 files created from a non-HP scanner.
HP Color LaserJet 9500 series printer
HP Color LaserJet 9500 printer updates
8
HP Multifunction Finisher (C8088A)
firmware revision: 031212_R
Changes have been made improving
performance with a single-sheet job. In
addition, the following issues have been
addressed:
•
The stacking tray moves down to a position
lower than specified when the accumulator
ejects sheets during a three-page print job.
•
The alignment plate moves forward during a
rear side adjustment when normal stacking
mode is set to OFFSET.
•
The alignment plate does not open
appropriately before receiving the first sheet
during staple mode when media printed after
a long interval stacks on the accumulator.
Stapler/Stacker (C8085A) firmware
revision: 031218_R
•
Multiple changes have been made to
enhance auto-flushing after a jam condition.
•
Changes were made to send pages not
supported by the Face-Down bin to the FaceUp bin.
•
Changes have been made to help address
certain scenarios that may cause 13.12.13,
13.12.02, 13.12.25, and 13.12.0D jams.
•
The paper offset for A4 paper size in
landscape orientation and A3 paper size has
been reduced to a half-inch.
In addition, the following issues have been
addressed:
•
Landscape-oriented documents are stapled in
the wrong location.
•
TOO MANY PAGES TO STAPLE does not
clear from the control panel without a power
cycle.
•
When printing to the Face-Down bin using
long media (11 by 17 or A3), the pages start
to output to the Face-Up bin.
•
The paper path will now halt motors to avoid
ignoring a restart while ramping down with a
sheet of paper coming.
•
Change to support noise and motor halting
problems to help printers running at a lower
speed.
•
Changes have been made to help address
certain scenarios that may cause 13.12.0D
and 13.12.02 jams.
In addition, the following issues have been
addressed:
•
When the stacker is detached, the printer
may hang while performing a media
autoflush.
•
When printing to the Face-Down bin using
long media (11 by 17 or A3), the pages start
to output to the Face-Up bin.
Control panel stuck at
CALIBRATING
Some printers, when powered-on, go through
the typical warming up procedure, but stop at
the message CALIBRATING. This also may
occur when the printer enters a calibration cycle
in the middle of a print job.
To troubleshoot this problem, follow the steps
below:
1 Open the printer’s front doors and lower the
green handle.
2 Open the printer’s right (ITB access) door
and remove the ITB.
3 Locate the black plastic shutter that covers
the calibration sensor.
Stacker (C8084A) firmware revision:
031211_R
•
Speed for ejecting the paper to the Face-Up
bin has been increased to keep pages from
being pulled below the exit roller.
Calibration sensor shutter
HP Color LaserJet 9500 printer updates
9
4 With the ITB access door open, open and
close the front, right door. As the door
moves, check that the black shutter moves
back and forth.
5 If the shutter does not move, make sure that
the actuator arm located on the left side of
the shutter is hooked into place.
3 Print an event log from either tray 1 or tray
4 (if installed). Note if the error occurs when
printing from these trays and whether a
41.19 error precedes the 59.E0 error in the
event log.
A 41.19 error typically indicates that the
error is associated with the secondary
transfer assembly. Another indication that
this assembly is at fault is that the error only
occurs when printing from trays 2 and 3.
To determine if the secondary transfer assembly
is causing the errors, follow the steps below:
1 Cycle the printer off and on to clear any
errors.
2 Open the front door of the printer and lower
the green ITB lever.
Note
Actuator arm
6 Reconnect the actuator arm if it is
disconnected: pull down on the end of the
shutter and push the actuator arm into the
hole on the end of the shutter. The arm often
falls into place when the shutter is pulled
down.
7 Once the arm is reconnected, manually push
the shutter toward the front of the printer to
ensure that the arm remains in place and
that the shutter moves freely.
59.E0 error
The service manual indicates that a 59.E0 error
is a registration motor error. However, the error
may also be caused by the secondary transfer
assembly since it is driven by the registration
motor. Please use the following troubleshooting
steps when you encounter a 59.E0 error:
If the secondary transfer assembly or secondary
transfer roller is out of place, the lever may not
lower. Do not force the lever, as this may break
other components.
3 Remove the secondary transfer roller and
inspect it for damage. The end of the roller
that sits at the rear of the printer is springloaded; ensure that the spring located
between the blue plastic housing and the
black bushing is present. Replace the roller if
it appears damaged or the spring is missing.
4 Reinstall the roller and try printing from
tray 2 or tray 3. If the error persists, replace
the secondary transfer assembly.
5 Check connectors J3030 on the registration
motor and J121 on the DC controller PCA.
6 Replace the DC controller PCA.
1 Cycle the printer off and on to clear the
error.
If the error occurs from all trays, including trays
1 and 4, and no 41.19 error is listed on the
event log, the printer is most likely experiencing
a registration motor error. Follow the
troubleshooting steps below:
2 Set each tray’s paper type as Plain, and
load letter or A4 media in each tray.
1 Cycle the printer off and on to clear the
error.
2 Check the registration assembly for damage
or jammed media.
3 Ensure that the gear train on the registration
drive assembly functions correctly.
HP Color LaserJet 9500 printer updates
10
4 Use the control panel COMPONENT TEST
to ensure test motor M11 functions correctly.
5 Check connectors J3036 on the registration
motor and J117 on the DC controller PCA.
6 Replace the registration motor if the motor
fails the component test.
7 Replace the DC controller PCA.
Background information
The high voltage contacts for the secondary
transfer roller are located on the secondary
transfer assembly. Using the cams on the
bottom of the secondary transfer assembly,
these contacts move into place against the
secondary transfer roller every time a page is
printed. The cams are engaged by firing a
solenoid which engages the clutch mechanism
on the secondary transfer assembly.
The timing for moving the high voltage contacts
into place varies because, depending on the
media source selected, media moves at a
different speed prior to registration. Tray 1
feeds at .5 speed, trays 2 and 3 feed at 1.5
speed, and tray 4 feeds at full speed. If the
solenoid or clutch cannot move the secondary
transfer roller high voltage contacts into place
once the media has reached the registration
assembly, a 59.E0 error posts on the control
panel.
Just prior to the 59.E0 error, a 41.19
secondary transfer high voltage error posts in
the event log. The error is most likely to occur
from trays 2 and 3 since the media moves
fastest to registration from these trays. However,
if these mechanisms are not working at any
speed, the error occurs from all trays.
HP Color LaserJet 9500 printer updates
Poor fusing after PowerSave
After spending several hours in PowerSave
mode, the printer may produce output with
toner improperly fused to the page. Output may
not improve until 20 to 50 pages have been
printed or the printer undergoes a power cycle.
This issue is most commonly seen when the
printer is first used in the morning, after
spending the night in PowerSave mode.
The following conditions must be met in order
for this issue to occur:
•
The PowerSave setting must be High (this is
the default setting for 220 volt printers).
•
The ambient room temperature must be less
than or equal to 60º F (15º C).
•
The printer must spend six to eight hours in
PowerSave mode (shorter or longer periods
of time will not cause this issue).
To workaround this issue, change the
PowerSave setting to Low, following the steps
below:
1 From the printer control panel, press Select
(√) to access the menu.
2 Navigate down the menu to CONFIGURE
DEVICE and press Select (√).
3 Navigate down the menu to RESETS and
press Select (√).
4 Navigate down the menu to POWERSAVE
and press Select (√).
5 Navigate down the menu to LOW and press
Select (√).
Note
Because the Low setting does not meet Blue
Angel energy-saving requirements for Germany,
this is a temporary workaround.
11
Recurring REMOVE AND SHAKE
<COLOR> CARTRIDGE message
Some customers have experienced a recurring
REMOVE AND SHAKE <COLOR> CARTRIDGE
error message. Approximately 200 pages after
a new print cartridge is installed, the control
panel posts the error REMOVE AND SHAKE
<COLOR> CARTRIDGE. Following these
instructions may clear the error for 10 to 20
pages, but then the error message appears
again. This issue has been seen with original
print cartridges shipped with the printer, as well
as with replacement print cartridges.
Please replace the print cartridge that is causing
the error. Cartridges with lot code 3D23XX or
earlier have been identified as having a defect
which causes the automatic pull strip embedded
in the cartridge not to release correctly when
the cartridge is initially installed.
The lot code is found on the front of the print
cartridge as indicated below, in a format
similar to other print cartridges:
•
First digit: year (3=2003, 4=2004)
•
Second digit: month (A=Jan, B=Feb)
•
Third and fourth digits: day
•
Fifth and sixth digits: shift
For example, 3D23S1 indicates 23 April 2003,
first shift.
In addition, check the lot codes of the printer’s
remaining three print cartridges. If any of the
cartridges have a lot code 3D23XX or earlier,
check the clear plastic pull strip on the bottom
of the cartridge, under the shutter, for damage.
Replace any print cartridges with damaged pull
strips. The error message is likely to appear for
these cartridges as well when toner runs low in
the image drum.
Note
Lot code location
Only a small percentage of cartridges within
the indicated lot code range will exhibit this
issue. Do not replace all cartridges within the
range, only those that exhibit the torn strip or
error message.
HP Color LaserJet 9500 printer updates
The image below shows what a typical failing
cartridge pull strip looks like, compared with a
good cartridge. The cartridge is shown with the
shutter pulled back, in the installed position.
Torn Mylar
strip—failing
cartridge
Mylar strip in
good condition
Print cartridge Mylar strip in
poor and good condition
Background information
When a new image drum is installed in the
printer, it is primed with a limited amount of
toner. As soon as the automatic toner
replenishment (ATR) sensor detects that the toner
to carrier ratio in the image drum is low, it
requests that toner be transferred from the print
cartridge to the image drum. If the ATR sensor
does sense a change to the toner/carrier ratio,
the message REMOVE AND SHAKE <COLOR>
CARTRIDGE is posted on the control panel,
assuming that shaking the cartridge will help
transfer toner from the print cartridge.
Reasons for the ratio not changing include:
•
Toner is bound in the print cartridge. This is
most likely to occur if the print cartridge was
exposed to high temperatures during
transport.
•
The motor on the T-cartridge drive assembly is
not working properly, either electrically or
mechanically.
•
The toner outlet on the bottom of the print
cartridge did not open properly when it was
installed in the printer, or the outlet is
otherwise blocked.
12
DSS (Digital Sending Services) updates
DSS Workflow version 1.1 update
DSS Workflow version 1.01 must be updated to
version 1.1. Please carefully follow the steps
below to update the software.
3 Click Browse and navigate to where the
Chai JAR files are stored. By default, they
are located in: [C]:\Program Files\HewlettPackard\HP DSS Workflow\HPDSS
ChaiJars
Uninstalling Chai JAR files
Note
IMPORTANT
The Chai JAR files need to be uninstalled in the
same order that they were installed:
The following steps explain how to uninstall the
printer’s Chai files. You must uninstall the Chai
files before installing the new DSS Workflow
version.
1 From the Windows Start menu, select
Programs, Hewlett-Packard, Remote Chai
Loader, and click Remote Chai Loader to
open the Remote Chailet Loader dialog box.
1 hp_laserjet_dynamicmenus_30a_1.3.jar
2 hp_laserjet_dssauth_30a_3.75x.jar
3 s_hp_dssworkflow_4100_9000_2024.jar
4 After selecting the first file, highlight the IP
address in the Device List area, and then
click Uninstall Selection to uninstall the first
Chai JAR file. Repeat this process to uninstall
the second and then the third Chai JAR files,
making sure that you uninstall them in the
correct order.
If the preceding steps do not uninstall the Chai
JAR files, you may need to initialize the hard
disk on the printer. However, a hard disk
initialization is not recommended until all other
options are eliminated, as it removes all
information on the disk, including address
books and speed dial lists.
Follow the steps below to initialize the hard
disk:
1 While powering-on the device, hold the Start
button down until all 3 LED lights remain
solidly lit.
2 Release the Start button, and press the left
arrow button to display INITIALIZE DISKS.
3 Press Select (√) to initialize the disks.
Installing DSS Workflow 1.1
2 Type the IP address of the printer in the
Device IP/Hostname box and click Add To
Device List.
DSS (Digital Sending Services) updates
After uninstalling the Chai JAR files, follow the
steps below to install DSS Workflow 1.1.
1 Run the file:
190374339236111_hp_dss_workflow_eng
lish_only.exe
13
2 Uninstall the previous version of DSS
Workflow when prompted. After
uninstalling, you may need to reboot the
computer.
3 Again, run the file:
190374339236111_hp_dss_workflow_eng
lish_only.exe
The most current version of DSS Workflow is
installed. If you have already registered DSS
Workflow, there is no need to register
again.
Installing current Chai JAR files
To complete the installation of DSS
Workflow 1.1, you must re-install the most
current Chai JAR files. Follow the steps on
page 13 for uninstalling the files, except click
Install Selection rather than Uninstall Selection in
step four.
Note
Make sure that you install the Chai JAR files in
the following order:
Firmware and DSS compatibilities
Questions have arisen concerning which
firmware versions are compatible with which
DSS software versions. The table below details
DSS Workflow and HP AutoStore versions and
the firmware versions with which they are
compatible.
Note
JAR files must be installed during the installation
of DSS Workflow or HP AutoStore. The JAR files
are installed in the following directories:
DSS Workflow: [C]:\Program Files\HewlettPackard\HP DSS Workflow\HPDSS ChaiJars
\4100_9000\
HP AutoStore: [C]:\Program Files\NSI
\AutoStore\ChaiJars\
If earlier versions of the JAR files have been
installed, they will need to be removed before
installing newer JAR files. Please refer to the
install guide on how to install the files.
1 hp_laserjet_dynamicmenus_30a_1.3.jar
2 hp_laserjet_dssauth_30a_3.75x.jar
3 s_hp_dssworkflow_4100_9000_2024.jar
DSS Workflow
Firmware
Version
JAR files
3.757
1.0 (first release)
s_hp_dssworkflow_4100_9000_2022.jar
hp_laserjet_dssauth_30a_3.75x.jar
hp_laserjet_dynamicmenus_30a_1.3.jar
3.779
1.02.000
s_hp_dssworkflow_4100_9000_2026.jar (or later)
hp_laserjet_dssauth_30a_3.75x.jar
hp_laserjet_dynamicmenus_30a_1.3.jar
HP AutoStore
Firmware
Version
JAR Files
3.757
1.0-202
s_hp_autostore_4100_9000_2021.jar
hp_laserjet_dynamicmenus_30a_1.1.jar
3.779
1.01 (fall release 2003)
s_hp_autostore_4100_9000_2032.jar
hp_laserjet_addressbook_30z)3.75x.jar
hp_laserjet_dynamicmenus_30a_1.3.jar
DSS (Digital Sending Services) updates
14
How to access HP LaserJet training
Where is the one-stop-shop for HP LaserJet
training information? It depends on who is
requesting the training. Following are a few
training resources based on audience:
•
Opportunities for HP Partners (outside the HP
firewall):
•
•
The Learning Center, accessed at
http://vsslfpro.compaq.com/plm/, is the
main global resource for training content.
However, it contains only Web-based or selfpaced courses, not instructor-led courses. HP
Partners must obtain student ID numbers to
use this site. Use the following link to obtain
an external account:
http://vsslfpro.zcce.compaq.com/Plm/conta
ct/index.html
For HP employees from any region, to log on
you must select North America as your
region, and enter an eight-digit employee
number (add leading zeros). To search for
courses, select Available Courses, and look
under Printers—Imaging/Print Technology or
Printers—Laser.
In North America, you may access
HP LaserJet training information from the
Partnership Web at
https://partner.americas.hp.com. Select
Training in the left navigation bar and then
select Printing and Digital Imaging from the
Service and Support Training menu. This site
provides both Web-based and instructor-led
training information.
Opportunities for HP Internal Employees (those
who sit inside the HP firewall):
•
http://learn.hp.com offers courses in both
Web-based and instructor-led formats—
search for “LaserJet.” Web-based courses
should always be available for download;
instructor-led course availability varies
according to course demand. Learn.hp.com
will track your learning progress and keep a
record of the courses you’ve taken.
•
The Learning Utility is a training repository in
which course materials are stored. If you can
not find what you are looking for on
learn.hp.com check out this internal site.
You must use the Browse LU search tool to
locate courses, and search for “LaserJet”. This
tool will not track your courses or provide you
with a learning record, so searching via
learn.hp.com first is recommended. There are
three servers available for the Learning Utility:
The Services Media Library is available on
CD by subscription. Partners with CSN.COM
access can order the CD; go to
www.hp.com/partners/csn and log on.
Select Support Tools & Information under the
Technical Support heading, click Technician’s
Toolbox at the top of the screen, then select
Order Now. This tool provides animated job
aids, videos, and computer simulations to
help you better understand HP products.
–
–
–
•
Americas:
http://learning1.americas.cpqcorp.net
EMEA: http://learning2.emea.cpqcorp.net
A/P: http://learning4.asiapac.hp.com
The Services Media Library is not an official
training Web site, but with animated job
aids, videos, and computer simulations, it is a
useful tool to help you better understand
HP products. The animations can be run from
the main server or downloaded to your
computer for more convenient access:
http://learning1.americas.cpqcorp.net/wbt/
e9-10200-wb/default.htm. Check out the
Procedures section under the product of your
choice.
HP learning center
How to access HP LaserJet training
15
Microsoft® and Windows are U.S. registered trademarks of
Microsoft Corporation. PostScript® is a U.S. registered
trademark of Adobe Systems Incorporated.
HP and the invent signature are trademarks of the HewlettPackard Company. All other brand and product names
mentioned are trademarks or registered trademarks of their
respective companies.
The information contained in this document is subject to change
without notice. Hewlett-Packard makes no warranty of any kind
with respect to this information. HEWLETT-PACKARD
SPECIFICALLY DISCLAIMS THE IMPLIED WARRANTY OF
MERCHANTABILITY AND FITNESS FOR A PARTICULAR
PURPOSE. Hewlett-Packard shall not be liable for any direct,
indirect, incidental, consequential, or other damage alleged in
connection with the furnishing or use of this information.
©Copyright Hewlett-Packard Company, 2004. All Rights
Reserved. Reproduction, adaptation, or translation without prior
written permission is prohibited, except as allowed under the
copyright laws. First Edition, March, 2004.
For more information visit our Web site at www.hp.com