1
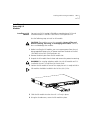
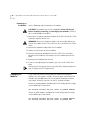
®
I/O MODULE INSTALLATION
GUIDE
SUPERSTACK II REMOTE ACCESS SYSTEM 1500
This guide describes how to install V.34 (analog), ISDN-BRI or a
combination of V.34 and ISDN-BRI modules into the RAS 1500 Base Unit
or RAS 1500 Expansion unit. It includes the following:
■
Overview
■
Related Documentation
■
Contacting 3Com
■
Before You Begin
■
Installing and Removing I/O Modules
■
Swapping I/O Modules
■
Powering the Unit On or Off
Visit 3Com’s web site (http://www.3Com.com/ras1500) for the latest
SuperStack II Remote Access System 1500 code and documentation.
Part No. 1.024.1911 Rev 2.00
December, 1999
2
I/O MODULE INSTALLATION GUIDE SUPERSTACK II REMOTE ACCESS SYSTEM 1500
Overview
The I/O modules are inserted into the RAS 1500 Base Unit or RAS 1500
Expansion unit. The RAS 1500 and RAS 1500 Expansion provide
remote-access services and terminal server functions, via analog and BRI
ISDN connections.
Related
Documentation
RAS 1500 documentation is available on the Resource CD that you
received with the Base Unit. The complete RAS 1500 documentation set
is available at http://www.3com.com/ras1500.
Contacting 3Com
Use this chart as a reference when you need to contact 3Com.
Contacting 3Com
3Com Corp. - 5400 Bayfront Plaza - P.O. Box 58145 - Santa Clara, CA - 95052-8145
Internet
http://www.3Com.com
For a complete listing of support and contact numbers, refer to Appendix
E, “Technical Support,” of the Installing and Configuring the RAS 1500
Guide.
Before You Begin
Before you begin installation, you should:
■
confirm you have the required equipment,
■
check that your I/O Module package contains everything it should.
Contact your network administrator for assistance.
You Should Have
Received
The following items should be included in your I/O Module package:
■
This I/O module installation guide,
■
a 4-port V.34 modem module or 2-port ISDN BRI module,
■
ISDN or regular telephone cables.
Installing and Removing I/O Modules
3
Installing and
Removing I/O
Modules
Installing an I/O
Module
You can install V.34 (analog), ISDN-BRI or a combination of V.34 and
ISDN-BRI modules in the RAS 1500 or RAS 1500 Expansion unit.
Use the following steps to install an I/O module:
CAUTION: The modules are not hot-swappable. Power off the unit
before installing, removing, or exchanging the module. Failure to
do so could damage the modules.
1 Before installing the I/O module, you must remove power from the unit
being upgraded. Remove the AC power cord from the back of the RAS
1500 Base Unit or RAS 1500 Expansion unit.
2 Remove the blank plate from the I/O module slot.
3 Unpack the I/O module from the box and remove the protective covering.
WARNING: Do not plug telephone cables into the I/O module until it is
installed in the unit. It could result in electric shock.
4 Position the I/O module in front of the empty slot so it is ready to slide in.
I/O modules should be installed in the left slot (slot 1) first.
5 Slide the I/O module into the slot until it is firmly in place.
6 Using the thumbscrews, screw the I/O module in place.
4
I/O MODULE INSTALLATION GUIDE SUPERSTACK II REMOTE ACCESS SYSTEM 1500
Removing an
I/O Module
Use the following steps to remove an I/O module:
CAUTION: The modules are not hot-swappable. Power off the unit
before installing, removing, or exchanging the modules. Failure to
do so could damage the modules.
1 Remove the AC power cord from the back of the RAS 1500 or RAS 1500
Expansion to power off the unit.
WARNING: Remove the telephone cables from the module before you
remove the module from the unit. Failure to do so could result in electric
shock.
2 Remove the telephone cables from the I/O module.
3 Loosen the two screws on the I/O module.
4 Place the screwdriver provided with the RAS 1500 in the small hole
beneath the I/O module’s slot and push until the module ejects out of
place.
5 Remove the I/O module from the slot.
6 If you are not replacing the I/O module, you must install a blank face
plate.
Leaving the I/O slot open presents a potential safety hazard and the unit
may no longer meet FCC requirements.
Swapping I/O
Modules
If you swap a Basic Rate Interface (BRI) I/O module and analog I/O
module, reset the modem’s settings. Otherwise, ports could hang. Two
examples are provided below. Be sure to provide the proper interface
(rm0, pem0, or pemX), slot (slot:1 or slot:2), and port numbers.
To reset an analog modem’s configuration to the factory-default settings,
use the following CLI command:
set switched interface rm0/slot:1/mod:1 at_command AT&F0&W
To reset an ISDN modem’s configuration to the factory-default settings,
use the following CLI commands:
set switched interface rm0/slot:1/mod:1 at_command AT&F0&W
set switched interface rm0/slot:1/mod:1 at_command ATZ!
Powering the Unit On or Off
Powering the Unit
On or Off
5
To power on the RAS 1500 Base Unit or RAS 1500 Expansion unit:
1 Connect the power cord to the AC power port of the unit.
2 Plug the power cord into the AC power supply source. The unit starts up.
To power off the RAS 1500 or RAS 1500 Expansion:
■
Remove the AC power cord from the AC power port of the unit.
6
I/O MODULE INSTALLATION GUIDE SUPERSTACK II REMOTE ACCESS SYSTEM 1500
Copyright © 1999, 3Com Corporation
Part No. 1.024.1911 Rev 2.00