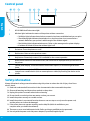
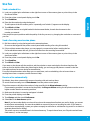
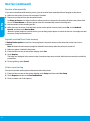
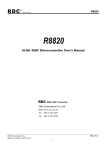
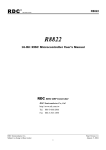
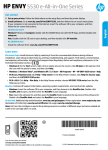
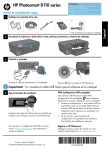
1
Reference Guide
HP Officejet 8040 e-All-in-One Series
Get started
1. Follow the illustrations in the Start here booklet to set up your printer.
Mobile Device OS: Type 123.hp.com in the browser of your mobile device to install the printer remote app.
This product is Apple AirPrint enabled. The printer and iOS device or Mac must be on the same local network.
Windows®: Type 123.hp.com in a browser, and then follow the on-screen instructions. If your computer is
not connected to the Internet, insert the software CD in your computer. If the CD does not start, browse to
Computer, double-click the CD/DVD drive icon with the HP logo, double-click setup.exe, and then follow the
on-screen instructions.
OS X/iOS: To install the latest HP software on a Mac, type 123.hp.com in a browser. HP software for Mac is not
included on the software CD that came with the printer.
3. Create an HP Connected account to activate your printer and HP OJ 8040 Hard Drive. Your Neat® account is
automatically created when you create your HP Connected account.
Learn more
Electronic Help: Install the electronic Help by selecting it from the recommended software during software
installation. Learn about product features, printing, troubleshooting, and support. Find notices, environmental,
and regulatory information, including the European Union Regulatory Notice and compliance statements, in the
Technical Information section.
•• Windows® 8.1: Click the down arrow in lower left corner of the Start screen, select the printer name, click
Help, and then select Search HP Help.
•• Windows® 8: On the Start screen, right-click an empty area on the screen, click All Apps on the app bar, click
the icon with the printer’s name, and then click Help.
•• Windows® 7: Click Start > All Programs > HP > HP Officejet 8040 series > Help.
•• OS X: Click Help > Help Center. In the Help Viewer window, click Help for all your apps, and then click HP
Officejet 8040 series.
Readme: Contains HP support information, operating system requirements, and recent printer updates.
•• Windows: Insert the software CD in your computer, and then browse to the ReadMe.chm file. Double-click
ReadMe.chm to open, and then select the ReadMe in your language.
•• Mac: Open the Documents folder located at the top-level of the software installer. Double-click ReadMe,
and then select the ReadMe in your language.
On the Web: Additional help and information: www.hp.com/go/support. Printer registration: www.register.
hp.com. Declaration of Conformity: www.hp.eu/certificates. Ink usage: www.hp.com/go/inkusage
Note: Ink from the cartridges is used in the printing process in a number of different ways and some residual ink
is left in the cartridge after it is used.
Scan to find out more!
Standard data rates may apply. Might not be available in all languages.
hp.com/mobile/OJ8040
EN
The information
contained herein
is subject to change
without notice.
*F5A16-90002*
*F5A16-90002*
F5A16-90002
Printed in [English]
© 2014 Hewlett-Packard Development Company, L.P.
English
2. Install the software.
Control panel
English
1
HP OJ 8040 Hard Drive status light
2
Wireless light: Indicates the status of the printer wireless connection.
•• Solid blue light indicates that wireless connection has been established and you can print.
•• Slow blinking light indicates that wireless is on, but the printer is not connected to a
network. Make sure your printer is within range of the wireless signal.
•• Fast blinking light indicates wireless error. Refer to the message on the printer display.
•• If wireless is turned off, then the wireless light is off.
3
On button: Turns the printer on or off.
4
Back button: Returns to the previous screen.
5
Help button: Shows help content if it is available for the current operation.
6
Home button: Returns to the Home screen, the screen that is displayed when you first turn on
the printer.
7
Control panel display: Touch the screen to select menu options, or scroll through the menu
items.
8
Near Field Communication (NFC) button: Indicates the area where you can print documents and
images from a mobile device (such as a smartphone or tablet) by touching the device on the
printer.
Safety information
Always follow basic safety precautions when using this printer to reduce the risk of injury from fire or
electric shock.
1. Read and understand all instructions in the documentation that comes with the printer.
2. Observe all warnings and instructions marked on the printer.
3. Unplug this printer from wall outlets before cleaning.
4. Do not install or use this printer near water or when you are wet.
5. Install the printer securely on a stable surface.
6. Install the printer in a protected location where no one can step on or trip over the power cord,
and the power cord cannot be damaged.
7. If the printer does not operate normally, see the help file (which is available on your
computer after you install the software).
8. There are no user-serviceable parts inside. Refer servicing to qualified service personnel.
9. Use only with the power cord and power adapter (if provided) supplied by HP.
2
Basic troubleshooting
If you are unable to print:
1. Make sure the cable connections are secure.
2. Make sure the printer is powered on. The On button is lit white.
4. Visit the HP Diagnostic Tools website at www.hp.com/go/tools to download free diagnostic utilities (tools)
that you can use to fix common printer problems.
Windows
Mac
Make sure that the printer is set as your default
printing device:
Check your print queue:
•• Windows 8.1 and Windows 8: Point to or tap the
upper-right corner of the screen to open the Charms
bar, click the Settings icon, click or tap Control
Panel, and then click or tap View devices and
printers.
•• Windows 7: From the Windows Start menu, click
Devices and Printers.
Make sure that your printer has a check mark in the
circle next to it. If your printer is not selected as the
default printer, right-click the printer icon and choose
Set as Default Printer from the menu.
If you are using a USB cable and you are still unable
to print, or, if you try to install the software from the
CD and the installation fails:
1. Remove the CD from the CD/DVD drive, and then
disconnect the USB cable from the computer.
2. Restart the computer.
3. Insert the printer software CD in the CD/DVD drive,
and then follow the on-screen instructions to install
the printer software. Do not connect the USB cable
until you are told to do so.
4. After the installation finishes, restart the computer.
If you are using wireless and you are still unable to
print:
Go to the Networking section on the next page for
more information.
English
3. Check the wireless status light to make sure your printer is connected to a network, if printing wirelessly.
1. In System Preferences, click Printers & Scanners
(Print & Fax in OS X v10.7 Lion and OS X v10.8
Mountain Lion).
2. Click Open Print Queue.
3. Click a print job to select it.
4. Use the following buttons to manage the print job:
•• Cancel icon: Cancel the selected print job.
•• Resume: Continue a paused print job.
5. If you made any changes, try to print again.
Restart and reset:
1. Restart the computer.
2. Reset the printer.
a. Turn off the printer and unplug the power cord.
b. Wait a minute, then plug the power cord back in
and turn on the printer.
Reset the printing system:
1. In System Preferences, click Printers & Scanners
(Print & Fax in OS X v10.7 Lion and OS X v10.8
Mountain Lion).
2. Press and hold the Control key as you click the list
at the left, and then choose Reset printing system.
3. Add the printer you want to use.
Uninstall the software:
1. If the printer is connected to your computer through
USB, disconnect the printer from your computer.
2. Open the Applications/Hewlett-Packard folder.
3. Double-click HP Uninstaller, and then follow the
on-screen instructions.
Anonymous usage information storage: The HP cartridges store a limited set of anonymous information about
the usage of the printer. For more information and instructions for disabling this storage, see the electronic Help.
Acknowledgements: Windows 7, Windows 8, and Windows 8.1 are U.S. registered trademarks of Microsoft
Corporation.
Mac, OS X, and AirPrint are trademarks of Apple Inc., registered in the U.S. and other countries.
3
Wireless networking
Need networking help?
www.hp.com/go/wirelessprinting
The HP Wireless Printing Center at www.hp.com/go/wirelessprinting can help you prepare your wireless network,
set up or reconfigure your printer, and troubleshoot networking problems.
If connecting your printer to the network was unsuccessful
English
•• Use the Wireless Setup Wizard to get your printer connected.
1. From the printer control panel, touch
2. Touch
(Wireless).
(Settings), and then touch Wireless Settings.
3. In the Wireless Settings screen, select Wireless Setup Wizard. Follow the onscreen instructions to complete
the printer wireless connection setup.
•• Confirm that your printer is connected to your network.
1. From your printer control panel, touch
2. Touch
(Wireless).
(Settings).
3. Touch Print Reports, and then touch Wireless Test Report. The Wireless Test Report is automatically printed.
4. Check the top of the report to see if something failed during the test.
–– See the Diagnostics Results section for all tests that were performed, to determine whether or not your
printer passed.
–– From the Current Configuration section, find out the Network Name (SSID) to which your printer is
currently connected. Make sure that the printer is connected to the same network as your computer.
Note: If your computer is connected to a Virtual Private Network (VPN), temporarily disconnect from the VPN
before proceeding with the software installation. After the installation you need to disconnect from the VPN to
access your printer over your home network.
•• Make sure security software is not blocking communication over your network.
Security software, such as firewalls, can block communication between your computer and printer when
installing over a network. If your printer cannot be found, temporarily disable your firewall and check if the
problem goes away. For more help and tips on security software, go to: www.hp.com/go/wpc-firewall.
•• Restart components of the wireless network
Turn off the router and the printer, and then turn them back on in this order: router first and then printer.
Sometimes, turning off devices and then turning them back on helps resolve network communication issues.
If you still cannot connect, turn off the router, the printer, and the computer, and then turn them back on in this
order: router first, then printer, and then computer.
Note: If the wireless connection cannot be made, the printer can also be connected to the network using an
Ethernet cable.
If you still have problems, visit the HP Wireless Printing Center (www.hp.com/go/wirelessprinting). This
website contains the most complete, up-to-date information about wireless printing, as well as information to
help you prepare your wireless network; solve problems when connecting the printer to the wireless network;
and resolve security software issues.
Note: If you are using a computer running Windows, you can use the Print and Scan Doctor tool, which can help
solve many problems you might have with the printer. To download this tool, visit www.hp.com/go/tools.
If you want to share your printer with multiple computers on your network
First install your printer on your home network. After you have successfully connected your printer to your home
network, you can share your printer with other computers on the same network. For each additional computer you
only need to install the HP printer software.
4
Wireless networking (continued)
If you want to change from a USB connection to a wireless connection
First make sure that you have already successfully installed your printer software.
Windows
1. Do one of the following according to your operating system:
•• Windows 8: On the Start screen, right-click an empty area on the screen, click All Apps on the app bar.
•• Windows 7: From the computer’s Start menu, select All Programs or Programs, and then select HP.
2. Select HP Officejet 8040 series.
English
•• Windows 8.1: Click the down arrow in lower left corner of the Start screen, select the printer name, and
then click Utilities.
3. Select Printer Setup & Software.
4. Select Convert a USB connected printer to wireless. Follow the on-screen instructions.
Mac
Use HP Utility in Applications/Hewlett-Packard to change the software connection to wireless for this printer.
If you want to use the printer wirelessly without a router
Use Wi-Fi Direct to print wirelessly without a router, from your computer, smartphone, or other wireless enabled
device. To use Wi-Fi Direct from a computer, the printer software must be installed on the computer.
1. Make sure that Wi-Fi Direct on your printer is turned on:
a. From the Home screen on the printer display, touch
b. If Status is Off, touch
(Wi-Fi Direct).
(Wi-Fi Direct Settings) and turn Wi-Fi Direct on.
2. Connect your wireless enabled device to your printer:
a. Turn on the Wi-Fi connection on your mobile device. For more information, see the documentation provided
with the mobile device.
b. From the mobile device, connect to a new network. Use the process you normally use to connect to a new
wireless network or hotspot. Choose the Wi-Fi Direct name from the list of wireless networks shown such as
DIRECT-**-HP Officejet-8040 (where ** are the unique characters to identify your printer).
c. Enter the Wi-Fi Direct password when prompted.
3. Print as you normally do from your computer or mobile device.
Note: Wi-Fi Direct connection does not provide Internet access.
Visit the HP Wireless Printing Center at www.hp.com/go/wirelessprinting for more information about Wi-Fi
Direct.
This product is designed for use in open environments (e.g., in homes and not connected to the public internet) in
which anyone may access and use the printer. As a result, the Wi-Fi Direct setting is in “Automatic” mode by default,
without an administrator password; this allows anyone in wireless range to connect and access all functions and
settings of the printer. If higher security levels are desired, HP recommends changing the Wi-Fi Direct Connection
Method from “Automatic” to “Manual” and establishing an administrator password.
If you want to print with AirPrint
This printer is Apple AirPrint™-enabled. You can print wirelessly from your iOS device or Mac.
•• Your printer and iOS device or Mac must be on the same wireless network.
•• With Apple AirPrint™, you cannot scan documents from the printer to your iOS device.
5
Set up fax
1. Connect the phone line.
Note: HP printers are designed specifically for use with traditional analog phone services. If you are in a digital
phone environment (such as DSL/ADSL, PBX, ISDN, or FoIP), you might need to use digital-to-analog filters
or converters when setting up the printer for faxing. Contact your phone company to determine which setup
options are best for you.
If the phone line is only used for fax
English
a. Connect one end of the phone cord to the phone wall jack.
b. Connect the other end to the port labeled 1-LINE on the back of the printer.
If you have subscribed to a DSL/ADSL service, connect a DSL/ADSL filter between the 1-LINE port and the phone
wall jack.
2. Test fax setup.
The fax test checks hardware, verifies phone cord type and connection status, and checks for a dial tone and an
active phone line. To run the test:
a. From the Home screen on the printer display, touch Fax.
b. Select Setup, select Setup Wizard, and then follow the on-screen instructions.
1
2
3
Phone wall jack
Fax port (1-LINE)
Note: Do not insert into the port labeled 2-EXT.
DSL/ADSL filter (provided by the telephone company
or service provider)
If additional devices are connected to the phone line
If you have other devices to connect, connect them as shown in the diagram below:
* TAM: Telephone answering machine
** FoIP: Fax over Internet Protocol
6
1
2
3
4
5
6
7
8
9
10
Phone wall jack
Parallel splitter
DSL/ADSL modem
Telephone answering machine
Telephone
ISDN wall jack
Terminal adapter or ISDN router
Broadband modem
DSL/ADSL filter
Analog telephone adaptor
Use fax
Send a standard fax
1. Load your original print-side down on the right front corner of the scanner glass or print-side up in the
Document Feeder.
2. From the printer control panel display, touch Fax.
4. Enter the fax number by using the keypad.
To add a pause in the fax number, press * repeatedly, until a dash (-) appears on the display.
5. Touch Black or Color.
If the printer detects an original loaded in the document feeder, it sends the document to the
English
3. Touch Send Now.
number you entered.
If the recipient reports problems with the quality of the fax you sent, try changing the resolution or contrast of
your fax.
Send a fax using an extension phone
1. Dial the number by using the keypad on the extension phone.
Do not use the keypad on the printer control panel when sending a fax using this method.
2. If the recipient answers the phone, you can engage in a conversation before sending the fax.
If a fax machine answers the call, you hear fax tones from the receiving fax machine.
3. Load your original print-side down on the right front corner of the scanner glass or print-side up in the
document feeder.
4. From the printer control panel display, touch Fax.
5. Touch Send Fax.
6. Touch Black or Color.
If you were on the phone with the recipient, ask the recipient to start receiving the fax when they hear fax
tones on the fax machine. When the printer begins faxing, you can hang up the phone or remain on the line.
You might not hear fax tones during fax transmission.
For more information about other ways you can send faxes, such as scheduling a fax to be sent later or
sending faxes from a computer, see the electronic Help.
Receive a fax automatically
By default, the printer automatically answers incoming calls and receives faxes.
To receive faxes manually, turn off Auto Answer from the printer control panel.
The printer answers calls after the number of rings specified in the Rings to Answer setting.
If an answering machine is connected to the printer, the Rings to Answer setting for the printer must be set to a
higher number than the answering machine.
1. Make sure the printer is turned on and paper is loaded.
2. From the printer display, touch Fax.
3. Touch Setup, and then touch Preferences.
4. Select On for the Auto Answer option.
Note: If you have subscribed to a voice mail service on the same phone line that you use for faxing, you cannot
receive faxes automatically. You must be available to respond in person to incoming fax calls. (If you want to
receive faxes automatically, contact your phone company to subscribe to a distinctive ring service or to obtain a
separate phone line for faxing.)
The printer can store received faxes in its internal memory. To reprint these faxes, see “Reprint received faxes
from memory” on the next page.
7
Use fax (continued)
Receive a fax manually
If you are on the phone with another person, you can receive faxes manually without hanging up the phone.
1. Make sure the printer is turned on and paper is loaded.
2. Remove any originals from the document feeder.
English
Set Rings to Answer to a higher number to allow you time to answer the incoming call before the printer does.
Or turn off Auto Answer so that the printer does not automatically answer incoming calls.
3. Ask the sender to start sending the fax.
4. When you hear fax tones, from the Home screen on the printer control panel, touch Fax, touch Send and
Receive, and then touch Receive Now.
When the printer begins to receive the fax, you can hang up the phone or remain on the line. You might not hear
fax tones during fax transmission.
Reprint received faxes from memory
If Backup Fax Reception is turned on, incoming faxes is stored in memory even when the printer has an error
condition.
Note: All faxes stored in memory might be deleted from memory when the printer is turned off.
1. Make sure paper is loaded in the printer.
2. From the Home screen on the printer display, touch Fax.
3. Touch Reprint.
The faxes are displayed in the reverse order from when they were received, with the most recently received fax
printed first.
4. To stop printing, select Cancel.
Print a report or log
Fax reports provide useful system information about the printer.
1. From the Home screen on the printer display, touch Setup and then touch Fax Setup.
2. Touch Reports and then touch Fax Confirmation.
3. Touch to select one of the options.
8
Solve fax problems
Cannot send but can receive faxes
1. Perform a copy or scan to ensure that the printer is
working properly.
2. Check the physical fax connections.
3. Check if other fax devices can send to the same
phone number. The receiving fax device might have
blocked your phone number, or it might be having
technical problems.
4. If the problem persists, print the fax test report and
fax log (and if available, the Caller ID report and
Junk Fax report), and then contact HP for further
help.
Cannot receive but can send faxes
1. Check the fax settings on the printer.
2. Check the physical fax connections.
3. Check if other devices connected to the same phone
line can receive faxes. The phone line might be
faulty or the sending fax device might be having
problems sending faxes. You might also want
to check if you have blocked the sender’s phone
number.
4. Check the problem with the sender. If the problem
persists, print the fax test report and fax log (and if
available, the Caller ID report and Junk Fax report),
and then contact HP for further help.
Cannot send and receive faxes
1. Perform a copy or scan to ensure that the printer is
working properly.
2. Check the physical fax connections.
3. Check the fax settings on the printer.
4. Check if other devices connected to this phone line
can send or receive faxes. There might be a problem
with the phone line.
5. Reset the printer by turning off the printer and,
if possible, the main switch of the power supply.
Wait for a few seconds before turning on the power
again. Try to send or receive a fax on the printer.
6. If the problem persists, print the fax test report and
fax log (and if available, the Caller ID report and
Junk Fax report), and then contact HP for further
help.
Check the printer fax settings
•• The Auto Answer feature is turned on for the
printer to receive fax automatically.
•• If you have subscribed to a voice mail service from
the phone company or service provider, ensure
that the Rings to Answer on the printer is set to a
greater number of calls than that of the telephone
answering machine. The printer software processes
an incoming call to detrmine if it is a normal phone
call or fax call. If it is a fax call, the printer starts a
fax connection automatically. Otherwise, you might
have to receive the fax manually by selecting Fax on
the printer display.
English
If you still have problems using fax after successfully
completing the fax test, follow the steps below:
•• If multiple phone numbers are assigned to the
same physical phone line and the line is shared
by multiple devices, ensure that the printer is set
to the correct distinctive ring setting for receiving
faxes.
Check the physical fax connections
•• Connect the phone cable from the 1-LINE port on
the back of the printer to the phone wall jack and
connect a phone cable from the 2-EXT port on the
back of the printer to an extension phone. From the
extension phone, call the phone number that failed
to receive the faxes.
•• If you were trying to fax to an external number, be
sure to include any required access code or numbers
prior to entering the number. You might also
need to add a pause in the number to prevent the
printer from dialing too fast; to add a pause, press *
repeatedly until a dash (-) appears on the display.
•• If you cannot make any outgoing calls because no
dial tone is detected or the line is noisy, try using
another phone cable in place of the one connected
to the 1-LINE phone port, or move the printer to
another location which has a separate phone line (if
possible) and see if there are similar problems.
•• If you are in a digital phone environment (such
as FoIP, fax over VoIP), reduce the fax speed and
turn off the Error Code Modulation (ECM) from the
printer control panel. If needed, contact your phone
company to find out if there are problems with the
phone line or to learn more about the capabilities of
the phone network.
7. Note: If you have subscribed to a voice mail service
on the same phone line used for faxing, you have to
receive faxes manually.
9
Neat®
Digitally organize your paperwork on the web in your Neat account. Neat’s proprietary technology extracts
important information from scanned receipts and business cards so you can work directly with your data. You can
instantly create tax, spending, and expense reports from your receipts. Neat instantly turns scanned business
cards into digital contacts. Neat allows you to do the following.
•• Scan receipts and documents with your smartphone or HP Officejet 8040 All-in-One printer
•• Create, send, and print expense reports from your smartphone or computer
English
•• Access your Neat account from virtually anywhere
•• Securely store your information. Items scanned to your Neat account are stored in Neat’s cloud service with
bank-level security and are automatically backed up on the 1 terabyte HP OJ8040 Hard Drive attached to the
back of your printer.
When you activated your printer during setup, you created a free HP Connected account which is linked to the
automatically created Neat account. The 1 terabyte printer hard drive is also automatically associated with these
accounts when activated.
Important tips for success
Activate your printer
You must activate your printer to use Neat. If you did not create your HP Connected account and activate your
printer during printer setup, visit hp.com/go/oj8040hd to complete the steps and enable Neat.
Keep your HP OJ8040 Hard Drive connected to your printer
Your Neat account files are automatically backed up on your HP OJ8040 Hard Drive only if the hard drive is attached
to your printer and activated.
Keep your printer on and connected to the wireless network
Your Neat account files are automatically backed up on your HP OJ8040 Hard Drive only if your printer is on and
connected to the Internet. When your printer is not being used it switches to Sleep Mode, which is a reduced power
state. When the Neat files are backed up to the hard drive, the printer turns on.
Remove your HP OJ8040 Hard Drive safely
If you need to remove your HP OJ8040 Hard Drive, be sure to remove it first on the printer display to avoid possible
damage to the hard drive or the loss of the stored files. To remove the hard drive safely do the following:
1. On the Home screen of the printer display, touch
2. Touch
(Settings).
3. Touch Safely Remove the Hard Drive.
10
(HP OJ8040 Hard Drive status screen).
Neat® (continued)
Use Neat®
After you have created your HP Connected account, you are ready to use Neat.
Scan from your printer
Note: If you are scanning multiple small receipts or cards, scan them one at a time on the scanner glass instead of
the automatic document feeder.
Scan from a mobile device
English
Place the documents that you wish to scan into your Neat account on the scanner glass or load them into the
automatic document feeder. Touch Neat® on the Home screen and then touch Start Scan.
Use the Neat mobile app to scan receipts, business cards, and documents with your phone camera and send them
to your Neat account. If you did not install the app during printer activation, visit Google Play for Android devices or
the Apple Store for Apple devices to download the Neat mobile app.
Import files into your Neat account
If you have digital files that you wish to add to your Neat account, visit cloud.neat.com and sign in using your HP
Connected Username and Password. Click the Sign in with HP Connected button when you sign in. To import the
files click Import and select the files or images you wish to upload.
Access files in your Neat account
To access your files, visit cloud.neat.com on your computer or use the Neat mobile app on your mobile device and
sign in using the HP Connected sign-in button.
View files backed up on the printer hard drive from your computer
All of the files stored in your Neat account are automatically backed up on the 1 terabyte hard drive attached to the
back of your printer. Download the HP OJ8040 Hard Drive Utility from hp.com/go/OJ8040Help to view all the files
in your Neat account.
To access HP OJ8040 Hard Drive Utility on your computer after the installation do one of the following:
•• Windows® 8.1: Click the down arrow in lower left corner of the Start screen, select HP OJ8040 Hard Drive
Utility, and then click HP OJ8040 Hard Drive Utility.
•• Windows® 8: On the Start screen, right-click an empty area on the screen, click All Apps on the app bar, select
HP OJ8040 Hard Drive Utility, and then click HP OJ8040 Hard Drive Utility.
•• Windows® 7: Click Start > All Programs > HP OJ8040 Hard Drive Utility > HP OJ8040 Hard Drive Utility.
•• OS X: Click Help > Help Center. In the Help Viewer window, click Help for all your apps, select HP OJ8040 Hard
Drive Uitility, and then click HP OJ8040 Hard Drive Utility.
IMPORTANT: Your Neat scans are automatically backed up from the Neat service to your HP OJ8040 Hard Drive. Do
not modify the Neat back-up files and folders on the hard drive. You may add other files and folders to the drive if
you wish.
Neat account support
Visit www.neat.com/support.
11
HP printer limited warranty statement
English
HP product
Duration of limited warranty
Software Media
90 days
Printer
1 year
Print or Ink cartridges
Until the HP ink is depleted or the “end of warranty” date
printed on the cartridge has been reached, whichever
occurs first. This warranty does not cover HP ink products
that have been refilled, remanufactured, refurbished,
misused, or tampered with.
Printheads (only applies to products with customer
replaceable printheads)
1 year
Accessories
1 year unless otherwise stated
A. Extent of limited warranty
1. Hewlett-Packard (HP) warrants to the end-user customer that the HP products specified above will be free from defects
in materials and workmanship for the duration specified above, which duration begins on the date of purchase by the
customer.
2. For software products, HP’s limited warranty applies only to a failure to execute programming instructions. HP does not
warrant that the operation of any product will be interrupted or error free.
3. HP's limited warranty covers only those defects that arise as a result of normal use of the product, and does not cover
any other problems, including those that arise as a result of:
a. Improper maintenance or modification;
b. Software, media, parts, or supplies not provided or supported by HP;
c. Operation outside the product's specifications;
d. Unauthorized modification or misuse.
4. For HP printer products, the use of a non-HP cartridge or a refilled cartridge does not affect either the warranty to the
customer or any HP support contract with the customer. However, if printer failure or damage is attributable to the use of
a non-HP or refilled cartridge or an expired ink cartridge, HP will charge its standard time and materials charges to
service the printer for the particular failure or damage.
5. If HP receives, during the applicable warranty period, notice of a defect in any product which is covered by HP's
warranty, HP shall either repair or replace the product, at HP's option.
6. If HP is unable to repair or replace, as applicable, a defective product which is covered by HP's warranty, HP shall,
within a reasonable time after being notified of the defect, refund the purchase price for the product.
7. HP shall have no obligation to repair, replace, or refund until the customer returns the defective product to HP.
8. Any replacement product may be either new or like-new, provided that it has functionality at least equal to that of the
product being replaced.
9. HP products may contain remanufactured parts, components, or materials equivalent to new in performance.
10. HP's Limited Warranty Statement is valid in any country where the covered HP product is distributed by HP. Contracts
for additional warranty services, such as on-site service, may be available from any authorized HP service facility in
countries where the product is distributed by HP or by an authorized importer.
B. Limitations of warranty
TO THE EXTENT ALLOWED BY LOCAL LAW, NEITHER HP NOR ITS THIRD PARTY SUPPLIERS MAKES ANY
OTHER WARRANTY OR CONDITION OF ANY KIND, WHETHER EXPRESS OR IMPLIED WARRANTIES OR
CONDITIONS OF MERCHANTABILITY, SATISFACTORY QUALITY, AND FITNESS FOR A PARTICULAR PURPOSE.
C. Limitations of liability
1. To the extent allowed by local law, the remedies provided in this Warranty Statement are the customer's sole and
exclusive remedies.
2. TO THE EXTENT ALLOWED BY LOCAL LAW, EXCEPT FOR THE OBLIGATIONS SPECIFICALLY SET FORTH IN
THIS WARRANTY STATEMENT, IN NO EVENT SHALL HP OR ITS THIRD PARTY SUPPLIERS BE LIABLE FOR
DIRECT, INDIRECT, SPECIAL, INCIDENTAL, OR CONSEQUENTIAL DAMAGES, WHETHER BASED ON
CONTRACT, TORT, OR ANY OTHER LEGAL THEORY AND WHETHER ADVISED OF THE POSSIBILITY OF
SUCH DAMAGES.
D. Local law
1. This Warranty Statement gives the customer specific legal rights. The customer may also have other rights which vary
from state to state in the United States, from province to province in Canada, and from country to country elsewhere in
the world.
2. To the extent that this Warranty Statement is inconsistent with local law, this Warranty Statement shall be deemed
modified to be consistent with such local law. Under such local law, certain disclaimers and limitations of this Warranty
Statement may not apply to the customer. For example, some states in the United States, as well as some governments
outside the United States (including provinces in Canada), may:
a. Preclude the disclaimers and limitations in this Warranty Statement from limiting the statutory rights of a consumer
(e.g., the United Kingdom);
b. Otherwise restrict the ability of a manufacturer to enforce such disclaimers or limitations; or
c. Grant the customer additional warranty rights, specify the duration of implied warranties which the manufacturer
cannot disclaim, or allow limitations on the duration of implied warranties.
3. THE TERMS IN THIS WARRANTY STATEMENT, EXCEPT TO THE EXTENT LAWFULLY PERMITTED, DO NOT
EXCLUDE, RESTRICT, OR MODIFY, AND ARE IN ADDITION TO, THE MANDATORY STATUTORY RIGHTS
APPLICABLE TO THE SALE OF THE HP PRODUCTS TO SUCH CUSTOMERS.
HP Limited Warranty
The name and address of the HP entity responsible for the performance of the HP Limited Warranty in your country is as follows:
United Kingdom: Hewlett-Packard Ltd Cain Road Bracknell GB-Berks RG12 1HN
Eire: Hewlett-Packard Ireland Limited, 63-74 Sir John Rogerson's Quay, Dublin 2
Malta: Hewlett-Packard International Trade B.V. Malta Branch, 48, Amery Street, Sliema SLM 1701, MALTA
You may have additional statutory rights against the seller based on your purchase agreement. Those rights are not in any way
affected by this HP Limited Warranty.
12