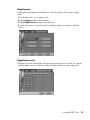
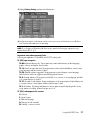
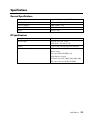
1
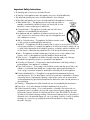
HP MR4000N HDTV Tuner
User’s Guide
Regulatory model: HSTND-3X01
The information in this document is subject to change without notice.
Hewlett-Packard Company makes no warranty of any kind with regard to this material, including, but not limited to, the implied
warranties of merchantability and fitness for a particular purpose.
HP shall not be liable for errors contained herein or for incidental or consequential damages in connection with the furnishing,
performance, or use of this material.
THE WARRANTY TERMS CONTAINED IN THIS STATEMENT, EXCEPT TO THE EXTENT LAWFULLY PERMITTED, DO NOT
EXCLUDE, RESTRICT OR MODIFY AND ARE IN ADDITION TO ANY MANDATORY STATUTORY RIGHTS APPLICABLE TO THE
SALE OF THIS PRODUCT OR SERVICE TO YOU.
HP assumes no responsibility for the use or reliability of its software on equipment that is not furnished by HP.
This document contains proprietary information that is protected by copyright. All rights are reserved. No part of this document
may be photocopied, reproduced, or translated to another language without the prior written consent of HP.
Hewlett-Packard Company
P.O. Box 4010
Cupertino, CA 95015-4010
USA
© 2004 Hewlett-Packard Development Company, L.P.
All rights reserved.
HP supports lawful use of technology and does not endorse or encourage the use of our products for purposes other than those
permitted by copyright law.
WARNING: Text set off in this manner indicates that failure to follow directions could
result in bodily harm or loss of life.
CAUTION: Text set off in this manner indicates that failure to follow directions could
result in damage to equipment or loss of information.
NOTE: Text set off in this manner indicates additional information.
DANGEROUS VOLTAGE: Text set off in this manner indicates the presence of
uninsulated voltages within the product enclosure that may be of sufficient magnitude
to constitute a risk of electrical shock to persons.
Important Safeguards
WARNING: TO PREVENT FIRE OR ELECTRIC SHOCK, DO NOT EXPOSE THIS APPLIANCE TO RAIN OR
MOISTURE.
CAUTION: RISK OF ELECTRIC SHOCKS
DO NOT OPEN
CAUTION: TO REDUCE THE RISK OF ELECTRIC SHOCK, DO NOT REMOVE COVER (OR BACK).
NO USER SERVICEABLE PARTS INSIDE.
REFER SERVICING TO QUALIFIED SERVICE PERSONNEL.
THIS SYMBOL IS INTENDED TO ALERT THE USER TO THE UNINSULATED “DANGEROUS
VOLTAGE” WITHIN THE PRODUCT’S ENCLOSURE THAT MAY BE SUFFICIENT REFER
SERVICING TO QUALIFIED SERVICE PERSONNEL.
THIS SYMBOL IS INTENDED TO ALERT THE USER TO THE PRESENCE OF IMPORTANT
OPERATING AND MAINTENANCE (SERVICING) INSTRUCTIONS IN THE LITERATURE
ACCOMPANYING THE APPLIANCE.
CAUTION
TO PREVENT ELECTRIC SHOCK, DO NOT USE THIS POLARIZED AC PLUG WITH AN EXTENSION
CORD, RECEPTACLE OR OTHER OUTLET UNLESS THE BLADES CAN BE FULLY INSERTED TO
PREVENT BLADE EXPOSURE.
LASER SAFETY
THIS UNIT EMPLOYS A LASER. ONLY QUALIFIED SERVICE PERSONNEL SHOULD REMOVE THE
COVER OR ATTEMPT TO SERVICE THIS DEVICE DUE TO POSSIBLE EYE INJURY.
CAUTION: USE OF ANY CONTROLS, ADJUSTMENTS, OR PROCEDURES OTHER THAN THOSE
SPECIFIED HEREIN MAY RESULT IN HAZARDOUS RADIATION EXPOSURE.
CAUTION:
TO PREVENT ELECTRIC SHOCK, MATCH WIDE BLADE OF PLUG TO WIDE SLOT, FULLY
INSERT.
ATTENTION: POUR EVITER LED CHOCS ELECTRIQUES, INTRODUIRE LA LAME LA PLUS LARGE DE LA
FICHE DANS LA BORNE CORRESPANDANTE DE LA PRISE ET POUSSER JUSQU’AU
FOND.
Important Safety Instructions
• All operating and use instructions should be followed.
• All warnings on the appliance and in the operating instructions should be adhered to.
• The safety and operating instructions should be retained for future reference.
• All the safety and operating instructions should be read before the appliance is operated.
1 Water and Moisture — The appliance should not be used near water; for
example, near a bathtub, washbowl, kitchen sink, laundry tub, in a wet
basement, or near a swimming pool, and the like.
2 Carts and Stands — The appliance should be used only with a cart or
stand that is recommended by the manufacturer.
3 An appliance and cart combination should be moved with care. Quick
stops, excessive force, and uneven surfaces may cause the appliance and
cart combination to overturn.
4 Wall or Ceiling Mounting — The appliance should be mounted to a wall
or ceiling only as recommended by the manufacturer.
5 Ventilation — The appliance should be situated so that its location or position does not interfere
with its proper ventilation. For example, the appliance should not be situated on a bed, sofa, rug
or similar surface that may block the ventilation openings; or placed in a built-in installation such
as a bookcase or cabinet that may impede the flow of air through the ventilation openings.
6 Heat — The appliance should be situated away from heat sources such as radiators, heat
registers, stoves, or other appliances (including amplifiers) that produce heat.
7 Power Sources — The appliance should be connected to a power supply only of the type
described in the operating instructions or as marked on the appliance.
8 Grounding or Polarization — The precautions that should be taken so that the grounding or
polarized means of an appliance is not deleted.
9 Power Cord Protection — Power-supply cords should be routed so that they are not likely to be
walked on or pinched by items placed upon or against them, paying particular attention to
cords or plugs, convenience receptacles, and the point where they exit from the appliance.
10 Protective Attachment Plug — The appliance is equipped with an attachment plug having
overload protection. This is a safety feature. See Instruction Manual for replacement or resetting
of protective device. If replacement of the plug is required, be sure the service technician has
used a replacement plug specified by the manufacturer that has the same overload protection as
the original plug.
11 Cleaning — The appliance should be cleaned only as a recommended by the manufacturer.
12 Power Lines — An outdoor antenna should be located away from power lines.
13 Outdoor Antenna Grounding — If an outside antenna is connected to the receiver, be sure
the antenna system is grounded so as to provide some protection against voltage surges and
build-up static charges. Article 810 of the National Electric Code, ANSI/NFPA 70, provides
information with regard to proper grounding of the mast and supporting structure, grounding of
the lead-in wire to an antenna-discharge unit, size of grounding conductors, location of antennadischarge unit, connection to grounding electrodes and requirements for the grounding
electrodes. See figure.
14 Nonuse Periods — The power cord of the appliance should be unplugged from the outlet when
left unused for a long period of time.
15 Object and Liquid Entry — Care should be taken so that objects do not fall and liquids are not
spilled into the enclosure through openings.
16 Damage Requiring Service — The appliance should be serviced by qualified service personnel
when:
a The power-supply cord or the plug has been damaged; or
b Objects have fallen, or liquid has been spilled into the appliance; or
c The appliance has been exposed to rain; or
d The appliance does not appear to operate normally or exhibits a marked change in
performance; or
e The appliance has been dropped, or the enclosure damaged.
17 Servicing — The user should not attempt to service the appliance beyond that described in the
operating instructions. All other servicing should be referred to qualified service personnel.
NOTE TO CATV SYSTEM INSTALLER:
THIS REMINDER IS PROVIDED TO CALL
THE INSTALLER’S ATTENTION TO
ARTICLE 820-40 OF THE NEC THAT
PROVIDES GUIDELINES FOR PROPER
GROUNDING AND IN PARTICULAR
SPECIFIES THAT THE CABLE GROUND
SHALL BE CONNECTED TO THE
GROUNDING SYSTEM OF THE
BUILDING, AS CLOSE TO THE POINT
OF CABLE ENTRY AS PRACTICAL.
Table of Contents
Safety ..................................................................................................................... 1
Introduction ............................................................................................................ 3
What’s in the Box .................................................................................................................................3
Setup ...................................................................................................................... 4
Rear Panel Connectors...........................................................................................................................4
Identifying Your Component’s Cables ......................................................................................................5
Connecting the HP HDTV Tuner...............................................................................................................6
Connecting an indoor/outdoor antenna ...............................................................................................6
Connecting to a TV with a DVI connector..............................................................................................6
Connecting to a TV with a component connector (YPbPr) ........................................................................6
Connecting to an analog TV (composite) ..............................................................................................7
Connecting a splitter for Picture-In-Picture TVs ........................................................................................7
Connecting audio equipment ..............................................................................................................7
Using the HP HDTV Tuner ........................................................................................ 8
Front Panel Controls ..............................................................................................................................8
Using the Remote Control .......................................................................................................................9
Identifying the remote control buttons ...................................................................................................9
Installing or replacing the remote control batteries ...............................................................................10
Using the Electronic Program Guide (EPG) .............................................................................................10
Using the On-Screen Menu...................................................................................................................11
Using the Main Menu ..........................................................................................................................11
Using the Channel Menu......................................................................................................................12
Using auto memorizing to set up your channels ...................................................................................12
Programming favorite channels..........................................................................................................12
Adding and deleting channels...........................................................................................................12
Fine tuning channels.........................................................................................................................13
Adjusting the signal strength..............................................................................................................14
Using the Caption Menu ......................................................................................................................14
Turning captions on and off ..............................................................................................................14
Analog mode ..................................................................................................................................14
Digital service .................................................................................................................................15
Digital service info ...........................................................................................................................15
Digital service font ...........................................................................................................................16
Table of Contents
vii
Using the Lock Menu ........................................................................................................................... 16
Using the Setup Menu ......................................................................................................................... 18
Screen format.................................................................................................................................. 18
4:3 ratio......................................................................................................................................... 18
16:9 ratio....................................................................................................................................... 19
Time............................................................................................................................................... 19
Sound ............................................................................................................................................ 20
Video noise reduction (analog channels only) ..................................................................................... 21
Electronic Program Guide (EPG) (digital channels only) ........................................................................ 21
Troubleshooting.....................................................................................................22
Specifications ........................................................................................................23
General Specifications......................................................................................................................... 23
RF Specifications................................................................................................................................. 23
Agency Regulatory Notice......................................................................................24
Federal Communications Commission Notice ......................................................................................... 24
Modifications ..................................................................................................................................... 24
Cables............................................................................................................................................... 24
Index ....................................................................................................................25
viii
Table of Contents
Safety
First:
•
•
•
•
•
Read all instructions before installing and operating the product.
Keep this User’s Guide in a safe place for future reference.
Observe all warnings in this User’s Guide.
Follow all instructions in this User’s Guide.
Do not use attachments that are not recommended by HP with this product. Use of inadequate
attachments may result in damage to the product or personal injury.
Installing the HP HDTV Tuner:
WARNING: To reduce the risk of fire or electrical shock, do not expose this HDTV
Tuner to rain or moisture.
• Install the HP HDTV Tuner on a flat surface to avoid tipping. Leave some distance between the back
•
•
•
•
•
•
•
•
•
•
•
of the HDTV Tuner and the wall for proper ventilation. Never install the unit where the ventilation on
the top of the HDTV Tuner is covered. Otherwise, fire or damage to the unit may occur.
Avoid installing HDTV Tuner in the kitchen, the bathroom, or any other area with high humidity.
Damp conditions may shorten the service life of the electronic components, or may cause fire or
electrical shock.
Route power and signal cords appropriately to avoid stepping or tripping on them.
Do not defeat the safety purpose of the polarized or grounding-type plug. A polarized plug has two
blades with one wider than the other. A grounding-type plug has two blades and a third grounding
prong. The wide blade, or the third prong, is provided for your safety. If the provided plug does not
fit your outlet, consult an electrician for replacement of the obsolete outlet.
Do not install the HDTV Tuner in a ship or a vessel; seawater damages the unit and may start a fire.
Do not use this HDTV Tuner near water.
Do not install HDTV Tuner near any heat sources such as radiators, heat registers, stoves, or any
other apparatus (including amplifiers) that produces heat.
Install the HDTV Tuner horizontally; any installation 90 degrees clockwise or counterclockwise may
induce poor ventilation and subsequent component damage.
Do not install the HDTV Tuner where it has a protruding edge. For example, do not place the
HDTV Tuner where an edge overhangs a table. Do not install the product on a column, where it
may accidentally fall.
If moving the HDTV Tuner from a cold place to a warm place, condensation may occur inside the
unit. Allow the condensation to dry before turning on the unit.
Unplug this HDTV Tuner during lightning storms or when unused for long periods of time.
Clean only with a soft dry cloth.
CAUTION: Danger of explosion if battery is incorrectly replaced. Replace only with the
same or equivalent type.
Safety
1
Precautions:
DANGEROUS VOLTAGE: Do not attempt to repair your HDTV Tuner yourself. Removing
the top cover of the HDTV Tuner may cause fire or electric shock.
If any of the following conditions occur, unplug the HDTV Tuner from the wall and contact a qualified
service professional:
•
•
•
•
•
•
The power cord or plug is damaged.
Liquid is spilled on the product, or objects have fallen into the product.
The product does not operate as described in the instructions.
The product has been damaged or dropped.
The product displays an abnormal condition.
The power cord or plug is damaged.
Use the correct external power source: The product should be operated only from the type of
power source indicated on the electrical ratings label. If you are not sure of the type of power source
required, consult your HP authorized service provider or local power company.
Overloading: Do not overload an electrical outlet, power strip, or convenience receptacle. The
overall system load must not exceed 80% of the power strip input rating.
Observe extension cord ratings: If an extension cord or power strip is used, make sure that the
cord or strip is rated for the product and that the total ampere ratings of all products plugged into the
extension cord or power strip do not exceed 80% of the extension cord or strip ampere ratings limit.
WARNING: Do not place any objects on top of the HDTV Tuner. Spilled water or metal
objects may cause short circuit, fire, or electric shock if they penetrate into the housing
of the HDTV Tuner.
Never use a damaged power cord. Do not place power cords in areas where they can
be pinched, stepped on, or otherwise compromised. Heavy objects, heat, chemicals,
or tensile force may damage the power cord and cause fire or electric shock.
Do not change or open the back cover. Removing the back cover of the HDTV Tuner
may cause fire or electric shock. Contact the manufacturer when inspection or
adjustment is required.
Do not use the HDTV Tuner if any abnormality occurs. If any smoke or odor becomes
apparent, unplug the power cord and contact the manufacturer immediately. Do not
try to repair the HDTV Tuner on your own.
CAUTION: These servicing instructions are for use by qualified service personnel only.
To reduce the risk of electrical shock, do not perform any servicing other than that
contained in the operating instructions unless you are qualified to do so.
2
Safety
Introduction
The HP High-Definition Tuner receives digital high-definition and standard definition ATSC broadcasts
right off of the air. A digital on-screen guide enables you to conveniently locate your favorite shows
using an intuitive interface. DVI output enables the transmission of pure digital signal for the best
picture available today. A digital coaxial link is also available, enabling Dolby Digital® audio signals
to be sent to an Audio receiver for pure and impressive sound.
What’s in the Box
•
•
•
•
•
•
•
HP HDTV Tuner
Remote control with two AAA batteries
Component cables
DVI cable
Left and right audio cable
User’s Guide
Warranty and Support Guide
Introduction
3
Setup
Rear Panel Connectors
RF Input (labeled AIR 75 ohm)
Connect an outdoor or indoor antenna.
Monitor Out
Connect composite cables to your TV or monitor. Insert the yellow video cable into the Video
connector and the white and red cables into the Audio L and R connectors, respectively.
Component Out
Connect component cables to your TV or monitor. Insert the green, blue, and red video cables into the
Y, Pb, and Pr connectors and the white and red cables into the Audio L and R connectors, respectively.
Digital Audio Out
Connect a cable from the digital audio input of your audio receiver.
Resolution Select
Choose a resolution setting that corresponds with the TV or monitor you are using.
• 1080i (interlaced scanning): Use this setting if you have an HDTV-ready 16:9 (wide screen)
•
•
•
4
Setup
aspect ratio TV monitor with HDTV-ready component video inputs that can handle the 1080i video
output format.
720p (progressive scanning): Use this setting for an HDTV-ready 16:9 (wide screen) aspect
ratio TV monitor with HDTV-ready component video inputs that can handle the 720p video output
format.
480p (progressing scanning): Use this setting for a digital-ready 4:3 aspect ratio TV monitor
with progressive scan DTV-ready component video inputs that can handle the 480p video output
format. The TV monitor may be labeled as “enhanced definition” or “progressive scan.”
480i (interlaced scanning): Use this setting for a conventional TV with composite video.
DTV Out Select (YPbPr/DVI)
• Use YPbPr when you use the component connectors to a TV, monitor, or other video component
•
input. This is compatible with resolution settings 1080i, 720p, and 480p.
Use DVI when you use the DVI connector to a TV, monitor, or other video component input. This is
compatible with resolution settings 1080i, 720p, and 480p.
DVI/RGB Out
Use to connect a DVI input on an HDTV or monitor. Use a VGA-to-DVI adapter (not included) to
connect a VGA monitor.
NOTE: Not all monitors with a DVI input are compatible.
Identifying Your Component’s Cables
Where you connect your component into the connectors depends on the type of component and
cables you are using. Your HDTV Tuner is compatible with composite, component, DVI-D, or VGA
cables. Use the following chart to determine your component type:
Type of
Component
Description of Cable(s)
Where to Connect
Composite
One three headed cable:
• Insert the yellow cable into the
• One yellow for video
• One red for audio
• One white for audio
Component
Three or five headed cable:
• One red for red video
• One green for green video
• One blue for blue video
Some component cables come with white and
red audio cables attached.
yellow Video connector in the
Monitor Out section.
• Insert the white and red cables into
the white and red (L and R) audio
connectors in the Monitor Out
section.
• Insert the red cable into the red
Y connector in the Component Out
section.
• Insert the green cable into the
green Pb connector in the
Component Out section.
• Insert the blue cable into the blue
Pr connector in the Component
Out section.
• Insert the white and red audio
cables into the white and red
(L and R) audio inputs in the
Component Out section.
DVI-D
One cable with 3 rows of 8 pins.
Insert the cable into the
DVI/RGB Out.
VGA
One cable with 3 rows of 5 pins.
Insert the cable into the DVI/RGB Out
connector. VGA-to-DVI adapter (not
included) is necessary.
Setup
5
Connecting the HP HDTV Tuner
This section explains how to connect your HP HDTV Tuner. It explains the following types of
connections:
•
•
•
•
•
Connecting
Connecting
Connecting
Connecting
Connecting
an indoor/outdoor antenna
to a TV with component connectors (YPbPr)
to an analog TV with composite connectors
to a PC monitor
audio equipment
Connecting an indoor/outdoor antenna
Connect your indoor or outdoor antenna to the RF Input (labeled AIR 75 ohm). If your antenna has
separate leads for VHF/UHF signals, you need a combiner (not included).
NOTE: The HP HDTV Tuner is able to receive DTV and analog signals from your local cable provider
when transmitted in the 8VSB modulation format approved by the FCC for DTV transmission.
Connecting to a TV with a DVI connector
Using a DVI connector to connect your HDTV Tuner to your TV provides the best picture. This is a
digital connection as opposed to the other connection options in this guide that are analog.
1 Connect your indoor or outdoor antenna to the RF Input (labeled AIR 75 ohm).
2 Insert the DVI cable from your TV into the DVI/RGB Out connector.
3 Make sure the DTV Out Select switch has DVI selected.
4 Select a Resolution setting that gives you the best picture (1080i, 720p, or 480p).
Connecting to a TV with a component connector (YPbPr)
1 Connect your indoor or outdoor antenna to the RF Input (labeled AIR 75 ohm).
2 Insert the red, green, and blue cables into the Y, Pb, and Pr connectors (respectively) in the
Component Out section.
3 Insert the white and red audio cables into the L and R Audio connectors (respectively) of the
Component Out section.
4 Insert the other ends of the red, green, and blue cables into the YPbPr Component In connectors of
your TV.
5 Insert the other ends of the white and red audio cables into the L and R In connectors of your TV or
audio receiver. Make sure they correspond with your YPbPr inputs.
6 Make sure the DTV Out Select switch has YPbPr selected.
7 Select a Resolution setting that gives you the best picture (1080i, 720p, or 480p, 480i).
6
Setup
Connecting to an analog TV (composite)
1 Connect your indoor or outdoor antenna to the RF Input (labeled AIR 75 ohm).
2 Insert the yellow cable into the Video connector in the Monitor Out section.
3 Insert the white and red audio cables into the L and R Audio connectors of the Monitor Out section.
4 Insert the other end of the yellow cable into the Composite In connector of your TV.
5 Insert the other ends of the white and red audio cables into the L and R In connectors of your TV or
audio receiver. Make sure they correspond with your composite input.
6 Select 480i for your Resolution setting.
Connecting a splitter for Picture-In-Picture TVs
To use the Picture-in-picture feature on your TV, use a splitter (not included) to connect your
HDTV Tuner.
1 Connect your indoor or outdoor antenna to the splitter.
2 Connect one cable from the splitter to the RF Input (labeled AIR 75 ohm) on the HDTV Tuner.
3 Connect another cable from the splitter to the RF connector on your TV.
Connecting audio equipment
This connection enables Dolby Digital* quality sound, when available. Use with an external digital
audio receiver decoder. See “Digital Output” on page 20 for configuring your HDTV Tuner to output
the appropriate audio format for your receiver.
Insert the cable from the Digital Audio Input of the audio receiver into the Digital Audio Out connector
on your HDTV Tuner. Refer to your TV documentation to locate the Digital Audio Input connector.
*Manufactured under license from Dolby Laboratories. “Dolby” and the Double-D symbol are
trademarks of Dolby Laboratories.
Setup
7
Using the HP HDTV Tuner
Front Panel Controls
•
•
•
•
•
•
•
8
Power button: Press to turn the power on and off.
Menu button: Press to display the On-Screen Menu.
Power LED: A red light appears when the power is on.
Arrow and Enter buttons: Press to navigate the On-Screen Menu.
DTV LED: A green light appears when you are on a channel receiving a digital signal.
Info button: Press to display the following information: current HDTV Tuner settings, the channel
number, captioning settings, the program title, the time, the program duration, the picture grade,
MTS settings, and ratings.
Clear button: Press to remove the On-Screen Menu from your display.
Using the HP HDTV Tuner
Using the Remote Control
Identifying the remote control buttons
Button
Description
Power
Press Power once to turn the HDTV Tuner on or off.
Number keys
Use the keypad numbers (0–9) to directly select
channels.
Help
Press when inside the On-Screen Menu. Displays a
help window describing the current feature.
Pre-CH
Press Pre-CH (previous channel) once to recall the
last channel.
Fav-CH
Press Fav-CH (favorite channel) once to view the
next channel assigned as a favorite channel.
MTS
Press MTS to select stereo, mono, or SAP (second
audio program) for the TV sound.
Caption
Press Caption to scroll through and select the CC1
to CC4 (analog) or Service 1 to Service 6 (digital)
caption options.
Guide
Press Guide to display the Electronic Program
Guide (EPG).
Info
Press Info to display current HDTV Tuner settings,
the channel number, captioning settings, the
program title, the time, the program duration, the
picture grade, MTS settings, and ratings.
CH
Use CH+ (or CH–) to select the next higher (or
lower) channel.
Arrow buttons
Use the arrow buttons to move the cursor in a
program guide or in menu screens.
(Select)
Press (Select) once after entering a channel
number. Use (Select) in the On-Screen Menu to
choose your selection.
Menu
Press Menu to access the On-Screen Menu (OSM).
Inside the OSM, pressing the Menu button takes
you back one screen.
Exit
Press Exit to exit out of the selected OSM and
return to your current channel.
Aspect
Press the Aspect button to select one of three
screen formats.
Still
Press the Still button to pause a frame. The audio
continues. Press Still again to undo the image
pause.
Signal
Press the Signal button to view the signal strength
or weakness of the current channel.
Using the HP HDTV Tuner
9
Installing or replacing the remote control batteries
When the remote control becomes less responsive or unresponsive, the batteries are low. Insert two
AAA non-rechargeable batteries into the remote control, and ensure that you match them to their
proper polarities.
1 Push down the tab and pull back the cover on the back of the remote control.
2 Insert the batteries into the remote control, and make sure that you match polarities.
3 Close the cover.
CAUTION: Use only the size and type of batteries specified.
Be sure to follow the correct polarity when installing the batteries as indicated in the
battery compartment. Reversed batteries may cause damage to the device.
Do not mix different types of batteries together (e.g., alkaline and carbon-zinc) or old
batteries with fresh ones.
When not using the remote for a long period of time, remove the batteries to prevent
damage or injury from possible battery leakage.
Do not try to recharge batteries that are not intended to be recharged; they can
overheat and rupture. (Follow the battery manufacturer’s directions for the batteries
you are using.)
Always remove batteries as soon as they become weak. Weak batteries can leak and
severely damage the unit.
Replace batteries when the remote control operation becomes erratic.
Do not take apart the batteries, heat them, or throw them into a fire.
Using the Electronic Program Guide (EPG)
Use the Electronic Program Guide (EPG) to view the listing of current and future programs. Press the
Guide button on your remote control to display the EPG. There are two different styles of the EPG:
Current Guide: Displays programs that are currently on air.
All Guide: Displays the same information as the Current Guide, plus a schedule of future programs.
For information on changing between Current Guide and All Guide, see “Electronic Program Guide
(EPG)” on page 21.
10
Using the HP HDTV Tuner
Use the arrow buttons on the remote control to scroll through the programs listed in your guide.
Highlighting a program gives you the following information:
•
•
•
•
•
•
•
Time the program begins and ends.
Channel the program is on.
Name of the program.
Closed captioning availability.
Format of the program broadcast (high definition or standard definition).
Language of the program.
TV rating or MPAA rating of the program.
Using the On-Screen Menu
The On-Screen Menu (OSM) provides an easy way to customize your HP HDTV Tuner. Use it to
customize channels, enable captioning, adjust screen format, and sound.
NOTE: When 1080i, 720p, or 480p (DTV) is selected with the Resolution Select switch on the rear
panel, the OSM and Electronic Program Guide are not supported for Monitor Out (composite). The
OSM for Monitor Out is supported only when 480i (analog) is selected.
Using the Main Menu
To display the OSM, press the Menu button on your remote control or the Menu button on the front
panel of the HDTV Tuner.
• Channel: Use to set channel memorization, select favorite channels, add or delete channels, fine•
•
•
tune channels, and display the signal strength of the current channel.
Caption: Use to turn captions on or off and to customize the font, style, and color of the captions.
Lock: Use to block channels from use; the viewer must know a code to see locked channels.
Setup: Use to change the screen format, set your time zone, adjust the sound, and display the
Electronic Program Guide.
Using the HP HDTV Tuner
11
Using the Channel Menu
To display the Channel menu, press the Menu button on your remote control, select (highlight) the
Channel option, and press the Select button.
Using auto memorizing to set up your channels
Auto memorizing scans for a signal for all of the VHF and UHF channels in your area. If a signal is
found, it adds the channel to your channel list. Follow these steps to set auto memorizing for your
channels:
1 Press the Menu button on your remote control.
2 Highlight Channel, and press the Select button.
3 Highlight Auto Memorizing, and press the Select button.
4 Highlight AIR, STD, HRC, or IRC (whichever is in your broadcast area), and press the Select
button.
5 Highlight Confirm, and press the Select button to begin the auto memorizing process.
6 A list of channels that were detected is displayed when the auto memorizing is complete. Press the
Exit button to leave the OSM, or use the Up and Down arrow buttons to scroll through your
channels.
Programming favorite channels
You can assign the channels you watch most often as your favorite channels. Then you can use the
Fav-CH button on your remote control to access them easily. Follow these steps to assign your favorite
channels:
1 Press the Menu button on your remote control.
2 Highlight Channel, and press the Select button.
3 Highlight Favorite Channel, and press the Select button.
4 Use the Up and Down arrow buttons on your remote control to highlight each channel.
5 Press the Select button on your remote control to assign a channel as a favorite channel. A yellow
dot appears next to the channel number.
6 Press the Exit button on your remote to leave the OSM.
7 Press the Fav-CH button on your remote control to access your favorite channels.
Adding and deleting channels
You can customize your channel list by adding channels that were not initially detected and by
deleting channels you do not ever watch. Follow these steps to add and delete channels:
1 Press the Menu button on your remote control.
2 Highlight Channel, and press the Select button.
3 Highlight Channel Add/Delete, and press the Select button.
12
Using the HP HDTV Tuner
4 Use the remote control number keys to enter the channel you want to add or delete.
Or
Use the Up and Down arrow buttons to go to the channel you want to add or delete.
5 Press the Select button on your remote control to add or delete the channel.
Fine tuning channels
Fine tuning manually adjusts the TV’s tuner. Follow these steps to fine tune a channel:
1 Press the Menu button on your remote control.
2 Highlight Channel, and press the Select button.
3 Highlight Fine Tune Channel, and press the Select button.
4 Highlight Manual, and press the Select button.
5 Use the Up and Down arrows on your remote control to adjust the tuning.
Using the HP HDTV Tuner
13
Adjusting the signal strength
Follow these steps to view the signal strength of your current channel:
1 Press the Menu button on your remote control.
2 Highlight Channel, and press the Select button.
3 Highlight Signal Strength, and press the Select button.
4 To increase the signal strength, adjust your antenna.
Using the Caption Menu
Turning captions on and off
You can view captions for the dialog. Follow these steps to turn on the captions:
1 Press the Menu button on your remote control.
2 Highlight Caption, and press the Select button.
3 Highlight On/Off, and press the Select button.
4 Highlight On, and press the Select button to turn on the captions. Highlight Off, and press the
Select button to turn off the captions.
Analog mode
Analog captions are displayed in analog RF channel mode. It is compatible with some digital
channels. Follow these steps to choose a type of analog caption:
1 Press the Menu button on your remote control.
2 Highlight Caption, and press the Select button.
3 Highlight Analog Mode, and press the Select button.
4 Use the Up and Down arrow buttons on the remote control to highlight an analog mode, and press
the Select button.
14
Using the HP HDTV Tuner
Digital service
Digital captions are displayed on digital channels. Follow these steps to choose a type of digital
service:
1 Press the Menu button on your remote control.
2 Highlight Caption, and press the Select button.
3 Highlight Digital Service, and press the Select button.
4 Use the arrow buttons on the remote control to highlight a digital service, and press the Select
button.
Digital service info
The Digital Service Info screen displays the language assigned to each service. When “Yes” appears
in the Easy Reader column, it indicates the captions have been edited to an easier reading level.
Using the HP HDTV Tuner
15
Digital service font
You can customize the appearance of your captions. Follow these steps to change the size, style, and
color of your caption fonts:
1 Press the Menu button on your remote control.
2 Highlight Caption, and press the Select button.
3 Highlight Digital Service Font, and press the Select button.
4 Use the Up and Down arrow buttons on the remote control to highlight a format, and press the
Select button.
Using the Lock Menu
The lock feature enables you to set a password to view movies and TV programs with unsuitable
ratings for some viewers who share the TV. Follow these steps to lock movies and TV programs:
1 Press the Menu button on your remote control.
2 Highlight Lock, and press the Select button.
3 Use the remote control number keys to enter a PIN. If this is your first time using this feature, enter
the default password, 0, 0, 0, 0, to gain access.
4 To create your own PIN, highlight Changing PIN, and press the Select button.
16
Using the HP HDTV Tuner
5 Highlight Rating Setting, and press the Select button.
6 Use the arrow buttons on the remote control to move your cursor into the block you would like to
lock. Press the Select button to lock the rating.
NOTE: If you forget your PIN and would like to reset it, enter the following key sequence on your
remote control: MTS, 3, 5, 9.
Important notes about parental locks
Following are explanations of the MPAA and TV (FCC) rating codes.
TV (FCC) age categories
TV-MA: Mature audiences only. The program may contain mature themes, profane language,
graphic violence, and explicit sexual content.
TV-14: Parents strongly cautioned. The program may contain sophisticated theme, sexual content,
strong language, and more intense violence.
TV-PG: Parental guidance suggested. The program may contain infrequent coarse language,
limited violence, and some suggestive sexual dialogue and situations.
TV-G: General audience. The program contains little or no violence, no strong language, and little
or no sexual dialogue or situation.
TV-Y7: Directed to older children. Themes and elements in this program may include mild physical
or comedic violence or may frighten children under the age of seven.
TV-Y: All children. The themes and elements in this program are specifically designed for a very
young audience, including children from ages two to six.
TV (FCC) subcategories for content
V: Violence.
S: Sexual content.
L: Offensive language.
D: Dialogue (sexual innuendo).
FV: Fantasy or cartoon violence.
Using the HP HDTV Tuner
17
The MPAA rating system (movies)
G: General audience. No restriction.
PG: Parental guidance suggested. Some material may be unsuitable for children.
PG-13: Parents strongly cautioned. Some material may be unsuitable for children under the
age of 13.
R: Restricted. Viewers should be 17 or older.
NC-17: Not classified. Viewers should be 17 or older.
X: Adults only.
• TV (FCC) guidelines: When you lock a rating such as the TV-PG rating and all of its V, S, L, and
•
•
D subcategories, the “more restrictive” ratings (TV-14 and TV-MA) and all of their V, S, L, and
D subcategories are automatically locked out as well. Two groups (TV-Y/TV-Y7 and TV-G/TV-PG/
TV-14/TV-MA) are controlled independently.
MPAA ratings: The particular rating that you select will be locked. In addition, any ratings that are
more restrictive will also be blocked.
Neither the TV (FCC) nor MPAA ratings apply to news broadcasts.
Using the Setup Menu
You can use the setup menu to change your screen format, set daylight saving, set the sound system,
reduce video noise, and set the Electronic Program Guide (EPG).
Screen format
Your screen format options depend on the type of TV or monitor you are using with your HP HDTV
Tuner. Follow these steps to change your screen format:
1 Press the Menu button on your remote control.
2 Highlight Setup, and press the Select button.
3 Highlight Screen Format, and press the Select button.
4 Highlight either 4:3 or 16:9, and press the Select button.
4:3 ratio
When using a 4:3 aspect ratio TV and receiving an image with a 16:9 aspect ratio, you need to
specify how the image is displayed. Choose one of the three following options:
Letter box
Letter box shrinks the picture so the entire image fits on the screen. Blank panels appear at the top and
bottom of the screen (1080i does not support letter box mode; full mode is automatically selected).
Full
Full vertically adjusts the 16:9 image so it fills your 4:3 screen. No blank panels are added, and the
image is not horizontally altered.
18
Using the HP HDTV Tuner
Zoom
Zoom adjusts to a wide movie format that fills the entire screen. Left and right portions of the picture
are cropped.
NOTE: If the input source signal is set to 16:9, the default mode is letter box. If the input source signal
is set to 4:3, the default mode is full.
16:9 ratio
When using a 16:9 aspect ratio, and receiving an image with a 4:3 aspect ratio, you need to specify
how the image is displayed. Choose one of the three following options:
Pillar box
Pillar box centers the picture with blank panels on the left and right sides. This option can be set when
receiving a 16:9 image.
Full
Full horizontally adjusts the 4:3 image so it fills your 16:9 screen. No blank panels are added, and
the image is not altered vertically. This setting is useful for viewing 4:3 formatted DVDs.
Zoom
Zoom maintains the correct image proportion when receiving a 4:3 image. Top and bottom portions
of the picture are cropped.
NOTE: If the input source signal is set to 4:3, the default mode is pillar box. If the input source signal
is set to 16:9, the default mode is full.
Time
You can set the time zone and daylight saving for your Electronic Program Guide.
Daylight Saving
Follow these steps to set daylight saving:
1 Press the Menu button on your remote control.
2 Highlight Time, and press the Select button.
3 Highlight Daylight Saving, and press the Select button.
4 Highlight Yes, and press the Select button if you live in an area with daylight saving.
Time zone
Follow these steps to select your time zone:
1 Press the Menu button on your remote control.
2 Highlight Time, and press the Select button.
3 Highlight Time Zone, and press the Select button.
4 Use the arrow buttons to highlight the time zone you live in, and press the Select button.
Using the HP HDTV Tuner
19
Sound
A digital TV transmission can receive simultaneous audio tracks. It can receive simultaneous
translations of a program into foreign languages called multitracks.
Analog Multi-Channel Television Sound (MTS)
Follow these steps to choose your analog MTS setting:
1 Press the Menu button on your remote control.
2 Highlight Setup, and press the Select button.
3 Highlight Sound, and press the Select button.
4 Highlight Analog MTS, and press the Select button.
5 Use the arrow buttons to highlight your choice of Mono, Stereo, or SAP, and press the Select
button.
6 Press the Exit button to return to your current channel.
Digital language
Follow these steps to choose your digital language setting:
1 Press the Menu button on your remote control.
2 Highlight Setup, and press the Select button.
3 Highlight Sound, and press the Select button.
4 Highlight Digital Language, and press the Select button.
5 Use the arrow buttons to highlight your choice of English, Spanish, or French, and press the
Select button.
6 Press the Exit button to return to your current channel.
Digital output
Follow these steps to choose your digital output setting:
1 Press the Menu button on your remote control.
2 Highlight Setup, and press the Select button.
3 Highlight Sound, and press the Select button.
4 Highlight Digital Output, and press the Select button.
5 Use the arrow buttons to highlight Dolby Digital (not available with analog broadcasts) or PCM,
and press the Select button.
6 Press the Exit button to return to your current channel.
20
Using the HP HDTV Tuner
Dynamic range compression
Dynamic range compression (DRC) sets up the optimal volume automatically, according to the current
channel. Follow these steps to choose your DRC setting:
1 Press the Menu button on your remote control.
2 Highlight Setup, and press the Select button.
3 Highlight Sound, and press the Select button.
4 Highlight DRC, and press the Select button.
5 Use the arrow buttons to highlight On, and press the Select button.
6 Press the Exit button to return to your current channel.
Video noise reduction (analog channels only)
Video noise reduction (NR) helps reduce any static and ghosts that may appear on your screen.
Follow these steps to turn on video NR:
1 Press the Menu button on your remote control.
2 Highlight Setup, and press the Select button.
3 Highlight Video NR, and press the Select button.
4 Use the arrow buttons to highlight On, and press the Select button.
5 Press the Exit button to return to your current channel.
Electronic Program Guide (EPG) (digital channels only)
The EPG displays program listings, start times, and program information. The Current Guide setting
displays programs that are currently on air. The All Guide setting displays the same information as the
Current Guide, plus a schedule of future programs. Follow these steps to set your EPG:
1 Press the Menu button on your remote control.
2 Highlight Setup, and press the Select button.
3 Highlight Program Guide Setting, and press the Select button.
4 Use the arrow buttons to highlight Current Guide or All Guide, and press the Select button.
5 Press the Exit button to return to your current channel.
Using the HP HDTV Tuner
21
Troubleshooting
Problem
Remedy
The HP HDTV Tuner is not receiving power and the
Power LED on the front does not light up.
Plug the power cord into a different power outlet.
Make sure the power outlet works by plugging in
another item such as a lamp.
There is no picture or sound.
Use your remote control to enter a channel number
that worked the last time you used your HDTV Tuner.
Double-check all cable connections. Check your
Resolution Select setting. Check your DTV Out
selection. Adjust your antenna.
There is no picture, but there is sound.
Double-check your cable connections. For Monitor
Out connections, double-check the yellow composite
cable. For Component Out connections, double-check
the green, blue, and red cable connections. For PC
connections, double-check your DVI/RGB Out
connection.
There is a picture, but there is no sound.
Double-check your audio cable connections.
The picture quality is poor.
Adjust your antenna. Double-check your cable
connections. You may need to adjust the signal
strength. Press the Signal button on your remote
control to view the signal strength.
The channel will not change with the remote control.
Replace the batteries in your remote control.
Check for a direct path from the remote control to the
HDTV Tuner.
22
Troubleshooting
Specifications
General Specifications
Broadcasting Standard
Digital TV (ATSC), analog TV (NTSC)
Power Requirement
120V, 60 Hz
Power Consumption
20W (standby 1.5W)
Dimensions (W x D x H)
35.8 × 30 × 6.9 cm (14.1 × 11.8 × 2.7 in.)
Weight
2.4 kg (5.3 lb.)
RF Specifications
Tuning System Type
Band Coverage
F/S
Air (VHF: 2–13, UHF: 14–69)
Cable (VHF: 1–64, UHF: 65–125
Antenna
75 ohm external antenna terminal for VHF/UHF
Number of Inputs/outputs
75 ohm air/cable (VHF/UHF)
Monitor output
DTV output (YPbPr/DVI (RGB), Lt, Rt)
Dolby digital out (coaxial)
Resolution select switch (1080i, 720p, 480p, 480i)
DTV output select switch (YPbPr/DVI (RGB))
Specifications
23
Agency Regulatory Notice
Federal Communications Commission Notice
This equipment has been tested and found to comply with the limits for a Class B digital device,
pursuant to Part 15 of the FCC Rules. These limits are designed to provide reasonable protection
against harmful interference in a residential installation. This equipment generates, uses, and can
radiate radio frequency energy and, if not installed and used in accordance with the instructions, may
cause harmful interference to radio communications. However, there is no guarantee that interference
will not occur in a particular installation. If this equipment does cause harmful interference to radio or
television reception, which can be determined by turning the equipment off and on, the user is
encouraged to try to correct the interference by one or more of the following measures:
• Reorient or relocate the receiving antenna.
• Increase the separation between the equipment and receiver.
• Connect the equipment into an outlet on a circuit different from that to which the receiver is
•
connected.
Consult the dealer or an experienced radio or television technician for help.
Modifications
The FCC requires the user to be notified that any changes or modifications made to this device that
are not expressly approved by Hewlett-Packard Company may void the authority to operate the
equipment.
Cables
Connections to this device must be made with shielded cables with metallic RFI/EMI connector hoods
in order to maintain compliance with FCC Rules and Regulations.
24
Agency Regulatory Notice
Index
1080i interlaced scanning, 4
480i interlaced scanning, 4
480p progressive scanning, 4
720p progressive scanning, 4
A
analog MTS, 20
analog TV
connecting, 7
audio equipment
connecting, 7
C
caption
analog mode, 14
digital service, 15
digital service font, 16
digital service info, 15
lock menu, 16
on/off, 14
caption menu, 14
channel
add/delete, 12
favorite, 12
fine tune, 13
channel menu, 12
component connector (YPbPr)
connecting, 6
component out, 4
composite connector
connecting, 7
connecting
analog TV, 7
audio equipment, 7
component connector (YPbPr), 6
composite connector, 7
HP HDTV Tuner, 6
indoor/outdoor antenna, 6
D
digital audio out, 4
digital language, 20
digital output, 20
digital service, 15
digital service font, 16
digital service info, 15
DRC, 21
DTV Out Select (YPbPr/DVI), 5
DVI/RGB Out, 5
dynamic range compression, 21
E
electronic program guide (EPG), 21
F
favorite channel, 12
fine tune channel, 13
front panel controls, 8
H
HP HDTV Tuner
connecting, 6
installing, 1
set up, 4
what’s in the box, 3
I
indoor/outdoor antenna
connecting, 6
Installing
HP HDTV Tuner, 1
L
lock menu, 16
M
main menu, 11
monitor out, 4
MPAA and TV (FCC) rating codes, 17
Index
25
N
S
noise reduction, 21
safety, 1–2
precautions, 2
screen format, 18
setup menu, 18
signal strength, 14
sound, 20
specifications
general, 23
RF, 23
O
On-Screen Menu
using, 11–21
P
parental locks, 17
R
ratings, 16
rear panel connectors, 4
remote control
buttons, 9
replacing batteries, 10
using, 9
resolution select, 4
RF input, 4
T
time
daylight saving, 19
time zone, 19
troubleshooting, 22
turning off, 9
turning on, 9
V
video noise reduction, 21
26
Index
Index
27