1
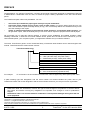
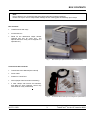
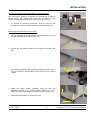
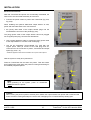
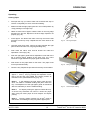
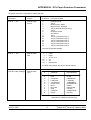
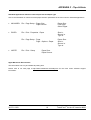
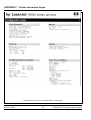
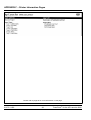
TowerFeed for the HP LaserJet 9000
TM
IU 675 / 0150
Installation and
User's Guide
TABLE OF CONTENTS
USER'S MANUAL
TowerFeedTM 444 for the HP LaserJet 9000 Series
IU 675 / 0150
TABLE OF CONTENTS
1
PREFACE
2
BOX CONTENTS
3
UNPACKING
4
RE-PACKING
5
INSTALLATION
Hardware Installation
Printer Panel Settings
Software Installation
6
11
12
OPERATING
Loading Paper
Marking a Tray with its Paper Type
Paper Tray empty
Paper Tray depleted during Print Job
Requested Paper missing
Paper Jam
13
14
14
14
14
15
APPENDIX A - Printer Specific Notes
16
APPENDIX B - PCL Paper Selection Commands
17
APPENDIX C - Tips & Hints
18
APPENDIX D - Paper Quality Guidelines
20
APPENDIX E - Troubleshooting
21
APPENDIX F - Printer Information Pages
Configuration Page
Menu Map
Paper Path Test
23
24
25
26
APPENDIX G - TowerFeed Selftest
27
APPENDIX H - TowerFeed Specifications
28
APPENDIX I - Cleaning and Maintenance
29
1
TM
TowerFeed for the HP LaserJet 9000
PREFACE
Congratulations! You selected TowerFeed, a superior sheet feeder specifically designed by Rutishauser Data AG
in Switzerland in collaboration with HP USA, to extend the paper handling capabilities of the HP LaserJet 9000
printer.
The TowerFeed Option offers new possibilities. You can
•
•
•
select from up to 9 different paper types directly from your workstation.
print extra copies instead of going to the copier to make copies. You get the better copies and you can
color code document copies to clearly identify a copy. The color already defines the addressee and you will
save the marking of the copies.
realize an attractive alternative to the multi-part forms printed on conventional impact printers. You
will get better copies, raise the flexibility and you can save cost for expensive preprints and chemical papers.
We encourage you to read this manual carefully to ensure correct installation and reliable operation. While
installing TowerFeed, or whenever an unclear situation arises, please also consult the user's manuals of your HP
LaserJet 9000 printer, your computer system, your application software and your network software.
The name TowerFeed is generic to the TowerFeed family of automatic sheet feeders and is used throughout this
manual. TowerFeed has this model number scheme:
TowerFeed 444/xx.65.yy
Version
01 = International (A4 trays, European power cable)
04 = USA (US Letter trays, US power cable)
05 = Switzerland (A4 trays, Swiss power cable)
Printer Model
65 = HP LaserJet 9000 Series
Configuration
44 = floor model with 4 trays (4x500 sheets)
66 = floor model with 6 trays (6x500 sheets)
For example:
TF 444/44.65.01 is an international version with 4 DIN A4 paper trays & European power cable.
A plate showing type and designation and the serial number are located besides the power inlet of your
TowerFeed. Please refer to this designation and the serial number whenever you call your service organization.
Rutishauser Data AG, Switzerland, reserves the right to make changes to its products or services without
prior notice and without incurring any obligations to incorporate such changes in units or publications
shipped.
Rutishauser shall in no event be liable for incidental or consequential damages arising from the use
of its equipment.
TowerFeed™ is a registered trademark of Rutishauser Data AG.
Windows™ is a registered trademark of Microsoft Corp.
TowerFeed Support Software for Windows is a copyrighted product of Rutishauser.
Other products and brand names mentioned are trademarks or registered trademarks of their respective companies.
IU 675 / 0150
2
TM
TowerFeed for the HP LaserJet 9000
BOX CONTENTS
Note:
Prior to delivery your TowerFeed was thoroughly tested and carefully packaged.
Please check your unit for transportation damage and/or missing parts immediately upon receipt.
Box Contents
•
TowerFeed unit with trays
•
Accessories box
•
Stand for the 3000-sheet output stacker
(optional and only for 4-tray unit;
the
optional stand for 6-tray unit is shipped in a
separate box)
Fig. 1
Box Content (incl. optional stand for 3000-sheet stacker)
Fig. 2
Accessories Box Content (incl. mounting kit for optional stand)
Accessories Box Contents
•
TowerFeed User's Manual (this manual)
•
Power cable
•
Rollers for TowerFeed
•
PPCA (Paper Path Connection Assembly)
•
3 roller clamps with screws and washers,
and Allen key 4mm (optional, comes only
with stand for 4-tray TowerFeed)
IU 675 / 0150
3
TM
TowerFeed for the HP LaserJet 9000
UNPACKING
Note:
Prior to delivery your TowerFeed was thoroughly tested and carefully packaged. Please check your unit for transportation damage
and/or missing parts immediately upon receipt.
It is advisable to get a second person to help you unpack the unit.
Fig. 3
Warning:
TowerFeed weighs up to 60 kilograms (130 pounds) depending
on configuration. Enlist the help of a second person to lift and
place the printer. To prevent back strain or injury, bend your
knees when lifting the unit.
Unpacking the TowerFeed unit
•
Cut the packing strips and remove the top of the shipping container.
•
Remove the two blue shock absorbers and the accessories box from
the top of the unit (Fig. 3).
•
If TowerFeed is delivered with the optional stand for the 4-tray unit,
remove the stand that is packed in front of TowerFeed (Fig. 4).
•
Enlist the help of another person and carefully lift TowerFeed out of
the container (Fig. 5).
•
Remove the stretched plastic from TowerFeed. Be careful to not
scratch the unit when using a cutting tool.
•
Insert the 4 rollers (from the accessories box) with some force onto
the roller shafts of TowerFeed. They will snap into position with a
noticeable click. Insert the 2 stoppable rollers on the left side
Fig. 4
Fig. 5
(Fig. 7a) and the 2 non-stoppable ones on the right side of the
unit (Fig. 7b).
Note:
When turning TowerFeed over on a side or its back, be careful to
not scratch its housing. Use a piece of cardboard or the like to
prevent the unit from scratches.
•
Fig. 6
Remove the transportation inserts in the TowerFeed trays (as described in INSTALLATION)
Important:
It is recommended to keep the packaging material and inserts for
proper protection of the unit and its parts in case of reshipment.
b
a
a
Fig. 7
IU 675 / 0150
4
TM
b
TowerFeed for the HP LaserJet 9000
RE-PACKING
Re-Packing the TowerFeed unit
To re-pack TowerFeed, proceed as follows (reverse order of
steps for unpacking the unit):
•
Remove the trays and insert the transportation inserts as
shown in Fig. 10 to secure the trays for shipping (it is
important to secure the trays to avoid possible shipping
damage).
•
Remove the PPCA (Paper Path Connection Assembly from
inside the printer, Fig. 11) and pack it into the accessories
box (Fig. 2).
•
Remove the 4 Rollers from the TowerFeed unit and pack
them into the accessories box (Fig. 7).
•
Place the shock absorbers on the bottom of the shipping
container (Fig. 5).
•
Stretch-wrap TowerFeed to prevent the trays to open during
shipping.
•
Enlist the help of another person to place the TowerFeed
unit inside the box. Ensure that the unit is correctly seated
and cushioned (Fig. 5).
•
If part of the shipment, also include the optional stand (Fig.
4).
•
Be sure that all accessories including the PPCA, user
manual, rollers and power cable are packed in the box (Fig.
2).
•
Add the blue shock absorbers on the top. Make sure that
the stand is correctly seated and held between bottom and
top absorbers (Fig. 3, Fig. 8).
•
Fix the accessories box with content on top of TowerFeed
with a tape (Fig. 8).
•
Close the container.
Caution:
For reshipping TowerFeed you must use the original
packing to avoid shipping damage of the unit.
Fig. 8
IU 675 / 0150
5
TowerFeed Packing
TM
TowerFeed for the HP LaserJet 9000
INSTALLATION
Hardware Installation
Warning:
POWER OFF your printer and disconnect all power and interface cables before installing and/or servicing
TowerFeed.
Positioning the Printer
•
Place the TowerFeed unit at the location you
wish. Be sure to place it on a flat location.
•
Carefully put the printer unit onto TowerFeed.
Rear, left and right fronts of the printer are
aligned with the TowerFeed fronts. The
positioning holes of the printer will match with
the positioning pegs of the TowerFeed top
(Fig. 9).
Warning:
1. The printer weighs up to 60 kilograms
(130 pounds). Enlist the help of a second
person to lift the unit. To prevent back
strain or injury, bend your knees when
lifting the unit.
2. To lift the printer, use the handholds of
the printer. When lowering the printer, be
careful to not damage the electrical
connector or the gearing interface of
TowerFeed (Fig. 9).
a
Caution:
When rolling TowerFeed and printer to
another place, watch out when crossing
doorsteps to not have the unit tipping over
or TowerFeed trays sliding open.
IU 675 / 0150
Fig. 9
6
Positioning the printer on TowerFeed
TM
TowerFeed for the HP LaserJet 9000
INSTALLATION
Removing the Trays Transportation Inserts
For shipping, the bottom plate of the TowerFeed
tray is secured with transportation inserts. These
have to be removed before loading the trays.
•
Pull out, lift upwards and pull out the trays from
TowerFeed. Remove the transportation inserts
(Fig. 10). There are two at each side (please
keep the inserts for eventual later reshipment).
•
Re-insert and close the trays.
Note:
In the right side plate of the tray you will find
white coding pins for the respective paper
size. These are set by the factory and must
not be changed.
Fig. 10
TowerFeed tray with transportation inserts
Fig. 11
PPCA
Fig. 12
Installing the PPCA in the printer
Installing the PPCA in the Printer
The PPCA (Paper Path Connection Assembly, Fig.
11) from the accessories box has to be installed in
the printer to guide and transport the paper delivered
from TowerFeed inside the printer.
•
Open the right side cover of the printer.
•
Take the PPCA - with the black rollers towards
you and the gearing to the right - and retract the
gray sliders with the metal bolts.
•
Slide the PPCA into the gap behind the right
side cover of the printer and release the sliders
to let the bolts snap into position (Fig. 12).
IU 675 / 0150
7
TM
TowerFeed for the HP LaserJet 9000
INSTALLATION
Assembling Stand and 3000-sheet Output Stacker (optional)
Required Tools
The following list shows the tools that are required to prepare and
assemble the stand with the 3000-sheet output stacker option:
• Allan key 4mm (included in the accessories box, Fig. 2)
• Torx hexagon key X20
• Fork wrench 10mm or monkey wrench (2 pieces)
a
b
Note:
The required Torx key and fork / monkey wrenches are not part
of the product shipment and must be obtained locally.
Fig. 13
Preparation of the Output Stacker
The guiding bar has to be moved from the stacker to the stand. For that
purpose proceed at follows:
• Remove the Torx screw fixing the grounding cable from the stacker to
the guiding bar (Fig. 13a). This screw will be used later on again.
• Loosen and remove the hexagonal "swivel"-bolt screw with nut
holding the guiding bar (Fig. 14b) to the stacker (Fig. 13b). That
guiding bar will be remounted with screw and nut to the stand.
Preparation of the Stand
• Mount the guiding bar to the stand using hexagonal screw and nut
(Fig. 14a, Fig. 15a).
• Attach the yellow-green grounding cable from the stand to the guiding
bar using the Torx screw from the output stacker (Fig. 15b).
b
a
Fig. 14
c
b
a
Fig. 15
Mounting the Output Stacker onto the Stand
• Put the stacker onto the stand so that its rollers rest on the lower
level of the stand. Make sure that the rear right stacker roller sits
between the positioning bolts as shown in Fig. 16. That figure also
shows a roller clamp with screw and washer from the accessories
box.
• Mount two roller clamps to the stand (on the side of the guiding bar)
and fasten them tightly to keep the stacker rollers in place (Fig. 17).
• Mount the third roller clamp loosely to the stand (Fig. 21). It will be
fastened after the height adjustment of the output stacker has been
done.
• Attach the grounding cable of the stacker to the stand using the premounted screw (Fig. 15c).
Fig. 16
Caution:
When removing the output stacker from the stand in a later point
in time, do not forget to detach the stacker grounding cable from
the stand!
Fig. 17
IU 675 / 0150
8
TM
TowerFeed for the HP LaserJet 9000
INSTALLATION
Blocking (De-blocking) the Guiding Bar in horizontal position
The stand has a provision for blocking the guiding bar so that the
output stacker, after being pulled back from the printer for jam
removal, can be pushed back easily and without risk to tip over.
•
To activate the blocking mechanism, push the bolt into the
guiding bar and fix it in position with the knurled screw (Fig. 18).
Fig. 18
Attaching the Output Stacker to the Printer
•
Insert the guiding bar of the stand into the guide holder that is on
the rear lower side of TowerFeed (Fig. 19).
Fig. 19
•
Slide-in the blue plastics guide until it snaps into position (Fig.
20).
Fig. 20
•
Push the stand with the output stacker towards the printer system
until the stacker's spring-loaded hooks snap into the printer's
cutouts.
Fig. 21
•
•
Adjust the output stacker inclination using the two blue
adjustment wheels of the outside stacker rollers (Fig. 21, Fig.
22a+b) until the output stacker is parallel to the printer (Fig. 22c)
a
b
Adjust clamp and tighten its screw (Fig. 22d)
c
d
Fig. 22
IU 675 / 0150
9
TM
TowerFeed for the HP LaserJet 9000
INSTALLATION
Electrical Connections
Now that TowerFeed and printer are mechanically assembled, the
units have to be connected electrically to each other.
c
• Connect the power cables to printer and TowerFeed (Fig. 23a,
Fig. 23b).
b
When installing the optional 3000-sheet output stacker as well,
power and data cable have to be connected too:
• the (short) data cable of the output stacker plugs into the
ACCESSORY connector of the printer(Fig. 23c).
The (long) power cable of the output stacker cannot be plugged
into a regular power plug. Here are two alternatives:
a
• Use a regular appliance cable* to extend the (long) power cable
of the output stacker to connect it with a wall plug.
• Use the HP PowerBox* (C4781-60500, Fig. 24a) with one
regular power cable (to connect to the wall plug) and 2+1
connectors for the connection of printer, TowerFeed and output
option (Fig. 24b, c, d).
Fig. 23
* additional appliance cable and HP PowerBox are not part of the shipment
Now the system is ready to be powered on.
Power-on TowerFeed first and then the printer. That will ensure
that TowerFeed is ready when the printer is booting and looking for
the installed peripheral options.
b
a
c
Note:
When powering on the system, power on TowerFeed
FIRST and then the printer.
d
Fig. 24
Caution:
When moving the printer system to another place, detach the output stacker from printer and TowerFeed and
watch out when crossing doorsteps to not have the unit tipping over or TowerFeed trays sliding open.
IU 675 / 0150
10
TM
TowerFeed for the HP LaserJet 9000
INSTALLATION
Printer Panel Settings
The following steps require the printer system to be powered on. When powering on the system, always power on
TowerFeed first and then the printer.
Paper Size Assignment
The TowerFeed trays are coded according to their size. At boot time, the printer automatically recognizes the trays
with their sizes.
Paper Type Assignment
Initially, the printer assigns PLAIN to each paper tray as its default paper type. (The paper type is being used to let
the printer distinguish between trays with same paper size but different media.)
In case of a paper out in a selected tray, the printer will automatically pull paper from another tray with the same
paper size and the same paper type. Assigning a different paper type to each tray inhibits the automatic switching
to another tray if the selected tray runs out of paper.
If you have several trays with the same paper, assign to each of these trays the same paper type. This will increase
your input capacity for this paper type, as the printer will automatically switch to the next tray with the same paper
type in case the selected tray runs out of paper.
To assign a paper type to an input tray, proceed as follows:
•
•
•
move with √ and the arrow keys to the PAPER HANDLING menu and select it with √
move with the arrow keys to the TRAY X TYPE, e.g. TRAY 4 TYPE and select it with √
(the printer will show here e.g. TRAY 4 TYPE = PLAIN)
move with the arrow keys to another of the list of 10 predefined paper types, e.g. BOND and select it with √
This assigns the paper type BOND to TRAY 4 of the system.
Proceed the same way for all the other trays in the menu to change their type assignment to a unique paper type
as well.
Note 1: We recommend to assign to each of the paper trays a unique paper type to avoid automatic
switching to another tray in case of a paper out condition.
Note 2: PLAIN is the default paper type. In case a print job arrives without paper selection, the printer will
pull paper from the first tray containing PLAIN paper (e.g. printer test pages).
Note 3: Be aware that the printer might apply processing constraints to certain paper types, e.g.
CARDSTOCK or TRANSPARENCY will not be duplexed and/or output to the 3000-sheet stacker.
For further information please also refer to APPENDIX C – Tips & Hints.
IU 675 / 0150
11
TM
TowerFeed for the HP LaserJet 9000
INSTALLATION
Software Installation
Installing the Printer Driver
Install the printer drivers delivered with your HP LaserJet as usual. In case of questions please refer to your
printer's manual or contact your dealer.
Configuring the TowerFeed Option
The TowerFeed option has to be activated in the printer driver. To do so, go via Start – Settings – Printers to select
the respective HP LaserJet driver.
In Windows 9x get via printer Properties - tab sheet Configure to the pull-down bar of the Optional Papersources:
where you will see two TowerFeed models:
• 4x500-sheet TowerFeed 44, and
• 6x500-sheet TowerFeed 66.
Select the respective TowerFeed model.
The additional paper trays now will show up in the pull-down windows for the Paper Sources:.
In Windows NT you assign in Properties – Device Settings to each of the trays the respective paper size.
Paper Selection
In the application programs you select the paper sources in the Page Setup function (File - Page Setup), where all
available paper sources show up in the respective Paper Sources: pull-down bar(s).
Hint:
The most recent printer drivers can be downloaded from the HP WEB site (http//:www.hp.com) or from our
WEB page at http://www.rutishauser.ch/ti/sdlhp.htm.
Note:
More information and details on paper selection possibilities are described in APPENDIX B – Tips & Hints
of this manual.
IU 675 / 0150
12
TM
TowerFeed for the HP LaserJet 9000
OPERATING
Operating
Loading Paper
•
Pull open the tray you wish to load until it reaches the stop or
remove it completely for more convenient loading.
•
Make sure that the right paper guide is in the LOAD position by
firmly pushing it to its right stop.
•
Obtain a fresh ream of paper. Hold the ream on the long edge
and bend it in and out. Repeat on the short edge. Square it off
properly (Fig. 25).
•
Insert approx. one third of the ream in the tray and ensure that
all paper is lined up nicely. Repeat that two more times to fill
the tray.
•
Load the paper face down, with its top edge towards the right
(DIN A4 and US Letter size, long edge feeding LEF).
•
Push down the stack, such that all sheets are under the
separation corners (Fig. 26).
•
Push the right paper guide with its separation corner tab to the
left to ensure proper guiding of the stock (Fig. 27). There
should be no gap between the paper guide and the stock.
•
Push down on the paper stack a few times. The paper must
move up and down freely.
•
Fig. 25
Fanning the Paper
Fig. 26
Filling in Paper
Fig. 27
Correct Paper Loading
Close the tray. Repeat the procedure for all trays to be loaded.
Note 1:
The right paper guide can be adjusted within
approx. ± 1mm (± .04") by pushing the separation corner
tab to the left and right (FEED and LOAD) position as
indicated on the yellow label the tray (Fig. 27).
Note 2:
A gap between the right paper guide and the
stock can lead to unreliable feeding and jams inside the
tray. The adjustment of the right paper guide as described
above is mandatory to ensure reliable feeding.
Note 3:
For duplex printing the paper is loaded face up.
A second tray eliminates the need to reload the paper
when using the same paper for both simplex and duplex
printing.
2
Note 4:
The tray loading capacity for 80 g/m paper is
500 sheets. Overloading the tray may lead to paper jams.
IU 675 / 0150
13
TM
TowerFeed for the HP LaserJet 9000
OPERATING
Stock Type
Marking a tray with its Paper Type
As each tray typically contains a different paper type, an indication
on the tray itself about the paper type loaded is helpful particularly
when re-loading the tray after a paper out condition. For that
purpose a paper sample can be mounted in the bow profile of the
tray to clearly identify the paper that is used in that tray.
Hint:
For your convenience, you may insert a sample piece (about
1 inch/28 mm) of the loaded paper type into the extrusion as
a reference when reloading the tray (Fig. 28).
Fig. 28
Marking the Tray
Paper Tray empty
TRAY n EMPTY
Media Type & Size
alternating
with
READY
This message indicates an empty paper tray. Refill the depleted tray.
While feeding occurs from a higher tray, lower ones may be reloaded without interrupting feeding and printing.
Paper Tray depleted during Print Job
LOAD TRAY n
Media Type & Size
(n = tray number)
This message appears if the selected tray runs out of paper (and if there is no other tray with the same paper size
and type, depending of the printer settings.)
If a tray runs out of paper, the printer will automatically switch to another tray with the same paper type and size
and pull paper from there. Otherwise it displays that message, the Attention LED starts blinking, and most probably
a respective error message appears at the user screen (depending on the application).
Refill the tray with the correct paper. After closing the tray, the printer will resume printing.
Requested Paper missing
LOAD TRAY 1
Media Type & Size
This message indicates that the requested paper is not available, either because the print job explicitly asks for
paper from tray 1, or because it asks for paper from a tray where size and type do not correspond with the
document page settings.
Load tray 1 with the requested paper or crosscheck the settings for the document (Page Setup ... ).
IU 675 / 0150
14
TM
TowerFeed for the HP LaserJet 9000
OPERATING
Paper Jam
In case of a paper jam, the printer panel Attention LED will start blinking and the printer display will show a
respective message with the following meaning:
13.03.xx PAPER JAM
13.11.xx PAPER JAM
•
Paper jam in printer
Paper jam in TowerFeed
In case of a printer paper jam, you will see the following message:
13.03.00 JAM INSIDE
RIGHT DOOR
Remove the paper jam and all other pages in the paper path and close all the cover(s). Printing will continue. For
more details on clearing printer paper jams please refer to your printer manual (Chapter Maintenance and Trouble
Shooting, Section Paper Jams).
•
In case of a TowerFeed paper error, the printer will display one of the following messages and TowerFeed
will beep in a certain sequence, depending on the type of error:
13.11. 2 x JAM IN
INPUT ACCESSORY
Cause: TowerFeed motor blocked
TowerFeed beeping:
13.11. 3 x JAM IN
INPUT ACCESSORY
(short - long cont.)
Cause: Paper jam inside TowerFeed
TowerFeed beeping:
13.11. 4 x JAM IN
INPUT ACCESSORY
(long - long cont.)
Cause: TowerFeed tray opened while feeding
TowerFeed beeping:
(6 short beeps)
* x = TF tray number (not system tray number)
Open the TowerFeed tray (the beeping stops when opening the tray that fed the last sheet), remove the
jammed paper and close again all TowerFeed trays. Printing will continue automatically.
In case the printer could not automatically eject the remaining paper inside the printer, open the printer cover(s)
and clear the paper path. Close the printer cover(s) to have the printer resume the print job.
IU 675 / 0150
15
TM
TowerFeed for the HP LaserJet 9000
APPENDIX A - Printer Specific Notes
Printer Firmware Revision
The Firmware of your HP LaserJet printer must be at least Revision 02.000.0 or higher to correctly support the
TowerFeed option. In case your printer does have an older Firmware, ask your dealer for a Firmware upgrade.
Printer Driver Revision
Please use the drivers received with your printer.
For the most recent driver revisions contact your dealer or consult the HP WEB or the Rutishauser WEB site at
http://www.rutishauser.ch/ti/sdlhp.htm.
HP LaserJet Duplexer Option
With the TowerFeed paper handling option installed, the printer's duplexing capabilities remain fully supported.
Optional HP 2000-sheet HCI Option
TowerFeed is used in place of this option and therefore, it cannot be installed together with TowerFeed.
Optional HP 3000-sheet output Stackers
This output stacker can be installed to a printer system with TowerFeed option when using the optional stand from
Rutishauser to compensate for the height difference of the units.
Other optional Devices
rd
Besides of the HP 3000-sheet output options, no other 3 party peripheral devices were tested together with the
TowerFeed option installed. Therefore, such other devices would need to be tested first for their compliance and
compatibility prior to their installation on a printer system with TowerFeed.
IU 675 / 0150
16
TM
TowerFeed for the HP LaserJet 9000
APPENDIX B - PCL Paper Selection Commands
Frequently used PCL commands for Paper Selection:
Command
function
# refers to
HP LaserJet 9000
ESC & l # H
Selects Paper
Source
0
1
2
3
4
5
6
7
8
20
21
22
23
24
25
print/eject page
Tray 2
Manual Feed - Paper
Manual Feed - Envelope
Tray 4 (2000-Sheet Input Tray*)
Tray 3
Envelope Feeder
Auto Select
Tray 1
Tray 4 (TowerFeed Tray 1)
Tray 5 (TowerFeed Tray 2)
Tray 6 (TowerFeed Tray 3)
Tray 7 (TowerFeed Tray 4)
Tray 8 (TowerFeed Tray 5)
Tray 9 (TowerFeed Tray 6)
*NA with TowerFeed installed
ESC & l # A
Selects Paper
Size
2
3
6
26
27
101
=
=
=
=
=
=
Letter
Legal
11 in x 17 in
A4
A3
Custom size
For other sizes please refer to your printer manual
ESC & n # Wd mediatype
Selects Paper
Type
#
mediatype
Panel Display**
6
11
11
13
11
5
9
6
11
6
Plain
Preprinted
Letterhead
Transparency
Prepunched
Bond
Recycled
Color
Cardstock
Rough
PLAIN
PREPRINTD
LTRHEAD
TRNSPRNCY
PREPUNCHD
BOND
RECYCLED
COLOR
CARDSTOCK
ROUGH
**indication for reference purposes only
IU 675 / 0150
17
TM
TowerFeed for the HP LaserJet 9000
APPENDIX C - Tips & Hints
Power ON Sequence
Power On TowerFeed first!
When powering on the printer, it will scan its option bus for available options. In case TowerFeed is not ready at
that point of time, the printer will not activate its support and not add this option to its configuration.
Printing on the wrong Paper
Why doesn't it print from the tray I selected?
If a selected Tray # does not contain the paper size assigned for the print job, the printer might look for other trays
containing the demanded paper size, and if this is available (and with the same Paper Type as Tray #), it will pull
paper from there.
The 3 Rules for Correct Paper Selection
1.
Assign a different Paper Type to every Tray # by using the printers control panel.
You may assign the same Paper Type to two or more tray numbers only if these trays all contain the
same Paper Type.
2.
Make sure that you select the correct Paper Size for the selected Tray #.
The selected Paper Size in the application software must be the same as the size of the selected Tray
#.
3.
Select paper within your application by Paper Type or by Tray #.
If a tray containing the selected Paper Type runs out of paper, the printer will pull paper from another
tray only if it has the same paper Size and Type.
Paper Control and Selection
Selection Criteria
The HP LaserJet offers various possibilities to select paper by offering three selection parameters:
•
Paper Size
•
Paper Source (Tray number)
•
Paper Type
The selection criteria differ in their priorities and can be changed using the respective printer utility software.
Paper Types
The Paper Type is a selection criteria which can be used to name trays and to distinguish between different paper
types within a given paper size. The HP LaserJet offers 10 predefined Paper Types: Bond, Cardstock, Color,
Letterhead, Plain, Preprinted, Prepunched, Recycled, Rough and Transparency.
Default Paper Type
Without a specific paper type assigned to a tray, PLAIN becomes the default paper type. Without a specific paper
source selection in a document, the printer will pull paper from a paper source with the paper type PLAIN.
Assigning a Paper Type to a Tray
Please refer to the section INSTALLATION – Printer Panel Settings – Paper Type Assignment of this manual or to
the printer's manual for more details on how to assign a paper type to a tray.
IU 675 / 0150
18
TM
TowerFeed for the HP LaserJet 9000
APPENDIX C - Tips & Hints
Standard Applications: Where to select Paper Size and Paper Type
Here is the information on where to set the paper selection parameters in the most common standard applications.
•
MS-WORD: File - Page Setup – Paper Size
Paper Source
Paper Size:
First Page:
Other Pages:
•
EXCEL:
File - Print - Properties - Paper
Size is:
Source is:
Type is:
File - Page Setup - Page
Page - Options - Paper
Paper Size:
Size is:
Source is:
Type is:
•
WRITE:
File - Print - Setup
Paper Size:
Paper Source:
Apple Macintosh Environment
This information was not yet available at printing time.
Please refer to our web page at http://www.rutishauser.ch/ti/sdlhp.htm for the most recent software support
information.
IU 675 / 0150
19
TM
TowerFeed for the HP LaserJet 9000
APPENDIX D – Paper Quality Guidelines
General
These paper quality guidelines are general recommendations. Paper beyond these specifications may work as
well, however it should be tested before use. Paper is a material that reacts intensively to adverse temperature and
humidity conditions. The observance of proper conditions as defined below is therefore essential for trouble-free
operation of TowerFeed. Please also refer to the corresponding guidelines in the printer manual.
Paper Quality and Surface
Bond type papers and papers with slight rag content are recommended. For papers with high rag content, as well
as very light and air mail papers, feeding tests must be conducted to check for satisfactory performance before
regular use. Paper with embossed or heavy printing should be tested in TowerFeed before use, as well. Papers
with glossy or structured surface are not recommended. Individual sheets in a stack must not be damaged, warped
more than 3 mm (0. 12") at an angle of max. 20° or creased, since all these may reduce the feeding performance.
Paper Weight
The specified paperweight is 60 - 95 g / m2 (16 - 24 lb.). Other paperweights must be tested before use.
Tolerance
Paper must be cut to the appropriate size dimension within a tolerance of ± 1.0 mm (±0.04"). The paper stack must
be cut square to within a tolerance of 90° ±0.1°.
Recommended Storage Environment
Temperature:
18°C - 24°C (64°F - 75°F)
Relative humidity:
40% - 60%
IU 675 / 0150
20
TM
TowerFeed for the HP LaserJet 9000
APPENDIX E - Troubleshooting
Diagnosing an Error Situation
When calling for support, please have the printer test pages at hand (Configuration Page, Menu Map and
Event Log Page as per APPENDIX F).
Pos
LED
Printer Display
TF Beeping
Description
Action / Remarks
1
OFF
TRAY n OPEN
NO
Tray n open
Close Tray
NO
Empty Tray without
pending print request
Reload tray n
LOAD TRAY 1
Media Type & Size
NO
Requested paper not
available
Load Tray 1 with the correct size.
LOAD TRAY n
Media Type & Size
NO
13.03.00 JAM INSIDE
RIGHT DOOR
NO
alternating with
READY
2
OFF
TRAY n EMPTY
Media Type & Size
alternating with
READY
3
4
5
ON
ON
ON
Also refer to section INSTALLATION – 'Printer
Panel Settings' in this manual and to your printer
manual for further details on how to change media
Size and Type through the printer control panel.
Paper requested from
empty Tray n
Refill Tray n.
Paper jam in Printer
Clear paper jam and all other sheets from the
paper path. Open/close printer cover(s).
The printer witches automatically to the next tray
with the same media Size & Type and pulls paper
from there (depending on printer settings).
Also refer to section 'OPERATING - 'Paper Jam' in
this manual and to your printer manual for further
details.
continued ...
For TF Beeping Sequences (TF Beep Types) see next page.
For other error messages on the printer panel display please refer to your printer manual.
IU 675 / 0150
21
TM
TowerFeed for the HP LaserJet 9000
APPENDIX E - Troubleshooting
Diagnosing an Error Situation (cont.)
When calling for support, please have the printer test pages at hand (Configuration Page, Menu Map and Event
Log Page as per APPENDIX F).
Pos
LED
Printer Display
TF Beeping
Description
Action / Remarks
6
ON
13.11.2x JAM IN
INPUT ACCESSORY
Beep Type 2
TowerFeed Motor blocked Open TF Tray(s). Remove all sheets from the TF
(x = TF tray which fed the paper path. Close TF Tray(s).
In case the error stays, call Service.
last sheet)
7
ON
13.11.3x JAM IN
INPUT ACCESSORY
Beep Type 3
Paper jam in TowerFeed Clear paper jam in TF. Close TF Tray(s).
(x = TF tray which fed the
last sheet)
8
ON
13.11.4x JAM IN
INPUT ACCESSORY
Beep Type 4
Remove paper from the TF paper path. Close TF
TowerFeed tray opened
Tray(s).
during feeding cycle
(x = TF tray which fed the
last sheet)
For TF Beeping Sequences (TF Beep Types) see below.
For other error messages on the printer panel display please refer to your printer manual.
TowerFeed Beep Types
Type 0
(1x short)
TowerFeed Reset Beep (e.g. after Power ON)
Type 1
(short – short)
Paper in TowerFeed paper path after a printer Reset,
or paper-out in TowerFeed tray
Type 2
(short – long)
TowerFeed Motor blocked
Type 3
(long – long)
Paper Jam in TowerFeed
Type 4
(6x short)
Opening a TowerFeed tray during a feed cycle
IU 675 / 0150
22
TM
TowerFeed for the HP LaserJet 9000
APPENDIX F – Printer Information Pages
The printer allows printing out information about its system configuration. These pages can be selected via the
printer panel (Item: INFORMATION MENU).
Note:
The informations for the Configuration Page are recorded at power-up time. There is no update of the
changes after power-up.
Configuration Page (Sample printout on page 23)
This page will be printed via the printer panel (INFORMATION - PRINT CONFIGURATION, or enter "22" on the
numeric keypad. Of particular interest are the indications under Paper Trays and Options and Event Log:
Paper Trays and Options
Event Log
- Device 1:
RUTISHAUSER TOWERFEED option with configuration,
Firmware Revision of Option PCB/Logic PCB,
installed trays with tray capacity (80 g/m2 paper)
shows the last three system errors, incl. TowerFeed errors.
TF Error Codes 13.11.xx
1**
2**
3**
4**
5**
6**
TowerFeed Motor blocked
TowerFeed Paper Jam
Tray opened while feeding
.15
.1F
.29
.16
.20
.2A
.17
.21
.2B
.18
.22
.2C
.19
.23
.2D
.1A
.24
.2E
** Number of TowerFeed tray (not printer tray) which fed the last sheet
Menu Map (Sample printout on page 24)
The Menu Map page can be selected via the printer panel (INFORMATION - PRINT MENU MAP, or enter "21" on
the numeric keypad). This page is showing on page 1 (and 2), item 3 PAPER HANDLING the different paper
sources and its allocated Media Types (TRAY x SIZE = ... and TRAY x TYPE = ...).
PAPER HANDLING
showing paper sources (trays) with SIZE and paper TYPE, e.g.
TRAY 4 SIZE = A4
TRAY 4 TYPE = PREPRINTED
Paper Path Test (Sample printout on page 25)
The printer's paper path test allows to perform feeding tests from the different input trays to the output bin(s). It can
be selected via the printer panel (CONFIGURE DEVICE – DIAGNOSTICS – SET PAPER PATH TEST) where you
can set Source, Destination, Duplex and Copies before releasing the printing of the Test Page. The printout shows
all the available input trays with their respective paper sizes and the output bins of the system.
Event Log
You can also print the Event Log (CONFIGURE DEVICE – DIAGNOSTICS – PRINT EVENT LOG). It shows the
last 50 system errors (the Configuration Page only shows the last 3 errors occurred. Very helpful for diagnosing
purposes! (The error codes for TowerFeed and their meaning are indicated above (see Configuration Page).
Note:
Whenever calling for service, please make sure you have these information pages at hand.
IU 675 / 0150
23
TM
TowerFeed for the HP LaserJet 9000
APPENDIX F – Printer Information Pages
Please refer to page 22 for more information on this page.
IU 675 / 0150
24
TM
TowerFeed for the HP LaserJet 9000
APPENDIX F – Printer Information Pages
Info Tray 4 (= TowerFeed Tray 1)
Info Tray 5 (= TowerFeed Tray 2)
Info Tray 6 (= TowerFeed Tray 3)
Info Tray 7-9 (= TowerFeed Tray 4-6)
Please refer to page 22 for
more information on this page.
IU 675 / 0150
25
TM
TowerFeed for the HP LaserJet 9000
APPENDIX F – Printer Information Pages
Please refer to page 22 for more information on this page.
IU 675 / 0150
26
TM
TowerFeed for the HP LaserJet 9000
APPENDIX G - TowerFeed Selftest
TowerFeed Selftest Feature
The TowerFeed selftest feature allows testing the TowerFeed unit independently from any printer and computer.
With this test you can the paper-feeding behavior of the unit (horizontal position, skew, jam).
Note:
To perform a TowerFeed selftest with the printer on top of it, open the right side cover of the printer to access
the media being fed from TowerFeed through the PPCA (Paper Path Connection Assembly).
To enter the TowerFeed selftest mode, proceed as follows
•
Power-off TowerFeed.
•
Open the printer's right side cover.
•
Open all TowerFeed Trays (approx. 5 cm / 2" is sufficient).
•
Power-on TowerFeed.
•
Wait for the following actions to be completed:
• activation of the solenoid (clicking) in each module
• spinning of the motor (approx. 5 sec)
• a short beep (TowerFeed Reset beep)
•
Close the top-most TowerFeed tray. After a few seconds a sheet will be fed from this tray. You now can mark
on the PPCA the position of the left edge of the sheet (reference for horizontal paper position).
•
Pull out the sheet from its waiting position. TowerFeed will automatically feed a next sheet. You now can
compare the (moving) position of the left edge of the next sheet. If it moves up straight in the same position,
this is ok. In case the left edge position would be different, or moving from left to right (or vice-versa), this might
indicate a problem in either the tray, the unit (module) or the paper loading.*
•
To test the next lower tray, close that tray before removing the sheet from its waiting position. Now remove the
waiting sheet and TowerFeed will feed a sheet from that next lower tray. (TowerFeed will always feed the next
sheet from its lowest closed tray.)
To revert to normal operation, open the top-most TowerFeed tray, remove the waiting sheet and power-off
TowerFeed. Close the right side cover and power on TowerFeed again with at least one tray closed. TowerFeed
will respond with spinning the motor and a short 'Reset' beep. Now it is ready again in its normal operating mode.
* In case error conditions are showing up which are depending on a specific TowerFeed tray, you can swap trays to
find out whether a problem exists with the tray itself or whether a specific module is the cause.
IU 675 / 0150
27
TM
TowerFeed for the HP LaserJet 9000
APPENDIX H – TowerFeed Specifications
Dimensions and Weights:
Floor Model with 4 trays
Floor Model with 6 trays
Model Designation
TF 444/44.65.
TF 444/66.65.
Width
740 mm
740 mm
Paper Specifications:
Paperweight:
Note:
60 - 95 g/m2 (16 - 24 lb.)
Also consult the paper specifications for your printer.
Paper Trays:
Standard trays:
International, CH:
USA:
DIN A4 Landscape (European Size)
1
US Letter Landscape (8 /2" x 11")
Tray capacity:
Positioning accuracy:
Environmental conditions:
Depth
725 mm
725 mm
Height
503 mm
683 mm
Weight
45 kg
58 kg
Optional trays:
DIN A3 Portrait (European Size)
1
US Legal Portrait (8 /2" x 14")
US Ledger Portrait (11" x 17")
A4, Letter, Legal:
Up to 500 sheets or a stack of 50 mm, whichever,
depending on paperweight, is reached first.
A3, Ledger:
Up to 250 sheets or a stack of 25 mm, whichever,
depending on paperweight, is reached first.
For 80 g/m2 bond type paper typically better than:
vertical:
± 2.0 mm (± 0.08")
horizontal:
± 2.0 mm (± 0.08")
skew:
2.5 mm (0.10")
Temperature
Operating:
Storage:
10°C to 32°C (50°F to 90°F)
-25°C to 50°C (-13°F to 122°F)
Relative humidity
(non-condensing)
Operating:
Storage:
25% to 80%
5% to 95%
Note:
Please observe recommended storage conditions
for paper (see 'Paper Quality Guidelines').
Power Requirements:
100 - 240 V~ +5% / -10%, 50-60 Hz, 1.5 A
Fuse Type:
3.15 A / 250 V slow (5x20mm)
IU 675 / 0150
28
TM
TowerFeed for the HP LaserJet 9000
APPENDIX J - Cleaning and Maintenance
TowerFeed does not require preventive maintenance. Cleaning of housing and removal of paper dust from within
the TowerFeed trays might now and then be indicated.
Clean the outside of TowerFeed with a lightly water-dampened cloth. Do not use detergents to avoid damage of
the surfaces.
To clean the paper drawers from paper dust, completely remove the drawers from TowerFeed, remove the paper
and use a vacuum cleaner with a soft brush.
Warning:
To avoid damage to the paper-out sensor arms do not reach into the openings for the paper drawers.
IU 675 / 0150
29
TM
TowerFeed for the HP LaserJet 9000
Notes:
IU 675 / 0150
30
TM
TowerFeed for the HP LaserJet 9000
Rutishauser Data AG, Switzerland, reserves the right to make changes to its products or
services without prior notice and without incurring any obligations to incorporate such
changes in units or publications shipped.
Rutishauser shall in no event be liable for incidental or consequential damages arising
from the use of its equipment.
TowerFeed models are available for the following HP LaserJet printers:
TowerFeed 444 for the
HP LaserJet 4100 Series
TowerFeed 444 for the HP
Color LaserJet 4550 Series
TowerFeed 444 for the
HP LaserJet 9000 Series
TowerFeed 444 for the
HP LaserJet 8150 Series
TowerFeed – a Swiss product - manufactured by
Rutishauser Data AG
Kronenstrasse 9
CH-8712 Stäfa
Switzerland
Tel:
Fax
e-mail
Internet:
+41 (0) 43 477 1111
+41 (0) 43 477 1122
[email protected]
http://www.rutishauser.ch