1
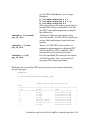
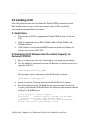
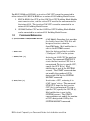
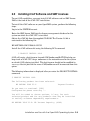
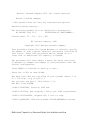
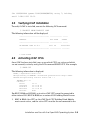
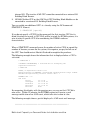
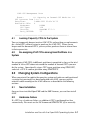
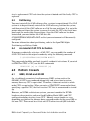
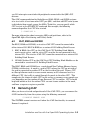
HP AlphaServer Systems
instant Capacity on Demand (iCAP)
Notes for Installation and Use
Order Number: EK-ASCOD-UG. A01
This document provides information about installing iCAP,
bringing additional iCAP CPUs on line, designating CPUs as
spares, loaning iCAP CPUs to the system, and purchasing iCAP
CPUs for full use.
Hewlett-Packard Company
March 2006
© 2006 Hewlett-Packard Development Company, L.P
The information contained herein is subject to change without notice.
The only warranties for HP products and services are set forth in the express warranty statements
accompanying such products and services. Nothing herein should be construed as constituting an
additional warranty. HP shall not be liable for technical or editorial errors or omissions contained
herein.
Linux is a registered trademark of Linus Torvalds in several countries. UNIX® is a trademark of The
Open Group.
Linux is a registered trademark of Linus Torvalds in several countries. UNIX is a trademark of The
ii
Contents
Chapter 1 Installation and Use with the Tru64 Unix Operating System
1.0
Introduction
1.1
Configuration
1.2
Command Reference
2.0 Installing iCAP
2.1 Restrictions
2.2 Retrieving iCAP Software from the instant Capacity on Demand CD-ROM
2.3 Installing iCAP
3.0 Configuring iCAP
4.0 Making Additional CPUs Available After iCAP Has Been Configured
4.1 Purchasing Spare Capacity CPUs
4.2 Loaning iCAP CPUs to the System
4.3 Returning a Borrowed Capacity CPU to the Spare State
4.4 Re-assigning iCAP CPUs among Hard Partitions in a System
4.5 Using the Manage CPUs Task to Put Additional CPUs On Line
5.0 Reconfiguring iCAP
6.0 Changing System Configuration
6.1 New Installation
6.2 Update Installation
6.3 Partitioning
7.0 Platform Caveats
7.1 GS80, GS160 and GS320
7.2 ES47, ES80, and GS1280
8.0 Removing iCAP Software
Chapter 2 Installation and Use with the OpenVMS Operating System
1.0
Introduction
1.1
Configuration
1.2
Command Reference
2.0
Installing iCAP Software and SMP Licenses
3.0
Verifying iCAP Installation
4.0
Activating iCAP CPUs
4.1
Loaning Capacity CPUs to the System
4.2
Re-assigning iCAP CPUs among Hard Partitions in a System
5.0
Changing System Configurations
1-1
1-1
1-1
1-2
1-3
1-3
1-4
1-5
1-5
1-6
1-6
1-7
1-7
1-7
1-7
1-8
1-8
1-9
1-9
1-9
1-9
1-9
1-9
1-10
2-1
2-1
2-1
2-2
2-2
2-4
2-5
2-6
2-6
2-7
iii
5.1
New Installation
5.2
Hardware Failure
5.3
Partitioning
5.4
Accidental iCAP CPU Activation
6.0
Platform Caveats
6.1
GS80, GS160 and GS320
6.2
ES47, ES80 and GS1280
7.0
Removing iCAP
8.0
MAIL Message Notifications
iv
2-7
2-7
2-7
2-7
2-7
2-7
2-8
2-8
2-9
Preface
Purpose of This Guide
This guide provides notes on the installation and use of HP’s instant Capacity on Demand
(iCAP) program.
Note: This program was formerly called “Compaq Capacity on Demand" or
CCoD. References to that name remain in the software and other
elements of the program, but do not affect functionality.
Who Should Use This Guide
This document is for HP AlphaServer customers and service providers who need
information about installing iCAP, bringing additional iCAP CPUs on line, designating
CPUs as spares, loaning iCAP CPUs to the system, and purchasing iCAP CPUs for full use.
Structure of This Guide
This guide is organized as follows:
•
Chapter 1, Installation and Use with Tru64 Unix - provides information for using
iCAP with the Tru64 Unix operating system.
•
Chapter 2, Installation and Use with OpenVMS - provides information for using
iCAP with the OpenVMS operating system.
•
v
Conventions Used in This Guide
In this guide, “Windows NT” refers to the Microsoft Windows NT operating system, and
"Tru64 UNIX" refers to HP’s Tru64 UNIX operating system.
This guide also uses the following conventions:
Convention
Meaning
Note
A note calls the reader’s attention to any item of information
that may be of special importance.
Caution
A caution contains information essential to avoid damage to
the equipment.
italic type
Italic type indicates complete titles of manuals.
bold type
Bold type indicates text that is highlighted for emphasis.
Monospaced
In text, this typeface indicates the exact name of a command,
routine, partition, pathname, directory, or file.
vi
Chapter 1
Installation and Use with the Tru64 Unix
Operating System
1.0
Introduction
iCAP systems contain two types of CPUs, those that are purchased initially
with the system, and those that can be made available as processing
requirements grow. This document provides information about installing iCAP,
bringing additional iCAP CPUs on line, designating CPUs as spares, loaning
iCAP CPUs to the system, and purchasing iCAP CPUs for full use. You must be
root or have the appropriate privileges to perform these tasks.
Please note the following restrictions:
1.1
•
iCAP runs on Tru64 UNIX Version 5.1B* + PK4 or later.
•
iCAP software and the associated SMP licenses must be installed on all
systems that have iCAP CPUs.
Configuration
When you install the iCAP software, all the CPUs on the system are in the
online state. This includes the CPUs that are purchased initially with the
system, as well as the additional CPUs that are reserved for future demand.
Use the iCAP software to configure the system by designating the iCAP CPUs
and setting them to the offline state.
You must include as active CPUs the primary CPU, and either the CPUs
responsible for managing hardware interrupts, or the CPUs being used by one
or more applications, or both when configuring iCAP.
For ES47, ES80 and GS1280, an inactive iCAP CPU cannot be connected to
either internal I/O (ES47 & ES80) or an external I/O Building Block Drawer.
1. ES47 & ES80: One CPU on the iCAP Dual CPU Building Block Module
must remain active, and the active CPU must be the one connected to the
Installation and Use with the Tru64Unix Operating System 1-1
internal I/O. The inactive iCAP CPU cannot be connected to an external I/O
Building Block Drawer.
2. GS1280: Neither CPU on the iCAP Dual CPU Building Block Module can be
connected to an external I/O Building Block Drawer.
1.2
Command Reference
codconfig -help
Displays a usage statement that lists the valid
options for the /usr/sbin/codconfig command.
codconfig [-show]
If Capacity on Demand has been initialized,
the list of iCAP CPUs is returned.
Example:
# /usr/sbin/codconfig –show
Compaq Capacity on Demand (CCoD) is
currently configured. The following CPUs
are CCoD spares and can be purchased or
loaned to the system:
456
If iCoD has not been initialized, a list of CPUs
that can be selected for iCAP will be
displayed.
Example:
# /usr/sbin/codconfig
Compaq Capacity on Demand (CCoD) is
currently not initialized. o initialize CCoD,
use the following command:
codconfig cpu_id_list
where the cpu_id_list contains 1 or more of
the CPUs in this list:
01234567
The CPUs not specified will become spare
CCoD CPUs.
codconfig cpu_id_list
Specifies the list (cpu_id_list) of CPUs
purchased or loaned and available for active
use. iCAP CPUs in the system that have not
yet been purchased should not be listed. You
1-2 instant Capacity on Demand Notes for Installation and Use
can list CPUs individually, or as a range.
Examples:
# /usr/sbin/codconfig 0 1 2
# /usr/sbin/codconfig 0 4 8 12
# /usr/sbin/codconfig 0-2
After you configure the system, purchased or
loaned CPUs remain in the online state, but
the CPUs reserved for expansion are kept in
the offline state.
codconfig -p[urchase]
cpu_id_list
“Purchases” (indicates user intent to pay
activation fee for) an iCAP CPU for use by the
system. Mail notification is sent to the root
account.
codconfig –l[loan]
cpu_id_list
“Loans” an iCAP CPU to the system as a
temporary replacement for a defective CPU
until the defective CPU is replaced. Mail
notification is sent to the root account.
codconfig –c[od]
cpu_id_list
Puts the specified CPUs back into the spares
or iCAP state after “loan” or as part of reassigning CPUs among partitions.
To display the state of the CPUs on the system, use the command sysman
hw_manage_cpus.
Example:
# /usr/sbin/sysman hw_manage_cpus
…
Manage CPUs on m44p0.mro.cpqcorp.net
CPUs:
*********************************************************************
* CPU
Status
Since
*
* ***************************************************************
*
* 0
On line
03/31/2004 10:27:46
*
* 1
On line
03/31/2004 10:27:46
*
* 2
On line
03/31/2004 10:27:46
*
* 3
On line
03/31/2004 10:27:46
*
* 4
Off line (spare)
03/31/2004 10:34:58
*
* 5
Off line (spare)
03/31/2004 10:35:02
*
* 6
On line (on loan)
03/31/2004 10:42:04
*
* 7
On line
03/31/2004 10:39:36
*
Installation and Use with the Tru64Unix Operating System 1-3
*********************************************************************
2.0 Installing iCoD
The iCoD software must be installed after Tru64 UNIX has been installed.
Mail notifications are sent to the root account when iCAP is installed,
initialized, or removed from the system.
2.1 Restrictions
•
This version of iCAP is supported on Tru64 UNIX versions 5.1A and
5.1B.
•
iCAP is supported only on ES47, ES80, GS80, GS160, GS320, and
GS1280 systems.
•
iCAP software and associated SMP licenses must be installed on all
systems that have iCAP CPUs.
2.2 Retrieving iCAP Software from the instant Capacity on
Demand CD-ROM
1. Log in as root or use the su(1) command to gain superuser privileges.
2. Use the mkdir(1) command to create the directory in which you want to
copy the iCAP kit:
/sbin/mkdir directory_name
For example, create a directory called iCAP under /var/tmp:
/sbin/mkdir /var/tmp/cod
3. Insert the instant Capacity on Demand CD-ROM into the drive.
4. You must determine the CD-ROM device name to mount the instant
Capacity on Demand CD-ROM. Enter the following command to find the
read-only CD-ROM device:
# file /dev/rrz*c | grep -E 'RRD|CD'
/dev/rrz4c:
character special (8/4098) SCSI #0 RRD45 \
disk #32 (SCSI ID #4) (SCSI LUN #0) offline
/dev/rrz4c:
character special (8/2) EIDE #0 CD-ROM X \
disk #0 (SCSI ID #0) (SCSI LUN #0) offline
1-4 instant Capacity on Demand Notes for Installation and Use
The result of this command shows that the CD-ROM device name is
/dev/rz4c.
5. Use the mount(8) command to mount the CD-ROM:
/usr/sbin/mount -r -o rrip -t cdfs cdrom_device_name
mount_directory_name
For example, to mount the CD-ROM to the /var/tmp/ccod directory you
created in the previous step 2:
/usr/sbin/mount -r -o rrip -t cdfs /dev/rz4c /var/tmp/ccod
This command mounts the CD-ROM as read-only using the Rock Ridge
Interchange Protocol (RRIP) and specifies the file system type as the
CD-ROM (Compact Disc Read Only Memory) File System.
Note that physically write-protected file systems must be mounted with
read-only access or errors will occur when access times are updated,
whether or not any explicit write is attempted.
2.3 Installing iCAP
To use iCAP capabilities, you must install the iCAP software and the associated
SMP license Product Authorization Key (PAK) at the time of the iCAP CPU
installation.
Use the lmf(8) command to install the SMP license PAK on the license
management database for the system on which the iCAP kit is installed. The
PAK is proof of purchase and represents your license to use a software product.
# /usr/sbin/lmf register - < PAK_file
In the previous example, PAK_file is the filename of the license PAK. This
command registers license data directly from the file PAK_file to the License
Database. See lmf(8) for more information.
To install the iCAP software on to an existing system:
1. Change to the directory where you mounted or downloaded the kit.
2. Use the tar(1) command to extract the iCAP kit:
# /sbin/tar xvf CODBASE520.tar
Installation and Use with the Tru64Unix Operating System 1-5
This command untars the kit to a subdirectory (CODBASE520) in the
current directory.
3. Install the iCAP kit using setld(8) with the following command:
# /usr/sbin/setld -l download_directory_name/CODBASE520 CODBASE520
Note that in the previous example, download_directory_name is the path to
the subdirectory where you downloaded the kit and the revision number of
the iCoD software product is 520. This revision number may increase for
later versions.
4.
Verify the iCAP installation with the command:
# /usr/sbin/setld -i | grep COD
3.0 Configuring iCAP
You must include as active CPUs the primary CPU, and either the CPUs
responsible for managing hardware interrupts, or the CPUs being used by one
or more applications, or both when configuring iCAP.
For ES47, ES80 and GS1280, an inactive iCAP CPU cannot be connected to
either internal I/O (ES47 & ES80) or an external I/O Building Block Drawer.
1. ES47 & ES80: One CPU on the iCAP Dual CPU Building Block Module
must remain active, and the active CPU must be the one connected to the
internal I/O. The inactive iCAP CPU cannot be connected to an external I/O
Building Block Drawer.
2. GS1280: Neither CPU on the iCAP Dual CPU Building Block Module can be
connected to an external I/O Building Block Drawer.
Perform these steps to configure iCAP:
1. Display the list of CPUs that must remain on line and the list of available
CPUs before configuring iCAP with the command:
# /usr/sbin/codconfig –show
2. Configure iCAP with the set of active CPUs initially purchased:
# /usr/sbin/codconfig cpu_id_list
Note: CPUs may be started (put on line) and stopped (put off line) as a
1-6 instant Capacity on Demand Notes for Installation and Use
consequence of using the /usr/sbin/codconfig command. Informational
messages will appear on the Console as a result. For example:
Starting secondary cpu 1
Stopping secondary cpu 1
See the codconfig(8) reference page for additional information on configuring
iCAP.
4.0 Making Additional CPUs Available After iCAP Has
Been Configured
You must determine the IDs of the reserved offline iCAP CPUs in order to make
them available. You can view the IDs and status of the system's CPUs by using
the System Management "Manage CPUs" task invoked with the following
command:
# /usr/sbin/sysman hw_manage_cpus
You also can use the following command line interface:
# /usr/sbin/sysman -cli -list val -comp hotswap -group cpus
This command lists the values (ID and status) for the given component
(hotswap) and group (cpus).
All CPUs in the offline and spare state are iCAP CPUs that are available for
activation.
4.1 Purchasing Spare Capacity CPUs
Use the /usr/sbin/codconfig -p cpu_id_list command to purchase iCAP CPUs.
4.2 Loaning iCAP CPUs to the System
You can temporarily borrow inactive iCAP CPUs and use them as replacements
for a failed CPU without having to purchase the iCAP CPU.
Use the /usr/sbin/codconfig -l cpu_id_list command to loan the specified CPUs to
the system.
When you no longer need the borrowed CPUs, you may either purchase them or
return them to their spare state. If a CPU is found to be defective and removed
from the system, an additional CPU will not be brought automatically on line.
You must use manually loan an iCAP CPU to the system and use the Manage
CPUs task to add activate the additional CPU.
Installation and Use with the Tru64Unix Operating System 1-7
4.3 Returning a Borrowed Capacity CPU to the Spare State
When you return borrowed capacity CPUs to the spare state, you must put
them off line first with the System Management "Manage CPUs" task
(/usr/sbin/sysman hw_manage_cpus). Then use the /usr/sbin/codconfig –c
cpu_id_list command to return borrowed capacity CPUs to the spare state.
Note: Spare CPUs cannot be put back on line until they are either loaned to the
system or purchased.
4.4 Re-assigning iCAP CPUs among Hard Partitions in a System
Re-assigning iCAP CPUs to different partitions is permitted as long as the total
number of active CPUs does not exceed the number of licensed CPUs you own
for the system. Operationally, make a CPU “spare,” as described in Section 4.3,
in one hard partition of a system and “purchase,” as described in Section 4.1, an
iCAP CPU in another hard partition without actually having to pay for the
iCAP CPU.
4.5 Using the Manage CPUs Task to Put Additional CPUs On Line
You can use the System Management "Manage CPUs" task to add a purchased
or borrowed CPU by selecting the CPU and changing its state to on line. This
adds the CPU to the list of purchased or borrowed CPUs.
"Manage CPUs" is invoked with the following command:
# /usr/sbin/sysman hw_manage_cpus
You also can use the following command line interface to place a CPU on line:
# /usr/sbin/sysman -cli -set val -comp hotswap -group cpus -attr \
status=online -key1 cpu_id
For example:
# /usr/sbin/sysman -cli -set val -comp hotswap -group cpus -attr \
status=online -key1 5
This command sets the value of the given component (hotswap), group (cpus),
and attribute (status) for CPU 5 (-key1 5) to the online state making it
permanently available to the system.
Note: You also can place CPUs on line by using the online(8) and psradm(8)
commands; however, these commands have no effect on iCAP and the CPUs will
not remain on line when the system is rebooted.
1-8 instant Capacity on Demand Notes for Installation and Use
5.0 Reconfiguring iCAP
If you accidentally put a CPU on line using the "Manage CPUs" task or include
an erroneous set of CPUs, you can reconfigure iCAP to put the incorrect CPUs
off line and to include only the CPUs you want. Use the /usr/sbin/codconfig show command to display the list of currently configured CPUs and then use
the /usr/sbin/codconfig cpu_id_list command to reconfigure iCAP.
The following example describes how to reconfigure iCAP when a CPU is added
accidentally to the iCAP configuration list.
3. Display the list of currently configured CPUs:
# /usr/sbin/codconfig –show
Compaq Capacity on Demand (CCoD) is currently configured.
The following CPUs are CCoD spares and can be purchased or
loaned to the system:
1236
4. Re-enter the correct list of configured CPUs
Continuing with the example, reconfigure iCAP without CPU 6:
# /usr/sbin/codconfig 1 2 3
6.0 Changing System Configuration
When you reinstall or update the operating system or hardware configuration of
a system that previously has been configured with iCAP, you may need to
reinstall, reconfigure, or both.
6.1 New Installation
A complete installation of Tru64 UNIX will overwrite the previously installed
iCAP software. You must reinstall and reinitialize the iCAP software once the
operating system installation is complete.
6.2 Update Installation
You should remove the iCAP software prior to performing an Update
Installation and then reinstall it using the version of iCAP appropriate for the
new operating system version.
Installation and Use with the Tru64Unix Operating System 1-9
6.3 Partitioning
You should install the iCAP software subset after a system has been
partitioned. If an iCAP system is to be partitioned, uninstall the iCAP software,
partition the system, and then reinstall the iCAP software on all of the new
partitions. It is up to the person who partitions the system to ensure that only
the CPUs that have been purchased are used within the partitions.
7.0 Platform Caveats
7.1 GS80, GS160 and GS320
The GS80, GS160, and GS320 systems have a Non-Uniform Memory Access
(NUMA) architecture. This can complicate the choice of which CPU to put on
line as memory access speeds can vary depending on whether the memory being
accessed resides on the same Quad Building Block (QBB) as the new CPU.
There also must be at least one CPU on line in each QBB to handle any I/O
interrupts associated with peripherals connected to the QBB's PCI drawers.
The iCAP recommendation for GS80, GS160, and GS320 systems is to start
with at least one online CPU per QBB, and then add CPUs one by one to evenly
distribute them across the QBBs. You can use the CPU numbers to determine
in which QBB of the partition the CPU resides with the following algorithm:
QBB_number = INT(cpu_id/4)
For example, on a 4 QBB system with 7 purchased CPUs, the following CPUs
should be on line: 0, 1, 4, 5, 8, 9, and 12.
7.2 ES47, ES80, and GS1280
For ES47, ES80 and GS1280, an inactive iCAP CPU cannot be connected to
either internal I/O (ES47 & ES80) or an external I/O Building Block Drawer.
1. ES47 & ES80: One CPU on the iCAP Dual CPU Building Block Module
must remain active, and the active CPU must be the one connected to the
internal I/O. The inactive iCAP CPU cannot be connected to an external I/O
Building Block Drawer.
2. GS1280: Neither CPU on the iCAP Dual CPU Building Block Module can be
connected to an external I/O Building Block Drawer.
The ES47, ES80, and GS1280 have a mesh-based Non-Uniform Memory Access
(NUMA) architecture. A mesh is a grid of CPUs where the CPU on one side of
the grid is connected to another CPU on the far side of the grid. When a CPU
on these platforms needs to access remote memory or I/O resources local to a
1-10 instant Capacity on Demand Notes for Installation and Use
different CPU, the traffic is routed through the mesh to the other CPU. This
complicates the choice of which CPU to put on line as memory access speeds can
vary depending on the number of hops from one CPU to another. CPUs should
be placed online so that the online CPUs are next to one another in the mesh,
and form as square a region as possible. The xmesh utility can be used to see
how Tru64 UNIX processor ids relate to the mesh. Xmesh can be obtained from
ttp://h30097.www3.hp.com/ by choosing software products and looking for
xmesh under management. xmesh shows the processor id of each CPU in the
upper left hand corner for the CPU.
8.0 Removing iCAP Software
After all of the Capacity on Demand CPUs have been put on line and purchased,
it is possible, but not necessary, for you to remove the iCAP functionality from
the system using the setld(8) command.
# /usr/sbin/setld -d CODBASE520
Note that in the previous example, the revision number of the iCAP software
product is 520, which changes for later revisions. You can determine the
installed version by executing:
# /usr/sbin/setld -i | grep CODBASE
Installation and Use with the Tru64Unix Operating System 1-11
1-12 instant Capacity on Demand Notes for Installation and Use
Chapter 2
Installation and Use with the
OpenVMS Operating System
1.0
Introduction
iCAP systems contain two types of CPUs, those that are purchased initially
with the system, and those that can be made available as processing
requirements grow. This document provides information about installing iCAP,
bringing additional iCAP CPUs on line, designating CPUs as spares, loaning
iCAP CPUs to the system, and purchasing iCAP CPUs for full use. You must
have CMKRNL and SYSPRV privileges to perform the tasks described in this
document.
Please note the following restrictions:
•
iCAP is supported on OpenVMS Alpha systems; it is not supported on
OpenVMS VAX systems.
•
iCAP Version 1.6 runs on OpenVMS Alpha Version 7.2-1H1 and higher
•
iCAP software and the associated SMP licenses must be installed on all
systems that have iCAP CPUs.
•
OpenVMS Galaxy is not supported in this release of iCAP.
When you install the iCAP software, all the CPUs on the system are in the
active state. This includes the CPUs that are purchased initially with the
system, as well as the additional CPUs that are reserved for future demand.
Use the iCAP software to configure the system by designating the iCAP CPUs
and setting them to the inactive state.
1.1
Configuration
You must include as active CPUs the primary CPU, and either the CPUs
responsible for managing hardware interrupts, or the CPUs being used by one
or more applications, or both when configuring iCAP.
Installation and Use with the OpenVMS Operating System 2-1
For ES47, ES80 and GS1280, an inactive iCAP CPU cannot be connected to
either internal I/O (ES47 & ES80) or an external I/O Building Block Drawer.
1. ES47 & ES80: One CPU on the iCAP Dual CPU Building Block Module
must remain active, and the active CPU must be the one connected to
the internal I/O. The inactive iCAP CPU cannot be connected to an
external I/O Building Block Drawer.
2. GS1280: Neither CPU on the iCAP Dual CPU Building Block Module
can be connected to an external I/O Building Block Drawer.
1.2
Command Reference
$ @SYS$SYSTEM:iCAP$SYSTEM MODIFY
iCAP Modify Procedure that provides
the facility to set the CPUs that will
be spare (inactive) when the
OpenVMS boots. Mail notification is
sent to the SYSTEM account.
$ SHOW CPU
Lists the Active and total available
(“Configure”) CPUs in the system.
$ START/CPU [n]
Activates an iCAP CPU for purchase
or loan. The command START/CPU
starts the first inactive CPU that is
encountered. To start a specific CPU,
specify the CPU ID [n]. Mail
notification is sent to the SYSTEM
account. The START command does
not modify the number of CPUs
designated iCAP by the SYSTEM
MODIFY command.
$ STOP/CPU [n]
Inactivates a CPU, restoring it to
iCAP “spare” status. The command
STOP/CPU stops the first inactive
CPU that is encountered. To stop a
specific CPU, specify the CPU ID [n].
Mail notification is sent to the
SYSTEM account. The START
command does not modify the number
of CPUs designated iCAP by the
SYSTEM MODIFY command.
2-2 instant Capacity on Demand Notes for Installation and Use
2.0
Installing iCAP Software and SMP Licenses
To use iCAP capabilities, you must install iCAP software and an SMP license
PAK at the time of the iCAP CPU installation.
To install the iCAP software on your OpenVMS system, perform the following
steps:
Log in to the SYSTEM account.
Enter the SMP license PAK into the license management database for the
system on which the iCAP CPU is installed.
Obtain the iCAP kit from the supplied CD-ROM. The Version 1.6 kit is
contained in the following file:
HP-AXPVMS-iCAP-V0106-0-1.PCSI
Install the iCAP software kit using the following DCL command:
$ PRODUCT INSTALL iCAP
iCAP will create a batch queue (named iCAP$nodename$BATCH)to help you
keep track of iCAP CPU usage. nodename is the network name for the system
on which iCAP is being installed. This batch queue should not be modified in
any way. A batch job with the name iCAP$nodename will be executed from this
queue.
The following information is displayed after you enter the PRODUCT INSTALL
command:
$ PRODUCT INSTALL iCAP
The following product has been selected:
HP AXPVMS ICAP V1.6
Layered Product
Do you want to continue? [YES]
Configuration phase starting ...
You will be asked to choose options, if any, for each
selected product and for any products that may be installed
to satisfy software dependency requirements.
HP AXPVMS ICAP V1.6: HP Instant Capacity (iCAP)
Installation and Use with the OpenVMS Operating System 2-3
Hewlett Packard Company 2005. All rights reserved.
Hewlett Packard Company
* This product does not have any configuration options.
Execution phase starting ...
The following product will be installed to destination:
HP AXPVMS ICAP V1.6
DISK$ALPHASYS:[VMS$COMMON.]
Portion done: 0%...10%...20%...80%
HP Instant Capacity iCAP
Copyright 2005 Hewlett-Packard Company.
This procedure allows the System Manager to initially specify
the number of iCAP (instant capacity) processors installed in
this server. These iCAP processors may be turned on at a
later time if additional CPU capacity is needed.
The procedure will then submit a batch job which runs every
15 minutes to compare the number of iCAP processors with the
initial configuration.
Press ENTER to continue or enter Q to quit:
There are 4 CPUs on node ALPHA.
How many iCAP CPUs are installed in your system? <Enter 0 to
4, ? for help, or Q to quit>: 1
Are you sure you have 1 iCAP CPU(s)? [Y]:
New mail from SYSTEM
%iCAP-I-STARTING, Starting iCAP now.
%iCAP-I-CPUSTOP, Now stopping 1 CPU(s) per iCAP requirements.
%iCAP-I-CPUSTOPINFO, Stopped CPU; 0 left to stop.
%iCAP-I-QCREATED, iCAP batch queue iCAP$ALPHA$BATCH created
2-4 instant Capacity on Demand Notes for Installation and Use
Job iCAP$ALPHA (queue ICAP$ALPHA$BATCH, entry 7) holding
until 5-DEC-2005 10:05
3.0
Verifying iCAP Installation
To verify if iCAP is installed, execute the following DCL command:
$ PRODUCT SHOW PRODUCT iCAP
The following information will be displayed:
------------------------------- ------------ ----PRODUCT
KIT TYPE
STATE
------------------------------- ------------ ----HP AXPVMS iCAP V1.6-1
Full LP
Installed
------------------------------- ----------- -------1 item found
4.0
Activating iCAP CPUs
Once iCAP has been installed, you can see which CPUs are active and which
are not currently active by using the DCL command SHOW CPU. For example:
$ SHOW CPU
The following information is displayed:
ALPHA, a AlphaServer GS160 6/731
Multiprocessing is ENABLED. Streamlined synchronization image loaded.
Minimum multiprocessing revision levels: CPU = 1
PRIMARY CPU = 00
CPU sets:
Active
Configure
Potential
Autostart
Failover
00 01
00 01 04 05
00 01 04 05
00 01 04 05
None
For ES47, ES80 and GS1280, an inactive iCAP CPU cannot be connected to
either internal I/O (ES47 & ES80) or an external I/O Building Block Drawer.
1. ES47 & ES80: One CPU on the iCAP Dual CPU Building Block Module
must remain active, and the active CPU must be the one connected to the
Installation and Use with the OpenVMS Operating System 2-5
internal I/O. The inactive iCAP CPU cannot be connected to an external I/O
Building Block Drawer.
2. GS1280: Neither CPU on the iCAP Dual CPU Building Block Module can be
connected to an external I/O Building Block Drawer.
You can enable one additional CPU at a time by using the DCL command
START/CPU. Format:
$ START/CPU [cpu-id]
If you do not specify a CPU ID in the command, the first inactive CPU that is
found (starting the search at CPU ID 0) will be started. On NUMA systems, it is
wise to select a specific CPU after considering the NUMA hardware
characteristics.
When a START/CPU command causes the number of active CPUs to exceed the
number of licenses you own for the system, this requires you pay for full use of
the CPU. You should contact Hewlett Packard to complete the purchase.
The following example shows the information that is displayed when a CPU is
activated.
$ START/CPU 4
%SYSTEM-I-CPUSELECTED, a selected CPU is attempting the
requested transition
$ SHOW CPU
ALPHA, an AlphaServer GS160 6/731
Multiprocessing is ENABLED. Streamlined synchronization image loaded.
Minimum multiprocessing revision levels: CPU = 1
PRIMARY CPU = 00
CPU sets:
Active
Configure
Potential
Autostart
Failover
00 01
00 01
00 01
00 01
None
04
04 05
04 05
04 05
By comparing this display with the previous one, you can see that CPU 04 is
now active. Within 15 minutes the SYSTEM account will receive a mail
message notification of an iCAP event, which tells what action to take.
The following example shows a partial display of a iCAP event mail message:
**************************************************
2-6 instant Capacity on Demand Notes for Installation and Use
iCAP CPU Management Data
Event:
*** Capacity on Demand CPU Addition ***
CPU increase from 2 to 3
Date/Time:
1-MAR-2001 03:49:18.70
Available CPUs:
4
Nodename:
ALPHA
CPU Type:
128
Version:
OpenVMS V7.2-1
Real_CPUTYPE:
11
**************************************************
4.1
Loaning Capacity CPUs to the System
You can temporarily borrow inactive iCAP CPUs and use them as replacements
for a failed CPU without having to purchase the iCAP CPU. When you no
longer need the borrowed CPUs, you may either purchase them or return them
to their spare state.
4.2
Re-assigning iCAP CPUs among Hard Partitions in a
System
Re-assigning iCAP CPUs to different partitions is permitted as long as the total
number of active CPUs does not exceed the number of licensed CPUs you own
for the system. Operationally, stop a CPU in one partition using STOP/CPU,
and start a CPU in another partition using START/CPU.
5.0
Changing System Configurations
When you reinstall or update the operating system or hardware configuration of
a system that previously has been configured with iCAP, you may need to
reinstall and/or reconfigure the iCAP software as described in the following
sections.
5.1
New Installation
Once you have installed OpenVMS and the SMP licenses, you can then install
iCAP.
5.2
Hardware Failure
If a CPU has a hardware failure, an additional CPU is not brought on line
automatically. You must use the DCL command START/CPU [n] to manually
Installation and Use with the OpenVMS Operating System 2-7
start a replacement CPU each time the system is booted until the faulty CPU is
replaced.
5.3
Partitioning
You must reinstall the iCAP software after a system is repartitioned. If a iCAP
system is to be partitioned, uninstall the iCAP software, partition the system,
and then reinstall the iCAP software on all of the new partitions. It is up to the
person who partitions the system to ensure that only the CPUs that have been
purchased are used within the partitions. Once the iCAP software has been
uninstalled, you must delete the iCAP data file
(SYS$SYSTEM:iCAP$DATA.DAT) so that your environment will be correctly
configured.
For more information about partitioning, refer to the OpenVMS Alpha
Partitioning and Galaxy Guide.
5.4
Accidental iCAP CPU Activation
If someone accidentally activates a iCAP CPU, you can modify the number of
iCAP CPUs back to the original number by using the following command:
$ @SYS$SYSTEM:iCAP$SYSTEM MODIFY
This command should be used only to rectify accidental activations. If you wish
to START or STOP a CPU, use the DCL commands
START/CPU [n] or STOP/CPU [n]
6.0
6.1
Platform Caveats
GS80, GS160 and GS320
On a traditional symmetrical multiprocessor (SMP) system such as the
GS140E, all CPUs are numbered sequentially and access time to system
memory from any CPU is equivalent. Therefore, it does not matter in which
order CPUs are put online. When you enter a START/CPU command without
specifying a specific CPU, the first inactive CPU that is encountered is started
up.
However, on NUMA architecture systems, you must consider the NUMA
hardware characteristics and your Quad Building Block (QBB) and CPU
configuration before starting a new CPU. Memory access speeds can vary
depending on whether the memory being accessed resides on the same QBB as
the new CPU. There must be at least one CPU online in each QBB to handle
2-8 instant Capacity on Demand Notes for Installation and Use
any I/O interrupts associated with peripherals connected to the QBB's PCI
drawers.
The iCAP recommendation for AlphaServer GS80, GS160, and GS320 systems
is to start with at least one online CPU per QBB, and then add CPUs one by one
to distribute them evenly across the QBBs. To do this, you can specify which
CPU to start in the START/CPU command. For example, the following
command specifies that CPU 8 be started:
$ START/CPU 8
For more information about managing QBBs and partitions, refer to the
OpenVMS Alpha Partitioning and Galaxy Guide.
6.2
ES47, ES80 and GS1280
For ES47, ES80 and GS1280, an inactive iCAP CPU cannot be connected to
either internal I/O (ES47 & ES80) or an external I/O Building Block Drawer.
1. ES47 & ES80: One CPU on the iCAP Dual CPU Building Block Module
must remain active, and the active CPU must be the one connected to the
internal I/O. The inactive iCAP CPU cannot be connected to an external I/O
Building Block Drawer.
2. GS1280: Neither CPU on the iCAP Dual CPU Building Block Module can be
connected to an external I/O Building Block Drawer.
The ES47, ES80 and GS1280 have a mesh-based Non-Uniform Memory Access
(NUMA) architecture. A mesh is a grid of CPUs where the CPU on one side of
the grid is connected to another CPU on the far side of the grid. When a CPU
on these platforms needs to access remote memory or I/O resources local to a
different CPU, the traffic is routed through the mesh to the other CPU. This
complicates the choice of which CPU to put on line as memory access speeds can
vary depending on the number of hops from one CPU to another. CPUs should
be placed online so that the online CPUs are next to one another in the mesh,
and form as square a region as possible.
7.0
Removing iCAP
After you have activated and purchased all the iCAP CPUs, you can remove the
iCAP functionality from the system using the following command:
$ PRODUCT REMOVE iCAP
The SYSTEM account receives mail when the iCAP functionality is removed.
Removal is optional.
Installation and Use with the OpenVMS Operating System 2-9
The following example shows the output from an actual product removal of
iCAP:
$ PRODUCT REMOVE iCAP
The following product has been selected:
HP AXPVMS iCAP V1.6-1
Layered Product
Do you want to continue? [YES] YES
The following product will be removed from destination:
HP AXPVMS iCAP V1.6-1
DISK$X705:[VMS$COMMON.]
Portion done: 0%...60%...70%...80%...100%
The following product has been removed:
HP AXPVMS iCAP V1.6-1
Layered Product
8.0
MAIL Message Notifications
The SYSTEM account receives mail regarding the following iCAP events:
•
iCAP product installation (PRODUCT INSTALL iCAP)
•
iCAP product removal (PRODUCT REMOVE iCAP)
•
iCAP CPU activation (START/CPU)
•
iCAP CPU modification (@SYS$SYSTEM:iCAP$SYSTEMMODIFY)
These events also trigger an OPCOM message to notify system management of
the event.
2-10 instant Capacity on Demand Notes for Installation and Use