1
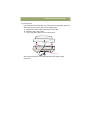
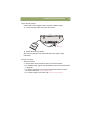
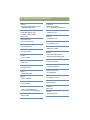
hp scanjet 7400c series scanner
setup and support guide
2
Copyright information
Warranty
© Copyright Hewlett-Packard Company
2000
The information contained in this document
is subject to change without notice.
All rights reserved. Reproduction,
adaptation, or translation without prior
written permission is prohibited, except as
allowed under copyright laws.
Hewlett-Packard makes no warranty of any
kind with respect to this information.
HEWLETT-PACKARD SPECIFICALLY
DISCLAIMS THE IMPLIED WARRANTY OF
MERCHANTABILITY AND FITNESS FOR A
PARTICULAR PURPOSE.
Trademark credits
Adobe, Adobe Photoshop, and Acrobat are
trademarks of Adobe Systems Incorporated.
Energy Star® is a U.S. registered service
mark of the United States Environmental
Protection Agency. Microsoft and Hotmail
are U.S. registered trademarks of Microsoft
Corporation.
All other products mentioned herein may be
trademarks of their respective companies.
Hewlett-Packard shall not be liable for any
direct, indirect, incidental, consequential, or
other damage alleged in connection with the
furnishing or use of this information.
NOTICE TO U.S. GOVERNMENT
USERS: RESTRICTED RIGHTS
COMMERCIAL COMPUTER SOFTWARE:
“Use, duplication, or disclosure by the
Government is subject to restrictions as set
forth in subparagraph (c) (1) (ii) of the Rights
in Technical Data Clause at DFARS 52.2277013.”
Material scanned by this product may be
protected by governmental laws and other
regulations, such as copyright laws. The
customer is solely responsible for complying
with all such laws and regulations.
3
1
Installing and
troubleshooting
This section provides information for installing the scanner and resolving issues that
might occur during installation. For usage problems after installation, see the user’s
manual.
Installing the scanner and accessories
Before you begin
●
Ensure you have a USB connection or SCSI card properly installed in your
computer. If you choose to use SCSI, you will need a SCSI cable.
●
Locate the Macintosh CD package.
4
Installing and troubleshooting
1. Check the box contents
ADF
scanner
HP PrecisionScan Pro
CD-ROM
XPA
power cable
●
HP ScanJet 7400C series
scanner
●
HP PrecisionScan Pro CD-ROM
●
automatic document feeder (ADF)
(some models only)
System requirements
See the box in which the scanner shipped.
USB cable
●
USB cable
●
power cable
●
transparency/slide adapter
(XPA)
Installing and troubleshooting
5
2. Connect the ADF
If your scanner came with an ADF or you purchased one separately, attach the
ADF to the scanner. Use the ADF to scan multiple pages.
a
b
c
Remove the protective film from the bottom of the ADF.
Attach the ADF to the scanner.
Connect the ADF cable to its port on the scanner.
ADF port
See “Using accessories” in the HP PrecisionScan Pro Help for usage
instructions.
6
Installing and troubleshooting
3. Unlock the scanner
Use your finger to flip the lock down to the unlocked position. If the lock is not
completely in the unlocked position, you will hear a grinding noise when you try
to scan.
Installing and troubleshooting
7
4. Install software
Install the HP scanning software before you install additional software.
a
b
c
d
e
f
Quit all open programs.
Insert the CD-ROM.
The HP Scanning Software window appears. (If the HP Scanning Software
window does not appear, double-click the icon for the HP Scanning
Software CD.)
Double-click the HP Scanning Software Installer, and then follow the
instructions on the screen.
When the main installation dialog box appears, select an installation
package from the pull-down menu (located in the upper-left part of the
dialog box).
Click Install.
The Installer copies component files onto your computer.
If the installation is successful, click Restart to leave the Installer and
restart the computer.
-OrClick Continue to add more installation packages from the main dialog box
of the Installer.
-OrClick Quit to leave the Installer without restarting the computer.
After you install the HP scanning software, install the additional software.
Note:
For more information about installing software, see the Installation Read
Me file on the HP Scanning Software CD.
8
Installing and troubleshooting
5. Connect interface cable
a
b
Turn off the computer.
Choose ONE:
● Connect the USB cable between the USB ports on the scanner and the
computer.
● Connect the SCSI cable between the SCSI ports on the scanner and the
computer.
SCSI
USB
6. Connect the power cable
a
b
Connect the power cable between the scanner and a surge protector or
grounded wall outlet that is easily accessible. This turns on the scanner.
(There is no power switch.)
Turn on the computer.
Installing and troubleshooting
9
7. Change the front panel overlay (if necessary)
The scanner has a front panel overlay installed. If necessary, change the
overlay to match your language.
a
From the bottom, front center of the overlay, gently lift the overlay off of the
scanner.
b
Align the pegs on the back of the new overlay with the holes on the scanner
and snap the overlay into place.
10
Installing and troubleshooting
Start scanning
Use one of these methods:
●
Scanner buttons. Scan directly to a destination by pressing one of these
buttons:
Edit Text
E-mail
Fax
●
Copy
File
HP Scanning
Software
HP PrecisionScan Pro software. Use the software to view or change the
scanned image before you send it.
Installing and troubleshooting
11
Connect the XPA (optional)
Use the XPA to scan negatives, slides, and other transparent items.
a
Connect the XPA cable to its port on the scanner.
XPA port
b
Restart the scanning software.
See “Using accessories” in the HP PrecisionScan Pro Help for usage
instructions.
Find help and support
See these sources:
●
●
●
●
View the three-minute product tour when you start the software.
For installation help, support, and specifications: See more information later
in this guide.
For tips and information on scanning and optional accessories: Visit the
HP ScanJet website at www.scanjet.hp.com.
For customer support on the Web, visit www.hp.com/go/support.
12
Installing and troubleshooting
Performing basic troubleshooting
If the scanner or software is not working, perform these steps first.
●
Check that the power cable is securely connected between the scanner and a
live electrical outlet or surge protector that is turned on.
●
Make sure you have properly and securely connected the scanner to the
computer using either the Universal Serial Bus (USB) or the SCSI Input/Output
(I/O) interface. See "Checking connections" on page 13.
●
Use the Apple System Profiler to make sure the scanner is connected to the
computer correctly. See "Checking connections" on page 13.
●
If the scanner is making a loud grinding noise, make sure the scanner is
unlocked. Move the lock down to the unlocked position.
●
Disconnect the power cable from the scanner and turn off the computer. After
30 seconds, reconnect the power cable and then turn on the computer, in that
order.
●
If you receive installation file errors or the scanning software will not run, make
sure all programs are closed, and then uninstall and reinstall the scanning
software.
●
Make sure your computer meets the minimum system requirements. See the
box in which the scanner shipped. If you do not have enough hard disk space,
remove unnecessary files or install the software on a different disk drive.
Installing and troubleshooting
13
Checking connections
The scanner can be connected to the computer using a USB or a SCSI connection.
USB is recommended because its installation is simpler.
If you are having trouble with a USB or a SCSI connection, use the Apple System
Profiler to verify that scanner is connected to the computer correctly.
Using the Apple System Profiler
The Apple System Profiler is a tool included in the Mac OS that provides information
about your computer, such as:
●
the version of the Mac OS your computer is using
●
the number and type of peripheral devices that are connected to your computer
●
what programs are installed on your computer
If you are still having trouble with USB after using the Apple System Profiler, see
“Checking the USB connection” below. If you are still having trouble with SCSI, see
"Checking the SCSI connection" on page 16.
To open the Apple System Profiler
1
Choose Apple System Profiler from the Apple (
) menu.
2
Click the Devices and Volumes tab.
3
Make sure the scanner is listed in the USB section or the SCSI section of the
window with the other USB and SCSI devices connected to the computer.
14
Installing and troubleshooting
Checking the USB connection
This scanner can be connected to the computer using USB if these requirements
can be met:
●
The computer has a USB connector on the back (see below).
●
The computer is running Mac OS 8.5.1 or later.
USB port on the scanner
USB port on the
computer
Installing and troubleshooting
15
To test the USB connection
1
Close all applications and shut down the computer.
2
Make sure that the scanner is unlocked.
3
Connect the power cord to the scanner and to an electrical outlet.
4
Turn on all external USB devices, including the scanner.
5
Turn on the computer.
6
Choose Control Panels from the Apple menu, and then choose HP ScanJet
Controls from the submenu.
7
Click the General tab in the HP ScanJet Controls dialog box.
8
Click USB, and then select the model number of your scanner from list, if it is
not already selected. (The scanner you select becomes the default scanner.)
9
Click Refresh.
10 Press the HP SCANNING SOFTWARE button on the front of the scanner. If the
scanner is connected correctly, the HP scanning software appears.
If USB still is not detected, use the SCSI connection. See "Checking the SCSI
connection" on page 16.
16
Installing and troubleshooting
Checking the SCSI connection
You can connect this scanner to a computer using a SCSI card and cable that meet
the requirements shown below. These requirements are the same as those on any
SCSI flyer that might be included in the scanner box.
For all SCSI cards and cables:
●
The SCSI card must be compliant with the operating system that your computer
is running.
●
The SCSI card must be installed with appropriate software drivers. See the
documentation for the card.
●
The SCSI card must have a connector visible on the back of the computer that
allows you to connect a SCSI cable.
●
The SCSI cable must have a connector on one end that matches the SCSI
connector on the computer (see example below).
●
The other end of the SCSI cable must have a connector that matches the highdensity, mini 50-pin connector on the scanner (see example below).
Possible shapes of the SCSI connector
on the computer
SCSI connector on the scanner
Installing and troubleshooting
17
Connecting the scanner
If you have other SCSI devices to connect to the SCSI card, connect the scanner to
the last device in the chain. For more information, see the documentation that came
with the SCSI card.
Testing the SCSI installation
Test the SCSI installation to see if it is working.
To test the SCSI installation
Note:
If you get an error message while testing the SCSI installation, follow the
directions in the message.
1
Close all applications and shut down the computer.
2
Make sure that the scanner is unlocked.
3
Connect the power cord to the scanner and to an electrical outlet.
4
Turn on all external SCSI devices, including the scanner.
5
Turn on the computer.
6
Choose Control Panels from the Apple menu, and then choose HP ScanJet
Controls from the submenu.
7
Click the General tab in the HP ScanJet Controls dialog box.
8
Click SCSI, and then select the model number of your scanner from the list, if it
is not already selected. (The scanner you select becomes the default scanner.)
9
Press the HP SCANNING SOFTWARE button on the front of the scanner. If the
SCSI card has been installed correctly, the HP scanning software appears.
18
Installing and troubleshooting
SCSI troubleshooting
If the scanner test fails, follow these steps.
●
Repeat basic troubleshooting. See "Performing basic troubleshooting" on
page 12.
●
Make sure the SCSI chain is less than 20 feet (6 meters) long, including any
cabling to SCSI devices inside the computer.
●
If other SCSI devices are connected to the computer, make sure the scanner is
the last physical device in the SCSI chain.
●
Disconnect all other SCSI devices and connect the scanner directly to the
computer to see if the problem is with the scanner or with another SCSI device
or cable.
●
Make sure that any SCSI devices connected between the computer and the
scanner have their termination turned off.
●
Check for an address conflict. See “Changing the SCSI address” below.
Installing and troubleshooting
19
Changing the SCSI address
The SCSI address (also called the SCSI ID) for the HP scanner is preset to 2. If you
have other SCSI devices attached to this SCSI card, you may need to change the
scanner address to prevent address conflicts. If this is the case, use the following
procedure only AFTER installing the scanning software.
To change the SCSI address
1
Find an available address using the documentation that came with the
computer. Do not choose the addresses for the SCSI card, typically 7, and the
hard disk drives, typically 0 or 1.
2
Press FAX and FILE on the scanner at the same time. “SCSI Address: 2” should
appear on the front panel display.
3
Use the NUMBER OF COPIES button on the scanner to select a number for the
SCSI address. The number changes on the front panel display as you press the
button.
4
To exit the SCSI address settings, press any button on the scanner except the
button.
NUMBER OF COPIES
20
Installing and troubleshooting
Uninstalling the software
The Uninstall option of the setup program allows you to remove the scanning
software from your computer.
To uninstall software
1
Unplug the scanner, and then restart the computer.
Note:
If you do not unplug the scanner and restart the computer before you
uninstall the software, some files are not removed from your computer
during the uninstallation.
2
Insert the HP Scanning Software CD into your computer's CD-ROM drive.
The HP Scanning Software window appears. (If the HP Scanning Software
window does not appear, double-click the icon for the HP Scanning Software
CD.)
3
Double-click the HP Scanning Software Installer, and then follow the
instructions on the screen.
4
When the main installation dialog box appears, select Uninstall from the pulldown menu (located in the upper-left part of the dialog box).
5
Click Uninstall.
6
Follow the instructions on screen.
7
After the uninstall finishes, quit the HP Scanning Software Installer.
Support, warranty, and specifications
2
21
Support, warranty,
and specifications
This section provides information for finding support for your scanner, the warranty,
and specifications.
Finding HP help on the Web
HP provides several resources on the Web to provide help with your scanner
whenever you want.
Visiting HP websites
HP product support
Visit www.hp.com/go/support to find information for your scanner model. Once you
enter the section that covers your scanner model, you will be able to choose
information about setting up and using your scanner, downloading drivers, solving a
problem, ordering, and information about the warranty.
HP ScanJet website
Visit www.scanjet.hp.com for:
●
tips for using your scanner more effectively and creatively.
●
HP ScanJet driver updates and software.
HP assistance
If you cannot find an answer to your question using the sites listed above, visit
www.hp.com/cposupport/mail_support.html. From there, you can discover how to
contact HP via e-mail, phone, and other methods.
22
Support, warranty, and specifications
Visiting related websites
Links to third-party websites are provided solely as a convenience to you. HP has
not reviewed all of these third-party sites and does not control and is not responsible
for any of these sites or their content. Thus, HP does not endorse or make any
representations about them, or any information, software or other products or
materials found there, or any results that may be obtained from using them. If you
decide to access any of the third-party sites, you do this entirely at your own risk.
ConnectCom Solutions website
If you need to install a SCSI card on your computer to connect the computer to the
scanner, HP recommends buying and installing a ConnectCom Solutions SCSI card.
Visit the ConnectCom Solutions website for information about the recommended
SCSI card, or to check for and download updated drivers for the card.
www.connectcom.net/products/hpscannersol.html
Support, warranty, and specifications
23
Contacting HP Customer Support
In addition to the Web, you can contact HP by telephone or mail for support and
service for your scanner. Prices, availability, and hours of support are subject to
change without notice.
How HP can help
HP's support hotline can help resolve problems with:
●
setup
●
installation
●
configuration
●
operation
For questions relating to operating systems or network configurations, contact your
point of purchase or internal support department. For help with non-HP hardware or
software, please contact the manufacturer of the other product.
Before you call
Please have the following information ready before you call.
●
serial number (found on the back or bottom of your scanner)
●
product name
●
date of purchase
24
Support, warranty, and specifications
Obtaining support within the United States
Free telephone support for one year
Within one year of your purchase, telephone support is provided to you free of
charge. If this is a long distance call for you, long distance charges will apply.
Call (208) 323-2551.
Our support staff is available from 6 am to 10 pm Mountain Time, Monday through
Friday, or 9 am to 4 pm Saturday.
After the first year
Call (900) 555-1500.
Charges are $2.50 per minute with a $25.00 maximum, charged to your phone bill.
Charges begin only when you connect with a support technician.
If you think your HP product may need service, call the Customer Support Center,
which can help determine if service is required and direct you to a service site.
Otherwise, contact the store where you purchased the product. Or, visit
www.hp.com/cpso-support/guide/psd/repairhelp.html for the nearest sales and
service office.
Obtaining support worldwide
If you need help with your HP product, please call the phone number listed below for
the Customer Support Center in your country. Telephone support is free for 90 days
in Asia and the South Pacific and 30 days in Europe, the Middle East, and Africa.
If you think your HP product may need service, call the Customer Support Center,
which can help determine if service is required and direct you to a service site.
Otherwise, contact the store where you purchased the product. Or, visit
www.hp.com/cpso-support/guide/psd/repairhelp.html for the nearest sales and
service office.
Support, warranty, and specifications
25
If the number below has changed, visit www.hp.com/cposupport/mail_support.html
to check for a new one.
Argentina
Finland
(5411) 4778 8380
0810 555 5520 (clientes del interior)
+358 (0)203 47 288
Australia
+61 (3) 8877 8000
Austria
+0810 00 6080
France
+33 (0)1 43 62 34 34
Germany
+49 (0)180 52 58 143 (24 PF/min)
Greece
Belgium
+30 (0)1 619 64 11
Dutch: +32 (0)2 626 8806
French: +32 (0)2 626 8807
Guatemala
Brazil
1 800 999 5305
(11) 3747 7799 (Grande São Paulo)
0800 157 751 (Demais regioes)
Hong Kong
Canada
Hungary
905 206 4663 (for support during the
warranty period)
877 621 4722 (for support after the
warranty period)
+36 (0)1 382 1111
Chile
800 22 5547 (Post-sales Business
Computing)
800 360 999 (Post-sales Home
Computing)
China
+86 (10) 6564 5959
Colombia
+9 800 919 477
Czech Republic
+42 (0)2 6130 7310
Denmark
+45 39 29 4099
+852 800 967729
India
+91 11 682 6035
Indonesia
+62 (21) 350 3408
Ireland
+353 (0)1 662 5525
Israel
+972 (0)9 952 48 48
Italy
+39 02 264 10350
Japan
+81 3 3335 8333
Korea, Republic of
+82 (2) 3270 0700 (Seoul)
080 999 0700 (outside Seoul)
26
Support, warranty, and specifications
Malaysia
South Africa
+60 (3) 295 2566 (Kuala Lumpur)
1 300 88 00 28 (Penang)
086 000 1030 (RSA)
+27-11 258 9301 (outside RSA)
Mexico
Spain
52 58 9922 (Mexico City)
01-800-472-6684 (outside
Mexico City)
+34 902 321 123
Middle East/Africa
+46 (0)8 619 2170
+44 (0) 207 512 52 02
Switzerland
Netherlands
+41 (0)848 80 11 11
+31 (0)20 606 8751
Taiwan
New Zealand
+886 (2) 2717 0055
+64 (9) 356 6640
Thailand
Norway
+66 (2) 661 4000 (Bankok)
+47 22 11 6299
Peru
0 800 10111
Philippines
+63 (2) 867-3551
Poland
+48 022 865 98 00
Portugal
+351 21 3176333
Puerto Rico
1 877 232 0589
Russian Federation
+7 095 797 3520 (Moscow)
+7 812 346 7997 (St. Petersburg)
Singapore
+65 272 5300
Sweden
+66 (53) 357990 (Chiang-Mai)
Turkey
+90 212 221 69 69
Ukraine
+7 (380-44) 490-3520
United Arab Emirates
971 4 883 8454
United Kingdom
+44 (0)207 512 52 02
United States
(208) 323-2551
Venezuela
800 47 777
Viet Nam
+84 (0)8 823 4530
Support, warranty, and specifications
27
Warranty Statement
HEWLETT-PACKARD LIMITED WARRANTY STATEMENT
HP PRODUCT
DURATION OF LIMITED WARRANTY:
HP ScanJet 7400C, 7450C, 7490C
Scanners and/or HP ScanJet
Automatic Document Feeder and/or
HP ScanJet Transparency Adapter
1 year
1
HP warrants to you, the end-user customer, that HP hardware, accessories and
supplies will be free from defects in materials and workmanship after the date of
purchase, for the period specified above. If HP receives notice of such defects
during the warranty period, HP will, at its option, either repair or replace
products which prove to be defective. Replacement products may be either new
or equivalent in performance to new.
2
HP warrants to you that HP software will not fail to execute its programming
instructions after the date of purchase, for the period specified above, due to
defects in material and workmanship when properly installed and used. If HP
receives notice of such defects during the warranty period, HP will replace
software which does not execute its programming instructions due to such
defects.
3
HP does not warrant that the operation of HP products will be uninterrupted or
error free. If HP is unable, within a reasonable time, to repair or replace any
product to a condition as warranted, you will be entitled to a refund of the
purchase price upon prompt return of the product.
4
HP products may contain remanufactured parts equivalent to new in
performance or may have been subject to incidental use.
5
Warranty does not apply to defects resulting from (a) improper or inadequate
maintenance or calibration, (b) software, interfacing, parts or supplies not
supplied by HP, (c) unauthorized modification or misuse, (d) operation outside
of the published environmental specifications for the product, or (e) improper
site preparation or maintenance.
6
TO THE EXTENT ALLOWED BY LOCAL LAW, THE ABOVE WARRANTIES
ARE EXCLUSIVE AND NO OTHER WARRANTY OR CONDITION, WHETHER
WRITTEN OR ORAL, IS EXPRESSED OR IMPLIED AND HP SPECIFICALLY
DISCLAIMS ANY IMPLIED WARRANTIES OR CONDITIONS OF
MERCHANTABILITY, SATISFACTORY QUALITY, AND FITNESS FOR A
PARTICULAR PURPOSE. Some countries, states or provinces do not allow
limitations on the duration of an implied warranty, so the above limitation or
exclusion might not apply to you. This warranty gives you specific legal rights
and you might also have other rights that vary from country to country, state to
state, or province to province.
28
Support, warranty, and specifications
7
HP’s limited warranty is valid in any country or locality where HP has a support
presence for this product and where HP has marketed this product. The level of
warranty service you receive may vary according to local standards. HP will not
alter form, fit or function of the product to make it operate in a country for which
it was never intended to function for legal or regulatory reasons.
8
TO THE EXTENT ALLOWED BY LOCAL LAW, THE REMEDIES IN THIS
WARRANTY STATEMENT ARE YOUR SOLE AND EXCLUSIVE REMEDIES.
EXCEPT AS INDICATED ABOVE, IN NO EVENT WILL HP OR ITS
SUPPLIERS BE LIABLE FOR LOSS OF DATA OR FOR DIRECT, SPECIAL,
INCIDENTAL, CONSEQUENTIAL (INCLUDING LOST PROFIT OR DATA), OR
OTHER DAMAGE, WHETHER BASED IN CONTRACT, TORT, OR
OTHERWISE. Some countries, states or provinces do not allow the exclusion
or limitation of incidental or consequential damages, so the above limitation or
exclusion may not apply to you.
9
THE WARRANTY TERMS CONTAINED IN THIS STATEMENT, EXCEPT TO
THE EXTENT LAWFULLY PERMITTED, DO NOT EXCLUDE, RESTRICT OR
MODIFY AND ARE IN ADDITION TO THE MANDATORY STATUTORY
RIGHTS APPLICABLE TO THE SALE OF THIS PRODUCT TO YOU.
Hardware repair services
If you think your scanner, ADF, or XPA needs repair, first call the Customer Support
Center, which can help determine if service is required and direct you to a service
site. Please see "Contacting HP Customer Support" on page 23. Otherwise, contact
the store where you purchased the product. Or, visit www.hp.com/cpso-support/
guide/psd/repairhelp.html for nearest sales and service office.
Service is free of charge during the warranty period. Beyond the warranty period,
service will be charged.
Support, warranty, and specifications
Specifications
Environmental specifications
Scanner
ADF
Temperature
Temperature
Operating: 10° to 35° C
(50° to 95° F)
Operating: 10° to 35° C
(50° to 95° F)
Storage: -40° to 60° C
(-40° to 140° F)
Storage: -40° to 60° C
(-40° to 140° F)
Humidity
Humidity
Operating: 15% to 80%
noncondensing 10° to 35° C
(50° to 95° F)
Operating: 10% to 80%
noncondensing
(10° to 35° C or 50° to 95° F)
Storage: up to 90%
(0° to 70° C or 32° to 158° F)
Storage: 10% to 90%
(0° to 40° C or 32° to 104° F)
XPA
Temperature
Operating: 10° to 35° C
(50° to 95° F)
Storage: -40° to 60° C
(-40° to 140° F)
Humidity
Operating: 15% to 80%
noncondensing
(10° to 35° C or 50° to 95° F)
Storage: 10% to 90%
(0° to 70° C or 32° to 158° F)
29
30
Support, warranty, and specifications
Product specifications
Scanner
Scanner Feature
Specification
Scanner type
Flatbed
Maximum item size
216 mm by 356 mm (8.5 in by 14 in),
or letter width by legal length
Scanning element
Charged-coupled device
Interface
USB or SCSI
Optical resolution
2400 dpi
Selectable resolution
12 dpi to 999,999 dpi at 100% scaling
Image processing
(options)
Dithering, thresholding, scaling, interpolation, gamma
adjustment, matrix adjustment
AC line voltage
100-240 VAC, 50-60 Hz
Power consumption
22 W maximum, 10 W idle mode, ENERGY STAR® compliant.
(ENERGY STAR® is a U.S. registered service mark of the United
States Environmental Protection Agency.)
As an ENERGY STAR® Partner, HewlettPackard Company has determined that this
product meets the ENERGY STAR®
guidelines for energy efficiency.
Weight
5.6 kg (12.4 lb)
Support, warranty, and specifications
31
ADF
ADF Feature
Specification
Size
535 by 290 by 90 mm (21.06 by 11.42 by 3.54 inches)
Weight
2.20 kg (4.85 lb)
Paper tray capacity
50 sheets of 75 g/m2 (20 lb bond)
Maximum paper size
216 by 356 mm (8.5 by 14 inches)
Minimum paper size
210 by 149 mm (8.27 by 5.85 inches)
Maximum paper weight
105 g/m2 (28 lb bond)
Minimum paper weight
60 g/m2 (16 lb bond)
Power requirements
420 mA (24 V dc) average
Speed
C7716B: 15 ppm for 216 by 279 mm (8.5 by 11 inches) sheets
XPA
XPA Feature
Specification
Size
330 by 235 by 88 mm by 88.9 mm
(13.0 by 9.25 by 3.54 in by 3.50 in)
Weight
0.95 kg (2.1 lb)
Power requirements
120 Vac (60.0 Hz)
32
Support, warranty, and specifications
Regulatory information
German Noise Declaration
The German noise declaration is required in Germany. It gives noise output figures.
Scanner
ADF
Geräuschemission
Geräuschemission
LpS < 70 dB
am Arbeitsplatz
normaler Betrieb
nach DIN 45635 T. 19
LpS < 70 dB
am Arbeitsplatz
normaler Betrieb
nach DIN 45635 T. 19
Die Daten sind die Ergebnisse von
Typenprüfungen
Die Daten sind die Ergebnisse von
Typenprüfungen
Support, warranty, and specifications
33
FCC Declaration of Conformity (scanner)
Supplier’s Name:
Supplier’s Address:
Contact Person:
Telephone:
Product Name:
Model Number:
Product Options:
Hewlett-Packard Company
Colorado Digital Imaging
700 71st Avenue
Greeley, CO 80634
USA
CDI Regulatory Manager
970-350-4000
HP ScanJet 7400C, HP ScanJet 7450C, HP ScanJet 7490C
C7710A (Base Scanner), C7717A or C7718A (Worldwide), C7713A
or C7715A (US Commercial), C7712A or C7714A (US Retail)
C7671B (transparency adapter); C7716B (automatic document
feeder; may contain different suffix)
The supplier listed above declares that this product has been tested and found to comply with
the limits for a Class B digital device, pursuant to Part 15 of FCC rules. Operation is subject to
the following two conditions: (1) This device may not cause harmful interference, and (2) This
device must accept any interference received, including interference that may cause undesired
operation.
These limits are designed to provide reasonable protection against harmful interference in a
residential installation. This equipment generates, uses, and can radiate radio frequency
energy and, if not installed and used in accordance with the instruction manual, may cause
harmful interference to radio communications. However, there is no guarantee that interference
will not occur in a particular installation. If this equipment does cause harmful interference to
radio or television reception, which can be determined by turning the equipment off and on, the
user is encouraged to try to correct the interference by one or more of the following measures:
●
Reorient or relocate the receiving antenna.
Increase the separation between the equipment and receiver.
● Connect the equipment into an outlet on a circuit different from that to which the
receiver is connected.
● Consult the dealer or an experienced radio/TV technician.
●
Changes or modification of this equipment not expressly approved by Hewlett-Packard could
void the user’s authority to operate this equipment. Only use the cables, connectors, power
cords and accessories supplied with this equipment or expressly approved by HewlettPackard.
Test report on file: C7710-1
Date:
February 2001
34
Support, warranty, and specifications
EU Declaration of Conformity (scanner)
According to ISO/IEC Guide 22 and EN 45014:
Supplier's Name
Supplier's Address
Hewlett-Packard Company
Colorado Digital Imaging
700 71st Avenue
Greeley, Colorado 80634
USA
declares that the product:
Product Name
HP ScanJet 7400C, HP ScanJet 7450C, HP ScanJet 7490C
Model Number(s)
C7710A (Base Scanner), C7717A or C7718A (Worldwide), C7713A
or C7715A (US Commercial), C7712A or C7714A (US Retail)
Product Options
C7671B (transparency adapter); C7716B (automatic document
feeder; may contain different suffix)
conforms to the following Product Specifications:
Safety
EN 60950:1992+A1:1992+A2:1993+A3:1995+A4:1996 +A11:1997
EN 60825-1: 1994 Class 1
EMC
CISPR 22: 1993+A1+A2, Class B/ EN55022:1994+A1+A2, Class B
IEC 1000-3-2: 1995/EN61000-3-2: 1995 Class A
IEC 1000-3-3: 1994/EN61000-3-3: 1995
EN 50082-1: 1997/EN 55024: 1998
EN/IEC 61000-4-2, 4kV CD, 8 kV AD
EN/IEC 61000-4-3, 3 V/m
EN/IEC 61000-4-4, 1kV Power Lines
EN/IEC 61000-4-5, High Energy Transients
EN/IEC 61000-4-6
EN/IEC 61000-4-8
EN/IEC 61000-4-11
Supplementary Information:
The product herewith complies with the requirements of the Low Voltage Directive 73/23/EEC
and the EMC Directive 89/336/EEC and carries the CE-marking accordingly. LEDs in this
product are Class 1 in accordance to EN60825-1.
Greeley, Colorado, USA, February 2001
Support, warranty, and specifications
35
HP Environmental Product Stewardship
Program
Protecting the environment
Hewlett-Packard Company is committed to providing quality products in an
environmentally sound manner. This product has been designed with attributes to
minimize impacts on our environment.
Energy consumption
Energy usage drops significantly while in low-power mode, which saves natural
resources and saves money without affecting the high performance of this product.
This product qualifies for ENERGY STAR®, which is a voluntary program to encourage
the development of energy-efficient office products.
As an ENERGY STAR® Partner, Hewlett-Packard Company has determined that this
product meets ENERGY STAR® guidelines for energy efficiency. For more
information, see http://www.epa.gov/energystar/.
Plastics
Plastic parts over 25 g (0.88 oz) are marked according to international standards
that enhance the ability to identify plastics for recycling purposes at the end of the
product's life.
36
Support, warranty, and specifications
Disassembly/End of life
This HP product (HP ScanJet 7400C series scanner) is designed for ease of
disassembly and to provide end-of-life disposal options by use of common fasteners
and snap-fitting parts.
Acoustical noise specification
This HP product (HP ScanJet 7400C series scanner) has the following sound power
levels:
Note: These specifications reflect sound power levels of the scanner without
any attached accessories.
Category
Specification
Acoustical noise
<70 dBa
(Declared sound power per ISO 7779 and ISO 9926)
Operational mode
<4 B LWAd
Product restricted material
This HP product (HP ScanJet 7400C series scanner) contains a dual mercury vapor
(Cold Cathode Fluorescent) lamp containing < 5 mg (0.0002 oz) of mercury.
HP offers a variety of product end-of-life return programs in a number of geographic
areas. To determine if one is available in your area, please contact your nearest HP
sales office.
WARNING!
This product contains mercury. Dispose properly.
Support, warranty, and specifications
37
Recycling materials
HP offers a variety of product end-of-life return programs in a number of geographic
areas. To determine if one is available in your area, please contact your nearest HP
sales office.
Products returned to HP are reused, recycled, or disposed of in a responsible
manner. Each month, HP reuses or recycles more than 3.5 million lb (1.6 million kg)
of material at our product recovery centers in Grenoble, France; Boeblingen,
Germany; and Roseville, California, USA. This represents 99 percent by weight of all
the material we receive from customers and HP operations.
38
Support, warranty, and specifications
39