1
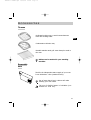
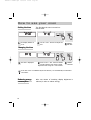
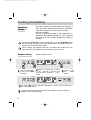
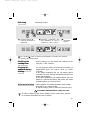
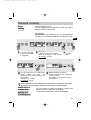
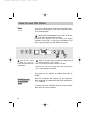
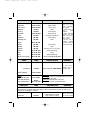
User Instruction Book
for
Hotpoint
Steam Oven
SEO100
................................................
99635871 CLIENT.qxd
14/02/05
09:53
Page 75
List of contents
Introduction
p.57
Steam cooking
G e n e ra l r e m a r k s
p.58
Your oven, how it works
p.59
Accessories
p.60
EN
How to install your oven
Electrical connection
p.61
Fitting
p.62
How to use your oven
Setting the time
Cooking immediately
Managing the water
p.63-64
p.65-66
p.67
Delayed cooking
p.68
The timer
p.69
Cooking times
p.70-71
How to maintain your oven
p.72
Changing the light bulb?
p.73
Troubleshooting ?
p.73
75
99635871 CLIENT.qxd
14/02/05
09:53
Page 76
Introduction
Dear Customer,
Thank you for buying a Hotpoint oven.
Our design staff have produced a new generation of kitchen equipment, to
make everyday cooking a pleasure.
You will find that the clean lines and modern appearance of your Hotpoint oven
blend in perfectly with your kitchen decor and form a perfect alliance of technological control, high quality cooking and aesthetic luxury.
Hotpoint also makes a range of products that will enhance your kitchen such
as hobs, extractor hoods, built-in dishwashers, microwave ovens and
refrigerators. There are models to complement your new Hotpoint oven.
Of course, we make every effort to ensure that our products meet all your
requirements, and our Customer Relations department is at your disposal, to
answer all your questions and to listen to all your suggestions.
Hotpoint is certain that by setting new standards of excellence by which comparisons can be made, customers will find that Hotpoint appliances offer a better and more exciting way of living.
Hotpoint
76
99635871 CLIENT.qxd
14/02/05
09:53
Page 77
Steam cooking
General remarks
Used in accordance with the instructions, steam cooking has many advantages over other
methods. Healthy and natural, steam cooking preserves the true taste of your food. A fine
sauce flavoured with aromatic herbs can make all the difference in the world.
Steam cooking is odourless. There is no need to flavour the cooking water with herbs or
spices, though - fish, for example, can be flavoured by placing it on a bed of seaweed, or EN
chicken on a bunch of rosemary or tarragon.
Meat, fish and vegetables can be cooked simultaneously.
Pasta, rice and purees can be reheated without drying out or sticking to the pan.
Cooking custards, flans, or milky rice dishes is facilitated by steam cookery. Covered in
aluminium foil, the condensation will not reach the food.
There is no need to season prior to cooking, not even the cooking water.
Meat can browned by a quick searing in hot butter on each side.
In comparison to boiling, steam cookery wins hands down.
It is quick: cooking starts immediately, whereas the cooking time of food in boiling water is
only counted from the return of the water to the boil.
It is healthy: the hydro soluble vitamins and minerals are conserved because they barely
dissolve in the condensed water that surrounds the food.
In addition, no fat is used in cooking.
Steam respects the food's own flavour. It adds neither flavour, nor the grilled or fried taste.
It doesn't remove any flavour either, because there is no dilution in water.
The other side of the coin: it is not worth cooking a fish that isn't fresh, or vegetables that
have been forgotten at the back of the refrigerator for a week: in this way - the results will
be catastrophic !
Steam does not transfer tastes or odours, so you can save both time and money by cooking
- side by side but not touching - a fish and a dessert, for example.
Steam is also highly suitable for blanching, defrosting and reheating, as well as keeping
warm - especially sauces.
Meats such as poultry, veal, and pork should be lightly browned in very little oil prior to
cooking, to render them appetisingly golden.
Then finish their cooking by steam.
Foods will cook more quickly and evenly if they are cut into pieces than if they are left whole.
77
99635871 CLIENT.qxd
14/02/05
09:54
Page 78
Your oven, how it works
Display
Indicator
panel
Water supply
tube
Tank
Steam
generator
Channel
The indicator panel in detail
1
2
5
3
12
4
14
9
10
START
SET
STOP
13
1.
2.
3.
4.
5.
6.
7.
78
Steam cooking control
Defrosting button
Start/Stop control
Time and delay display
or timed period
Steam cooking symbol
Cooking time symbol
End of cooking time symbol
8
15 11
8.
9.
10.
11.
12.
13.
14.
6
7
Temperature display
+/- controls for timer
Selector button
Autonomous timer
Water circuit problem signal
Defrosting symbol
Display of the cooking period or delayed
start time
15. Control panel locked
99635871 CLIENT.qxd
14/02/05
09:54
Page 79
Accessories
Tin ware
Perforated cooking tray to avoid contact between
foods and cooking water.
EN
Condensation collection tray.
Movable stainless steel grill: must always be used in
the oven.
Dishes can be washed in your washing
machine.
Removable
tank
Tank for the independent water supply of your oven.
It can hold about 1 litre (maximum level).
Use of water that is low in calcium will make
cleaning your oven easier.
The use of distilled water is forbidden (not
suitable for food use).
79
99635871 CLIENT.qxd
14/02/05
09:54
Page 80
How to install your oven
Electrical
connection
For a permanent connection, make sure a
system of disconnection that complies with the
installation regulations. The appliance must be
placed in such a way as to leave the plug
accessible if it is flush-fitted.
Use of an earthed power socket, connected in
compliance with current safety standards
Your installation must be fitted with a 10 amp device
for thermal protection.
Do not use the oven if the supply cord or its plug are
damaged. In this case, they must be replaced by the
manufacturer, its after-sales service or similarly
qualified persons, to avoid any danger.
Operating voltage ............................................................. 220-240 V ~ 50 Hz
Total power of oven .......................................................................... 2,77 kW
Energy consumption
-Heating to 100°C and maintaining temperature for 1 hour ............... 0,71 kWh
Inside dimensions of oven
Width .............................................................................................. 38,5 cm
Height ............................................................................................. 18,2 cm
Depth .............................................................................................. 33,5 cm
Usable volume ............................................................................. 23,5 litres
80
99635871 CLIENT.qxd
14/02/05
09:54
Page 81
Fitting
EN
560
544
20
550
380
50
386,5
378
405
595
1. Place the appliance in the hole.
The appliance must be horizontal.
Check this position.
2. For improved stability, attach the
oven to the unit using 2 screws, via the
holes provided for this purpose on the
side posts.
3. Carry out the electrical connection.
Make sure that the rating plate
remains accessible after installation.
81
99635871 CLIENT.qxd
14/02/05
09:54
Page 82
How to use your oven
Setting the time
The first time the oven is turned on:
Set the time.
SET
1
The display flashes on
12.00.
the + and - buttons to adjust the
2 Use
3 Validate
time.
with SET.
Changing the time
SET
1 The time is displayed.
on the + and - buttons simulta2 Press
3 Validate
with SET
neously until the time starts to flash.
Adjust the time using the + and -button.
If the time set is not validated by the SET button, it is automatically recorded after
one minute.
Reducing energy
consumption
82
After one minute of inactivity, display brightness is
reduced, in order to reduce energy.
99635871 CLIENT.qxd
14/02/05
09:54
Locking the
control panel
SET
Page 83
The control panel can be locked. This can only be
activated when you are not using timed or delayed
cooking features.
SET
EN
beep sounds and a “key”
down
the
To unlock, hold down
1 Hold
2 Aappears
on the screen. 3 the START/STOP button
START/STOP button
for a few seconds.
From this moment, no button is for a few seconds. A beep
live.
sounds
ans
the
key
disappears.
83
99635871 CLIENT.qxd
14/02/05
09:54
Page 84
Cooking immediately
The water contained in the tank reaches the cavity via a
tube. This water is transformed into steam on contact with
a hot surface placed in the lower part of the cavity:
the steam generator.
There is no need to add water to the cooking dish. To
guarantee TRUE STEAM COOKING, your oven is supplied
with a set of tin ware specially designed for cooking to
perfection.
Operational
principle
You MUST IMPERATIVELY fill the water tank up to the maximum level
before starting cooking. Put the tank back in place, and push it as far as
possible until it CLICKS INTO PLACE.
When cooking, the appliance gets hot. Hot steam may escape when you
open the door of the appliance. Keep children out of the way.
Steam cooking
Steam cooking at 100°C.
START
STOP
1
1
2
3
2
Adjust the cooking time as necesPress the button
.
sary ( minimum 5 min and maxiA time of 25 minutes is
mum 60 min by pressing on + and suggested.
button
3
SET
Validate with
the
START
button.
START
STOP
SET
symbol
comes on. When the temperature is reached, 100° becomes cons4 The
tant, and a beep sounds.
In order to avoid altering the results of the cooking, avoid opening the
appliance door during cooking.
84
99635871 CLIENT.qxd
14/02/05
09:54
Page 85
Defrosting
Defrosting at 60°C.
START
1
1
2
STOP
3
Press the button
.
A time of 40 minutes is
suggested.
SET
the cooking time as
with
2 Adjust
3 Validate
necessary ( minimum 5 min
the START
and maximum 60 min by
pressing on + and - button.
button.
START
SET
STOP
symbol
comes on. When the temperature is reached, 60°C becomes
4 The
constant, and a beep sounds.
Modifying the
cooking time
During cooking, you can modify the cooking time by
using the + and - buttons.
Stopping the
appliance during
cooking
You can stop the cooking at all times by pressing on
START/STOP (hold the button down for about
1 second).
If the steam production has not yet started (about
1 minute), the oven will stop immediately and the time
setting will disappear.
If the steam production has already started, the time
passes to 3 minutes and during this period, the steam
evacuates before you open the oven.
At the end of cooking
0m00s displays. The display animation stops. Beeps
are heard for a 3 minute period.
To stop the beeps, press on STOP and open the door.
You MUST IMPERATIVELY empty the tank
In order to make sure the oven is reliable, the fan continues to operate
for a certain period after the end of cooking.
85
EN
99635871 CLIENT.qxd
14/02/05
09:54
Page 86
Advice
FISH
VEGETABLES
Freeze small portions; defrosting will be faster, more homogenous and quality will be preserved. When semi-defrosted, you can turn over the food items or spread them out (for
example vegetables patties). Protect pastries with a cling wrap or keep the original packaging. Wipe fish and sausages before grilling: humidity stops them from becoming golden
brown. For large pieces (roasts, etc.) proceed in steps by turning the piece over several
times and adjust the time accordingly.
Patties (spinach, etc.)
placed on dish
25 min
In blocks
placed on dish
40/45 min
Trout (whole)
placed on dish
placed on dish, turned over half way
through
Salmon steak
Filets (protected by a cling wrap)
placed on dish
Prawns
placed on dish
placed on dish, turned over half way
through
15/20 min depending
on thickness
10/12 min
40/45 min
25 min
Liver cubes (for skewers)
placed on dish
placed on dish, protected by a cling
wrap, placed on the grill
to be separated half way through
FRUIT
Poultry breast (protected by a
film)
Sausages
25 min
Mixed berries
placed on dish
Stewed fruit (apple, etc.)
protected by a cling wrap
PASTRIES
MEATS
Chicken thighs
30 min
Doughnuts
kept in packaging, placed on the grill
15 min
Chocolate croissants
kept in packaging, placed on the grill
15 min
Chops (pork, veal, etc.)
25 min
25/30 min
55/60 min
15 min
35/40 min
Reheating
You can reheat a cooked dish in your steam oven. The dish will not dry out, will not become
overcooked and will not splatter or stick. Adjust steam sequence at 100°C, place the dish
or plate on the grill, protect with aluminium foil or cling wrap to avoid drops of water accumulating and heat for 20 to 25 minutes depending on the dish and your preferences.
Examples:
A plate of sauerkraut: 20 min
A bowl of soup (300 ml): 20/25 min
Managing the water
In case of problems related to the water circuit during cooking,
the 'no water' symbol appears and a beep sounds.This fault is
specifically related to:
- an empty tank,
- a wrongly-fitted tank.
After checking these two points, the cooking will recommence automatically after the door.
86
99635871 CLIENT.qxd
14/02/05
09:54
Page 87
Delayed cooking
Steam
cooking
Steam cooking at 100°C.
You can program the cooking time so that your dish is
ready at a time of your choice.
For example:
It is 10 o'clock, and you have to go out, your dish should
be ready at 12 o'clock and it will take 20 minutes to cook.
EN
START
1
1
SET
STOP
Press the button
.
A time of 25 minutes
is suggested.
3
2
2
Adjust the cooking time as necessary
( minimum 5 min and maximum
60min) by pressing on + and - button.
For example : 20 min.
SET
4
with
3 Validate
the SET
button.
SET
5
time and the end of cooking time
Validate with the SET button.
4 The
symbol display and flash. The 5 The time and the end of cooking time
adjustment of the end of cooking time is
now possible:
Press the + or - buttons
For example : 12h00
become constant.
The symbol for the length of cooking
time displays.
If the programming is not validated by touching SET, the recording of the program
is cancelled, the time display disappears and the time is displayed again.
Modification of
cooking time
and the end
of cooking time
You can consult or modify the length of cooking time
and the end of cooking time, at all times.
To cancel the programming, press START/STOP.
87
99635871 CLIENT.qxd
14/02/05
09:54
Page 88
How to use the timer
Timer
Your oven is fitted with an electronic timer that is independent of the operation of the oven, and allows time
to be counted down.
This function is independent of your oven. It can not
order the end of automatic cooking.
However, this function can be used even during
operation of the oven. In this case, the display of the
timer is given priority over the display of the time.
START
SET
STOP
2
the
1 Hold
down for
SET button
a few seconds. 00m00s and the timer
symbol flash.
1
Adjust to the period required (maximum 9 minutes and 50
2 seconds)
using the + and - buttons.
After a few seconds, the timer counts down the time.
Once the time has run out, beeps will sound every few seconds. 0m00s displays and flashes.
The beeps can be stopped by holding down SET or
START.
Modifying and
stopping the
timer
Once the countdown has started, you can modify the
time remaining by holding down SET then pressing the
+ or - buttons.
To cancel the timer, hold SET down for a few seconds,
then return the time to 0m00s.
88
99635871 CLIENT.qxd
14/02/05
09:54
Page 89
Cooking times
VEGETABLES
Artichokes (Small)
Asparagus
Broccoli
Carrots
Celeriac
Pumpkin
Mushrooms
Cabbage
TIME
Whatever the quantity
18 min.
in little flowerets
20 to 22 min.
in fine slices
25 to 30 min.
15 to 20 min.
in fine slices
in cubes
15 min.
in fine strips
30 to 35 min.
22 min.
30 to 35 min.
Brussels sprouts
Flowers in little bunches
Green shredded
Spinach
20 min.
35 min
Chicory
30 min.
Fennel
22 min.
Potatoes
SHELLFISH
30 to 35 min.
15 to 20 min.
20 to 25 min.
25 min.
25 min.
40 to 45 min.
TIME
in slices
(fresh) stir during cooking
(frozen) “
“
“
core removed and cut in two
lengthwise
cut in 2
cubed
/
cut in 2
• The cooking
time is the same
regardless of the
quantity to be
cooked.
For example :
1 or 4 artichokes,
same
cooking time.
• To check how
well done the
food is, test the
thickest part of
the vegetable; if
it is cooked, it
will not resist.
PREPARATION
REMARKS
• Arrange the
shellfish on a grill
or glass dish, and
add
a
few
aromatic herbs
• Arrange seafood
on a bed of seaweed.
10 to 12 min.
20 to 25 min.
with aromatic herbs
with aromatic herbs
Crabs/Lobster/
Dublin Bay
Prawns
25 min.
/
30 to 35 min.
according to weight
12 to 15 min.
/
TIME
PREPARATION
10 to 15 min.
whole, peeled
25 min.
strips of fruit
10 min.
in ramekins
Custards
nature, size and
freshness of the
vegetables.
Follow
the
instructions
given in the
"Preparation"
column.
sliced
whole
Scallops
Mussels/Whelks
FRUITS
CUSTARDS
Apples/ pears/
peaches
puree
REMARKS
40 to 45 min .
placed upside down in the dish
• These times
35 to 40 min. for the tips, reduce the cooking time depend on the
10 to 15 min.
Courgettes
20 min.
Chinese artichokes
Green beans
Turnips
Fresh peas
Leeks
PREPARATION
REMARKS
Time according
to ripeness
89
EN
99635871 CLIENT.qxd
14/02/05
09:54
FISH
Page 90
TIME
PREPARATION
REMARKS
Pike
Cod/hake
25 to 30 min.
13 to 15 min.
whole (1kg)
steaks (180g)*
Sea bream
Haddock
Herring
Monkfish
Lotte
20 to 25 min.
whole (1kg)
15 min.
fillets
20 min.
15 to 20 min.
whole (200g)
steaks (180 g)
15 min.
according to thickness
Mackerel
Whiting/cod
20 min.
whole (250g)
15 min.
fillets
• *Steaks :slices of
fish 2 or 3 cm
thick (180/200g)
per person.
• Always insist on
very
fresh
products
• Place whole fish
directly into the
dish or on bay leaves, fennel or
other herbs.
• At the end of
cooking, remove
the skin which will
come away easily.
Skate
25 to 30 min.
Mullet
Mullets
Dogfish
Salmon
Sole
whole (200g)
15 min.
Tuna
Whole trout (1kg)
MEATS/
EGGS
10 min.
fillets
20 min.
15 to 20 min.
thick slice (6 to 10 cm long)
steaks (180/200 g)
10 to 12 min.
fillets
20 to 25 min.
steaks (180/200 g)
20 to 25 min.
whole (200g) 13 to 15 min.
TIME
PREPARATION
15 to 30 min.
Beef
25 min.
Pork (filet mignon)
Joint 800 gr.: 55 to 60 min.
Poultry (breast, fillet) 20 to 25 min. Chicken drumsticks : 35 to 40 min.
(Paupiettes)
Sausages
Black pudding
Eggs
eggs that are very
fresh and stored at
room temperature
RICE, PASTA
COUCOUS
25 min.
Turkey roast joint : 50 to 60 min.
20 min.
Morteau 400 g piece
REMARKS
• The brown
under grill in
another dish.
10 to 15 min.
7 min.
5 to 6 min.
8 min.
10 to 12 min.
TIME
Boiled eggs : Place directly on the grill.
Fried eggs : broken in an individual dish on the grill
and cover with cling film
Soft-boiled: Place directly on the grill.
Hard
/ Cocotte see detailed recipes.
PREPARATION
REMARKS
Place directly in a dish, covered with water or milk. The steam is not sufficiently wet to
saturate these foodstuffs that swell. Place a sheet of aluminium foil over the dish to protect it from the droplets of water.
100g of washed rice - 20 cl of milk -•Separate grains
30 min.
Rice pudding
with a fork at the
2 dessertspoons of sugar
end of the cooking.
20 min.
Couscous
200g (1/4 litre of water)
90
99635871 CLIENT.qxd
14/02/05
09:54
Page 91
How to maintain your oven
Maintenance
Cavity (after each use)
Wipe out the cavity with a dry cloth after the steam
generator has cooled or leave the cavity to dry out
with the door open.
Water supply tube (Once per month)
EN
Remove the water supply tube by pulling it towards
yourself.
Remove any scale that may have formed on the inside
(using a fine, pointed object such as a skewer or
knitting needle).
Steam generator tube (Once per month)
Pour half a glass of spirit vinegar onto the generator.
Leave to work for a few minutes, clean and rinse with
water.
Do not use sponges, abrasive powder, or descaler.
Cleaning the channel
Dismantle this channel by pulling upwards. Wipe it and
replace it, using the three notches
provided for this purpose.
The oven must not be cleaned with a steam
cleaner.
91
99635871 CLIENT.qxd
14/02/05
09:54
Page 92
Changing the light bulb ?
The bulb is by the far right
corner.
Always switch the oven off at
the
mains
before
changing the bulb in order to safeguard against electric shocks.
- Turn the cover slightly anti-clockwise (left).
- Unscrew the bulb the same way.
The bulb is a :
- 25 W
- 220/240 V
- Type E14 suitable up to 300ºC
- Change the bulb and reassemble the unit
making sure the seals are positioned correctly.
- Switch the oven back on at the mains.
Troubleshooting
IF YOU REALIZE
THAT
The display panel is
not lit up.
POSSIBLE
CAUSES
A fault in the oven
electrical supply.
Electric card out of
order.
WHAT SHOULD
YOU DO?
- Check that the tank
has been pushed in
completely.
- Contact the AfterSales Service.
The light doesn't
work.
The bulb needs
replacing.
The oven is not
switched on at the
mains.
The fuse has blown.
- Change the bulb.
- Switch the oven on
at the mains.
- Change the fuse.
Water or steam
leaking from the door
during cooking.
The door is not shut
correctly.
The door seal is
faulty.
- Contact the AfterSales Service.
In all cases, if you are unable to solve the problem yourself,
please contact the After-Sales Service without delay.
92