1
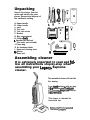
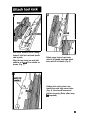
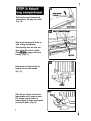
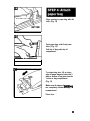
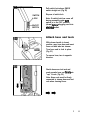
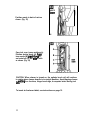
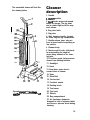
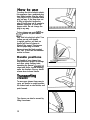
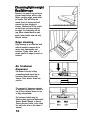
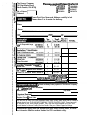
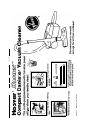
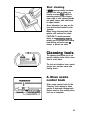
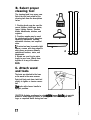
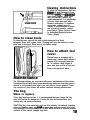
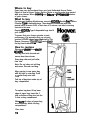
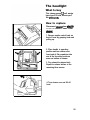
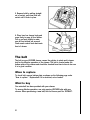
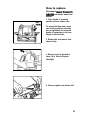
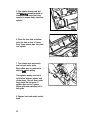
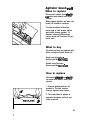
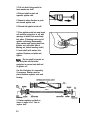
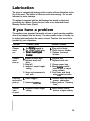
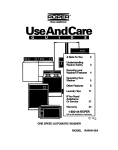
Vacuum
Cleaner
1 Read this manual before
operating cleaner
Fill in and retain
The HOOVER vacuum cleaner you have just purchased is designed
for carpet and rug ckaning and has cleaning took for other tasks.
The model and serial number are located on the bottom of the cleaner.
For your personal records, please en&w the COMPLETE model and serial
number in the spaces provided and retain this information.
Your cleaner Is model
and has serial number
It is suggested that you attach your sales receipt to this owner’s manual.
Verification of date of purchase may be required for warranty service of
your Hoover product.
Save!
Index
Assembling Cleaner .”............................. 3-11
Cleaner Description ................................... 12
Cleaning Effetiveness Per Amp Rating....2 8
Energy Saving Tips .................................... 27
How To Use
Cleaning Tools .....”.......................... 16-18
Upright Cleaner .”............................. 13-16
If You Have a Problem ............................... 26
Important Safeguards ...........”..................... 2
Lubrication ...... ................. .“..................”... 26
Maintenance
Authorized Service .....I........” .............. 27
Replacing Agitator Brush Roll.. ... -24-2 5
Replacing Belt .“........“........” ........... 21-23
Replacing Headlight ....................... .20-21
Replacing Paper Bag .-. ..... ..“........ w 18-19
Unpacking Cleaner ......... ......... .I.......”......... 3
Wananty ...................................................... 29
4
CtD
0
Important Safeguards!
ken using an electrical appliance, basic precautions should
always be followed, including the following:
READ ALL INSTRUCTIONS BEFORE USING THIS APPLIANCE
Warning. injury:
n
l
l
l
l
l
l
l
l
l
l
l
l
l
l
l
l
To reduce the risk of fire, electric shock, or
Do not use outdoors or on wet surfaces.
Close supervision is necessary when any appliance Is used by or near
chlldren. Do not allow vacuum cleaner to be ueed as a toy or to run
unattended at any time.
Keep hair, loose clothing, fingers, feet and all parts of body away from
openings, rotating agitator and any other moving parts. Do not
operate cleaner in bare feet or when wearing open toe shoes or
sandals.
Do not pull or carry by cord, use cord as a handle, close door on cord
or pull cord around sharp edges or corners. Do not run appliance over
cord. Keep cord away from heated surfaces.
Do not pick up anything that is burning or smoking, such as cigarettes, matches, or hot ashes.
Do not use to pick up flammable or combustible liquids such as
gasoline or use in areas where they may be present.
Avoid picking up hard, sharp objects with the cleaner. They may
damage the cleaner and the bag.
Unplug cleaner when not in use. Turn off all controls before unplugging.
Always disconnect cord from electrical outlet before servicing the
cleaner.
Do not use without dust bag and/or filters in place. Change bag frequently when picking up very fine materials such as powder.
Use extra care when cleaning on stairs.
Do not put any object Into openings. Do not use with any opening
blocked; keep free of dust, lint, hair, and anything that may reduce air
flOW.
Grasp the plug to disconnect from wall outlet to avoid damage to cord,
plug, prongs, or receptacle. Never handle plug or appliance with wet
hands.
The use of an extension cord is .not recommended.
Do not use wtth damaged cord or plug. If appliance is not working as it
should, has been dropped, damaged, left outdoors, or dropped into
water, take it to a Hoover Factory Service Center or Authorized Hoover
Warranty Service Dealer (Depot).
Use vacuum cleaner only for its intended use as described In the
instructions. Use only attachments recommended by The Hoover
Company; others may cause hazards.
Save these instructions!
2
.
Unpacking
Unpack the cleaner from the
carton and identify the parts
shown. Remove and dispose of
the cardboard packing.
A. Upper handle
B. Lower handle
c. cord
D. Tool rack
E. Tool rack screw
F. Bracket
G. Bag compartment
H. Cleaner body
I. Handle bolt and nut
(One extra nut included)
J. Paper bag
K. Air freshener tablet
L. Hose and cleaning tools
Mi Wands
N. Extra belt
AB”
Assembling cleaner
It is extremely important to read and follow all instructions step-by-step when
assembling your Legacy@ Supreme
cleaner.
The assembled cleaner will look like
this drawing.
If you need assistance with any step
Of th8 assembly, CalI Th8 tiOOV8r
CO. Consumer Response Center at
1-800-944-9200.
This cleaner is intended for
household use.
Side mounted hose trademark of
The Hoover Company
/I
L-I
ROI
Note: The white switch look above the ON/OFF switch, on th8 upper handle,
holds the switch in the Off position and aids in proper assembly of your
cleaner. Assembly can be continued if the switch lock is missing. However, do
not remove the switch lock until assembly is completed.
Place upper and lower handle sections on a flat surface, aligning rod sections.
Push sections together firmly until they *click” and rod sections lock together.
m. 1)
l Re carefui not to press against the gray rod extending from the
lower handle. (Fig. 2)
HANDLE
Insert large rectangular end of cord into pocket in bottom of handle, with side
marked “UP” visible. (Fig. 2) Make sure rectangular end is pushed into the
handle as far as possible. Slide cord protector toward upper handle. (Fig. 2)
4
PROTECTOR
‘fess cord into place at each of the three
notches indicated. (Fig. 3)
Move cord protector until the arrow points to arrow on handle. (Fig. 4 and 5)
GROOVE
Press groove in cord protector into slot in handle. (Fig. 5 & 6) Pull cord tight.
With sides marked FRONT facing
forward, hold tool rack and handle
side by side.
Align the two hooks on rack with
notches at A md B on handle as
shown. (Fig. 7)
Attach upper hook of rack onto
notch A of handle and lower hook
onto notch B of handle. (Fig. 8)
Holding tool rack in place, turn
handle over and align screw holes
(Fig. 9). Insert small screw and
tighten securely (Extra effort may
bs required).
6
Pull bag door latch forward and
remove door. Set bag door aside.
(Fig. 10)
Note round opening and hooks on
back of bag compartment.
Place opening over dirt tube and
align hooks with slots in handle.
Press fbmly to snap hooks into
handle. (Fig. 11)
Note location of tapered rails on
bracket and on lower handle.
(Fig. 12)
Slide rails on bracket onto rails on
lower handle until it snaps in place.
Pull bracket toward bottom of
handle slightly to make sure bracket
is locked in place. (Fig. 13)
7
Align opening in paper bag with dirt
tube. (Fig. 14)
Push paper bag collar firmly onto
tube. (Fig. 15)
Fold top of bag under top of
compartment.
To replace bag door, lift up lower
edge of paper bag and insert the 3
tabs on bottom of bag door into the
3 slots on bag compartment.
(Fig. 16)
Make sure all edges of paper bag
are completely inside the bag
compartment.
Close door.
8
With cord hooks to back, place
assembled handle onto handle
base of cleaner body. (Fig. 17)
Rock handle side to side while
pushing down firmly. Extra
pushing effort may be required.
Press the handle release lever to
move handle to the operating or
middle position.
Push bolt into hole on lower front of
handle. (Fig. 18)
If bolt will not go through hole
essily the bracket Is not locked
and/or handle is not pushed down
completely.
Place nut in recessed area at back
of handle. Hold nut in place while
tightening bolt securely with a
screw driver. (Fig. 19)
Only one nut is needed on this
,model. The extra nut is not required
but has been provided for your
convenience.
Pull switch lock above ON/Off
switch straight out. (Fig 20)
SWITCH
LOCK
ON/OFF
SWITCH
Dispose of switch lock.
Note: If switch lock has come off
during assembly make sum
switch is in the OFF position
(down) before plugging cord into
elsctrkal outlet.
Attach hose and tools
With cleaner handle in lowest
position, open hose door and insert
hose end with tabs into cleaner.
Turn hose end to lock in place.
(Fig. 21)
To remove hose, turn in opposite
direction.
Stretch hose over tool rack and
push opposite hose end firmly into
“cup” in rack. (Fig. 22)
Note: Hose ends must be firmly
connected to cleaner base and tool
rack when cleaning floors.
1
0
zlBACK
UIEW
Position wands in back of rack as
shown. (Fig. 23)
4
Open tool cover (some models only).
Position dusting brush (A), fumiture nozzle (B), crevice tool (C),
and extra belt (D) into side of rack
as shown. (Fig. 24)
CAUTION: When cleaner is turned on, the agitator brush roll will continue
to rotate when cleaner handle is in upright position. Avoid tipping cleaner
or setting It on furniture, fringed area rugs, or carpeted stairs during tool
use.
To insert air freshener tablet, see instructions on page 15.
11
The assembled cleaner will look like
the drawing below.
Cleaner
description
1. Handle
2.ONK)FF switch
Operate cleaner only st voltage
specMed on data plate on bottom d
cleaner.
3. cord hooks: wrap cord around
hooks for storage. The top hook
can be rotated right or left for easy
cord release.
4. Bag door latch
5. Bag door
6. Stair cleaning handle: located
on lower edge of bag compartment.
7. Handle release lever: step on
lever to lower handle to operating or
low position.
6. Cleaner body
9. Nozzle control knob: slide knob
to correct setting for height of
carpet being cleaned or for cleaning tools.
10. Furniture guard: helps prevent
cleaner from marking furniture.
11. Headlight
12. Hood
13. Hose door: open door to
connect hose to cleaner.
14. Hose
15. Extra Belt
16. Crevice tool
17. Furniture nozzle
18. Dusting brush
19. Tool cover
20. Tool rack
21. Wands
22. Bag compartment
23. Air freshener dispenser:
designed to hold a fragrance tablet
and release a pleasant scent during
cleaning.
12
How to use
To reduce the risk of electric shock,
this appliance has a polarized plug
(one blade is wider than the other).
This plug will fit in a polarized outlet
only one way. If the plug does not
fit fully in the outlet, reverse the
plug. If it still does not fit, contact a
qualified electrician to install the
proper outlet. Do not change the
plug in any way.
To turn cleaner on, push swjtch up.
po$;n cleaner off, push switch
Plug cord into electrical outlet. Turn
cleaner on and, with handle
in upright position, pull back on
handle until front of cleaner is
lifted off the carpet. This insures
that the paper bag is inflated.
Hose end must be firmly pushed
into “cup” in tool rack for maximum
suction on floors.
Handle positions
The handle of your cleaner has
three positions; upright for storage
and when using cleaning tools;
operating for general operationon
carpet and floors; low for reaching
under low furniture. Step on handle
release lever to lower handle.
Tkansporting
cleaner
To move your cleaner from room to
room, put handle in upright position,
tilt cleaner back on rear wheels, and
push forward.
The cleaner can also be moved by
lifting it as shown.
13
Carpet height
adjustment
The cleaning of carpet and rugs
takes place at the nozzle.
t
’ I
NOZZLE
NOZZLE CONTROL
KNOB
I
If it is necessary to raise and lower
the nozzle for various carpet pile
heights, slide the nozzle control
knob to the correct setting.
For ease in sliding knob, the handle
should be in the upright position.
The nozzle will not move into the
adjusted position until the cleaner
handle is lowered to the operating
position.
When using hose and tools, slide
knob to the Cleaning Tools
setting. Return knob to the correct
setting when cleaning floors. Do
not leave knob in Cleaning Tools
setting when cleaning floors.
Leave hose attached to cleaner and
place other end firmly into tool rack
for peak performance when
cleaning carpets.
For maximum cleaning performance the following carpet height settings
are recommended.
l Setting 1:
for low pile, level loop, kitchen type carpet.
l Setting 2:
for other types of carpet.
l Higher Settings:*
for very deep pile carpet where
easier pushing effort is desired, while
maintaining good cleaning performance.
l Setting 5:
for hose and cleaning tool use only.
*Note: If the cleaner is difficult to push, slide the knob to the next higher
setting.
14
Cleaning lightweight
flexible rugs
Stand on one end of rug and move
cleaner toward other end or edge.
Before reaching edge, push down
on handle. This will lift up the
nozzle (front of cleaner) and will
prevent rug from clinging to
cleaner. Continue to lift up nozzle
so that when you have reached
the edge, it is completely off the
rug. Move cleaner back to start
again, lower nozzle, and use only
forward strokes.
Edge cleaning
Edge cleaning is provided on both
sides of nozzle to remove dirt in
carpet near baseboards and
furniture. Guide either side of
nozzle parallel to edge of carpet or
furniture.
Air freshener
dispenser
Lift drawer in the top of bag
compartment and insert the air
freshener tablet packed with
cleaner. Push drawer down into
position.
The amount of fragrance released
is regulated by sliding the control to
one of three settings shown on top
of bag compartment.
Air freshener tablets may be
obtained from your local Authorized
Hoover Dealer (Depot), a Hoover
Factory Service Center, or by using
the mail order form in this owner’s
manual.
15
Please complete this entire form!
The Hoover Company
101 East Maple Street
North Canton, OH 44720
~]4010001A
g 4010324A
Q 57363003
0 38528008
No. of items
Ordered:
Q 160147AG
0 049258AG
Q 38528027
0 38634074
Please Print Your Name and Address carefully in Ink.
Please allow 3 to 4 weeks for delivery.
Name
No. of
Packs TOTAL
-I---
Type A Disposable bags
Agitator belt
Power Drive belt
Zonvertible’“/Decade 80’“/Decade 800’”
049258AG
Agitator belt
1
$ 1.15
EliteT”/LegacyTu Agitator belt 38528027
1
$ 1.15
Friction fit extension wand 38634074
1
$ 1.95
TOTAL MERCHANDISE $
ADD YOUR APPLICABLE STATE TAX +
TOTAL COST $ 1
0 Check or Money Order payable to: The Hoover Company
0 Visa IJ MasterCard Card Number
Name on Card
Exp. Date:
Daytime Phone 81 Area Code
Use this f&m to order HOOVER disposable bags, belts, bulbs, spare tools and air freshener
tablets directly from THE HOOVER COMPANY, NORTH CANTON, OHIO, These items will
be shipped to your home freight prepaid. They may also be purchased from your local
Hoover dealer or Hoover Factory Service Center. See your Yellow Pages for listings.
Please detach order form and enclose with your check, money order, or credit
card information. Mail-in orders limited to U.S. residents only.
Stair cleaning
A stair cleaning handle has been
designed for ease in using your
cleaner on stairs. with handle in
operating position, place fingers
under edge of stair cleaning handle
and guide cleaner with other hand
on upper handle.
As an alternative, you may use the
hose and furniture nozzle for stair
cleaning.
When using cleaning tools, the
agitator will continue to rotate.
CAUTION: To avoid personal
injury or unwcessatywearto
carpet, and to prevent the cleaner
from falling, use extra care tf
cleaner is placed on stairs.
Cleaning tools
The cleaning tools allow you to do
specific cleaning tasks and to clean
hard to reach areas.
The tool set includes a hose, wands,
crevice tool, furniture nozzle and
dusting brush.
A. Move nozzle
control knob
Slide nozzle control knob to the
Cleaning Tools setting to divert
suction to hose and cleaning tools.
Return knob to floor setting when
tool use is complete.
16
B. Select proper
cleaning tool
The cleaning tools have many uses.
Select the tool best suited for the
cleaning task from the descriptions
below.
1. Dusting brush may be used for
carved furniture, table tops, books,
lamps, lighting fixtures, Venetian
blinds, baseboards, shutters, and
registers.
2. Furniture nozzle may be used
for upholstered furniture, draperies,
tapestries, mattresses, clothing,
automobile interiors, and carpeted
stairs.
3. Crevice tool may be used in tight
spaces, corners and along edges in
such places as dresser drawers,
upholstered furniture, stairs, and
baseboards.
4. Wands are used to give extra
length to your hose. Attach them
together or to any of the above
tools.
ttLz!ia
2
3
4
C. Attach wand
and tools
The toots are attached to the hose
or the wand in the same manner.
Push tool firmly onto hose; twist tool
slightly to tighten or loosen connection.
U&e tools with cleaner handle in
upright position.
CAUTION: Agitator continues to rotate while cleaner handle is in upright
position. Avoid tipping cleaner or setting it on furniture, fringed area
rugs, or carpeted stairs during tool use.
17
Clearing obstructions
To check for obstructions, first turn
cleaner off and disconnect from
electrical outlet; then disconnsct
hose from cleaner. Open hose
door and carefully remove any
visible obstruction. If no obstruction
is found, check hose and tools.
Remove obstruction. To continue
using tools, reattach hose to
cleaner. If no obstruction is found
and a problem persists, contact
your Hoover Factory Service Center
or Authorized Warranty Service
Dealer (Depot).
How to clean tools
To clean the hose, wipe off dirt with a cloth dampened in a liquid
detergent. Rinse with a damp cloth. Cleaning tools may be washed in warm
water with a detergent. Rinse and air dry before using.
How to attach tool
cover
The tool cover is designed with a
‘break-away” feature which allows it
to snap off if it is pushed open too
far. To reattach, align hinges of
cover with slots on side of tool rack.
Press cover back into place.
Maintenance
The following sections are concerned with proper maintenance of the cleaner.
Familiarize yourself with these home maintenance tasks and keep this owner’s
manual in a convenient place where you can refer to it when needed. Proper
use and care of your cleaner will ensure continued cleaning effectiveness.
The bag
When to replace
Check bag from time to time. It is recommended that you change the bag
when dirt reaches the dotted line. If more dirt than this accumulates, your
cleaner may not operate effectively.
CAUTION: Very fine materials, such as face powder, cornstarch, fireplace
ashes or fireplace soot, may seai the paper bag and may cause it to burst
even though it is only partially full of dirt. When cleaner is used to remove
material of this nature, change bag often.
18
Where to buy
Paper bags may be purchased from your local Authorized Hoover Dealer
(Depot) or from a Hoover Factory Service Center or use the order form packed
with your cleaner. When ordering bags, be suit) to ghre the modsi number
of your cleaner.
What to buy
For improved cleaning effectiveness, use only HOOVEFb Breathe Easp Micro
Filtration TLpe A disposable bags. These bags are constructed with filter
material which removes 99.9% of dust down to 5 microns, and aids in returning
clean air to the room.
Regular HOOVEFb Type A disposable bags also fit
your cleaner.
To assure that your cleaner operates at peak
performance, it is imperative that you use only
genuine HOOVER p er ba s distributed by The
Hoover Company. Ha80VE#bags can be identified by these trademarks -
How to replace
Disconnect cleaner from eiectriCdOlJtkt.
Pull bag door latch forward and
remove door from cleaner.
Grasp bag collar and pull collar
from tube.
Note: Do not clean out old bag
and reuse. Discard used bag.
Align opening in new paper bag
with dirt tube in outer bag. Push
b.ag collar firmly onto tube.
Fold top of bag down under top of
bag compartment.
To replace bag door, lift up lower
edge of paper bag. Insert the 3
tabs on bottom of bag door into the
3 slots on bag compartment.
Make sure ail edges of paper bag
are completely inside the bag
compartment.
Close door.
19
The headlight
What to buy
This cleaner uses a 12 volt, wedge
base type 912 bulb, Hoover part
No. 27313-105.
How to replace
Disconnect ckaner from eiectricai outlet and detach hose from
cieaner.
1. Remove nozzle control knob on
front of hood by grasping knob and
pulling up.
2. Place handle in operating
position and turn cleaner over.
Insert end of flat screwdriver into
one of the four slots beside an
arrow on bottom of cleaner.
3. Pry outward to release latch.
Repeat to release latches at the
remaining three arrows.
4. Turn cleaner over and lift off
hood.
20
5. Remove bulb by pulling straight
out of socket; push new bulb into
socket until it locks in place.
6. Place hood on cleaner body and
press firmly to snap all four latches.
Pull up on hood slightly to make
sure all four latches are secured.
Push nozzle control knob back onto
front of cleaner.
The belt
The belt on your HOOVER cleaner causes the agitator to rotate and is important for the effective operation of the cleaner. The belt is located under the
bottom plate of the cleaner and should be checked from time to time to be sure
it is in good condition.
When to replace
To check belt, remove bottom plate as shown on the following page under
“How to replace.” Replace belt if it is stretched, cut or broken.
What to buy
One extra belt has been provided with your cleaner.
To assure effective operation, use only genuine HOOVER belts with your
cleaner. When purchasing a new belt, ask for Hoover part No. 38528427.
21
How to replace
Disconnect deanerfrom eiectrical outlet and detach hose from
deaner.
1. Place handle in operating
position and turn cleaner over.
To remove bottom plate, insert
end of flat screwdriver into wide
area of right-hand slot and push
handle of screwdriver to the rear.
Repeat in left-hand slot.
2. Rotate plate and remove from
cleaner body.
3. Remove hood as directed in
steps l-4 of ‘How to Replace
Headlight.’
4. Remove agitator and broken belt.
22
5. Slip agitator through new belt
(with iettering toward outside of
cleaner). Lower end of belt into
opening in cleaner body; reposition
agitator.
6. Place the three tabs on bottom
plate into slots in front of cleaner
body. Snap bottom plate into place
over agitator.
7. Turn cleaner over and stretch
new belt onto motor pulley.
Extra effort may be required to
stretch beit onto pulley.
Turn agitator, making sure belt is
not pinched between agitator and
cleaner body. The belt must rotate
freely inside the belt guide. If
agitator does not turn, remove
bottom plate and reposition belt in
belt guide.
8. Replace hood and nozzle control
knob.
23
Agitator brush rolI
When to replace
Disconnect cleaner from eiectrical outiet and detach hose from
cleaner.
When agitator brushes are worn, the
brush roll should be replaced.
To check condition of brushes,
move edge of card across bottom
plate while turning agitator. To
maintain cleaning effectiveness,
replace brush roll if brushes do not
touch card.
What to buy
The brush roll may be replaced with
either a single or double brush roll.
Single row of brushes Hoover part No. 48414-033.
Double row of brushes Hoover part No. 48414432
How to replace
Disconnect cleaner from ekctricai outiet and detach hose from
cleaner.
1. Remove bottom plate as described in ‘The belt. section.
Remove agitator from cleaner.
2. Turn end plates of agitator in
opposite directions until one end
plate comes off.
24
3. Pull out shaft, being careful to
leave washer on shaft.
4. Reinsert shaft to push out
opposite agitator end.
5. Repeat in other direction to push
out second agitator end.
6. Discard old agitator brush roll.
7. Place agitator ends into new brush
roll, matching projections in roll with
openings in ends. Push ends firmly
into place. (If bearing comes out of
agitator end during disassembly,
place washer and bearing back into
agitator end, with white side of
bearing out, before inserting shaft.)
8. Insert shaft (with washer) into
agitator. Replace end plate and
tighten.
No&x Be sure shaft is inserted so
that end plate with flat-sided
projection is secured onto belt end
of agitator roll.
Use this illustration for reassembly,
if necessary. Washer must be
placed between agitator ends and
bearing.
9. Replace agitator and belt as
shown in steps 4-8 of “How to
replace belt.’
25
Lubrication
The motor is equipped with bearings which contain sufficient lubrication for the
liie of the motor. The addition of lubricant could cause damage. Do not add
lubricant to motor bearings.
The agitator is equipped with two ball bearings that should be lubricated
periodically by a Hoover Factory Service Center or an Authorized Hoover
Warranty Service Dealer (Depot).
If you have a problem
This appliance was inspected thoroughly and was in good operating condition
when it was shipped from the factory. If a minor problem occurs, it usually can
be solved quite easily when the cause is found. Therefore, this check list is
provided for your convenience.
Problem
Possible cause
Possible solution
Cleaner
won’t
run
I. Not ftrmly plugged in.
2. No voltage In wall plug.
3. lbWwlfl~seArlpped
.
I. Plug unit in firmly.
2. Check fuse or breaker.
3. Replace fuse/reset
breaker.
Cleaner
won’t
pick up
I. Broken or worn belt.
2. Agitator brush roll
worn.
3. Bag full.
4. Incorrect carpet height
setting.
I. Replace belt.
2. Replace brush roll.
5. Hose end notsecure In
tool rack
I. Hose clogged
Cleaning
tools won’t
2. Incorrect setting.
pick up
Cleaner
hard
to push
I. Incorrect carpet height
setting.
3. Change paper bag.
4. Move nonle control
knob to type of carpet
being cleaned.
5. Push hose end firmly
into %up” In tool rack=
I. Remove hose and tools;
remove obstructlon.
2. Move knob to “Cleaning
Tools”.
I. Move nozzle control
knob to a higher setting.
26
Service
lf the problem persists, check the Yellow Pages of your telephone
book under ‘Vacuum Cleaners-Household” for your nearest Hoover Factory
Sewlce Center or Authorized Hoover Warranty Service Dealer (Depot)
where approved HOOVER service and genuine HOOVER replacement parts
may be obtained. Provided with this product is a listing of the Hoover Factory
Sewice Centers. If you are unable to obtain the information you need from the
Yellow Pages, contact a Hoover Factory Service Center to find your nearest
Authorized Hoover Warranty Service Dealer (Depot). For service under
warranty, follow the instructions in the warranty provided with this product.
Do not send your cleaner to The Hoover Company in North Canton for service
as this will only result in a delay.
Always identify your cleaner by the complete model number when requesting
information or ordering parts. (The model number appears on the bottom of
the cleaner.)
If further assistance is needed, contact The Hoover Company Consumer
Response Center, North Canton, Ohio 44729,1-809-944-9200.
In Canada contact Hoover Canada, Burlington, Ont. L7R 4A8.
1-800-283-8378
Energy saving tips
1. Replace paper bag promptly, before it is overfilled. Use a genuine
HOOVER bag made for you cleaner.
2. To maintain effective cleaning, replace agitator brush roll and belt when
necessary.
3. Turn off cleaner when not in use, such as when moving furniture.
4. Keep your cleaner operating at peak performance - have inspection and
service performed by a Hoover Factory Service Center or Authorized Hoover
Warranty Service Dealer (Depot).
27
Service
tf the problem persists, check the Yellow Pages of your telephone
book under ?/acuum Cleaners-Household” for your nearest Hoover Factory
Service Center or Author&d Hoover Warranty Senrlce Dealer (Depot)
where approved HOOVER service and genuine HOOVER replacement parts
may be obtained. Provided with this product is a listing of the Hoover Factory
Service Centers. If you are unable to obtain the information you need from the
Yellow Pages, contact a Hoover Factory Service Center to find your nearest
Authorized Hoover Warranty Service Dealer (Depot). For service under
warranty, follow the instructions in the warranty provided with this product.
Do not send your cleaner to The Hoover Company in North Canton for service
as this will only result in a delay.
Always identify your cleaner by the complete model number when requesting
information or ordering parts. (The model number appears on the bottom of
the cleaner.)
If further assistance is needed, contact The Hoover Company Consumer
Response Center, North Canton, Ohio 44720,1-800-944-9200.
In Canada contact Hoover Canada, Burlington, Ont. L7R 4A8.
1-809-283-8378
Energy saving tips
1. Replace paper bag promptly, before it is overfilled. Use a genuine
HOOVER bag made for you cleaner.
2. To maintain effective cleaning, replace agitator brush roll and belt when
necessary.
3. Turn off cleaner when not in use, such as when moving furniture.
4. Keep your cleaner operating at peak performance - have inspection and
service performed by a Hoover Factory Service Center or Authorized Hoover
Warranty Service Dealer (Depot).
27
Cleaning Effectiveness Per Amp Rating
This is m an Amp rating. Amps do m measure dirt removal, only the amount
of electricity used. Cleaning Effectiveness Per Amp is determined by dividing
this model’s Cleaning Effectiveness* by its Amps.
,*Cleaning Effecthfeness is the percent value obtained from dividing:
I(a) the geometric mean of the amount of embedded carpet dirt removed in
testing under ASTM Test Method F808-89, by
(b) the value 29 (the geometric mean of the midpoints of the % Dirt Pick Up
Scales of ASTM F1411 Buyers Guide).
28
Full One Year Warranty
(Domestic Use)
Your HOOVER@ appliance is warranted in normal household use, in actordance with the Owner’s Manual against original defects in material and
workmanship for a period of one full year from date of purchase. This warranty
provides, at no cost to you, all labor and parts to place this appliance in
correct operating condition during the warranted period. This warranty applies
when the appliance is purchased in the United States including its territories
and possessions, or in Canada or from a U.S. Military Exchange. Appliances
purchased elsewhere are covered by a limited one year warranty which covers
the cost of parts only. This warranty does not apply if the appliance is used in a
commercial or rental application.
Warranty service can only be obtained by presenting the appliance to one of
the following Authorized Warranty Service outlets. Proof of purchase will be
required before service is rendered.
1. Hoover Factory Service Centers
2. Hoover Authorized Warranty Service Dealers (Depots)
This warranty does not cover pick up, delivery, or house calls; however, if you
mail your appliance to a Hoover Factory Service Center for warranty service,
transportation will be paid one way.
While this warranty gives you specific legal rights, you may also have other
rights which vary from state to state (or province).
If further assistance is needed, or if there are questions concerning this
warranty or the availability of warranty service outlets, write or phone the
Consumer Response Center, The Hoover Company, 101 East Maple St., North
Canton, Ohio 44720. Phone 1-800-944-9200.
In Canada contact Hoover Canada, Burlington, Ont. L7R 4A8.1-800-268-6876
,
The Hoover Company wants to quickly resolve any concerns about your cleaner or questions regarding its use.
However, do not send your cleaner to The Hoover Company in North Canton for service. This will only result in a
delay.
If you are not completely satisfied look on the list provided with the product for your local Hoover Factory Service Center or in the Yellow Pages under “Vacuum Cleaners - Household” for the Authorized Warranty Service 6
Dealer (Depot) nearest you or call:
1-800-944-9200
(U.S. only).
HOOVER and
are registered trademarks
THE HOOVER COMPANY, NORTH CANTON, OHIO 44720
RA, 8-94 U5089-930/99-930, U5109-930 Litho USA
5651 l-398