1
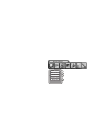
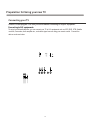
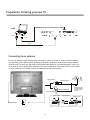
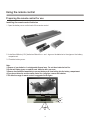
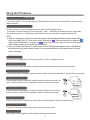
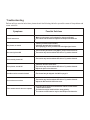
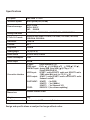
R
LCD COLOUR TV
USER'S MANUAL
LCD3704NEU
Part No:
CONTENTS
The symbol of the dustbin barred means that this apparatus cannot be put at the
rebus with not sorted waste domestic running.
It is interdict to throw with not sorted waste domestic running, of deposited on the
public thoroughfare or at any other place not envisaged to this end. This apparatus
contains substances being able to be harmful for the environment.
The presence of certain substances can have harmful effects on the environment.
This apparatus profits from a specific treatment of recycling for the re-use of the matters which make it
up.
This apparatus must be thrown only to the places envisaged. Inform near your authority to know the
places of electronic collection of waste.
Your sale point must collect this apparatus against the purchase of a new one for its recycling.
The selective collection of waste electronics is to reduce the number of substance vermin not recycled
and to thus contribute to the environment.
WARNING: TO PREVENT FIRE OR SHOCK HAZARD, DO NOT EXPOSE THIS APPLIANCE TO RAIN OR MOISTURE.
The lightning flash with arrowhead symbol, within an
equilateral triangle is intended to alert the user to the
presence of uninsulated dangerous voltage within the
product ' s enclosure that may be of sufficient magnitude
to constitute a risk of electric shock.
CAUTION
CAUTION: TO REDUCE THE RISK OF ELECTRIC SHOCK, DO NOT REMOVE
COVER(OR BACK).NO USERSERVICEABLE PARTS INSIDE.
REFER SERVICING TO QUALIFIED
SERVICE PERSONNEL.
The exclamation point within an equilateral triangle is
intended to alert the user to the presence of important
operating and maintenance( servicing ) instructions in
the literature accompanying the set.
WARNING: TO PREVENT FIRE OR SHOCK HAZARD, DO NOT EXPOSE THIS APPLIANCE TO RAIN OR MOISTURE.
IMPORTANT
SAFEGUARD
FIRE AND SHOCK PRECAUTIONS
Adequate ventilation must be provided to prevent heat build up inside unit. Keep the inside of unit free
from foreign objects, such as hairpins, nails, paper, etc. Do not build the set into a bookcase or other
enclosures in which it would be poorly ventilated. Do not place it on carpet or a bed as low ventilation
boles could become obstructed.
Do not set liquids, including flower vases and vessels filled with chemicals or water etc., On top of the
unit as liquid could get inside the unit. If a hazardous object falls inside the TV set, unplug it immediately
and call a qualified technician for removal.
When placing or moving the TV set, take care to insure that the power cord is fitted into the allocated slot.
To avoid damage to the power cord, never allow heavy objects such as the TV set itself to be placed on
the power cord. Keep cord away from radiating appliances. Do not allow cord to become knotted or
tangled. Do not lengthen the cord. When removing the power plug from the socket, always hold onto the
plug, never pull by the cord.
This TV set shall be connected to a main socket outlet with a protective earthing contaction
The main plug and main switch should be remain readily operable after installation
No nacked flame sources, such as lighted candles, should be placed on the apparatus
Minimum distances around the apparatus for sufficient ventilation
The use of apparatus in moderate climates
WARNING
Do not remove the back cover of the TV set. Accidental contact with high voltage components could result
in electric shock. When internal adjustment is necessary, please contact your distributor.
If your set produces sound but no picture, or it emits smoke or produces a strange sound or smell, continue
operation is dangerous. Immediately turn off power and remove the power plug from the socket and
contact your distributor.
During vacation or other occasions when you will not be using the set for an extended period, remove the
power plug from the socket.
This appliance should not be operated by children or infirm persons without adequate supervision.
-1-
General settings
Language
Colour system
Noise reduce
Deinterlacer
Factory reset
Sleep timer
english
Preparation for Using your new TV
Selecting a location for the TV
1)Place the TV on the floor or on a sturdy platform in a location where light does not directly hit the screen.
2)Place the TV far enough from the walls to allow proper ventilation. Inadequate ventilation may cause
overheating, which may damage the TV.
NOTE: Please contact local dealer for wall mounting.
Learning about your TV
You can operate your TV by using the buttons on the front panel or the remote control. The terminals on the
back panel provide all the connections you will need to connect other equipment to your TV.
Front Controls
28
MENU
SOURCE
11
VOL
VOL
CH
CH
-3-
B
B
R
COMPONENT IN
R
L
R
AUDIO IN
ANT IN
75
SCART2
SCART1
Note: The above figures are for reference only, please refer to the actual units to determine their appearance.
-4-
Preparation for Using your new TV
Connecting your TV
Caution: Do not plug the TV in until you have finished connecting all of your equipment.
Connecting to A/V equipments
To enjoy its multimedia features, you can connect your TV to A/V equipments such as VCR, DVD, STB, Satellite
receiver, Camcorder, Audio amplifier etc., and select signal sources using your remote control. Connect the
devices as shown below.
1
B
R
- 5-
Preparation for Using your new TV
RGB line
PC/NB
B
To speaker
B
R
COMPONENT IN
R
L
R
AUDIO IN
C
ANT IN
75
To VGA
Audio line
Connecting to an antenna
To enjoy the terrestrial signal transmitted by your local TV station, you need an indoor or outdoor antenna
(not supplied). Perfect picture quality requires a good signal and generally means that an outdoor antenna
must be used. The exact type and location of the antenna will depend on your particular area. Consult your
local dealer or service personnel for best advice. If you are a subscriber of your local CATV net, the outdoor
or indoor antenna is not needed. Connect the equipments as the following figure.
Plug(not supplied)
COAXIAL CABLE (75W )
TWIN-LEAD FEEDER(300 W )
Adaptor (not supplied)
Loosen the screw
ANTENNA SOCKET
ANT 75¦¸
- 6-
Insert the feeder in
The signal comes from:
An outdoor antenna
An indoor antenna
CATV net
Tighten the screw
Using the remote control
Preparing the remote control for use
Installing the remote control batteries
1. Open the battery cover on the back of the remote control.
2. Install two AAA size(1.5V) batteries. Match the + and - signs on the batteries to the signs on the battery
compartment.
3. Close the battery cover.
Note:
1.Dispose of your batteries in a designated disposal area. Do not throw batteries into fire.
2.Do not mix battery types or combine used batteries with new ones.
3.Remove dead batteries immediately to prevent battery acid from leaking into the battery compartment.
4.If you do not intend to use the remote control for a long time, remove the batteries.
5.The effective range of remote control is suggested in the figure.
6m
15
15
8m
6m
30
6m
30
8m
- 7-
6m
Using the remote control
Learning about the remote control
- 8-
Using the TV features
Understanding the TV features
Multimedia - TV receiver, Video monitor and PC display, all in one.
Wider viewing angle, 16:9 display - 176¡ã
viewing angle at typical value
Digital display device - truthfully reproducing the images, without distortion or blurring, irrespective
of magnetic or geomagnetic effect.
200 channels storage
Sleep timer
Teletext with 252 pages memory
NICAM
Three SCART interface
Multi-language OSD
Basic Operations
Power ON/OFF
1) Connect the TV to power outlet and turn on the power switch, the power
indicator will be red and then turn blue.Several seconds later, TV picture
will display on the screen.
2) Press the Power button on the front control or on the remote control to make
the TV on standby.Press the power switch to turn off power.
3) If you decide to shut off the TV for a long time, it is recommended
that you unplug the power from the outlet.
POWER
INDICATOR
Signal source selection
Press [CH+/CH- ] button to select TV main source input; press the [SOURCE] button to select TV ,YPBPR ,Video,
S-video,VGA,DVI, scart1,scart2 and scart3 input;press the [VIDEO] button to select VIDEO input; press the
[S-VIDEO] button to select S-VIDEO input; press the [ YPBPR button to select YPBPR input; press the [PC] button
to select VGA or DVI input;
press the [PIP SOURCE] button to select TV ,YPBPR ,video,vga,dvi,scart1,scart2 and scart3 input of pip
source input;press [PIP CH+/CH- ] button to select TV input;
press the [SWAP] button to swap main source input and pip source input.
Select channels by [CH+/CH-]
- 9-
Using the TV features
Select channels by [CH+/CH-]
You can also use[CH+ / CH-] to select channels. [CH+] indicates channel number increase; [CH-] indicates channel
number decrease.
Select channels by numbers
To select a channel : Press the channel numbers in series to select channel directly.
For example, to seclect channel 120, Press the button 1, and 1 will display on the top right corner of the screen,
then press the button 2, 12 will display, press the button zero, you can enjoy the program of channel 120.
NOTE:
1) When you changing the channel, the sound state graphics can be displayed below the channel number. There
are 3 sound states in this TV. If the sound is mono, the graphics is , If the sound is stereo, the graphics is
If the sound is NICAM dual I/II, the graphics is
. There are two symbol at right of the sound state graphics,
Which indicate preset of picture system and sound system.
2) When you changing the channel, the sound of current channel will be firstly changed to stereo or NICAM dual I
according to the sound state of current channel. You can press the I/II button on the remote control to change
current sound type.
Adjust Volume
When menu is not displayed on the screen, press [VOL+ or VOL-] to adjust the volume.
Use [Recall] button
Power ON/OFF
Press the [ Recall ] button repeatedly to alternate between the present channel and the previous channel.
Display channel number
Press [Display] button to display the present channel number, but it will also disappear 3 seconds after your pressing.
Select picture modes
You can select the picture mode from among three preset modes and one user-set
mode. Press the [ P.mode ] button repeatedly to select the desired picture mode.
Normal
User
Soft
Bright
Select sound modes
You can select the sound mode from among three preset modes and one user-set
mode. Press the [ S.mode ] button repeatedly to select the desired sound mode.
Speech
Nomal
Use [Still] button
User
Music
Press the [ Still ] button to snapshot the present picture, and press again to return to normal watching.
Use [ Zoom ] button
Press the [ Zoom ] button to adjust the screen aspect ratio and zoom ratio
Mute function
Press [ Mute ] button repeatedly to switch between mute and unmute mode.
- 10-
Using the TV features
Using the TV settings menu
Program
1) Press the [MENU] button to enter the main menu.
2) Press the [VOL+ or VOL-] button to select the item TV settings.
3) Press the [CH+ or CH-] button to select Program.
4) Press the [VOL+ or VOL-] button to select the present channel.
Tv settings
Sound system
You can set sound syetem.
1) Press the [MENU] button to enter the main menu.
2) Press the [VOL+ or VOL-] button to select the item TV settings
3) Press the [CH+ or CH-] button to select sound system.and press
the [VOL+] button to enter sound system
4) Press the [VOL+ ] button to switch among AUTO I D/K B/G L/L`
Tv settings
AUTO-Search
1) Press the MENU button to enter the main menu.
2) Press the [VOL+ or VOL-] button to select the item TV settings.
3) Press the [CH+ or CH-] button to select Auto search and press
the [ VOL+ ] button to enter Auto search .
4) Press the [ VOL+ ] button to switch among Normal and Auto +L/L`.
Notes:If you want to select L/L` and else sound system,
please select [auto search +L/L`] as right shown.
Program
Sound system
Auto search
Manual search
Fine tune
Skip
Channel edit
Manual search
1) Press the MENU button to enter the main menu.
2) Press the [VOL+ or VOL-] button to select the item TV settings.
3) Press the [CH+ or CH-] button to select Manual search.
4) Press the [ VOL+ or VOL-] button to start Manual searching.
Fine tune
1) Press the MENU button to enter the main menu.
2) Press the [VOL+ or VOL-] button to select the item TV settings.
3) Press the [CH+ or CH-] button to select Fine tune.
4) Press the [ VOL+ or VOL-] button to start Fine searching.
Skip
1) Press the [MENU] button to enter the main menu.
2) Press the [VOL+ or VOL-] button to select the item TV settings
3) Press the [CH+ or CH-] button to select Skip.
4) Press the [VOL+] button to skip or unskip the present channel.
NOTE: The 'skipped' channels cannot be accessed by [CH+ or CH-] , but you can access them by digit (direct select)
button.
11-
Using the TV features
Using the Picture menu
PROGRAM
Adjust picture settings
Picture parameters
1) Press the [MENU] button to enter the main menu.
2) Press the [VOL+ or VOL-] button to select the item Picture
Parameters.
3) Press the [CH+ or CH-] button to select the item you want to adjust.
4) Press the [VOL+ or VOL-] button to adjust the level.
5) The adjusted data is stored automatically in the user mode.
NOTE : The Colour temp is only to adjust in the PC mode.
.
Brightness
Contrast
Saturation
Hue
Colour temp
Sharpness
Using the Audio setting menu
Adjust audio settings
Audio settings
1) Press the [MENU] button to enter the main menu.
2) Press the [VOL+ or VOL-] button to select the item Audio settings.
3) Press the [CH+ or CH-] button to select the item you want to adjust.
4) Press the [VOL+ or VOL-] button to adjust the level.
5) The adjusted data is stored automatically in the user mode.
Bass
Treble
Balance
Sorround
Using the PIP menu
Picture in picture
1) Press the MENU button to enter the main menu ,press the
[VOL+ or VOL-] to select the Picture in picture.
2) Press the [CH+ or CH-] button to select the PIP size, and
PIP position
press the [ VOL+] button to enter the PIP size, Press the
PIPsize
[CH+ or CH-] button to select the Off/Small/Medium/Large/PBP .
PIPbrightness
3) Press the [CH+ or CH-] button to select the PIP source, and
PIP contrast
press the[ VOL+] button to enter the PIP source, Press the
PIP source
[CH+ or CH-] button to select the pip source.
4) Press the [CH+ or CH-] button to select the PIP position or PIP
brightness or PIP contrast, press the [VOL+ or VOL-] button to adjust the value.
Note: 1) When main picture is TV/ VIDEO/SCART/S-VIDEO. pip picture is HDTV/VGA/DVI.
2) When main picture is HDTV/VGA/DVI. pip picture is TV/ VIDEO /SCART.
-12 -
Using the TV features
Using the OSD settings menu
OSD position
OSD settings
1) Press the [MENU] button to enter the main menu.
2) Press the [VOL+ or VOL-] button to select the item OSD
settings.
3) Press the [CH+ or CH-] button to select OSD position
4) Press the [VOL+ or VOL- or CH+ or CH-] button to
adjust the OSD POSITION
OSD position
OSD timeout
OSD language
OSD lock
OSD timeout
Transparency
1) Press the [MENU] button to enter the main menu.
2) Press the [VOL+ or VOL-] button to select the item OSD
settings.
3) Press the [CH+ or CH-] button to select OSD timeout
4) Press the [VOL+ or VOL- or CH+ or CH-] button to
adjust the OSD TIMEOUT
OSD language
1) Press the MENU button to enter the main menu.
2) Press the [VOL+ or VOL-] button to select the item OSD settings.
CHANGE
3) Press
the [CH+PASSWORD
or CH-] button to select OSD language,and press the [VOL+]]button
to enter the OSD language
4) Press the [ VOL+] button to select the language what you want use.
OSD lock
1) Press the MENU button to enter the main menu.
2) Press the [VOL+ or VOL-] button to select the item OSD settings.
CHANGE
3) Press
the [CH+PASSWORD
or CH-] button to select OSD lock ,and press the [VOL+]button
to enter the OSD lock
4) Press the [ VOL+] button to select Yes, then OSD locked.
At that time you press MENU again,the screen will display as right shown.
Notes: If you want to unlock the OSD, please press [9] when the screen
display as right shown.
Transparency
1) Press the MENU button to enter the main menu.
2) Press the [VOL+ or VOL-] button to select the item OSD settings
3) Press the [CH+ or CH-] button to select Transparency
4) Press the [ VOL+ or VOL-] button to adjust the ITEM
-13 -
OSD locked!
Using the General settings menu
Language
Noise reduce
1) Press the MENU button to enter the main menu.
2) Press the [VOL+ or VOL-] button to select the item General settings
3) Press the [CH+ or CH-] button to select Noise reduce.
4) Press the [ VOL+ ] button to enter the Noise reduce.
5) Press the [ CH+ or CH-] button to select Low / Middle / High .
Deinterlacer
1) Press the MENU button to enter the main menu.
2) Press the [VOL+ or VOL-] button to select the item General settings
3) Press the [CH+ or CH-] button to select Deinterlacer
4) Press the [ VOL+ ] button to enter the Deinterlacer
5) Press the [ CH+ or CH-] button to select the feature
Factory reset
1) Press the MENU button to enter the main menu.
2) Press the [VOL+ or VOL-] button to select the item General settings
3) Press the [CH+ or CH-] button to select Factory reset.
4) Press the [ VOL+-] button to select Yes or No .
Sleep timer
1) Press the MENU button to enter the main menu.
2) Press the [VOL+ or VOL-] button to select the item General settings
3) Press the [CH+ or CH-] button to select Sleep timer
4) Press the [ VOL+-] button to adjust the Sleep timer
-14-
Using the TV features
Using the PC menu
PC Parameters
1) Press the MENU button to enter the main menu.
2) Press the [VOL+ or VOL-] button to select the item
PC Parameters.
3) Press the [CH+ or CH-] button to select the item you
want to adjust.
Auto
LANGUAGE
ENGLISH
Clock
NOTE: 1)The menu is useful only on VGA/DVI and HDTV mode.
Phase
It is useless in others mode.
2) The button [AUTO] is used to adjust position of picture
Position
automatic and it is effective only on VGA/DVI mode.
I/p info
The button [AUTO COLOUR] is used to adjust quality
of picture manually when signal is not good sometimes.
The button [POSITION] is used to adjust the position of
picture.
The button [CLOCK] and [PHASE] can adjust quality of picture minutely,
and they are used less.
3) In HDTV mode ,Clock can not be select.
4) In DVI mode,I/P info can be select only.
Teletext Operations
Selecting teletext mode
Select the channel that is broadcasting the desired Teletext program.
Press [ TEXT ] button and alternate between Teletext mode and normal mode.
Note: All the operations below should be under the Teletext mode except TIME operation.
Page selection
You
[ 0~9 buttons.
] buttons.
You can
can directly
directly input
input your
your desired
desired page
page number
number by
by pressing
pressing [0~9]
You
can
sequentially
read
pages
by
pressing
[
CH+
or
CH]
button.
You can sequentially read pages by pressing [¡ orÄ ¡ Å
Hold
Some Teletext information is contained on more than one page, the pages automatically changing
after a given reading time.
Press [ S-Video ] button to stop the page changing.
Press [ S-Video ] button again to allow the page to change.
Reveal
Some Teletext pages contain quiz or questions with hidden answers.
Press the [ Source ] button to see the answers.
Press the [ Source ] button again to hide the answers.
Cancel
When a page is selected in Teletext mode it may take some time before it becomes available.
Press the [ YPbPr ] button to switch to the TV mode.
When the required page is found, the page number will appear at the top of the TV picture,
press the [ YPbPr ] button to return to the selected Teletext page.
Note: You can not change TV program while in this mode.
-15-
Using the TV features
Teletext Operations
Sub code
Some Teletext pages contain sub page that require you to input the sub code.
Press [ Zoom ] button until ***|**** is displayed, and enter last four-digit sub code for the sub page you need.
Mix
You can mix Teletext with TV pictures, which means transparent teletext.
Press [ Swap ] to mix, and press [ Swap ] again to cancel the mixed effect.
Size (top/bottom/full)
Press the [ PC ] button to display the TOP HALF of the page.
Press again to display the BOTTOM HALF of the page.
Press again to return to a FULL PAGE display.
Note: Changing pages reverts to a FULL PAGE display.
Index
Teletext index page guides you quickly to your desired page.
Press [ Vedio ] button to enter index page.
Fast text
The RED, GREEN, YELLOW & CYAN buttons are used for quick access to colour coded pages
transmitted by FAST TEXT broadcast.
-16-
Also known as Peritel, this standard provides a cheap multi-signal connector
to domestic TV and other video equipment.
Arrangement 1 is the original and allows for composite video input/output,
RGB inputs and stereo audio input/output.
Arrangement 2 allows for composite video input/output,and stereo audio
input/output.
Cation:The output of video and audio are always from turner of R F.
Arrangement 3 allows for composite video input, S-Video inputs,and stereo
audio input/output.
TV can auto check aspect ratio in scart.
Scart Connector Pinout Details
SCART arrangement 1
Pin Signal
Signal level
Impedance
1
Audio output B (right)
0.5V rms
<1kohm
2
Audio input B (right)
0.5V rms
>10kohm
3
Audio output A (left)
0.5V rms
<1kohm
4
Ground (audio)
-
-
5
Ground (blue)
-
-
6
Audio input A (left)
0.5V rms
>10kohm
7
Blue input
0.7V
75ohms
8
Function select (AV control)
High(9.5-12V)- AV mode
>10kohm
Low (0-2V) - TV mode
9
Ground (green)
-
-
SCART arrangement 2
Pin Signal
Signal level
Impedance
1
Audio output B (right)
0.5V rms
<1kohm
2
Audio input B (right)
0.5V rms
>10kohm
3
Audio output A (left)
0.5V rms
<1kohm
SCART arrangement 3
Pin Signal
Signal level
Impedance
1
Audio output B (right)
0.5V rms
<1kohm
2
Audio input B (right)
0.5V rms
>10kohm
3
Audio output A (left)
0.5V rms
<1kohm
4
Ground (audio)
-
-
5
Ground
-
-
6
Audio input A (left)
0.5V rms
>10kohm
7
-
-
-
8
Function select (AV control)
High (9.5-12V) - AV mode
Mid(5-8V)-Wide-screen
>10kohm
-
-
10 -
-
-
11 -
-
-
12 -
-
-
13 Ground (Chrominance)
-
-
14 Ground (blanking)
-
-
15 Chrominance input
0.3V
75ohms
16 -
-
-
17 Ground video (input &output)
-
-
18 Ground video (input &output)
-
-
19 Video output (composite)
1V including sync
75ohms
20 Video input (composite)
/Luminance input
1V including sync
75ohms
21 Common ground (shield)
-
-
Low (0-2V) - TV mode
9
Ground
Notes: composite Video input of SCART1 can not output by SCART1 and SCART3.
Notes: Y/C can not be displayed in the PIP source.
Cleaning and care
WARNING: Do not try to remove the cabinet back. Refer servicing to qualified service technicians.
To clean the TV screen:
1) Unplug the TV to avoid possible shock hazard.
2) Use a clean cellulose sponge or chamois cloth dampened with a solution of mild detergent and warm
water to clean the TV screen and trim. Do not use too much water as water spilled into the cabinet
can cause damage to the TV.
3) Wipe off any excess moisture with a clean dry cloth.
4) Polish the cabinet with a quality furniture polish to maintain the finish and appearance of the cabinet.
Caution: Never use strong solvents such as thinner, benzene, or other chemicals on or near the cabinet.
These chemicals can damage the finish of the cabinet.
-19 -
Troubleshooting
Before calling a service technician, please check the following table for a possible cause of the problem and
some solutions.
Symptoms
Possible Solutions
TV will not turn on
Make sure the power cord is plugged in, then press [Power].
The remote control batteries may be dead. Replace the batteries.
No picture, no sound
Check if you have set the off timer.
Check the antenna/cable connections.
Press [Display] to see if you have select the right signal source.
No sound, picture OK
The sound may be muted. Press [VOL+] on the remote control or .
The station may have broadcast difficulties. Try another channel.
Poor sound, picture OK
The station may have broadcast difficulties. Try another channel
Poor picture, sound OK
Check the antenna connections.
The station may have broadcast difficulties. Try another channel.
Adjust the picture from the menu.
Unable to select a certain channel
The channel may be skipped. See SKIP on page 11.
Poor colour or no colour
The station may have broadcast difficulties. Try another channel.
Adjust the HUE and COLOUR in the menu.
The remote control does not operate
There may be an obstruction between the remote control and the
remote control sensor.
The batteries may be installed with a wrong polarity.
The remote control batteries may be dead. Replace the batteries.
Specifications
LCD panel
940.3mm TFT LCD
Television system
Multi- system(PAL,SECAM)
Channel coverage
VHF-L: E2-S8
VHF-H: S9-S37
UHF: S38-E69
Analog RGB mode
640X480/60Hz,800X600/60Hz,1024X768/60Hz,1280X1024/60Hz
Resolution
480I/60Hz,480P/60Hz,576I/50Hz,576P/50Hz,720P/50Hz,720P/60Hz,
1080I/50Hz,1080I/60Hz
1366X768
Contrast
600:1
Brightness
500cd/m
Viewing angle
176 (H)/176 (V)
Power source
AC160V--240V, 50/60Hz
Power consumption
200W
Audio output
5W+5W
Y P B/C B P R/C R mode
Connection interface
o
2
o
RF input:
Cable/ antenna RF 1
YP BP R 1 1.0/0.286Vp-p 75 W ,CVBS 1,Y/C 1,
VIDEO input:
GRAPHIC input: Analog RGB 15pin(VGA) 1(0.7Vp-p 75 W )
Digital RGB(DVI-D) X1
SCART 1 audio,SCART 2 audio and SCART3 audio
AUDIO input:
CVBS aduio,Mini-jack for PC (3.5 )X1
AUDIO output: SCART 1 audio, SCART 2 audio and SCART3 audio
Subwoof audio X1
SCART INPUT: SCART1 ( for RGB )
SCART2 ( for CANAL+ )
SCART3 ( for Video and Y/C)
OTHER:
RS232C X 1 ( for software updating )
Dimensions
950mmX760mmX107mm
Weight
32kg
Supplied accessories Remote control, AC Power cord, Batteries
Design and specifications are subject to change without notice.
-21 -