1
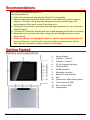
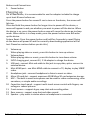
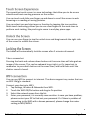
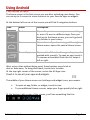
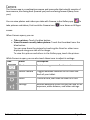
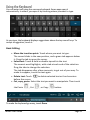
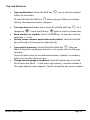
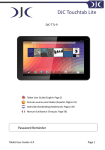
Recommendations ................................................................................................ 5
Getting Started ..................................................................................................... 5
Buttons and Connections.................................................................................. 5
Charging up ....................................................................................................... 6
Touch Screen Experience .................................................................................. 7
Unlock the Screen ............................................................................................. 7
Locking the Screen ............................................................................................ 7
WIFI connection ................................................................................................ 7
Using Android ....................................................................................................... 8
The Home Screen .............................................................................................. 8
Changing the Wallpaper ................................................................................... 9
Camera ............................................................................................................ 10
Using the Keyboard ......................................................................................... 11
Settings ........................................................................................................... 13
Storage ............................................................................................................ 14
Connecting to a PC .......................................................................................... 14
Managing Applications ....................................................................................... 15
Arrange & work with Apps .............................................................................. 15
Adding & Removing Applications.................................................................... 16
Using Folders................................................................................................... 16
Included Applications.......................................................................................... 17
Browser ........................................................................................................... 17
Email ............................................................................................................... 19
Video Player .................................................................................................... 20
Clock ................................................................................................................ 20
Tablet User Guide
Page 1
Music ............................................................................................................... 20
Troubleshooting .................................................................................................. 21
Resetting your device to Factory Defaults ...................................................... 21
Getting further help and support ................................................................... 21
Tablet User Guide
Page 2
Control information
This device is in accordance with the requirements in Radio & Telecommunications Terminal Equipment
Directive 1995/5/EC.
This device complies with the requirements in EMC Electromagnetic Compatibility Directive
2004/108/EC and Low Voltage Directive 2006/95/EC.
FCC STATEMENT
1. This device complies with Part 15 of the FCC Rules. Operation is subject to the following two
conditions:
(1) This device may not cause harmful interference.
(2) This device must accept any interference received, including interference that may cause undesired
operation.
2. Changes or modifications not expressly approved by the party responsible for compliance could void
the user's authority to operate the equipment.
NOTE: This equipment has been tested and found to comply with the limits for a Class B digital device,
pursuant to Part 15 of the FCC Rules. These limits are designed to provide reasonable protection against
harmful interference in a residential installation.
This equipment generates uses and can radiate radio frequency energy and, if not installed and used in
accordance with the instructions, may cause harmful interference to radio communications. However,
there is no guarantee that interference will not occur in a particular installation. If this equipment does
cause harmful interference to radio or television reception, which can be determined by turning the
equipment off and on, the user is encouraged to try to correct the interference by one or more of the
following measures:
Reorient or relocate the receiving antenna.
Increase the separation between the equipment and receiver.
Connect the equipment into an outlet on a circuit different from that to which the receiver is
connected.
Consult the dealer or an experienced radio/TV technician for help.
RF warning statement:
The device has been evaluated to meet general RF exposure requirement. The device can be used in
portable exposure condition without restriction.
Recycling information
Hannspree attaches great importance to our environmental policy, and firmly believe that we can
better protect the "health" of the earth by properly disposing and recycling the industrial
technological equipment that has reached service life.
These devices contain recyclable materials, which can be re-added to new material after
decomposition. In contract, other materials are classified as dangerous and toxic substances. We
sincerely hope that you contact the relevant institutions based on the information we provide to
recycle this product.
For more information, please visit http://www.hannspree.com.
Tablet User Guide
Page 3
Preventing hearing loss
Caution: Permanent hearing loss may occur if earphones or headphones are used at high volume for
prolonged periods of time.
This device have been tested to comply with the Sound Pressure Level requirement laid down in the
applicable EN 50332-1 and/or EN 50332-2 standards.
The Li-ion battery package in the product is not serviced and replaced.
Trademark Notice:
Hannspree products incorporate High-Definition Multimedia Interface
(HDMI™) technology.
The terms HDMI and HDMI High-Definition Multimedia Interface, and the HDMI Logo are
trademarks or registered trademarks of HDMI Licensing LLC in the United States and other
countries.
Tablet User Guide
Page 4
Welcome to Hannspree tablets PC !
Recommendations:
1. Open the package and take out the tablet PC from polybag.
2. Please remove the protective film from the screen before you start using the
tablet pc. This film is for protection during transit only and will lower the
performance of the touch screen if you keep it on.
3. The device is sensitive to moisture, dust and high temperatures, try to keep the
tablet PC away.
4. The tablet PC should be handle with care, avoid dropping on the floor or striking.
5. Please do not try to open the outer casing, this will damage the set or cause
electric shock.
6. While the adaptor is charging the tablet PC, avoid using touch screen that will
cause interference. And in order to ensure optimum performance, please
don't operate the device while the battery is charging.
1.
2.
3.
4.
5.
6.
7.
8.
9.
10.
11.
12.
13.
Tablet User Guide
Power button
Volume + “button”
Volume – “button”
DC IN charging interface
USB interface
HDMI interface
Earphone interface
Micro SD card interface
MIC
Capacitance Multi-touch panel
Front camera 0.3MP
Rear camera 2MP
Loudspeaker
Page 5
Buttons and Connections:
1. Power button
For all new device, it is recommended to use the adaptor included to charge
up at least 8 hours before use.
Press the power button for around 2 sec to turn on the device, the screen will
light up.
Press and hold the power button for longer time to power off the device, a
menu will appear to ask you whether you want to power off the decice. When
the device is on, press the power button once will cause the device go to sleep
mode. When device is in sleep mode, press the power button once will wake
up the device.
System Reset: Press the power button and hold for 4 seconds to reset (Doing
so the device will power off and the currently downloading application will be
lost. Please be cautious before you do this.)
2.
3.
4.
5.
6.
7.
8.
9.
10.
11.
12.
13.
Volume up
When playing video or music, press this button to turn up volume.
Volume down
When playing video or music, press this button to turn down volume.
5VDC charging port, connect 5V, 2.1A adaptor to charge the device.
USB port– connect Mini-usb cable to this jack to copy data, apk or connect to
external device.
Mini-HDMI port – use Mini-HDMI cable to connect to TV, display to play 1080P
video.
Headphone jack – connect headphone to listen to music or video.
Micro SD card slot – support maximum 32GB Micro SD card extension storage.
MIC – The built-in mono microphone can be used for video conferencing, voice
narrations, or simple audio recordings.
Capacitive touch panel – support multi-touch screen control with fingers, can
enlarge or reduce pictures.
Front camera – support skype, snap shot and recording video.
Rear camera – support snap shot and video record.
Speaker – play music in stereo when no headphone is connected.
Tablet User Guide
Page 6
The capacitive touch screen is a new technology that allow you to do screen
selection without exerting pressure on the screen.
You can touch and slide your finger up and down to scroll the screen in web
browsing or e-reading or seeing pictures.
You can select icon and start apps or function by tapping the icon position.
Multi-touch technology allows you to use a few fingers at the same time to
perform muti-tasking, like pinching to zoom in and play piano apps.
You can use your finger to tap the unlock icon and drag towards the right side
of the screen to unlock the screen.
The tablet will automatically lock the screen after 2 minutes of unused.
Take a screenshot
Pressing the back and volume down buttons at the same time will also grab an
image of the screen. This can be awkward to get right, so it’s important to
remember to press both buttons at the same time, and hold them until the
shutter sound is heard.
You can use WIFI to connect to internet. The device support any router that run
on 802.11b/g/n standard.
Connect your device to WIFI:
1. Tap Settings, Wireless & Networks then WIFI.
2. Touch the WIFI Off/On button and drag to On position.
3. Select the network name from the list.
4. Enter your password, it is normally case sensitive. In case you have problem,
please contact your ISP to find out your password. Or if there is problem of
connecting to the WIFI with a known password, please change the router
setting to WPA/WPA2.
Tablet User Guide
Page 7
The home screen is the first screen you see after unlocking your device. You
can use up to 5 screens to store shortcuts to your favorite apps or widgets.
At the bottom left corner of the screen you will find 3 navigation buttons.
Icon
Name
Description
Back
Opens the previous screen you were working
in, even if it was in a different app. Once you
back up to the Home screen, you can't go back
any further in your history.
Opens Home. If you’re viewing a left or right
Home screen, opens the central Home screen.
Home
Recent Apps
Opens a list of thumbnail images of apps you’ve
worked with recently. To open an app, touch it.
To remove a thumbnail from the list, swipe it
left or right.
After a short time without being used, these buttons may shrink to
dots or fade away. To bring them back, touch their location.
At the top right corner of the screen, notice the All Apps icon.
Touch it to see all your apps and widgets.
The middle of your Home screen can hold app and widget icons, plus folders.
•
•
To open an app, folder, or widget, touch its icon.
To see additional Home screens, swipe your finger quickly left or right.
At the bottom right corner of the screen, you'll see something like this:
Tablet User Guide
Page 8
Status icons to the left of the clock tell you which apps have sent you
notifications—for example, that a message has arrived, or it's time for a
meeting.
• To see your notifications, touch the clock or the icons on either side of it.
System icons to the right of the clock display the current wireless and network
connection strength, battery level, and sometimes more.
At the top left corner of the screen you'll find Google Search, which lets you search
your tablet or the Internet. Touch Google to type your search terms, or
them.
to speak
Wallpapers are images from Gallery (pictures you shot with Camera, synced from
Picasa, and so on), still images included with the system, and live images (such as
an animation or a map that centres on your location). They take the place of the
default background for your Home screens.
1. Touch & hold anywhere on a Home screen that's not occupied.
A list of options appears.
2. Touch a wallpaper source:
Gallery. Choose from pictures that you've taken with Camera or
downloaded to your device.
Live Wallpapers. Choose from a scrolling list of animated wallpapers.
Wallpapers. Choose from thumbnails of default images, or touch a
thumbnail for a larger version.
You can download additional wallpapers on Google Play.
3. To set a wallpaper image, touch Set wallpaper or, for Gallery images,
determine the cropping and touch Crop.
Tablet User Guide
Page 9
The Camera app is a combination camera and camcorder that actually consists of
two cameras, one facing back (toward you) and one facing forward (away from
you).
You can view photos and videos you take with Camera in the Gallery app.
take pictures and videos, first touch the Camera icon
To
on a Home or All Apps
screen.
When Camera opens, you can
• Take a picture: Touch the blue button.
• View the most recently taken picture: Touch the thumbnail near the
blue button.
You can now share the picture by touching the Gmail or other icons
displayed along one side of the image.
To view this picture and others in the Gallery app, touch the picture.
While Camera is open, you can also touch these icons to adjust its settings:
Icon
Name
Description
Mode
Switch among camera & video modes.
Switch Camera
Toggles between cameras on the front and
back of your tablet.
Zoom
Touch & hold, then slide to zoom in or out.
Settings
Reveals additional icons that you can use to set
exposure, white balance, and other settings.
Tablet User Guide
Page 10
You can enter text using the onscreen keyboard. Some apps open it
automatically. In others, you open it by touching where you want to type.
As you type, the keyboard displays suggestions above the top row of keys. To
accept a suggestion, touch it.
Basic Editing
• Move the insertion point: Touch where you want to type.
The cursor blinks in the new position, and a green tab appears below
it. Drag the tab to move the cursor.
• Select text: Touch & hold or double-tap within the text.
The nearest word highlights, with a tab at each end of the selection.
Drag the tabs to change the selection.
The tab disappears after a few moments, to get out of your way. To
make it reappear, touch the text again.
• Delete text: Touch
to delete selected text or the characters
before the cursor.
• Cut, copy, paste: Select the text you want to manipulate. Then touch
the Paste
, Cut
, or Copy
button:
To make the keyboard go away, touch Done.
Tablet User Guide
Page 11
Tips and Shortcuts
•
Type capital letters: Touch the Shift key
letters for one letter.
once to switch to capital
Or touch & hold the Shift key
while you type. When you release
the key, the lowercase letters reappear.
•
•
•
•
•
Turn caps lock on: Double-tap or touch & hold the Shift key
, so it
changes to
. Touch the Shift key
again to return to lowercase.
Show numbers or symbols: Touch the ?123 key. To see more choices,
touch the = \ < key.
Quickly access common punctuation and symbols: Touch & hold the
key to the right of the space bar (period key).
Type special characters: Touch & hold the Shift key
while you
touch a key with a small grey character in its corner to enter the grey
character.
Touch & hold any key to see alternative letters, symbols, or numbers,
which you can then touch to type.
Change input language or keyboard: Touch & hold the key to the left
of the space bar (with ... in the lower-right corner), and then release it.
The Input options menu appears. Choose the option you want to adjust.
Tablet User Guide
Page 12
Settings screen allows you to configure some settings of your Tablet,
including Wireless & Network, Sound, Display, Location & security,
Applications, Account, Storage, & Language & input, Accessibility, Date &
time. Click the tabs on the left to switch screens and do the related
configurations.
There are two ways to enter the Settings screen.
From the desktop
1. Tap the notification area at the bottom right corner.
2. Tap and extend the quick configuration area.
3. Tap Setting to open the Setting screen.
From the Apps menu
1.
2.
Tap Apps menu on the top right corner.
Tap Settings.
Tablet User Guide
Page 13
Built in Storage
Your tablet comes complete with either 4GB, 8GB or 16GB of built in storage.
However the Android operating system divides this space up into 2 sections, internal
storage and internal flash storage.
The Internal storage is reserved for use by applications and the operating system. You
may not see all of the space available for use as the rest is used by Android. You
cannot access this area from your computer. The Internal flash storage shows the rest
of the free space. This is the storage that you see when you plug your tablet into your
computer and should be used to hold your movies and music etc.
Using a Micro SD Card
Available storage can be expanded using a Micro SD card of up to 32GB in capacity.
To use a Micro SD Card:
1. Insert the Micro SD card into the slot shown in the front of this guide.
You may need to use a pen or similar implement to push the card fully
into place.
2. The tablet will automatically prepare the card for use.
To eject the card:
1. Push the end of the card inwards again until it clicks then release. The card
will pop out from the slot.
To copy files to and from your device via your PC:
1. Connect the device to the computer using the supplied USB cable. You
will see a notification in the status bar that USB is connected.
2. Touch the USB icon.
3. Touch the “USB Connected” option.
4. Touch “Turn on USB storage”
5. You should see a pop up on your computer asking you if you want to
Tablet User Guide
Page 14
browse the device. You can also see the device under “My Computer”.
6. To copy files you can now drag and drop files to and from your device.
7. Per scollegare dal computer ripetere il punto 2 sopra e poi toccare
“Disattiva memoria USB”.
To see all your apps, touch the All Apps icon on any Home screen.
The main All Apps screen opens. This is where you can see all your apps, including
those downloaded on Google Play. You can move app icons to any of your Home
screens.
From All Apps, you can
•
•
•
•
•
Move between screens: Swipe left or right.
Launch an app: Touch its icon.
Place an app icon on a Home screen: Touch & hold the app icon, slide
your finger, and lift your finger to drop the icon in place.
Explore your widgets: Touch the Widgets tab at the top of any All Apps
screen.
Get more apps. Touch the Google Play icon in the list of app icons, or
the Shop icon at the upper right.
Tablet User Guide
Page 15
Adding Applications
To download apps you need a Google account. You can login or setup a new
account after you have started the Google Play application. A simple wizard guides
you through this process.
Uninstalling Applications
To remove an app icon from the Home screen, touch and hold it, slide your finger
toward the top of the screen, and drop the app over the Remove icon.
You can combine several app icons in a folder. Drop one app icon over another on
a Home screen, and the two icons will be combined.
From any Home screen, you can
•
Open a folder: Touch it.
The folder opens:
•
•
Rename a folder: Touch its name.
Move icons around your Home screens: Touch, hold, and slide.
Tablet User Guide
Page 16
There are many applications included with your tablet. Below you will find
information on how to use the main applications.
From a Home or All Apps screen, touch the Browser icon.
Browser opens to the last webpage you were viewing. If you haven't used it recently,
it opens to your homepage.
Browser also opens when you touch a web link—for example, in an email or chat.
The web address (URL) of the current page is displayed at the top of the screen,
unless the address box (also called omnibox) scrolls off the top. If this happens, swipe
down to show it again.
Open a webpage or search the web
1. Touch the omnibox at the top of the page.
2. Type the address of a webpage or terms to search for.
As you type, a list of matching suggestions appears. Icons in the list help
identify the type of match:
The Favorites icon
identifies items from your bookmarks.
The Search icon
identifies related searches.
3. To search for the contents of the omnibox or open a specific web
address it contains, touch the Gokey in the lower right corner of the
keyboard.
OR
To search for a suggestion or go to a suggested web page, touch it.
Tablet User Guide
Page 17
The Browser opens either the specified webpage or a list of search results.
To set which search engine you want to use for searches from the Omnibox, go to
Menu > Settings > Advanced > Set search engine.
Navigate within a webpage
Webpages that aren’t optimized for mobile devices typically open with the
page zoomed out, to give you the big picture.
To change this behaviour, go to Menu > Settings > Advanced > Open pages in
overview. Uncheck the option to zoom in on new webpages automatically.
While viewing most webpages, you can:
•
•
•
Scroll. Swipe the screen in any direction.
Zoom: To zoom out, touch the screen with two fingers and pinch
them together. To zoom in, spread them apart.
OR
Double-tap the place where you want to zoom in. To return to the original
zoom level, double-tap again. You can control the way double-tap works
with the Auto-fit setting, described below.
Find text. Touch Menu > Find on page and type.
As you type, the first word on the page with matching characters
highlights, and subsequent matches are boxed. To move between
matches, touch the up and down arrows at the top right.
Auto-fit behaviour for double-tap is controlled by the option Menu > Settings
> Advanced > Auto-fit pages:
•
•
With Auto-fit checked, double-tapping a column of text causes
Browser to fit the text to the screen; and double-tapping again returns
to the original view.
With Auto-fit unchecked, double-tapping just zooms in and out
without regard for the text layout.
When a page doesn't zoom: Websites that are optimized for mobile devices
typically open to a size appropriate for the device, and may not permit zooming
and scrolling. In some cases you may prefer to view the desktop (non-mobile)
version of a site. Most mobile-optimized sites provide a link that allows you to
switch to the desktop version.
Tablet User Guide
Page 18
Bookmark a webpage
4. Open the webpage.
5. Touch
6. Edit the bookmark label and address if necessary, or choose a
different account.
7. To specify a different place to store the bookmark, touch the name
displayed beside Add to, and choose a Bookmarks folder, the top-level
list of bookmarks, or the Home screen.
8. When you're done, touch OK.
The bookmark is added to your list of bookmarks.
Open a bookmark
1. Touch the Bookmarks icon .
A set of three tabs appears, with Bookmarks on the left.
To show or hide an account's bookmarks, touch the email address for
the account.
2. To open a bookmark in the current tab, touch it.
OR
To open a bookmark in a new tab, touch & hold it, then choose Open in
new tab.
The bookmarked page opens.
You can enter one or several email accounts to your tablet.
Adding an email account
1.
2.
3.
4.
5.
6.
Touch the email icon.
In the account interface touch Next.
In the e-mail address box enter your email address.
Enter your password in the password box.
Touch OK.
Manual settings (optional) – The device should detect your other settings
automatically, however should you need to enter them manually click
Manual settings to make any required changes.
7. Touch Next.
Tablet User Guide
Page 19
8. Enter an account name.
If you have problems connecting to the account please check all of your
settings with your email service provider.
You can view photos and videos with the Gallery app.
The Gallery app finds all of your media and arranges it in a thumbnail view. It shows
folders on the first screen. Touch the folder you would like to open to go into it and
the app will show all of the files in that folder. Touch the file you would like to play.
Playing back through your HD TV
1. Connect your tablet to your TV using a Mini HDMI to HDMI lead.
2. Switch to the relevant input source on your TV.
3. Your tablet will automatically start displaying its output to your TV.
Touch the Clock icon to view the current date and time.
Setting an Alarm
You can set several alarms at the same time.
1. From the clock app press menu – Add alarm clock.
2. Set the time you would like the Alarm to go off (if you do not select
repeat the alarm will delete automatically after the time of the alarm).
3. Touch enable alarm clock.
4. Touch OK.
1.
2.
3.
4.
Touch the Music icon.
Select your desired music to play from the music/album/artist/playing list.
Use the Previous – Pause – Next icons to control the playback.
To return to the previous screen press the back icon in the navigation area
or to return to the home screen press the home icon.
Tablet User Guide
Page 20
If you need to reset your device to the factory default settings for any reason please
follow the process below:
WARNING!!!
Please be aware any information currently on the device will be permanently erased
by following this procedure.
1.
2.
3.
4.
5.
6.
Go to applications screen and touch the settings button.
Touch the Backup & reset option.
Select Factory data reset.
Leave the erase SD card option unticked & touch “Reset tablet”.
Touch “erase everything”.
The unit will now reset itself back to factory reset and any previous
information/data will have been permanently erased.
Please see our support site below for further help and support with your device
including how to install software updates if available and much more:
www.hannspree.com
[ Notes ]
- Some of the applications downloaded from Play Store or produced by other third party are not fully supported on this
device.
Tablet User Guide
Page 21