1
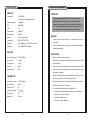
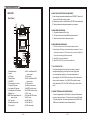
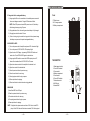
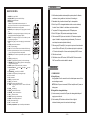
Hamilton
PA-85
OPERATION MANUAL
SPECIFICATIONS
IMPORTANT SAFEGUARDS
AMPLIFIER
Power supply:
IMPORTANT
AC120V/60Hz
To protect rechargeable battery life, this unit is shipped without
installing battery fuse. Before using this unit please install fuse
(included in accessories pack). Charge the battery fully before first
use. Charge battery each month if you are not going to use this unit
for a long period of time. Avoid total discharging of the battery.
built-in 3x6V 7A rechargeable batteries
Frequency response:
35-20000Hz
SPL:
94dB(1W/M)
T.H.D.:
<1%
Input wired mic:
-58dBV600
Record output:
0dBV 1K
Speaker:
2x 8" full range speaker
Output power:
RMS 85W, PEAK 170W
Input jack:
2x1/4" wired mic jack, 1 RCA audio Line In jack
Output jack:
1 RCA (VIDEO+L/R AUDIO) jack
WARNING:
*
To prevent fire or shock hazard, do not expose the unit to rain
or moisture.
*
To avoid electrical shock, do not open the cabinet. Refer servicing to
qualified personnel only.
RECEIVER
PRECAUTIONS:
Carrier frequency range:
UHF690~865 MHz
*
Be sure to use the correct power supply.
RF sensitivity:
<-101dB
*
Hold the plug of the cable when connecting or disconnecting the cable
Image rejection:
> 60dB
S/N ration:
>65dB
Operation range:
150 ft
from wall socket.
*
Turn volume control of the amplifier to minimum before power on. Then
adjust volume to suitable level as desired to avoid damage to your ear,
the amplifier or speaker.
*
TRANSMITTER
Please pull out AC plug from the wall socket and turn off the unit if you
are not going to use the unit for a long period of time.
Carrier frequency range:
UHF 690~865MHz
RF power output:
<10mW
Modulation level:
*
To extend the usage time, keep the interval between turn on and turn
off of the unit no less than 10 seconds.
*
15K
~ 60
Do not use the system where it may be subjected to:
Operation temperature:
-18
Power supply:
9V
--- excessive dust or poor ventilation
Battery Life:
10 Hours
--- excessive humidity or rain
--- direct sunlight or near the heat radiators or other heat sources
--- mechanical or other vibrations
---8---
---1---
PARTS DESCRIPTION
AMPLIFIER
4. USING TAPE CASSETTE PLAYER & RECORDER
1) Insert the tape into cassette holder after press STOP/EJECT button. And
Rear Panel
then press PLAY button to enjoy the tape.
2) Adjust volume controls of the amplifier and CD/TAPE to the suitable level.
3) Treble and bass control adjustment depends on your request.
1
2
+
+
+
3
5. USING WIRED MICROPHONE
DVD PLAYER
5
4
1) Plug wired microphone to MIC in jack.
2) Turn the volume control of each MIC to the desired position.
3) Adjust tone and echo control as per your request.
+
+
6
6. USING WIRELESS MICROPHONE
1) This unit is with built-in two UHF wireless microphone system.
2) Insert attached 9V battery into transmitter battery compartment. Turn on
13 14
MIC 1
RF1
15 16
+
7
8
9
10
11
12
MIC 2
+
RF2
17 18
+
LINE IN
RECHARGE
LOW BATT
19 20
POWER
LINE OUT
VIDEO OUT
21
22
23
24
25
26
transmitter power switch. RF indicator on the rear panel of amplifier will
light to show receiving signal from transmitter.
3) Adjust MIC volume to suitable level.
4) Adjust TONE and ECHO control to the suitable level.
POWER SWITCH
AC INPUT
+
+
+
7. TALK OVER FUNCTION
The volume of background music will turn down when you speak to
1. Retractable trolley
2. Handle
3. DVD player
4. Remote sensor
5. USB PORT
6. Cassette player & recorder
7. Charge LED indicator
8. Low battery LED indicator
9. Amplifier power LED indicator
10. Battery fuse:
NOTE: Please install battery fuse
before first use.
11. AC input jack
12. Amplifier power switch
13. Echo control
14. MIC 1 and Wireless MIC 1
volume control
15. Tone control
16. MIC 2 and Wireless MIC 2
volume control
17. Talk over switch
18. LINE IN volume control
19. MASTER volume control
20. DVD/TAPE volume control
21. MIC 1 input
22. Wireless MIC RF indicator
23. MIC 2 input
24. RCA LINE IN
25. RCA LINE OUT
26. RCA Video output
---2---
microphone during playing music. Music will come up again when
you stop speaking to microphone. The music cutting down level
can be adjusted. Turn TALK OVER to left, the music will not be reduced
when you talk to microphone. Turn TALK OVER to middle, the music
will be reduced about 50%. Turn TALK OVER to right, the music will be
cut off.
8. CONNECT EXTERNAL AUDIO/VIDEO DEVICES
This unit is equipped with one RCA audio(R+L) input jack. External audio
sources can be input to this unit. This unit has also one group RCA audio
(R+L)video output jack. The stereo signal comes from the AUDIO L/R or
VIDEO can be transmitted to other audio/video devices.
---7---
PARTS DESCRIPTION
C. Charge the built in rechargeable battery.
Front
1) Using supplied AC cord to connect the unit to suitable power source with
the correct voltage as marked. Charge LED indicator will flash.
NOTE: Either DVD power and main AMP power is on or off, the battery
27. Metal corner
28. Full range speaker
29. Battery compartment
27
will be charged once you plug AC power.
28
2) Charge indicator will turn from red to green when battery is fully charged.
3) Charging time should be about 10 hours.
4) If the unit is not going to be used for a long period of time, please charge
29
the battery once per month to protect rechargeable battery.
2. USING DVD PLAYER
1) Turn on the power switch of amplifier and power LED indicator will light.
2) Turn on the power of DVD PLAYER, LCD display will light.
3) Open the door of DVD player by pressing OPEN/CLOSE button and
insert a disc. Press OPEN/CLOSE again to close the door.
4) Using supplied RCA cable to connect the VIDEO output jack and TV,
TRANSMITTER
video will be transferred from DVD PLAYER to TV screen.
5) Adjust main volume controls of the amplifier to the desired level.
6) Adjust tone control to the desired level.
7) Press the previous button for previous song.
8) Press the next button for next song.
9) Press play/pause button for play or pause.
10) Press stop button for stopping.
11) Press track button to select track when singing karaoke.
5 6 7
1. Mesh(capsule inside)
2. Power LED indicator
3. Power switch
4. Battery compartment
5. Power switch
6. Power LED indicator
7. Attenuation switch
8. MIC IN jack
9. Headset MIC
8
1
2
3
3. USING USB
4
1) Insert flash DISC into USB port.
2) Press the previous button for previous song.
3) Press the next button for next song.
4) Press play/pause button for play or pause.
9
5) Press stop button for stopping.
NOTE: To play flash disc, please make sure that no DVD disc is inside DVD
player. If both DVD disc and flash disc are inserted, DVD will be played.
---6---
---3---
FEATURES
REMOTE CONTROL
1. POWER: Turn on/off DVD.
2. OPEN/CLOSE: To open and close DVD tray.
3. MUTE: To mute DVD sound.
4. Number Key:
1~0/10: To input number less than and equal to 10
10+: Press 10+ and then 1~9 to input number more than 10
5. SETUP: Press this button to set up system
6. DISPLAY: press to display track no, playing time, time left
etc.
7. SUBTITLE: to change caption language. Valid only when
playing file has different languages options.
8. ANGLE: To change the angel of movie. Valid only when
movie has angle options.
9. GOTO: Timing play. Press to start playing from the selected
time.
10. TITLE: press to enter sub menu.
11. N/P: TV system change.
12. PBC: Turn on/off VCD disc menu. Valid with VCD disc only.
13. A-B: to repeat selected part. Press to choose the starting
point A. Press again to select the end point B.
14. REPEAT: press to choose repeat mode: repeat one, repeat
all.
15. STEP: play step by step
16. PROG: To program playing order of your favourite songs.
17. RESUME: After you stop playing, press to continue playing
from the last ending point.
18. ENTER: press to confirm the function you choose
19. Direction buttons:
go to left
go to right
go to top
Go to bottom
20. PLAY/PAUSE press to PLAY or PAUSE
21. STOP: Press to pre stop. Press again to stop..
22. FF: fast forward
23. FR: fast reward
24. PREV: go to previous track
25. NEXT: go to next track
26. PTV/TV: choose to play DVD or USB
27. LANG: language button. Press to choose DVD audio
output
28. SLOW slow playing
29. ZOOM press to zoom in video.
30. RETURN return to last interface
31. VOL+ increase volume
32. RESET: press to go to default setup.
33. MENU: press to display disc menu
34. L/R sound track change
35. VOL- decrease volume
36. Battery compartment: open to install 2pcs AAA batteries.
---4---
1. Multi-functional portable wireless amplifier system is perfect for Karaoke,
conference, training, auditorium, hotel, church, & teaching etc.
1
2
2. Retractable trolley, handle and wheels. Easy for transportation.
3
3. Built-in 3pcs 6V*7A rechargeable batteries which can work continiously
for about 3 hours. Suitable for both indoor and outdoor activities.
4
6
7
10
11
14
15
5
8
9
12
13
16
17
4. Two pieces 8" full range speakers provide 170W peak power.
5. Built-in DVD player, USB port and cassette player & recorder.
6. With two wired MIC IN jacks and two built-in UHF wireless microphone
system. Suitable for many people using simultaneously. The volume of
18
19
each microphone can be adjusted individually.
7. With one group RCA audio(R+L) line in jack to input music from other audio
20
21
24
25
28
29
32
33
22
23
26
27
30
31
34
35
sources. With one RCA audio( R+L) and video output jacks to output video
to TV and audio to amplifier. Volume can be adjusted by LINE IN volume.
8. With talk over function.
9. With Master volume, DVD volume, LINE IN and MIC IN volume controls.
With Tone and Echo controls suitable for karaoke.
OPERATION
1. POWER SUPPLY
A. Using AC power
Using supplied AC cord to connect the unit to suitable power source with the
correct voltage as marked.
NOTE: When AC power is connected, DVD and amplifier use AC power, not
battery power.
36
B. Using built-in rechargeable battery
1) It is not necessary to connect the AC power, the rechargeable battery will
supply power to the unit.
2) If the low battery LED indicator on the back of the unit lights, it
indicates the battery power is low and need to be charged.
---5---