1
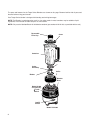
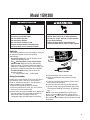
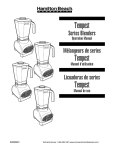
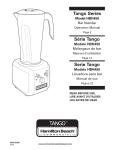
Ozs
Cups
44
51/2
40
5
36
41/2
32
4
28
3 /2
24
3
20
21/2
16
2
12
11/2
8
4
2
840083701-UK
Tango Series
Bar blenders
Operation Manual
1
1/2
1/4
www.commercial.hamiltonbeach.com
Blender Safety
IMPORTANT: This operation manual should be reviewed with all equipment operators as part of your
operator training program.
Your safety and the safety of others is very important.
We have provided many important safety messages in this manual and on your appliance.
Always read and obey all safety messages.
This is the safety alert symbol.
This symbol alerts you to hazards that can kill or hurt you and others.
All safety messages will be preceded by the safety alert symbol and the word “DANGER” or
“WARNING.” These words mean:
You will be killed or seriously injured if
you don’t follow instructions.
wDANGER
wWARNING
You can be killed or seriously injured if
you don’t follow instructions.
All safety messages will identify the hazard, tell you how to reduce the chance of injury, and tell you what
can happen if the instructions are not followed.
wWARNING
wWARNING
Electrical Shock Hazard
Plug into a grounded outlet.
Do not remove ground.
Do not use an adapter.
Do not use an extension cord.
Failure to follow these instructions can result
in death, fire, or electrical shock.
Cut Hazard
Always place cover on jar when blending.
Do not put hands, spoons or other utensils in
jar when blending.
Failure to follow these instructions can result
in broken bones or cuts.
Requesting Assistance or Service
Before calling for assistance or service, please check
the “Troubleshooting Guide” in this manual. If you still
need help, follow the instructions below.
Whenever you call to request assistance or service,
you need to know the complete model number. You
can find this information on the label on the bottom of
your blender.
Please also record the purchase date of your
equipment and your dealer’s name, address, and
telephone number.
Model Number__________________________
Purchase Date _________________________
Dealer Name ___________________________
Dealer Address _________________________
Dealer Phone___________________________
You can also order replacement parts by calling
your nearest Hamilton Beach Commercial Service
Center or your local dealer.
Call our Technical Service number: 866-285-1087 or 910-693-4277
8 a.m. – 5 p.m. EST Monday – Friday
(www.commercial.hamiltonbeach.com)
2
Blender Safety
IMPORTANT SAFETY INSTRUCTIONS
WARNING –
When using electrical appliances, basic safety precautions should be followed, including
the following:
• Read all instructions.
• Plug into a grounded outlet.
• Do not touch surfaces that may be hot.
Use handles or knobs provided.
• Extreme caution must be used when moving an
appliance containing hot oil or other hot liquids.
• Do not use appliance for other than intended use.
• To protect against electrical shock, do not
immerse cord, plug, or blender base in water
or any other liquid.
• Close supervision is necessary when any
appliance is used by or near children.
• The use of accessory attachments not
recommended by Hamilton Beach may cause
injuries.
• To reduce risk of personal injury, unplug cord
from outlet when not in use, and before putting on
or taking off parts or doing any other servicing of
the blender.
• Do not let cord hang over edge of table or
counter or touch hot surfaces.
• Do not place on or near a hot gas or electric
burner or in a heated oven.
• To reduce risk of personal injury and to prevent
damage to blender or jar and cutter assembly,
DO NOT insert utensils into blender jar while
operating blender, or store utensils in the blender
jar when it is not in use.
• Avoid contacting moving parts.
• Blades are sharp. Handle carefully.
• Inspect jar and cutter assembly daily. Check
cutter for wear, nicks, or broken blades. Replace
jar and cutter assembly at least every 12 months.
• Do not defeat the jar pad sensors.
–
• Do not use outdoors.
• This appliance is intended for short periods
of operation, with a rated operating time of
3 minutes.
• To prevent damage to blender, jar, or cutter
assembly, DO NOT move or shake blender while
in operation. If blending action stops during
operation, turn blender OFF, remove jar from
base, remove jar cover, and use a thin rubber
spatula to push mixture towards cutters.
• Do not spray the base with a high-pressure
spray gun.
• Disconnect power before cleaning or servicing.
• To prevent burns from hot liquids splashing out of
the jar, always remove the filler cap of the
container cover before blending hot liquids.
• Do not operate any appliance with a damaged
cord or plug or after the appliance malfunctions,
or is dropped or damaged in any manner.
Return appliance to the nearest service facility
for examination, repair, or electrical or
mechanical adjustment.
• If the supply cord of this appliance is damaged,
it must be replaced by the manufacturer or its
service agent or a similar qualified person. If fitted
with a non-rewirable U.K. plug, the 13 amp fuse
approved by ASTA to be B.S. 1362 must be used.
If you need a replacement fuse carrier, it must be
replaced by the same colour coded carrier with
the same markings. Fuse covers and carriers can
be obtained from approved service agents.
IMPORTANT: If the molded plug is cut off,
dispose of it immediately. The plug is not rewirable
and would cause a shock hazard if inserted into
a socket.
SAVE THESE INSTRUCTIONS –
Blender Operation – Quick Start Guide
1.
2.
3.
Place the blender on a dry, level surface.
Make sure the power switch is in the “off” or O
position. Plug the blender into a grounded electrical
outlet.
Place the jar on the base with ingredients and jar
lid in place.
4.
5.
Set the controls to your preference.
Move the power switch to the “on” or I position.
3
Parts and Features
The parts and features for the Tango Series Blenders are shown on this page. Become familiar with all parts and
features before using your blender.
Your Tango Series blender is designed for blending and mixing beverages.
NOTE: The Blender is not designed to crush ice. Ice cubes made in most icemakers may be added to liquid
ingredients in the blender to make daiquiris or similar drinks.
NOTE: Only use the Hamilton-Beach 91300 blender container (part number 6126-91300, as provided with the unit).
Removable
Filler Cap
Cover
Container
Gasket
Cutter
Assembly
Collar
Blades
Blender
Base
Model 91300
On (I)/Off (O)/
Pulse
Switch
Low/Hi
Switch
Model 1G91300
4
Operation
Operating the Blender–Model 1G91300
wWARNING
Electrical Shock Hazard
Plug into a grounded outlet.
Do not remove ground.
Do not use an adapter.
Do not use an extension cord.
Failure to follow these instructions can
result in death, fire, or electrical shock.
wWARNING
Cut Hazard
Always place cover on jar when blending.
Do not put hands, spoons or other utensils
in jar when blending.
Failure to follow these instructions can
result in broken bones, cuts or other injuries.
Controls
Two separate switches on the front panel allow you
to control the blender for precise blending
requirements:
• The On/Off switch will turn the blender On for
continuous operation or Off.
• The
Pulse position on the On/Off switch
(Model 91300 only) turns on the blender only
when the switch is pressed. When the switch is
released, the blender will stop. This will allow you
to precisely control the operation of the blender.
• The Hi/Low switch allows you to select the
following speeds:
Hi – 20,000 RPM Low – 18,500 RPM
Using the blender
Before you use the blender for the first time, wash
the container, cover, and cutter unit assembly.
Refer to “Cleaning Instructions.” Do not put the
cutter assembly in the dishwasher.
To operate the blender, proceed as follows:
1. Place the blender on a clean, dry, level surface,
and set the On/Off switch to Off.
2. Place cutter unit in the threaded collar, blades up.
Slip the gasket OVER the blades and onto the
base of the cutter assembly. Screw the
completed cutter assembly onto the container.
On (I) /
Off (O) /
Pulse
Switch
Hi/Low
Switch
Model 1G91300
3. Plug the blender into an electric outlet.
4. Place the ingredients to be blended into the
container.
5. Place the container onto the base. Make sure it
rests securely on the base.
6. Place the cover and filler cap on the container.
7. Set the Hi/Low switch to the desired speed. See
“Professional Blending Techniques” for blending
tips.
NOTE: If you want the blender to run for short
bursts, press the
Pulse switch. While you are
pressing the
Pulse switch, the blender will run at
the selected speed. Release the Pulse switch to stop
the blender.
5
Operation
Operation
Professional Blending Techniques
Filling the container
When filling the container with ingredients, follow
these recommendations:
• Use sufficient amount of liquid to ensure that the
mixture is fluid and free-running at all times. Pour
the liquid into the container FIRST.
• Cut solid ingredients into pieces that are no
bigger than a 1″ (2.5 cm) cube.
• Add the ingredients to container in batches. Do not
blend maximum volume all at once.
• Do NOT overfill the container with product. This
may prevent the blender from processing the
product properly. Process dense foods or thick
mixtures in small batches, and remember that the
volume of the product normally increases during
processing.
• Do not exceed one quart of content when
blending hot product.
• Always place the cover and filler cap on the
container when blending. For blending hot
liquids, remove filler cap from container cover
before blending.
Blending techniques
Icy drinks – Do not use blender to crush large ice
cubes. The blender is not designed for this. Small
ice cubes or crushed ice is recommended. Pour in
liquid, then add ice. Cover. Set speed at HIGH and
process until desired consistency is reached.
Chunks of frozen fruit can be added to milk or fruit
juice to produce a sherbet or slush.
wWARNING
Burn Hazard
Always use caution when blending
hot contents.
Failure to follow these instructions
can result in burns.
Blending hot mixtures
IMPORTANT: To minimize the possibility of
scalding, the following precautions MUST be
observed:
• Do not exceed 1 quart of content when blending
hot product. Remember that the volume of the
product normally increases during processing.
• Always place the cover on the container and
remove the filler cap from container cover when
blending hot liquids to prevent the build up of
pressure.
• Never stand with your face directly over the
container when operating the blender where
steam may be released.
• Begin on LOW speed and then select a speed
that produces a column of air in the center of
the container.
Filler Cap
Use the filler cap to add liquids to the container
while the unit is running.
6
Caring for the Blender
Cleaning Instructions
wWARNING
Electrical Shock Hazard
Plug into a grounded outlet.
Do not remove ground.
Do not use an adapter.
Do not use an extension cord.
Do not immerse base in water or
other liquid.
Failure to follow these instructions can
result in death, fire, or electrical shock.
General cleaning
Do not allow food residue to dry on any part of the
blender. Wash and rinse container, cutter unit
assembly and base after each use, or whenever it
will not be used again within one hour, as follows:
1. Remove the container from the base, and then
remove the cover. Add cleaning solution to the
container. Use a washing solution of hot water
(less than 115° F/46° C) and a non-sudsing
detergent. Use the recommended amount of
detergent.
2. Scrub and flush out the container interior,
cover and filler cap to remove food residue.
Empty container.
3. Fill container 1⁄4 full with fresh washing solution
and place it on the base.
4. Replace the cover on the container and run the
blender on high speed for 2 minutes.
5. Repeat step 3 using clean rinse water
(95° F/35° C).
6. Wipe down the container, filler cap, and cover
with a soft cloth or sponge, dampened with fresh
washing solution.
7. Wipe the exterior of the base with a damp cloth
or sponge. The base contains electrical
components: do not immerse, use a
high-pressure washer, or use a dishwasher
to clean the base.
wWARNING
Cut Hazard
Always place cover on jar when blending.
Do not put hands, spoons or other utensils
in jar when blending.
Failure to follow these instructions can
result in broken bones or cuts.
Sanitizing
1. Wash container as instructed in “General
Cleaning.”
2. Fill container with sanitizing solution (See
“Recommended Sanitizing Solution” below)
and place on base.
3. Replace cover and filler cap and run on LOW
speed for 2 minutes. Empty container.
4. Wipe the container exterior with a soft cloth or
sponge dampened with sanitizing solution.
5. Immerse the cover and filler cap in sanitizing
solution for two minutes.
6. Remove any remaining moisture from cutter
assembly by replacing container on base with
cover and filler cap in place. Then run blender
on HiGH speed for a minimum of 2 minutes.
7. To dry, place empty container on base and
run on HIGH speed for two seconds.
8. When ready to use, rinse with clean water.
NOTE: Do not rinse container, cover or filler cap
after sanitizing.
Recommended Sanitizing Solution:
The sanitizing solution should consist of 1
tablespoon of household bleach per 1 gallon of
clean, cool water (60° F, 16° C) mixed according
to the instructions on the bleach. When using a
sanitizing solution other than that recommended,
the sanitizing solution concentration should be
tested using commercially available test strips
and should indicate a concentration between
100 and 200 parts per million of bleach to water.
7
Caring for the Blender
Troubleshooting Guide
Problem . . .
Solution . . .
Blender fails to start
or stops while it is
running and cannot
be restarted
• Check to see if unit is securely plugged into an electric outlet.
• Check to see if the fuse for the electric outlet has blown or if a circuit breaker
has tripped.
Ingredients will not mix • Check to see if enough liquid has been added to the ingredients. Mixture should
properly
be fluid and free-running at all times.
• Solid pieces are too large. Pieces should not exceed 1" cubes.
• Container is too full. Do not fill past highest graduation marking.
• Cutter unit blades are not sharp or are damaged. Inspect
container and cutter assembly daily. Replace container and
cutter assembly at least every 12 months or sooner if cutter assembly appears
worn or damaged.
• Check to see if cutter assembly is installed properly.
• Select speed to create a fluid blend.
Maintenance
Inspect the blender and its various parts and replace as follows:
Daily
Weekly
Yearly
Unplug the blender and remove the container from the base, and then inspect the
container and cutter unit assembly for wear, nicks, and broken or loose blades. Replace if
necessary. If the blades are loose, discontinue use immediately and replace the blades.
Do not attempt to repair or tighten the cutter assembly. See “Replacement Parts” below.
Unplug the blender, and then inspect the power cord insulation and power plug for cracks.
Refer to “Requesting Assistance or Service” for repair or replacement.
Replace the container and cutter assembly at least once a year.
See “Replacement Parts” below.
Replacement Parts
Refer to “Requesting Assistance or Service” to order parts below.
Model
Part Description
Part Number
1G91300
1G91300
1 container
Cutter assembly
6126-91300
99200
840083701-UK
261 Yadkin Road
Southern Pines, NC 28387
12/03