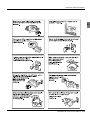
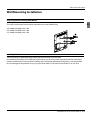
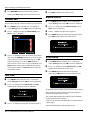
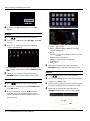
1
LE42H5000 LE47H5000 LE55H5000 Please READ this manual carefully before operating your TV, and retain it for future reference. Contents Contents Safety Warnings 2 Welcome................................................................ 2 Important Information......................................... 2 Important Safety Instructions 3 About Your LED LCD TV 5 Installing the Stand ............................................ 5 Wall Mounting Installation..................................6 Front Control Panel..............................................7 Back panel connections.......................................8 Get to Know Your Remote Control...................... 9 External Equipment Connections..................... 10 Power source.........................................................................10 Connecting to an Antenna or Cable Connection.....10 Connecting to HDMI Device............................................11 Connecting to an AV Device............................................12 Connecting to an Audio Device......................................13 Connecting to a PC..............................................................13 Basic Receiving and Playing Operations 14 Switching ON/OFF the TV set..........................................14 Choose the Input source...................................................14 Tuning Your TV.................................................... 14 Color System..........................................................................14 Sound System........................................................................14 Channel Edit...........................................................................15 Fine Tune.................................................................................15 Manual Search.......................................................................15 Auto Search............................................................................15 Using Your TV...................................................... 16 How to Select the TV Program........................................16 How to Adjust Volume........................................................16 Adjusting Picture Settings................................. 16 Changing the Picture Setting..........................................16 If the TV is currently in the 2D mode................. 17 If the TV is currently in the 3D mode................. 17 Adjusting Sound Setting.................................... 17 Changing the Sound Setting...........................................17 Setting Functions . ............................................. 18 EN-1 LED Backlit Flat TV instruction Manual Cloud Functions 18 Cloud Functions....................................................................18 All Apps....................................................................................19 Local File Browser.................................................................19 Browser....................................................................................19 Settings....................................................................................20 You Tube..................................................................................21 Twitter......................................................................................21 Facebook.................................................................................22 Net FileBrowser................................................... 22 Maintenance 22 Troubleshooting 22 Specification 23 Format 23 Safety Warnings Safety Warnings Welcome Thanks for buying this 47"/55" LED Backlit Flat TV. This guide will help you to set up and begin using your TV. Firstly, check the contents of your box with the parts checklist below: • 42"/ 47"/ 55"LED Backlit Flat TV • Remote control • AAA battery ×2 • Instruction Manual • TV Stand • 8Xscrews for 42"model ; 8x screws for 47" model(Plastic Tray×2,only for 47"); • AV adaptor • 3D glasses ×6 Now you can get started! En Important Information READ ALL INSTRUCTIONS BEFORE USE AND KEEP FOR FUTURE REFERENCE. WARNING RISK OF ELECTRIC SHOCK DO NOT OPEN WARNING TO REDUCE THE RISK OF ELECTRIC SHOCK DO NOT REMOVE COVER (OR BACK). NO USER SERVICEABLE PARTS INSIDE. REFER TO QUALIFIED SERVICE PERSONNEL. *To avoid electric hazards, it is strongly suggested that the back cover not be opened, as there is no any accessory inside the casing. *If necessary, please contact authorized after-sales services. could result in serious injury by high voltage. *An exclamation mark in a triangle: Major part or accessory of which technical must be followed i f it is to be replaced. WARNING: To avoid fire or electric hazards, never place your television receiver in an area with heavy moisture. Attention should be paid to avoid accidental scratches or impacts onto the screen. The ventilation should not be impeded by covering the ventilation openings with items, such as newspaper, table-cloths, curtains, etc. CAUTION: ▲ The main plug is used as disconnect device which shall remain readily operable. ▲ Please read this manual carefully before using your television and keep this manual in a good place for future reference. ▲ To achieve the best performance of your television, read this User‘s Manual carefully and properly store it for future reference. ▲ Information of screen displays and figures in the User’s Manual may vary due to technical innovations. ▲ Unauthorized disassembly of this product is prohibited. WARNING To prevent the spread of fire,keep candles or other open flames away from this product at all times. LED Backlit Flat TV Instruction Manual EN-2 Important Safety Instructionss Important Safety Instructions EN-3 LED Backlit Flat TV Instruction Manual Important Safety Instructionss En LED Backlit Flat TV Instruction Manual EN-4 About your LED LCD TV About Your LED LCD TV Installing the Stand Step 1 : Connect the guide stand to the stand using 4 screws(M 4X8) as shown. Step 2 : Remove 4 EA screws on back of TV as shown in picture. Step 3: Put the stand base on the slot of display bottom; Finally fix 4 screws(M 4X12) in accessory to the right position as shown in picture. Step 4: Stand assembly is finished. ⬉㾚ᴎ㚠䴶 screws EN-5 LED Backlit Flat TV Instruction Manual hole About your LED LCD TV Wall Mounting Installation Preparing before installing Wall-Mount. To install a wall-mount from another manufactuer,use the Holder-Ring. 42" model standard screw : M6 47" model standard screw : M6 55" model standard screw : M6 Installing Wall-Mount kit The wall mount kit (Sold separately) allow you to mount the TV on the wall. For detailed information on installing the wall mount see the instructions provided with the wall mount. Contact a techinical assistance when installing the wall mont bracket.Haier Electronics is not responsible for any damage to the product or injury to yourself or others if you elect to install the TV on yor own. LED Backlit Flat TV Instruction Manual EN-6 En Front Control Panel Front Control Panel SOURCE MENU VOL+ VOL- CH+ CH- POWE R 1 SOURCE 2 MENU 3 VOL+/- Press this key to open/close signal source options menu. Menu display. Press to access the on-screen menu display. Press to increase and decrease the volume. EN-7 LED Backlit Flat TV Instruction Manual 4 CH+/5 POWER TV channel up and down. Press to turn the TV on and off. Back Panel Connections Back panel connections HDMI 2 IN HDMI 1 IN USB DIGITAL AUDIO En 1 LAN 2 ANT IN 3 PC Video IN input input input 4 PC Audio IN input 5 COMPONENT IN 6 AV IN 7 USB input input input 8 9 0 AV OUT DIGITAL AUDIO OUT (OPTICAL) HDMI 1 IN/HDMI 2 IN output output input LED Backlit Flat TV Instruction Manual EN-8 Remote Control Get to Know Your Remote Control When using the remote control, aim it towards the remote sensor on the TV. 1 2 3 4 5 6 7 8 9 0 A B C D E F G H I J K L M N O P Q R S EN-9 LED Backlit Flat TV Instruction Manual Turn the TV on and off. Quick button switch to TV source. sleep button. Press to directly access to channels. Display the channel list on the screen. Adjust the Volume. Quick button for 3D functions. Quick button for Sound Mode function. Displays the main on- screen menu. No available. Turn previous. Selects the on-screen menu items and changes the values on the menu. Turn next. Function button (just reference the OSD). Play/Pause button (only for USB). Fast Reverse (only for USB). Enter setting interface. Hotel Lock. Press to jump back and forth between two channels. Cut off the sound temporarily. Change Channels. Quick button for Cloud functions. Select the Picture Mode. APPS@TV(TV-APPS homepage). Returns to the previous menu. OK button. Exit the menu. No available. Fast Forword (only for USB). External Equipment Connections External Equipment Connections Power source Connecting to an To use AC Power Supply Antenna or Cable Use the AC polarized line cord provided for operation on AC. Insert the AC cord plug into a standard polarized AC outlet. Connection En Over-the-air TV reception quality will depend on your antenna type, antenna location and antenna positioning. Note ❏❏ Never connect the AC line cord plug to other than the specified voltage. Use the attached power cord only. ❏❏ If the polarized AC cord does not fit into a nonpolarized AC outlet, do not attempt to file or cut the blade. It is the user’s responsibility to have an electrician replace the obsolete outlet. ❏❏ If you cause a static discharge when touching the unit and the unit fails to function, simply unplug the unit from the AC outlet and plug it back in. The unit should return to normal operation. VHF/UHF Antenna or Cable Television Network Note ❏❏ To improve the picture quality in a poor signal area, please purchase a signal amplifier and install properly. ❏❏ If the antenna needs to be split for two TV’s, install a “2-Way Signal Splitter” . ❏❏ When you move or swivel the TV with Antenna cable tightly connected, there is high risk antenna jack on TV will be broken off. LED Backlit Flat TV Instruction Manual EN-10 External Equipment Connections Choose Your Connection There are several ways to connect your television, depending on the components you want to connect and the quality of the signal you want to achieve. The following are examples of some different ways to connect your TV with different input sources. Connecting to HDMI Device Using an HDMI or HDMI/DVI Cable: HD connection(up to 1080p) We recommend using the HDMI connection for the best quality HD picture. Available devices: DVD player, Blu-ray player, HD cable box, HD satellite receiver(STB). BD/DVD player/ HD cable/Sat.box HDMI OUT DVI OUT HDMI IN PC AUDIO IN AWhen using an HDMI/DVI cable connection, you must use the HDMI IN jack for video. A DVD player, Blu-ray player,HD cable box,HD satellite receiver(STB), cable box,or STB satellite receiver may require a DVI-HDMI(DVI to HDMI)cable or DVI-HDMI(DVI to HDMI)adapter.You must use the PC/DVI AUDIO IN jack for audio. BThe picture may not display normally(if at all)or the audio may not work if you connect an external device that uses an older version of HDMI mode to the TV. If such a problem occurs, ask the manufacturer of the external device about the HDMI version and, if out of date,request an upgrade. CBe sure to purchase a certified HDMI cable, Otherwise, the picture may not display or a connection error may occur. EN-11 LED Backlit Flat TV Instruction Manual External Equipment Connections Connecting to an AV Device Using a Component(up to 1080p) or an Audio/Video Cable Available devices: DVD player,Blu-ray player,cable box,STB satellite receiver,VCR Note ❏❏ For better picture quality, the Component connection is recommended over the A/V connection. AV OUT: Connects to the audio input jacks on your amplifier/home theater AWhen connecting, use the appropriate connector (included with your TV). BWhen you connecte an audio amplifier to the AV OUT jacks: Decrease the volume of the TV and adjust the volume AV OUT level with the Amplifier’s volume control. LED Backlit Flat TV Instruction Manual EN-12 En External Equipment Connections Connecting to an Audio Device Using an Optical(Digital) or Audio(Analog) Cable Connection DIGITAL AUDIO OUT (OPTICAL) Available devices: Digital Audio System, Amplifier, Home Theater. When you connect a Digital Audio Syetem to the DIGITAL AUDIO OUT (OPTICAL) jack: Decrease the volume of both TV and the system. Connecting to a PC Using an HDMI cable or HDMI to DVI Cable / a D-Sub Cable HDMI OUT DVI OUT EN-13 LED Backlit Flat TV Instruction Manual Basic Receiving and Playing Operations Note ❏❏ Your PC may not support an HDMI connection. Basic Receiving and Playing Operations En Tuning Your TV Switching ON/OFF the Display Tuning menu by pressing SOURCE button then use 6 button to select the source of TV . TV set In the manual, the OSD (on screen display) may be different from your TV’s because it is just an example to help you with the TV operation. APress MENU button and then use 34button to select Tuning menu. press OK to enter. BPress 6 button to select the desired items, press OK to enter its submenu. Switching ON/OFF the TV set AFirst, connect power cord correctly and the power indicator will light. BPress POWER on the remote control. CIf you want to exchange to standing by status,please press down POWER on the remote control DDisconnect the power supply or unplug the television if it is intended to completely cease the television performance. Color System APress MENU button , Press 34 button to select Tuning, press OK to enter its submenu. Choose the Input source Use to select TV or an external input source such as a DVD player/Blu-ray player/cable box/STB satellite receiver. APress SOURCE button to enter the Input Source menu and then use 6 button to select the desired external input source (TV, AV, YPBPR, PC, HDMI1, HDMI2). BPress 6 button to select Color System, Press34button to select PAL/NTSC/SECAM/AUTO. CPress RETURN button to return to the previous menu, press EXIT button to exit the menu screen. Sound System APress MENU button , Press 34 button to select BPress OK button to confirm . Tuning, press OK to enter its submenu. BPress 6 button to select Sound System, Press34button to select DK/I/BG/M. LED Backlit Flat TV Instruction Manual EN-14 Basic Receiving and Playing Operations CPress RETURN button to return to the previous DPress EXIT button to exit menu screen. menu, press EXIT button to exit the menu screen. Channel Edit You can add a label to a channel to make it easier to find. APress MENU button and then use 34button to select Tuning menu. press OK to enter its submenu. BPress6button to select the Channel Edit, press OK to enter its submenu. Manual Search APress MENU button and then use34button to select Tuning menu. press OK to enter its submenu. BPress 6 button to select Manual Search , press OK to enter its submenu. CPress34button to adjust the Frequency. DPress MENU button to return to the previous menu, press EXIT button to exit the menu screen. CPress 56 button to select the channel you want to edit . Press the GREEN button on the remote control, Choose the other Channels to Exchange, Press OK Confirm Exchange. If select the RED button ,the channel with a check icon is a skipped channel. Press OK button to display "please Input Channel Name", Select OK or Cancel. Press EXIT button to return to the previous menu. Fine Tune Auto Search APress MENU button and then use34button to select Tuning menu. press OK to enter its submenu. BPress 6 button to select Auto Search, Press OK button on the remote to start to scan. CPress MENU button to return to the previous menu, press EXIT button to exit the menu screen. APress MENU button and then use34button to select Tuning menu. press OK to enter its submenu. BPress 6 button to select Fine Tune, Press OK button on the remote to enter its submenu. All channels now available will be automatically preset in older .After the search has finished, the firet program number will display on the screen. This search automatically adds only the active channels in your area to the TV's memory. CPress 34 button to select your desired Frequency. It deletes any channels on which there is no broadcast or a poor signal. The channels found are automatically saved. EN-15 LED Backlit Flat TV Instruction Manual Basic Receiving and Playing Operations Using Your TV YYPicture Mode How to Select the TV Program YYBrightness This will select the picture mode. Select Standard/ Vivid/Soft/User, according to the program. AUsing Program number button Enter the channel number with the number keypad on the remote control. BUsing CH∧/CH∨ button. Press the CH∧/CH∨button to select a channel number. YYContrast This will adjust the intensity of bright parts in the picture but keep the dark parts unchanged. YYColor This will adjust the saturation level of the colors to suit your personal preference. How to Adjust Volume Press This will adjust the light output of the complete picture, which will mainly affect the darker areas of the picture. button on the remote control or the keypad on the TV to adjust the volume level. YYSharpness This will adjust the sharpness of fine details in the picture. YYColor temperature Adjusting Picture Press34 button to set Color temperature as Standard, Cool, Warm. Settings This will increase or decrease Warm (red) and Cool (blue) colors to suit personal preferences.Select Cool to give the white color a blue tint, Standard to give the white color a natural tint, Warm to give the white color a red tint. Changing the Picture Setting YYAspect Ratio APress MENU button.then press34button to select Picture , press OK button to enter. Press 34 button to set Advanced Ratio as Panorama, Cinema, Zoom, JUST SCAN, FULL SCREEN, 4:3. YYDNR Press 34 button to set DNR as AUTO, High, Off, Low, Medium. YYColor Management Press34 button to set Colour Management as Auto, On, Off. YY3D Setting BPress5button to select the item which requires to be adjusted. Ensure you read and understand the following safety information before using the TV's 3D function. CPress34 button to adjust the selected item. DWhen you are satisfied with your choice, press the EXIT button to return to normal viewing or press RETURN button to return to the previous menu. LED Backlit Flat TV Instruction Manual EN-16 En Basic Receiving and Playing Operations Note ❏❏ Some people may experience discomfort, such as dizziness, nausea and headaches, while viewing 3D TV. If you experience any such symptom, stop watching 3D TV, remove the 3D glasses and have a rest. ❏❏ Watching 3D images for an extended period of time may cause eye strain. If you feel that your eyes are becoming strained, stop watching 3D TV, remove your 3D glasses and have a rest. ❏❏ Do not allow children under 6 years old to view 3D images. A responsible adult should frequently check on children who are using the 3D function. If there are any reports of tired eyes, headaches, dizziness or nausea, stop the child from watching 3D TV and have a rest. ❏❏ Do not use the 3D glasses for other purposes (such as general spectacles, sunglasses, protective glasses etc.) ❏❏ Do not use the 3D function or 3D glasses while walking or moving around. If you use the 3D function or 3D glasses while walking or moving around you may run into objects, trip and/or fall and injure yourself. ❏❏ Do not drop, exert pressure on or step on the 3D glasses. ❏❏ The TV doesn’t store the 3D mode settings, so if you switch it off, it will return to 2D mode when turned back on again. ❏❏ In USB mode, there are various modes of 3D video sources. With USB signals, the 3D switch key only functions when playing a film. The TV will exit 3D mode when the film finished or when you manually exit 3D mode. Adjusting Sound Setting Changing the Sound Setting APress MENU button. BPress34button to select Sound , press OK button to enter. CPressbutton to select the item which require to be adjusted. DPress34button to adjust the selection item. ❏❏ Do not use the 3D glasses if they are cracked or broken. If the TV is currently in 2D mode, APress the 3D switch key on the remote to display the prompt menu. BPress34button. You can then select a corresponding 3D mode. If the TV is currently in 3D mode, APress the 3D switch key on the remote to display the prompt menu. BPress34button to select 3D Mode off/2D>3D setup. Note ❏❏ When you watch a 3D TV programme, please wear 3D glasses. EN-17 LED Backlit Flat TV Instruction Manual EWhen you are satisfied with your choice, press the EXIT button to return to normal viewing or press RETURN button to return to the previous menu. YYSound Mode This sound setting can be adjusted to suit your personal preference . Select Standard/Music/Movie/ News/User according to the program. YYTreble Adjust to increase or decrease higher-pitched sounds. YYBass Adjust to increase or decrease lower-pitched sounds. Basic Receiving and Playing Operations YYBalance Adjust to emphasize left or right speaker balance. Press34button to select Last Viewed /Navigator / Select Source. YYSubWoofer Adjust to increase or decrease subwoofer-pitched sounds. YYSurround The surround sound feature expands the audio listening field wider and deeper to create exceptional sound quality from the TV's speakers. YYDialog Clarity En Pressbutton to select Select Port, press 34to select TV/AV/YPbPr/PC/HDMI1/HDMI2. Press34button to set AVL as On or Off.( When YYReset Surround is set on, it's will appearance.) YYBass Boost Press34button to set the SPDIF as On or Off.( When Surround is set on, it's will appearance.) Press34button to select OK or Cancel to Reset Factory Set. YYDNLP Press34button to select On/Off to auto regulation contrast or brightness. Setting Functions YYOPC Press34button to select On/Off to set OPC. APress MENU button. BPress34 button to select Setting, press OK button to enter. CPressbutton to select the item which require to be adjusted. DPress34button to adjust the selected item. EWhen you are satisfied with your choice, press the EXIT button to return to normal viewing or press RETURN button to return to the previous menu. Cloud Functions Cloud Functions APress button to enter Cloud interface. BPress34button to select the icon which you required. Press OK to enter. CWhen you are satisfied with your choice,press RETURN button to return to the previous menu. YYMenu Time Press34button to select the number of minutes: To select 5s,10s, 15s, 30s, 60s. YYStartup Select Pressbutton to select the Startup Select, DPress MENU button in this interface of Cloud stair menu, the OSD will display Wallpaper, Manage apps and System settings. You can pressbutton and press OK button to select it. LED Backlit Flat TV Instruction Manual EN-18 Basic Receiving and Playing Operations EIf you want to Exit Cloud functions, press Exit button. All Apps APress button to enter Cloud interface. BPress34button to select ALL Apps. Press OK to enter. CPress34button to select the item which require to be adjusted. •• Photo: *. jpg, png etc. •• Music: *. Mp3(8-320kbps; WMA(32-192kbps); AAC(16-576kbps) etc. •• Movie: MPEG4: *. avi files in accordance with Div*4. x/5. x Protocol; MPEG2: some *. mpeg files; MPEG1: *. dat and some *. mpeg files; RealVideo ect. •• Text: *. Txt. DWhen you are satisfied with your choice,press The ALL Apps contions all functions of Cloud, you can enter this submenu for example Settings by ALL Apps. DWhen you are satisfied with your choice,press RETURN button to return to the previous menu. Local FileBrowser APress button to enter Cloud interface. BPress34button to select Local FileBrowser. Press OK to enter. CPressbutton to select the USB STORAGESANDISK. Press the corresponding key on the remote control to call out the prompt menu. (See Picture below). EN-19 LED Backlit Flat TV Instruction Manual RETURN button to return to the previous menu. Browser APress button to enter Cloud interface. BPress34button to select the icon which you required. Press OK to enter. CPress the corresponding key on the remote control to call out the prompt menu. (See Picture below). DWhen you are satisfied with your choice,press RETURN button to return to the previous menu. Basic Receiving and Playing Operations Settings 5IF.PEFN1PSUPOUIF8BMM APress button to enter Cloud interface. BPress 34button to select Settings. Press OK &YUFSOBM.PEFN "%4-7%4-$BCMF .PEFN$BCMFOPUTVQQMJFE to enter. -"/$BCMF OPUTVQQMJFE CPressbutton to select the item which require to #BDLPG57 be adjusted. 3PVUFS LAN -"/$BCMFOPUTVQQMJFE • Depending on how your network is configured, you may be able to attach your TV to your LAN by connecting the LAN port on the back of your TV directly to a network wall outlet using a Cat 5 cable. See the diagram below. Note that the wall outlet is attached to a modem or router elsewhere in your house. 5IF.PEFN1PSUPOUIF8BMM Connecting to a Wired Network #BDLPG57 LAN APress button to select Ethernet, press OK to enter. -"/$BCMFOPUTVQQMJFE BPress 56 button to select DHCP item, then press Save button, it will automatically finished. You can set up your TV to access the Internet through your local area network (LAN) using a wired or wireless connection. Connecting to a Wired Network. You can attach your TV to your LAN using a cable (cable not included) in three ways: • You can attach your TV to your LAN by connecting the LAN port on the back of your TV to an external modem using a Cat 5 cable. See the diagram below: 5IF.PEFN1PSUPOUIF8BMM &YUFSOBM.PEFN "%4-7%4-$BCMF57 LAN If the IP address allocation by the DHCP server has failed, turn the external modem off, turn it on again after at least 10 seconds and then try again. For the connections between the external modem and the router, refer to the owner’s manual of the corresponding product. You can connect the TV to the LAN directly without connecting it through a router. You cannot use a manual-connection-type ADSL modem because it does not support DHCP. You have to use an automatic connection-type ADSL modem. .PEFN$BCMFOPUTVQQMJFE #BDLPG57 Note The terminals (the position of the port and the type) of the external device may be different depending on the manufacturer. -"/$BCMF OPUTVQQMJFE Connecting to a Wireless Network • You can attach your TV to your LAN by connecting the LAN port on the back of your TV to a router. which is connected to an external modem. Use a Cat 5 cable for the connection. See the diagram below: APress button to select WI-Fi, press OK to enter, To see available networks, turn Wi-Fi On. BPress 56 button to select Wireless Setting item,press OK button to enter. CPress 56 button to select the network you need LED Backlit Flat TV Instruction Manual EN-20 En Basic Receiving and Playing Operations and press OK button to enter. DPress 56 button to select the Network security key and press OK button to enter . EEnter the password if necessary. Select OK to confirm. Press button to select Storage or Apps. When select Storage, Press OK to enter, It's will display informations of USB. When you select Apps, press OK to enter and press 4button, then pressbutton to select the item which you required. YYPERSONAL Press button to select Security/ Language&input / Backup&reset. Press OK and press4 to enter. Pressbutton to select the item which require to be adjusted. To connect your TV to your wireless network, you need a wireless router or modem. YYSYSTEM 8JSFMFTT 3PVUFS Press button to select Date & Time/ About Device. Press OK and press4to enter. Pressbutton to select the item which require to be adjusted. 5IF-"/1PSUPOUIF8BMM -"/$BCMF Note ❏❏ To use a wireless network, your TV must be connected to a wireless router. If the wireless router supports DHCP, your TV can use a DHCP or static IP address to connect to the wireless network. ❏❏ If the wireless router allows you to turn the Ping connection function on/off, turn it on. ❏❏ Select a channel for the wireless router that is not currently being used. If the channel set for the wireless router is currently being used by another device nearby, this will result in interference and communications may fail. ❏❏ This series include build-in Wi-Fi dongle, but Haier reserves the right to make changes without further notice to any products herein to improve reliability, function or design. YYDEVICE EN-21 LED Backlit Flat TV Instruction Manual You Tube APress button to enter Cloud interface. BPress34button to select the icon which you required. Press OK to enter. CPressbutton to select the item which require to be adjusted. DWhen you are satisfied with your choice,press RETURN button to return to the previous menu. Twitter APress button to enter Cloud interface. Maintenance/Troubleshooting BPress34button to select the icon which you Cleaning the Screen required. Press OK to enter. CPressbutton to select the item which require to AHere’s a great way to keep the dust off your screen be adjusted. for a while. Wet a soft cloth in a mixture of lukewarm water and a little fabric softener or dish washing detergent. Wring the cloth until it’s almost dry, and then use it to wipe the screen. DWhen you are satisfied with your choice,press RETURN button to return to the previous menu. BMake sure the excess water is off the screen, and Facebook then let it air-dry before you turn on your TV. APress button to enter Cloud interface. BPress34button to select the icon which you Cleaning the Cabinet required. Press OK to enter. To remove dirt or dust, wipe the cabinet with a soft, dry, lint-free cloth. Please be sure not to use a wet cloth. CPressbutton to select the item which require to be adjusted. DWhen you are satisfied with your choice,press Extended Absence RETURN button to return to the previous menu. If you expect to leave your TV dormant for a long time (such as a vacation), it’s a good idea to unplug the power cord to protect against possible damage from lightning or power surges. Net FileBrowser Net File Browser is a standard that allows various consumer electronic devices to share connect with each other across a standard home network.This would allow a device such as a Net File Browser compatible television to play music or view videos or photos stored on a desktop computer or other compatible device. Troubleshooting For the sake of time and cost, it is strongly recommended that you checkout the problem by yourself according to the instructions listed hereunder before contacting the after-sales service for technical assistance. button to enter Cloud interface. APress BPress 34button to select APPS, Press OK button to enter. Problem CPress 34button to select Net File Browser, then press OK button to play it. No picture, no sound Maintenance Problem Possible remedies Turn on the power supply; Properly plug theTV setto the powersocket; Check to see if the power cable of other appliance is plugged in the TV set. Make sure that the power cable of the TV set is properly connected. Possible remedies Maintenance Good picture, no sound Depress the volume button; Check out the audio frequency input signals. Early malfunctions can be prevented. Careful and regular cleaning can extend the amount of time you will have your new TV. Be sure to turn the power off and unplug the power cord before you begin any cleaning. Failure of remote controller Check to see if the remote controller display receiving window are blocked by other objects and if batteries are properly loaded. LED Backlit Flat TV Instruction Manual EN-22 En Specification/Format No color, weak color or poor picture Designate the item of color from the Picture menu and depress the volume button; Keep the display and VCR separate a reasonable space; Activate some functions to store picture brightness; Make sure that the display and signal source are available and turned on. Excessive brightness or darkness Adjust brightness or contrast. Picture too big or small Adjust the setup of sizes. One speaker failure Balance the sound in the menu. Slight sound from display It is a normal phenomenon. Color System PAL, NTSC, SECAM, AUTO Video Input USB,AV, Component, HDMI or PC, Operating temperature range: +5°C - +35°C Operating humidity range: 20%-80% Storage Temperature: -15°C~+45°C Storage Humidity: 5%-90%, non-condensing Environmental condition If the storage temperature is lower than 0 °C, please first lays the machine aside after in the operating temperature environment carries on restores 2 hours, then electrifies the use again, protects your television not to receive the damage. Product main size (contain stand) Note ❏❏ Do not leave the television with static picture in an extended period as it may result in residual image on your television screen. Note ❏❏ Production of the screen requires high and precision technologies. However, there might be some dark or bright (red, blue or green) spots, or some anomalistic stripes or spots. This is not defect. If the TV set is used in an area 2,400 meters above the sea level where the air pressure is below 750hpa, the picture on the screen maybe affected and a muffled sound might be produced. These phenomena might happen in the area 1,500 meters above the sea level. This is resulted from difference between air pressures inside and outside the display. This is not a defect covered by the limited warranty. Specification Basic specification and parameter Power 100-240V~ 50/60Hz EN-23 LED Backlit Flat TV Instruction Manual MODEL Power Consumption Net Size(LxWxH) Net Weight LE42H5000 120W 961x222x613mm 15.5Kg LE47H5000 130W 1070x222x676mm 18.5Kg LE55H5000 160W 1243x280x773mm 27Kg Note ❏❏ Design and specifications are subject to change without notice. The dimension in this manual is a approximation. Format Recommendatory HDTV/ SDTV(YPbPr/YCbCr)format Sequence Number Format Refresh Frequency (Hz) 1 480i/480p 60 2 576i/576p 50 Format 3 720p 50/60 4 1080i/1080p 50/60 Recommendation PC connection input format En sequence number Format H-Frequency (KHz) V-Frequency (Hz) 1 640*480@60Hz 31.5 60 2 800*600@60Hz 37.88 60 3 1024*768@60Hz (Recommendatory) 48.36 60 Recommendation DVI connection input format Sequence Number Resolution Refresh Frequency (Hz) 1 640*480 60 2 800*600 60 3 1024*768 60 Recommendation HDMI connection input format Sequence Number Format Refresh Frequency (Hz) 1 480i/480p 60 2 576i/576p 50 3 720p 50/60 4 1080i/1080p 50/60 LED Backlit Flat TV Instruction Manual EN-24