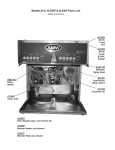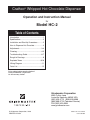
1
Crathco® Whipped Hot Chocolate Dispenser
Operation and Instruction Manual
for
Model HC-2
Table of Contents
Introduction ..................................................1
Specifications................................................2
Installation and Start-Up Procedures............2
How to Dispense Hot Chocolate ..................3
Adjustments ..............................................3-4
Cleaning ....................................................4-5
Troubleshooting Guide ..............................6-7
Rough-In Drawings ......................................8
Exploded Views ......................................9-10
Wiring Diagram ..........................................11
Parts List ....................................................12
Prior authorization must be obtained
from Grindmaster Corporation
for all warranty claims.
Grindmaster Corporation
4003 Collins Lane
Louisville, Kentucky 40245 USA
(502) 425-4776 (800) 695-4500
(800) 568-5715 (Technical Service)
FAX (502) 425-4664
www.grindmaster.com
© Grindmaster Corporation, 1996
PRINTED IN USA
0804 Form # CC-316-03
Part # 090-099
Introduction
We are pleased you have chosen Crathco’s Whipped Hot Chocolate Dispenser for your hot chocolate service. You
have chosen the finest engineered, most functionally sound and easy to operate piece of equipment available. The
HC-2 is a manual push and hold dispense machine, producing 1 ounce of chocolate per second into any cup size. It
will accommodate bag-in-boxes, cans or hoppers of chocolate syrup.
Inside the carton you should find:
1) HC-2 Whipped Hot Chocolate Machine
2) Plastic chocolate hopper (optional)
3) Drip tray
4) Operation and Instruction Manual
The HC-2 Whipped Hot Chocolate Dispenser is supplied complete with a 6 foot, 120V A.C. 3 wire cord and NEMA
5-20 plug. Plugging the unit into a NEMA 5-20R outlet (20 AMP receptacle) is the only electrical service required.
Plumbing service requires a high temperature food grade water supply line. The water supply line is connected to a
1/4” male flare fitting in the rear of the unit. Installation should comply with the National Plumbing Code.
HC-2 Hot Chocolate Dispenser Specifications
Model HC-2
Finished Product Size
Variable due to manual push and hold button
Dispenser Rate
1 ounce per second
Drink Strength Ratio
Variable between 4:1 and 6:1 - factory set at 5:1
Hot Chocolate Dispenser Temperature 180 degrees F + 5 degrees F
Production Capacity
120 degrees F water in
(230) 5 oz. cups/hour
50 degrees F water in
(115) 5 oz. cups/hour
Power Requirement
1800 watts, 15 Amps
Electrical Service
120 Volt a.c., 20 Amp. NEMA 5-20 outlet
Plumbing Service
0.75 GPM minimum, 30-75 PSI water supply line to
1/4” male flare fitting
Water Compartment
2 3/4 gallons
Initial Fill Time
Approximately 5 minutes
Dispenser Spout Clearance
6”
Overall Height
27”
Body Width
10 1/2”
Body Depth
17 1/2”
Product Compartment
10” H x 9” W x 10” D
Page 1
Crathco® Whipped Hot Chocolate Dispensers
Installation and Start-Up Procedures
1.
Remove all packing material around the chocolate dispenser.
2.
Place the hot chocolate dispenser upright on a leveled table at location intended for operation.
3.
Place the drip tray on the front of the dispenser; using the 2 locating tabs on the sides of the tray.
Water Inlet Connection:
1.
An experienced plumber or equipment installer should connect the dispenser to a properly sized water line.
Water supply should be 0.75 GPM minimum, 30-75 PSI.
2.
Installation should comply with the National Plumbing Code.
3.
The water supply line connects to the male flare found on the rear of the unit, using a 1/4” female flare nut.
4.
Copper or brass tubing or stainless steel braided teflon lined or similar high temperature food grade hose should
be used for the water line. Include extra length of water supply line to allow room to move the unit for cleaning.
5.
Hot or cold water hookup can be used. Hot water will increase the production of the dispenser.
6.
Be sure to flush the supply line before making the connection to dispenser.
7.
A shut-off valve and union should be in the supply line near the dispenser.
Caution: Do not use low temperature plastic tubing for water supply line.
Start-Up Procedures:
1.
Plug the hot chocolate dispenser into a 120V 20 AMP, NEMA 15-20 outlet. A 6 foot, 3 wire cord with NEMA 5-20
plug is required.
2.
Fill the hot chocolate dispenser with water. With power and water supplies to the dispenser turned “On”, the
dispenser will automatically fill with water. The water tank holds 2 3/4 gallons. It takes approximately 5 minutes
to initially fill the water tank because of the auto refill system employed with this dispenser. When the water tank
is full of water, filling will stop and the water level will be maintained at this point.
3.
The water in the tank will automatically heat up to dispensing temperature. A 30-40 minute initial heat-up time is
required when the dispenser is connected to 50 degree F water. If a hot water hookup is used, heat-up time will
be shorter.
How to Dispense a Cup of Hot Chocolate
1.
Make sure the dispenser is filled with water and up to temperature.
2.
Load a hot chocolate bag-in-box or fill hopper with chocolate syrup.
Crathco® Whipped Hot Chocolate Dispensers
Page 2
How to Dispense a Cup of Hot Chocolate (cont.)
1
Bag-in-Box Loading Instructions
2
a. Lift the tab located on top of the box.
3
b. Pull out the tube assembly with the retainer ring.
FIGURE A
c. Secure the retainer ring on the leading edge of the cutout.
(Refer to Figure A)
d. Insert the product box on the product shelf with the top side down
and with the hose assembly toward the front.
4
e. Remove the stopper cap from the box tube assembly.
(Refer to Figure B)
5
FIGURE B
f. Connect the box tube assembly over the pump inlet tube.
g. Remove the pinch clamp from the box tube assembly.
(Refer to Figure C)
6
7
h. You are now ready to draw product.
3.
Push and hold the dispense switch.
FIGURE C
NOTE: It takes a few seconds to engage the hot chocolate pump rollers and
to move the hot chocolate through the pump to the mixer assembly.
(Refer to Figure D)
4.
PUSH BUTTON
SYRUP SWITCH
PUSH BUTTON
WATER SWITCH
The dispenser is now ready for operation.
DISPENSE SWITCH
PRESS & HOLD TO
DISPENSE CHOCOLATE
Adjustments
Mix Ratio Adjustment:
Front Elevation
FIGURE D
The drink strength is adjustable from 4 parts water to 1 part chocolate to
6 parts water to 1 part chocolate. The dispenser is factory set at
5 parts water to 1 part chocolate.
MORE WATER
WEAKER CHOCOLATE
LESS WATER
STRONGER CHOCOLATE
SLOT
1.
Remove the hole plug.
2.
Insert a screwdriver in the slot and turn
clockwise for less water/stronger
chocolate or counter clockwise for
more water/weaker chocolate.
(Refer to Figure E)
FIGURE E
Page 3
Crathco® Whipped Hot Chocolate Dispensers
Thermostat Adjustment:
!
WARNING: Adjustments are to be done only by a qualified service technician.
Water temperature setting is made in the top control section where electrically live parts
are present. Your product supplier can be helpful in providing this expertise and making
sure the correct dispense temperature is obtained.
Access to temperature adjustment is from the top.
CALIBRATION SET SCREW
CW=LOWER TEMPERATURE
CCW=HIGHER TEMPERATURE
To remove the top cover, remove the 2 screws and lift the
cover off. Water temperature is factory set
at 180 degrees F + 5 degrees F.
Insert a screwdriver in the slot and turn clockwise to obtain
a lower temperature and counterclockwise for a higher
temperature (Refer to Figure F).
SLEEVE (FULL CW=ON)
THERMOSTAT LABEL
THERMOSTAT BRACKET
TOP VIEW
TOP COVER REMOVED
FIGURE F
Cleaning
Daily Cleaning
Mixing Chamber:
1.
The stainless steel cabinet is kept clean with a damp cloth or a stainless steel cleaner.
2.
Push the whipper rinse switch to flush until the water leaving the dispense spout is clear.
Weekly Cleaning
Mixer:
(Refer to Figure G)
1.
Disconnect the hoses to the mixer.
2.
Lift off the cover.
3.
Lift off the funnel cover.
4.
Turn the whipping chamber clockwise and pull it off.
5.
Pull off the whipping blade. Leave the backing washer on the metal shaft.
6.
Wash all parts in mild soap. Rinse well and reassemble.
Product Switch
Cover
Water Switch
Mixing
Chamber
Syrup
Inlet Tube
Pump
Inlet
Tube
Water
inlet
Tube
Whipping
Chamber
Dispenser Switch
Crathco® Whipped Hot Chocolate Dispensers
Page 4
Cleaning (cont.)
Weekly Cleaning
Syrup System:
1.
Close the clamp on the product box tube and disconnect from the pump inlet.
2.
Connect the cleaning tube to the pump inlet and drop the open end of the tube into a basin of hot, soapy water.
3.
Push the pump rinse switch until clear water leaves the spout.
4.
Repeat steps 3 with hot, clean water until there is no trace of soap.
5.
Remove the cleaning tube and reconnect the pump inlet to the box tube. Open the clamp on the box tube.
NOTE: DO NOT UNDER ANY CIRCUMSTANCES USE CHLORINE BASE BLEACH OR CLEANING COMPOUNDS.
Page 5
Crathco® Whipped Hot Chocolate Dispensers
Troubleshooting Guide
The following procedures must be performed by a qualified service technician.
Problem/Possible Cause
Consistent filling of water tank
• Leaking fill solenoid valve
Service Check
• Electrode lined up or faulty
• Removing power to machine does not
stop tank fill
• Jumper from C to high on probe side of
board shuts fill off
• Faulty white common
connection to ground
• Liquid level control faulty
• Jumper from COM on probe side of
board to ground stops fill
• Jumper from High to COM on probe
side of liquid level does not shut fill Off
Water not heating up
• Thermostat Off
• Thermostat faulty
• Power relay faulty
• Heating element faulty
Nothing dispensed - water or
chocolate - No whipper action
• Dispense switch faulty
No water dispensed or whipper
action - Only chocolate is dispensed
• Water switch faulty
No water dispensed - Whipper
works and chocolate is dispensed
• Tank refill problem
• Kinked silicone tubing
• Dispense valve faulty
No whipper action - only water
and chocolate are dispensed
• Whipper motor faulty
No chocolate dispensed - Whipper
works and some water is
dispensed
• No syrup to pump
• Kinked pump tubing
• Syrup pump faulty
Constant dispense - chocolate,
water and whipper action
• Dispense switch faulty
Constant water dispense or drip
• Dispense valve faulty
Remedy
• Clean-replace fill valve
• Clean electrode rods. Check
rods & wiring; replace if
necessary
• Tighten, clean, replace COM
connection to ground
• Replace liquid level control
• Visual
• Thermostat contacts do not close with
sleeve clockwise and inner screw
counter clockwise
• No voltage to heating element - 120V.
across coil of relay does not pull in
• Turn thermostat sleeve clockwise
• Replace thermostat
• 120V across heating element but no
heat-element reads open with ohmeter
• Replace heating element
• Switch reads open with ohmeter when
switch is pushed
• Replace switch
• Switch reads open with ohmeter when
switch is in On position
• Replace switch
• Check auto refill system
• Check tubing run to mixer assembly
• 120V across input terminals on valveno actuation
• Clean-replace components
• Reroute tubing-unkink
• Replace coil or entire valve
• 120V across motor leads but motor
does not run
• Replace whipper motor
• Check syrup container
• Check tubing runs
• 120V across pump motor leads, pump
does not run; check for jammed rollers
• Replenish syrup supply
• Unkink, reroute, replace
• Replace syrup pump-Unjam
rollers
• Switch reads closed with ohmeter with
switch in the Off position
• Replace switch
• Dispense or drip continues with
power Off
• Clean, rebuild; replace
dispense valve
Crathco® Whipped Hot Chocolate Dispensers
• Replace power relay
Page 6
Troubleshooting Guide (cont.)
Problem/Possible Cause
Chocolate is dispensed or
constantly dripping
• Syrup pump rollers not
engaging silicone tubing
• Pump tubing faulty
Service Check
Remedy
• Check for syrup pump rollers in “storage’ • Rotate pump to engage rollers
position or weak springs
or replace pump
• Check for holes in tubing or loose
• Replace pump tubing-check
connections to break vacuum
connections
If you still need help, call our Technical Service Department at (800) 568-5715 (USA or Canada) or 1-502-425-4776,
Monday through Friday, 8 am - 6 pm EST, or an authorized service center in your area. Please have the model and
serial numbers ready so that accurate information can be given.
Prior authorization must be obtained from Grindmaster Corporation’s Technical Services Department for all warranty
claims.
Page 7
Crathco® Whipped Hot Chocolate Dispensers
Rough-In Drawings
17 1/2”
10 1/2”
7 13/16”
1 3/16”
14”
3 3/4”
Product Shelf
Drink Strength
17
Adjustment
(Behind Hole Plug)
Water Inlet
1/4” SAE Male
Flare Fitting
/16”
11
6 FT. 120 Vac
Cord With NEMA
5-20 Plug
Syrup
Connection
27”
Product/Rinse
Push Button Switches
Water Tank
Drain Plug
6”
5”
FRONT
5”
SIDE
REAR
Door removed for clarity
UTILITIES
Water Connection
1.) Hot or Cold Supply
2.) .75 GPM Minimum Flow At Unit
30 to 70 PSIG
Electric
1.) 120 AC, 20 Amp Service Required
2.) 1800 Watt Tank Heater, 15 Amp
Total Load, Approx.
Drawing # A090-757
Crathco® Whipped Hot Chocolate Dispensers
Page 8
Exploded View Whipper Assembly
FRONT CONTROL PANEL
PART
ITEM
QTY
NUMBER NUMBER
1
DESCRIPTION
A533-023
1
Whipper Motor
2
601051
2
#8-32 Acorn Nut
3
A539-115
2
#6-32 x 1/4” Truss Head Screw
4
A548-066
1
Washer, Slinger
5
A548-063
1
Base, Self-Locating Whipper
6
A551-058
1
Bearing, 1/4 ID x 5/16 OD x 3/16
7
A544-034
1
Seal, 0.250 x 0.616 x 3/16
8
A544-033
1
O-Ring, 0.250 x 0.070
9
A548-065
1
Blade, 4 Blade Whipper w/Stop
10
A548-067
1
Whipper Cover
11
A548-078
1
Whipper Funnel
12
A548-062
1
Chamber, GM Whipper
13
A548-064
1
Restrictor, Angle Outlet
14
603008
2
#6 Spring Lock Washer
Drawing # A720-036 Rev. B
Page 9
Crathco® Whipped Hot Chocolate Dispensers
Exploded View Pump
A548-111
A548-112
A314-553 (MFG BY A.M.W.)
CLEAR TYGON TUBING P/N: A585-250
(SUPPLIED WITH PUMP)
Drawing # A0903-028 Rev. Rel
Crathco® Whipped Hot Chocolate Dispensers
Page 10
Wiring Diagram 120V With Portion Control (Option 5)
Black
Red
White
Black
Drawing # 091-329
Page 11
Crathco® Whipped Hot Chocolate Dispensers
HC-2 Parts List
PART NO.
DESCRIPTION
515067
549-006
712-046
712-018
515027
535-058
537-025
537-009
537-033
537-022
720-024
550-089
537-109
531-009
537-016
537-030
515001
531-029
533-040
548-111
548-112
533-023
548-066
548-063
551-058
544-034
544-033
548-065
548-067
548-078
548-062
548-064
720-036
585-250
585-048
585-049
585-045
585-039
585-047
511005
515074 Power Cord
Liquid Level Control
Thermostat
Electrode Assembly
Power Relay 25/30 Amp 115V Coil
Heater
Water Fill Valve
Fill Valve Repair Kit
Coil for Fill Valve
0.5GPM Flow Disc for Fill Valve
Heater Tank Fill Tube-Outlet from Fill Valve
Wiring Harness
Dispense Valve
Dispense Relay Manual
Repair Kit for GS56 Dispenser Valve
Adjustable Gate for Dispenser Valve
Product -- Rinse Button
Dispense Switch
Hot Chocolate Pump
Hose Barb Plastic 0.250” x 0.250” Fitting
Hose Barb Plastic 0.250” x 0.312” Fitting
Whipper Motor
Slinger Washer
Self-Locating Whipper Base
1/4” ID 5/16” OD x 3/16” Bearing
0.250” x 0.616” x 0.188” Seal
0.250” x 0.070” O-Ring
4 Blade Whipper W/Stop
Whipper Cover
Whipper Funnel
GM Whipper Chamber
Angle Outlet Restrictor
Whipper Assembly
Clear Tygon Tubing (12-1/2”)
Syrup Dispense Tubing (15”)
Water Outlet Tube (3-1/2”)
Water Dispense Tube (6”)
Overflow Tube (1/2” OD x 24”)
Cleaning Tube (1/2” OD x 12”)
1-1/8” cp. Hole Plug for Dispense Valve
Optional:
530-021
531-033
K2K-30-661 Portion control Timer NCC
HC Red Stop Switch Button
Crathco® Whipped Hot Chocolate Dispensers
Page 12