1
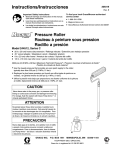
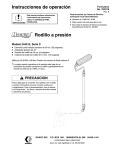
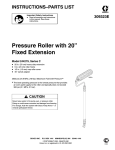
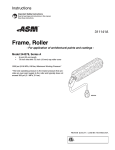
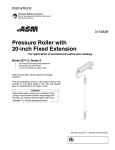
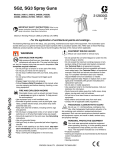
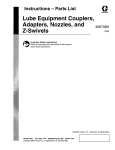
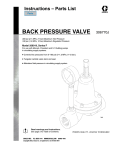
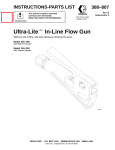
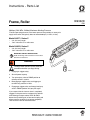
Instructions - Parts List
309322D
Frame, Roller
ENG
3600 psi (24.8 MPa, 248 bar) Maximum Working Pressure
*The best operating pressure is the lowest pressure that provides an even paint
supply to the roller and typically does not exceed 300 psi (2.1 MPa, 21 bar).
Model 244271, Series C
•
•
9 in. (22.9 cm) length
7/8 in. inlet with 1/2 in. roller cover
Model 244623, Series C
•
•
9 in. (22.9 cm) length
1/8 in. inlet with 1/2 in. roller cover
IMPORTANT SAFETY INSTRUCTIONS.
Read all warnings and instructions in this manual.
Save these instructions.
WARNING
To help prevent injection injuries, follow this
procedure whenever you stop painting.
ti1538a
1. Engage gun trigger safety.
2. Shut off power to pump.
3. Turn prime/spray valve to PRIME position to
relieve pressure in system.
4. Disengage gun trigger safety and trigger gun
to relieve any pressure in hose.
5. Engage gun trigger safety and keep prime/spray
valve in PRIME position until you paint again.
If you suspect that the frame or hose is completely
clogged or that pressure has not been fully relieved
after following the steps above, VERY SLOWLY
loosen the tip retaining nut or hose end coupling and
relieve pressure gradually, then loosen completely.
Then clear the frame or hose obstruction.
WARNING
EQUIPMENT MISUSE HAZARD
Misuse can cause death or serious injury.
• Do not operate the extension tube or roller frame or use
parts not designed for this equipment.
• Do not use 1,1,1-trichloroethane, methylene chloride,
other halogenated hydrocarbon solvents or fluids containing such solvents in pressurized aluminum equipment.
Such use can cause serious chemical reaction and equipment rupture, and result in death, serious injury, and property damage.
FIRE AND EXPLOSION HAZARD
Improper grounding, flammable fumes, such as solvent and paint fumes, in work area can ignite or
explode. To help prevent fire and explosion:
• Provide fresh air ventilation to avoid the buildup of flammable fumes from flushing fluids or the coating being
applied.
• Keep the application area free of debris, including solvent,
rags, and gasoline.
WARNING
Refer to your sprayer and spray gun manuals for appropriate
warnings and instructions for safe operation of this roller
frame.
Gasket (12) must be in place before installing frame (1). If
gasket is not in place, there is a potential injection hazard
which could result in serious injury.
1.
Follow Pressure Relief Procedure on page 1.
2.
Prime pump.
3.
Install roller frame.
Cleaning
This is the procedure for flushing the pressure roller. The
pump and gun you are using may have additional flushing
steps, such as cleaning filters and screens. See the pump and
gun flushing instructions.
NOTE: Leave the pressure roller attached to the gun for this
procedure.
SKIN INJECTION HAZARD
High-pressure fluid from hose leaks, or ruptured components will pierce skin. This may look like just a cut,
but it is a serious injury that can result in amputation. Get
immediate surgical treatment.
• Keep your hands and body away from the roller frame
when flushing. High pressure fluid emitted from the holes
in the frame could cause an injection injury.
• Always relieve pressure before you check or repair leaks
and when you turn off the pump or stop painting.
• Never use components rated less than system Maximum
Working Pressure.
See Pressure Relief Procedure
on page 1.
1.
Relieve the pressure.
2.
Remove roller cover and diffuser (3) from roller frame (1)
as follows (see Parts Drawing).
PERSONAL PROTECTIVE EQUIPMENT
Failure to observe the electrical hazards described
below could result in serious injury, including burns or
electrocution. To help prevent harmful electrical shock:
• Avoid contact with power lines.
• Follow all grounding instructions in your separate pump
and gun instruction manual, and comply with all local,
state, and national fire, electrical, and safety regulations.
• Use only Graco paint hoses.
2
a.
Use your thumb to press down on clip (5) to release
end caps (2 and 4), diffuser (3), and roller cover into a
pail.
b.
Remove roller cover from diffuser (3).
c.
Pull end caps (2 and 4) off diffuser (3).
3.
Clean roller cover, caps (2 and 4) and diffuser (3) with
water or a compatible fluid for oil-based materials.
4.
Place roller frame (1) in paint pail. Be sure the holes in
roller frame (1) are facing inside the paint pail.
5.
Prim pump with water or flushing fluid for oil-based materials. Use the lowest pump priming pressure setting.
6.
Turn prime/spray valve to SPRAY.
NOTE: Perform step 7 at the lowest pressure possible.
7.
Trigger gun until flushing fluid begins to dilute the paint.
8.
Place roller frame (1) in another bucket and continue
flushing until fluid coming out of the roller frame (1) is
clear.
9.
Shut off the pump. Turn prime/spray valve to PRIME.
309322D
Parts
Parts
3
2
1
5
13
4
12
14
10
15
16
Ref.
1
2
3
4
Part
5
10
12
13
14
15
16
197106
111612
115524
198804
197117
115524
197118
245999
15B065
246277
Description
FRAME, roller
CAP, end
DIFFUSER, roller
CAP, end (includes seal, retainer and
o-ring)
CLIP, roller
ADAPTER, tube (Model 244623 only)
GASKET (Model 244623 only)
LABEL, instruction
NUT, retaining (Model 244271 only)
GASKET (Model 244271 only)
FITTING, swivel (Model 244271 only)
Qty.
1
1
2
1
1
1
1
1
1
1
1
Wetted Parts: FKM, nylon, plated steel, POM,
polyethylene, stainless steel
Roller Covers:
107589
107590
107591
107592
309322D
9 in. x 3/8 in.
9 in. x 1/2 in.
9 in. x 3/4 in.
9 in. x 1-1/4 in.
3
All written and visual data contained in this document reflects the latest product information available at the time of publication.
Graco reserves the right to make changes at any time without notice.
Original instructions. This manual contains English. MM 309322
Graco Headquarters: Minneapolis
International Offices: Belgium, China, Japan, Korea
GRACO INC. P.O. BOX 1441 MINNEAPOLIS, MN 55440-1441
Copyright 2010, Graco Inc. is registered to ISO 9001
www.graco.com
Revised 2010