1
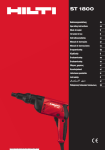
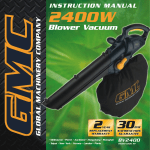
INSTRUCTION MANUAL
1800W
Blower Vacuum
• Melbourne • Perth • Auckland • Hong Kong • Shanghai
• Taipei • New York • Verona • London • Paris
ST1800
050903 PR ED01
Contents
Introduction
Environmental protection
Description of symbols
Specifications
Safety instructions
Additional safety rules for blower vacs
Know your product
Unpacking
Preparation of the blower vac prior to use
Fitting the blow/vac tube to the housing
Removing the blow/vac tube
To fit the collection bag
Fitting the auxiliary handle
Shoulder strap
Fitting the chute wheel assembly
Operation of the blower vac
Extension cord support
To select the blow operation
To select the vacuum operation
Important notes when using the
blower/vacuum selector lever
To empty the collection bag
Tips for using your blower vac
Maintenance and storage information
Replacement of the electrical supply cord
Full 2 Years Home Use Warranty
3
3
3
3
3
5
7
8
8
8
8
8
8
9
9
9
10
10
10
Whilst every effort is made to ensure your complete
satisfaction with this tool, occasionally, due to the mass
manufacturing techniques, a tool may not live up to our
required level of performance and you may need the
assistance of our service department.
This product is warranted for a 2-year period for home
domestic use from the date of the original purchase. If
found to be defective in materials or workmanship, the
tool or the offending faulty component will be replaced
free of charge with another of the same item. A small
freight charge may apply.
The warranty replacement unit is only made available by
returning the tool to the place of purchase with a
confirmed register receipt. Proof of purchase is essential.
We reserve the right to reject any claim where the
purchase cannot be verified.
This warranty does not include damage or defects to the
tool caused by or resulting from abuse, accidents,
alterations or commercial or business use.
It also does not cover any bonus accessories unless the
tool is a GMC Platinum Professional model.
Please ensure that you store your receipt in a safe place.
Conditions apply to the above warranty.
If you need direction of what constitutes a free of
charge warranty claim, please review the guide given on
the rear of the Receipt Holder. An indication is given as
to the types of claim that are permissible, and those
that are not.
11
11
11
11
11
2
Description of symbols
Dear Customer
The rating plate on your tool may show symbols. These
represent important information about the product or
instructions on its use.
If you require any help with your product, whether it
is a Warranty claim, spare part or user information,
please phone our Help Line for an immediate response.
Phone 1300 880 001 in Australia or 0800 445 721 in
New Zealand.
Wear hearing protection. Wear eye protection.
Wear breathing protection.
Introduction
Double insulated for
additional protection.
Your new GMC power tool will more than satisfy your
expectations. It has been manufactured under stringent
GMC Quality Standards to meet superior performance
criteria.
You will find your new tool easy and safe to operate,
and, with proper care, it will give you many years of
dependable service.
Caution. Carefully read through this entire Instruction
Manual before using your new GMC Power Tool. Take
special care to heed the Cautions and Warnings.
Your GMC power tool has many features that will make
your job faster and easier. Safety, performance, and
dependability have been given top priority in the
development of this tool, making it easy to maintain
and operate.
Conforms to relevant standards for
electromagnetic compatibility.
Specifications
Voltage:
Input power:
Speed:
Maximum Air Speed:
Collection Bag Capacity:
Mulching Ratio:
Insulation:
Weight
Environmental protection
230–240 Vac ~ 50Hz
1800W
15000 RPM
240 km/h
35 Litre
10:1
Double insulated
5kg
Safety instructions
Recycle unwanted materials instead of
disposing of them as waste. All tools, hoses
and packaging should be sorted, taken to
the local recycling centre and disposed of
in an environmentally safe way.
The tool must be used only for its prescribed purpose.
Any use other than those mentioned in this Manual will
be considered a case of misuse. The user and not the
manufacturer shall be liable for any damage or injury
resulting from such cases of misuse.
To use this tool properly, you must observe the safety
regulations, the assembly instructions and the operating
instructions to be found in this Manual. All persons who
use and service the machine have to be acquainted with
this Manual and must be informed about its potential
hazards. Children and infirm people must not use this
tool. Children should be supervised at all times if they
are in the area in which the tool is being used. It is
3
also imperative that you observe the accident prevention
regulations in force in your area. The same applies for
general rules of occupational health and safety.
The manufacturer shall not be liable for any changes
made to the tool nor for any damage resulting from such
changes.
Warning. When using power tools, basic safety
precautions should always be taken to reduce the risk of
fire, electric shock and personal injury. Also, please read
and heed the advice given in the additional important
safety instructions.
1. Keep the work area clean and tidy. Cluttered work
areas and benches invite accidents and injury.
2. Consider the environment in which you are working.
Do not use power tools in damp or wet locations.
Keep the work area well lit. Do not expose power tools
to rain. Do not use power tools in the presence of
flammable liquids or gases.
3. Keep visitors away from the work area. All visitors
and onlookers, especially children and infirm persons,
should be kept well away from where you are working.
Do not let others in the vicinity make contact with the
tool or extension cord.
4. Store tools safely. When not in use, tools should be
locked up out of reach.
5. Do not force the tool. The tool will do the job
better and safer working at the rate for which it was
designed.
6. Use the correct tool for the job. Do not force small
tools or attachments to do the job best handled by a
heavier duty tool. Never use a tool for a purpose for
which it was not intended.
7. Dress correctly. Do not wear loose clothing or
jewellery. They can be caught in moving parts. Rubber
gloves and non-slip footwear are recommended when
working outdoors. If you have long hair, wear a
protective hair covering.
8. Use safety accessories. Safety glasses and earmuffs
should always be worn. A face or dust mask is also
required if the operation creates dust.
9. Do not abuse the power cord. Never pull the cord
to disconnect the blower vac from the power point or
extension cable. Keep the cord away from heat, oil and
sharp edges.
10. Do not overreach. Keep your footing secure and
balanced at all times.
11. Look after your tools. Keep tools sharp and clean for
better and safer performance. Follow the instructions
regarding lubrication and accessory changes. Inspect
tool cords periodically and, if damaged, have them
repaired by an authorised service facility. Inspect
extension cords periodically and replace them if
damaged. Keep tool handles dry, clean and free from
oil and grease.
12. Disconnect idle tools. Switch off before servicing,
when changing accessories and when the tool is not
in use.
13. Remove adjusting keys and wrenches. Check to see
that keys and adjusting wrenches are removed from
the tool before switching on.
14. Avoid unintentional starting. Always check that
the switch is in the OFF position before connecting
the 240V power supply. Do not carry a tool with
the mains power connected with your finger on the
switch.
15. Stay alert. Watch what you are doing. Use
common sense. Do not operate a power tool when
you are tired.
16. Check for damaged parts. Before using a tool,
check that there are no damaged parts. If a part is
slightly damaged, carefully determine if it will operate
properly and perform its intended function. Check
for alignment of moving parts, binding of moving
parts, breakage of parts, proper mounting and any
other conditions that may affect the operation of
4
the tool. A part that is damaged should be properly
repaired or replaced by an authorised service facility,
unless otherwise indicated in this instruction manual.
Defective switches must be replaced by an authorised
service facility. Do not use a tool if the switch does
not turn the tool on and off correctly.
17. Guard against electric shock. Prevent body contact
with grounded objects such as water pipes, radiators,
cookers and refrigerator enclosures.
18. Use only approved parts. When servicing, use only
identical replacement parts. Use an authorised service
facility to fit replacement parts.
19. Warning. The use of any accessory or attachment
other than those recommended in this instruction
manual may present a risk of personal injury.
20. Have your tool repaired by a qualified person. This
electric tool is in accordance with the relevant safety
requirements. Repair should only be carried out by
qualified persons using original spare parts, otherwise
this may result in considerable danger to the user.
distance of at least 5m from other people when using
the tool.
• Never direct the blower tube towards bystanders or pets.
Never blow debris in the direction of bystanders or pets.
• Do not handle the plug or the tool with wet hands and
do not use the tool in the rain.
• Ensure that the extension lead is secured in a manner
that prevents it form disconnecting from the plug whilst
in use.
• Keep all the air intakes and the blower tube free of
dust, lint, hair and other material that may cause a
reduction in air flow.
• Keep a balanced and stable stance while using the tool.
• Do not switch on the tool in enclosed or poorly
ventilated spaces or in the presence of inflammable
and/or explosive substances such as liquids, gasses and
powders.
• Only operate the tool during broad daylight or with
adequate artificial light.
• When the tool is not in use, store it in a dry place and
out of reach of children.
• After use, disconnect the tool from the power supply
and check for damage. If you have the slightest doubts,
contact an authorised service centre.
• Only use the tool according to the instructions given in
this manual.
• Check regularly that the screws are tight.
• Use only spare parts and accessories recommended by
the manufacturer.
• Do not try to repair the tool or access internal parts.
Contact authorised service centres only.
• Do not get distracted and always concentrate on what
you are doing. Use common sense. Never operate the
tool when you are tired, sick or under the influence of
alcohol or other drugs.
• Do not operate this appliance with long loose hair or
Additional safety rules for blower vacs
• Always wear adequate protective clothing when
operating the tool to avoid injuries to face, eyes, hands,
feet, head or hearing. Use safety glasses or a face
shield, high boots or sturdy shoes, long trousers, work
gloves, a hard hat and ear defenders.
• Do not start the tool when it is upside down or when it
is not in the operating position.
• Switch the motor off and remove the plug when the
tool is not being used, left unattended, being cleaned,
being moved from one place to another or when the
extension cord is entangled or damaged.
• Use only outdoor rated extension leads that are so
marked. Keep the extension cord away from heat, oil
and sharp edges.
• Do not operate the tool near people, especially children
or pets. Turn it off if they get too close. Maintain a safe
5
loose fitting jewellery. Tie long loose hair back and
remove loose fitting jewellery.
• Do not allow the blower vac to pick up any burning or
smoldering materials like ashes, cigarette butts etc.
• Do not attempt to pick up breakable objects like glass,
plastics, china etc.
• Do not use in vaccum operation without the collection
bag fitted.
• Do not use the blower vac in either the vaccum or the
blow position on gravel surfaces.
6
Know your product
1. On/off switch
2. Blower/vacuum selector lever
3. Rubber grip handle
4. Auxiliary handle
5. Collection bag
6. Cord support
7. Auxiliary handle adjusting knob
8. Tube retaining clip (upper)
9. Tube retaining clip (Lower)
10. Shoulder strap attachment location
11. Chute wheel
12. Housing
13. Shoulder strap (not shown)
14. Blow/vac tube
1
3
6
4
10
7
12
8
2
5
9
14
11
7
Unpacking
To fit the collection bag
Due to modern mass production techniques, it is unlikely
that your power tool is faulty or that a part is missing.
If you find anything wrong, do not operate the tool
until the parts have been replaced or the fault has been
rectified. Failure to do so could result in serious personal
injury.
Prior to fitting the collection bag, the blow/vac tube must
be fitted to the housing.
3
Preparation of the blower vac prior to use
a
The ST1800 blower vac requires some assembly prior to
use for the first time.
This includes the fitting of the blow/vac tube to the
housing, fitting the chute wheel assembly and the fitting
of the collection bag.
This section also covers the fitting and removal of the
shoulder strap, and adjustment of the auxilary handle.
b
2
1
c
1. Attach the strap (1) to the hook underneath the blow/
vac tube (a).
2. Attach the push-on plastic connector (2) to the outlet
tube of the housing (b). Push the fitting of the
collection bag directly onto the outlet until it “clicks”
into position.
3. Connect the last strap (3) onto the hook on the
underside of the blower vac housing (c).
To remove the collection bag,
disconnect the attachments in
the reverse order.
When removing the fitting on
the outlet, first depress the two
buttons as indicated, and then
pull downwards on the fitting.
Finally, remove the strap from
the hook under the blow/vac
tube.
Fitting the blow/vac tube to the housing
1. To fit the blow/vac tube into the housing, first move
the upper and lower retaining clips away from the entry
point of the housing.
2. Fit the tube into the entry of the housing with the
large round tube section upper most in the housing.
3. Push the tube fully into the housing.
4. Move the upper retaining clip down on to the tube, and
push the rubber section over the raised section of the
tube. Repeat the same for the lower retaining clip.
5. The blow/vac tube is now securely in place.
Removing the blow/vac tube
1. Grasp the rubber tab on the upper and lower retaining
clip and pull away from the tube. This releases the
retaining clips.
2. Slide the tube outwards from the housing using a slight
wobble type action.
Note. The blower vac will not operate if the blow/vac
tube is not correctly fitted. This is a safety feature to
prevent accidental contact with the impellor.
Fitting the auxiliary handle
For full control of the blower vac during use the auxiliary
handle should always be fitted and adjusted to the most
suitable position for the operator.
1. To fit the handle to the housing, fully unscrew and
remove the adjusting knob and bolt from the auxiliary
handle.
8
2. Slide the auxiliary handle over the housing as per the
attached diagram, ensuring the handle is orientated so
as the serrated or pattern surface aligns with the same
pattern surface on the housing.
3. Fit the auxiliary locking knob and bolt through the
handle and housing from the left hand side of the
blower vac (same side as the blower vacuum selector)
and tighten in a clockwise direction.
4. To adjust the angle of the handle, loosen the auxiliary
locking knob (rotate in an anti-clockwise direction) and
move the handle to the preferred position and then
tighten the knob firmly.
from the end of the underside of the blow/vac tube.
1. Loosen the clamp screw 2–3 full turns. (it is not
necessary to remove the clamp screw completely)
2. Slide the chute wheel assembly onto the mounting
section at the end of the blow/vac tube.
3. Position the chute wheel assembly to the desired
location and then tighten the clamp screw.
4. To adjust the position of the chute wheel assembly,
loosen the clamp screw 2–3 turns and reposition
the chute wheel assembly by sliding it backwards or
forwards.
5. Retighten the clamp screw when the chute wheel
assembly is repositioned.
Shoulder strap
Your ST1800 blower vac is supplied with a shoulder strap
to assist with user comfort during use. The strap assembly
can be fitted or removed from the top of the housing via
the metal buckle on the end of the strap.
1. To open the buckle, remove the small retaining screw
and washer, which retains the buckle pin in position.
After removing the small screw & washer, remove the
larger pin from the buckle. If the buckle was on the
hosing, by removing the pin, the buckle will be free of
the housing.
2. If you are fitting the buckle to the housing, slide
the pin through the one side of the buckle and then
through the housing. On the other side of the housing
allow the pin to again pass through the hole in the
buckle. Fit the small washer on to the retaining screw,
and fit the screw into the end of the pin and tighten
firmly.
3. To adjust the length of the shoulder strap, slide the
plastic adjusting buckle up or down the strap,
A quick release is also fitted to the strap which allows the
strap to be opened, but does not allow the strap to be
removed from the blower vac.
Operation of the blower vac
Prior to using the blower vac, ensure you have read and
understood this instruction manual.
Ensure you are wearing suitable clothing and also safety
equipment like safety glasses, ear protection and a mask
if necessary.
Ensure the attachments to the blower vac are correctly
fitted and adjusted.
Be aware of other people and animals in the area where
you are to be operating the blower vac.
To turn the blower vac on
1. Check the on/off switch is in the off position. This is where
the slide switch is in the back position and the letter “O” is
displayed towards the front of the slide switch.
2. Plug the power cord into an approved electrical
extension cord, and turn the extension cord on.
3. Ensuring the blower vac is directed in a safe direction,
push the on/off switch forward and the blower vac
will start. The letter “I” will be displayed on the rear
section of the slide switch when the switch is in the
“on” position.
Be sure to be holding the blower vac firmly on start up.
Fitting the chute wheel assembly
The chute wheel assembly can be easily fitted or removed
9
While in the “on” position, the blower vac will continue
to operate without the need to hold the switch in the
“on” position.
To turn the blower vac off
To turn the blower vac “off”, slide the on/off switch
backward and this will turn the blower vac off. In the off
position the letter “O” will be displayed towards the front
of the switch.
Important. After you have turned the blower vac off, do
not leave the product until the blower vac has been fully
disconnected from the electrical supply.
5. To seat the cable firmly, gently pull one of the two
lengths of extension cable on the right hand side of the
blower vac.
6. After, and only after the cable is correctly seated, plug
the blower vac plug into the socket of the extension
cable.
To select the blow operation
1. Move the selector lever
towards the back of the
housing.
When the blow operation
is selected, air is drawn up
through the large blow/vac tube
and then expelled at a much
higher velocity in the lower
cavity below the blow/vac tube.
Ensure when the blow operation is selected the blower
vac is pointed, directed and used in a safe manner. Do
not direct the air flow from this blower vac directly or
indirectly towards another person.
Extension cord support
During use of the blower vac, the extension cord will
continually be pulled as you move from one area to another.
An extension cord support has been provided on the
housing of the blower vac to assist in preventing the
electrical connection between the extension cord and
blower vac plug being forced apart.
Note. The support is for the extension cord, and not the
cable from the blower vac.
1. To fit the extension cord to the support, make a tight
loop in the extension cord, approximately 300mm from
the socket on the extension cord.
2. Fit the loop into the square recess in the back portion
of the blower vac on the right hand side.
3. Push the loop all the way through the housing by
approximately 25mm.
4. Push each side of the loop downwards so each side of
the loop fits into the round cut away section.
To select the vacuum operation
1. Push the selector lever
forward.
When the vacuum operation is
selected, air and debris is drawn
up through the large vac tube,
and forced through the mulching
impellor.
The debris is mulched and then
blown down into the collection
bag.
Important. Always ensure the collection bag is correctly
attached as per the “Fitting the collection bag” section in
this manual.
Always be aware of what is being drawn up into the
blow/vac tube. This product is only designed for garden
debris like leaves, twigs and garden cuttings.
10
Important notes when using the blower/
vacuum selector lever
attempt to mulch any material than general garden
debris.
• For better performance and comfort, it is recommended
the collection bag is emptied when it becomes
approximately half full. This reduces the weight and
also allows the vac operation to perform at its highest
level.
Do not force the lever. The lever should move with
very little resistance. If the lever is difficult to move,
disconnect the power supply, remove the collection bag
and ensure debris, dirt or mud has not jammed the lever
inside the large round outlet.
When selecting either of the operations, ensure the
selector lever is fully in one position or the other, not
half way.
Maintenance and storage information
Prior to cleaning or any maintenance, always ensure the
power plug has been removed from the electrical power
supply.
When you have finished using the blower vac, always
check to make sure the product is clean and free of dirt
and debris. This is important around the selector lever flap
which is just inside the round outlet. To check this area,
remove the collection bag and ensure this area inside the
outlet tube is free of debris and dirt.
Operate the selector lever backwards and forwards to
ensure correct operation.
Do not hose or submerge any part of the blower vac.
Do not use solvents to clean the blower vac.
Store the blower vac in a dry place, and out of reach of
children.
To empty the collection bag
The collection bag is attached to the blower vac in 3
places. It is not necessary to remove the collection bag
from the blower vac when the bag needs to be emptied.
The rear of the bag is fitted with a full length zip.
Simply open the zip and empty the contents.
Ensure to close the zip prior to operating the blower vac.
Tips for using your blower vac
The following points may assist you in the operation of
the blower vac.
• Always try and vacuum dry leaves, cuttings or general
garden debris.
• Wet material is difficult to mulch and also can cause
the blower vac to clog.
• If the leaves etc. are damp, then use the blower vac in
blow selection to pile the leaves etc. into one area, vac
and mulch the leaves when dry.
• Avoid using the vac on areas where there are stones,
or other hard objects. These objects will damage the
impellor of the blower vac.
• It is also advisable not to allow the blower vac to
pick up soil. Soil generally contains moisture and
when combined with other garden debris can clog the
blower vac.
• The blower vac is not a garbage disposal unit. Do not
Replacement of the electrical supply cord
If the supply cord of this product is damaged, it must
be replaced by the manufacturer or its service agent, or
similarly qualified person in order to avoid a hazard.
11
Carefully read the entire Instruction Manual
before using this product.
Before returning this product for a
Warranty Claim or any other reason
Please Call 1300 880 001 (Australia)
or 0800 445 721 (New Zealand)
When you make your call, please have
the following information at hand:
With continuing product development changes may
have occurred which render the product received
slightly different to that shown in this instruction
manual. The manufacturer reserves the right to
change specifications without notice. Note:
Specifications may differ from country to country.
• GMC Product Type • GMC Product Code
A GMC Service Engineer will take your call and, in
most cases, will be able to solve your problem over
the phone.
You are welcome to use this phone-in service to
make suggestions or give comments about any
GMC product.
16 Scammel Street, Campbellfield
Victoria, Australia 3061
Tel: (03) 9303 2133
Fax: (03) 9308 7822
The GMC 777 Helpline operates from 7am to
7pm, 7 days a week (EST). This allows you
to contact GMC directly with any queries and
technical questions you have regarding
our products.
Save this Manual for future reference.