1
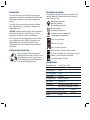
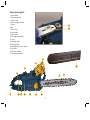
2000W
ELECTRIC CHAIN SAW
ELC2000
INSTRUCTION MANUAL
Black
Cyan
Magenta
Yellow
Code: ELC2000
Date: 070110
Edition: 12
Op: DCR
Contents
Warranty
Introduction
Environmental protection
Description of symbols
Specifications
Safety instructions
Additional safety rules for electric chain saws
Know your product
Mounting the chain bar
Setting the chain saw tension
Oil filling
Checking the automatic oil function
Avoiding kickback
Avoid jamming
Extension cord support
Before start-up
Start up
Operating the electric chain saw
Cross cutting
Branch cutting
Chain sharpening and maintenance
Chainsaw maintenance
First time user
General Inspection
Power cord maintenance
Storage
��������������������
2
3
3
3
3
4
5
7
8
8
8
9
9
9
9
10
10
10
10
10
11
11
12
12
12
12
����������������������������������������������������
�����������������������������������������������������������
��������������������������������������������������������
���������������������������������������������������
�������������������������������������
�������������������������������������������������������
�����������������������������������������������������
������������������������������������������������������
���������������������������������������������������
��������������������������������������������������������
�����������
�������������������������������������������������������
����������������������������������������������������������
��������������������������������
��������������������������������������������������������
���������������������������������������������������
��������������������������������������������������������
��������������������������������������������������������
�����������������������������������������������
�������������������������������������������������
���������������������������������������������������������
���������������������������������������������������
����������������������������������������������������������
���������������������������������������������������������
���������������������������������������������������������
���������������������������
���������������������������������������������������
���������������������������������������������������
����������������������������������������������������
�����������������������������������������������
�������������������������������
2
Description of symbols
Introduction
The rating plate on your tool may show symbols. These
represent important information about the product or
instructions on its use.
Wear hearing protection.
Wear eye protection.
Wear breathing protection.
Double insulated
for additional protection.
Conforms to relevant standards for
electromagnetic compatibility.
Your new GMC power tool will more than satisfy your
expectations. It has been manufactured under stringent
GMC Quality Standards to meet superior performance
criteria.
You will find your new tool easy and safe to operate,
and, with proper care, it will give you many years of
dependable service.
CAUTION. Carefully read through this entire Instruction
Manual before using your new GMC Power Tool. Take
special care to heed the Cautions and Warnings.
Your GMC power tool has many features that will make
your job faster and easier. Safety, performance, and
dependability have been given top priority in the
development of this tool, making it easy to maintain
and operate.
Don’t use one handed.
Don’t use in the wet.
Don’t use point of the bar.
Environmental protection
Hold the electric chainsaw with two hands.
Recycle unwanted materials instead of
disposing of them as waste. All tools, hoses
and packaging should be sorted, taken to
the local recycling centre and disposed of
in an environmentally safe way.
If cordset is damaged or cut discontinue use and
remove it from the mains immediately.
Use cutting length of the bar.
Specifications
Nominal Voltage:
Rated Power:
Cutting Speed:
Oil Tank Capacity:
Chain Brake:
Protection class:
Bar Length:
Acceleration:
230-240 Vac ~ 50Hz
2000W
10m/s
250ml
0.15 Sec.
Double insulation
400mm, 16”
Rear Handle under load 3.79 m/s2
Front Handle underload 4.96 m/s2
Sound Power Level Under Load:
97 dB(A)
Acoustic Pressure Level Under Load:
86 dB(A)
Weight
5.8Kg
3
Safety Instructions
WARNING. Read and understand all instructions. Failure
to follow all instructions listed below may result in
electric shock, fire and/or serious injury. The term
“power tool” in all of the warnings below refers to your
mains-operated (corded) power tool or battery-operated
(cordless) power tool.
Save these instructions
Work area
• Keep work area clean and well lit. Cluttered and dark
areas invite accidents.
• Do not operate power tools in explosive atmospheres,
such as in the presence of flammable liquids, gases, or
dust. Power tools create sparks which may ignite the
dust or fumes.
• Keep children and bystanders away while operating a
power tool. Distractions can cause you to
lose control.
Electrical safety
• Power tool plugs must match the outlet. Never modify
the plug in any way. Do not use any adapter plugs with
earthed (grounded) power tools. Unmodified plugs and
matching outlets will reduce risk of electric shock.
• Avoid body contact with earthed or grounded surfaces
such as pipes, radiators, ranges and refrigerators. There
is an increased risk of electric shock if your body is
earthed or grounded.
• Do not expose power tools to rain or wet conditions.
Water entering a power tool will increase the risk of
electric shock.
• Do not abuse the cord. Never use the cord for carrying,
pulling or unplugging the power tool. Keep cord away
from heat, oil, sharp edges or moving parts. Damaged
or entangled cords increase the risk of electric shock.
• When operating a power tool outdoors, use an outdoor
extension cord suitable for outdoor use. Use of a
cord suitable for outdoor use reduces the risk of
electric shock.
Personal safety
• Stay alert, watch what you are doing and use common
sense when operating a power tool. Do not use a power
tool while you are tired or under the influence of drugs,
alcohol, or medication. A moment of inattention
while operating power tools may result in serious
personal injury.
• Use safety equipment. Always wear eye protection.
Safety equipment such as a dust mask, non-skid
safety shoes, hard hat, or hearing protection used for
appropriate conditions will reduce personal injuries.
• Avoid accidental starting. Ensure the switch is in the
off-position before plugging in. Carrying power tools
with your finger on the switch or plugging in power
tools that have the switch on invites accidents.
• Remove any adjusting key or wrench before turning the
tool on. A wrench or a key that is left attached to
a rotating part of the power tool may result in
personal injury.
• Do not overreach. Keep proper footing and balance at
all times. This enables better control of the power tool
in unexpected situations.
• Dress properly. Do not wear loose clothing or jewellery.
Keep your hair, clothing and gloves away from moving
parts. Loose clothes, jewellery or long hair can be
caught in moving parts.
• If devices are provided for the connection of dust
extraction and collection facilities ensure that these are
connected and properly used. Use of these devices can
reduce dust-related hazards.
Power tool use and care
• Do not force the power tool. Use the correct power tool
for your application. The correct power tool will
do the job better and safer at the rate for which it
was designed.
4
Additional safety rules for electric
chain saws
• Do not use the power tool if the switch does not turn
it on and off. Any power tool that cannot be controlled
with the switch is dangerous and must be repaired.
• Disconnect the plug from the power source before
making any adjustments, changing accessories, or
storing power tools. Such preventive safety measures
reduce the risk of starting the power tool accidentally.
• Store idle power tools out of the reach of children and
do not allow persons unfamiliar with the power tool
or these instructions to operate the power tool. Power
tools are dangerous in the hands of
untrained users.
• Maintain power tools. Check for misalignment or
binding of moving parts, breakage of parts and any
other condition that may affect the power tool’s
operation. If damaged, have the power tool repaired
before use. Many accidents are caused by poorly
maintained power tools.
• Keep cutting tools sharp and clean. Properly
maintained cutting tools with sharp cutting edges are
less likely to bind and are easier to control.
• Use the power tool, accessories and tool bits etc.,
in accordance with these instructions and in the
manner intended for the particular type of power
tool, taking into account the working conditions and
the work to be performed. Use of the power tool for
operations different from intended could result in a
hazardous situation.
Service
• Have your power tool serviced by a qualified repair
personnel using only identical replacement parts. This
will ensure that the safety of the power tool
is maintained.
Note. For safety reasons the electric chain saw is
shipped with the chain brake fully engaged. This brake
must be released before the saw becomes operational.
• Never cut into the ground.
• Never cut into wire fences.
• Never cut into samplings.
• Never cut into prepared wood.
• Use the Chainsaw to cut only wood.
• Remove the plug from the mains immediately if the
supply cable is damaged or cut.
• Use the bar cover when moving the electric chain saw
away from the working site.
• During transport the brake must be applied to avoid
accidental start-up.
• Make sure the tool is disconnected when checking,
tigthtening, changing or cleaning the chain.
• Always disconnect the electric chain saw when not in
use, to avoid damage to third persons.
• Do not expose the electric chain saw to rain or windy
conditions or in poor light.
• Find a suitable position before beginning work.
• When working on slopes, the saw operator must stand
beside or above the wood to cut, i.e. felled trees.
• Use the electric chain saw holding it firmly with both
hands.
• Make a wedge-shaped cut before felling the tree, then
the felling cut leaving a hinge for the felling direction.
• Beware of any falling branches after felling operations.
• Beware of wood splinters when cutting chopped wood.
• Ensure your chain saw is suitable for the job.
• Never work above shoulder level or reach out to cut a
branch: ensure you have stable footings at all times.
5
• It is advisable to provide a support for the electric chain
saw when cutting branches. Do not cut using the bar
point and beware of branches under tension.
• Children under 18 must not use electric chain saws.
• The machine must not work in an explosive
environment.
• Keep people away from the electric chain saw when
in use.
• Check the following conditions before beginning work:
• There should be no people in the felling area.
• Make sure there is a second person within calling
distance.
• The working area should be free from obstacles.
• Wear suitable clothes which do not hinder movement.
• Use specific prodections during operations involving
head, hands, feet, eyes and ears.
• It is recommended the use of a helmet with a visor
during felling, branch cutting and chopping operations.
• Wear gloves with an external protection when using the
electric chain saw.
• Use ear protection to prevent hearing injuries.
• Wear safety boots when using the electric chainsaw.
6
Know your product
1. Front handle
2. Front hand guard
3. Oil tank cap
4. Chain clamp/lock knob
5. Chain
6. Bar
7. Power cord
8. Rear handle
9. Chain wheel
10. Bar adjustment block
11. Cover
12. Bucking spikes
13. On/off switch
14. Lock-off button (not shown)
15. Bar cover
16. Oil level indicator
17. Cord retention hook
9
10
2
1
15
3
8
7
5
13 17 16
11
4
12
7
6
Mounting the chain bar
Setting the chain saw tension
1. Place the chainsaw with the
motor on a cover to avoid
any mess from the oil.
2. Place the chain (5) in the
grove of the bar (6). Pay
attention to the correct
running direction. As shown
by the running direction
symbol.
3. Place the chain links around
the chain wheel (9) and put
the bar on such that the two
locating pegs fit into the
slotted hole of the bar.
4. Prior to fitting the cover (11)
it is important to set the
chain adjusting cam. To do
this fully depress the chain
clamp/lock knob and rotate
until the cam is aligned with
the arrow as pictures in Fig 1.
5. To fit the cover (15) insert
Fig 1
the back locating hook into
the slot provided near the oil
indicator and lower the cover
over the bar ensuring the
clamp bolt of the cover passes
through the centre of the bar
adjustment block (10) and
rotate the clamp/lock knob
until it just starts to become
tight.
Note. Do not push the clamp/lock knob while rotating.
Proceed as detailed below to set the chain tension.
6. Screw in the chain clamp/lock knob tightly.
1. Loosen the chain clamp/lock
knob by turning it anti-clockwise
approximately 1-2 turns.
2. Press the chain clamp/lock
knob inwards and turn it in a
clockwise direction until the
correct chain tension is reached.
3. The correct tension is reached
when the chain in the middle
of the bar can only be raised
by approximately 3-4mm.
4. Release the chain clamp/lock
knob and ensure it springs
away from the housing
slightly.
5. Tighten the chain clamp/lock
knob by turning it clockwise without pressing it inwards.
6. Check whether all chain links lie correctly in the guide
tracks of the bar.
Oil filling
Note. The chain saw is shipped
without oil in it. The chain saw
must never be used without
oil or with an oil level that is
below the indicator.
Warning. Always ensure that
the chainsaw is switched off
and the plug is removed from
the power point before making
any adjustments.
1. Remove oil tank cap (3) and fill the tank with chain
oil. Replace the oil tank cap and tighten well.
2. Lubrication is activated only when the machine is working.
3. Check the oil level periodically, through the oil level
indicator (16).
8
Avoid jamming
Always cut into the compression wood first until the cut
starts to close. Always make the compression cut beneath
if the log or limb is suspended from one end, and on top
if it is supported at both ends. Cut from the other side
towards the compression cut. Make a habit of using a
wedge to prevent the compression cut jamming tight on
the chainsaw blade.
4. Use good quality ecological chain oil to ensure long life
for the moving parts. Do not use recovered or preused
oil containing impurities.
Make sure that no dirt gets into the oil tank.
Extension cord support
During use of the chainsaw, the extension cord will
continually be pulled as you move from one area to another.
A cord retention hook (17) has been provided on the
housing of the chainsaw to assist in preventing the
electrical connection between the extension cord and
chainsaw plug being forced apart.
Note. The support is for the extension cord, and not the
cable from the chainsaw.
1. To fit the extension cord to the support, make a tight
loop in the extension cord, approximately 300mm from
the socket on the extension cord.
2. Fit the loop into the rectangle recess in the back
portion of the chainsaw.
3. Push the loop all the way through the housing by
approximately 25mm.
4. Push each side of the loop downwards so each side of
the loop fits over the cord retention hook.
5. To seat the cable firmly, gently pull one of the two lengths
of extension cable on the right hand side of the chainsaw.
Checking the automatic oil function
Check the automatic operation of the chain lubrication by
pointing the tip of the switched-on saw towards a piece of
paper laying on the ground. If a patch of oil appears and
becomes larger, then the automatic oil function is working.
If there are no traces of oil even though the oil tank is
full, then the automatic oil function is not working.
If the automatic oil function is not working, remove the
chain bar and clean out the oil ways of the chainsaw
and chain bar. On reassemble if the chainsaw is still not
working take it to an autorised service centre.
Avoiding kickback
• Be constantly aware of the position of the upper
quadrant of the blade tip. This is the part that triggers
a kickback when it hits resistance.
• Never engage the upper quadrant of the guide bar with
whatever you are cutting and avoid contact with any
hidden branches or obstructions. Ensure there is a clear
work area.
• Always clear away brush, vegetation and any
obstructing debris before attempting a cut that might
trigger a kickback.
• Avoid cuts that will cause the chainsaw to jam in a tree
trunk or limb.
6. After, and only after the cable is correctly seated, plug the
chainsaw plug into the socket of the extension cable.
9
Before start-up
Operating the electric chain saw
1. Check the tool and cable are
Safe chainsaw operation
in good working order before
starting the chain saw.
2. Make sure that the chain
lubrication is working and
check the oil level.
3. Check the chain tension and
the operation of the chain brake.
While cutting, always:
• Run the chainsaw motor at full revs. This makes the job
safer, as there is less chance of pull-in or kick-back.
• Position your body to the left of the chainsaw so if
it kicks back uncontrollably, it goes over your right
shoulder.
• Keep a firm grip with your left hand on the front
handle, with your thumb securely below the handle. The
swivel of your wrist in a kick-back situation will activate
the chain brake.
• Make sure the chain is tensioned correctly.
• Observe the size of wood shavings, if they become dusty
your chain could need sharpening.
Start up
1. Remove the bar cover.
2. Release the chain brake by pulling the front hand guard
(2), firmly towards the back of the electric chain saw
until a click is heard. To check the chain brake has been
released, you should be able to move the chain by hand.
3. Connect the cable to the power.
Cross cutting
WARNING. Do not touch
protruding branches with the
bar tip to prevent kickback.
1. Fit the bucking spike in the
bark at point A.
2. Using point A as a pivot
point lift the rear of the
A
chainsaw so the chain enters
the wood to be cut.
3. Pivot and repeat the operation until the trunk has been
cut completely.
4. Use the central part of the bar and never the tip for
cutting purposes.
Note. Ensure the brake is working efficiency, check
its operation every time you use the chain saw before
commencing work with it.
WARNING. The on/off switch (13) must never be
depressed before pulling back the front hand guard.
4. Hold the electric chain saw by its grip with both hands.
5. To Start the chainsaw, press the lock-off button (14) in
and pull on the trigger switch.
6. To stop the chain saw, release the trigger switch.
Branch cutting
Stand opposite the branches to be cut. Use the section of
the bar as close to the chainsaw as possible, never use the
tip of the bar. Perform the cutting operation downwards.
WARNING. Hold the electric chain saw with both hands
until the chain is completely still.
10
Chain sharpening and maintenance
10. Bars with sprockets need frequent greasing which can
be performed as follows:
• Fill a syringe or similar device with grease for
bearings.
• Each time the saw is used grease through the
hole provided near the bar tip until the grease
penetrated onto the tip.
• After 3 times of sharpening the chain your self have
it professionally sharpened. This will ensure that all
the teeth are even.
To avoid damage to the motor, do not keep the chain saw
running if the chain is lodged in the wood.
WARNING. Always ensure that
the tool is switched
off and the plug is removed
from the power point before
making any adjustments or
maintenance procedures.
The chain requires sharpening
when the chain saw
does not cut appropriately, this
operation is performed as follows.
1. Extend the chain bar.
2. Fix the bar in a vice so that the chain can slide.
3. Fit the file in a file holder
(not included) and place it
over the tooth at 350.
4. File forward only until all the
worn part of the tooth has
been eliminated.
5. Count the file movements
made on the first tooth
and do the same on all the
others, both right and left.
6. After some sharpening the
delimiting device on the
chain will exceed the height
of the cutting teeth, file the
exceeding part by means of
a flat file to round off the
depth delimiting device.
7. Ensure that the chain is replaced before stretching to
exceed the maximum adjustment of the chain saw bar.
8. ‘Deep’ Filing should be performed with an electric file. We
advise to use a service centre to perform this operation.
9. Ensure that the chain slides smoothly over the bar when
pulled with hands. Periodically sharpen chain and check
the chain tension.
Chainsaw maintenance
WARNING. Always ensure that
the tool is switched
off and the plug is removed
from the power point before
making any adjustments or
maintenance procedures.
• Always keep the air holes
clean on the electric chain saw
body. They tend to become
clogged with sawdust during
use and this affects the
efficiency of cooling, causing
overheating of the motor the
other fundamental parts of the
electric chain saw.
• Do not operate the chainsaw
with the air intake on the
ground as this will draw foreign particles into the motor
area and damage the windings of the motor.
• Regularly check to see if any dust or foreign matter has
entered the grills near the motor and around the on/off
switch. Use a soft brush to remove any accumulated dust.
Wear safety glasses to protect your eyes whilst cleaning.
11
• If the body of the tool needs cleaning, wipe it with a soft
damp cloth. A mild detergent can be used but nothing like
alcohol, petrol or other cleaning agent.
• Never use caustic agents to clean plastic parts.
• Turn the bar periodically to use both the sides so that
it wears evenly.
• It is essential that motor cooling vents are kept free
from a build-up of sawdust and this decreases the
engines tools cooling capacity and causes overheating
damage to the motor as well as other important
equipment, oil pump etc. It is recommended that this is
carried out after every use.
• Clean the guide and oil holes periodically.
• Deburr the race sides periodically with a flat file. Time
may cause any “Burrs” to detach and damage the bar.
• The bar needs to be evened with a flat file if one of the
races is higher than another and then smoothed with a
file and fine sandpaper. If races are considerably worn,
check that the height is always greater than the chains
transmission links so that the latter do not touch the
bottom. Replace the bar if this should occur.
The chainsaw should be periodically serviced to check the
correct operation of the chain, chain drive, motor and brake.
CAUTION. Water must never come into contact with
the tool.
General inspection
Regularly check that all the fixing screws are tight.
They may vibrate loose over time.
Power cord maintenance
If the supply cord needs replacing, the task must be carried
out by the manufacturer, the manufacturer’s agent, or an
authorised service centre in order to avoid a safety hazard.
Storage
• Clean the electric chain saw with a dry cloth, do not use
aggressive cleaning fluids.
• Replace the electric chain saw blade cover and store in a
dry place. Do not store in hot, dry boiler rooms or other
damp places.
First time user
If you are not familiar with chain saws and the felling of
trees, it is recommended that you obtain informed instructions in addition to reading this manual fully. We also
recommend as a minimum that you practice cutting logs
on a saw-horse or log cradle.
12
13
14
15
GMC customer assist
If your product needs repairing, replacing,
technical service or you simply need help or advice,
please contact us on our Customer Assist Line
1300 880 001 (Australia) or 0800 445 721 (New Zealand).
For prompt service we suggest you log your service request
online at www.gmcservice.com.au. Should you not have
access to the Internet, please contact our service department
on 1300 880 001 (Australia) or 0800 445 721 (New Zealand).
7am – 7pm, 7days a week (AEST).
Please note that if repair or replacement is required,
you must provide a valid original purchase receipt.
You will need the following details at hand to log your service request;
Personal details: First & Last name, address, pick up address,
contact phone numbers, email address
Product details: Product number, date of purchase, retailer bought from,
State & postcode, receipt number, reason for the request,
copy of official purchase receipt
Attach your purchase receipt and save with this Manual for future reference.
Please refer to our website www.gmcompany.com for full GMC warranty Terms and Conditions.
16