1
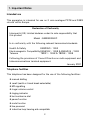
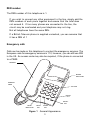
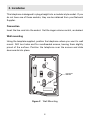
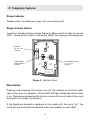
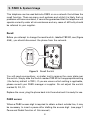
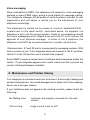
Gemini Basic Telephone OPERATING INSTRUCTIONS This Interquartz telephone has been manufactured to very high standards and is very easy to use. Please read this manual carefully to find out how to use the features. Contents 1. Important Notes .............................................................................. 2 Intended use ....................................................................................... 2 Telephone facilities .............................................................................. 2 REN number ........................................................................................ 3 Emergency calls ................................................................................... 3 2. Installation ...................................................................................... 4 Connection ......................................................................................... 4 Wall mounting ..................................................................................... 4 3. Telephone Features ....................................................................... 6 4. Operation ........................................................................................ 7 5. PABX & System Usage .................................................................. 8 6. Maintenance and Problem Solving ............................................... 9 7. Warranty and Service .................................................................. 10 Figure Figure Figure Figure Figure 1 General Appearance ............................................................... 3 2 Wall Mounting ....................................................................... 4 3 Handset Retainer for Wall Mount ............................................. 5 4 Bottom View ......................................................................... 6 5 Recall Switch ........................................................................ 8 1 1. Important Notes Intended use This apparatus is intended for use on 2 wire analogue PSTN and PABX circuits within Europe. Declaration of Conformity Interquartz (UK) Limited declares under its sole responsibility that this product Model : GEMINI BASIC Is in conformity with the following relevant harmonized standards Health & Safety EN60950 : 1992 Electromagnetic Compatibility EN55022 : 1998 & EN55024 : 1998 Telecom TBR21 : 1998 & TBR38 : 1998 Following the provisions of Council Directive on radio equipment and telecommunications terminal equipment. January 2001 Telephone facilities This telephone has been designed for the use of the following facilities : manual dialling recall (earth or timed break selectable) MF signalling ringer volume control ringing indicator last number re-dial pause function mute function line powered inductive loop hearing aid compatible 2 REN number The REN number of this telephone is 1. If you wish to connect any other equipment to the line, simply add the REN numbers of each piece together and ensure that the total does not exceed 4. If too many phones are connected to the line, the circuit may be overloaded and your telephone may not ring. Not all telephones have the same REN. If a British Telecom phone is supplied unmarked, you can assume that it has a REN of 1 Emergency calls Calls can be made on this telephone to contact the emergency services. The European code for emergency services is 112, however, you can still use 999 in the UK. An access code may also be required, if the phone is connected to a PABX. HANDSET RINGER INDICATOR HANDSET CORD KEYPAD REDIAL KEY RECALL KEY MUTE INDICATOR MUTE KEY PAUSE KEY Figure 1 General Appearance 3 2. Installation This telephone is designed to plug straight into a modular style socket. If you do not have one of these sockets, they can be obtained from your Network Supplier. Connection Insert the line cord into the socket. Set the ringer volume control, as desired. Wall mounting Using the template supplied, position the telephone where you want to wall mount. Drill two holes and fix roundheaded screws, leaving them slightly proud of the surface. Position the telephone over the screws and slide downwards into place. . . N FOR WALL MOUNT S1 TBR S2 ER . Figure 2 Wall Mounting 4 To enable the handset to be supported in the cradle when the phone is mounted on the wall, follow the procedure shown in Figure 3 to reserve the HANDSET RETAINER. 1. Use your thumb to press the HANDSET RETAINER 2. Push the HANDSET RETAINER out of the slot 3. Turn the HANDSET RETAINER 180° 4. Insert the HANDSET RETAINER back into it's slot Figure 3 Handset Retainer for Wall Mounting 5 3. Telephone Features Ringer Indicator Flashes when the telephone rings with an incoming call. Ringer Volume Switch Located on the base of the unit (see Figure 4). Move switch to select no sound (OFF), muted sound (LOW) or full sound (HIGH) for ringing on incoming call. RINGER HI / LO / OFF SWITCH . . N S1 S2 ER TBR . TIMED BREAK / EARTH RECALL SWITCH VOICE MESSAGING ( N / S2 / S1 ) SWITCH Figure 4 Bottom View Mute Button Pressing and releasing this button cuts off the handset so that the caller cannot hear your conversation. The red LED will light indicating that the mute is on. Pressing and releasing the button a second time will cancel the mute and return to normal conversation. If the telephone handset is replaced on the cradle with the mute on, the mute will automatically be released when the handset is next lifted. 6 Pause Button Press the pause button to insert a 3.6 second pause in the number sequence. Redial Button To redial the last number dialled, lift the handset, wait for the tone and then press Redial. 4. Operation Pause Function The Pause command may be used if the phone is connected to certain types of PABX or to any network where a pause is required. Note: No more that 3 pauses should be inserted consecutively, otherwise the telephone may not function properly. Lift handset Dial any digits required before the pause Press Pause button Dial remaining digits Redial Function To dial a number, lift the handset, wait for the tone and then key in the number required. If the number dialled is busy, obtain a new line - by replacing the telephone handset and then lifting it again. Press the button labelled REDIAL and the last number that you dialled will automatically be redialled. 7 5. PABX & System Usage This telephone can be used behind a PABX or on a network that utilises the recall function. There are many such systems and whilst it is likely that no problems will be encountered, it cannot be guaranteed that the telephone will operate correctly under all circumstances and any cases of difficulty should be referred to your supplier. Recall N ER Before you attempt to change the recall switch, labelled TBR ER, see (Figure 4&5), you should disconnect the phone from the network. . . ER N S1 S2 TBR S1 TBR S2 . Figure 5 Recall Switch You will need a screwdriver, or similar tool to remove the cover plate over the switch. Simply slide the Switch marked TBR ER to the appropriate setting ( the factory default is TBR ). If you are unsure which setting is applicable, please consult your PABX manager or supplier. Do not adjust the switch marked N, S2, S1. Replace the cover, plug the phone back into the socket and it is ready for use. PABX access Where a PABX access digit is required to obtain a direct outside line, it may be necessary to insert a pause after dialling the access digit (see page 7 Pause and Redial function of this manual ). 8 Voice messaging When used behind a PABX, this telephone will respond to voice messaging systems on many PABX types, giving a visual signal of a message waiting. Your telephone manager will be aware of which system is relevant to your organisation and will adjust or advise you on the adjustment of your telephone accordingly. This adjustment is carried out by means of a switch, labelled N/S2/S1 , located next to the recall switch, mentioned above. As supplied, the telephone is set to the N (normal) position. Under no circumstances should this Voice messaging switch (Figure 4) be set at the S1 or S2 without the approval of your telecoms manager. In either of the S positions, the telephone must NOT be connected directly to a public network line. (Technical note : S1 and S2 are for reverse polarity messaging systems. With such a system in use, if the telephone does not respond in the S1 position, switch it to the S2 position and it should then respond. Some PABXs require a certain level of software and/or hardware within the switch. If your telephone appears not to work, make sure that you have the correct software/hardware installed). 6. Maintenance and Problem Solving Your telephone is a precision electronic instrument. Avoid rough handling and extreme temperatures. Use a mild detergent and a damp cloth when cleaning. Never use a stronger cleaner. If your telephone does not appear to be working correctly, please check the following : No Dialling tone - Is phone cord properly connected to the wall socket? Will not ring - ringer switch is set to off? 9 - REN number may exceed 4, for all telephones connected to the line. Disconnect a phone until the number is below 4. If there are still problems, and you have more than one telephone: Remove the problem phone. Insert another phone and check that it works. If yes then the problem phone is possibly faulty. If not, then you may have a faulty line. Try using the other socket and see which phones work. If you do have a faulty line then you should contact your Network Supplier. You should however be aware that if you request them to repair a fault that is found not to be theirs, then they are entitled to charge you for a visit. In the event that you still have problems then you should consult your supplier. 7. Warranty and Service This product is guaranteed, by Interquartz (UK) Limited, for six years from the date of manufacture. Every Interquartz telephone has a unique serial number and part of that number refers to the date of manufacture. A label, similar to that shown below is affixed to each telephone 0111 030852 (model no) The figure 0111 means that the telephone was made during week 11 (12 March) 2001. The six year warranty, cover will apply until 12 March 2007. A warranty is designed to cover either manufacturing faults or component defects. It is not designed to cover fair wear and tear. The Interquartz warranty is no exception. We look to you, our customer, to be reasonable and sensible over the warranty. We will endeavour to repair any telephone sent in to us within the warranty period but we reserve the right to charge for items that we consider 10 replaceable under wear and tear. For example, if a handset cord splits within a few months, it will be replaced. If a phone is returned after, say, four years of heavy use with a similar problem, we might take a different view and wish to charge. If you have a genuine warranty problem and provided that the warranty seal has not been broken, we will either repair your telephone, or, at our sole discretion, replace it with a similar telephone. In the event that a model may have been discontinued, any replacement would have similar or enhanced features. If you need to return a faulty unit to us, send it to: Interquartz (UK) Limited Pennine House Salford Street Bury BL9 6YA Make sure that you tell us what is wrong with the phone. DO NOT FORGET TO INCLUDE YOUR OWN NAME AND ADDRESS. We ask that you bear the cost of returning the telephone to us. We will return it to you, at our expense. This warranty is in addition to any statutory rights. For further advice visit our Website www.interquartz.co.uk This telephone is approved to EEC directive 1999/5/EC Distributed in the United Kingdom by Interquartz (UK) Limited Manufactured by International Quartz Limited 3C933001S12B A Subsidiary of Chiaphua Industries Ltd. ©Copyright INTERNATIONAL QUARTZ LTD. 2002