1
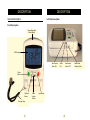
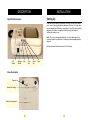
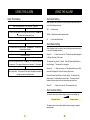
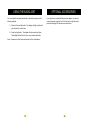
MULTIFUNCTION ALARM CLOCK
C l o c k
A l a r m
TravelClock
CONTENTS
INTRODUCTION
CONTENTS
1
INTRODUCTION
Unpacking the TravelClock
2
2
DESCRIPTION
General Description
3
3
INSTALLATION
Setting Up
6
6
USING THE CLOCK/CALENDAR
Time Setting
12h/24h Clock Setting
7
7
8
USING THE ALARM
Alarm Time Setting
Alarm Alert Setting
Alarm Mode Setting
Alarm Volume Setting
9
9
10
10
10
USING THE TIMER
Count Up Timer
Count Down Timer
11
11
12
USING THE BACKLIGHT
13
OPTIONAL ACCESSORIES
14
TROUBLESHOOTING
15
SAFETY INFORMATION
16
GUARANTEE
17
RECYCLING DIRECTIVES
19
1
Congratulations on purchasing your Geemarc travelclock. This is a
multifunction alarm clock which offers additional features such as snooze,
backlight and calendar display
Its is important that you read the instructions below in order to use your
Geemarc alarm clock to its full potential. Keep this user guide in a safe
place for future reference.
Unpacking the TravelClock
When unpacking the travelclock, you should find the following in the box:
•
1 Travelclock unit
•
3 AAA batteries
•
✑ Carrying case
For product support and help visit our website at www.geemarc.com
Telephone 01707 384438
Or fax 01707 372529
2
DESCRIPTION
DESCRIPTION
Left Side Description
General Description
Front Description
Snooze/Backlight
Button/Strobe
LCD Display
Snooze and
Alarm ON
Alarm
ON
Snooze and
Alarm OFF
Mode
Button
Up/Down
Button
Alarm
Volume
Setting
Light Button
Carrying Strap
3
4
Alarm Mode
Settings Switch
DESCRIPTION
INSTALLATION
Right Side Description
Setting Up
Slide and open the battery compartment found on the base of the alarm
clock. Insert 3 good quality alkaline batteries (AAA size, 1.5V type, these
are not supplied) into the battery compartment. Check the battery polarity
diagrams in the battery compartment when inserting the batteries.
Replace the battery cover.
Note : Do not use rechargeable batteries. Do not put batteries into the
household rubbish, pay attention to battery regulations regarding battery
disposal.
Remove the clear film label found on the LCD display.
4.5V
Socket
Settings
Switch
Lock
Time
Set
Alarm
Set
Timer
Base Description
Speaker
Alarm Alert Setting
Battery Compartment
5
1
6
USING THE CLOCK/CALENDAR
Time Setting
Slide the settings switch to the Time Set
position
USING THE CLOCK/CALENDAR
12h/24h Clock Setting
In the Lock position, Press ".
This will allow you to toggle between 12h
and 24h clock setting.
The HOUR digits will flash. Use ! and " to select the correct hour
Press Mode button
The MINUTE digits will flash. Use ! and " to select the correct
minute
Press Mode button
The YEAR digits will flash. Use ! and " to select the correct year
Press Mode button
The MONTH digits will flash. Use ! and " to select the correct
month
Press Mode button
The DATE digits will flash. Use ! and " to select the correct date
When satisfied with the time and date setting, slide the setting switch
back to the Lock position. This protects the set time against
accidental changes caused by touching buttons
Note: The day of the week will be set automatically by the internal
calendar after the year, month and date are set.
3
7
4
8
USING THE ALARM
USING THE ALARM
Alarm Time Setting
Alarm Alert Setting
Slide the settings switch to the Alarm Set
position
‘ALARM’ and the alarm HOUR digits will start to flash. Use ! and
" to select the required alarm hour
Press Mode button
The alarm MINUTE digits will flash. Use ! and " to select the
required alarm minutes
Press Mode button
Select the alarm alert you wish to use by sliding the alarm alert switch to
one of the following selections:
VIB
= Shaker alarm
VIB+AL = Shaker and sound and strobe alarm
AL
= Sound and strobe alarm
Alarm Mode Setting
Select the alarm mode you wish to hear by sliding the alarm mode switch
to one of the following selections:
Alarm On
= Alarm on, snooze off. The alarm icon will be displayed
in the top left corner of the screen
The SNOOZE digits will flash. Use ! and " to select the required
snooze time. The range of snooze time is between 1 – 60 minutes
The alarm will ring once for 1 minute. Press the Snooze/Light button to
stop the ringing. The alarm will not ring again.
When satisfied with the alarm setting, slide the setting switch back to
the Lock position. This protects the set alarm time against accidental
changes caused by touching buttons
Snooze On
= Alarm on, snooze on. The alarm and the snooze (Zz)
icons will be displayed in the top left corner of the screen
Press the Snooze/Light button to stop the ringing. The alarm will ring
three times for 1 minute whilst in snooze mode . The snooze interval
between the three rings can be set when setting the alarm time.
Alarm Off
= Alarm off, snooze off. The alarm will not ring
Alarm Volume Setting
The alarm volume can be altered using the alarm volume setting key.
Decrease volume
Increase volume
The alarm volume can be altered while the alarm is ringing or simply in
standby mode.
9
5
10
USING THE TIMER
Count Up Timer
USING THE TIMER
Countdown Timer
Slide the settings switch to the Timer Set position
Slide the settings switch to the Timer Set position
Press Snooze/Light button to Start and Stop the count up timer
Press Mode button twice
To clear the count up timer – press Snooze/Light button to stop the
timer followed by the mode button
The timer HOUR digits will flash. Use ! and " to select the
required timer hour
Press Mode button
The MINUTES digits will flash. Use ! and " to select the required
timer minutes.
Press Mode button
The SECOND digits will flash. Use ! and " to select the required
timer seconds
Press Snooze/Light button to start the countdown timer. This button
can also be used to stop the timer
When finished with the timer, slide the setting switch back to the Lock
position
Notes: The maximum countdown is 29 hours 59 minutes. The minimum
countdown is 1 hour.
11
14
12
USING THE BACKLIGHT
You can check the time easily and clearly in the dark by using one of the
following methods:
OPTIONAL ACCESSORIES
If you wish to use an optional Geemarc mains adaptor, you need to
connect the power supply to the 4.5V socket on the right side of the
travelclock and plug the other end into a wall socket.
1) Press the Snooze/Light button. The display will light up with a soft
glow that lasts for a short time.
2) Press the Light button. The display will light up with a soft glow.
The backlight will switch off as soon as you release this button.
Note: Frequent use of this feature will reduce the life of the batteries.
13
14
TROUBLESHOOTING
No display
No alarm or weak alarm
No backlight
Reduced functionality
• Make sure the batteries are inserted correctly
• Make sure that the batteries are fully charged
SAFETY INFORMATION
General
Do not open the unit (except to replace the batteries). Contact the helpline
for all repairs.
Never dispose of batteries in a fire. There is a serious risk of explosion
and/ or the release of toxic chemicals.
Cleaning
Clean the alarm clock with a soft cloth. Never use polishes or cleaning
agents - they could damage the finish or the electrics inside.
Environmental
Do not expose to direct sunlight.
Always ensure there is a free flow of air over the surfaces of the alarm
clock
Do not place any part of your product in water and do not use it in damp or
humid conditions e.g. bathrooms.
Do not expose your product to fire or other hazardous conditions.
15
16
GUARANTEE
From the moment your Geemarc product is purchased, Geemarc
guarantee it for the period of one year. During this time, all repairs or
replacements (at our discretion) are free of charge. Should you experience
a problem then contact our help line or visit our website at
www.geemarc.com. The guarantee does not cover accidents, negligence
or breakages to any parts. The product must not be tampered with or
taken apart by anyone who is not an authorised Geemarc representative.
The Geemarc guarantee in no way limits your legal rights.
IMPORTANT: YOUR RECEIPT IS PART OF YOUR GUARANTEE AND
MUST BE RETAINED AND PRODUCED IN THE EVENT OF A
WARRANTY CLAIM.
GUARANTEE
Electrical connection: The apparatus is designed to operate from a 230V
50Hz supply only. (Classified as ‘hazardous voltage’ according to
EN60950 standard). The apparatus does not incorporate an integral
power on/off switch. To disconnect the power, either switch off supply at
the mains power socket or unplug the AC adaptor. When installing the
apparatus, ensure that the mains power socket is readily accessible.
Telephone connection: Voltages present on the telecommunication network
are classified TNV-3 (Telecommunication Network Voltage) according to
the EN60950 standard.
Please note: The guarantee applies to
the United Kingdom only
DECLARATION: Geemarc Telecom SA hereby declares that this
product is in compliance with the essential requirements and other
relevant provisions of the Radio and Telecommunications Terminal
Equipment Directive 1999/5/EEC and in particular article 3 section
1a, 1b and section 3. The telephone does not operate if the line
current is lower than 18 mA.
17
18
RECYCLING DIRECTIVES
The WEEE (Waste Electrical and Electronic Equipment) has been put in
place for the products at the end of their useful life are recycled in the best
way.
When this product is finished with, please do not put it in your domestic
waste bin.
Please use one of the following disposal options:
- Remove the batteries and deposit them in an appropriate WEEE skip.
Deposit the product in an appropriate WEEE skip.
- Or, hand the old product to the retailer. If you purchase a new one, they
should accept it.
Thus if you respect these instructions you ensure human health and
environmental protection.
For product support and help visit our website at www.geemarc.com
Telephone 01707 384438
Or fax 01707 372529
UGTRAVELCL_UK
19
ED.01