1
ge.com
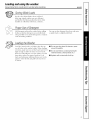
Safety Information
Operating
.......
2,3
Instructions
WBSR3000
Control Panels
WBSR3140
and Settings ................
Features .....................
Loading and Using
the Washer .................
4-7
7, 8
WCSR¢170
9, 10
WHDRR418
WJSR4160
WHDSR315
Troubleshooting
Tips
WHDSR¢I
Before You Coll
For Service
7
WJRR4170
...............
11-14
WLDSR416
WSERR/417
Consumer Support
Consumer
Support
Warrantg
....................
...BackCover
1S
Write the model and serial
numbers here:
Model #
Serial #
You can find them in the upper
right corner on the back of gour
washeE
175D1807P564
49-90296
05-06 JR
IMPORTANTSAFETYINFORMATION.
READALLINSTRUCTIONSBEFOREUSING.
--^WARNING,I For
your
safe_
the
information
inthis
manual
must
befollowed
tominimize
the
risk
offire
or explosion, electric
shock, or to prevent property
damage, personal injury, or loss of fife.
WATER
HEATER
SAFETY
Under certain conditions, hydrogen gas may be produced in a water heater that has not been used for
two weeks or more. Hydrogen gas can be explosive under these circumstances.
If the hot water has not been used fi)r two weeks or more, prevent the possibility of damage or iqjury by
turning on all hot water timcets and allowing them to mn fi)r several minutes. Do this befi)re using any
electrical appliance which is connected
to the hot water system. This simple procedure
will allow any
built-up hydrogen gas to escape. Since the gas is flammable, do not smoke or use an open flame or
appliance during this process.
PROPER
INSTALLATION
This washer must be properly installed and located in accordance with the Installation Instructions
before iris used. If you did not receive an Installation Instructions sheet, you can receive one by visiting
ge.com or by calling 81_.G£CARE$ (800.432.2737).
•
Install
or st()re where
to temperatures
the weather,
damage
below
which
it will not
be exposed
fl'eezing
or exposed
could
and im'alidate
cause
• Properly
to
pei_nanent
ground
washer
to confi)rm
goxeming
codes and ordinances,
in Installation
Instructions,
with
Foll(m
all
details
the _m'ant)
YOUR
LAUNDRY
AREA
• Keep the area underneath
and around _our,
appliances fl'ee of combustible
materials such
as lint, paper; rags, chemicals, etc.
• Close supervision
is necessa_ y if this appliance is
used by or near children. Do not allow children
to play on, with or inside
appliance.
this or any other
g_com
WHENUSINGTHEWASHER
Use this
appliance
only for its
intended
purpose as
described in
this Owner's
Manual.
• Never reach into washer while it is mtMng.
_Mfit until the machine has completely stopped
befin'e opening
the lid.
• Do not mix chlorine
bleach
with ammonia
or
adds such as vinegar and/or
rust removei:
Mixing different chemicals can produce
a toxic
gas which may cause death.
• Do not wash or (hy articles that have been
cleaned in, washed in, soaked in or spotted with
combustible
or explosive substances (such as
wax, oil, paint, gasoline, degreaseis,
dry-cleaning
solvents, kerosene, etc.). These substances give
off \'apoi_ that may ignite or explode. Do not
add these substances to the wash watei: Do not
use or place these substances around
washer or dryer duling operation.
your
• The
laundI
retaMancy
7 process
can
of flJbrics.
To avoid
reduce
careflllly
fbllow the garment
_V;Ish
and care insti tlctions.
tile flame
such
a result,
manufi_cmrer's
• To minimize the possibili F ot electric shock,
unplug this appliance fl'om the power supply
or disconnect
the washer at the household
distribution
panel by removing the Rise or
switching off the circuit breaker before
attempting
any maintenance
or cleaning.
NOTE: Turning the Cycle Selector knob to an
off position does NOTdisconnect
the appliance
from the power suppl>
• Never attempt to operate this appliance if it is
damaged, malflmctioning,
paifially disassembled,
or has missing or broken parts, including a
damaged coM or plug.
WHENNOTIN USE
\'ka-
• Turn off water fimcets to relieve pressure on
hoses and \_fl\'es and to minimize leakage if
a break or rupture should occtu: Check the
condition
of the fill hoses; they should be
replaced every 5 veals.
• Do not attempt to repair or replace any part of
this appliance
Ulfless specifically recolnmelMed
in this Owner's Malmal, or in published
use>
repair instructioi]s
that you ui]delstand
and
have the skills to carIw out.
• gefiwe discarding a washei; or ren]oving it
fl'oln service, relnove the washer lid to prevent
children from hiding inside.
• Do not talnper with controls.
READANDFOLLOW
THISSAFETY
INFORMATION
CAREFULLY.
SAVETHESEINSTRUCTIONS
3
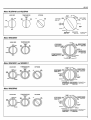
About the washer controlpanel
You can locate your model number on the back of your washer.
0
• Select load size and
otherwash options
° Add clothes
• Add detergent
• Select wash cycle
• Add dilutedfabric
softener(on models
with a fabric
softenerdispenser)
Quick
, Closelid
° Pull knob
Start Guide
Model WBSR3140 and WBSR3000
LOAD
SIZE
TEMPERATURE
HF_.VYMED,
LIGHT
WASH/I_NSE
LARGE
o
SMALL
SUPER
COLD
COLD
WARM
COLD
e
COTTONS
HOT
COLD
LIGHT
OEL,_
NORMAL/EAST
POWER
MEDIUMHEAVY
eLIGH_
WASH
NORMAL/FAST
AUTOSOAI( 15
HEAVY
EXTRA
HEAVY
PUllKnobToSta_.
pushToStOO
Model WCSR4170
LOAD
SIZE
TEMPERATURE
OPTIONS
ZNDRINSE
WJ_SI_PJNSE
SUPER
e
RESET
e
COLD
COLD
WARM
COLD
e
HOT
COLD
OFF
2nd
RINSE
SOAK HEAVY
MED.
UGHT
EXTRA
UGRT
OR_N
COTTONS
EASY CARE
RINSE
GENTLE/FAST
NORMAL/FAST
2ND RINSE
MEDIUM
OPTION
SM_LL
EXTRA IJGHT
PREWASH
NORMAL/SLOW
4
DELICATES
GENTLE/SLOW
Pull KnobToStart
Push
To Stop
ge.COITI
Model WJSR#160 and WLDSR#16
LOAD
SIZE
TEMPERATURE
OPTIONS
r_H/RTN$_
SUPER
RESET
e
e
ZNDRINSE
OPTION
OFF
WARM
COLD
COLD
COL
ROT
OLD
OFF
SnS
_C
!_
_a
O_NSE
SOAK ffFAVYMEG,
UGHT
FF_
UGHT
MEDIUM
HEAVY
COTTONS
NORMAL
/ FAST
EXtrA
CARE
OF_
V
_
_
"_
RINSE
GENTLE/FAST
& SPIN
2ND RINSE
OPTION
MEDIUM
AUTOSOAK15
SM_LL
EASY
UGHT
PREWASH
OELICATES
NORMAL/SLOW
PuO Knob To Start
GENTLE/SLDW
Push To Stop
Model WHDSR315
LOAD
SIZE
TEMPERATURE
HEAVYME0,
LIGHT
W_I/RINSE
SUPER
RESET
WARM
COLD
I EASY
COLD
HOT
CARE
J
GENTLE/FAST
NORMAL/FAST
• LIGHT
- EXTRA LIGHT
[OELICATES J
GENTLE/SLOW
POWER
SMALL
WASH
]
NORMAL/FAST
_AUEOSOAH30
RINSE
PUllKnob
HEAVY
To Start-
Pu shToSt°P
Model WHDSR417 and WSERR417
LOAD
SIZE
TEMPERATURE
W_UP,
OPTIONS
LVS_
WARM
SUPERRESET
COLD
COL0
OFF
HOT
_
OGAIN
2nd
OFF
LIGHT
EXTRA
LIGHT [
_ _ _
RINSE
GENTLE/FAST
_:_,:_
- DEE
I_2ND
mNSE
MEDIUM
LIGHT
AUTOSOAK15 _
I DELICATES
NORMAL/SLOW
I
PushPu/IKB°bT°StartTo
Stop
GENTLE/SLOW
Model WHDRR418
LOAD
SIZE
TEMPERATURE
OPTIONS
_SII/PdNSE
WARM
SUPERRESET
COLD
COLD
HOT
OFF
DRAN
2nd
2ND RINSE SOAK HEAVY
OPTION
MEG.
OFF
_
L GHT
_!!!
i_iiii_ !Ji)jii
!ii_
EXTRA
&SHN_
ii
NORMAL/FAST
LOHT
IEASY GENTLE/FAST
CAREI
RINSE
....
_iiiiiiiii_/iii;iiiii_i_
_
& SHIN
i_iiiii!i!iiiiii!;iii!_
EXTGA
MEG UM ="
HEAVY
OFF
RINSE
LIGHT -
OPTION
AUTOSOAK
15
MEDIUM
*
AUTOSOAK3S
NORMAL/SLOW
LIGHT
EXT.A.G._
GENTLE/SLOW
5
About the washer controlpanel
Model WJRR4170
LOAD
SiZE
TEMPERATURE
OPTIONS
WA_/PJNSE
SUPER
WARM
COLD
COLD
LIGHT
HOT
2rid
OFF
L GHT
RINSE
GENTLE/FAST
sP,.
i:J
o
_INSE
o,.o.
}:
SMALL
PREWASH]
UGHT
JDELiCATES
L
NORMAL/StOW
}J Pu//KnobToStart
Push TO Stop
GENTLE/SLOW
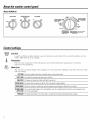
Control settings.
Load Size
i,ooselv
load
clothes
no higher
than
the
top
row
oI holes
in the
washer
basket.
The
water
level
should
just
cover
the
clothes. A(!just the load size accordingly.
Temperature
Select
the
water
temperature
for the
wash
and
rinse
cycles.
_Mwa_:s ti)llow
thbric
manufi_cmrer's
care
label
or
instructions when laundering.
Wash Cycle
The wash cycle controls the length of the washing process. The chart below will help you match the wash cycle setting
with yore" clothing.
COTTONS Forheavyto lightlysoiledcottons,householdlinens,workandplayclothes.
EASYCARE Forwrinkle-freeandpermanentpressitems,andknits.
DELICATESForlingerieandspecial-care
fabricswith lightto normalsoil.
POWERWASH Forheavilysoiledandheavy-duty
fabrics.Thiscycleprovidesa longeragitation.
POWERRINSE Providesanautomatic,seconddeeprinsetothoroughlyremovedetergentor bleachfromyourclothes.
15MIN/30 MIN Forverysoiledclothes.Beginswith a briefagitation,soaksfora specifiedperiodof time,thenmovesthroughthe rest
AUTOSOAK ofthe cycleautomatically.
PREWASH Forheavilysoiledclothesor forclotheswith a carelabelthat recommends
prewashingbeforewashing.
About the washer features.
NOTE: Not all features are available on all washer models.
2nd Rinse Option (onsomemodels)
OPTIONS
OFF
ge.com
2nd
RINSE
\_l_en
you
use
extra
detergent
or
bleach
to clean heavily soiled clothes, you may
want to tlse the 2ndRinse option. It
provides a second deep cold rinse. On
some models, this option can be totmd
on the cycle selector knob.
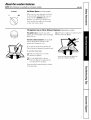
The Agitator Cap or Fabric Softener Dispenser (depending
onmode/)
Theagitator cap tits into the top of the
agitatm: ]fit accidentally
comes off, simply
put it back on.
_'] Add water to dispenser
_
the maximmn
fill line.
tmtil it reaches
The fabric softener dispenser a t m )matically
releases
I)r°I)er
liquid
time
tid)ric
dining,
softener
the
at the
cycle, .
Do not stop the washer during the first spin.
This will cause the dispenser to empty too soon.
Touse, follow these steps:
E_] Make sm'e dispenser
attnched to agitntm:
is seem'ely
_-_ ILrse onE, liquid ed)ric softenei:
Pore" into dispense_; using amotmt
recommended
on package.
Never pour fabric softener directly on clothes.
/t may stain them.
Do not pour anythinginto flTeagitator if flTe
agitator cap or dispenseris removed.
About the washer features.
NOTE"Not all features are available on all washer models.
Cleaning the Fabric Softener Dispenser (on some models)
[Z]
]_emo',e
I )arate
['_Se
on
the
the
dispenser
ti'om
I)enser
the
inside
dis
of the
the
I
cu )
cup with
top
ot the agitator;
fl'om the co',er
your finge_s.
,,
I
,
I
I
1)'_ gras )ing the to ) and
)ushin,,
Dispenser
cup will pop fl'ee fl'om
,_ down
the
Co_, ei;
rj]To
Separate for cleaning.
clean
fidlowing
the dispense_;
solution:
soak
both
the
dispenser
•
1 USgallon(3.8liters) warm water
•
1/4 cup (60 ml) heavy duty liquid detergent
•
I cup
cup
and
the
dispenser
coxer
in the
(240ml) bleach
[-_]f
necessary;
brush;
)ou
loosen
1)uildup
with a (lean, soft cloth after
ma) roughen
the sm_fi_ce of the (lispense_:
N
Rinse
reassemble
and
dispenser
Place
dispenser
back
soaking.
on
the
Do not
use a stiff
agitator
Liquid Bleach Dispenser (onsomemodels)
The
dispenser
[Z]
Check
['_
Measm'e
[_]
dilutes
clothing
liquid
care
liqtfid
labels
bleach
•
Never pour undiluted
•
Do not pour
•
add
Do not mix chlorine
the
wash
it reaches
load.
on the bottle.
instructions
dispenser
pore" nleasured
amount
or o_ e_filling,
disi)enser
basket
vet:u" wash
bleach dkect/y onto clothes or into the wash baskeL
into bleach
with
bleach with ammonia
Mixing canproducea
before
instructions.
following
liquid chlorine
powderedbleach
it into
1)leach
fi)r special
carefull):,
Before
starting
the washe_;
disi)enser
A_oid si)lashin_,
bleach,
8
chlorine
wmr
oI bleach
dire('tl)
into 1)lea(h
]f_ou, I)refer to t/se [)owdered
(lete_gent.
or acids such as vinegar and/or
toxic gas which may cause death.
rust remover
Loadingand usingthe washer.
Always
_
follow fabric manufacturer's
care label when laundering,
ge.com
SortingWashLoads
Sort by color (whites, lights, col(n_), soil lexel,
rid)tic t},pe (sturdy cottons, easy care, delicates)
and whether the _abric produces lint (ten T cloth,
chenille) or collects lint (velveteen, cordm'(U).
ProperUseof Detergent
Add detergent
and stnrt the washer before adding
clothes so that the detergent
can work effectively:
Using too little (:,r too nluch detergent
is a common
Ca rise
of la tlndI'y
problems.
You can use less detergent
if you have soft water;
a smaller load or a lightly soiled load.
Loadingthe Washer
I,oad dry items loosely, no higher than tile top
row of holes in the washer basket. When loading
wet items, make sure you set the load/water
level
high enough
to allow the items to move freely.
_4"_ter level should just cover the clothes. To add
items atter washer has started, push in Cycle
knob and submerge
additional
items next to the
agitator.
Close the lid and pull Cycle knob out
to restart.
• Do not wrap long items like sheets or pants
around the agitator.
• Do not wash fabrics containing flammable
materials (waxes, cleaning fluids, etc.).
• Agitation will not start with the lid up.
Loadingand usingthe washer.
\!/._
_------"
Always
follow fabric manufacturer's
care label when laundering.
Careand Cleaningof the Washer
Wash Basket: I,eme the lid open after washing to
allow moisture to e;'aporate,
lf}ou want to clean the
basket, use a clean soft cloth dampened
with liquid
detergent,
then rinse. (Do not use ha_h or gritty
cleane_.)
Fill Hoses: Hoses connecting
should
be replaced
washer
Moving and Storage:_k the service technician
to
remo_e water fl'om drain pump and hoses. See the
Installation
Instructions
packed with product for
infi_mmtion
on how to reinstall the shipping rod to
keep the tub stationa_w when moving the washe_:
For more infimnation,
visit go.cam or call
800.GE.CARE$ (800.432.2737).
Do not store the
washer where it will be exposed to the weather:
to fimcet
every 5 xea_.
Exterior:hnmediately
LongVacations:
Be StlI'e water supply is sit lit eli at
damp
fimcets.
wipe off an} spills. X,\qpe with
cloth. T D not to hit surli_ce with shaq) objects,
Drain all water fl'om hoses if weather
be below fl'eezing.
FabricCareLabels
Below
are rid)tic
care label
"sxmbols"
that
affect
the clothing
you will be laundering.
WASH LABELS
wash
cycle
__
__
Nora,
a, pwrinkle
..........
tPress/ delicate
Gent_em
resistant
Hand wash
Water
temperature
• •
•
• •
Hot
•
W....
(50°C/120<'F)
DonotwoshDonotwrh_O
CoN/cool
(40<'C/105°F)
(30<'C/85<'F)
DRY LABELS
,. o,oNFOIFON
D
dry
Dry
.o,, e
setting
High
Normal
Permanent Press/
wrinkle resistant
Gentle/
delicate
Do not tumNe dry
® ® •
Medium
Low
No heat/air
Pq
instructions
Line dry/
hang to dry
Drip dry
Dry flat
BLEACH LABELS
SymuOtS
10
Any bleach
(when needed)
Do not dry
(used with
do not wash)
Dilly ....... hlorine bleach
(when needed)
Do not bleach
In the shade
xdll
Before you call for service..,
gecom
Troubleshooting -tips
Save time and money! Review the charts on the following pages, or
visit ge.com. Youmay not need to call for service.
WATER
Toomanysuds
Possible Causes
What To Do
Type
* Switch
of detergent
to a lower
iustrucfious
Soft
water
Too
much
detergeut
braud
aud
fl)llow
• Try less detelgent.
detergent
• Measure
have
Water leaks
sudsiug
ou package.
Fill hoses
or dxaJn
improperly
hose
is
• Make
cmmected
your
detelgent
soft water;
sure
rubber
hose
The
hose
washei_
is not
load
Use
colmections
are tight
Make
installed.
less soap
or a lightly
are
is correctly
drain hose
the collar
fl'om tile
careflllly.
a smaller
if wm
soiled
load.
at faucets
sure
end
inserted
in and secm'ed
should
be inserted
into
and
of drain
to drain
ti_cili_i.
the washer and
or clip should
be screwed
in. Remove
any kinks
dI'ain hose. Make sure that tile hose com_ection
strained
when
the washer
is pushed
close
to the
wall.
Household
&cain
may be dogged
• (3heck
household
pluufl)ii_g.
You
nmy i_eed
to call a
plulnbeI:
Cm_tmat
water pressure
hoses at the water source
to the fill
• Tighten
hoses
each use.
at tile timcets
• Check
condition
e;'eYv 5 veal'S.
Using
too much
detergent
ha
smaller
Ftll hoses,
washers
mad screens
load
• Check
tile
the washer
• I,ooselv
in the
above
Watertemperature
incorrect
seems
Cooler
water
hnproved
temperatures
energy
Control
is not
provide
• New
efficiency
set properly
Water
supply
is turned
or improperly
Water
valve
stopped
off
screel_s
are
up
load
with
wash
l)eI'J[oIIn_l
are
TtlYU
o]1}
no
not
Water
won't
drain
Drain
water
heater
is
hose
hnproperly
is kinked
cmmected
• Make
sure
• Straighteu
on
haxe
screens
be replaced
soti water,
have
and
a
been
screens
should
the top
row
of holes
water
should
bej
ot the
beei_
ti)i_n ulated
to
without
aflectiug
teml)eratures
ust
hot
coutrol
(ou
seine
models)
or
a(!iust.
and
cold
COlmected
tile
than
level
telnperature
water
hoses
house
at 120°F-140°F
or
if you
and
have
water
aim
colmection
set properly
should
washei_
higher
The
timcets
fifth'
to correct
taucets.
SO/li'ce aud
i'ei/love
ti'oln
a brush
or toothpick
Recoi_nect
tile hoses
House
they
off after
IlCe.
water
both
water
load.
washei_
detelgelKs
cooler
knob
hoses
•
clothes
la tmdlT
• Turn
commcted
tile
e\'eI T 5 veaI_.
work
Cycle
soiled
Fill hoses,
washer
basket.
the clothes.
• Check
less soap
rubber
correctly:
be replaced
Overloading
Use
or a lightly
that
installed
mrn
of the fill hoses;
• Use less detergent.
washer
and
tile
upper
on and
tile
back
heater
sure
water
of tile
to clean the screens
and tui'n tile water
water
inake
washei:
Use
in the umchine.
back on.
is deliveling
water
(48°(;-60°C).
draiu
hose
aud
nlake
sure
washer
is wet sittiug
it.
• Top of drain
above fleet:
outlet should
be less than
8 ft. (2.5 m)
11
Before you call for service...
WATER
Waterfills and drains
at thesametime
Possible Causes
What ToDo
Sipholfing
• If your standpipe
or drain fiw the washer is less than 3
feet off the floo_; the water will drain fl'(nn the mb while
it is filling. I,ifiing the drain hose at least 3 teet off the
floor will allow the water to relnain ill the tub until the
I)UlnI ) drains it out. The anti-sii)hon
clip will lilt the drain
hose high enough to do this. The anti-sii)hon
clip is
included with the installation
parts package ti)r your
washei:
• Another way siphoning
can occur is if the standpipe
is
stttfl'ed with rags or other items that prevent air fl'oln
escaping with the watei: Mr flow is needed to break the
suction.
• Check to make sure only the straight part of tile drain
hose is inserted into the'standi)ii)e;
no ribs of the drain
hose should be ill the standpipe
or drain pipe.
• The washer drain ii/tlst be 3 teet or more off of the floor
to I)revent the washer fl'oln draining during fill. If your
washer drain is less than 3 teet above the flooi; use the
anti-sii)hon
clip shipi)ed with your washer to attach the
drain hose to the back of your washe_: The clip will hold
the drain hose ill place and ensure that the washer does
not self'drain during fill. See installation
instructions
tor
details.
• Only tile
inserted
the hose
drain as
straight top portion at the drain hose should be
into the drain. Inserting the ribbed section of
may create a siI)hon, and cause the washer to
it fills.
" If the drain opening is excessively tight around tile drain
hose, or if the opening around the hose is closed with
rags or other material, a siphon may occm; and the
washer will drain as it fills. T() avoid this problem,
ensure
that there is open area around the end (ff the drain hose
to allow air to flow into the drain as water is i)umped out
of the washe_:
OPERATION
Washer pauses
spin cycle
during
Washer won't operate
Possible Causes
What To Do
This is normal
• The washer ma_, pause durin(,_ the spin cycle to remoxe
soapy water inore efficiently.
Washer
• Make sure cord is plugged
is unplugged
Water supply
Controls
properly
is turned off
are not set
Lid is open--safety
prevents agitation
when lid is up
Circuit breaJ_er/fuse
tripped/blown
PERFORMANCE
Colored spots
[2
• Turn both hot and cold taucets
• Check controls
to ON position.
feature
mad sphmhlg
is
securely
• Close lid and reset cycle, to the beginning
• Check house
reset breaker.
Incorrect
softener
• Check tid)rk sottener package
directions fin" using dispense_:
• Pretreat stain and rewash.
• Sort whites
is pulled
out
if' necessa_a:.
circuit breake_/fllses.
Replace fllses or
_._lsher should have separate outlet.
What ToDo
Dye _'m_sfer
outlet.
flfllv on.
and inake sure Cycle knob
Possible Causes
use of fabric
into a working
or lightly
colored
lot instructions
items from
and tollow
dark colo_.
ge.com
PERFORMANCE(cent)
Grayed oryellowed
clothes
Possible Causes
What To0o
Not enough
* [)se more detergent
(espe(iallv with larger loads).
sure to follow detergent
manuthcturer's
directions.
Haacd water
* Use a water conditioner
a water so]'[ellel:
Water is not hot enough
* Make sure water heater is delivering
120°F-140°F
(48°C-60°C).
_;asher
* Select load size to match
is overloaded
Detergent
dissolving
tint or residue ou
c/ethos
detergent
is not
like Calgon
clothes
brand
Be
or install
water at
load.
• Add detergent
as wash basket fills with water before
?on load clothes.
Dye traaasfer
* Sort clothes by colo_: If filbfic label states wash separately,
unstable dyes may be indicated.
C3othes axe air or line dried
• If you do not dry your clothes
clothes may retain more lint.
with a clothes
Incorrect
sorting
• Separate
lint collecto_.
_;astfing
too long
Detergent
* _lsh
not dissolving
lint produce_
small loads tb_ a shorter
• Add detergent
load clothes,
• Try a liquid
• [)se
Overloading
Dora
wan//er
softener
}on
detergent,
water
tei//pel'ilttlre,
* Load clodles no higher
washer basket.
use of fabric
larger loads.
as wash basket fills with water; beibre
than the top ro_ of holes ill tile
• Make sm'e load size selected
Incorrect
time than
dryer; your
• Check thbric softener package
directions for using dispensel:
matches
clothes
load size.
_br instructions
and follow
Pilling
Result of normal wear on
poly-cotton blends and
fuzzy fabrics
* _Aqlile this is not caused b) tile *<_she_; }tin can slo_ tile
pilling process by washing garments inside out.
Snags, holes, tears, rips
or excessive wear
Pins, snaps, hoolcs, shm-p
buttons, belt buckles,
* Fasten
zippers and sharp objects
left in pockets
snaps, heels,
buttons
and zippel_.
• Remove loose items like pins, objects in pockets
and shmp buttons.
• Turn knits (which snag easily) inside
Undiluted
chlorine
bleach
* Check bleach
package
instructions
out.
tot proper
amotmt.
• Never add tmdiluted
bleach to wash or allow clothes
to come ill contact with undiluted
bleach.
Wrinkliug
on them
ChemicaJs _<e hair bleach
or dye, permanent
wave
solution
* Rinse items that may have chemicals
washing.
Improper
* A_oid mi_ng heax 3 items (like work clothes)
light items (like blouses).
sorting
be%re
with
• Try a lid)tic soitenel:
Overloading
or
incorrect water level
* Load your _;isher so clothes have enough room
to move fi'eely with water covering all of the clothes.
Incorrect
wash aaad
dry cycles
* Match Cycle selection to tile t}])e of fitbric you are
washing (espedally ior easy care loads).
Repeated
washing in
water that is too hot
* Wash ill warm or cold watel:
1_
Before you call for service...
NOISE
Washer is noisy
Possible Causes
What To Do
Washer
• To level the fl'ont of the washer, a_!iust the front leveling
legs by rotating the individual leg in the proper direction
for up or down. To level back of washe_; lilt back of
machine 4" (11 cm) and set down.
is ulleven
Washer load is
unbalanced
• Push the Cycle knob in to stop the washe_; open the lid
and redistribum
the load evenly. Close the lid and restart.
Shipping
in refit
• To relno_e shipping rod ti'Oln washei; pull yellow tag and
attached rod fl'om the bottom right hand side of washer.
rod is still assembled
Washer is sitting too close
to wall (causes knocking
during cycle)
Whistle
or knock
during
Clm_ldng or clmff&_g
• Pull washer
needed.
f'dl
away ti'om the wall; about
4" (11 cm) is
• Nomml sotmds dm_ing fill include the water filling
in through
the house plumbing.
_s the water pressm'e
goes up and down, a knock or hammer can develop.
Make sure the wamr taucets are fllllv turned on.
• Many washe_ haxe featm'es such as pulse agitation and
pauses dm_ing rinse and spin fin" reduced clothes wear
and to reduce likelihood of soap residue. These short
pauses of less than 1 minute are nomml and will reduce
clothing wear and increase water extraction.
Sotmds such
as a metallic knock, double knock or met;dlic chink
occur when the washer transitions fl'om a stop or paused
state to running
or spinning. They occm" several times
per wcle after speed changes or pauses.
Nomml sounds during fill include the sotmd of water
flowing through yore" household
pipes. Additionally,
a
knock or hammering
so/uld ulay also occ/lY when the
washer water \_dves tm'n off'. To reduce this noise, make
sure that the washer fill timcets are flflly opened.
• Your washer will pause between the warious wash, rinse,
spin and drain portions of the wash wcle. It may also
pause dtu_ing agitation if a Pulsed Agitation cycle is
selected. Sotmds such as metallic knocks or clinking may
occm" dtwing these transitions fl'om framing to stopped
or fl'om stopped to running.
Thev may also occm" if yore"
machine changes speeds or brakes dm_ing a wash cycle.
OTHER
Labels on the exterior
of the washer will not
peel off cleanly
/4
Possible Causes
What To Do
Occasionally
the adhesive
used on the labels does
• Use a hair (hTer set at the lowest heat
the air at the label for a short amotmt
not release clemlly
release
oI the
the adhesive
washex;
easily,
without
setting,
directing
of time. This will
damaging
the
surfhce
GEWasher Warranty.
Aft warranty service provided by our Factory Service Centers,
or an authorized Customer Care® technician. Toschedule service,
on-line, 24 hours a day, vis# us at ge.com, or call 800.GE.CARES
(800.432.2737).Please have serial number and model number
available when calling for service.
For The Period Of."
Staple your receipt here.
Proof of the original purchase
date is needed to obtain service
under the warrant_
We Will Replace:
One Year
From the date of the
originalpurchase
Anypart oI the _z_sher which tifils due to a detect in materials or workmanshii_.
During this
limited one-year warranty, we will also i)rovi(le, free of charge, all labor and related service to
replace the (lefecti\'e part,
What Is Not Covered:
•
Service
trips
to your
home
to teach
you
how
to use
•
Damage
to the product
or acts of God.
•
Incidental
the product.
•
Improper
•
Failure
used
installation,
delivery
of the product
for other
than
or maJntenm_ce.
if it is abused,
the intended
misused,
purpose
or
or used
•
commercially.
•
Replacement
breakers.
•
Products
working
or consequentiaJ
defects
with
Defects
or dmnage
by accident,
dmnage
caused
fire,
floods
by possible
this applimlce.
due
to operation
in freezing
temperatures.
of house
which
caused
fuses
are not
as described
or resetting
defective
in the
of circuit
or broken,
Owner's
or which
•
Damage
caused
•
Product
not
after
delivery.
accessible
to provide
required
service.
axe
Manual.
I
Any impfied warranties, including the implied warrauties of merchautability or fituess for a particular purpose, are limited to
I EXCLUSIONOFIMPLIED
WARRANTIES--Your
one year or the shortestperiod
allowed by law.sole and exclusive remedy is product repair as provided in this Lim#ed Warrauty.
I
I
This warranty is extended to the owinal purchaserand any succeedingowner forproducts purchasedfor home use within the USA.If the product is
located in an area where servtceby a GEAuthon#ed Serviceris not available, you may be responsible for a trip charge or you may be requked to
bnbg the product to an Authon#ed GEServicelocation. In Alaska, the warranty excludes the cost of shipping or servicecalls to yourhome.
Some states do not allow the exclusionor hrnitation of incidental or consequentialdamages. Thiswarranty gives you specific legal rights, and you
may also have othernghts which van/from state to state. Toknow what your legal nghts are, consult yourlocal or state consumeraffairs office or
your state# Attorney General
Warrantor:GeneralElectric Company.Louisville,KY40225
/5
ConsumerSupport.
gEAppliancesWebsite
Haxe
or need
a ques0on
an)
day of the
order
}ear!
assistance
For greater
I)a_ts or exert
schedtfle
ge.com
)our
with
appliance?
COlp_elfience
serxice
and
Tr)
taster
the
(;E Appliances
service,
you can
now
_._ebsite
24 hotu_
download
Owner
a day,
s Manuals,
on-line.
ScheduleService
Expert
(;E repair
setsice
your comenience
busii_ess
hours.
ge.com
is (mix one
24 hours
am
step
awa)
fl'om
(lax of the xear!
your
Or
door:
Get on-line
call 800.(;E.CARES
and
schedtfle
800.432.2737)
your
serxice
(huing
nom/al
at
RealLife DesignStudio
GE suI_ports
the
Universal
people
of all ages,
mental
abiliOes
design
ideas
sizes
and
concept--l_roducts,
capabili0es.
impaim_ents.
for people
800.TDD.GEAC
Design
and
with
ge.com
services
We recognize
For
details
disabilities,
the
of GE's
check
out
and
need
Universal
our
_.Vebsite
environments
to design
Design
that
for a wide
applicaOons,
today.
For
the
can
be used
range
including
heating
by
of physical
and
kitchen
impaired,
please
call
(800.833.4322).
ExtendedWarranties
Purchase
a GE extended
is still in efle'ct.
You
(;E
Home
Consumer
warrant'
ge.com
and
learn
about
can purchase
it on-line
Serxices
will still be there
special
allytime,
after
discounts
that
or call 800.626.2224
your
warran
are available
dtllJllg
while
ilOli/lal
your
business
warrant_
horus.
b expires.
PartsandAccessories
ge.com
Individuals
qualified to set_'ice their own appliances
can have parts or accessories sent directly to their
homes (VISA, MasterCard
and Discover cards are accepted).
Order on-line toda)', 24 hours every' day or
by I)hone at 800.626.2002
duling noi_nlal business houi_.
Instructions contained in this manual cover procedures to be performed by any user. Other servicing generally
should be referred to qualified service personnel. Caution must be exercised, since improper servicing may cause
unsafe operation.
ContactUs
ge.com
If vou are not satisfied
with the service w)u receive fl'om GE, contact
including
numbe_;
your phone
us on our X_'ebsite with all the details
or w_ite to: General Manage_; Customer Relations
GE Appliances,
Appliance
Park
i,ouisville, KY 40225
RegisterYourApplbnce
de. com
Register your new applimlce on-line---at your convenience! Timely product
ellhanced
COlllllltlllica0oll
You may also
mail
in the
alld
i)romi)t
pre-p_inted
serx'ice
registration
t/ildei"
card
the
tei_ms
included
I'egistI'a0Oll
of _otli" WalTallty,
in the
should
will allow for
the
need
alise.
I)ackim*_ material.
Printed in the United States