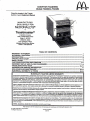
1
ooNVEYOR
TOA-9TER$,
ModelsTC208M,&
TC240M
tmcEoniios
rl.
PlacethischaplefirjtheToaqte.r
Section
of your EquipmentManual
MANUFACTURED
EXCLUSIVELY
FOR
McDONALD'S@
Toastmaster@
A MiddlebyCompany
1400ToastmasterDrive
Elgin,lL 60120
(708\7+1-3300
FAX (708)741"4406
Middleby Corp 24 Hour Service
Hotline 14W238-8444
TABLEOF CONTENTS
WARRANWSTATEMENT
WARNINGS
& CAUTIONS
INTRODUCTION
SPECIFICATION
CHART
INSTALLATION.
PARTSIDENTIFICATION
AND FUNCTION
EOUIPMET.IT
SET-UPAND CLOSEPROCEDURES
TROUBLESHOOTING
GUIDE.......
ORDERING
AND SERVICEINFORMATTON.
NOI.I.SCHEDU
LED MAINTENANCE
....
ELECTRICAL
SCHEMATIC
& wlRING
2
3
3
4
..............67
9
10-:l1
,.........-..
-11
12.17
orirrroUr-rirliirrrrrriirrrirtiii..r.j;44..i.i..,.r..r......i................
...r.... ji;;.r.;.i,...;..; 1 8-1 9
McDONALD'STOASTERLIMITEDW
All equipmentmanufacturedby ToasfnasterCommercialwhichis spld underthe Toaq@astef traqemarkand used fqr qgmlnerght
pytPoges wanantedagainstdefectsin materialsandworkmanship.The warrantyrunsfor one yeai (seeexceptionl)frqmthe.dite,
is
of originalinstallation
or 18 monthsfromtheoriginaldateof purchase,andis forthebenefitol theoriginalpurchaser
oniir.ALl Offidn
WARRANTIES,
EXPRESSOR IMPLIED,STATUTORY
ON OTNENWISE,INCLUDINGWTHOUTLIMITATIONAruYINAPUEO
WARRANTY
OR MERCHANTABILITY
OR FITNESSFORPURPOSE,ABE.EXCLUDEP,
Sellershalfin no eventbe liabtefor direot,
indirectorconsequentia|damagesinconnectionwithToastnasterConimercia|produdf'
Selle/sobligationunderthiswanantyis limitedto the repairof defectswittroutchargd,by a fastoryautirorized
seMce agency
or one
-proOlc,ts.
of its sub'seMceagencies.Suchrepairservicewillbe providedon custom6fsptefiisedexceptintne.ca*eof portabld
Modelsthat are consideredporhble (deviceswithcordand plugsexceptconveyortoasters)mustbe takenor shippedto the closest
....;...;
authodzed
sEMceagency,transportation
chargesprepaid.
Thiswanantyisnotefiectiveif
damageoccurs
becauseof
accident,
carelgssness,
prope.rsg!:upsupeMsion
iFproperingtallation,lackof
whenrequired;or, becauseequipmentis installedon a ditferentvoltage,slteamiti oas seMce thendesionatedon thE.eouioment
nameplate;
or, if the equipmentis installedor operatedin anymannerboritraryto.tire'insbilation
anbope-ritton
iistfucdons.'tiitteie
cases,repairswill be madeat a reasonablecost.Workperformedby unauthoiiziidpell*clnnetoi serviceag6niies voiOsttriswananty.
Autrcrizedserviceagenciesare locatedin principalcitiesthroughout
the UnitedStates.Thiswanantyis validin the 50 UnitedStates
andisvoidelsewhere.Pleaseconsultyourclassified
telephone
directory,yourfoodserviceequipmentOistributor,
or writethe Factory
ServiceDepartnent,Toastmaster'@,'l4ooToastTaster
tirive,Elgin,tttinoiiootz0,forinformation
andotherdetailsconcemingservice
of thiswarranty.
'NOTE: Exceptions
- ModelSS2,SinkSanitizerwarantyruns90 days.
Thismanualis for the exclusiveuseof licensees
and employeesof McDonald'sSystems,lnc.
@ .1995McDonald'sCorporation
All RightsReserved
Printed in March
EM T6
'
'":
i!:
.
rr,:,'
SAFETY
INTRODUCTION
, i : .:
'i..
& TC240Mtoasteriqqcomqleroial
Thd.$-OilelsTC208M
-English
conv6!'ortobsterdesignedto unifonily""toist
quantities,
continuusingeitherbatch.or
muffinsin large
individual
A partialloadswitchpermits
ousfeedmethods.
mutfintoastingwithoutchangingbatchsettings.
toasterat
WARNTNG:, ln case of fire de-endr:gize
switch.Thiswill cut off powerto the heating
disconnec't
the
eoplthusreduoing
andallowthetoestertro
elements
andmakingit easierto Stopthefire.
temperature
per
upto360muffins
Thetoasteriscapableof producing
hour.
CO.or
onlywith
CAUTION:Useafireextinguisherfilled
powered
equipment.
for
electric
Halonwhichis suitable
shouldbe grounded
acqordWARNING,'Thetoaste_r
gfingers
W ARNIN G,'Donotpickuplhetoasterbystickin
p"rpve.6[the.
possibility
of
csde$
tO
ingto localelectrical
shock
Elgctrical
andexftope,nings.
rrdth intotoasterentrange
a gblntlg;dl1€lg.eptacle
shock.lt requii-€S
electrical
cah'resdlt'
the
body
to
bums
and/or
separateelectricallines,prirtddtedby fuSesor cirosit
of theproperrating.
breakers
o-iusegasoline
donOtstol'e
CAUTION: Foryour,safety
ofthisor
inthevicinity
vapors
oiiiquiOs
orotherflammable
rdference.This
NOTE: Retaintnis mah$id
anyotherappliance.
manualprovidesdetailg$
operation of yourToag-t-6;,
tionto assistthe-qplptofineventof a maliun*ioin,
Thisfor the operatofand Shouid
and
installatign
,Sofne,
informa'
ridblemsin the
t'iiiiportanttool
available.
NOTE: UsinganypartsotherthangenuineToastmasthe manufacturer
ofall
terfactorysuppliedpartsrelieves
liability.
(lr/lanufacturer)
thedght
reserves
NOTETToastmaster
and productdesignwithout
to changespecifications
do notentitlethebuyerto conenotiee.Suchrevisions
or replaceimprovernents,
additions
changes,
sponding
previously
pr.rrchased
equipmenl
rnentsfor
...
Standard
PREQAUTION: HazardCommunication
(HCS)*The procedure(q)
inthischapterinclude
theuse
Thesechemigalproductq
willbe
of chgmicalprgd.uqts,
facelettersfollou/edbythgabbrefvith'bold
highli$hted
Standbrd
viation(HCS).SeetheHazardComri'iuriication
(HCS)Manual'fsr
MaterialSafetyData
the appropriate
(MSoS).''
Sheei(s)
is madeinAmerica
and
N Of E: f nispieceofequipment
sizgs
of
h4r{wgre.
All
hardware
metric
hasAmerican
andcanvaryin size.
areapproximatb
ccinversions
testingandrepairofelectrical
WenUWA,' Inspection,
performed
be
onlybyqualified
service
equipmentshould
persorihe].
Thelpastefslroulflbe qnplgggFd
whenserdrerequired.
vicing,excep!whenelectricaltests
circuit
WARNING,'Useextremecareduringelectrical
willbeexposed.
tests.Livecircuits
TOASTER,
SREo|F|CAT|ON
CHART
llaelal
overallDimensions:
width
Depth (tnctudes
2-114.
BackGuard)
4'Legs)
_ Height (tnctudes
Toasting ChamberDimensions:
width
Length
Heightof Opening
Tt\tnall
16-112'(419mm)
24'(61Omm)
x
16-114'(413qm)
16-1n'(419mm)
x
24"(61Omm)
x
16-114'(418mm)
11-112'(292mm)
x
15'(381mm)
x
1-5/8"(41mm)
(292mm)
11-112^
x
15' ( 381mm )
x
1-57sr
1a.tmm)
x
Approiciniate
Net Weight
51 lbs (23 kg)
51 lbs (23 kg)
ApproxiniateShippingWeight
56lbs (25kg)
56lbs (25kg)
Construction
Formed& WeldedSheetSteel
Finish
StainlessSteel
Cord
6tt. (1.86m)
6ft. (1.86m)
Plug
NEMA6.30P
(208V)
NEMA6.30P
(240V)
208V,1Ph,50-60
Hz,
2 Pole,3 Wire
240V,1Ph,50-60Hz,
2 Pole,3 Wire
3200Watts
3600Watts
15.4Amp
15.0Amp
20 Amp
20 Anip
20 Minutes
20 Minutes
360 Mutfins/Hour
360 Muffin3/Flour
Electrical
Totalwattage
TotalAmperage
MainPanelCircuitBreaker
Pre-heatTime
ProductionCapacity
WARNING:
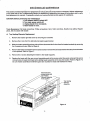
INSTALLATION
A. tnspect for Shipping Damage
'
giioie maliihdanyetestricatconnectionsbe sure
ttiE niainelectricalsupply souroeis turned"OFF
shouldbe ercamined
for damAll shippingcontaine.rs
g unloading.Thisequipmentwas C. Electricalconnection
agebeforeand'durin
carefullyinspectedand packagedat the factory.The
toastersarefactory
& TC24OM
The ModelTC2OSM
for its sale
freightcarderhas dssuniedresponsibil'rty
and
cord
with
equipped
lf
equipment
is
received
in
damand
delivery.
transft
Plug.
agedcondition,eitherapparentor concealed,a claim
mustbe madewith the deliveringcanier.
1. ApparentDamageor Loss - lf damageor loss is
apparentit mustbe notedonthefreightbillor express
receiptat thetimeof delivery,andit mustbe signedby
the canie/s agent (driver).lf this is not done, the
cardermay refusetheclaim.Thecanierwillsupplythe
necessaryctaimforms
2. ConcealedDamageor Loss- lf damageor lossis
NOT apparentuntil after equipmentis unpacked,a
requestfor inspectionof concealeddamagemustbe
madewith carrierwithin15 days.Thecarrierwill make
an inspectionand will supplyneoessaryclaimforms.
Be certain to retain all contentsplus extemal and
internalpackagingmatedalsfor inspection.
B. UnpackingToaster
1. Removestaplesfromcarlon.
2. Litt out foam packingand poly bag frorn around
toaster.
3. Carefullylift toasterout of carton.
4. Removeall loosepartsandthe informationpacket
fromthe carton.Be sureall loosepartsare removed
fromthe bottomof the carton.
5. Removethetoaster:fromthecartonandremoveany
parts or packing materialsfrom inside the toaster
chamber.Checkfor any damageto the unit or the
looseparts.
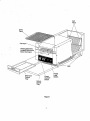
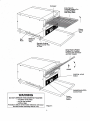
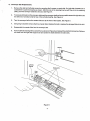
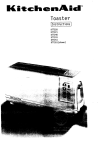
6. Instatlthe 4' legs shownin Figure 1 and place
conveyortoasterin desiredlocation.
7. Install the retum crumbtray by positioningthe
bracketson the sideof thetray againstthe frontlegs
of the toasteras shownin Figure1.
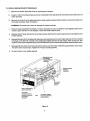
8. Installtheentryraclgslide-outcrumbtrayandexit
rackas shownin Figure1.
D. Checkingthe Installation
supplysourceoON".
1.Turnmainelectrical
SeeFigure1.
Switeh'ON".
PowerON/OFF
2. Fr,rsh
is movingforwardintotoaster.
3.Checkthatconveyor
areheating
checkthatall heatingelements
4.Visually
red.SeeFigure1.
andglowing
conveyor
LOADButton.Checkthat
5. PushPARTIAL
speedsup for 20 +/-5 secondsandthen retumsto
originalspeed.
Switch'OFF'.
6. PushPowerOIVOFF
7. Visuallyeheckthat all heatingelementsare no
longeron.
8. Checkthatconveyorhasstopped.
l=leatiqgEle^mentS
Locate.d
Aboveand
BeloWC6nveygr
Slideiout
Crgrnb
Tiai
Retum
Crumb
fray
Figure1
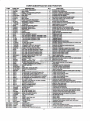
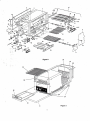
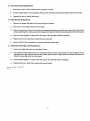
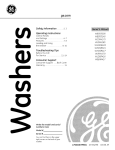
PARTSIDENTIFICATION
AND FUNCTION
ITEM
PART NO.
DESCRIPTION
'l
Encloses K
2
E!
t0 support
topheater
Attachesto
sidewall
UIIJE
o
4
3005r-
FANEI. T,OP.I-IEATER SU PPORT
/t,UU] /U
t,9I
5
U
7
I
:a74794rutJ4 FATT(iruLL
70"0704/.
EELTING
'l
irt 0121c
TJELI UNKU
3
30067
FFIONI FIgLLER WELDMENT
I
,/ti'1(,64
BEARINGS,FRONTASSEMBLY
10
/uu6l
31fft262
ijgotru
70059ttit
7006964
79o7045
I.IEAF{ HL,LLETT WELUM tsN I
t'EAIiINCi, F{EAFi,LEFT
1
tsbATtING, REAR FIIGHT
['FROCKETS
2
7007tr05
UNAIN
31Q7212
MASTER UNK
RAOK, ELEMENTGUARD
2
tt
1Z
13
14
15
16
IU
'19
30247
2Q
3UU5U
EO]UU
3156?
20
315CiJ
21
s99+o
't9
'zz
'4t
24
25
I\.T
A|\trL WtrLL'MtrNI
FANEL
IUM TANEL
EtAH|NGS, F.tic)NI
SPRINGS
2
z
I
1
''l
I 9I' FIEAI INCi. ELEMtsN I ASlitsMtsLY
| 9r. FrtsArrNu tsLbMEN t ASS_EM9LY24OV
't
z9913Zl
z0u6l6i:,
trr-trMtrN I Durr(Jrl
I ItFUl(,t\E I
i,
I
7004775
uuFitrw, a-,52x 1t+.,uLt HE
I'AT.TELTOF HEATER SUPPOFT
4
z6
ZT
ou4uv
D\.rr r Lrvr nEAr Ert Durr\rnl,
ntr':n I
I
?6
29
30u54
315E5
E'lJl tlt,M nERt
Lt
29
30
sl567
3B20A8SO1
tsL)| I(JM HtsATING ELEMENT 2O8V
EOTTOM TIEATING ELEMENT.[;240V
SCREW WASH HE)( HD 8.32 X 3/8'
iJl
it05rc
I HEFIMAL
Ert UUrrLrFil,
SNAI'
)vt
w
300,2757
Mf,z.r.:f,rr > LLLg
;J4
UIruZUUU
3(ru70
3(Xr69
ol-EE!J..|9Sr!!
3003EZE
273SZW2
IJN/L'TT
ity
4{)
41
z/lcv-(ruuu
|,Irrnu
il1zlztt4xruI
3()ul2;.6
42
4Z
4?
42
3(,b40
iJ1914
9064'l
3197:J
+z
30tro
U(iFTEW FAN
FU!'E
I"LU{i/U9f{lJ
rLU(:i/(J(,tlL,
l-LUg/UUt{U
t'LUG/(ruHp
rLUL'/UL,rtU
36
37
Itu
rts
l.It
1
26
IYDrLrl.tMEn
r !:ILTLLEn
j:i.r,
sl'EEu sdlN ! H9|-LEH KNQts .,_ili:1ij..
(j()NTf,tgLLEFl
Sl'EbD
GUABD Ti
DYYI I L'N
'l
r!I
OE
I r l/\.r\JLlll1:
'l
f't|I
MgUN
I ING
t'lN & SLEEVE{re€d h u.S.A
I WIS I LOgK{s€d h U.St
l'lN at ttLEEVE-Non/t .S-A& G€man}
I WIIJT LgGK{'lqdlJ.S-A e cflrgny
rlN at l'LEEVE{rs€d h G€rriar
1
1
1
'l
Drervl\tr,l,
I
49
i{EIAY A( ;tstis uooH
I EITMINAL ELOGK
ENTRY FACK
50
/tru9u56
EXr I tlAgK
1
51
i'UUT I
52
c5
7610645
152388301
c'tw556
co6til
321049
31616
Hts I UFTNUHUMts I }tAY
t'UDts, IN gftUME TBAY
59
EiturAu6S5
{ot shown
30664
{o1snown 30696
cools air in botl9mcompanment
Lonnec6 ran wfin Iermtnat DtocK
useo to mounttan
c0llu
27011-OO17
7008180
{ol snown /uu595/
{ol snown grg'rzb4
compEtescrpunto crmponenb
DnuIs oII curTer[ ro m9tor |I cullem
i'UU/l'
301z,2
Elementtoastsbo-tqmoJrteql
Elementtoasts bouomol nem
)d to atiach parts
rns toaster otf whenoverheatecl
1
1
47
I
55
56
57
5U
ll:
igtspFments electrlcal
hsuFlon Detvveen
neafng ebments and metal parts
Attacheselements
suppolb and attachesheaunoelements
Afaches elemenE
Attaohesto sldewallto supporttop heater
Attacttesto ilght std€wellto supportbottom heater
4
NUt, ntrru 1(}-itz
PUSHEUTTON SWTTCHWUGHT€BEEN
TIME DELAY RELAY
wl'lL
r"9
tvgs.meconveyor
ilitl,romrc|sspeeo or agnveyor
I UmSSpeeooornror|er
to a setspeeo
lhob ouad
'''l:ii.:
30075
30074
b4
TOASls.top
0f ltem
item
"-:(i0llV€[S nOm i|06 Ot 24UV lO IZOV l0r COnrOl C|rcUn
._....- ,,::i-,
. ...:,."::.;,.i
4
45
46
2w1371
I':I9I€$S 9l€ln9ols
Alrqcneslo.lqEts'^{flLlg€qppq4,Dllqrn n9ar9!
U]!iU
32
35
Bearingand springassemb
ACCeptsennereno oI nont conveyorsnan
Apply pressureto conveyor
Rearshaft of convEyor
ACCepls|en eno 0t rear @nveyorsnan
Acceotsr m eno ot rear convevorsnan
Engagewiul Dourenos ol cnarnIo dnve conveyor
yor
qnajn fink usedto dt€lssemDle
chain
it
U
U
it
zwogzs
Encloseselectncalcomponents
Protestionfrom tan blades
'temsnrcUgn toaster
Eenwnicn Cronveys
unl(s u/hichmal(eup rle conveyorDelt
Frontsnanot conveyor
z
I()F FttsAIIN(i ELEMENT Z4OV
BUS BATI
u I Ffirir MruA FttsAH
NU I nErU b-3i.
3102634
FUNCTION
of toaster
OTY
761UU,{tz
7008168
4
1
'l
qrErw rs roo nlgn
Toastercord& pin plug
Toaster@rd & twist lock plug
Toastercord& pin plug
Toalsfer
G6id&,lwrgtlspfiptug
-Toaster
cord&Tin plg$
Ataches too heateaauDoort
Danel
Momenraryswncnpusneolor parBattoaos
iMqU.Ft
tor time delayrelay
rltru\I
relay
/\ccessfoaedjusting
1
Loadsrtemsontoconveyor
Deliversitemsto retumcrumbtrav beneatn toaster
Fleceivesftemstrom conveyorand oatches crumDs
cabhes crumbsfiom nemsinsidetoaster
LE\iU, 3- E r_ALit\ rLAU t lV
UAl.LELi N{JN I'KIU
4
4
LAUtsL
[-AEEL, CAUTION HOT
Cautionlabel
Cautionlabel
spaceDetweenloaslerand wa[
Marntarns
LllsstDates
neatbetweentoa$er and rear panel
Attachessiclepanel
16
Toasfnasterlogo
4
Useclto holcl insulation in place
-Providesconnecfi
onbeiw6eleffi icafcomoonents
and maintenance
ToasteroDeration
rANtrL
HEAI1
INSIDE PANEL
D\ TTEYY
NAMEI'I.AIh
INSULAI ION GLIPS
WITtb, FIAfINESS
U9NVEY9H
I OASTER MANUAL
6
AOJU$aDle|egs USeOlO SUppOnne toaster
Non sKiclc€ D O N | e q
Figure2
EQUIPMENT
SET-UP
ANDCLOSEPROCEDURES
Set-Up:
1. Insertthe powercoid intoa propgi20 Amp.electrical
receptacle.
Close:
WARN[NG: Alwaysdisconneetelectrical poweror
unplug toaster and allow to cool before cleaning
or performing any service.
2. InstAtltheretum cruihbtrayby positioning
thebrackets
on the side of the tray againstthe front legs of the 1. Withthe conveyorrunningbnrshany crumbsoff the
oonveyorand ontothe crumbpan below.
toasteras shownin Figure4.
3. Installtheehtryrapk,slide-outcrurnbtrayandexitrack 2. Tum offthetoasteranddiseonnectelectricalpoweror
unplugtoaster.Thenallowtoasterto cool;
as shownin Figurd4.
4. Tum toasteron by pushingPowerOIVOFFSwitch 3. Cleanthe toaster exterior by wiping with a clean,
sanitizedtoweldampehedwith a hotsolutionof McD
oN.
All Purpose Goncenbate (APC) (HCS) as drawn
from the sink propoitioper.Rinse by wiping with a
5. Allow20 minutesfor warmup.
clean,dampsanitizedtowel.DO NOT uge abrasive
padsof scoudngcleansers.
Theywillscratchanddull
6. AdjustDARKER/LIGHTER
Knobto approximately'S"
the
finish.
tor toastinga normalbatchof 7 to 12 mutfinhalves.
4. Crumbtrays and racks:
7. Loadingmutfinsintotoaster:
NOTE:Muffinsare placed in toastercut sideup. .
WARNING:Hot Surface€ - DO NOT TOUCHHOT
Batch LoadingSURFACESOR REACI.IINTOTOASTERWHENIT
For batchloadingstagemuffinson bun spatulaand
ts HoT.
thenplacemtrffinson entryrackwith rackin lowered
position.Raiseentry rack to feed muffinsonto eonAfter the toaster has cooled, remove the slide-out
veyor.
crumbtray and the retumcrumbtray by slidingthem
ContinuousLoading.
out of the toaster.
Forpartialbata.hloading stagemuffinsdirectlyonentry
rackwith rackin raisedposition.
CAUTION:Do not remove slide-out crumb tray
while conveyor i3 moving.
8. Pressthe PARTIALLOAD Buttonfor a batch of 6
RempVethe entryrackand exit rackfrom toaster.
mutfinhalvesor less andthe conveyorwillspeedup.
It will resetto normalspeedautomatically
when the
partialloadhas beentoasted.
5. Wagtrthg S1ide.gut
crumbtray,retumcrumbtrayand
racK in ahot -s-olution
of McD All Purpose Concentrate (APG)(HCS).Removeany gold discoloration
WARNING: Always discon4gctelectricalpower or
f romthe f rorit of the slide-outcrumb tray by scrubunplug toaster before cl6aning or performingany
bing with a McD No Scratch Pad.
service.
9. Clearing
Jams:Usee:<femecautionwhen
removing
a productjam. lt is alwaysbeltertowaitfortoasterto
jammedproduct.
cool,iftimepermits,b6loreredi'oving
Unplugtoasterbefore
clearing
djdm,CAUTION:
When
clearingjams use cautionto not damAgeelements.
WARNING:DO NOTstick anythinginto the toast
ing chamber as you may damage the heating
elementsand cause electrical shock.
Rinsewell and sanitize by immersing in McDSink
Sanitizersolution (HCS)(1 pak in 10 galtons of
Remove parts from sanitizer soluwa-fm,,WFJ.gr).
titifi An-ciallow to air dry.
'!;::i:ij::fii'
...i.
;l
i,,.,:"
I
.
:
6r'r,iddh$sefibleall partsontooven.
CAUTION:DO NOT use excessive water or submerge toaster in water. Electrical pfobiems will
occur.
EntrvRackln Raised
PosilionFor Feeding
ProductOnto Gonveyor
And lnto Toaster
t
\
r
RAISE
PARTIALLOAD
Button
DARKER/LIGHTER
ControlKnob
WARNING
DO NOTOPERATETHE CONVEYOR
TOASTER:
. on either of its sides
. on iE rear surface
. without legs
Prematurefailureof the heaterelementswill occur
and the toasterwarrantywill be void,
Figure4
9
TROUBLESHOOTING
t,it[JuLEM
Producttoastddt6o dark or too light.
PROBABLE CAUSE
CORREGTIVE AGTION
DARKERAIGHf
ERcontrolknsb
notsetcorectly.
Setknobforcorrecfdarkness.
PartialLoadbuttonnotbeing
preqsedwhen6 or less
items'qr€bOingtoasted.
PressPartialLoad
buttonwhen
slidinglobdsof6 orless
itemsonloconveyor.
Usingrefdgerated
orfrozenmuffins. Mutfinsmustbeat room
temperature
beforetoasting.Allow
a2 dayoldrotation
whenusing
freshmuffins.
TimeDelayRelaynotsetconectly. Callservice
agency.
toasteroverneatsand shutsclown.
L;OOllng
tan dirty,
ulean Ine tan. Fo[ow proceoure
on PlannnedMaintenance
Card1.
Cooling fan unplugged.
Tum ON/OFFswitchand main
powerswitchoff, removebottom
coverand checkthat plug
on fan is pluggedin. Referto
Wiringdiagram.
Coolingfan defective.
Callseruiceagency.
Thermostatswitchoverheats
and opens.
Callserviceagency.
Toasterwill not heat up.
HrugInloasrer.
Tum mainpowerswiichon.
Replaceswitch.
Plugintodifferentreceptacle.
Replaceplugor powercord.
Callseruiceagency:
Callserviceagency.
r oa$er wlil neat up Du
conveyor does not move.
ForelgnoDJeet:blocKng
conveyor.
I um L|N/(JFFSwncn ano maln
powerswitchoffand remove
objectfromconveyor.
DriveMotorfuseis blown.
Turntoasteroffandcallservice
d$Qn0li..
Wire(s)loose.
10
, .r,,,'
Oallserviceag€ncy.
TRO-U
BLE-S
HI O.'T|
N,g,C,entinued
PROBLEM
Noticeablebum,ingsmell.
nemsteed into machinebut are not
delivdredto front of retumcrumb
tray.
PHOBABLECAUSE
CORRECTIVE
ACTION
Toasteditemstuckin toaster.
TumOl,l/OFFswitchandmain
powersffich 6ff andrembve
itemfromtoaster.
Toomanyaccum'ulated
crumbs
inslide-out
crumbtray.
Tumtoasterotfandletit cooland
thenremoveandcleanslide-out
orunibtray.RefertoPage10.
tsxfiracKnotinstalleclin machine.
rn$4ilexfi racK.HeTerrcHage5.
Item(s)stuckon exit rack.
Tum OIVOFFswitchoff and
removeitem(s).
ORDERING/SERVICE
INFORMATION
OrderingParts
Service
Useonlygenu.ine
ToastmasJer
(manufactu.rer)
reptace- lf iechnicathelp is neededcsntactyour localauthorized
mentpartsin yourtoaster.Useof partsotherthan
those seMce agency.Pleasehave the followinginformation
suppliedby rnanufacturer
voidsthe wanantyand U.L. readywhenyou call:
status.
NOTE:Model# and Sefiat# are found on the dataplate,
Yourauthorized
serviceagencyhasa padspricelistand refer to Figure5.
willbe gladto informyouof the costof yourpartsorder.
Manufacturer:Toastmaste
I
Localeyourdesiredpaft in the explodedpartsdrawing
and.tfe-r.r
findthe itemandpart numberof thepartin the Model#:TG208MorTG2&M
partslist.
Serial#
Listthefollowingorderinginformation:
NOTE:Modet# andSeia!# arefoundon thedata plafte, Problem
withtoasterandsymptoms:
referto Figure5.
Model#:TC208M
orTC240M
ManufacturenToastmaste
r
Serial#:
ItemNo(frompartslist):
PartNo (frompartslist):
RetumPolicy
Description:
An RGAnumber(Return
GoodsAuthorization)
mustbe
obtainedfromToastmaster
beforereturninga product.
Orderthe requiredpartsfromyourlocalauthorized
ser- Shippingchargesmustbe prepaidby buyer.Returned
goodsaresubjectto
vrceagency.
Toastmasters
inspection
andacceptance.,
DeliveryDateof Toaster:
LocalService
Agency:
Name
Number& Street
DahFi!.iri&d
A ha.ioftoidr
City,State,Zp
PhoneNumber
'i,
Figure 5
Data Plate Locatioh
t1
.
,i..
. i':..
.
.:
.
i
NON.SCHEDULED
CE
Beforereplaeement
partsund.nrnponents
asnecessary.
infonnition
forreplacement
ofvari'ous
Thissectioriprovides
problem
andtoverify
thecauseof the,
in determining
Section
forassistance
of anypartsreferto theTrgr.rbleshooting
serviceagencyfor assistance.
lf necessary
is required.
contactyourlocalauthorized
thatreplaoement
Beforeperformingany maintenanoe:
GAUTION:
1.TurntoasterON/OFF
switchOFF.
3:llill,l!1i"3lJil.;.#l!l"iT;"".
4. Allow toaster to cool.
Toots Neeessary: Flat bladescrewdriver,Phillpsscrewdriver,Set of Allenwrenches,Needlenose pliers, Ftegular
pliers,Set.otsocketswithhandle
A. Top Heating ElementsReplacement
1. Removethe toasterrightsidecoverby removingthe 6 screws.
2. Removethe 6 nutsfromthe rightsidetop.heatersupportpanel.
3. Slidethe heaterassemblypartwayoutandthendisconh€ctthe2 wiresfromthe heaterterminalsby removing
the 2 screwsand nuts.Referto Figure6.
4. Removetheheaterassemblyfromthetoasterandthenremovethebusbar(s)andthemicastripfrorntheheater
to be replaced.FlefertoFigure7.
5. Removethe 2 screwsattachingthe heaterto the heatersupporls,
6. Replacethe heaterwiththe newoneand reasemblepartsinthe reverseordertheywereremoved.Be sureto
beforeslidingheaterassemblyallthe way intotoaster.Referto Figure7 io
connectwiresto heaterterminals
be sureheaterassernblyand elementguardare mountedon studsand insertedintoholes.
Disconnect
and
wireswith
TopHeating
ElementAssembly
in this position
Top Heating
Element
Assembly
Figure6
Platewithstuds
andholeswhichis
mounted
on right
insidewallofoven
Mountheater
assembly
onto
studswhen
reassembling
guard
Element
mustbeinserted
into3 holesat each
endwhen
reassembling
Figure7
13
B . Bottom Heating ElementsReplacement
1. Rernovethe toasterrightside coverby removingthe 6 screws
Z. Loosen4 motormountingscrewsand movemotor/shaftto the rightandthenremovethe drivechainfromthe
motor sprocket.
g. Removethe 6 nutsfromthe rightsidebottomheatersupportpanelandthe 2 screwsto removethe wiresfrom
the heaterterminals.Referto Figure8.
WARNING:Be carefulnot to bendor damagethe heaterterminals.
to pry slightlyaJeachend of
4. Removeheaterassemblyfromtoaster.tt maybe necessaryto usea screwdriver
panel.
heatersupportbracket.Do not damageor bendthe heatersupport
S. Replacebottomheaterelementby removing2 screwsattachingit to heatersupportpaneland attachingnew
heaterelement.
6. Reassemblepartsin thEreverseordertheywere removed.Besureto insertheaterelementintothe2 bracket
openingson the leftside of toasterwhenslidingthe heatirigelementintothetoaster.Referto Figure8. Also
heaterassemblyintotoaster.
positionheatersupportagainstspringat endof shattbearingwhenreassembling
drivechainontomotorsprocketandthenpushthe motorto theleftto placetensiononthechain.
7. Reassemble
The drive chainmustbe tight.Tightenthe 4 motormountingscrews.
8. Connectwiresto newheatingelement.
wjrgs
BoJtom
HeqtingEieinent
A6Sdmbly
BottomHeating
Element
nssembly
Whenreassembling
heaterassembly:
The heater
elementsmustbe
positionedbetween
the bracket
openings.
The heatersupport
mustbe againslthe
bearingspring.
Figure8
t4
C. Conveyor Belt Replacement:
1. Removethe rightand left side coversby removingthe 6 screwson each side.On rightsideof toasteruse a
screwdrivertopushthe bearingas shown.Withthe holein the bearinglinedup witntne slotin the retaining
plate,pushthe conveyorshaftthru the slot. See Figureg.
2. To removeall tbnsionon the conveyorbettpushthe conveyorshaftas far as possibletowardtherightsideuntil
the left end of conveyorshaft is free of the left side bearing.see Figure9.
3. Tum the conveyorbelt so the masterlinksare at the frontof the toaster.See Figureg.
4. Usinglongnosepliersremovethethreemasterlinks.Replace
thebeltor replacethedamaged
linksinthe belt.
5. Reassemble
the masterlinksintothe conveyorbelt.
6. Pushtheleftsidebearingwithascrewdriverasshown
inFigureg andreinsertthe
shaftintothebearing.
Flelease
the shaftfromthe rightside supportslot and centerthe shaftbetweenthe sidewalls.
Figure9
t)
D. ElectricalComponentsReplacement(DriveMotor,Transformer,Fan,On/OffSwitch,SpeedController,
PushbtrttonPartidl LoadSwiteh)
1. Liftthetoasterontoits sideas shown.
the4 sciews
the bottompanelby r6moving
2. Remove
andreplace
components
arenowaccessible.
wiresoneatatimefromtheoldcomponent
Remove
3. Theelectrical
theoldcompohent
tothetoasterand
Remove
themonthe newcomponeht.
theScrews
and/ornutSaftaching
rernoveit. Mountthe newcomponent
ontothetoaster.
if necessary.
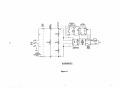
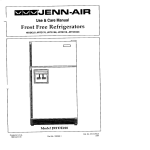
4. Usethewiringdiagramto helpconnectthewiresto thenewcomponent
bottompanel.using
the4 screwsthatwereremoved.
5. Replaoe
PartialLoad
Fushbutton
Swtbh
Speed
Conttolter
3---Transtormei
Figure10
l6
1. Removethe door in the left side coverby removing1 screw.
2. The time delayrelay is now accessible.Removethe relayfromits socketand replacewiththe newrelay.
3. Replacethe doorin the leftsidecover.
F. Relay Socket Replacement
1. Removethe toasterleft side coverby removingthe 6 screws.
.2. Removethe Time DelayRelayfromthe socket.
3. Removewiresone at a time fromthe old relaysocketand replacethemonthe new relaysocket.Removethe
screwsattachingthe old relaysocketto thetoasterand removeit. Mountthenewrelaysocketontothetoaster.
3. Usethe wiringdiagramto helpconnectthewiresto the new relaysocketif necessary.
4. Replaceside cover usingthe 6 screwsthat were removed.
5. Referto MRC#19 for instructions
to properlyadjusttimedelayrelay.
G. Automatic ResetHigh Limit Reptacement
1. Removethe rightside coverby removing6 screws.
2. The AutomaticResetHigh Limitis now accessible.Removewiresoneat a time from the old HighLimitand
replacethem on the new one. Removethe screwsattachingthe old HighLimitto the toasterand removeit.
Mountthe newHighLimitontothetoaster.
3. Usethe wiringdiagramto helpconnectthewiresto the newHighLimitif necessary.
4. Replaceside cover usingthe 6 screwsthatwere removed.
3Aa-s37^oosT
1n
LI
6
gE
F>
o
6
FG
=
b9
6>
tr2e
o*
FO9
>b
L
18
E,-l,,8 |eEF?
E
ot
OE
el
kl
>l
tul
EI
8l
E:,
o
=
Et
ll
'i
E5
B6 s
/r/
FI<
,'
/ ti;
i/
E
€€E
rD-<
€fl
EE
ao
<cE
//
r/i
tt;
,i5,
I /t \,\,
i// \\
!
/
iii i\
//i/ i
/// i
ryi
/i/
//l ' i / 4 ,
i/i / / / / \
i/
,/
-=a6:5
€68
0- o- (/,
19
>l
<l
aEl
6l
3l $g
CIl lL
.E,
Zl
EI
=l