1
Range
contents
16,18
Aluminum Foil
3,5
Anti-TipBracket
2
ApplianceRegistration
9
CanningTips
22-25
Care and Cleaning
12
Clock/Timer
5
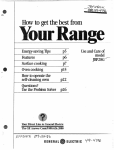
Energy-SavingTips
6,7
Features
5
Installationhstructionq
5
Leveling
2
Modeland SerialNumbers
13
Oven
14,15
Baking,BakingGuide
Broiling,BroilingGuide 18,19
13
ControlSettings
Door Remol~al
22
Light;BulbReplacement 13,22
13,15
Preheating
Roasting,RoastingGuide 16,17
SeM-C1emhg
hstructions 20,21
,;-—...
,..
,
-.
.7’
—
VentDuct
ProblemSolver
22
26
RepairService
27
3,4
SafetyInstructions
8
SurfaceCooking
8
ControlSettings
10,11
CookwareTips
LightBulbReplacement
23
SurfaceUnits
23
8
3-in-1SurfaceUnit
BackCover
Warranty
..—
—
.
--
It ~~~Htended
~0help youoperate
~mdmaintainyournewrange
properly.
Keepit handyfor answersto your
questions.
If youdon’tunderstandsomething
or needmorehelp, write (include
yourphonenumber):
ConsumerAffairs
GE Appliances
ApplianceMk
Louisville,KY40225
Writedownthe model
andserialnmberse
You’llfindthemon a labelon
the front ofthe rangebehindthe
ovendoor.
Thesenumbersare also on the
ConsumerProductOwnership
RegistrationCard thatcamewith
yourrange.Beforesendingin this
card, pleasewrite thesenumbers
here:
ModelNumber
SerialNumber
Use theser~umbersin any
correspondenceor servicecalls
concerningyourrange.
mediately contactthedealer (or
builder)that s~ldyouthe range.
savethe
ad
money.
Beforeyou request
Sertice.*.
Checkthe ProblemSolveron
page26.It listscausesof minor
operatingproblemsthatyoucan
correctyourself.
MGE m mAcH m~s
comD BEsmousLY
~-.
“.
@Never wearImse-fitthg or
ha@g garmen@ Wwe Whg
tie~~~we.
~ble~tetid
could be ignited if brought in
contactwiti hot hatig elements
and may cause severe bums.
* Use Qtiy - Pt hOlden—
moist or damp potholders on
hot surfaces may resdt ti bums
ti~ sm. DOnot let ~t holders
touch hot heating ele~enk. Do
not use a towel or otier bu~
Cloti.
@Never use your appumce for
ww~tig or ~e~ttig the roo~.
h oronapptianee
~ stomge
Rmable rna&tidsShodd notbe
stored in ~ oven or near surbce
Utifi.
oven. These
sufices ~aj be hot
enou~ to burn even tiough hey
‘aredark ti color. Dutig and
stir use, do not touch, ~r let
cloting or otier H-able
materials contact surface units,
areas ne~by sufice units or any
titerior area of tie oven; Wow
sufficient ttie for coo~g, fnst.
P~tentiWy hot sufices include
tie cooMopand.areas facing tie
cod~op, oven vent opening and
surfaces near the o~ntig, and
crevices around tie oven door. ,
Re~e~ber: The inside surface
of tie oven maybe hot when tie
door is owned.
@when Cmwg prk9 fouow
tie directions e~ctiy and always
cook tie meat tom ~ternd
te~peratire of at least l~°F.
Ttis assures tiat, in tie xe~ote
possibtiity hat trictina may be
present in tie meat, it will be
tiUed ~d tie meat will be safe
to eat.
ne.xtpage)
I (Continwd
surface
CootingUnik
@~~e pro~r
~an s&e—Ttis
appfiace is equipped with one
or more surface utits of dfierent
sk. Select utinstis having flat
bottoms large enough to cover
the sutiace utit heating element.
The use of understied utensfls
WN expose a portion of the
heating element tq direct contact
and my result in igtition of
clothing. Pro~r relationship of
utensd to burner WMdso
tiprove efficiency.
e ~~~~~~~~~~~~~~~ ti~
mmndd
at @ hat W*.
Boflovercauses srnotig amd
greasy spilloversthat may catch
on fire.
e Be SWe tip pm ad vent
duc~ are not covered amd we
h place. Theti absence during
cookirig cotid d=age range
parts and wiring.
,
@~~~9~~~ ~bm
f~fl ~ ‘
Une *ip p- or anywhere in
the oven except as described in
this book. Misuse could result in
a shock, fire burd or daage
to the ~ge.
%Ws of glms9
@Od-y ceb
*W pOssibHe.Frost on frozen
foods or ~oistu~e on fresh foods
can cause hot tit to bubble up
and over sides of pan.
glw/cerdc, eatihenmm or
othergl=d contiem me stitible for mge-top setice;
otiers may bre~ because of the
sudden change in te~pe~ture.
(See section on “surface
Cootig” for suggestions.)
burns9 ignition
@To -k
of fl-able
~aterids, and
sp~age, tie h~dle of a
conbiner should be tu~ed ~
towwd tie center of the rage
witiout extendkg.over nearby
Sufice Uniw.
@Mways turn surface dt
ombefar$
remotig
to
wte~il,
fatS10W1y9
and
@~WyS heat
watch as it heats.
usedeepfatthermometer
@
wheneverWssibletoprevent
overheatingtit beyondthe
smokingpoht .
SAW TmsE
msTRucTIoNs
surface
Cooting
~Preheatovenonlywhen
necessa~. Mostfoods‘willcook
satisfactorilywithoutpreheating.
If youfind thatpreheatingis
necessary,watchthe indicator
tight,and put foodin oven
promptlyafterthe lightgoesout.
~Use cookingutensfisofmedium
weightaluminum,withtight-fitting
covers,andflatbottomswhich
completelycoverthe heated
portionof the sutiaceunit.
The.angeshouldbe installedon
a sheetofplywood(or similar
the
material)as follows:m~~
flQor
coYeting
ends
atthefront of
f;~erange, theareathatthe range
willrest on shouldbe builtup with
plywoodto the samelevelor higher
thanthe floorcovering.Thiswill
d~owthe rangeto be movedfor
cleaningor servicing.
Levelingscrewsare locatedon
eachcornerofthe baseof the
range.Removethebottomdrawer
andyoucan levelthe rangeon an
unevenfloor withthe use of a
nutdriver.
pull drawer
Toremove drawer,
outaBR
the way3tntup the front
and @k@it out.To replace
&aVJer9insertglidesat backof
drawerbeyondstopon rangeglides.
Lifidrawerif necessaryto insert
easily.Let frontof drawerdown,
hen push into close.
Oneof the rear levelingscrews
willengagethe ANTI-TIPbracket
(allowfor somesideto side
adjust~~ent).Allowa minimum
clearanceof 1/8”betweenthe range
andthe levelingscrewMatis to be
installedintothe ANTI-TIPbracket.
@Cookfreshvegetableswitha
~tinimurnamountof waterin a
coveredpan.
* P.lwaysturn ovenOFF beiore
removingfood.
~Watchfoodswhenbringingthem
quic~y to cookingtemperaturesat
HIGHheat. Whenfoodreaches
cookingtemperature,reduceheat
immediatelyto lowestsettingthat
wfi keepit cooking.
* Duringbaking,avoidfrequent
door openings.Keepdoor open
as shorta time as possibleif it is
opened.
~Be sureto wipeup,exciss spfllage
beforestaring the self-cleaning
operation.”
~Use residualheatwithsurface
cookingwheneverpossible.For
example,,whencookinge~s in the
she~, bringwaterand eggsto boil,
thenturn to OFFpositionad cover
with lid to completethe coohg.
* Use correctheatfor coo~g ‘tisk:
“HIGH—tostartcOok.h2g
(if t&e
*WS, do notuse HIGHheattq ~
start).
ME~NM HIGH—qujckbr;wn+g.
MEDIUM–S16Wfrying.
‘
LOW—finishcookingmost ,
quantities,simmer-double b~iler
heat, finishcooking,andspecjd
for smallqum~ities.
, ;}~~”
W.M-to mainiin setiing ‘
temperatureof mostfotis. ”
~Whenboilingwaterfqrtea
or cotiee,heat onlythe amount
needed.It is noteconomicalto bofi
a containerfullof waterfor one
or twocups.
‘
-
~Cookcompleteovenmeals
insteadbfjust onefooditem.
Potitoesjothervegetables,and
somedessertswtilcooktogether
witha-main-dishcasserole,meat
loaf, chick~nor roast. Choose
foodsthat cookat the same
temperatureand in ap~roxi.mately
—the
~
—
., sameiime.
‘,
~Use residud heatin the oven
whenevertiossibleto finish~
~oo~~g,c~$sero~es,
ovenme~s,
.- etc.,~SO add rollsor precooked
, ~essertsto-warmgven,using
regidu+ heatto warmthem.
‘
----
I
P
.
!, ,1,.
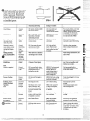
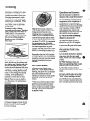
ModeIm391GK
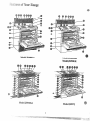
6
see
Wge
2
, 2 Surfitceunitcontrols
1
I
I
@
8
e
8
2
I
I
@
@
2
2
2
2
4 CooktopLampSwitch
1 5 oven
setcontrol
!
6 oven Ternpcontrol
@
13
e
II
8 AutomaticOvenTimer,
ClockandMinuteTimer
9 Door Latcl]
10 BroilerPanand Rck (Donot
cleanin Self-Cleanoven.)
I 11 DoorLockedLight
20
e
18
e
20
I
e
20
[ 13 3-in-l SurfaceUnitControl
_l 14 3-in-1SurfaceUnit
I
I
8
8
15 Plug-InSurfaceUnit
(Maybe removedwhencleaning.)
23
161 Tilt-LockSurfaceUnit
(Maybe raisedbut notremoved.)
23
17 Chrome-PlatedTrimNngs
and PorcelainDrip Pans
23
18 Chrome-PlatedTrimNngs and
AlurriinumDrip Pans
23
19 Oven.VentDuct (Underright
rear surfaceunit.)
22
\ 20 OvenInteriorLight
22
I
13
21 OvenLightSwitch
~ 22 BroilUnit
18
\ 23 BakeUnit
14
24 OvenShelves
13
25 OvenShelfSupports(Letters
A, B, C and D indicatecooking
positionfor shelvesas s~lggested
on cookingguides.)
13
,/,-]-., 26 StorageDrawer
22
3,5
7
2 6-in.
1 $-in,
4
2 6-ill.
2 8-in.
2 6-in.
2 8-in.
4
e
+
2 6-in.
2 8-in.
2 6-in.
2 8-in.
4
4
e
S?irfaaec@okiE%g
with
InfiniteHeatcontrols
Yoursurfaceunitsand controls
are designedto giveyouallin~~nite
choiceof heatsettingsfor surface
{~nitcooking.
Atboth OFF and HI positions,
thereis a slightnicheso control
“clicks”at thosepositions;“click”
on HI marksthehighestsetting;the
lowestsettingis betweenthewords
WM and OFF.In a quietKtchen
youmayhear slight“clicking”
soundsduringcooking,indicating
heatsettingsselectedare being
maintained.
Switchingheatsto highersettings
alwaysshowa quickerchangethan
switchingto lowersettings.
How to set the Controk
step1
Graspcontrolknoband pushin...
control mustbe pushedinto set
Ody from
OFFposition.
when
other
control isinany position
than OWF,itmaybe Fotited
without pushing in.
Be sure youtum controlto OFF
whenyoufinishcooking.An
indicatorlightwillglowwhen
ANYheaton anysurfaceunitis on.
Coos
Gtide
for Utig Heah
m
LMGE—8-inch unit. Turnswitch
to 8“ whenusinglargeutensilsthat
completelycoverthe unit (3-quafi
to 6-quartsaucepansor 8- to 10inchskillets).Thenselectdesired
heat setting.
~m~:
WDm—6-inch unit. Turn~
switchto 6“ whenusingmediumsizedcookingutensilsthatdo not
completelyctiverthe unit(2-to
2%-quartsaucepansor 6- to 7-inch
skillets).Then selectdesiredheat
setting.
Quickstartfor cooking;
bringwaterto boil.
m~ Fastfry,pan broil;maintain
m fastboilon largeamountof
food.
mD Sauteandbrown;maintain
slowboilon largeamount
of food.
Lo
Cookafter startingat HI;
cookwithlittlewaterin
coveredpan.
Steamrice, cereal;maintain
servingtetiperatureof most
foods.
1. At HI, MED HI, neverleave
foodunattended.Boiloverscause
smoking;greasyspilloversmay
catchfire.
2. At WM, LO,meltchocolate,
butteron smallunit.
How h use the
3=’h-=1unit
@ode] m490)
1.
.’
“$’~]rn
eitherclockwiseor counterclockwiseto desiredheat setting.
Matchunitsizeselectionto sizeof’
utensil.
This surfaceunitoffersthe
convenienceof threeunitsin
one. The unitmaybe used as an
8-inch,6-inch,or 4-inchunitto
accommodateany sizeutensil.
~rn sizeselectorswitch,nextto
surfaceunitcontrol,to 8“,6“ or 41’
Thenturn surfaceunitcontrolto
desiredheat setting.
8
8,
1
SWL&4-inch unit. Turnswitch
to 4“ whenusingsmallcooking
utensilsabout4 inchesin diameter
(as a l-quartsaucepan).Then
selectdesiredheatsetting.
.,
‘-.
‘,.,, ,’ ;;
L...
.,>
,Q:”
pp
J:].,~$:31Bf{)odstliltlpreserves
)
OR E23ySlirfaceull$ts:~
.+.
+ Yes. but only use cookware
designedfi>rcanningpu~oses.Cheek
~ben]a~ufa~turer’s
instr~~ti~nsand
~-ecipes
for preservingfoods.Be
surecanneris flat-bottomedand
fi~soverthecenterofyourCalrod@
unit. Sincecanninggenerateslarge
amountsof steam,be caref~llto
avoidburnsfromsteamor heat.
Canningshouldonlybe doneon
surfaceunits.
Q. can I coverZnydrip pans with
foil?
A. No. Cleanas recommendedin
CleaningGuide.
Q. canI use specialCooking
equipment9like an oriental Woky
on anysurfaceunM?
A. Cookwarewithoutflatsurfaces
is notrecommended.Thelifeof
yoursurfaceunitcan be shortened,
andthe rangetopcan be damaged
fromthehighheatneededfor this
typeof cooking.
Q. “whyam I Rotgettingthe heat
I need from my units eventhough
I havethe knobson the right
setting?
A. Afterturningsurfaceunitoff
and makingsureit is cool, checkto
makesurethatyourplug-inunits
are securelyfastenedintothe
surfaceconnection.
Q. winydoesmycookwaretilt
whenI placeit onthe surfaceunit?
A. Becausethe surfaceunitis
notflat. Makesurethatthe “feet”
on yourCairod@unitsare sitting
tightlyin the rangetop indentation
andthe reflectorringis fiaton the
rangesurface.
Q.Why isthe porcelainfinishon
mycookwarecomingoff?
A. If yousetyourCalrod@unit
higherthan requiredfor the
cookwarematerial,and leaveit, the
finishmaysmoke,crack,pop,or
burndependingon thepot or pan.
Also,a toohighheatfor long
periods,and sma~lamountsof dry
food,maydamagethe finish.
..————..
.-..-.
e canning
mps
observe
FollowingPoin@
incanning
In surfacecookingof foodsother
thancanning,theuse of largediameterpots(extendingmorethan
l-inchbeyondedgeof trim ring)is
notrecommended.However,when
canningwith water-bathor
pressurecanner,large-diameter
potsmaybe used. Thisis because
boilingwatertemperatures(even
underpressure)are not harmfulto
cooktopsurfacessurrounding
heatingunit.
HOWEVER,DO NOTUSE
LARGEDIAMETERCANNERS
OR OTHERLARGEDIANIETER
POTSFOR FRYINGOR
BOII.INGFOODSOTHER
Ti~AP?JNATER.Mostsyrupor
saucemixtures—andall typesof
frying-cook at temperaturesmuch
higherthan boilingwater.Such
.‘-”--W,
couldeventually
--,,DeratU.reS
- .-,.;;-~m
cooktops~]rfacessurrounding
j,c,,
,i<
f: c.
L._r..
li4>j
i.lnits.
1. Bringwaterto boilon HIGH
heat, then afterboilinghasbegun,
adjustheatto lowestsettingto
maintainboil (savesenergyand
bestuses surfaceunit.)
2. Be sure cannerfitsovercenter
of surfaceunit. If yourrangedoes
not allowcannerto be centeredon
surfaceunit, use smaller-diameter
potsfor goodcanningresults.
3. Flat-bottomedcannersgivebest
canningresults.Be surebottomof
canneris flat or slightindentation
fits snuglyoversurfaceunit.
Cannerswith flangedor rippled
bottoms(ofienfou~~d
in enamelware)
are not recommended.
mGHT
n
moNG
9
0$yourcanner;manufacturersof
glassjars for canning,suchas Ball
andKerr; andthe UnitedStates
Departmentof Agriculture
ExtensionService.
i. ~Jsemedi~]mor heavy-weight
cookw:~re.
-Aluminum
cookware
co~]ducts
heatfasterthanother
n?e!a!s.Cast ironandcoatedcast
ironcookwareis slowto absorb
heat,butgenerallycooksevenly
at LOor MEDIUMsettings.Steel
pansmay Cook unevenly if not
combinedwithothermetals.
Food
Cereal
Cornmeai,grits,
oatmeal
Cookware
cocoa
Uncovered
Saucepan
Coffee
Percolator
Eggs
Cookedinshell
Covered
Saucepan
Covered
Saucepan
Use non-stickor coatedmetal
cookware.Flatground~roceram”
saucepansor skilletscoatedon the
bottomwithaluminumgenerally
cookevenly.Use glasssaucepans
withheat-spreadingtrivets
availablefor thatpurpose.
-2. Toconservethe mostcooking
energy,pansshouldbe flat on the
bottom,havestraightsidesandtight
fittinglids. Matchthe sizeof the
saucepanto the sizeof the surface
unit. A pan thatextendsmorethan
an inchbeyondtheedgeof thetrim
ringtrapsheatwhichcauses
“crazing”(finehairlinecracks)
on porcelain,anddiscoloration
rangingfromblueto dark grayon
chrometrim rings.
DirectionsandSetting
toStartCooking
Settingto Complete
Cooking
HI. In coveredpanbring
watertoboilbeforeadding
cereal.
HI. Stirtogetherwateror
milk,cocoaingredients.
Bringjusttoa boil.
HI. Atfirst perk,switch
heatto LO.
LOor WM, thenaddcereal.
Finishtimingaccording
tonacka~edirections.
HI. Covereggswithcool
water.Coverpan,cook
untilsteaming.
MEDHI. Meltbutter,add
e~s andcoverskillet.
LO.Cookonly3 to 4
minutesforsoftcooked;
15minutesfor hardcooked.
Continuecookingat MEDHI
untilwhitesarejust set, about
3 to 5 moreminutes.
LO,thenadde~s. When
bottomsofeggshavejust set,
carefullyturnoverto cook
otherside.
LO.Carefullyaddeggs.
Cookuncoveredabout5
minutesat MEDHI.
MED.Addeggmixture.
Cook,stirringto desired
doneness.
MED.to cook1or 2 minutes
tocompletely
blendingredients.
Cerealsbubbleandexpandas
theycook;uselargeenough
saucepanto preventboilover.
Milkboilsoverrapidly.Watchas
boilingpointapproaches.
LOto maintaingentlebut
steady perk.
Percolate8 to 10minutesfor
8 CUPS,
lessforfewercups.
Friedsunny-side-up
Covered
Skillet
Friedovereasy
Uncovered
Skillet
HI. Meltbutter.
Poached
Covered
Skillet
HI. In coveredpanbring
waterto a boil.
Scrambledor omelets
Uncovered
Skillet
HI. Heatbutteruntillight
goldenin color.
Fruits
Covered
Saucepan
HI. Incoveredpanbring
fruitandwatertoboil.
LO.Stiroccasionallyand
checkforsticking.
Meats, Poultry
Braised:Potroastsof
beef.lambor veal;
porksteaksand
chops
Covered
Skillet
H]. Meltfat,thenaddmeat.
Switchto MEDHI to
brownmeat.Addwateror
otherliquid.
LO.Simmeruntilfork
tender.
Pan-fried:Tender
Uncovered
Skillet
H1.Preheatskillet,then
greaselightly.
MEDHI or MED.Brownand
cooktodesireddoneness,
turningoveras needed.
chc)ps;thin steaks up
LO3/4-inch; minute
.:eaks; hamburgers;
tr:Irik:,and sausage:
thin fish .——
fillets
Comments
If youdonotcoverskillet,baste
eggswithfattocooktopsevenly.
Removecookedeggswithslotted
spoonor pancaketurner.
Eggscontinuetoset slightlyafter
cooking.Foromeletdonotstir
lastfewminutes.Whenset, fold
in half.
Freshfruit: Use 1/4to 1/2cup
waterperpoundof fruit.
Driedfruit: Usewateras package
directs.Timedependsonwhether
fruit hasbeenpresoaked.If not,
allowmorecookingtime.
Meatcanbe seasonedandfloured
beforeit is browned,if desired.
Liquidvariationsfor flavorcould
be wine,fruitor tomatojuice or
meatbroth.
Timing:Steaks1to 2-inches:1to
2 hours.BeefStew:2 to3 hours.
PotRoast:2!+to4 hours.
Panfryingis bestfor thinsteaks
andchops.If rareis desired,preheatskilletbeforeaddingmeat.
RIGHT
~~ DeepFat Frying.Do notoverfill
Y ‘ettle~vithfat thatmayspillover
~vhenaddingfood.Frostyfoods
bubblevigorously.lVatchfoods
fryingat HIGHtemperaturesand
keeprangeand hoodcleanfrom
accumulatedgrease.
Food
Cookware
WRONG
..—.
OVER
1“
Settingto Complete
Cooking
DirectionsandSetting
toStartCooking
Comments
FriedChicken
Covered
Skillet
HI.Meltfat. Switchto MED
HI tobrownchicken.
LO.Coverskilletand
cookuntiltender.
Uncoverlastfewminutes.
Panfriedbacon
Uncovered
Skillet
MEDHI. Cook,turning
overas needed.
Sauteed:Lesstender
~finsteaks(chuck,
round,etc.); liver;
thickor wholefish
Simmeredor stewed
meat;chicken;corned
beefismokedpork;
stewingbeefitongue;
etc.
Covered
Skillet
HI. Incoldskillet,arrange
baconslices.Cookjust
untilstartingto sizzle.
HI. Meltfat. Switchto MED
to brownslowly.
Forcrispdrychicken,coveronly
stir switchingto LO for 10
minutes,Uncoverandcook,turning
occasionally10to20 minutes.
A moreattention-freemethod
is to startandcookat MED.
LO.Coverandcook
untiltender.
Meatmaybebreadedor
marinatedinsaucebeforefrying.
LO.Cookuntilfork
tender.(Watershould
slowlyboil).Forverylarge
loads,mediumheatmay
beneeded.
Addsaltor otherseasoning
beforecookingif meathasnot
beensmokedor otherwise
cured.
Covered
DutchOven,
Kettleor
Large
Saucepan
HI. Covermeatwithwater
andcoverpanor kettle.
Cookuntilsteaming.
Meltingchmolate,
butter,marshmallows
Small
Uncovered
Saucepan.
Usesmall
surfdceunit
wM. Allowloto15minutesto
meltthrough.Stirto smooth.
Pancakesor
Rench toast
Skilletor
Griddle
MEDHI. Heatskillet8 to
10minutes.Greaselightly.
Cook2 to3 minutesperside.
Thickbattertakesslightlylonger
time.~m overpancakeswhen
bubblesriseto surface.
Covered
LargeKettle
or Pot
HI. In coveredketde,bring
saltedwatertoa boil,uncover
andaddpastaslowlyso
boilingdoesnotstop.
MEDHI. Cookuncovered
untiltender.Forlarge
amounts,HI maybe
neededto keepwaterat
rollingboilthroughout
entirecookingtime.
Uselargeenoughketdeto
preventboilover.Pastadoubles
in sizewhencooked.
PressureCooking
Pressure
Cookeror
Canner
HI. Heatuntilfirstjiggleis
heard.
MEDHI forfoodscooking
10minutesor less.MEDfir
foodsover10minutes.
Cookershouldjiggle2 to 3 times
per minute.
Puddings,Sauces,
Candies,Frostings
Uncovered
Saucepan
HI. Bringjust toboil.
LO.Tofinishcooking.
Stirfrequentlytoprevent
sticking.
Vegetables
Fresh
Covered
Saucepan
HI. Measure1/2to 1inch
waterin saucepan.Add
saltandpreparedvegetable.
In coveredsaucepanbring
to boil.
HI. Measurewaterandsalt
as above.Addfrozenblock
ofvegetable.In covered
saucepanbringtoboil,
HI. In skilletmeltfat.
MED.Cook1pound10
to 30or moreminutes,
dependingontenderness
ofvegetable.
Uncoveredpanrequiresmore
waterandlongertime.
LO.Cookaccordingto
timeonpackage.
Breakupor stiras neededwhile
cooking.
MED.Addvegetable.
Cookuntildesired
tendernessis reached.
~rn overor stirvegetableas
necessaryforevenbrowning.
WM.Coverandcook
accordingto time.
Triplein volumeaftercooking.
Timeat WM. Rice: 1cupriceand
2 cupswater—25minutes.Grits:
1cupgritsand4 cupswater—
40minutes,
Pasta
Noodlesor spaghetti
Covered
Saucepan
Sauteed:Onions;
greenpeppers;
Uncovered
Skillet
mushrooms; celery; etc.
Covered
Saucepan
HI. Bringsaltedwaterto a
boil.
11
Whenmeltingmarshmallows,add
milkor water.
TheAutomaticTimerand Clockon
~o~i ovenare helpfuldevicesthat
serveseveralpurposes.
TosettheC;ock
Pushinthecenter knobofthe
MinuteTirnerandturnk.nobin
eitherdirectionto setthe Digital
Clocknumeralsto the correcttime.
(Aftersettingthe Clock, letthe
knobout, and turn the Minute
Timerpointerto OFF.)
To set the Mhuf’e mmer
TheMinuteTimeris the largedid
to the leftof the DigitalClock.Use
it to time all yourprecisecooking
operations.Thisdialdso setsor
changesthe DigitalClock.
~ SET’THE MINUTETIMER,
turnthe center knobclockwise,
withoutpushingin, untilpointer
reachesnumberof minutesyou
wishto time (upto 60).
mmeBakeuses
Automaticmmer
UsingAutomaticTimer,youcan
TIMEBAKEwiththe ovenstarting
immediatelyandturningoffat the
StopTimeset or youcan setboth
DELAYEDSTART(somemodels
saySTART)andSTOPdialsto
automaticallystartand stopovenat
a latertimeofday.It takesthe
worryout of notbeinghometo
startor stoptheoven.
Settingthe dialsfor TIMEBAKE
is explainedin detailon page 14.
SeIfOClea Uses
AutOmatic ~mer
Theself-cleaningfinction on your
ovenusesthe AutomaticTimerto
setthe lengthoftimeneededto
cleanwhetheryouwishto clean
immediatelyor delaythecleaning
untillowenergytimessuchas
duringthe night.Seepage20.
Q. How can 1 we my Minute
Timertomakemysurface
cookingeasier?
A. YourMinuteTimerwijlhelp
timetotalcookingwhichincludes
timeto boilfoodandchange
temperatures.Donotjudgecooking
timeby visiblesteamonly.Food
willcookin coveredcontainers
eventhoughyoucan’tsee any
steam.
Q. Mustthe Clockbe set on
correcttimeof daywhenI wish
to use the AutomaticTimerfor
baktig?
A. Yes,if youwishto set the
DELAYEDSTARTor S~P dials
to turn on andoffat settfies during
timedtinctions.
Q. CanI use the Mnute Timer
duringovencooking?
A. The MinuteTimercanbe
used duringanycookingfinction.
TheAutomaticTimers(DELA~D
STARTand S~P dials)are used
with TIMEBAKEfinction only.
Q. CanI changethe Clockwhile
I’m~me Coofing in the oven?
A. No.TheClockcannotbechanged
duringanyprogramthat usesthe
oventimer.Youmusteither stop
thoseprogramsor waituntilthey
are finishedbeforechangingtime.
—
—
.—
1. Look at thecontrols.Besure
youunderstandhowto set them
properly.Readoverthe directions
forthe AutomaticOvenTimerso
youunderstanditsuse withthe
controls.
2. Checkoveninterior.Lookat
[heshelves.Takea practicerun at
removingand replacingthem
properly,to givesure, sturdy
support.
3. Readoverinformationandtips
thatfollow.
4. I<eepthisbookhandyso youcan
referto it, especiallyduringthe
firstweeksof gettingacquainted
withyourrange.
ovencontrols
Thecontrolsforthe ovenare
markedOVENSET and IOVEN
TEMP.The OVENSET controlhas
settingsfor BAKE,TIME BAKE,
BROIL,CLEAN and OFF. When
youturn the knobto the desired
setting,the properheatingunitsare
thenactivatedforthat operation.
TheOVENTEMPcontrolmaintains
thetemperatureyouset, from
WNRM(150°F.)to BROIL(550°F.)
andalsoat CLEAN (880°F.).
PREHEATINGthe oven,evento
hightemperaturesettings,is speedy
—rarelymorethanabout10minutes.
Preheattheovenonly when
necessary.Mostfoodswillcook
satisfactorilywithoutpreheating.
If youfindpreheatingis necessary,
keepan eyeon the indicatorlight
andput foodin theovenpromptly
afterthe lightgoesout.
oven Inkrior shelves
Theshelvesare designedwithstoplocksso thatwhenplacedcorrectly
on the shelfsupports,they(a)will
stopbeforecomingcompletelyfrom
when
the oven,and (b) wil~not tilt
removingfoodfromor placingfood
on them.
Toremoveshelffromthe oven,lifi
up rearof shelf, pull forwardwith
s~op-locks(curvedextensionunder
sh~lf)alongtop of shelfsupports.
Becertainthat shelfis coolbefore
touching.
Toreplaceshelfin oven,insert
shelfwith stop-locksrestingon
shelfsupports.Push shelftoward
rear of oven;it willfallintoplace.
Whenshelfis in properposition,
stop-lockson shelfwillrun under
shelfsupportwhenshelfis pulled
forward.
ovenLi@t
The lightcomeson automatically
whenthedooris opened.Use
switchon frontofdoorto turn light
on andoff whendooris closed.
Lamp over Surface Utit
Models JB500andm490)
Pressthe lamp switchbuttonto
lightthelamp.Besureto holdbutton
depresseduntillightcomeson.
shelf Positiom
The oven cycling Light glows
untilthe ovenreachesyour selected
temperature,thengoesoff andon
withtheovenunit(s)duringcooking.
Theovenhas four shelfsupports—
A (bottom),B, C and D (top).
Shelfpositionsfor cookingfood
are suggestedon Bating, Roasting
and Broilingpages.
*.
—.
-.–
}When
cookinga foodfor the first
timein yournewoven,usethetime
givenon recipesas a guide.Oven
thermostatsmay“drift” fromthe
factorysettingoverthe years,and
5-to 10-rninute
differencesin timing
betweenanoldandnewovenarenot
unusual.Youmightthinkyournew
ovenis notperformingcorrectly;
however,it has beenset correctlyat
thefactoryandis morelikelyto be
accu~;tethanthe ovenit replaced.
Howto setYourRange
forBaking
off automaticallyat specifictimes
youwantbakingto startand stop.
The ovencyclinglightwillstayon
whileusingtheTimeBakeselection.
YourTimeBakeoptions:
m-w SW& Au@mticStip
Oventurns on rightawayandturns
off automaticallyat yourpreset
stoptime.
DelayedS@ti & Stop.Oven
automat~.tally
turns on laterat
yourpreset starttime andturns
off at yourpresetstoptime.
Rememberwhen settingstoptime
thattime-bakedfoodswillcontinue
cookingafter the oventurnsoff.
Beforebeginning,makesurethe
rangeclockshowsthe correcttime
of day.
HowtoSet Delayed Stiti
and stop
1. Toset StartTime,pushin knob
on DELAYEDSTARTdial(some
modelsmaysaySTART)andturn
pointerto time youwantovento
turn on; for example,3:30.
2. Toset StopTime,pushin knob
on Stopdialand turn pointerto
time youwantovento turn offi for
example,6:00.Thismeansyour
recipecalledfor 2YZhoursof
bakingtime.
N~E: Timeon STOPdialmustbe
laterthantimeshownonrangeclock
and DELAYEDSTARTdial.
1. Placefoodin oven,beingsureto
leaveabout 1“betweenpansand
ovenwallsfor goodcirculationof
heat. Closeovendoor,and avoid
frequentdooropeningsduring
bakingto preventundesirable
results.
2. TurnOVENSET,knobto
BAKEand OVENTEMP knob
to temperatureon recipeor
BakingGuide.
3. Checkfoodfor donenessat
minimumtimeon recipe.Cook
longerif necessary.Switchoff
heatand removefoods.
—
1. Toset StopTime,pushin knob
on Stopdid andturn pointerto
timeyouwantovento turn offi for
example,6:00. The DELAYED
STARTdial shouldbeat the same
positionas thetimeof dayon clock.
How to mme
Bake
Theoventimercontrolsare
designedto turn the ovenon and
2. TurnOVENSET knobto
TIME BAKE.~m OVENTEMP
knobto desiredoventemperature;
for example,250°F.The ovenwill
start immediatelyand will stopat
the time youhaveset.
3. ~rn OVENSET knobto TIME
BAKE.Turn OVENTEMPknobto
250”F.or recommended~mperatu~.
Placefoodin oven,closethe door
and the ovenwillbe turnedon and
off automaticallyat the timesyou
haveset. Turn OVENSETto OFF
and removefoodfrom oven.
OVENINDICA~R LIGHT(s)
at TIME BAKEsettingmaywork
differentlythan theydo at BAKE
setting.Carefullyrecheckthe steps
givenabove.If all operationsare
done as explained,the ovenwill
operateas it should.
—
-—
Baking
Guide
. Aiurninumpansconductheat
quic~y.For mostconventional
baking,light,shinyftishes generally
givebestresults.Theyprevent
~verbrowningin tie ~fie it takes
forheatto cookthecenterareas.
Dull(satin-finish)bottomsurfaces
of p~ans are recommendedforcake
p&s andpie platesto
.- be surethose
areasbrowncompletely.
2. Dark or non-shinyfinishes,
glassandPyroceram@
cookware,
generallyabsorbheat, whichmay
resultin dry,crispcrusts.Reduce
ovenheat25”F.if lightercrustsare
desired.Preheatcastironfor
bakingsomefoodsfor rapid
browningwhenfoodis added.
3. Preheatingthe ovenis notalways
necessary,e~peciallyfor foods -
—.
whichcooklongerthan30 to 40
minutes.For foodwithshort
cookingtimes, preheatinggives
best appearanceandcrispness.
4. Openthe ovendoorto check
foodas littleas possibleto prevent
unevenheatingandto saveenergy.
Shelf
Wsition
Oven
~mperature
Time,
Minutes
ShinyCookieSheet
B,C
400°-4750
15-20
B,A
350°-4000
20-30
B
B
400°-4500
350°
20-40
45-55
Preheatcastironpanforcrispcrust.
MuffIns
Popovers
ShinyMetalPanwith
satin-finishbottom
CastIronor Glass
ShinyMetalPanwith
satin-finishbottom
ShinyMetalMuffinPans
DeepGlassor CastIronCups
A, B
B
400°-4250
375°
20-30
45-60
Decreaseabout5 minutesformuffin
mix,or bakeat450T. for25minutes,
thenat 350”F.for 10to 15minutes.
Quickloafbread
Y~t bread(2loaves)
Metalor GlassLoafPans
MetalorGlassLoafPans
B
A, B
350°-3750
375°-4250
45-60
45-60
Plainrolls
Sweetrolls
]Cakes
(withoutshortening)
Angelfood
Jellyroll
Sponge
cakes
Bundtcakes
Cupcakes
ShinyOblongor Muffinkns
ShinyOblongor MuffinPans
A, B
B.A
375°-4250
350°-3750
10-25
20-30
A
B
A
325°-3750
375°-4000
325°-3500
30-55
10-15
45-60
MetalorCeramicPan
ShinyMetalMuffinPans
A, B
B
325°-3500
350°-3750
45-65
20-25
Metalor GlassLoafor
Wbe Pan
ShinyMetalPanwith
satin-finishbottom
ShinyMetalPanwith
satin-finishbottom
Metalor GlassLoafPans
A, B
275°-3000
2-4hrs.
B
350°-3750
20-35
B
350°-3750
25-30
B
350°
40-60
Metalor GlassPans
CookieSheet
CookieSheet
CookieSheet
B,C
B,C
B,C
B.C
325°-3500
350°-4000
400°-4250
375°-4000
25-35
10-20
6-12
7-E
A, B,C
B
350°-4000
300°-3500
30-60
30-60
B
325°
50-90
A
400°-4250
45-70
Food
Bread
Biscuits(%-in.thick)
Coff= cake
Cornbreador muffins
Gingerbread
Fruitcakes
Layer
Layer,chocolate
Loaf
cookies
Brownies
Drop
Refrigerator
Rolledor slicd
hits,
~her Dessefi
Bakedapples
Custard
Puddings,Rice
mdCustard
Ha
Fromn
Container
Aluminum~be Pan
MetalJellyRollPan
Metalor CeramicPan
Glassor MetalPan
GlassCustardCupsor Casserole
[setin panofhotwater)
GlassCustardCupsor
Casserole
FoilPanonCoo,MeSneet
‘tieringue
Spreadtocrustedges
B,A
325°-3500
15-25
2necrust
rwclcrust
%str~shell
Glassor Satin-finishMetal
Glassor Satin-finishMetal
Glassor Satin-finishMetal
A, B
B
B
400°-4250
400°-4250
450°
40-60
40-60
12-15
A, B,C
A, B,C
B
325°-4000
325°-3750
300°-3500
E
15
L-
60-90
30-60
30-75
Comments
Canned,refrigeratedbiscuitstake
2 to4 minuteslesstime.
Darkmetalor glassgivedeepest
browning.
Forthinro~s,ShelfBmaybe used.
Forthinrolls,ShelfBmaybeused.
Two-piecepanis convenient.
Linepanwithwaxedpaper.
Paperlinersproducemoremoist
crusts.
Use300”F.andShelfBforsmallor
individualcakes.
Barcookiesfrommixusesametime.
UseShelfC andincreasetemp.
25”F.to50°F.formorebrowning.
Reducetemp.to300”F.forlarge
custard.Cookbreador ricepudding
withcustardbase80to 90minutes.
Largepiesuse400”F.andincrease
time.
Toquicklybrownmeringue,use
400”F.for8 to 10minutes.
Custardfillingsrequirelower
temperature,longertime.
Increasetimeforlargeamount
or size.
Roastingis cookingby dry heat.
Tendermeator poultrycanbe
roasteduncoveredin youroven.
Roastingtemperatures,which
shouldbe lowand steady,keep
spatteringto a minimum.When
roasting,it is notnecessaryto
sear,baste,coveror add water
to yourmeat.
Roastingis redly a baking
procedureusd formeats.Therefore,
Gvencontrolsare set to BAKEor
TIMEB~.
(Youmayheara
slightclickingsound,indicating
theovenis workingproperly.)
Roastingis easy;just follow
thesesteps:
Step 1: Checkweightof meat,and
place,fat sideup, on roastingrack
in a shallowpan. (Broilerpanwith
rackis a goodpan for this.) Line
broflerpan withaluminumfoilwhen
usingpan for marinating,cooking
withfruits, cookingheavilycured
meats,or for bastingfoodduring
cooking.Avoidspillingthese
materialson ovenliner or door.
Step 2: Nate in ovenon shelfin
A or B position.No preheatingis
necessary.
%ep3:~m
OVENSET to BAE
md OVENTEMPto 325”F.Small
poultrymaybe cookedat 375”F.
forbestbrowning.
1
L
S@p4: Mostmeatscontinueto
cook slightlywhilestanding,after
beingremovedfromtheoven.
Standingtimerecommendedfor
roastsis 10to 20 minutesto allow
roastto firm up and makeit easier
to carve.Internaltemperaturewill
riseabout5°to 10”F.;to compensate
for temperaturerise, if desired,
removeroastfromovenat 5°to 10”F.
lessthantemperatureon guide.
N~E: Youmaywishto use TIME
B-,
as describedon page14,to
turn ovenon andoff automatically.
Rememberthatfoodwillcontinue
to cookin thehotovenandtherefore
shodd be removedwhenthedesired
internaltemperaturehasbeen
reached.
For hzen
Roam
@Frozenroastsofbeef, pork,
lamb,etc., canbe startedwithout
thawing,but allow10to 25 minutes
per poundadditionaltime(10
minutesper poundfor roastsunder
5 pounds,moretimefor larger
roasts).
~Thawmostfrozenpoultrybefore
roastingto ensureevendoneness.
Somecommercialfrozenpoultry
can be cookedsuccessfullywithout
thawing.Followdirectionsgiven
on packer’slabel.
Q. k it necessarytocheck for
~~
witha meat@mm*?
A. Checkingthefinishedinternal
temperatureat thecompletionof
cookingtimeis recommended.
Tempemturesare shownin Roasting
Guideon oppositepage.For roas~
over8 pounds,cook~ at 3W°F.
withreducedtime, checkwith
thermometerat half-hourintervals
afterhdf the timehas passed.
Q. Why is my roaster~bting
whenI try to carveit?
A. Roastsare easierto sliceif
allowedto cool 10to 20 minutes
afier removingfromoven.Be sure
to cut acrossthe grainof the meat.
Q. Do 1needto preheatmy
oveneachtimeI cooka roast
or pultry?
A. It is rarelynecessaryto preheat
youroven,onlyfor very small
roasts,whichcooka shortlength
of time.
Q. When buying a roast, are
thereanyspecialtips that would
helpme cookit moreevetiy?
A. Yes.Buya roastas evenin
thicknessas possible,or buy rolled
roasts.
Q. CanI sealthe sidesof myfoil
“tents’whenroastinga turkey?
A. Sealingthe foilwill steamtie
meat.Leavingit unsealedWowsthe
air to circulateandbrownthe meat.
.-
small-sizeroasts(3 to 7 Ibs.)and
at A for largerroasts.
2. Placemeatfat-sideup, orpoultry
breast-sideup, on broilerpanor
othershallowpan withtrivet.Do
notcover.Do notstuffpoultryuntil
just beforeroasting.Use meat
probefor moreaccuratedoneness.
ContrQ’signalswhenfoodhas
reachedset temperature.(Donot
placeprobein stuffing.)
Nw
necessary.Basteas desired.
4. Stinting timerecommendedfor
roastsis 10to20minutestoMowroast
to firm up andmakeit easierto
carve.Internaltemperaturewillrise
about5°to 10”F.;to compensatefor
temperaturerise, if desired,remove
roastfromovenat 5°to 10”F.less
thantemperatureon guide.
Oven
~mperature
Doneness
Meat
Tendercuts; rib,highqualitysirlointip,
rumpor topround*
325°
LambLegor bone-inshoulder*
325°
‘.’ealshoulder,legor loin*
Porkloin, rib or shoulder*
Ham,precooked
325°
325°
325°
Rare:
Medium:
WellDone:
Rare:
Medium:
WellDone:
WellDone:
WellDone:
ToWarm:
Ham,raw
325°
WellDone:
conventionallyroastedbyadding
10to 25 minutesperpoundmore
timlethangiveninguidefor
refrigeratedroasts.(10minutes
perpoundforroastsunder5pounds.)
Defrostpoultrybeforeroasting.
Approximate
RoastingTime,
in M]nutesper~und
6 to $-lbs.
3 to5-lbs.
18-22
24-30
22-25
30-35
28-33
35-45
20-23
21-25
24-28
25-30
28-33
30-35
35-45
30-40
30-40
35-45
10minutesperpound(anyweight)
10to 15-lbs.
Under10-lbs.
17-20
20-30
Interred
~mperature‘F
130°-1400
150°-1600
170°-1850
130°-1400
150°-1600
170°-1850
1700-180°
170°-180°
125°-1300
160”
*Forbonelessro~]~roas~over6-inchesthick,add5 to lo minutesper poundto timesgivenabove.
Poultry
Chickenor Duck
Chickenpieces
325°
375°
WellDone:
WellDone:
Turkey
325°
WeliDone:
3 to5-lbs.
35-40
35-40
10to 15-lbs.
20-25
Over5-lbs.
30-35
OverE-lbs.
15-20
185°-190°
185°-1900
In thigh:
185°-1900
———
—
—
Broiling
Broilingis cookingfoodbyintense
radiantheat fromthe upperunitin
theoven.Mostfish and tendercuts
of meatcan be broiled.Follow
thesestepsto keepspatteringand
smokingto a minimum.
Step 1:If meathasfator gristlenear
edge,cut verticalslashesthrough
bothabout2“ apart. If desired,fat
maybe trimmed,leavinglayer
abo~~t
1/8”thick.
Step2: Placemeaton broilerrack
in broilerpan whichcomeswith
range.Alwaysuse rack so fatdrips
intobroilerpan; otherwisejuices
maybecomehotenoughto catchfire.
Step3:Wsitionshelfonrecommended
shelfpositionas suggestedinBroiling
Guideon oppositepage.Most
broilingis doneon C position,but
if yourrangeis connectedto 208
volts,youmaywishto usehigher
position.
Step4: have doorajar a fewinches
(exceptwhenbroilingchicken).
Thedoor staysopenby itself,yet
thepropertemperatureis maintained
in the oven.
Step 5: Turn both OVENSET and
OVENTEMP knobsto BROIL.
Preheatingunitsis not necessary.
{Seenotesin BroilingGuide.)
Questiom
Step 6: Turn foodonlyonceduring
cooking.Timefoodsfor first side
per BroilingGuide.
Turnfood,thenuse timesgivenfor
secondsideas a guideto preferred
doneness.(Wheretwothicknesses
and timesare giventogether,use
first timesgivenforthinnestfood.)
Step Z TurnOVENSETknob
to OFF.Servefoodimmediately,
and leavepan outsideovento cool
duringmealfor easiestcleaning.
1. If desired,broilerpanmaybe
linedwithfoilandbroilerrackmay
be coveredwithfoilforbroiling.
ALWAYS
BECERTAIN~ MOLD
FOILTHOROUGHLY~
BROILERRACK,ANDSLIT
FOILTOCONFORMWITH
SLITSIN RACK.Broilerrackis
designedto minimizesmokingand
spattering,andto keepdrippings
coolduringbroiling,Stoppingfat
andmeatjuicesfromdrainingto
thebroilerpanpreventsrackfrom
servingitspurpose,andjuicesmay
becomehotenoughtocatchfire.
2. DONOTplacea sheetof
aluminumfoilon shelf.Todo so
mayresultin improperlycooked
foods,damageto ovenfinishand
increaseinheaton outsidesurfaces
oftheoven.
&Amwers
Q. Why should
I leavethe door
closedwhen broilingchicken?
A. Chickenis theonlyfood
recommendedforclosed-door
broiling.This is becausechickenis
relativelythickerthanotherfoods
youbroil. Closingthe door holds
moreheatin theovenwhichallows
chickento cookevenlythroughout.
Q. Whenbroiling,is it necessary
to alwaysuse a rackin the pan?
A. Yes.Usingtherack suspends
the meatoverthepan. As the meat
cooks,thejuicesfallintothepan,
thuskeepingmeatdrier.Juices
are protectedbythe rack andstay
cooler,thus preventingexcessive
spatterand smoking.
Q. ShouldI saltthe meatbefore
broiling?
A. No. Saltdrawsoutthejuices
and allowsthemto evaporate.
Alwayssalt aftercooking.Turn
meatwithtongs;piercingmeat
witha fork alsoallowsjuicesto
escape.Whenbroilingpoultry
or fish, brush eachsideoften
withbutter.
Q. Whyaremymeatsnot turning
out as brownas theyshould?
A. IIIsomeareas,thepower
(voltige)to the rangemaybe low.
In thesecases,preheatthe broil
unitfor 10minutesbeforeplacing
broilerpan withfoodin oven.
Checkto see if youare usingthe
recommendedshelfposition.Broil
for longestperiodoftime indicated
in the BroilingGuide.Turnfood
onlyonceduringbroiling.
Q. Do I needto greasemybroiler
racktopreventmeatfromsticking?
A. No. The broilerrack is designed
to reflectbroilerheat, thuskeeping
the surfacecoolenoughto prevent
meatstickingtothesurfice.However,
sprayingthebroilerracklightlywi
a vegetablecookingspraybefore
cookingwill makecleanupeasier.
Guide
1. Al~v~ys
usebroilerpan andrack
thatcomeswithyouroven.It is
designedto minimizesmokng and
spatteringbytrappingjuicesin the
shieldedlowerpart of thepan.
2. Ovendoor shouldbe ajar forall
fwds exceptchicken;thereis a
specialpositionon doorwhich
holdsdoor opencorrectly.
3. Fo- ste~ andchops,slashfat
everdyaroundoutsideedgesofmeat.
6. Broilerdoesnotneed to be
preheated.However,for verythin
foods,or to increasebrowning,
preheatif desired.
Steak can be
7. frozen
conventionallybroiledby
positioningthe ovenshelfat next
lowestshelfpositionand increasing
cookingtime givenin this guide
1%timesper side.
8. If yourovenis connectedto
208volts,raresmaybe brofied
by preheatingbroilheaterand
positioningthe ovenshelfone
positionhigher.
‘Toslash,cut crosswisethrough
outerfat surfacejust to the edgeof
the meat. Use tongsto turn meat
overto preventpiercingmeatand
losingjuices.
4. If desired,marinatemeatsor
chickenbeforebroiling.Or brush
withbarbecuesaucelast5 to 10
minutesonly.
5. men arrangingfoodon pan,
do not let fattyedgeshangover
sides,whichcouldsoilovenwith
fatdripping.
Shelf
Position
FirstSide
~me, Minutes
SecondSide
Time,Minutes
c
3%
3%
Arrangein singlelayer.
c
7
4-5
Spaceevenly.
Upto 8 pattiestakeaboutsametime.
l-inchthick
(1to 1%-lbs.)
c
1%-in.thick
(2tO2%-lbs.)
c
c
c
7
9
13
10
15
25
7
9
13
7-8
14-16
20-25
Steakslessthan 1inchcookthrough
beforebrowning.Panfryingis
recommended.
Slashfat.
1whole
(2to2%-lbs.),
splitlengthwise
A
35
10-15
Reducetimesabout5 to 10minutesper
sidefor cut-upchicken.Brusheachside
withmeltedbutter.Broilwithskin
downfirstandbroilwithdoorclosed.
2 to 4 slices
1pkg.(2)
2 (split)
c
1%-2
1~
c
3-4
hbswr ~i~S
(6to 8-02.each)
2-4
B
13-16
Do not
turnover.
Cutthroughbackofshell.Spread
open.Brushwithmeltedbutter
beforeandafterhalftime.
Fish
l-lb. fillets%to
‘A-in.thick
c
5
5
Handleandturnverycarefilly.
Brushwithlemonbutterbeforeand
duringcookingif desired.Preheat
broilerto increasebrowning.
IiamSlices
(precooked)
l-in. thick
B
8
8
Increasetimes5 to 10minutesper side
for 1%-inchthickor homecured.
Wrk Chops
WellDone
2(% inch)
2 (l-in. thick)
about1lb.
c
B
10
13
10
13
Slashfat.
Umb Chops
Medium
IVellDone
Me4iium
~ell Done
2(1 inch)
about10to 12oz.
2 (1%inch)
about1lb.
c
c
4-7
10
4-6
12-14
Slashfat.
c
B
8
10
10
17
l-lb. pkg.(10)
c
6
1-2
Fmd
Quantityandior
‘rhicknw
Bacon
Vz-lb.(about8
thinslices)
Groud Beef
WellDone
l-lb. (4patties)
1Ato %-in.thick
Beefsteaks
Rare
Medium
1WellDone
Rare
Medium
WellDone
Chicken
BakeryProducts
Bread(Toast)or
ToasterPastries
EnglishMuffins
$~iene~andsimilar
precookedsausages,
bratwurst
.—
c
c
19
Commen@
Spaceevenly.PlaceEnglishmuffins
cut-side-upandbrushwithbutter,if
desired.
If desired,splitsausagesin half
lengthwise;cut into5 to6-inchpieces.
,
~
..-
Contrek,cheek These
Thi~s:
step1:
Removebroilerpan, broilerrack
andother cookwarefromtheoven.
(Ovenshelvesmaybe lefiin oven.
Note:Shelveswilldiscolorafter
the self-cleancycle.)
step 2:
W~pe~pheavysoilon ovenbottom.
Caution:Chrometrim rings
aroundthe surfaceuxlitsshould
neverbe cleanedin the selfcleaningoven.Neithershould
reflectorpansof foilor shiny
chrome.
How to
Step2:
Slidethe LAl~H HANDLEto the
rightas far as it willgo.
setoven
for cleaning
step1:
~rn OWN SET’and OWN
TE~ knobsto CLE~. Controls
willsnapintofinalpositionwhen
the CLEANlocationis reached.
Step3:
Set the automaticoventhmer:
~ Makesure boththerangeclock
andthe DELAYEDSTARTdial
showthe correcttimeof day.When
the DELAYEDSTARTknobis
pushedin and turned,it will “pop”
intoplacewhenthetime shownon
the rangeclockis reached.
e Decideon cleaninghours
necessary.
RecommendedCleaningTime:
ModerateSoil—2houm
(thinspillsand lightspatter)
HeavySoiI—3hours
(heavy,greasyspillsand spatter)
~ Addthesehoursto presenttime
of day,then pushin and turn S~P
dialclockwiseto this desiredstop
time. CLEANINGlightglows,
showingcleaningis starting.
The LOCKEDlightwill glow,
indicatingovenis hot and door
cannotbe opened.Ovendoor and
windowgethotduringself-cleaning.
DO N~ ~UCH.
A. oven Frontmame
B. Oven DoorGasket
C. Openingsin Door
D. OvenLight
step 3:
Cleanspattersor spillson oven
frontframe (A)and ovendoor
outsidegasket~) with a dampened
cloth.Polishwitha dry cloth.Do
notcleangasket(B). Do notallow
waterto run downthroughopenings
in topof door (C). Neverusea
commercialovencleanerin or
aroundself-cleaningoven.
step 4:
Closeovendoorand makesure
ovenlight(D) is off.
Step 5:
Thealuminumor porcelainenameleddrip pansthat came
withyourrangecan be cleaned
automaticallyin the self-c~eaning
oven,but the aluminumpansmay
ti~entuallychangecolor. Wipeoff
i~~i]~ver~
that are not stuckon
l~eforeplacingtwopans, upside
(Jowit,on each ovenshelf.
20
elf-cleaaiag fter cleaningis complete,the
~~~r willstay-lockeduntiltheoven
cooisand theLOCKEDlightgoes
off. Thistakesabout30 minutes.
step1:
WhenLOCKEDlightis off, slide
the LA~H HANDLEto the Iefias
faras it willgo andopenthe door.
step 2:
TurnOVENSETknobto OFF.
step3:
Turn
OVENTEMPknobto WW.
N~E: If youwishto startand
stopcleaningat a latertimethan
shownon clock,push in andturn
DELAYEDSTARTdialto time
youwishto start. Addthehours
neededfor cleaningto this “start”
time,then pushin and turn S~P
did to this desiredstoptime. Oven
willautomaticallyturn on and off
at the set times.
QuestionsandAmwen
Q. Whywon’tmyovenclean
immediate~yeventhoughI set
al!the timeandcieanknobs
correctly?
A. Checkto be sureyour
DELAYEDSTARTdialis set to
the sametimeas the rangeclock.
Nso checkto be sureLA~H
HANDLEis movedto theright.
Q. Mrnyovenclockis notworm,
can I stillself+leanmyoven?
A. No. YourAutomaticOven
Timerusesthe rangeclockto help
startand stopyourself-cleaning
cycle.
Q. CanI usecommercialoven
cleanerson anypartof my
se~f+laning oven?
A. No cleanersor coatingsshotid
be usedaroundanypart of this
oven.If youdo usethemanddo not
wipethe ovenabsolutelyclean,the
residuecan scarthe ovensurface
and damagemetalpartsthe next
timethe ovenis automaticdy
cleaned.
Q. CanI c~eanthe WovenGasket
aroundthe ovendoor?
A. No, his gasketis essentialfor
a goodovenseal, andcare mustbe
takennotto rub, damageor move
thisgasket.
ovento coolfor at least(Jnehour
beforeopeningthe door.Wipeup
the excesssoiland resetthe clean
cycle.
Q. 1sthe 66crackiing”
soundI
hearduringcleating normal?
A. Yes.Thisis the metalheating
andcoolingduringboththe
cookingandcleaningfinctions.
Q. Shouldtherebe any odor
duringthe cleatig?
A. Yes,theremaybe a slightodor
duringthe fwstfewcleanings.
Failureto wipeout excessivesoil
mightalsocausean odor when
cleaning.
Q. Whattames the hair-we
lineson the enameledsurface
of myoven?
A. Thisis a normalcondition
resultingfromheatingand cooling
duringcleaning.Theydo not affect
howyourovenperforms.
Q. Whydo I haveash left in my
ovenaftercleaning?
A. Sometypesof soilwill leavea
depositwhichis ash, It can be
removedwitha dampspongeor
cloth.
Q. My ovenshelvesdo not stide
easily.Whatis the matter?
A. Afier manycleanings,oven
shelvesmaybecomeso cleanthey
do not slideeasily.If youwish
shelvesto slidemore easily,
dampenfingerswith a small
amountof cookingoil and rub
lightlyoversidesof shelfwhere
theycontactshelfsupports.
Q. Afterhavingjust usedthe
oven~the LOC=D lightcme
on andI eodd notmovethe
LA~H ~mLEe Why?
A. Afier severalcontinuoushightemperaturebakingsor broilings,
the LOCKEDlightmaycomeon.
The ovendoor can’tbe latchedfor
self-cleaningwhilethe LOCKED
lightis on. fithis happens,let the
ovencooluntilthe LOCKEDlight
goesoff. Thenthe ovendoorcan
be latchedfor self-cleaning.
Q. My ovenshelveshavebecome
grayafterthe self~lean cycle.Is
this normal?
A. Yes.Afier the self-cleancycle,
the shelvesmaylose someluster
and discolorto a deep graycolor.
Q. Whatshodd I do if excessive
Smotingoccursduringcleaning?
A. Thisis causedby excessivesoil,
md youshouldswitchthe OVEN
SETknobto OFF.Openwindows
to rid roomof smoke.Allowthe
Q. CanI cookfoodon the
cooktopwtile the ovenis selfcleaning?
A. Yes.Whilethe ovenis selfcleaning,youcan use the cooktop
just as younormallydo.
Propercare andcleaningare
inlportantso yourrangewillgive
youefficientandsatisfactoryservice.
Followthesedirectionscarefullyin
caringfor yourrangeto assuresafe
andpropermaintenance.
ovenventDuet
ovenLamp
Yourrangeis ventedthrougha
ductlocatedundertherightrear
CalrodQunit. Cleanthe ductoften.
Removethe ovendoor,if desired,
to reachlampeasily.
Etishes
Theporcelainenamelfinishis
sturdybut breakableif misused.
Thisfinishis acid-resistant.
However,anyacidfoodsspilled
(suchas fruitjuices, tomato,or
vinegar)shouldnotbe permitted
to remainon the finish.
cleati~
under
the Ra~e
The area underthe rangeofmodels
equippedwith a bottomdrawercan
be reachedeasilyfor cleaningby
removingthe bottomdrawer.To
remove,pulldrawerout allthe way,
tiltup th; frontandremoveit. To
replace,insertglidesat backof
drawerbeyondstopon range
glides.Lift drawerif necessaryto
inserteasily.Let frontof drawer
down,then pushinto close.
Removableoven
Door
Toremove:
~Makesureunitis cool.
a Lifiup rightrear surfaceunit.
~Removetrim ring anddrippan.
o Liftoutovenventduct.
Toreplace:
@Placethe part overthe ovenvent
locatedbelowthe cooktopwiththe
openingof the ductunderthe round
openingin the drip pan. It is
importantthatthe ductis in the
correctpositionso moistureand
vaporsfromthe ovencan be
releasedduringovenuse. N~E:
Nevercoverthe holein theoven
ventductwith aluminumfoilor
anyothermaterial.Thisprevents
the ovenventfromworking
properlyduringanytooting cycle.
Lmp
ToREMOVEdoor, opento BROIL
position,or whereyoufeelhinge
catchslightly.Graspdoor at sides;
lifidoor up and awayfromhinges.
ToREPLACE,graspdoor at sides,
lineup door with hingesandpush
door firmly intoplace.
~eplacement
CA~ON: BEFORE
REPLAC~G
ANY LAMP,DISCONNE~
ELE~WC POWER~ RANGE
ATTHEMAINFUSEOR
CIRCUITBREAKER
PANEL.
LETLAMP(ORBULB)AND
LAMPCOVERCOOL
COMPLETELY.
Afier replacinglamp(bulb),
reconnectelectricalpowerto the
range.
22
If the ovenlamp @uib)hasa
removablegiasscoverwhichSS
heldin placetith a bafl-shaped
tire...
Toremove:
@Holdhandundercoverso it
doesn’tfallwhenreleased.With
fingersof samehand, fitiy push
downwirebailuntdit clearscover.
Liftoffcover,DONOTREMCVE
ANYSCREWSTOREMOVE
THISTYPEOF COVER.
~Replacebulbwitha 40-watt
homeappliancebulb.
Toreplacecover:
~Placecoverintogrooveof lamp
receptacle.Lifiwirebailup to
centerof coveruntilit snapsinto
place.Whenin place,wireholds
coverfidy, butbe certainwire
bailis notbelowdepressionin
centerof cover.
If Iarnpcoveris heldk piacewith
threeslottedscrews...
~Removethe screws,removecover,
andreplacebulbwith40-watt
appliancebulb.
~ Replacelampcoverwiththree
screws.
=—
__
Coolitopsurface
Lamp
=={~~Q{~~g~qq~)
e-:-’=
VHEN ~HANGI~~ A
COOK~P LAMP,DO N~
‘~UCH THE METALAT
ENDSOF LAMP.
Yourcooktoplightis easily
replacedwith a fluorescenttube
ofthe samewattage.Makesurethe
powerto the rangeis disconnected
at mainfise or circuitbreaker
panelor pullplug.
mt-kk
Utitsmot
be removed.
Toremove:
Liftlamp cover.
~Placefingerson top near each
endof lightbulb.
~Pressdownandroll top ofbulb
gentlytowardfrontof rangeuntilit
stops.
~Removebulbgentlyfromunit
makingsure it doesn’thit lamp
cover.
Toreplace:
~ Placefingerson top near each
nd of ligh~bulb. ‘
~Pressbulb gentlyinto slotsand
rolltopof burbge~tlytowardback
of rangeuntilit stops.
~Movelamp coverdown.
surface
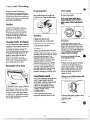
Toreplacea plug-ti ufit:
Youcan lifi a tilt-lockunitupward
about6“ and it willlock in the up
position.
Toreptisitionthe tilt-lockutit:
@Replacethe drip pan andtrim
ringintothe recessin the cooktop.
~Put the trim ring in placeoverthe
drip pan. Thedrip pan must be
underthe trim ring.
~Guidethe surfaceunit intoplace
so it fits evenlyintothe trim ring.
Pl~-h Utib
(on models so equippd)
Utik
Cleantie area underthe drippans
often.Built-upsoil, especially
grease,maycatchfire. Tomake
cleaningeasier,tilt-lockunitslifi
up andlock in the up position,and
plug-inunitsare removable.
Caution: Be sure all controlsare
turnedto OFFand surfaceunits
arecoolbeforeattemptingtolift
or removethem,
AfterIifiingthetilt-lockunitsor
removingplug-inunits, removethe
trim ringsand drip pans underthe
unitsand cleanthemaccordingto
directionsin the CleaningGuideon
page25. Wipearoundthe edgesof
the surfaceunit openings.Clean
‘e areabelowthe units.Rinseall
~.::~.T
~&~-/ashed
areas witha damp clothor
sponge.
* Firstplacethe drippan, thenthe
trim ringintothe surfaceunitcavity
foundon top of thecooktopsothe
unitreceptaclecanbe seenthrough
the openingin thepan.
@Insertthe terminalsofthe plug-in
unitthroughthe openingin the drip
pan andintothe receptacle.
~Guidethe surfaceunitintoplace
so it fitsevenlyintothe trim ring.
Note: Thedrip panmustbe under
the trim ring.
cAmIoN
~Do notattemptto cleanplug-in
surfaceunitsin an automatic
dishwasher.
~Do notimmerseplug-insurface
unitsin liquidsof anykind.
Plug-inunitscan be removed.
@Do not bendtheplug-insurface
unitplugterminals.
~Do notattemptto clean, adjustor
in anywayrepair theplug-in
receptacle.
Lifi a plug-inunitabout 1“above
thetrim ring—justenoughto grasp
it—andyoucan pullit out.
a plug-inutit more
Do nottift
than IL’If youdo, it maynottie
flat on the trimringwhenyou
plug it backin.
23
-.
——
-.
—
-–
~
—. .
—.
-~
~—
—.
-~
—.
—.
-.
-~.- .
-w
*
Adjwthg oven
Thermosbt
Usetimegivenon recipe
whencookingfirsttime. Oven
thermostatsmay “drift” fromthe
factorysettingoverthe yearsand 5to 10-minutedifferencesin timing
betweenan old and a newovenare
notunusual.Yourovenhas been set
correctlyat the factoryand is more
aptto be accuratethan the oven
whichit replaced.However,if you
findthatyourfoodsconsistently
browntoo littleor too much,you
maymakea simpleadjustmentin
thethermostat(OvenTemp)knob.
PULLKNOBOFF OF SHAFT,
LOOKATBACKOF KNOBAND
N~E CURRENTSETTING
BEFOREMAKINGANY
ADJUSTMENT.
Toincreasetemperature,turn
towardHI or RAISE;to decrease
turn towardLOor LOV~ER.Each
notchchangestemperature10
degrees.
Followone of the sketchesat right
to adjustyouroventhermostat.
1, Removeknob,andholdit so
pointeris at top of knob.Usinga
pot holderor ~imilarmaterial~hold
“skirt” of knobfirmlyin onehand.
Grasphandleof knobin otherhand.
Notepositionof pointerandturn
handleto movepointertoward
Raiseor Lower.
Pointeris designednotto move
easily.If it is seatedso it is difficult
to move,pointermaybe loosened
slightly.Insert a thin screwdriver,
knifebladeor similarinstrument
andlift up end ofpointerslightly.
1. Pull off knob,loosenboth
screwson backof knob.
2. Movepointeronenotchin
desireddirection.Tightenscrews.
3. Returnknobto range,matching
flat area of knobto shaft.
Recheckovenperformancebefore
makingan additionaladjustment.
2. AReradjustmentis made,press
pointerfidy againstknob.Return
knobto range,matchingflat area
on knoband shafi.
Recheckovenperformancebefore
makingan additionaladjustment.
-—
=
@
24
cleani~lg
Guide
e:
bt
oven/range
pafi cool beforetouchingor handling.
Pm
I MATEMALS~USE
GENERALDm~IONS
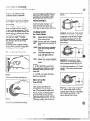
Donotcleanthebakeunit or broil unit. Any soil will burnoffwhentheunitis
heated.N~E: Bakeunitis hingedandcan be lifted gentlyto clean oven floor.
I
If spillover,residueor ash accumulatesaroundbakeunit, gentlywipe around
unitwith warmwater.
Bake Utit
arkdBroil Unit
Broiler %Rand fick
~ Soap and Water
~ Soap-Filled Scouring Pad
e Plastic Scouring Pad
ControiWebs:
e MildSoap and water
Ran~e TODand Oven
Outside Glass finish
~ Soap and Water
Metal, including
Brushed Chrome
and Cooktop
%rcelain Enamel
Surface*
minted Surfaces
~ Soap and Water
s Paper Towel
e Dry Cloth
@SoapandWater
I ~Soapand Water
ide Oven Door*
OvenGasket*
~ SoapandWater
I
~ SoapandWater
Oven Liner
C)venVentDuct
Shelves
I
o Soapand Water
o Soapand Water
(See Self-Cleaning
Oven Directions)
Calrod@Surface
Unit Coils
Chrome-Plated
Trim Kings
Soapand Water
~ Stiff-Bristled Brush
@Soap-Filled Scouring Pad
(Non-metallic)
o
~rcelain Enamel or
~ Soap and Water
Aluminum
~riphs
~Soap-Filled
Scouring
Pad
~Plastic
Scouring
Pad
Drainfat, coolpanandrackslightly.(Donotlet soiledpanandrackstandin
oventocool.)Sprirddeondetergent.Fill panwithwarmwaterandspreadcloth
or papertoweloverrack.Letpan andrackstandfora fewminutes.Wash;scour
if necessarv.Rinseanddrv.OPTION:CleanDanandrackindishwasher.
Pulloffknobs.Washgentlybutdo notsoak. Dryandreturncontrolsto range,
makingsureto matchflatareaonknobandshaft.
Cleanoutsideofcooledblackglassdoorwitha glasscleanerthatdoesnot
containammonia.Washotherglasswithclothdampenedin soapywater.Rinse
andpolishwitha drycloth.If knobsare removed,do notallowwaterto run
downinsidesufice ofglasswhilecleaning.
Wash;rinse,andthenpolishwitha dry cloth.DON(YTUSEsteelwool,
abrasives,ammonia,acids,or commercialovencleanerswhichmaydamage
thefinish.
Avoidcleaningpowdersor harshabrasiveswhichmayscratchtheenamel.
If acidsshouldspillon therangewhfleit is hot, usea drypapertowelor cloth
to wipeup rightaway.Whenthe surfacehas cooled,washandrinse.
Forotherspills,suchas fatsmatterings,etc., washwithsoapandwaterwhen
cooledandthenrinse.Polishwitha dm cloth.
Usea mildsolutionofsoapandwater.Do notuse anyharshabrasivesor
cleaningPowderswhichmayscratchor mar surface.
Removeovendoorbyopeningit to BROKposition,graspingit at sides,and
liftingup andawayfromhinges.Cleanwithsoapandwater.Replacebygrasping
doorat sides,liningupdoorwithhinges,andpushingdoorfidy intoplace.
AvoidgettingANYcleaningmaterialson the gasket.
Coolbeforecleaning.Frequentwipingwithmildsoapandwaterwillprolong
thetimebetweenmajorcleanings.Be sureto rinsethoroughly.
Removethe OvenVentDuctfoundunderthe rightrear surfaceunit.Washin
hot, soapywater,dryandreplace.(Openingshouldmatchopeningin drippan.)
Shelvescan becleanedin SeW-Clemingovenor dishwasher,or by hand,
usingsoapmd water.Rme thoroughlytoremovesoapaftercleaning.
Spattersand spillsbum awaywhencoilsare heated.Afiermeal,removeall
cookwarefromsurfaceunitsandheatsoiledunitsat HI. Let soilbum offabouta
minuteandswitchunitsto OFF.Trynotto getcleaningmaterialson coils.If you
do, wipeoffwithdamppapertowelbeforeheatingsurfice unit,
DON~ handletheunitbeforecompletelycooled.
DONCYI’
attempttocleantheplug-inunitsin the self-cleaningoven.
DON~ immerseplug-inunitsin anykindof liquid.
Cleanas describedbelowor in dishwasher.DO N~ CLEAN~ SELFCLEmG OVEN.Ringswilldiscolor.Wipeaftereachcookingso unnoticed
spatterwillnot “burnon” nexttimeyoucook. Toremove“burned-on”spatters,
use anyor all cleaningmaterialsmentioned.Rublightlywith scouringpadto
preventscratchingofthesurface.
Drippanscanbecleanedin self-cleaningovenor dishwasheror byhand—
afterpanscoolslightly,sprirddeondetergent,washor scourwithhotwater,
rinseanddrv.
*Spillageof marinades, fruit juices, and basting materials containing acids may cause discoloration. Spillovers should bewipedupimmediately,with
.=_.
—-,.arebeing@kento nottouchanyhotportionofthe oven.Whenthesurfaceis cool, cleanandrinse.
..r=:&
.=2s..%=
~w~;
PROBLEM
I POSSIBLECAUSEANDRE~DY
OVENWILLNOTWOW
Plugon rangeis not completelyinsertedin theelectricaloutlet.
Thecircuitbreakerin yourhousehasbeentripped,or a fusehasbeenblown.
Ovencontrolsnotproperlyset.
Doorlefiin lockedpositionafter cleaning.
OVENLIGHT
DOESNOTWORK
Lightbulbis loose.
Bulbis defective.Replace.
Switchoperatingovenlightis broken.Callfor service.
FOODDOESN~
BROILPROPEWY
OVENSETknobnotketatBROIL.
,.
OVENTEMP.knobnot setat BROIL.
Door notleftajar as recommended.
Impropershelfpos~lonbeingused: CheckBrbfiingGuide.
‘
Necessa~ preheating-wasnotdon~.’
.,. ,, ~
Foodis beingcookedonhot pan.
Utensilsare not suipd fg~broiling. - .
Aluminu~fo~used.on thebroil,fiw rack hasnotbeenfittedproperlyand
slit
,!
asrecomended. ‘ -. .. .
~ ‘ ‘,
OVENSET,knobnot seton~~,.~
~~
.OVENTEMPknob~ot setcotieqtly.,
-, ,
,Shelfpo$itionis incorrect.Chick-Roastingor Bag Guides: ~
Ovenshelfis notlevel. ~
‘
.
Incorrectcootiare or coo~are of impropersizqis beingused.
A fofltentwasnotusedwhenneededto slowd~wn’browtiing
duringroasting.
\,.
Surfaceunitsarenotpluggedin solidly. ~ ...
- , Trimrings anddrip pansare
not
set
securely~n~e
r&ge
top;,
,,
Surfaceunitcontrolsare notprppe~lyset.
‘
.
,.
Automatictimerdids not setor no~setpti&rly. ~lockmustbe-setto ~imeofday
andtheS~P did mustbe setandadvancedbeyondthetimenoti on ovenclock.
TheS~P dialwasnot advancedfor longenough.
BothOVENSET andOVENTEMPknobsmust be set at CLEANsetting.
A thickpileof spilloverwhencleanedleavesa heavylayerof ash in spots
whichcouldhaveinsulatedthe area fromfirther heat.
Latchnot movedto the right.
,,
FOODDOESN~ ROAST
ORBAKEPROPERLY
~ALROD”SU~ACE UNITS
Nm FUN~IONING
PROPERLY
OVENW~L~NOT
$ELF-CLEAN
3VEN
DOOR
WON’TLA~H
firnOVENSETknobto CLEAN.GlowingLgckedLightafier knobis tur~~ed
in&catesovenis too hot fromprevioususeand door won’tlatch. Tocooloven,
opendoor wide,thenLatchcanbe moved..
IOVENSET’knobmustb: at CLEANor OFF beforeLatchcan be moved.
26
B
—
If YouNeedservice
Toobtainservice,seeyourwarranty
on thebackpageof thisbook.
We’reproudof our serviceand
wantyouto be pleased.If for some
reasonyouare nothappywiththe
serviceyoureceive,here are three
stepsto followfor futiherhelp.
FIRST,contactthepeoplewho
servicedyourappliance.Explain
whyyouare notpleased.In most
cases,this willsolvethe problem.
NEXT, if youare stillnotpleased,
writeallthe details-including
yourphonenumber—to:
Manager,ConsumerRelations
GE Appliances
AppliancePark
Louisville,Kentucky40225
FINALLY,if yourproblemis still
not resolved,write:
MajorAppliance
ConsumerActionPanel
20 North WackerDrive
Chicago,Illinois60606
E-
--——
r.-...
— .. . . .
—.
~
—.
—.
-—
27
—..——-
YOURGENERALELEmRICRANGE
of
Save
proof
WARRANW
original purchase datesuchasyoursalesslipor cancelledcheckto establishwarrantyperiod.
4
ONE-YEAR
WARRANTY
Thiswarrantyis extendedto
WHAT
1sCOWRED FULL
the originalpurchaserandany
Foroneyearfromdateoforigins!
purchase,wewill provide,freeof
charge,partsandservicelabor
in your hometo repairor replace
anypafi of the range thatfails
becauseof a manufacturingdefect.
~~~~
~~ ~m
COVERED eservice
triP~to Yourhometo
teachyou ttowto usethe product.
Readyour UseandCammaterial.
If youthen haveanyquestions
aboutoperatingthe product,
pleasecontactyourdealeror our
ConsumerAffairsofficeatthe
addressbelow,or call,tollfree:
GEAnswerCenteF
800.626.2000
consumerinformationservice
succeedingownerfor products
purchasedfor ordinaryhomeuse
in the 48 mainlandstates,Hawaii
andWashington,D.C.InAlaskathe
warrantyis the sameexceptthat it is
LIMITEDbecauseyoumustpayto
shipthe productto the serviceshop
or for the se~ice technician’stravel
coststo yourhome.
All warrantyservicewill be provided
by our FactoryServiceCentersor
byour authorizedCustomerCare@
~o~)~ersduring normalworking
.
Lookin the Whiteor YellowPages
of yourtelephonedirectoryfor
GENERALELECTRICCOMPANY,
GENERALELE~RIC FACTORY
SERVICE,GENERALELECTRICHOTPOINTFA~RY SERVICEor
GENERALELE~RIC CUSTOMER
CARE@SERVICE.
~ Replacementof housefusesor
resettingof circuitbreakers.
~ Failureof the productif it is used
for otherthan its intendedpurpose
or usedcommercially.
@Damageto productcaused
by accident,fire,floodsor acts
of God.
WARRAN~R ISNOTRESPONSIBLE
FORCONSEQUENTIALDAMAGES.
@Improperinstallation.
If you havean installationproblem,
contactyourdealeror installer.
Youare responsiblefor providing
adequateelectrical,gas,exhausting
andotherconnectingfacilities.
Somestatesdo notallowthe exclusionor limitationof incidentalor consequentialdamages,sothe abovelimitationor exclusion
maynotapplyto you,Thiswarrantygivesyouspecificlegalrights,andyoumayalsohaveotherrightswhichvaryfromstateto state.
Toknowwhatyourlegalrightsarein yourstate,consultyourlocalor stateconsumeraffairsofficeor yourstate’sAttorneyGeneral.
Warmntor:GenemlElectricCompany
Iffutiher help is needed concerningthis warmnty,write:
Manager—ConSUmer
Atiaim,GEAppliances,Loui5vil$e,
KY40225
JB391GKJSP27J
JB400GKJSP28GJ
JB490GJ