1
t
30" Self-Cleaning
Electric Free-Standing
Use & Care Guide
Range
Estufa EI6ctrica
30" Tipo "lndependiente"
con Autolimpieza
Guia para el Uso y Cuidado
Models, Modelos
911.93501,
93588,
93508, 93581, 93582, 93587,
93601,93602,
93607, 93608
÷
÷
229c4o2oP183-6
(SR-10452)
Sears, Roebuck and Co,
Hoffman Estates, IL 60179 U.SJ_.
www.sears.eom
I
÷
SELF-CLEANiNG
FREE-STANDiNG
RANGE
Tableof Dontents
Oven Racks............................ 17
Oven Control .......................... 17
Broiling............................. 18-19
Range Safety ........................ 3-7
Anti-Tip Bracket .................... 3-4
Self-Cleaning Cycle .......... 20-21
Preparing YourOven .............. 20
Oven Door Gasket .................. 20
To Set A Clean Cycle ............. 21
To Set A Delayed Cycle .........21
To Stop A Cycle ...................... 21
After The Cycle....................... 21
ControlPanel .......................... 22
BroilerPan and Grid............... 22
WallsOf The Oven.................. 22
Cooktopand Area Under
Cooktop.................................. 22
Drawer and Sides of Range .. 22
Oven Door Glass.................... 22
DoorVent Trim........................ 22
RemovableParts.............. 23-28
Lift-UpCooktop...................... 23
ControlKnobs.........................24
Oven Light Bulb......................24
CooktopUnits.........................25
Oven Racks ............................ 26
Oven Door ........................ 26-27
StorageDrawer ......................28
Features of Your Range ........... 8
Removalof Packaging Tape.... 8
Cooking Elements .................... 9
Control Settings........................ 9
Home Canning Tips .................. 9
Hour/Minute ArrowPad .......... 10
Temp Recall ........................... 10
Display.................................... 10
Oven Light Switch .................. 10
Indicator Lights ....................... 10
Black Out The Display ............ 10
F-Codes .................................. 11
PF Code .................................. 11
Automatic Oven Shutoff ......... 11
To Set The Clock .................... 12
To Set The Timer .................... 12
To Reset The Timer ................ 12
To Cancel The Timer .............. 12
Baking .............................. 13-14
Oven Cooking Tips ........... 15-17
Strong Smell or Odor .............. 15
Aluminum Foil ......................... 15
Oven Vent ............................... 15
Peeking ................................... 15
Preheating .............................. 15
Oven Light .............................. 15
Baking With Margarine ........... 15
Bakeware Placement.............. 16
Bakeware ................................ 16
Element Cycling ..................... 16
÷
BeforeCalling for
Service.............................. 29_31
TemperatureAdjusb]_3nt
.... 17, 32
Warranty .................................34
ConsumerServiceNumbers.,.68
For your convenience and future reference, please write down your model
and serial numbers In the apace provided. They are located on the front
frame behind the storage drawer.
SERIAL NUMBER:
MODEL NUMBER:
© Sears, Roebuck and Co.
I
2_'t8_EN'_01
.pro6
,2
2
÷
_24J00,
_34 AM
÷
f
PI
iiii!i m
[
IMPORTANT
SAFETY
INSTRUCTIONS
SAVE THESE INSTRUCTIONS
Read all Instructions before using this appliance. When using gea
or electrical appliances, basic safety precautions should be followed,
Including the following:
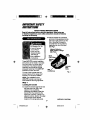
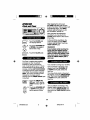
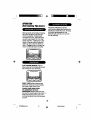
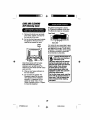
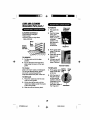
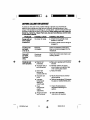
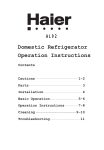
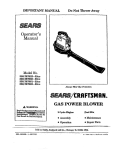
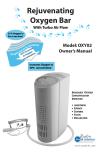
B. Use the bracketas a template
and mark2 holepositionson the
wall and 2 hole positionson the
floor,Use either the woodor
concretefloor set of positions,
depending on yourfloortype.
See Fig. 1.
Adjacent Cabinet or
Final Location of Range
Side Panel
Wood
Floor Holes
÷
Bracket
Side
These ANTI-TIP bracket installation
instructionsare for wood or concrete
floors and walls.Any othertype of
constructionmay requirespecial
installation techniquesto provide
adequate fastening of the ANTI-TIP
bracket tothe floor and wall.
The use of this bracket does not
prevent tippingof the rangewhen
bracket is not properlyinstalled.
NOTE: The installation of the
ANTI-TIP bracket mustmeat all
localcodes for securingappliance.
Step
Wall
Holes
Rear
Leveling Leg
÷
Fig. 1
1
Locating the bracket
A. Locate the bracketagainstthe rear
wall and eitherthe rightor left
cabinet, if the countertop
overhangsthe cabinet,offsetthe
bracket from the cabinet by the
amountof overhang. If there is no
adjacent cabinet, position the edge
of the bracket at the desired
locationof the range side panel.
€ondnued on next page
3
I
IMPORTANT
SAFETY
INSTRUCTIONS
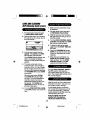
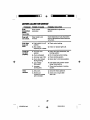
C. Concrete Construction:
1. Hardware required:
4 each
V,' x 11/2'lag bolt
4 each
V£ O.D. sleeve
anchor
2. Drillthe recommendedsize
hole for the anchors intothe
concreteat the center of each
pre-markedconcretefloorand
wall hole position.Installthe
sleeve anchorintothe drilled
holesand then installthe lag
boltsthroughthe bracket.
DO NOT OVERTIGHTENTHE
BOLTS.
Ard_l-TIp Bracket (contd.)
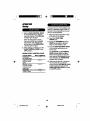
Step
2
Anti-tip bracket installation
A. Wood Construction:
1. Roor. Drilla _' pilothoaein
the centerof each pre-.marked
wood floorhole position(a nail
or awl may be used if a drillis
not available),
AND
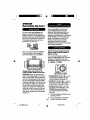
Step
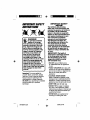
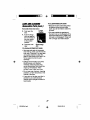
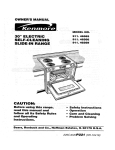
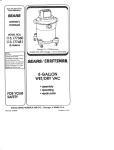
2. Wall: Drillan angled _" pilot
hole (as shownin Fig. 2) in the
center of each pre-marked
wall hole position(a nailor awl
may be used if a drill is not
available).
A'rrACHMENTTOWALLANDFLOOR
÷
Checking the installation
A. Complete the installationof
the rangeper the installation
instructionsprovidedwithit.
B. Check if the ANTI.TIP bracket is
installedand engaged properly.
Removethe kick panelor storage
drawerand inspeotthe REAR
LEVEUNG LEG. Make sure it fits
securelyintothe slot.See Fig. 1.
Bracket
I
__..._j
ScrewMunt
F.==w_
"_
3
Plate
Im T
Rg. 2
B. Mount theANTI-TIP bracket
with the 4 screws provided as
illustratedin Fig. 2,
4
÷
÷
I
IMPORTANT
SAFETY
INSTRUCTIONS
IMPORTANT
SAFETY
NOTICE:
The California Safe Drinking
Water and Toxic Enforcement Act
requires the governor of California
to publish • list of substances
known to the stets to cause birth
defects or other reproductive harm
and requires businesses to warn
their customers of potential
exposure to such substances.
The fiberglass insulation in a
saIl-cleaning oven will give off a
very small amount of carbon
monoxide during the cleaning
cycle. Exposure can be minimized
by venting with an open door or
window or using a ventilation fan
or hood.
from abnormal use, Including
exceealvs loading of the oven
door, attach the range to the
wall or floor by installing the
Anti-Tip device supplied, if the
range is moved for cleaning,
servicing or any reason, be
sure the Anti-Tip device is
re-engaged properly when
the range Is slid back n the
opening. Failure to do so could
result In the range tipping end
may cause personal Injury. To
Inspect the AnU-TIp device,
remove the storage drawer end
look to see If the rear leg leveler
fully engages the slot In the
bracket.
÷
t
IMPORTANT:
The health of
some birds is extremely sensitive
to the fumes given off during
the self-cleaning
cycle of any
range. Move birds to another
well-ventilated room.
÷
• DO NOT leave children alone
or unattendednear an appliance
in use.
• TEACH CHILDREN not to play with
controlsor any part ofthe appliance
and not tosit, ctimb,or stand on the
door or any otherparts of the
appliance.
• CAUTION: NEVER STORE
itemsof interestto childrenon the
backguard or in cabinetsabove the
appliance, Childrenclimbing on the
appliance could be seriouslyinjured,
• KEEP THIS bookfor later use.
#
Important: To ensure safetyfor
yourself, family, and home, please
read yourOwner'sManual carefully.
Keep it handyfor reference. Pay
close attentionto Safety Sections.
BE SURE your appliance is installed
and grounded by a qualified
technician.
• NEVER TRY to repair or replace
any part of the appliance unless
instructions are given in this manual.
Atl other work should be done by a
qualified technician.
• NEVER USE your appliance for
warming or heating the room.
5
j
,
÷
,-,=.,,'-,
f
f
[
W
IMPORTANT
SAFETY
INSTRUCTIONS
• ALWAYS KEEP combustible wall
coverings, curtains, dishcloths,
towels, potholdersand other linens
a safe distancefrom the appliance.
• NEVER HEAT unopened food
containers. Pressurebuildup can
cause the containerto burst and
cause injury.
• NEVER LEAVE containersof fat or
drippings in your oven.
• ALWAYS KEEP the oven and
surface unitareas free from things
thatwill burn. Food, wooden
utensils,and grease buildup could
catch fire. Plasticutensilscould
melt and canned foods could
explode. Your appliance should
never be used as a storage area.
÷
surfacesnear the oven vent
openings, oven door and window
and cooktopsurfaces may also be
hot enoughto cause burns.
• ONLY CERTAINkindsof glassor
ceramiccookwarecanbe usedfor
cooktopcooking.Makesurethe
cookwareyouchooseto useis
designedfor ccoktopcooking
withoutbreakingdue to the sudden
temperaturechanges,
• ALWAYS USE carewhentouching
cod(topelements.Theywiltretain
heatafterthe rangehasbeen
turnedoff.
• NEVER BLOCK theoven air vent
underthe dghtrear element.
• COOKWAREUSED for cook,
top
cookingshouldbe flat on thebottom
and largeenoughto covertheheating
areabeing used.Undersizedutensils
exposethe heatingelementand may
resultin directcontactor ignitionof
clothing.The propersize utensilwill
alsoimproveefficiency.
• ALWAYS KEEP your appliance
clear of things that will burn
(gasolineand other flammable
vaporsor liquids).
• NEVER TRY to clean hot
surfaces.Some cleaners produce
noxiousfumes, and wet clothsor
sponges could cause steam burns.
• NEVER WEAR loose-fittingclothing
when usingyour appliance.
• NEVER USE a towelor other bulky
clothas a potholder.Make sure the
potholderisdry. Moistpotholders
and wet clothsor sponges oouJd
cause steam burns. DO NOT let
potholderstouchhot heating
elements.
• DO NOT touch heating elements,
surfacesnear them, or interioroven
surfaces.These may be hot enough
to cause burnseven thoughthey
are dark in color.During and after
use, do nottouch or let clothingor
flammablematerialcontact the
elementsor hot surfacesuntil they
have had time to cool. Other
• ALWAYS USE dripbowlsto prevent
widngandcomponentdamage.DO
NOT usealuminumlinersor foil in drip
bowls.Improperusemay resultin risk
of electricshookor fire.
• NEVER LEAVE surfaceunits
unattendedat highset_ngs.Boilovers
resultin smokingor greasyspills
whichcouldcatch fire.
• ALWAYS TURN utensilhandles
inward and away fromothersurface
unitsto reducethe riskof burns,
ignition,unintendedcontact,and
spillage.
• NEVER put heatingelementsin water.
• WHEN PREPARINGflaming foods
underthe venthood,turn the fanon.
6
÷
I
IMPORTANT
SAFETY
INSTRUCTIONS
• IF THE SELF-CLEANING mode
malfunctions,turnthe oven off and
disconnectthe power supply.Have
it servicedby a qualified technician.
_
CAUTION:
Nevar lins the drip bowls
with aluminum foil. Foil
can block the normal heat flow
and damage the range.
Always use cookware and woke
that are fiat on the bottom and
the same size as the cooking
element being used.
Cookware should not extend
more than 1" beyond the edge
of the conking element.
• PLACE OVEN RACKS in the
desired positionwhilethe oven is
cool If racksmustbe moved while
oven is hot,do not let potholder
contact the hot oven element.
÷
• AFTER BROILING, alwaystake the
broiler pan and grid out of the oven
and clean them. Leftovergrease in
the broiler pan could catch fire the
next timeyou useyour oveR.
• ALWAYS USE care when opening
the oven door.Let hot air and steam
escape before movingfoods.
• NEVER USE aluminumfoil to line
the oven bottom,Improper use of
foil could starta fire, or electrical
shookcould result.
READ AND UNDERSTAND
THIS INFORMATION
NOW!
Be sure everyone In your home
knows whet to do In case of fire.
Never use water on a grease fire;
It will only spread the flames.
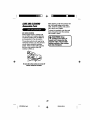
COOKTOP GREASE RRE:
Never pick up • flaming pen...
1. Turn off the surface elements.
• CLEAN ONLY the parts listed
in this manuel. Follow all cleaning
instructions, Be sure to remove
the broiler pan end grid before the
self-clean cycle.
2. Smotherthe flame witha tightly
fitting lid, use baking soda, or use
a dry chemical, foam or halon-type
extinguisher.
• NEVER RUB, move, clean, or
damage the door gasket on selfcleaning ranges, It is essential for a
good seal.
Do not try to =wove the panl
1. Close the oven door and turn
controls off.
• NEVER TRY to clean utensils,
cookware, removable parts, or
broiler pan and grid in the selfclean cycle.
• DO NOT USE oven cleaners No commercial oven cleaner or
protective coating of any kind
should be used in or around any
part of the oven.
2. If fire continues,carefullyopen
the door, throw baking soda on
the fire, or use e dry chemical,
foam, or helen-type extinguisher.
7
÷
I
I ÷
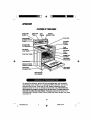
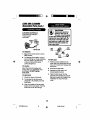
OPERATION
FEATURES
OF YOURRANGE
Oven Light
Clock and
Timer
Oven
Control
Surhlna
Indicator Light
Oven Vent
4 Removable
Cooktop Control
Porcelain
Enamel
4 Removable
Broil
Self-Clean
Lock
Serf-Cleen
Oven
nterle_'
Oven Door
÷
Broiler Pan
and Grid
Removeble
Rllcke
Bake memem
Model end Serial
Number Location Remove_e
)ocr
Removalde
Storage Drawer
Self-Cleaning
Oven Geaket
To remove the adhesive residue left from packaging tape, use household
dishwashingliquid, mineral oil, or cookingoil, Witha softcloth, rub intothe
area and allowto soak. Rinse and dry well. Repeat procedure using an
appliance polishto insure no damage is done to the oven, This should be
done before the range Is tumed on for the flrat time. The tape cannot be
removed once the oven has heated. Packaging tape can be found in the
following areas: Cooktop Surface, Control Panel Area, Door Handle,Oven Area,
and Door Trim.
8
÷
r
I
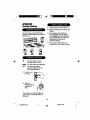
OPERATION
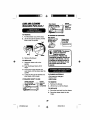
Cooktop Cooking
J
Centercannerover the element.
2. Make surethe canner is fiaton the
bottom.
1.
The sign below each controlknob
showsyou whichelement isturned on
by that knob.
3,
OO
O0
4.
O0
Left
÷
HI
MED
LO
Left
Rlgflt
Front
Front
÷
Forquick starts,such as
bringing water to a boil.
Forslow boilingand saut6ing,
Forsteamingfoods or
keeping cookedfoods at
servingtemperature.
1. Push in to turn
the knob,
2. Set on or
for desired
heat,
between marks
Use caution, while canning, to
prevent burns from steam or heat.
O0
O0
O0
Rear
Use recipesand procedures
from reputablesources.These
are availablefrom manufacturers
such as BalP and Kerre and the
Departmentof Agriculture
ExtensionService.
=
/_
The surface unitindicator light will
glow when any cooking element is
activated.
9
i
r
I ÷
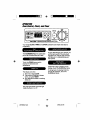
OPERATION
OvenControl, Clock,andtimer
OFF
O'_,NCd..EJUIg4G G_OC_U,
AI_4TO_
_1
O'_O_aa_TO'_
Your range CLOCK, TIMER, and OVEN operations are s=mpleand easy to
understand
As you read throughyourmanual,you
w=llfind what each of the ind_wdual
indtoatorsare used for and howthey
willhelpyou in understandingyour
new control
The HOUR/MINUTE arrow pads allow
youto set the exact timeyou need
Jm
÷
÷
Touch the DOWN arrow pad to
d=splay the selected oven
temperature
If the time of day is showing in the
dtsplay, touch the CLOCK pad once
To bring back the d_splay from the
bme of day blackout, touch the
CLOCK pad twice,
The displaywdl show
1. The timeof day CLOCK
2. The amountof timeyou choose
when us=ngthe TIMER
3. Any delayed funct=onsor cooking
times set
The oven lightsw_tchturnsthe light
inside the oven on or off
/o
I
÷
J
OPBMTiON
OvenCon ol, Clock, and Timer(cont.)
If the display flashes an "F" followed
by a number and beeps continuously,
you have a function errorcode.
Note the number after the "F." Turn
the oven controlknob to the OFF
position. Disconnect all power to the
range for at least 30 seconds and
retry the oven operation. If the "F"
displays during a self-clean cycle,
check the oven door latch. Make sure
the latch is moved to the right as
far as it will go. Turn the OVEN
CONTROL KNOB to the OFF
position. Allow the oven to cool 1 hour
and retry the oven operation. If the
problem repeats, call for service,
Advise the technician what the
flashing code was.
÷
When the power to your range is
turned on for the firsttime, or if you
experience a power failure, the
display will flash "PF." By touching
the CLOCK pad, the display will flash
"12:00."Touch the CLOCK pad again
and follow the instructionsto set the
clock.Any operation set beforea
power failure will need to be reset.
The oven will automatically shut off
if it has been left on for more than
12 hours.
To deactivateor reactivatethe
automaticshutoff,touchand hold the
MIN UP and DOWN arrowpads for
about 4 seconds,
11
÷
J
÷
OPERATION
Clockand Timer
After releasingthe arrowpad,
theTIMER indicatorlightwill blink
three to fivetimes, The countdownwill
automaticallybegin. The TIMER
indicatorlight willremainon until
the countdown reaches "O."
Whenthe timer has started the
countdown, you may touchthe
CLOCK pad to returnto the current
timeof day.
At the end of the countdown,the
controlwill beep and the TIMER
indicatorlightwillflash. Touchthe
TIMER ON/OFF pad.
1. until
ouchthe
displayflashes.
CLOCK pad
2. or
Touchthe
HOUR/MIN
UP
DOWN arrow
pads to
(_
REMINDERI
If you hesitate while touching the
arrow pads, the display and the
TIMER indicator lights will blink 3
times and return the display to the
time-of-day clock. If this happens,
touch the TIMER ON/OFF pad to
start over.
set the time of day.
3. Touch the CLOCK pad.
÷
÷
The Timer is used to time cooking
processesor other household
activities.It does notcontrolthe
oven.it can be set for up to 11 hours
and 59 minutes.It willcountdown in
minutesuntilthe LAST 60 SECONDS
is reached, then the controlwill beap
once.When the countdownreaches
ZERO, the controlwill beep 3 times
followedby one beep every6
secondsuntilthe TIMER ON/OFF pad
is touched.
Ifyou decide to change your set time:
if the countdownis showingFnthe
display,touchthe HOUN/MIN UP
or DOWN arrowpads, Select the
newtime.
If the time-of-dayclock is showingin
the display,touch the TIMER ON/OFF
pad. Then, touchthe HOUR/MIN UP
or DOWN arrowpads. Selectthe
new time.
1. Touch
OFF pad.
the "0:00"
TIMERand
ON/the
TIMER indicator light will
flash.
If the countdownisshowingin the
display,simplychange the time. If it
isn't,touchthe TIMER ON/OFF pad,
then touchthe TIMER ON/OFF pad to
cancel.
2. or
Touchthe
HOUH/MIN
UP
DOWN arrow
pads to
(_
set the amountof time,
/2
I
OPERATION
Baking
1. Set the OVEN CONTROL KNOB
to thetemperatureyou wantto
use when baking.The OVEN ON
indicatorlightwillglow.
When the temperatureinside
the oven reaches your selected
temperature,the preheattone
willsound and the PREHEATED
indicatorlight willglow.
2. When baking is finished,turnthe
OVEN CONTROL KNOB to the
OFF position.
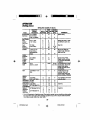
BAKING SHELF POSITION CHART
TYPE OF FOOD
÷
SHELF PosnloN
Frozen pies
(on cookie sheet)
4
Angel food cake,
bundt or pound
cakes
3 or 4
Biscuits, muffins,
brownies, cookies,
cupcakes, layer
cakes, pies
Casseroles
3 or 4
Turkey or Roast
The oven willturnon immediatelyand
cookfor a selected length of time, At
the end of the cookingtime, the oven
willturnoffautomatically.
1. Make sure the correcttime of day
is showingin the display.
2. Touchthe COOK TIME
ON/OFF pad
3. Touchthe HOUR/MIN UPend/or
DOWN arrow pads, to set how
long you want foodsto cook.
4, Turnthe OVEN CONTROL KNOB
to the bakingtemperatureyou
want to use
The OVEN ON and AUTOMATIC
OVEN indicator lightswillglow.
When the temperatureinsidethe
oven reaches the temperatureyou
have selected,the PREHEATED
indicatorlight willglow.
6. Whenthe set amount of cooktime
has reached zero, a tone will
sound and the AUTOMATIC OVEN
indicatorlightwillblink untilthe
OVEN CONTROL KNOB is turned
to the OFF position.
3 or 4
1
/3
÷
L
Illl l
OPERATION
Baking (cont.]
÷
You can set the oven controltodelay
startthe oven, cook for a specific
length oftime, and then turnoff
automatically,
1. Make sure the correcttimeof day
is showingin the display.
2. Touchthe COOK TIME
ON/OFF pad.
3. Touchthe HOUN/MIN UP and/or
DOWN arrow pads, to set how
long you want foods to cook.
4. Touchthe START TIME
ON/OFF pad.
5. Touchthe HOUN/MIN UP and/
or DOWN arrowpads to set the
timeof day you want the oven to
turnon.
÷
;iiiii
6. Turnthe OVEN CONTROL KNOB
to the baking temperatureyou
wantto use.
The OVEN ON and AUTOMATIC
OVEN indicatorlightswillglow.
7. Whenthe starttime is reached,
the oven willautomatically turnon
and startcooking.When the
temperatureinsidethe oven
reaches the temperatureyou have
selected, the PREHEATED
indicator lightwill glow.The set
amountof cooktimewillcount
downto zero, a tone willsound,
and theAUTOMATIC OVEN
indicatorlightwillblink untilthe
oven controlknob isturned to the
OFF position.
NOTE: After touchingtheCOOK
TIME or START TIME pads, if you
hesitatebeforetouchingthe HOUR/
MIN pads, the displaywill blink3
limes and returnto the time of day. If
this happens, repeat the operationto
continue.
14
÷
L
÷
OPEP TION
OvenCookingTips
liii!i!il .rr
Opening the door oftento check
foods willcause heat loss and poor
baking results.
It is normalto have someodor when
usingyour oven for the first time. To
help eliminatethis odor, ventilate the
room by opening a window or using
a vent hood.
Preheatingis bringing the oven
temperatureup to the temperature
you willbe using duringbaking, Let
the oven preheatwhen recipescall
for preheating.
IMPORTANT: Never cover the oven
bottomor oven rack with aluminum
foil. Improper use can cause poor
heat flow, poor baking results,and
may damage the oven finish. To
prevent stainingfrom spillovers,you
may place a piece of aluminum foilor
a cookie sheet on the rackbelow the
food which may spillover.
To prolong the life of your oven light
bulb, follow this helpful tip: Arways
turn the lightoff when the oven is not
in use or during a clean cycle, If yo_Jr
oven light is left on for an extended
period of time, the oven willbe warm
when the door is opened due to the
heat generated from the oven light
bulb.
÷
Most recipes for baking have been
developed usinghigh-fat products
suchas butter or margarine(80% fat
by weight--the federal requirement
for productslabeled "margarine").
You willget poor resultsifcakes, pies,
pastries,cookies,or candies are
made withlow-fat spreads. Low-fat
spreadscontainless fat and more
water. The highmoisturecontentof
thesespreads affectsthe textureand
flavor of favorite baked recipes.The
lowerthe fat contentof a spread
product,the more noticeablethese
differencesbecome,To ensurebest
results,usemargarine, butter,or stiok
spreads containingat least70%
vegetableoil,
The oven vent is locatedunder the
rightrear element. Thisarea could
become hot during oven use. It is
normalfor steam to come out of
the ventand/or collectmoisture
underneathwhen the oven is in use.
The vent is importantfor properair
circulation.Never block this venL
OvenVent
/5
÷
I
÷
OPERATION
OvenCookingTips{cont.J
liiiiiiil
I
The OvenTemperatureSensor
continuouslysensesand controlsthe
temperatureinsidethe oven. To keep
a constantset temperature,the
elementswillcycle (turnon and off
during cooking).
Baking resultswill be batter if baking
pans are centered in the oven as
much as possible. If bakingwith
more than one pan, place the pans
so each hasat least I to 1½" of air
space aroundit. If bakingfour cake
layersat the same time, place two
layerson rack 2 and two layerson
rack 4. Stagger pans on the rack so
one is notdirectlyabove the other.
÷
÷
FLAT COOKIE SHEETS, without
sides, allow air to circulate all around
the cookies for even browning.
SHINY PANS reflectheat and are
perfect for cakes and quick breads
that need a light browncrust.
GLASS, DARK NON-STICK,
OR DARKENED-BY-AGE
BAKEWARE absorbsheat and can
be used for yeast breads, pie crust,or
foodsthat need a brown crust.The
oven temperatureshouldbe reduced
by 25"F.
16
m
1
20P1836El_h_O14n6
16
÷
2,'24/00, 9:.3S AM
I
÷
I
OPERATION
OvenCookingTips(cont.)
You may feel thatyour new oven
cooks differentlythan the oven it
replaced.We recommendthat you
use yournewoven a few weeks to
become more familiar withit, following
the timesgivenin your recipesas a
guide. If you feel your oven is too
hot or too cool for yourcooking
preference,see Do-It-Yourself
Adjustmentin the back of thismanual
to make the adjustment,
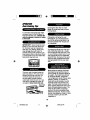
The oven racks are designed with
stops,a convenienceas well as a
safetyprecaution.The guides havea
bump to prevent the racksfrom tilting
when they are pulled out of the oven.
Thisdesign allows the racksto be
insertedin onlyone way.
Bump
In Rack
I'__
_
|
li
Oulde_
NOTE: On soma models the Oven
Control Knob must be pushed In
before tumlng.
Your oven controlhas a selector
knob for settingBake, Broil,or Clean.
Simply turnthe knob to the bake
temperaturesettingyou want to use
or to BROIL or CLEAN,
Your oven has six (6) rack positions.
The top position is only a guide. It
cannot be used as a rack position,
Guidee
÷
6
6
÷
1'
Always place oven racks In the
proper position while oven Is cool.
CAUTION: Whenyou are usingthe
rack in the lowestposition(1), you will
need to use cautionwhen puffingthe
rack out.We recommendthat you pull
the rack out several inchesand then,
usingtwo potholders, pull the rack out
by holdingthe sides of it. The rack is
low and you could be burned if you
place your hand in the middle of the
rackand pullall the way out. Be very
careful not to burnyour hand on the
door when usinga rack in the lowest
position(1).
I--'"
,7
The Indicator Lights:
• PREHEATED indicatorlight- turns
on and stayson when oven has
reached selectedtemperature,
• OVEN ON indicatorlight- turnson
and stayson when a Bake, Broil,or
Clean function has been chosen.
• CLEAN indicatorlight- turnson
and stayson for self..c)ean.If the
CLEAN indicator light flashes,
you shouldcheck for one of the
following:
1. The latch handle is lockedduring
a baking function.
2. The latch handle is not locked
/7
during a self-cleanfunction.
÷
I
liiiiiiil,
OPERATION
Broiling
Broiling is cookingby direct heat from
the upper element.The oven door
shouldremain opened to the broil
stop positionduring broiling.
÷
It is not necessary to preheat the oven
when broiling. Use the broiler pan and
grid that came with your range, Both
are designed for proper drainage of
fat and liquids.
ff foil is used, It must be
molded tightly to the grid
and slits cut Into the foil
to match those of the grid. This
allows fats end liquids to drain
Into the broiler pan, preventing
fire and excessive smoke.
L
I
The U.S. Departmentof Agriculture
recommendsto cook meat and
poultrythoroughly---meatto at least
an INTERNALtemperatureof 160°F
and poultryto at leastan INTERNAL
temperatureof 180°F. Cookingto
thesetemperaturesusually protects
againstfood-borneillness.
The closeryou place foodsto the
broilelement, the festerfoods brown
on the outsideyet remainred to pink
in the center.
Movingmeats away from the element
willallowthe meat to cook to the
center whilebrowningon the outside.
Using thispositioning, cook side t at
least 2 minuteslongerthan side 2. If
youroven is connected to 208 volts,
you may want to use a higherrack
positionand/or broilfoods longer.
The size, weight, thickness,starting
temperature,and your preferenceof
the donenessof the meat willaffect
broiling.The chart on the next page is
based on meats at refrigerator
temperature.
1. Set the OVEN CONTROL KNOB
to BROIL.
2. When broiling is finished,turn the
OVEN CONTROL KNOB to the
OFF position,
Always remove the
pan and grid from ,_
the oven. Storing
or forgetting a
soiled broiler pan
in the oven Is s potential smoke
or fire hazard.
18
÷
÷
I
OPERATION
Broiling(cont.)
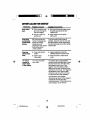
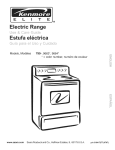
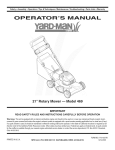
BROIUNG
QUANTITY
AND/OR
FOOD
THICKNESS
GroundBeef 1 le (4 paffies)
WellDone
½' to _'4"thick
4 Ibs.(12 patties)
BeefSteaks
Rare_
_' to 1" thick
Medium
(1 to l'h Ibs.)
WellDone
Raret
11h'thick
Medium
(2 to2'hIbs.)
WellDone
Chicken
Bakery
Product=
Bread
(Toast) or
English
Muffins
LobMer
Tails
÷
Fish
Salmon
Steaks
Fillets
Hem Slices
(precooked)
I whole, cut up
2 to 21,_Ib6.),
;plit lengthwise
3reast
GUIDE (HI Broil)
FIRST SECOND
SHELF SIDETIME SIDETIME
COMMENTS
PosmoN
(MIN.)
(MIN.)
4
13
8
Spaceevenly.
4
15
11
6
5
5
4
4
5
3
6
8
10
10
15
20
25
4
6
8
8
10-12
20
25
25
15
3
3-4
1
to 4 slices
Z (split)
Z to 4
3to 8 oz. each)
10-20
I lb. fillets V4' to _,_'
Lhick
2 (1" thick)
2 lye' to s/£ thick)
_z"thick
' thick
Pork Chops
Weft Done
2 (Y£ thick)
2 (I" thick)about1 Ib.
Medium
Well Done
Medium
Well Done
2(l"l_x). ab0ut
t0t012a
_eaks lessthan _A' thick
are difficultto cook rare.
Slashfat.
Brush each side with
melted butter, Broilskinside down first,
Spaceevenly.Place
Englishmuffinsout-sideupandbrushwithbutter,
it desired.
Do not Cutthroughbackofshell.
tomover. Spreadopen,Brushwith
rnoitedbutterbefore
broilingandafterhalfof
broiling
time.
5
5
Handleandtorn vep/
carefully.Brushwith
lemonbutterbeforeand
dudngcooking,ifdesired.
5
5
4
10
10
ti
5
Turn carefully. Do not fum
skin-sidedown.
4
ti
8
4
4
10
15
10
15
÷
6
Slash fat.
2 (1_' Ih_k)abmtI lb.
t The U.S. Department of Agdcultum says "Rare beef is popular, but you should know that cooking
it to only 140°F means some food poisoning organisms may survive."(Source: Safe Food Book.
Your KitchenGuide. USDA Rev. June 1985.)
/9
I
"
÷
I
÷
I
M
iiiiiiii
CAREANDCLEANING
Self-CleaningCycle
The gasketis designed to have a
5"-6" gap at the bottomof the door.
This allows for proper aircirculation.
Door Panel
1. Removethe broiler pan and grid,
oven racks, utensils,and any foil
that may be in the oven.
2. Soil on the front frame and outside
the gasket on the door liner will
need to be cleaned by hand.
Door Liner
Front
It is normal for your oven door to give
the appearance of not havinga good
seal againstthe range. This is due to
the gasket. The location of the gasket
on the door maintains a good seal
and prevents any heat loss.
Frame
Utensils should never be
_t In the oven during a
self-clean cycle.
The oven racks may be cleaned
during the eelf-cisen cycle, but
will lose their luster and become
hard to slide, if you choose
to leave them In during the
cycle, wiping them down with
vegetable oil after the cycle will
help them slide easier.
For the first clean cycle, vent the
room with an opened window or
hood vent. This will reduce the
odor produced when heating
new parts.
_,
I _1
Door
÷
Gneket
Liner
Clean these areas with hot water,
soap-filled steel-woolpads, or
cleansers such as Soft Scrub®to
remove any soil, Rinse well with clean
water and dry.
3. Wipe up any heavy apillovers on
the oven bottom.
4.
Gasket
Do not clean the gasket. The
fiberglass material of the oven
door gasket cannot withstand
abrasion. It is essential for the
gasket to remain intact. If you
notice it becoming worn or frayed,
it should be replaced.
÷
2O
m
I
÷
I
E
÷
CAREANDCLEANING
SelFCleaningCycle(cont.)
1.
2. For best results, follow the steps
in PREPARINGYOUR OVEN.
3. Slidethe self-cleantookhandle to
the right as far as it will go. Do not
force the handle.
4. Turnthe OVEN CONTROL KNOB
to CLEAN. The CLEAN and OVEN
ON indicatorlightswillglow.
5. To delay the startof the clean
cycle touchthe START TIME ON/
OFF pad.
6. Touch the HOUR/MIN UP and/or
DOWN arrow pads to set the time
of day you wantthe oven to start
cleaning,
7.
Whenthe cycle is finished,the
OVEN ON and CLEAN indicator
lightswillflash,Turn the OVEN
CONTROL KNOB to the OFF
position and unlockthe door.
1. For best results,follow the steps
in PREPARING YOUR OVEN.
2. Slidethe self-cleanlock handle to
the right as far as it wiU go, Do not
force the handle.
÷
Make sure the correcttimeof day
is displayed.
3. Turnthe oven control knob to
CLEAN. The CLEAN and OVEN
ON indicator lights willglow.
If the CLEAN indicator flashes, the
door is not closedcompletely.
Simply push the handle to the lock
position.
4. The clean cycle lasts 4 hours
and 20 minutes--this includes a
cool-down time. You may change
this to any time from 3 hours to 5
hours and 59 minutes by touching
the HOUR/MIN UP and/or DOWN
arrow pads.
When the door locks, CLEAN
and OVEN ON indicator lights
will glow. The oven temperature
must drop below the looking
temperature before the door can
be opened. The CLEAN and
OVEN ON indicators will blink at
the end of the cycle.
5. Turn the OVEN CONTROL KNOB
to the OFF positionand unlockthe
door.
÷
Turnthe OVEN CONTROL KNOB to
the OFF position.Wait (approx. 1
hour) beforeattempting to open the
door.The indicatorlightwillnot blink if
the cycle isstopped,
After the cycle, you may noticesome
white ash in the oven. Just wipe itup
with a damp clothor sponge.
Ifwhite spots remain,scrub them
with a soap-fiUedsteal-woolpad. Be
sure to rinsethoroughly.Theseare
usuallydepositsof saltthatcannotbe
removed duringthe cycle.
If for any reasonyou are not
satisfied with the cleaning
results, just repeat the cycle.
21
m
,1
÷
I
I
÷
I
CAREAND CLEANING
Cleaning
CLEANING MATERIALS
• Dishwashingdetergent
• Warm water
• Paper towel
• Ammonia
• Abrasive cleaner
• Soouring pad
CLEANING MATERIALS
• Dishwashing detergent
• Warm water
• Soft cloth
Do IIot usa abfaehte cleaners,
Industrial cleaners, or bleach,
CLEANING MATERIALS
• Dishwashingdetergent
• Warm water
• Soap-filled steer-woolpad
• Commercialoven cleaner
TO CLEAN
Allow the pan to soak. Sprinkle the
grid with dishwashing detergent and
cover with a damp cloth or paper
towel and let stand, Scour as needed.
Wash, rinse, and dry well. You may
also place both the pan and grid in
the dishwasher.
÷
Clean onlyas touch-upbetween
clean cycles. Use dishwashing
liquid, warm water, or soap-filled
steel-woolpad. Rinse well after
cleaningand dry.
NEVER USE OVEN CLEANERS IN
OR AROUND ANY PART OF THE
OVEN.
TO CLEAN
Clean after each use. If acidic foods
(hot fruit filling, tomatoes,sauerkraut,
or sauces withvinegar or lemonjuice)
spill,use a dry paper towel to wipe up
as much as possible.When surface
has cooled,thoroughlyclean cooktop.
CLEANING MATERIALS
• Dishwashing detergent
• Warm water
• Paper towels
÷
TO CLEAN
Do not use oven cleaners,
cleansing powder or harsh abrasives.
If marinades, tomato sauce, basting
materials, etc. should spill, wipe up
as much as possible, When surfaces
have cooled, thoroughly clean painted
areas.
TO CLEAN
Foreveryday cleaning,use glass
cleanerand a paper towel.For
stubbornsoil, use paste of baking
soda and water. Rinsethoroughly.
When cleaning, be sure not to bend
or displace the temperaturesensor,
located on the back wall of the oven,
CLEANING MATERIALS
• Soft abrasive cleaner
• Sponge scrubber
DO not use hard, abrasive €leanere,
22Industrial
I
°
÷
cleaners, or bleach.
I
I
I
CAREANDCLEANING
RemovableParts
After cleaningunderthe cooktopwith
hot, mildsoapy waterand a clean
cloth, lowerthe cooktop.Be careful
not to pinch yourfingers.
To lowerthe cooktop,push the rods
back and gentlylowerthe cooktop
untilit restsin place.
(on some models)
Some models have a cooktop that
can be lifted up for easier cleaning.
The entirecooktopmay be lifted up
and supportedin the up position.
The surface unitsdo not need to be
removed;however,you may remove
one to make raisingthe oooktop
easier.There are two side supports
that lockinto positionwhen the
cooktopis liftedup.
working In this area, be
amful not to bump Into the
upport rod(s). The porcelain
Is_namel
CAUTION"
surface of When
the cooidop
n chip If dropped.
1
÷
÷
Be cure all eurface unite are tumed off
before raising the cooktopo
23
I
°
÷
I
I
÷
CAREANDCLEANING
RemovableParts {cont.)
Disconnect electrical
power to the oven at
CLEANING MATERIALS
• Dishwashingdetergent
• Warm water
• Soft cloth
or fuse box before attempting to
Clear
Molded Groove
Bye
. Collar
BaH
SpringClip
TO REMOVE
Ught
Bulb
1. Be sure the controlknob is in the
OFF position.
÷
Bulb
Cover
2. Pullstraightoffthe stem.Using a
piece of string can make removing
the knobeasier.Slip the string
underand around the knob,
pullingstraightout.
TO REPLACE
1. Hold your hand under the bulb
cover and firmly pushback the bail
wire, until it clears and releases the
bulb cover.
TO CLEAN
Wash the knob thoroughly with
soapy water. Dry completely with
a soft cloth. DO NOT let the
2. Unscrewthe light bulb.
3. Replacethe bulb with a 31/2"
40-watt appliance bulb.
4. Place the bulb cover into the
grooves of the socket and pull the
bail wire forward until itrests in the
indentation on top of the bulb
cover.
knob soak.
TO REPLACE
1. Check the back of the knob.
2. The molded rib of the knob is
designedto fit perfectlyonto the
knobstem.
3. Alignthe molded rib to the clear
groovein the knobstem. Push the
knob back as far as it willgo.
24
÷
I
+iilIll ÷
CAREANDCLEANING
RemovableParts (cont.J
TO CLEAN THE DRIP BOWL
For brown food stains - Use
dishwashingdetergent,warm water,
plasticscouringpads, mild abrasive
cleaners, soap-filled scouringpads,
or ammonia.Clean drip bowlsafter
each use. Rinseand dry well, Foods
that are not removedcan cause
permanentstainsthat cannotbe
removed. Forheavilysoiled bowls,
place themin a covered container(or
a plasticbag) with _Acup of ammonia
to loosenthe soil,then gentlyscrub
the bowlwith a plasticscouring pad.
TO REMOVE
1. Be sure the controlsare in the OFF
positionand the elements are cool
beforeattempting to remove them.
r_
GAUTION:
Do not
operate the €ooktop
elements without tha drip
bowl In place. Scorching of
the cooktop, bumlng of wldng
Insulation and loss of energy
will occur.
2. Grasp theelement and lift slightly,
just enoughto clear the drip bowl
and pull it straightout.
I_
÷
CAUTION"
Do not lift
the element mere than 1". /
Iftlng the element more than 1" /
an damage the receptacle,
/
auslng the element not to lie flati
en It is plugged back In.
,)
hi
TO REPLACE THE UNIT
÷
1. Place the drip bowl intothe
opening and make sure the
receptacle is visible.
2. Slide the elementfirmly back
into the receptacle and lower it
onto the drip bowl.
3. Lift out the drip bowl.
25
I -+'1""
+
÷
I
I
[iiiiiiit'--_
CAREANDCLEANING
RemovableParts (cont.)
TO REMOVE
Hinge Lock
(Unlock_l
PoJtton)
1. Fully open the
door.
CLEANING MATERIALS
• Dishwashing detergent
• Warm water
• Scouring pad or soap-filled
steel-wool pad
Rekmd
Back of
the Rack
2. Push the hinge
locks down
toward the door
frame, to the Slot
unlocked
position. This
may require a
flat-blade
screwdriver.
Bump
In
Rack
Guide
Arm
3. Firmly grasp both
sides of the door
at the top.
4. Close door to the
door removal
position,
5. Lift door up until
the hinge arm is
clear of the slot.
TO REMOVE
1. Pull the racks out to the stop
position.
2. Pull up the front of the rack and
slide under the bump of the rack
guide.
÷
I
÷
Removal Pooltlon
TO CLEAN
TO REPLACE
Clean with warm water and detergent
For hard-to-remove stains, gently
scrub with a scouring pad or a
sosp-filled steel-wool pad. Rinse well,
1. Firmly grasp both Edge of
Bottom
2,
TO REPLACE
1. Place the raised back of the rack
onto the rack guides,
2. Lift the front of the rack until the
raised back slides under the bump
of the rack guides.
sides of the door
at the top
With the door at
the same angle
as the removal
position, seat the
indentation of the
hinge arm into
the bottom edge of
the hinge slot.
Hinge
Arm
Indoctatlon
3. Slide the rack all the way back.
26
m
I
'6
÷
I
I
I
CAREANDCLEANING
RemovablePa_s (cont.)
TO CLEAN INSIDE OF DOOR
• Because the area inside the gasket
is cleaned during the self-clean
cycle, you do not need to clean this
by hand.
Removable Oven Door (cont.)
3.
Fully open the
door.
Locked
Pooltion
• The area outside the gasketand
the door linercan be cleaned witha
soap-filledstsel-woolor plasticpad,
hotwater, and detergent.Rinsewell
witha vinegar and water solution.
4. Pushthe hinge
locksup against
the front frame of
the oven cavity,
to the locked
position.
6. Closethe oven
Sealed Hinge
Arm
door.
TO CLEAN OUTSIDE OF DOOR
• Use soap and waterto thoroughly
clean the top, sides,and frontof the
oven door. Rinsewell. You may also
use a glasscleaner to clean the
glass on the outsideof the door. Do
not let water drip intothe vent
openings.
• Spillageof marinades,fruit juices,
tomatosauces, and basting
materials containing acids may
cause discoloration and shouldbe
wiped up immediatery. When
surface is cool, clean and rinse.
÷
÷
• Do not use oven cleaners, cleaning
powders, or harsh abrasives on the
outside of the door.
• If any stain on the door vent trim is
persistent, use a serf abrasive
cleaner and a sponge scrubber for
best results.
27
m
I
÷
I
I
I
CAREANDCLEANING
RemovableParts (cont.)
Rear drawer
I
TO REMOVE
i_
nppeu
III
awayfrom
_
_
÷
I
CLEANING MATERIALS
• Dishwashingdetergent
• Damp cloth
• Warm water
Drawer
doeanot
cHose
TO REMOVE
1. Remove the drawer.
2. Liftthe linerout of the drawer.
_
L'-
i
ii _omr,,_y
drawerin title erea Iil
panel Upped
opened.
IF DRAWER WON'T CLOSE
Powercordmay
Drawerfront
CAUTION:
The drawer
gives you space for
keeping €ookwara
and bakewere. Plastics and
flammable materials should not
be kept in this drawer. Do not
ovedoed the storage drawer, if
the drawer Is too heavy, k may
slip off the base rail when
TO REPLACE
1. Placethe drawer railon the
guides,
2. Pushthe drawer back untilit
stops.
3. Liftthe front of the drawerand
push back untilthe stopsclear the
guides.
4. Lowerthe front of the drawer and
push back untilit closes.
i_
on top of guide rail
Reardrawer
support Is on top
Of gtdde rail on
3. Removethe drawer.
be obotructlng
_-- front.pen:'
IFDRAWERISCROOKED
1. Pullthe drawer out until it stops.
2. Liftthe front of the drawer untilthe
stopsclear the guides.
Pall
÷
Drawer
,upper le ,,,ti,g _
I]
TO REPLACE
1. Place the linerback intothedrawer.
2. Place the drawerback intothe
range.
28
n
I
"
÷
i
÷
liiiiiHiiHI
Ei:i| --"
I
BEFORECALLINGFORSERVICE
To save you time and money, before making a service call, check the list
belowfor any problemyou may feel you have withthe performanceof your
range. If the problemissomethingyou cannot repair,use the ConsumerService
Numbers locatedat the back of this manual.When making any calls, have the
Model No., Serial No., Repair Parts List, Use end Care Manual, end the Date
of Purchase available.
PROBLEM
÷
POSSIBLE CAUSE
POSSIBLE SOLUTION
Range will not
work; totally
Inoporstlve.
No power to range,
a. Check the household circuit
breaker or fuse box.
b. Check to make sure the range is
plugged in.
Cooktop will
not work,
oven Is ok.
Elements
unplugged,
Check the elements, make sure
they are properly plugged into the
receptacle.
Oven will
not work,
Cooktop
okay.
Control set
improperly,
Check the control and check oven
cooking section.
Foods do not
bake properly,
a. Oven is not
preheated,
b. Improper rack or
pan placement,
a. Be sure to preheat until the tone
sounds.
€. Oven vent
blocked or
covered with foil.
b. Maintainuniformair space
around pans and utensils.See
oven cookingtips section.
¢. Keep ventclear,
d. Racks shouldnot be covered
during baking.
e. Reduce temperature25 degrees
for glass or dull/darkenedpans.
d. Improper use
of foil.
a. Improper
temperature
settingfor
utensilused.
f. Oven
temperature
needs
adjustment.
g. Range and oven
rack not level,
29
f. Check the temperature
adjustment following this
section.
g. Check the installation
instructions for leveling.
÷
I
i
÷
B£FOB£CALLING
FOBS£B¥1€£
PROBLEM
POSSIBLE CAUSE
POSSIBLE SOLUTION
Oven control
calibration,
See temperature adjustment
section.
Oven will
not unlock,
Clean cycle is not
finished,
Oven temperaturemustdrop below
the lock temperaturebefore the door
will unlock.
Oven light
does not
work.
e. Lightswitchis in off a. Check switchsetting.
position.
b. Bulb needs
b. Check or replace lightbulb.
replacingor is loose.
Foods do
not broil
properly,
e. Improperrack
position,
b. Oven preheated,
a. Check broilpan placement;see
broilingsection.
b. Do not preheat when broiling,
c. Improperuseof foil.
d. Oven door closed
during broiling,
e. Lowvoltage
(208 volts),
f. Improper
broilingtime.
€. Check broiling section.
d. Open door to broilstop position.
e. Dirtyoven.
b. Broilerpan
containinggrease
left in the oven.
a. Check for heavy spillover.
b. Clean pan and grid after
each use.
Oven
temperature
seems
Inaccurate.
÷
Oven
smokes,
e. Use higher rack position and/or
longer cookingtime.
f. Check broilingchart in broiling
section.
3O
÷
÷
I
iiiiEiiil
I
BEFORECALLING
FORSERVIDE
PROBLEM
Oven emits
odor.
POSSIBLE CAUSE
POSSIBLE SOLUTION
a. Oven insulation may
emit odor during the
first few usages.
a. Put oven through self-cleancycle
to speed up process of odor
"wearing off."
b. Wipe excess soil off before
using oven.
b. Failure to wipe out
excess soil.
Oven door
accidentally
locked while
baking.
Do not force the lock
handle. Temperatures
above the locking
temperature will
prevent the lock handle
from sliding to the
unlock position.
Turn the control knob to the off
position. Allow the oven to cool until
the temperature inside drops below
the lock temperature and the handle
slides easily.
Clennlng
results were
poor.
a. Oven was heavily
soiled.
a. Heavy spilloversshouldbe
cleaned before the cycle is set.
b. Allowthe oven to clean its full
cycle.
"F-and or
a
number
letter" flash
In the dlspley
b. Clean cycle
interrupted.
You have a function
errorcode.
If a function errorcode appears
during the self.-cleaningcycle, check
the oven door latch.The latch may
have been moved,even if only
slightly,from the locked position.
Make sure the latch ismoved to the
right as far as itwillgo. Turn the oven
temperaturecontrol knobto OFF.
Allowthe oven to coolfor one hour.
Put theoven back intooperation.
Ifthe functioncede repeats,
disconnectall powerto the range for
at least30 seconds and then
reconnectpower. If the function error
code repeats,call for service.
31
÷
I
÷
"DO-IT-YOURSELF"
TEMPERATURE
ADJUSTMENT
You may feel that yournew oven
cooksdifferently than the oven it
replaced. We recommendthat you
use yournew oven a few weeks to
become more familiar with it, following
the timesgiven in yourrecipes as e
guide.
If you thinkyour newoven istoo hot
(burningfoods) or nothot enough
(foodsare undercooked),you can
adjustthe temperatureyourself.The
appearance end textureoffoods is a
better indicator of oven accuracy than
an oven thermometer,These
thermometerscan varyby 20-40
degrees from the true temperatureof
the oven. In addition,the oven door
mustbe opened to read these
thermometers.Openingthe door will
change the temperatureofthe oven.
To decide how much to change
the temperature,set the oven
temperature25 degrees higher
(if foods are undercooked)or
25 degrees lower (if foods are
burning) than the temperaturein your
recipe, then bake. The resultsof this
"test" shouldgive you an idea of how
much the temperatureshouldbe
changed.
÷
rMi.
I
1. Pressand hold, at the same
tim, the HOUR UP and DOWN
arrowpads untilthe display
showsa two-digitnumber.
2. Pressthe HOUR UP arrow pad to
increasethetemperature up to
+35°F hotte_
or
Pressthe HOUR DOWN arrow
pad to decrease the temperature
down to -35°F cooler,
3. When this adjustment has been
made, the display will returnto the
time of da_
ThisadjustmentwLIIremainin memory
untilthese stepsare repeated and a
new temperatureis selected.It will
remainin memory even after e power
failure.
Thisadjustment willnot affect the Broil
or Clean temperatures.
÷
m
I
=
÷
t
i_l
÷
liiiiiiil
I
÷
÷
33
m
20PIB36EN_OI.pm6
33
÷
_4._0,
t_.'.'.'.'.'.'.'.'.36
AM
I
÷
I
I
FREE-STANDING
RANGEWARRANTY
fFULL ONE-YEAR WARRANTY
ON ALL PARTS
if, within one year from the date of installation, any part fails to function
properly due to a defect in material or workmanship, Sears will repair or
replace it, at our option, free of charge.
If this product is subjected to other than private family use, the above
warranty is effective for only 90 days.
WARRANTY SERVICE IS AVAILABLE BY CONTACTING THE NEAREST
SEARS SERVICE CENTER IN THE UNITED STATES.
This warranty gives you specific legal rights, and you may also have other
rights which vary from state to state.
Sears Roebuck and Co. Dept. 817 WA Hoffman Estates, IL 60179
To further odd to the value of your Range,
Buy • Sears Malntenarme Agreement.
Years of Ownership Coverage 1st Year
1. Replacement of Defective Parts
W
÷
Ilia
2. Annual Preventive Maintenance
,..
2nd Year
3rd Year
MA
MA
MA
MA
÷
Check at your request
W - Warranty
MA - Maintenance Agreement
Kenmore Appliances are designed, manufactured and tested for years of
dependable operation. Yet, any appliance may require service from time to
time. The Sears Maintenance Agreement offers you an outstanding service
program for your product.
The table above shows the additional benefits a Sears Maintenance
Agreement offers compared to a Sears Warranty.
Contact your Sears Sales Associate or local Sears Service Center to
purchase a Sears Maintenance Agreement.
24
I
÷
I