1
e
thebest“g
Irom
UseandCneof
Bdt-tiModel
GSD
400Y
Ener~-saving
tips
p2
Howtooperate
your
dshwmher
p4
Loaded
right,
fishes
getclemer
p8
Wht isdshwmher
sale?p10
Save
tie md money
Before
youcm
forSewice,
Solver p12
usetieProblem
_——
>—
——
-—
_——
-—
~
~
----
TheGE,AnswerCenteY8000626e2000
Help IRs
help you e*
ConsumerServices ~+...~~....’.~~
Warmnty . . . . . .“.. :’.xhckco~~~
.
..
●
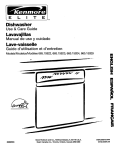
tips
Eaergy-sating
consu-mpticmof your
Thepower
dishwashercan bc$tiinimizedif ~
you followthesesuggestions:
e Oflerate the dishwasher6n@
when it’s full. Let the dishesaccumulatein the dishwasher.When
you put in only a partial load, use
the RH’=JSE
ONLYcyc~eto rinse
off heavy soils. Be sure to latch the
door when waitingfor a full-load.
This helps to keep soilsmoist,
easierto remove.
* If you don’t need your dishes
right away, use your ENERGYu
SAVRRnomheatfeature that turns
the drying heater off automatically.
Dishesdry natuxallyover a longer
-periodsuch as overnight.
e
Readthk3usetwit‘chre
Book carefully
writedown the modeland
It is intendedto helpyou operate
and maintainyournewdishwasher
properly.
Keepit handy for answersto your
questions.
If you don’t understandsomething
or needmore help...Call, toll free:
The GE Amwww4%nterTM
800.626.2W0
consumer’information service
or write(includeyourphone
number):
ConsumerAffairs
GeneralElectricCompany
AppliancePark
Louisville,KY40225
If you receiveda damaged
dishwasher,immediatelycontact
the dealer(or builder)that sold
you the dishwasher.
Save time and money...
before you cdl for service
Checkthe Problem Solver(pages
12-14). It listsminor causesof
operatingproblemsthat you can
correctyourself. It could saveyou
an unnecessaryservicecall.
You’llfind them on a labeljust
insidethe.dishwasherdoor.
Thesenumbersare also cmthe
ConsumerProduct Ownership
RegistrationCard that camewith
your dishwasher.Beforesending
in this card, pleasewrite these
numbershere:
serial
numbers
ModelNo.
SerialNo.
Use thesenumbersin any
correspondenceor servicecalls
concerningyour dishwasher.
To obtain Hispanicversion of
this book, call
The GE AnswerCenterTM
800.626.2000
consumerinformation service.
Toll-free.
I%ra obtenerla versibnen
espaiiolde estemanual,
llarnegratis a
The GE AnswerCenter,
serviciode informacibn
para el consuxnidor,
teMfono800.626.2000.
IhfPoRTANT SMETY INSTRUCTIONS
Read auinstructions
before l.lsing this appliance
—
~~
~RNMNG--When usingthis
appliance,alwaysexercisebasic
safetyprecautions,includingthe
following:
u
To minimize
the possibility
s HYDROGENGASis produced
by the chemicalactionwithinyour
waterheaterand the gascan
~ Whenloadingitemsto be
accumulatein the waterheater
washed:
and/or waterpipesif hot waterhas
s Use this applianceonly for its
not beenused for a periodof two
A. Locatesharp itemsso that
intendedpurpose as describedin
weeksor
longer.HYDROGEN
theyare not likelyto damagethe
thisUseand Care.Book.
GAS
IS
EXPLOSIVE.So
to predoor seal, and
ventthe possibilityof damageor
B. Load sharp kniveswiththe
@This dishwashermust be
injury,if you havenot used hot
handlesup to reducea risk of
properlyinstalled and bcaled in
water for two weeksor more, or
cut-typeinjuries.
accordancewith the Installation
moveinto a residencein whichthe
Instructionsbefore it is used. If
hot watersystemmay not have
you did not receivean Installation @Do not touch the heating
been used for sometime, turn on
elementduringor immediately
Instructionssheetwith your dishall hot water faucetsand allow
after use.
washeryou can obtain one by
them to run for severalminutes
contactingthe servicelocation
before usingany electricalappli@Do not operateyour dishwasher ancewhichis connectedto the hot
nearestyou.
unlessall enclosurepanelsare
water system.ThiswiHallowany
properlyin place.
—Thisappliancemust be conhydrogengasto escape.Of course,
nectedto a groundedmetal,
sincethe gas is flammable,do not
@Do not tamper with controls.
permanent, wiringsystem;or an
smokeor use an open flameor
equipment-groundingconductor
applianceduring thisprocess.
@Do not abuse, sit on, or stand
must be run with the circuitconon the door or dish rack of the
ductorsand connected,to the
dishwasher.
equipment-groundingterminalor
ead of the appliance.
~ Closesupervisionis necessary
if this applianceis used by or near
—Connectto a properly rated,
protected and sizedpower-supply children.Do not aHowchildrento
circuitto avoid electricaloverload. play inside, on or with this appliance or any discardedappliance.
Disposeof discardedappliances
@Use onIy detergentsor wetting
agentsrecommendedfor use in a
and shippingor packingmaterial
properly.Beforediscardinga
dishwasher.
dishwasher,removethe door of
@Do not wash plasticitemsunless the washingcompartment.
marked “dishwashersafe” or the
@Keep all washingdetergentsand
equivalent.For plasticitems not so wettingagentsout of the reach of
marked, check the manufacturer’s children, preferably in a Iocked
recommendations.
cabinet. Observeall warningson
container
labelsto avoid personal
@Load light plasticitems so they
injury.
willnot becomedislodgedand
drop to the bottom of the dish\\asher-they might come into
contact with the heating unit and
be darnaged.
of injury.
Howvtooperate
your
dishwasher
w =]
‘w
.-----...1
m-!!
13H4HML@E~EHRlC
Sound-insulated
STEP 4. SelectThe Cycleand start
dishwasher.
If your dishwasherdrainsinto a
food wastedisposer,operatethe
disposeruntil it is emptybefore
starting the dishwasher.(SeeCycle
selectionhints on nextpage.)
To obtain the benefitsof a complete cycle,be carefulthat you do
not turn the dial any further than
necessaryto start the dishwasher.
~ For NORMAL WASH cycle:
LIGHT WASH @
ENERGY
SAVER
---ON
OFF
4#
~
‘-~
‘
~
RINSE
@
@
ONLY
@ DRYING
HEATED DRYING. Turnsthe
dryingheater on for fast drying.
ENERGY SAVER.Turnsthe
dryingheater off to save energy.
Dishesdry naturally over a longer
period such as overnight.
If you need your dishessooner,
open the dishwasherdoor after the
cycleis completeto reducethe
drying time.
Use of this option reducesthe electricalenergy used by this model
approximately9V0for Normal
Cycle.
Estimated yearlysavings,depenciing on your local electricalrates,
are:
fElectric Rate
I
I
-
Aw-
STEP 1. Load your dishwasher
withdishes,silverware,pots, pans,
bowls,etc. accordingto instructionscmpage 8 and 9.
STEP 2. Add detergentto the
detergentdispenser.Makesure the
CycleIndicator Dial is at OFF
positionbefore adding detergent,
~ages 6 and 7).
Userinse aid agent to helpprevent
spotting. (Seepage 6.)
STEP 3. SelectDryingOption
HEATHI
DRYING
Cycle Indicator Dial
(Turnto Start)
Door Latch
(Locked)
I
~YearlySavings $6.25 $10.00 $13.7’5
a. Latch the door.
b. Slowlyturn CycleIndicator
Dial to IONpositionto start
the cycle.
LIGHT WASH
ON
@
OFF
@
&lJ RINSE
ONLY
43DRYING
Ilk SUm3
door isUMAkmhd.
Slowlyturn CycleIndicator
Dial to LIGHT WASH
position.
Latch door to start the cycle.
d
LIGHT WASH ~
ON
@
oFF
@
_-:
.
&
---
@
i
—
I
@ RINSE
ONLY
a DRYING
a. Be sum door is unlatched.
b. SelectENERGYSAVER
dryingoption.
c. Slowlyturn CycleIndicator
Dial to RINSEONLY
position.
d. Latch the door to start the
cycle.
cycle selection Hints
XORMALWASH—
For most loadsof everydaydishes,
lassesand cookware.
LiGHT WASH—
For dishesthat havebeenprerinsedbeforeloading.Also, for
washingverylightlysoileddishes
withsoilsthat havenot driedon.
RINSE ONLY—
For rinsingpartialloadswhichwill
be washedlater.Do not use
iiciergent.
W’M Happens in Each cycle
Wash
Cycles
Water
Use
Gallons
(approx.)
Approx.
Wash
Cycle Time
(in minutes)
Cycle Sequence
NORMAL WASH
LIGHT WASH
IRiNsEONLY
rying Options:
HEATED DRYING. Add 30 minutes to wash cycletime. Availableon
aI1wash cyc~esexcept RINSE ONLY.
ENERGY SAVER. No Heat Drying to save energy.
5
@You’11
hear occasionalclicking
sounds:
—Soft food disposershredding
action.
—Drain valveopeningto pump
water out.
—Timercontrol as cycle
progresses.
—Detergentcup opening.
~ The motor stops duringdrying.
~ Water vapor comesthrough the
vent by the door latch during
dryingand when water is being
,pumped out.
GMMidishwashing
$immt$with HOT’ ‘wWter
Toget dishescleanand dry you
needhot water.Tohelpyouget
waterof the proper temperature,
your GeneralElectricdishwasher
has a waterheatingfeaturethat.
automaticallyheatsthe waterin
the washcycle.Thiswaterheating
featuremay allowyou to turn
downyour householdwaterheater
and saveenergy.For goodwashing
and drying,the enteringwater
must be at least 120°F.Toprevent
dish damage,inletwatershould
not exceed150°F.
check your water temperature
with a candy or meat thermormekr. Turn on the hot waterfaucet
nearestthe dishwasher.Put the
thermometerin a glassand let the
waterrun continuouslyinto the
glassuntil the temperaturestops
rising.If the water temperatureis
below120”F.adjust your water
heater.
.Helpfui!hints: If outsidetemperatures are unusuallylow or if your
water travelsa long distancefrom
heater to dishwasheryou may need
to set your heater’sthermostat up.
If you have not used hot water for
some time, the water in the pipes
willbe cold. Turn on the hot water
faucet at the sink and allowit to
run until the water is hot. Then
start the dishwasher.If you’ve
recentlydone laundry or run hot
water for showers,giveyour water
heater time to recoverbefore
operating the dishwasher.
YOU!mnt
spottimg
agent
help prevent
‘with a rinse
A rinseagentmakeswaterflowoff
dishesquickerthan usual.This
lessenswaterspotting.Makes
dryingfaster,too.
For best.dishwashingperformance, useof a rinseagentis
recommended.
Rinseagentscomein eitherliquid
or solidform. Yourdishwasher’s
dispenserusesthe solidform.
H you cm’t find any rinseagent,
write:
ECONOMICSLABORATORY,
INC.
(“JET DRY”)
Osborn Building
St. Paul, Minnesota55102
H(NVto d-maw madI.lse
detergent
First,
me only detergent
specifically made for use in
dishwashers.Other types will
cause Oversudsing.
Second, deck the phosphate
content. Phosphatehelpsprevent
hard-waterinateriak from forming
spots or filmon your dishes.If
your wateris hard (7grainsor
more), your detergenthas to work
harder. Detergentswith a higher
phosphatelevelwillprobablywork
better. If the phosphatecontent is
low (8.7070
or less),you’llhaveto
use extra detergentwith hard
water.
Your water departmentcan tell
you how hard your water is. So
can your rural countyagent. Or
your area’swater softenercompany. Just calland ask them how
many “grains” of hardnessis in
your water.
How much detergent should you
use? That depends. Is your water
“hard” or “soft?” With hard
water, you need extra detergentto
get dishesclean. With soft water,
you need lessdetergent.
Too much detergentwith soft
water not only wastesmoney,it
can be harmful. It can cause a
permanent cloudinessof glassware, called “etching:’An outside
layer of glassis etchedaway! Of
course, this takes sometime. But
why take a chancewhen it’s easy
to find out the hardnessof your
water.
Keep your detergent fresh and
dry. Under the sink isn’t a good
place to store detergent. Too much
moisture. Don’t put detergent into
the dispenseruntil you’re ready to
wash dishes, either. (R won’t be
fresh OR dry.)
If your detergent gets old or
lumpy, throw it away. It won’t
wash well. Old detergent often
won’t dissolve.
what you cam
km on dishes
And what you shouldn’t
!ssmF
Esxw.
~-’-
If this is your first dishwasher,or
dispenserson the hlsiiiedoor’of
if you‘rereplacinga mucholder
your dishwasl-ier.Two, because
model,YOU
may wonderhow
somecyclesusetwo washes.
muchpre-preparationyour dishes
need. Actuallyverylittle.Prerinsingof normalfood soilsis not
necessary.With commonsenseand
a littlepracticeyou’llsoon know
what foodsto remove.Here are
someguidelines:
1. Scrapeoff bones, seeds,skins,
toothpicksand other hard solids.
It is also best to removehard
shelledvegetables,meat trimmings,
leafyvegetablesand crusts.
See “DetergentUsageGuide”
Remove-excessive
quantitiesof oil
beiow.(Besure the CycleIndicator or grease.
Dialis at QFFpositionbefore
2. Removelargequantitiesof any
addingdetergent.)
food. Yourdishwasherhas a builtin soft food disposerthat pulverizessoft food bits and flushesthem
away.It can handlesmallamounts
of soft foods, but cannot handle
largeamountsof food as soft as
mashedpotatoesor applesauce.
3, Tryto removefood scrapsand
placedishesin dishwasherbefore
soilhas a chanceto dry and
becomehard. Disheswithdried-on
soilare moredifficultto washand
may requireadditionalpreparation
for good results.Rememberto use
your RINSEONLYcyclefor small
“holding”loads.
Note: The foods mentionedabove
are for examplesonly.Other foods
not mentionedmay also needto be
removedfrom your dishes.You
may also want to consider
removingfoods such as mustard,
mayonnaise,vinegar,lemonjuice
and other foods that can cause
discolorationof stainlesssteelif
allowedto remain on dishesfor a
long period of time.
CYCLES
Main Cup
NORMAL WASH cycle
1 Tablespoon
minimum
LIGHTWASHcycle
1Tablespoon
I
Open Cup
Main Cup
~ 1 Tablespoon
minimum
Half Full
None
I
~
HalfFull
Open Cup
Half Full
None
minimum
RINSE ONLY cycle
Useno detergent
Use no detergent
—–
msw=-A—.
—
rssm———
—r
—
Fm5%w.
— -- -. .
—1
wYrT—
——..
-
—
—F
—-
Main Cup$
Completely
Full
I
J
Completely
Full
Open Cup*
Completely
Full
None
Use no detergent
$12 grains ancl up is extremely hard water. A water softener is recommended.Without it,
limecan build up in the water valve.The water valvemay stick whileopen and cause flooding.
$FilledMain Cup holds 3 tablespoons; FilledOpeIICUPholds 2 tablespoons.
—-.==e.h
-
m“~.
HARDWATER
(7-12grains*)
.
~
—
—,
—
—
Detergent usage Guide
MEDIUM WATER
(3-7grains)
—~..
—1
Ciosethe main cup.
NOTE: Detergentcup may be
opened manuah’ywith no harm.
SOFT WATER
(O-3grainshardness)
E
!
.1
.
.;
-,:,,
JLoadedE@@,dishes
getcleaner
Tmsii Q?w@m
m@e@kwif, the W#bSt
“
cmmm iypeyou will@2ve.
!’.
.’
Make sure dishesare pkoperiyl~add. to insure~
that watet $anreach.the soiledsurfaces.The
wash arm in the bottom sprayswa(erup. The
~
tower that risesin the centerseidi water out
overthe dishesto,washthe i~emsin jh~.u~per
r.
rack.
How
to bad meTOP lRf4c’K
17M5
top rack is bestfor glasses,cupsand
I sm.wers,Cups and glassesfit best alongthe
sides.Thisis the,placefor dishwasher-safe
- -,plastics,too. Makesure s~all plasticitemsare~
lodged in-tightlyso they can’t fallcmtothe
‘ Qlrod” heatingwit.
.
.
l?’{
..., ,..
P
H?ATCHOUTFOR THIS.
The wash tower risesthrough the center of
the bottom rack during the-washand rinse
portions of the cycle.Don’t block ~tor load
tall things next to it. Also, be careful not to let
portion of an item extend through the bottom
rack or the silverwarebasket, such as knives,
skewersor pot handles.
----
Saucepans$mixingbowlsand other small
itemsmay be placed—facedown-in the top
‘rack.The top rack is handy for all kinds of
odd shapes. Be sure the force of water and
detergentcan reach soiledsurfaces.
.-
-. ..
Fit platesandsaucersbetweenthepins.Load
platters,pots,pansandbowlsalongthesides,in
cornersor in theback.
Heavilysoiledpots,pansandcasserolesMUSTbe
loadedin thebottmnrack,facingdown,Prop the
broilerpan andrackalongtheedge.Shallow
itemsmaybeangled.providedthelowersidedews
notshieldthesoiledsurfaceinsidefromthewa~er,
I
w-
Don’t let any ‘
itemextend
through bottom.
Put flatware in the removable si~verware basket
with handles up to protect your hands. l’vlix
knives, forks and spoons so they don’t nest
together. IXstribute evenly”SmaIl pIastic items,
such as measuring spoons and lids from small
containers are not recommended for automatic
dishwaslling. If placed in dishwasher, they should
go in bottom of silver basket with silverware on
[op.
,
.- ”-,
out anything that may fall or extend through
the bottom of the basket.
T’ake
,’---%
!
-j
\
..
. . . .. . .
-.
.5$HH
- -&&*—
.,
fj
--- .
.W
U._
—
- .!r{!
.......
..
~%+z.A-&“fm-L
~,.~.
~=:.
~~::~- Fi,:1%“:.,.
K.Jw%d]y
safe
Exeeptio%s
(MotW&t?)
!&s
Some colored armdimd
ak.minum canPade.
YIN :
Antiquel metal trimmed,
hand-paintedor over-the-glaze
patternsfade.
Gold-leaf will discolor.
YES
Load &xmreljto preventrrsovmenL
Antique, metal-trimmed,or
hand-~aintedpatterns fade.
Gold-leafwilldiscolor,
Do notwashin dishwasher.Damageto dishwasb.er
and discolorationor stainingof dishwasher
may result..
No
YES
Milk glassmay yellow,
No
Iron willrust.
No
Pewtertarnishes.
YES
SAl%,test onepiece
If it doesn’tsay ~lS1-l~AS~~R
before dishwashingan entireset. Washin top rackonly.
s-wink%%
steel
yE~
Rinseif riot washingimmediately.Saltyor ac~d
foods can stain if left on.
sterling SWV6M
ZMid
silver
plate
yJ+j
il
Don’t put in samesilverware
basket with stainlesssteel.
Contact.betweenmetalscan
damagesilver.
Don’t use copper utensiisin
the sameload. Silvermay get a
brown film.
.Adhesiveused to attach some
hollow-handleknivescan
loosen.
Rinseif not washingimmediately.Saltyor acid
foods can stain if left on. Dry detergentcan cause
difficult-to-removeblack spots. Place in the back
sectionof silverwarebasket to avoid bei~gexposed
to detergentfrom the detergentcup.
After washing,wipethe non-stickcoating area
with vegetableoil to keep it from Iosingits
non-stickquality.
!(E3
No
Tin can rust.
No
Wood can warp, crack or lose
its finish with any type
washing.
.$OF&x a dish? Ew3f’f39s
W)tul%llHowever, opening the door during
any cyclekxxms definingpower
22(lj~j~&
..IJ::IJ)H.(L%Hi31
because the W-nperatm inside the
during a
:’idddishes any time
dishwasher is bwmd. so try to
%-m
RIPYTSE0NL% cyck.
km! everything‘atthebegim-hg.
2. Wait a few secondsuntil the
water calms. Then open the door.
3. Adddishesyou’veRN-gotten.
4. (lx% the door and push the
latch to the far Tight. VW-Mm
the
door is hkd,
washing ‘VW.
continue.
-—.
::;i&~.~mfj;shyyashefs
.:
airgape
-. .Lwe 3J-14
f:’ -! ~
..
,-
An
..
How
Keepit
-.,__ X%M-i
J
,:
to prep~re ym..w
disilwasller forwiB$ter
~f~~~
airgap
k a phmbing device.It
protectsyour dishwasheragainst
waterbackingup into it if a drain
clogs,The air gap is not a part of
lhe dishwasher.And you may not
evenhaveone. Not a~lplumbing
codesrequireair gaps.
If you havean air gap, checkit at
leastonce a month. THE AIR
GAP Is NOT PART OF YOUR
DISHWASHER.IT’IS NOT
COVEREDIN YOUR
~~ARRANT~,
The air gap is easy to clean. With
lmosttypes, first turh off the
- dishwasher,then Iift off the
.;RS<
.
oL~~-hro~e cover.Then unscrewthe
plasuccap and check for any
build-upof grit. A toothpick
makescleaningeasy.
Check the air gap any time your
dishwasherisn’t draining well.
Eikw
Cleanthe controlpanelwitha
lightlydampenedcloth. Dry
thoroughly.Do not useabrasives
or sharp objectson the panel.
Theycan damageit.
Cleanthe outsidewith a good
appliance-polishwax. The outside
cabinetfinishis durable, but it.can
scratch. So use no scouringpads,
harsh or grittycleaners.
AppliancePolishWax& Cleaner
(Cat. No. WR97XH6)is available
from GE and Hotpoint Appliance
Parts Marts.
The insideusuallytakes care of
itself. If it shouldeverneed
cleaning,usea mild cleansing
powder.Scouringpads and harsh
cleanserscan mar the finish.
toGive YmNrDishwasher
If you are redecorating, you can
reverseyour dishwasher’sfront
panels to change color.
The panel is held in place by the
door trim. You have a choice of
three colors; one on each side of
the removable panel and a third
cmEhepermanent panel underneath. Or you can paint the panel
~ith the color of your own choice.
How+to ehamgedoor panel insert:
1. Take out the three trim screws
on either side of the dishwasher
door. Remove the side trim.
“Y. Slide out the pane].
,,
$3 New
Sh%-ige
If your dishwasherk left in an
unheatedlocationduringthe
wintermonths, havea service
techniciantake the followingsteps
to preventthe machinefrom
freezing:
Removefusesor trip circuk
breakersto removeelectric
powerfrom the dishwasher.
Turn off waterto dishwasher.
Disconnectthe water inletline
from the water valveand drain,
Removewater valvefrom the
dishwasherand blowon small
plasticoutletto removewater.
Replacewater valveand water
line.
Removeplug in bottom of
rubber boot and drain completely.Replacethe plug.
Look—change
UtsChmNr!
3. Put the color you want in
front; or leavethe removable
panel off if you want the Black
panel showing. (Handle the
pane~carefully.The edgesmay
be sharp.)
4. Replaceside trim and screws.
H your dishwasherdoes not have
trim that accepts ?4-inch thick
wood insert, an .AccessoryTrim
Kit GPF18 can be purchased for
that purpose.
Dimensionsfor !A-inchwood
insert:
19X”high x 23~6°wide
dishwasher
Note: Do notoperate
while changing panel or when
lower access panel is removed.
s-=-. .---. -..-.----,
.. ..
.-..
. ., .,
Changecolor in minutes. .?ustremove
trim and change.
...
save
Your Time allcl Money
Before Vou Canforservice,
Check the I%wbkm-il
solver
“
If you ha~c a problem, it may be
minor. You may be able to correct
it jrourself. .Just use this Problem
Solver to locate your problem
and then follow the suggested
recommendations.
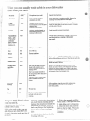
The Problem Sober
PROBLEM
POSSIBLE CAUSE AND REMEDY
DISHWASHER WON’T
RUN
A fuse in your home may be blown, or the circuit breaker tripped.
Replace fuse or reset circuit breaker. Remove any other appliances from
the circuit.
UNUSUAL NOISE
Utensils may not be secure on rack pins, Or something small may have
dropped from the rack. Water is causing utensils to rattle. Make sure
everything is securely placed in dishwasher.
DISHES DON’T DRY
Make sure inlet water temperature is correct. (See page 6.)
Unload the bottom rack first. Water from dishes in the top rack maybe
spilling into the bottom rack.
Check for improper loading. Dishes shouldn’t nest together. Avoid
overloading.
UNCLEAN DISHES
.4ND FLATWARE
Check inlet water temperature. It should beat least 120‘F. (To test,
see page 6.)
To obtain the benefits of a complete cycle, be careful that you do not
turn the dia! my further than necessary to start the dishwasher,
Water pressure may be temporarily low. Turn on a faucet. Is water coming
out slower than usual? If so, wait until pressure is normal before using
your dishwasher.
Plugged air gap. (See page 11.)
Improper rack loading. (See pages 8 & 9.)
BLACK OR GRAY
MARKS ON DISHES
Aluminum deposits often leave marks when they rub against other things.
Remove marks with a mild abrasive cleanser.
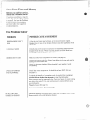
PROBLEM
PCX$W3LECAUSE AND REMEDY
DETERGENT LEFT IN
DiSPENSER CUPS
blocking detergent cup,
Water may not be reachirig the cietergeni cups. Move clishes that may be
The dispenser cover may not be opening or may be blocked by
improperly loaded items. Ojmn the cup and remove any caked-on
cietergenl. If the cup s~illdoesn’[ open automatically, call for service,
Detergent may be old. If it’s hard or cakecl in [he box, throw it away.
The detergent may not be working well. Try another brand.
DETERGENT CUP COVER
W~N’T LATCH
SPOTS AND FILMING
ON GLASSES AND
FLATWARE
.
Make sure Cycle Indicator is in OFF position,
Spotting can be caused by all these things:
~ Extremely hard water, (See page 6,)
o Low inlet water temperature. (To test, set; page 6.)
~ Overloading the dishwasher.
@Improper loading. (See pages 8 & 9.)
~ Old or damp detergent.
~ Phosphate level in detergent too low. (See page 6.)
~ Too little detergent. (See page 7.)
Due to varying local water conditions and personal preferences, try
several brands of detergents to find one that gives the best results for
you.
To remove stubborn spots and film from glassware:
1.
2.
3.
4.
Remove all metal utensils from the dishwasher.
Do not add detergent.
Select NORMAL WASH cycle.
Start the dishwasher and allow to run for 15 to 20 minutes. The
dishwasher will now be in the main wash.
5. Then open the door and pour 2 cups (500 ml) of white vinegar into
the bottom of the dishwasher.
6. Close the door and allow to complete the cycle.
If vinegar rinse doesn’t work: Repeat as above, except use 1Acup
(60 ml) of citric acid crystals instead of vinegar. (Most drug stores carry
citric acid crystals. If yours doesn’t, call GE Factory Service. )
Using a vinegar or citric acid crystal rinse more than twice a month?
Consider a home water-softener.
CLOUDINESS ON
GLASSWARE
If vinegar or citric acid crystal rinse doesn’t work, the cloudiness is
“etching:’ The film cannot be removed.
It can be prevented: Use less detergent if you have soft water. Wash
glassware in the shortest cycle that will get them clean.
Water temperature entering dishwasher exceeds 150‘F.
-—
—
,
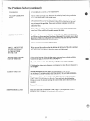
The Problem salver
(continued)
PROBLEM
POSSIBLE CfAtJsE’Arwl REMEDY
YELLOW OR BROWN
FILM
Tea or coffee can stain cups, Remove the stains by hand, using a solution
of ?42cup bleach and 3 cups warm water,
e“
An overall yellow or brown film on dishes or glassware can be caused by
iron deposits in water. A special filter in the water supply line is the only
way to correct this problem. Your water softener company can tell you
about the filter.
-.
Yellow film on sterling silver results when you wash copper utensils in the
same load. Silver polish will usually remove this stain.
CHIPPING OF CHINA
Rough handling can cause chipping. Load with care. Make sure glassware
and china are secure and can’t jar loose. (See page 8 for correct way to load
glassware.) Make sure tall glasses and stemware will clear the top of the tub
when you push the rack into the dishwasher.
Always use the top rack for delicate items.
SMALL AMOUNT OF
WATER STANDING
IN THE BOTTOM
OF THE TUB
Water around the outlet on the tub bottom at the back of the tub is normal.
It is clean water. It’s thereto keep the water seal lubricated.
WATER WON’T PUMP
OUT OF THE TUB
If the entire bottom of the tub has water, you may have a drain problem.
Clean the air gap, if you haveone.(Seepage11.)
Check the kitchen sink. Is it draining well? You may need a plumber.
If dishwasher drains into disposer, run disposer to clear. 13esure disposer is
not clogged.
SUDS IN THE TUB
Sudsing detergents are not meant for dishwashers. USE ONLY
AUTOMATIC DISHWASHER DETERGENTS TO AVOID SUDSING.
To remove sudsfrom the tub: Open the dishwasher. Let suds evaporate.
Add 1 gallon of cold water to the tub. Close and latch the dishwasher.
Pump out water by slowly turning the control dial until a drain period is
reached.
Repeat, if necessary.
DISHWASHER LEAKS
Suds can cause unit to overflow. That’s why it’s so important to use a
detergent that’s designed for automatic dishwashers.
—
——
—
Our ConsumerServicesare designedwith your needsand wantsin mind.
warranty
Protection
Beforeyour newapplianceleft the factory,it went
throughrigoroustests to detectmanufacturingdefects.
And you havea writtenwarrantyto protectyou. Seethe
warrantyon the back pageof this book far details.
@
Convenient Service
Whetheryour applianceis in or out of warranty,you’re
just a phone callawayfrom our nationwidenetworkof
Factory TrainedServiceprofessionals.
Simplycall our GE serviceorganization.Look in the
Whiteor YellowPagesof your telephonedirectoryfor
GENERALELECTRICCOMPANY,GENERAL
ELECTRIC FACTORYSERVICE,GENERAL
EL13CTRIC-HOTPOINTFACTORYSERVICEor
GENERALELECTRICCUSTOMERCAREQ
SERVICE.
Servicecan normallybe scheduledat your convenience
and the techniciandrivesa fully-stockedparts service
truck so that, in most cases,the repair can be completed
in one visit,
We’reproud of our serviceand want you to be pleased,
but if for some reasonyou are not happy with the service
you receive,here are three stepsto followfor further help.
FIRST,contact the peoplewhoservicedyourappliance.
Explainwhyyouare not pleased.In most cases,this will
solvethe problem.
NEXT,if youare stillnot pleasedwriteall the
details—includingyour phone numberto:
Manager,ConsumerRelations
GeneralElectric
AppliancePark
Louisville,Kentucky40225
FINALLY,if yourproblemis stillnot resolved,write:
Major ApplianceConsumerAction Panel
20 North WackerDrive
Chicago,Illinois60606
service contracts
~m~&~
-. -;. .r=y-..
For trouble-freeservicebeyond
thewrittenwarrantyperiod.
If you prefer to budgetyour repair expenditures
instead of beingsurprisedby them, GE offers
servicecontracts for varyinglengthsof time on
all GE major appliances.With a contract, we’ll
keep your appliancein good operating condition
during the contract period at no additional
charge.
~
~
-~-’
:_:>::-.:-_z:.”~
~
..,,, ~
$$
‘‘%..?.:
“2t’-2”’z
-!...“‘ ’4’
a
The Quick Fix” system
You cansavemoneyand time
by doing it yourself.
t!
I
=@
f
For do-it-yourselferswho would prefer to fix
GE major appliancesthemselves. . . GE offers P
an industry first, the Quick Fix” System.
!
1
Servicecontracts let you pay today’spricesfor
servicea month, a year,or severalyearsfrom
now.And, you’llreceiveservicefrom GE
trained servicetechniciansusingonlygenuine
GE parts. If you haveany questionsabout
ServiceContracts, call TOLL-FREE
800.626.2224.(In Kentucky,call 800.292.2057.)
A program for do-it-yourselfappliancerepair,
the systemincludess~ep-by-steprepairmanuals
for refrigerators, most non-microwaveelectric
ranges, dishwashers,and standard and large
capacity washersand dryers, plus specia61y
packagedreplacementparts, and technicalhelp
with a tollfree 800number.
Help For YOU By Phone
The GE Answer Center~Mconsumer
information serviceis open 24 hours a day,
sevendays a week.
Our staff of experts stands ready to assist you
anytime.
Should you need help in the selectionand
purchase of new appliances, or have questions
about the operation of the GE appliancesyou
now own—or have anj~other questions about
GE consumer products or services,you are
only a TOLL FREE call away.
Your Direct I&e
toGened
‘
Ekmk
‘l-k! GE AnswereentQF8000626.2000
15
.
to ship the product to the service
shop or for the service technician’s
travel costs to your home.
All warranty service will be provided
by our Factory Service Centers or
by our authorized Customer Care@
servicers during normal working
hours.
Look in the White or Yellow Pages
of your telephone directory for
GENERALELECTRICCOMPANY,
GENERALELECTRICFACTORY
SERVICE,GENERALELECTRICHOTPOINTFACTORYSERVICEor
GENERAL ELECTRICCUSTOMER
CARE” SERVICE.
Consumer Affairs office at the
address below, or call, toll free:
The GE Answer CenterTM
800.626.2000
consumer information service
~ Improper installation.
If you have an installation problem,
contact your dealer or installer.
You are responsible for providing
adequate electrical, plumbing and
other connecting facilities.
Some states do not allow the exclusion or limitation of incidental or consequential damages, so the above limitation or exclusion
may not apply to you. This warranty gives you specific legal rights, and you may also have other rights which vary from state to state.
To know what your legal rights are in your state, consult your local or state consumer affairs office or your state’s Attorney General.
VVi3ri3n~t3r:
General Electric Company
!ffurther help is needed concerning this warranty,contact:
iblanager-Conswmer Affairs, Genera! Electric Company, Appliance Park, L.cwisvilk, KY’ 40225
1-85
__——
GSD4X