1
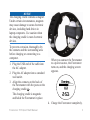
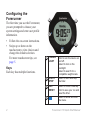
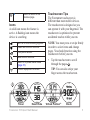
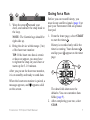
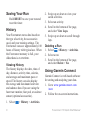
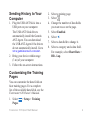
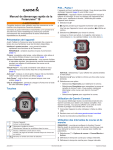
FORERUNNER ® 610 quick start manual Important Information Getting Started warning Always consult your physician before you begin or modify any exercise program. See the Important Safety and Product Information guide in the product box for product warnings and other important information. 1. 2. 3. 4. notice The Forerunner® is waterproof to IEC Standard 60529 IPX7. It can withstand immersion in 1 meter of water for 30 minutes. Prolonged submersion can cause damage to the unit. After submersion, be certain to wipe dry and air dry the unit before using or charging. note: The Forerunner is not intended to be used while swimming. 2 When using your Forerunner the first time, complete these tasks. Charge the Forerunner (page 2). Configure the Forerunner (page 4). Locate satellites (page 6). Put on the optional heart rate monitor (page 6). 5. Go for a run (page 7). 6. Save your run (page 8). Charging the Forerunner warning The charging cradle contains a magnet. Under certain circumstances, magnets may cause interference with some medical devices, including pacemakers and insulin pumps. Keep the charging cradle away from such medical devices. Forerunner 610 Quick Start Manual notice The charging cradle contains a magnet. Under certain circumstances, magnets may cause damage to some electronic devices, including hard drives in laptop computers. Use caution when the charging cradle is near electronic devices. To prevent corrosion, thoroughly dry the contacts and the surrounding area before charging or connecting to a computer. 1. Plug the USB end of the cable into the AC adapter. 2. Plug the AC adapter into a standard wall outlet. 3. Align the contacts on the back of the Forerunner with the posts on the charging cradle ➊. The charging cradle is magnetic and holds the Forerunner in place. ➊ When you connect the Forerunner to a power source, the Forerunner turns on, and the charging screen appears. 4. Charge the Forerunner completely. Forerunner 610 Quick Start Manual 3 Configuring the Forerunner ➊ The first time you use the Forerunner, you are prompted to choose your system settings and enter user profile information. • Follow the on-screen instructions. • Swipe up or down on the touchscreen to view choices and change the default selection. For more touchscreen tips, see page 5. ➋ ➎ ➌ ➍ ➊ POWER/ LIGHT ➋ START/ STOP ➌ LAP/ RESET Keys Each key has multiple functions. ➍ 4 Hold to turn the device on and off. Select to turn on the backlight. Select to search for a compatible weight scale. Select to start and stop the timer. Select to mark a new lap. Hold to save your run and reset the timer. Select to show and hide the menu. Forerunner 610 Quick Start Manual ➎ ◄ Touchscreen Tips The Forerunner touchscreen is different than most mobile devices. The touchscreen is designed so you can operate it with your fingernail. The touchscreen is optimized to prevent accidental touches while you run. Select to return to the previous page. Icons A solid icon means the feature is active. A flashing icon means the device is searching. NOTE: You must press or swipe firmly in order to select items and change pages. You should practice using the touchscreen before you run. GPS is on and receiving signals. Heart rate monitor is active. Foot pod is active. Bike sensor is active. • Tap the touchscreen to scroll through the pages ➊. TIP: You can also swipe your finger across the touchscreen. Watch is in power save mode (page 10). Fitness equipment is active. ➊ » » Timer » Heart Rate Forerunner 610 Quick Start Manual » Virtual Partner® » Clock 5 • Swipe left to exit power save mode. • Tap the touchscreen to confirm messages. • Make each touchscreen selection or swipe a separate action. Locating Satellite Signals It may take 30–60 seconds to locate satellite signals. 1. From the clock page, swipe left to view the locating satellites banner. 2. Go outdoors to an open area. 3. Wait while the Forerunner searches for satellites. Do not begin your activity until the locating satellites banner disappears. The time of day and date are set automatically. 6 Putting on the Heart Rate Monitor NOTE: If you do not have a heart rate monitor, you can skip this task. Wear the heart rate monitor directly on your skin, just below your breastplate. It should be snug enough to stay in place during your run. 1. Snap the heart rate monitor module ➊ onto the strap. ➊ 2. Wet the electrodes ➋ on the back of the strap to create a strong connection between your chest and the transmitter. Note: Some heart rate monitors have a contact patch ➌. Wet the contact patch. Forerunner 610 Quick Start Manual ➍ ➌ ➋ ➋ 3. Wrap the strap ➍ around your chest, and connect the strap hook to the loop. NOTE: The Garmin logo should be right-side up. 4. Bring the device within range (3 m) of the heart rate monitor. TIP: If the heart rate data is erratic or does not appear, you may have to tighten the strap on your chest or warm up for 5–10 minutes. After you put on the heart rate monitor, it is on standby and ready to send data. When the heart rate monitor is paired, a message appears, and appears solid on the screen. Forerunner 610 Quick Start Manual Going for a Run Before you can record history, you must locate satellite signals (page 6) or pair your Forerunner with an optional foot pod. 1. From the timer page, select START to start the timer ➊. History is recorded only while the timer is running. Your distance ➋ and lap pace ➌ appear on the timer page. ➋ ➊ ➌ The data fields shown are the defaults. You can customize data fields (page 9). 2. After completing your run, select STOP. 7 Saving Your Run Hold RESET to save your run and reset the timer. History Your Forerunner stores data based on the type of activity, the accessories used, and your training settings. The Forerunner can save approximately 180 hours of history with typical use. When the Forerunner memory is full, your oldest data is overwritten. Viewing History The history displays the date, time of day, distance, activity time, calories, and average and maximum pace or speed. The history can also display the average and maximum heart rate and cadence data if you are using the heart rate monitor, foot pod, or cadence sensor (optional accessories). 1. Select 8 2. Swipe up or down to view your saved activities. 3. Select an activity. 4. Scroll to the bottom of the page, and select View Laps. 5. Swipe up or down to scroll through laps. Deleting a Run 1. Select > History > Activities. 2. Select a run. 3. Scroll to the bottom of the page, and select Delete > Yes Using Garmin Connect Garmin Connect is web-based software for storing and analyzing your data. 1. Go to www.garminconnect.com /start. 2. Follow the on-screen instructions. > History > Activities. Forerunner 610 Quick Start Manual Sending History to Your Computer 1. Plug the USB ANT Stick into a USB port on your computer. The USB ANT Stick drivers automatically install the Garmin ANT Agent. You can download the USB ANT Agent if the drivers do not automatically install. Go to www.garminconnect.com/start. 2. Bring your device within range (3 m) of your computer. 3. Follow the on-screen instructions. 2. Select a training page. 3. Select . 4. Change the number of data fields you want to see on the page. 5. Select Enabled. 6. Select ◄. 7. Select a data field to change it. 8. Select a category and a data field. For example, select Heart Rate > HR - Lap. Customizing the Training Pages You can customize the data fields on four training pages. For a complete list of the available data fields, see the Forerunner 610 Owner’s Manual. 1. Select Pages. > Setup > Training Forerunner 610 Quick Start Manual 9 About the Battery warning This product contains a lithium-ion battery. See the Important Safety and Product Information guide in the product box for product warnings and other important information. Forerunner Battery Life Battery Life* Forerunner Use 1 week You are training for 45 minutes per day with GPS. The Forerunner is in power save mode for the remaining time. Up to 4 You are using the weeks Forerunner in power save mode the entire time. Up to 8 hours You are training with GPS the entire time. *The actual battery life of a fully charged battery depends on how much time you use GPS, the backlight, 10 and power save mode. Exposure to extremely cold temperatures will also reduce battery life. Power Save After a period of inactivity, the Forerunner goes into power save mode and appears. The Forerunner displays the time and date, but does not connect with your ANT+ accessories or use GPS. Swipe left to exit power save mode. Troubleshooting Resetting the Device If the keys or screen stop responding, you may need to reset the device. 1. Hold POWER until the screen goes blank. 2. Hold POWER until the screen turns on. Forerunner 610 Quick Start Manual Getting the Owner’s Manual 1. Go to www.garmin.com/intosports. 2. Select your product. 3. Click Manuals. Registering Your Device Help us better support you by completing our online registration today: • Go to http://my.garmin.com. • Keep the original sales receipt, or a photocopy, in a safe place. Getting More Information You can find more information about this product on the Garmin Web site. • Go to www.garmin.com/intosports. • Go to www.garmin.com /learningcenter. • Go to http://buy.garmin.com, or contact your Garmin dealer for information about optional accessories and replacement parts. Forerunner 610 Quick Start Manual Contacting Garmin Product Support You can contact Garmin Product Support if you have any questions about this product. • In the USA, go to www.garmin .com/support, or contact Garmin USA by phone at (913) 397.8200 or (800) 800.1020. • In the UK, contact Garmin (Europe) Ltd. by phone at 0808 2380000. • In Europe, go to www.garmin.com /support and click Contact Support for in-country support information, or contact Garmin (Europe) Ltd. by phone at +44 (0) 870.8501241. 11 © 2011–2012 Garmin Ltd. or its subsidiaries. Garmin®, the Garmin logo, Virtual Partner®, and Forerunner® are trademarks of Garmin Ltd. or its subsidiaries, registered in the USA and other countries. Garmin Connect™, USB ANT Stick™, and ANT+™ are trademarks of Garmin Ltd. or its subsidiaries. These trademarks may not be used without the express permission of Garmin. For the latest free software updates (excluding map data) throughout the life of your Garmin products, visit the Garmin Web site at www.garmin.com. TA-2011/376 Garmin International, Inc. 1200 East 151st Street, Olathe, Kansas 66062, USA Garmin (Europe) Ltd. Liberty House, Hounsdown Business Park, Southampton, Hampshire, SO40 9LR UK Garmin Corporation No. 68, Zhangshu 2nd Road, Xizhi Dist., New Taipei City, 221, Taiwan (R.O.C.) December 2012 190-01296-01 Rev. D Printed in Taiwan