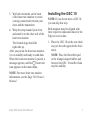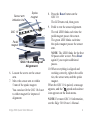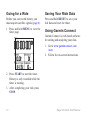
1
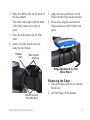
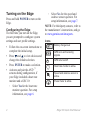
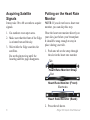
quick start manual EDGE® 500 GPS-ENABLED CYCLING COMPUTER © 2009–2012 Garmin Ltd. or its subsidiaries Garmin International, Inc. 1200 East 151st Street, Olathe, Kansas 66062, USA Tel. (913) 397.8200 or (800) 800.1020 Fax (913) 397.8282 Garmin (Europe) Ltd. Liberty House, Hounsdown Business Park, Southampton, Hampshire, SO40 9LR UK Tel. +44 (0) 870.8501241 (outside the UK) 0808 2380000 (within the UK) Fax +44 (0) 870.8501251 All rights reserved. Except as expressly provided herein, no part of this manual may be reproduced, copied, transmitted, disseminated, downloaded or stored in any storage medium, for any purpose without the express prior written consent of Garmin. Garmin hereby grants permission to download a single copy of this manual onto a hard drive or other electronic storage medium to be viewed and to print one copy of this manual or of any revision hereto, provided that such electronic or printed copy of this manual must contain the complete text of this copyright notice and provided further that any unauthorized commercial distribution of this manual or any revision hereto is strictly prohibited. Garmin Corporation No. 68, Zangshu 2nd Road Xizhi Dist. New Taipei City, 221 Taiwan (R.O.C.) Garmin® and Edge® are trademarks of Garmin Ltd. or its subsidiaries, registered in the USA and other countries. Garmin Connect™, GSC™10, ANT™, and ANT+™ are trademarks of Garmin Ltd. or its subsidiaries. These trademarks may not be used without the express permission of Garmin. Windows® is a registered trademark of Microsoft Corporation in the United States and/or other countries. Mac® is a registered trademark of Apple Computer, Inc. Other trademarks and trade names are those of their respective owners. Information in this document is subject to change without notice. Garmin reserves the right to change or improve its products and to make changes in the content without obligation to notify any person or organization of such changes or improvements. Visit the Garmin Web site (www.garmin.com) for current updates and supplemental information concerning the use and operation of this and other Garmin products. December 2012 Part Number 190-01071-01 Rev. C Printed in Taiwan Getting Started warning Always consult your physician before you begin or modify any exercise program. See the Important Safety and Product Information guide in the product box for product warnings and other important information. When using your Edge® the first time, complete the following tasks: 1. 2. 3. 4. 5. Charge the Edge (page 2). Install the Edge (page 2). Turn on the Edge (page 4). Acquire satellites (page 6). Set up the optional heart rate monitor (page 6) and the optional GSC™ 10 (page 7). 6. Go for a ride (page 10). 7. Save your ride (page 10). 8. Get Garmin Connect™ (page 10). Edge 500 Quick Start Manual 9. Transfer history to your computer (page 11). About the Battery warning This product contains a lithium-ion battery. See the Important Safety and Product Information guide in the product box for product warnings and other important information. The Edge is powered by a built-in, lithium-ion battery that you can recharge using the AC charger or the USB cable included in the product box. NOTE: The Edge will not charge when outside the temperature range of 32°F to 122°F (0°C to 50°C). 1 Charging the Edge notice To prevent corrosion, thoroughly dry the mini-USB port, the weather cap, and the surrounding area before charging or connecting to a computer. 1. Plug the AC charger into a standard wall outlet. 2. Pull up the weather cap from the mini-USB port. 3. Plug the small end of the AC charger into the mini-USB port. To connect the Edge to your computer using the USB cable, see page 11. 4. Charge the Edge for at least three hours before you begin using it. A fully charged battery can run for up to 18 hours before it must be recharged. Installing the Edge For the best GPS reception, position the bike mount so the front of the Edge is oriented toward the sky. You can install the bike mount on the stem (shown on page 3) or the handlebars. Tabs Mini-USB port under the weather cap 2 1. Select a suitable and secure location to mount the Edge where it does not interfere with safe operation of your bike. Edge 500 Quick Start Manual 2. Place the rubber disk on the back of the bike mount. The rubber tabs align with the back of the bike mount so it stays in place. 3. Place the bike mount on the bike stem. 4. Attach the bike mount securely using the two bands. Rubber disk 5. Align the tabs on the back of the Edge with the bike mount notches. 6. Press down slightly and turn the Edge clockwise until it locks into place. Bike mount notches Edge Mounted on the Bike Stem Bands around the bike stem Edge 500 Quick Start Manual Releasing the Edge 1. Turn the Edge clockwise to unlock the device. 2. Lift the Edge off the mount. 3 Turning on the Edge Press and hold POWER to turn on the Edge. Configuring the Edge The first time you turn on the Edge, you are prompted to configure system settings and user profile settings. • Follow the on-screen instructions to complete the initial setup. • Press and to view choices and change the default selection. • Press ENTER to make a selection. • Activate and pair the ANT+™ sensors during configuration, if your Edge included a heart rate monitor and a GSC 10: ◦◦ Select Yes for the heart rate monitor question. For setup information, see page 6. 4 ◦◦ Select Yes for the speed and cadence sensor question. For setup information, see page 7. Note: For third-party sensors, refer to the manufacturer’s instructions, and go to www.garmin.com/intosports. Icons Battery charge level GPS is on and receiving signals. GPS is turned off. Heart rate monitor is active. Speed and cadence sensor is active. Power meter is active. Edge 500 Quick Start Manual Buttons Each Edge button has multiple functions. Button Description POWER/ LIGHT Press and hold POWER to turn the device on and off. Press LIGHT to activate the backlight. Press any button to extend the backlight for 15 seconds. BACK Press BACK to cancel or return to the previous menu. Edge 500 Quick Start Manual START/ STOP Press START/STOP to start and stop the timer. Press or to select menus and settings. Press and hold or to scroll quickly through settings. LAP/RESET Press LAP to create a new lap. Press and hold RESET to reset the timer. PAGE/ MENU Press PAGE to scroll through training data pages. Press and hold MENU to switch between menu and timer modes. ENTER Press ENTER to select options and acknowledge messages. 5 Acquiring Satellite Signals Putting on the Heart Rate Monitor 1. Go outdoors to an open area. 2. Make sure that the front of the Edge is oriented toward the sky. 3. Wait while the Edge searches for satellites. Do not begin moving until the locating satellite page disappears. Wear the heart rate monitor directly on your skin, just below your breastplate. It should be snug enough to stay in place during your ride. It may take 30 to 60 seconds to acquire signals. note: If you do not have a heart rate monitor, you can skip this step. 1. Push one tab on the strap through the slot in the heart rate monitor. Tab Heart Rate Monitor Strap Slot Heart Rate Monitor (Front) Electrodes Heart Rate Monitor (Back) 2. Press the tab down. 6 Edge 500 Quick Start Manual 3. Wet both electrodes on the back of the heart rate monitor to create a strong connection between your chest and the transmitter. 4. Wrap the strap around your chest and attach it to the other side of the heart rate monitor. The Garmin logo should be right‑side up. After you put on the heart rate monitor, it is on standby and ready to send data. When the heart rate monitor is paired, a heart rate message appears, and the icon appears on the main menu. Installing the GSC 10 note: If you do not have a GSC 10, you can skip this step. Both magnets must be aligned with their respective indication lines for the Edge to receive data. 1. Place the GSC 10 on the rear chain stay (on the side opposite the drive train). NOTE: Place the flat rubber pad or the triangle-shaped rubber pad between the GSC 10 and the chain stay for stability. Note: For more heart rate monitor information, see the Edge 500 Owner’s Manual. Edge 500 Quick Start Manual 7 Reset button Indication line Indication line Cable ties GSC 10 on Rear Chain Stay 2. Loosely attach the GSC 10 using two cable ties. 3. Attach the pedal magnet to the crank arm using the adhesive mount and a cable tie. The pedal magnet must be within 5 mm of the GSC 10. The indication line on the pedal magnet must line up with the indication line on the GSC 10. 8 Cable tie Pedal Magnet on Crank Arm 4. Unscrew the spoke magnet from the plastic piece. 5. Place the spoke in the groove of the plastic piece and tighten slightly. The spoke magnet can face away from the GSC 10 if there is not enough room between the sensor arm and the spoke. The spoke magnet must line up with the indication line on the sensor arm. Edge 500 Quick Start Manual Sensor arm indication line Spoke magnet GSC 10 Pedal magnet GSC 10 and Magnet Alignment 6. Loosen the screw on the sensor arm. 7. Move the sensor arm to within 5 mm of the spoke magnet. You can also tilt the GSC 10 closer to either magnet for improved alignment. Edge 500 Quick Start Manual 8. Press the Reset button on the GSC 10. The LED turns red, then green. 9. Pedal to test the sensor alignment. The red LED blinks each time the pedal magnet passes the sensor. The green LED blinks each time the spoke magnet passes the sensor arm. note: The LED blinks for the first 60 passes after a reset. Press Reset again if you require additional passes. 10.When everything is aligned and working correctly, tighten the cable ties, the sensor arm, and the spoke magnet. When the GSC 10 is paired, a message appears, and the speed and cadence icon appears on the main menu. Note: For more GSC 10 information, see the Edge 500 Owner’s Manual. 9 Going for a Ride Saving Your Ride Data 1. Press and hold MENU to view the timer page. Using Garmin Connect Before you can record history, you must acquire satellite signals (page 6). Press and hold RESET to save your ride data and reset the timer. Garmin Connect is web-based software for storing and analyzing your data. 1. Go to www.garminconnect.com /start. 2. Follow the on-screen instructions. 2. Press START to start the timer. History is only recorded while the timer is running. 3. After completing your ride, press STOP. 10 Edge 500 Quick Start Manual Transferring History to Your Computer 1. Connect the USB cable to an available USB port on your computer. 2. Pull up the weather cap from the mini-USB port. 5. Follow the instructions included with the software. Customizing Your Data Fields You can set up custom data fields for three training data pages. For a complete list of the available data fields, see the Edge 500 Owner’s Manual. 1. Press and hold MENU. 2. Select Settings > Bike Settings > Data Fields. 3. Select one of the pages. Mini-USB port under the weather cap 3. Plug the small end of the USB cable into the mini-USB port. 4. Go to www.garminconnect.com /start. Edge 500 Quick Start Manual 11 4. Select the number of data fields you want to see on this page. Edge Temperature Readings You can customize the Edge to display temperature in a data field. To turn off an optional page, set the number of data fields to zero. 5. Use , , and ENTER to change the data fields. 6. Repeat steps 3 through 5 for each page you want to customize. 12 Note: The Edge may display temperature readings that are higher than the actual air temperature if the Edge is placed in direct sunlight or held in your hand. Also, the Edge will take some time to adjust to significant changes in temperature. Edge 500 Quick Start Manual For the latest free software updates (excluding map data) throughout the life of your Garmin products, visit the Garmin Web site at www.garmin.com. TA-2012/1220 © 2009–2012 Garmin Ltd. or its subsidiaries Garmin International, Inc. 1200 East 151st Street, Olathe, Kansas 66062, USA Garmin (Europe) Ltd. Liberty House, Hounsdown Business Park, Southampton, Hampshire, SO40 9LR UK Garmin Corporation No. 68, Zangshu 2nd Road, Xizhi Dist. New Taipei City, 221, Taiwan (R.O.C.) December 2012 Part Number 190-01071-01 Rev. C Printed in Taiwan