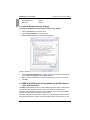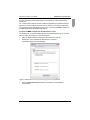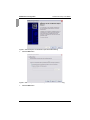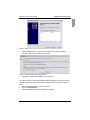
1
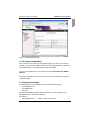
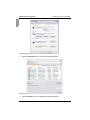
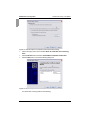
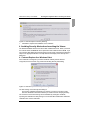
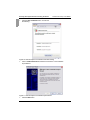
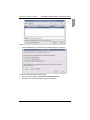
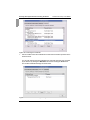
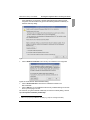
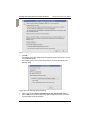
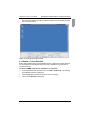
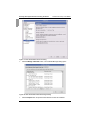
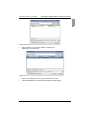
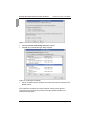
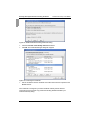
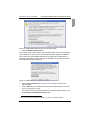
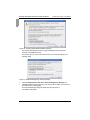
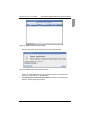
Initial Browser Setup
control
BX600 Digital KVM Switch
Keyboard/Video/Mouse Switch
590-673-501A
English
2
USA Notification
Warning: Changes or modifications to this unit not expressly approved by the party
responsible for compliance could void the user’s authority to operate the equipment.
Note: This equipment has been tested and found to comply with the limits for a
Class A digital device, pursuant to Part 15 of the FCC Rules. These limits are
designed to provide reasonable protection against harmful interference when the
equipment is operated in a commercial environment. This equipment generates, uses
and can radiate radio frequency energy and, if not installed and used in accordance
with the instruction manual, may cause harmful interference to radio communications. Operation of this equipment in a residential area is likely to cause harmful
interference in which case the user will be required to correct the interference at his
own expense.
Canadian Notification
This Class A digital apparatus complies with Canadian ICES-003.
Cet appareil numérique de la classe A est conforme à la norme NMB-003 du
Canada.
Japanese Notification
Korean Notification
Initial Browser Setup for the BX600
Edition January 2007
Comments... Suggestions... Corrections
The User Documentation Department would like to know your opinion of this manual.
Your feedback helps us optimize our documentation to suit your individual needs.
Contact information is included in the back of the manual.
Certified documentation
according to DIN EN ISO 9001:2000
To ensure a consistently high quality standard and user-friendliness, this documentation
was created to meet the regulations of a quality management system which complies
with the requirements of the standard DIN EN ISO 9001:2000.
Copyright and Trademarks
Copyright © 2006 Fujitsu Siemens Computers GmbH.
All rights reserved.
Delivery subject to availability; right of technical modifications reserved.
All hardware and software names used are trademarks of their respective
manufacturers.
Initial Browser Setup of the BX600
Installing the JRE for Windows Clients ........................................ 1
Installing the JRE for Linux Clients .............................................. 2
DKVM network configuration ....................................................... 2
Default IP address .................................................................... 2
IP address configuration ........................................................... 3
Network port settings ................................................................ 3
Internet Browser Security Settings............................................ 4
MMB and DKVM certificate integration into the IE6 browser’s
store of trusted sites.................................................................. 4
Avoiding Security Alerts when Launching the Viewer................ 11
Internet Explorer 6 on Windows Client.................................... 11
Mozilla Firefox 1.5 on Red Hat 4............................................. 17
Mozilla 1.7.12 on Red Hat 4.................................................... 23
Mozilla 1.7.5 on SUSE9 .......................................................... 29
Finding the dKVM IP-address when using DHCP ..................... 37
Integrating the DKVM IP address with https setting................ 38
Resolutions supported by the DKVM Console Viewer............ 39
Initial Browser Setup of the BX600
The following browsers are supported for client machines managing the BX600 Server
Blade Chassis:
•
Internet Explorer 6.0 (w/SP1, w/SP2) for Windows® XP and Windows 2003
•
•
Mozilla Firefox 1.5 for Red Hat® 4 Linux
Mozilla 1.7.12 for Red Hat 4 Linux
•
Mozilla 1.7.5 for SUSE® 9 Linux
The Management Module Board’s (MMB) embedded web server has a web page for
downloading two Java-based clients, the Java Viewer Client and the Java Virtual Media
client. After the MMB authenticates the connection to the dKVM, the dKVM’s embedded
web server sends the appropriate Java client to the client’s browser.
Both Java application clients require a Java Runtime Environment (JRE) version 1.4.2
or greater. The JRE is a software bundle from Sun Microsystems that allows the client
OS to run a Java application.
A released Java Runtime Environment version is available on the Fujitsu Siemens
Computers ServerStart CD/DVD and the DKVM Support CD
1 Installing the JRE for Windows Clients
If the client OS is Windows, the JRE installation requires:
•
the Windows Installer to be on your client machine
-or•
an active Internet connection to be available in order for the JRE to be downloaded
automatically.
When installing the JRE, the program InstallShield requires the Microsoft Windows
Installer (version 2.0 or greater1) to be on your machine; if it is not found (or an older
version is found), then InstallShield automatically tries to download Microsoft Windows
Installer.
If your client machine is not on the Internet or is behind an authenticated proxy, the
installation will fail at that point. To proceed, simply use the Windows Offline Installer
from the Java download page at http://www.java.com/en/download.
A Microsoft Windows Installer (version 2.0 or greater) is included in this download.
Alternatively, you can manually download Microsoft Windows Installer by going to
microsoft.com and searching for “Windows Installer “.
To see which version of Microsoft Windows Installer is installed on your client:
Locate the file “MSI.DLL” (Usually located in C:\WINDOWS\SYSTEM32).
Select the file and right-click on it.
Choose Properties and click the Version tab.
1. Version 2.0 of Microsoft Windows Installer is included in Windows XP and Windows 2000
Service Pack 3. Version 3.1 of the Windows Installer is included in Windows 2003 SP1.
1
Installing the JRE for Linux Clients
Initial Browser Setup of the BX600
2 Installing the JRE for Linux Clients
Go to http://www.java.com/en/download/linux_manual.jsp
There are two types of installation packages:
•
Linux RPM package
•
Linux self extracting binary file.
To Install the JRE for Linux clients:
Download the package that best suits your needs. Follow the instructions outlined
on the website.
To test that the JRE is installed, enabled and working properly on your computer,
run the test applet from the following web site:
http://www.java.com/en/download/installed.jsp
3 DKVM network configuration
3.1 Default IP address
The Ethernet port on FSC-DRM is manually configurable from the (MMB) web pages.
Configuration data is passed via the FSC BX600 chassis I2C bus.
The default IP address configuration is static. (DHCP is turned off by default)
•
The default settings are:
•
Hostname: FSCDigitalKVM
•
IP address: 192.168.0.121
•
Subnet mask: 255.255.255.0
•
Gateway IP address: 192.168.0.1
The MMB default IP address is 192.168.0.120, but it is user configurable1.
To launch the KVM configuration web page:
To get to the MMB web page, point your browser to the IP address of the MMB.
Once you have access to the MMB web page, mouse click the dKVM Blade folder
on the left of the page. The dKVM Blade folder expands
click the Network Configuration link to launch the KVM Configuration page.
1. The IP address of the MMB and the IP address of the dKVM must be of the same subnet.
2
Initial Browser Setup of the BX600
DKVM network configuration
Figure 1: KVM Configuration Page
3.2 IP address configuration
Once you have access to the KVM Configuration page, if you want to use a static IP
address, you can set the IP address of the KVM to any valid IP address you choose as
long as that address is in the same subnet as that of the MMB.
If you want to use DHCP, then mouse click the box labeled Use DHCP (For KVM IP
Address)
The given IP-Address will be shown after a few seconds by an update of the network
configuration page.
3.3 Network port settings
The following ports can be configured from the KVM Configuration page:
•
Keyboard/Mouse Port
•
Virtual Media Port
•
Video Port
Their respective defaults are 2068, 3668, and 8192 but you can manually type in
appropriate values in the fields for each port.
For example:
Keyboard/Mouse Port
50000 (2 ports are required)
3
DKVM network configuration
Virtual Media Port
Video Port
Initial Browser Setup of the BX600
: 50002
: 50003
3.4 Internet Browser Security Settings
To configure the IE6 browser with recommended security settings:
Click on the Tools menu of the IE6 menu.
Click on Internet Options of the Tools menu.
Click the Advanced tab of the Internet Options dialog.
Figure 2: Internet Explorer 6 Internet Options Advanced Dialog
Click the Restore Defaults button to assure the Security settings are appropriate
for accessing the FSC BX600 Server Blade Chassis.
Make sure the box labeled Do not save encrypted pages to disk is not checked.
Click OK.
3.5 MMB and DKVM certificate integration into the IE6 browser’s
store of trusted sites
The MMB embedded web server is an SSL enabled web server. When a web browser
connects to an SSL enabled web server, the server sends the browser its SSL
certificate. The web browser uses it to verify that the web server is actually the MMB
server to whom the browser intended to communicate.
Each SSL certificate has paired with it a private key. That private key is kept secret by
the legitimate web server, and it is never shared with anyone. No web server can use
4
Initial Browser Setup of the BX600
DKVM network configuration
the SSL certificate to identify itself unless it is in possession of the corresponding
private key.
For a web browser to believe the SSL certificate is legitimate, that certificate must be
signed by a trusted certificate authority known in advance to the browser. Otherwise,
you will see a Security Alert dialog box every time you access the MMB IP address or
the MMB FQDN (Fully Qualified Domain Name).
To import the MMB certificate into the IE6 browser’s store:
The simplest way to import the MMB certificate into the IE6 browser’s store of trusted
sites is to follow the sequence of steps listed below:
Using the Window Explorer, find the file, RemoteView CA Cert.der.
Double click on the certificate file, RemoteView CA Cert.der.
A Certificate dialog should be displayed:
Figure 3: Internet Explorer 6 Certificate Dialog with Trusted Certificate
Click on Install Certificate and follow the instructions of the Certificate
Import Wizard.
5
DKVM network configuration
Initial Browser Setup of the BX600
Figure 4: Internet Explorer 6 Certificate Import Wizard Start Dialog
Click the Next button.
Figure 5: Internet Explorer 6 Certificate Import Wizard Certificate Store Dialog
6
Click the Next button.
Initial Browser Setup of the BX600
DKVM network configuration
Figure 6: Internet Explorer 6 Certificate Import Wizard Complete Dialog
Click the Finish button to complete the importation of the trusted certificate.
You should see a warning similar to the following:
Figure 7: Internet Explorer 6 Security Warning
Click Yes to complete the installation of the certificate.
For another method of importing an MMB or dKVM certificate that is signed by trusted
certificate authority into the certificate store of the IE6 browser, perform the following
steps:
Mouse click the Tools menu of the IE6 browser.
Click on Internet Options
Click the Content tab of the Internet Options dialog box.
7
DKVM network configuration
Initial Browser Setup of the BX600
Figure 8: Internet Explorer 6 Internet Options Content Dialog
Click the Certificates button. The Certificates Dialog appears.
Figure 9: Internet Explorer 6 Certificates Dialog
8
Click the Import button. The Certificate Import Wizard appears.
Initial Browser Setup of the BX600
DKVM network configuration
Figure 10: Internet Explorer 6 Certificate Import Wizard
Click Next.
Browse to the location of the trusted certificate file and click on the name of the certificate or type-in the fully specified path to the certificate filename.
Figure 11: Internet Explorer 6 Certificate Import Wizard Browser
Click the Next button.
9
DKVM network configuration
Initial Browser Setup of the BX600
Figure 12: Internet Explorer 6 Certificate Import Wizard Store Dialog.
Click in the empty circle next to the label Place all certificates in the following
store.
Click the Browse button and select Trusted Root Certification Authorities
Click the Next button to reveal the following dialog box.
Figure 13: Internet Explorer 6 Certificate Import Wizard Complete
You should see a warning similar to the following:
10
Initial Browser Setup of the BX600
Avoiding Security Alerts when Launching the Viewer
Figure 14: Internet Explorer 6 Security Warning
Click Yes to complete the installation of the certificate
4 Avoiding Security Alerts when Launching the Viewer
The dKVM embedded web server is also an SSL enabled web server. When you launch
the console viewer the MMB web server presents an SSL certificate to the dKVM. If you
see a Security Alert dialog when launching the Console Viewer, performing the following
steps for the appropriate browser can help eliminate the display of the Security Alert
dialog box.
4.1 Internet Explorer 6 on Windows Client
If the certificate is not signed by a trusted certificate authority that the browser
recognizes, then the browser may present the following Security Alert dialog:
Figure 15: Internet Explorer 6 Security Alert Dialog
The first warning on the Security Alert dialog is:
The security certificate was issued by a company you have not chosen to trust.
View the certificate to determine whether you want to trust the certifying authority.
The occurrence of this first warning can be eliminated by viewing the certificate,
importing the certificate and then placing it in the Trusted Root Certification Authorities
certificate store of the IE 6 browser.
11
Avoiding Security Alerts when Launching the Viewer
Initial Browser Setup of the BX600
Click the View Certificate button. You will see
the following:
Figure 16: Internet Explorer 6 Certificate Information Dialog
Click on Install Certificate and follow the instructions of the Certificate
Import Wizard.
Figure 17: Internet Explorer 6 Certificate Import Wizard
12
Click the Next button.
Initial Browser Setup of the BX600
Avoiding Security Alerts when Launching the Viewer
Figure 18: Internet Explorer 6 Certificate Store Page of Certificate Wizard
Click the Next button.
Figure 19: Internet Explorer 6 Completing the Certificate Import Wizard
Click on Finish. You should see a warning similar to the following:
13
Avoiding Security Alerts when Launching the Viewer
Initial Browser Setup of the BX600
Figure 20: Internet Explorer 6 Security Warning Dialog
Click Yes to complete the installation of the certificate.
If the last warning on the Security Alert dialog box is:
The name on the security certificate is invalid or does not match the name of
the site.
It can only be removed by using a signed SSL Certificate whose name matches the URL
name assigned to the MMB web server.
Figure 21: Internet Explorer 6 Security Alert with Name not Matching Site
14
This can be done by:
•
Adding an entry to your Domain Name Server (DNS) for the MMB that maps its
Fully Qualified Domain Name (FQDN) to its IP address. (e.g., https://fsc-management-blade resolves to 192.168.0.12).
•
Generating a Certificate whose Common Name (CN) matches the Fully Qualified Domain Name (FQDN) assigned to the MMB web server.
•
Submitting a “Certificate Signing Request” to a Trusted Third Party Certificate
Authority.
•
Uploading the requested signed certificate from the Trusted Third Party Certificate Authority to the MMB web server.
Initial Browser Setup of the BX600
Avoiding Security Alerts when Launching the Viewer
Now if you specify the MMB FQDN1 when accessing the MMB via the Internet Explorer
browser, the “Security Alerts” dialog box should not be displayed.
If you don’t have a third party certificate:
Confirm the alert by clicking the Yes button.
The Security Alert dialog will no longer appear when the remote console session
is opened.
The very first time you try to launch the console viewer you will see the Java Web
Start dialog box appear
The Java Web Start applet will begin its one-time initial download of the
viewer application.
Figure 22: Java Web Start Dialog
Finally the viewer application presents its signed certification for verification and
asks you for permission to run the application.
Click the checkbox labeled Always trust content from this publisher. This will
prevent the display of the Warning - Security dialog upon subsequent launches of
the console viewer application.
1. As an example, https://fsc-management-blade could be an FQDN.
15
Avoiding Security Alerts when Launching the Viewer
Initial Browser Setup of the BX600
Figure 23: Java Warning - Security Dialog
Click the Run button to launch the Viewer Console Application.
The next window displayed should be a Remote Viewer Console Application similar
to the one shown below.
Figure 24: Digital KVM Viewer Application Window
16
Initial Browser Setup of the BX600
Avoiding Security Alerts when Launching the Viewer
4.2 Mozilla Firefox 1.5 on Red Hat 4
Before getting started make sure the Firefox browser is configured to interface with SSL
and is configured to automatically select the security certificate to be presented to a
requesting web site.
To import the MMB certificate into the Mozilla Firefox 1.5 browser:
Click in succession on the Firefox browser pull-down menu: Edit - Preferences.
This will bring up the Firefox Preferences dialog box.
Click the Advanced icon.
Figure 25: Firefox Preferences Dialog
Click the View Certificate button to reveal the following dialog
17
Avoiding Security Alerts when Launching the Viewer
Initial Browser Setup of the BX600
Figure 26: Firefox Certificate Manager Dialog
Click the Import button to import the RemoteView CA Cert.der certificate.
Figure 27: Finding the RemoteView CA Cert.der Certificate File
18
Click the folder icon to locate the directory containing the
RemoteView CA Cert.der file.
Once you have found the certificate’s directory, click on the certificate name or type
in the file name of the certificate into the File name field.
Initial Browser Setup of the BX600
Avoiding Security Alerts when Launching the Viewer
Figure 28: Opening the RemoteView CA Cert.der Certificate File
Click the Open button. The Downloading Certificate dialog box will appear:
Figure 29: The Downloading Certificate Dialog
Click the checkbox labeled Trust this CA to identify web sites.
Click OK. The Certificate Manager dialog box will reappear.
19
Avoiding Security Alerts when Launching the Viewer
Initial Browser Setup of the BX600
Figure 30: Confirming the Certificate
Use the scrollbar to find the certificate and confirm that it has been imported into the
Firefox browser.
You can also manage the past certificates from web sites that have been accepted
by the browser by clicking the Web Sites tab and then clicking the View button.
The resultant Certificate Manager is shown below.
Figure 31: Firefox Certificate Manager Dialog
20
Initial Browser Setup of the BX600
Avoiding Security Alerts when Launching the Viewer
If the certificate is not signed by a trusted certificate authority that the browser
recognizes, then the browser may present the following Website Certified by an
Unknown Authority dialog:
Figure 32: Firefox Certified by Unknown Authority Dialog
Click on Examine Certificate to find out why the certificate is not recognized.
Figure 33: Firefox Domain Name Mismatch Dialog
Click on View Certificate to find all of the certificates involved in the
SSL handshake.
Click on OK after you are satisfied that the security certificate belongs to the web
server you are trying to access.
The next time you get the Website Certified by an Unknown Authority dialog, click the
option Accept this certificate permanently.1
1. Make sure you specify a FQDN for the MMB (e.g., https://fsc-management-blade).
21
Avoiding Security Alerts when Launching the Viewer
Initial Browser Setup of the BX600
Figure 34: Accepting Firefox Website Certificate
Click OK.
Thereafter Security Alert dialogs should stop appearing when the browser connects
to the MMB web server.
The first time you try to launch the console viewer you will be prompted by the
following dialog.
Figure 35: Firefox Opening Viewer.jnlp Dialog
22
Click on the checkbox Do this automatically for files like this from now on.
Click on OK to load the viewer.jnlp binary. After the.jnlp file is loaded, you should
not be prompted by this dialog again.
Initial Browser Setup of the BX600
Avoiding Security Alerts when Launching the Viewer
The next window displayed should be a Remote Viewer Console Application similar
to the one shown below.
Figure 36: Firefox dKVM Viewer Window
4.3 Mozilla 1.7.12 on Red Hat 4
Before getting started make sure the Mozilla browser is configured to interface with SSL
and is configured to automatically select the security certificate to be presented to a
requesting web site.
To import the MMB certificate into the Mozilla 1.7.12 browser:
From the Mozilla browser pull-down menu, click Edit - Preferences. This will bring
up the Mozilla Preferences dialog box.
Click the plus sign to expand the Privacy & Security category.
Click on the Certificates subcategory.
23
Avoiding Security Alerts when Launching the Viewer
Initial Browser Setup of the BX600
Figure 37: Red Hat Mozilla Preferences Dialog
Click the Manage Cetificates button. The Certificate Manager dialog opens.
Figure 38: Red Hat Mozilla Certificate Manager Dialog
24
Click the Import button to import the RemoteView CA.Cert.der certificate.
Initial Browser Setup of the BX600
Avoiding Security Alerts when Launching the Viewer
Figure 39: Red Hat Mozilla Certificate Selection Dialog
Use the folder icon to locate the directory containing the
RemoteView CA Cert.der file.
Figure 40: Red Hat Mozilla Certificate Import Dialog
Click on the certificate name or type it into the File name field.
Click the Open button. The Downloading Certificate dialog appears.
25
Avoiding Security Alerts when Launching the Viewer
Initial Browser Setup of the BX600
Figure 41: Red Hat Mozilla Downloading Certificate Dialog
Click the Trust this CA to identify web sites checkbox.
Click OK. The Certificate Manager dialog reappears.
Figure 42: Confirming the Certificate
Use the scrollbar to find the certificate and confirm that it has been imported to the
Mozilla browser.
If the certificate is not signed by a trusted certificate authority that the browser
recognizes, then the browser may present the following Website Certified by an
Unknown Authority dialog:
26
Initial Browser Setup of the BX600
Avoiding Security Alerts when Launching the Viewer
Figure 43: Red Hat Mozilla Certified by Unknown Authority Dialog
Click on Examine Certificate to find out why the certificate is not recognized.
Figure 44: Red Hat Mozilla Domain Name Mismatch Dialog
Click on View Certificate to find all of the certificates involved in the
SSL handshake.
Click OK after you are satisfied that the security certificate belongs to the web
server you are trying to access.
The next time you get the Website Certified by an Unknown Authority dialog, click
the Accept this certificate permanently option.1
1. Make sure you specify a FQDN for the MMB (e.g., https://fsc-management-blade).
27
Avoiding Security Alerts when Launching the Viewer
Initial Browser Setup of the BX600
Figure 45: Accepting Red Hat Mozilla Website Certificate
Thereafter the Security Alert dialogs should stop being displayed when the browser
connects to the MMB web server.
The first time you try to launch the console viewer you will be prompted by the
following dialog.
Figure 46: Red Hat Mozilla Opening Viewer.jnlp Dialog
Click the Always perform this action when handling files of this type checkbox.
Click OK to load the viewer.jnlp binary. After the .jnlp file is loaded, you should not
be prompted by this dialog again.
The next window displayed should be a Remote Viewer Console Application similar
to the one shown below:
28
Initial Browser Setup of the BX600
Avoiding Security Alerts when Launching the Viewer
Figure 47: Red Hat Mozilla dKVM Viewer Window
4.4 Mozilla 1.7.5 on SUSE9
Before getting started make sure the Mozilla browser is configured to interface with SSL
and is configured to automatically select the security certificate to be presented to a
requesting web site.
To import the MMB certificate into the Mozilla 1.7.5 browser:
From the Mozilla browser pulldown menu, click Edit - Preferences. This will bring
up the Mozilla Preferences dialog box.
Click the plus sign to expand the Privacy & Security category.
Click the Certificates subcategory.
29
Avoiding Security Alerts when Launching the Viewer
Initial Browser Setup of the BX600
Figure 48: Suse Mozilla Certificate Preferences Dialog
Click the Manage Certificates button. The Certificate Manager will appear.
Figure 49: SUSE Mozilla Certificate Manager Dialog
30
Click the Import button to import the RemoteView CA Cert.der certificate.
Initial Browser Setup of the BX600
Avoiding Security Alerts when Launching the Viewer
Figure 50: SUSE Mozilla Certificate Selection Dialog
Use the folder icon to locate the directory containing the
RemoteView CA Cert.der file.
Figure 51: SUSE Mozilla Certificate Import Dialog
Click on the certificate name or type it into the File name field.
Click the Open button. The Downloading Certificate dialog will appear.
31
Avoiding Security Alerts when Launching the Viewer
Initial Browser Setup of the BX600
Figure 52: SUSE Mozilla Downloading Certificate Dialog
Click the Trust this CA to identify web sites checkbox.
Click OK. The Certificate Manager dialog will reappear.
Figure 53: Confirming the Certificate
Use the scrollbar to find the certificate and confirm that it has been imported to the
Mozilla browser.
If the certificate is not signed by a trusted certificate authority that the browser
recognizes, then the browser may present the following Website Certified by an
Unknown Authority dialog:
32
Initial Browser Setup of the BX600
Avoiding Security Alerts when Launching the Viewer
Figure 54: SUSE Mozilla Certified by Unknown Authority Dialog
Click the Examine Certificate button.
If the common name of that certificate does not match Domain name (or the IP address)
for the dKVM, then a Security Error: Domain Name Mismatch dialog box is displayed.
If the common name of the MMB certificate that is presented to the dKVM does not
match the Domain Name (or the IP address) for the MMB, then Security Error: Domain
Name Mismatch will also be displayed.
Figure 55: SUSE Mozilla Domain Name Mismatch Dialog
Click the View Certificate button to find all of the certificates involved in the
SSL handshake.
Click on OK after you are satisfied that the security certificate belongs to the web
server you are trying to access.
The next time you get the Website Certified by an Unknown Authority dialog, click
the Accept this certificate permanently option.1
1. Make sure you specify a FQDN for the MMB (e.g., https://fsc-management-blade).
33
Avoiding Security Alerts when Launching the Viewer
Initial Browser Setup of the BX600
Figure 56: Accepting SUSE Mozilla Website Certificate
The Security Alert dialogs should no longer be displayed when the browser
connects to the MMB web server.
The first time you try to launch the console viewer you will be prompted by the
following dialog.
Figure 57: SUSE Mozilla Opening Viewer.jnlp Dialog
Click the Always perform this action when handling files of this type box.
Click OK to load the viewer.jnlp binary. After the .jnlp file is loaded, you should not
be prompted by this dialog again.
The Download Manager dialog will display after the jnlp binary is
successfully downloaded.
34
Initial Browser Setup of the BX600
Avoiding Security Alerts when Launching the Viewer
Figure 58: SUSE Mozilla Download Manager
Next the Java viewer .jar file will begin its one-time initial download.
Figure 59: SUSE Mozilla Java Web Start Indicator
Finally, the viewer application presents its signed certificate for verification and
asks you for permission to run the application.
Click Always trust content from this publisher checkbox to avoid seeing the
Warning - Security dialog shown below.
35
Avoiding Security Alerts when Launching the Viewer
Initial Browser Setup of the BX600
Figure 60: SUSE Mozilla Java Security Dialog
Click the Run button to launch a Viewer Console Session similar to the
display below.
Figure 61: SUSE Mozilla dKVM Viewer Window
36
Initial Browser Setup of the BX600
Finding the dKVM IP-address when using DHCP
5 Finding the dKVM IP-address when using DHCP
The dKVM IP address is displayed on the “KVM Configuration” web page. To get there,
do the following:
Point your browser to the MMB IP Address to get the primary Blade Server System
Information web page shown below.
Figure 62: Primary Blade Server System Information Web Page
Click the plus sign next to the dKVM Blade folder on the left side of the web page.
Click the Network Configuration file icon to display the KVM Configuration web
page shown below.
37
Finding the dKVM IP-address when using DHCP
Initial Browser Setup of the BX600
Figure 63: KVM Configuration Web Page
You should see the assigned KVM IP Address displayed on this page.
5.1 Integrating the DKVM IP address with https setting
There is no need to integrate the DKVM IP address with the https setting. Once the
HTTP SSL is enabled on the LAN Interface web page, the DKVM IP address does not
have to be integrated with the https setting.
38
Initial Browser Setup of the BX600
Finding the dKVM IP-address when using DHCP
5.2 Resolutions supported by the DKVM Console Viewer
Analog video detected and provided to the remote console viewer will be in the range of
640 x 480 to 1024 x 768. The video resolutions supported will be as follows:
Resolution
Refresh Rate
Horizontal Freq
640X480
60Hz
31.5KHz
72Hz
37.9KHz
75Hz
37.5KHz
85Hz
43.3KHz
60Hz
37.9KHz
72Hz
48.1KHz
75Hz
46.9KHz
85Hz
53.7KHz
60Hz
48.4KHz
72Hz
56.5KHz
75Hz
60.0KHz
85Hz
68.7KHz
60Hz
64.0KHz
800X600
1024X768
1280X1024
39
Finding the dKVM IP-address when using DHCP
40
Initial Browser Setup of the BX600