1
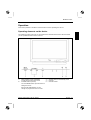
Contents
Introduction........................................................................................................................................... 1
Notational conventions ................................................................................................................. 2
Important notes..................................................................................................................................... 2
Safety notes.................................................................................................................................. 2
Cleaning ....................................................................................................................................... 4
Transport ...................................................................................................................................... 4
Power cable.................................................................................................................................. 4
CE marking................................................................................................................................... 4
Disposal and recycling ................................................................................................................. 5
Preparing for use .................................................................................................................................. 5
Unpacking and checking the delivery........................................................................................... 5
Preparing remove control ............................................................................................................. 6
Inserting batteries................................................................................................................. 6
Replacing batteries............................................................................................................... 6
Removing the foot (when using a wall bracket)............................................................................ 7
Installing LCD TV ......................................................................................................................... 8
Connections on LCD TV............................................................................................................... 9
Connecting LCD TV ................................................................................................................... 12
Switching LCD TV on/off ............................................................................................................ 13
Switching LCD TV on/into standby mode ................................................................................... 13
Setting language of the OSD menu............................................................................................ 14
Carrying out programme search................................................................................................. 14
Adjusting programme settings.................................................................................................... 15
Arranging programmes....................................................................................................... 16
Changing programme properties........................................................................................ 16
Deleting program................................................................................................................ 18
Selecting signal source .............................................................................................................. 18
Changing programme................................................................................................................. 18
Operation............................................................................................................................................ 19
Operating elements on the device.............................................................................................. 19
Changing the device settings with the buttons of the control panel ........................................... 20
Remote control ........................................................................................................................... 21
Teletext............................................................................................................................... 22
Buttons for editing programme list...................................................................................... 22
PIP (Picture in Picture) ....................................................................................................... 22
Changing device settings with remote control............................................................................ 23
Description of menus.................................................................................................................. 23
PICTURE menu - picture settings ...................................................................................... 24
SOUND menu - sound settings .......................................................................................... 25
SETUP menu - advanced settings ..................................................................................... 27
TIME menu - time settings ................................................................................................. 29
TV menu - programme settings.......................................................................................... 30
A26361-K1070-Z120-1-M119, edition 1
English
Contents
Display modes.....................................................................................................................................31
Main display mode ......................................................................................................................31
PIP mode (Picture in Picture)......................................................................................................32
Technical data.....................................................................................................................................33
VESA-DDC-compatible VGA interface .......................................................................................35
Preset operating modes (PC) .....................................................................................................35
Power consumption ....................................................................................................................35
PC Analogue (D-SUB) ................................................................................................................36
PC Digital (DVI-D).......................................................................................................................36
SCART (Half/Full) .......................................................................................................................37
S-Video .......................................................................................................................................37
Colour and transmission system by country ...............................................................................38
Troubleshooting ..................................................................................................................................40
English
A26361-K1070-Z120-1-M119, edition 1
Introduction
Your new LCD TV MYRICA V40-1 possesses a whole range of useful features and functions, e.g.:
●
●
●
●
●
●
●
●
●
●
●
●
●
●
●
●
TFT monitor (Thin Film Transistor; active matrix)
analogue tuner for VHF, UHF and cable programmes
connections for SCART (video and RGB), video and S-Video
minimal space requirements thanks to slim casing
optimum ergonomic characteristics (totally distortion-free and colour purity right into the
corners)
high degree of brightness and good contrast
high resolution for operation on a PC
easy-to-operate remote control
convenient operation via integrated OSD (On-Screen-display) menu
2 tuner picture in picture
picture size changeover: full-screen, panorama, zoom 1 and zoom 2
power management for reducing power consumption when the computer is not in use
integrated dual-channel loudspeakers
integrated NICAM/IGR sound decoder for stereo and two-channel sound
automatic switch-off function
Teletext
This operating manual contains important information you require to start up and run your device.
For TV operation with the integrated tuner, a terrestrial antenna or a cable connection is required. As
an alternative, a satellite receiver can be connected to one of the SCART jacks.
When you put the device into operation for the first time, you should carry out a programme search
(see "Preparing for use").
Target group
You don't need to be an "expert" to perform the operations described here. Do, however, read the
"Important notes" chapter in the operating manual of the computer and in this operating manual.
In the event of any problems occurring, please contact your sales outlet or our help desk.
Additional information
Details of how you set the resolution and refresh rate are provided in the documentation on your
screen controller/the associated driver software.
A26361-K1070-Z120-1-M119, edition 1
English - 1
MYRICA V40-1
Notational conventions
The meanings of the symbols and fonts used in this manual are as follows:
!
Pay particular attention to text marked with this symbol. Failure to observe this warning
endangers your life, destroys the device, or may lead to loss of data.
i
Supplementary information, remarks, and tips follow this symbol.
►
Text which follows this symbol describes activities that must be performed in the order shown.
"Quotation marks" indicate names of chapters or terms.
Texts in italics indicate filenames and menu items.
Important notes
In this chapter you will find information regarding safety which is essential to take note of with your
LCD TV.
!
Avoid still images on the screen for longer periods, e.g. still images from videos, sender
label etc. (maximum of 1 hour).
!
This product from Fujitsu Siemens Computers contains intellectual property of third
parties. Any tampering with or modification of the product will void the warranty and may
lead to legal prosecution to the full extent of the law.
This pictures may remain visible! Also avoid longer operation in a picture mode in which
black bars are visible. These black bars can also remain visible.
Safety notes
This device complies with the relevant safety regulations for data processing equipment. If you have
any questions, contact your sales outlet or our help desk.
●
The display surface of the LCD TV is sensitive to pressure and scratches. You should therefore
be careful with the display surface so as to avoid lasting damage (Newton rings, scratches).
●
If the device is brought into the installation site from a cold environment, condensation can
form. Before operating the device, wait until it is absolutely dry and has reached approximately
the same temperature as the installation site.
●
During installation and before operating the device, please observe the instructions on
environmental conditions in the "Technical data" chapter as well as the instructions in the
"Preparing for use" chapter.
●
To ensure sufficient ventilation, the intake and exhaust air openings of the device must never
be blocked.
●
The device automatically sets itself to the correct voltage within the range from 100 V to 240 V.
Ensure that the local mains voltage lies within these limits.
●
Ensure that the power socket on the device or the earthed mains outlet is freely accessible.
2 - English
A26361-K1070-Z120-1-M119, edition 1
MYRICA V40-1
●
The ON/OFF switch does not disconnect the device from the mains voltage. To completely
disconnect the mains voltage, remove the power plug from the socket.
●
Lay all cables so that nobody can stand on them or trip over them. When attaching the device,
observe the relevant notes in the "Preparing for use" chapter.
●
If you use a different PC data cable from the one supplied, ensure that it is adequately
shielded. CE conformance and optimum picture quality are guaranteed only if you use the data
cable supplied.
●
No antenna or data transfer cables should be connected or disconnected during a
thunderstorm.
●
Make sure that no objects (e.g. jewellery chains, paper clips, etc.) or liquids get inside the
device (danger of electric shock, short circuit).
●
The device is not waterproof! Protect the device from spray water (rain, sea water).
●
In emergencies (e.g. damaged casing, elements or cables, penetration of liquids or foreign
matter), switch off the unit, disconnect the power plug and contact your sales outlet or our help
desk.
●
The device must be disposed of in accordance with the local regulations for disposal of special
waste. During handling and disposal, the safety regulations applicable to fluorescent materials
must be observed.
●
Only qualified technicians should repair the device. Unauthorised opening and incorrect repair
may greatly endanger the user (electric shock, fire risk).
●
You may set only those resolutions and refresh rates specified in the "Technical data" chapter.
Otherwise you may damage your monitor. If you are in any doubt, contact your sales outlet or
our help desk.
●
Use a screen saver with moving images in PC mode and activate the power management for
your monitor to prevent still images from "burning in".
●
Keep this operating manual together with your device. If you pass on the device to third parties,
you should include this manual.
A26361-K1070-Z120-1-M119, edition 1
English - 3
MYRICA V40-1
Cleaning
●
Remove the power plug before cleaning the device.
●
Do not clean any interior parts yourself, leave this job to a service technician.
●
Do not use any cleaning agents that contain abrasives or may corrode plastic.
●
Ensure that no liquid will run into the system.
●
Ensure that the ventilation areas of the device are free.
●
The display surface of the device is sensitive to pressure and scratches. Clean it only using a
soft, slightly moistened cloth.
Wipe the device casing with a dry cloth. If the monitor is particularly dirty, use a cloth which has been
moistened in mild domestic detergent and then carefully wrung out.
Transport
●
Transport the device with care and only in its original packaging or another corresponding
packaging to protect it from knocks and jolts.
●
Never drop the device (danger of glass breakage).
Power cable
To guarantee safe operation, use the cable supplied. Use the following guidelines if it is necessary to
replace the original cable set.
●
The female/male receptacles of the cord set must meet IEC60320/CEE-22 requirements.
●
The cable has to be HAR-certified or VDE-certified. The mark HAR or VDE will appear on the
outer sheath.
●
For devices which are mounted on a desk or table, type SVT or SJT cable sets may be used.
For devices which sit on the floor, only SJT type cable sets may be used.
●
The cable set must be selected according to the rated current for your device.
CE marking
The shipped version of this device complies with the requirements of the EEC directives
89/336/EEC "Electromagnetic compatibility" and 73/23/EEC "Low voltage directive".
4 - English
A26361-K1070-Z120-1-M119, edition 1
MYRICA V40-1
Disposal and recycling
This device has been manufactured to the highest possible degree from materials which can be
recycled or disposed of in a manner that is not environmentally damaging. The device may be taken
back after use to be recycled, provided that it is returned in a condition that is the result of normal
use. Any components not reclaimed will be disposed of in an environmentally acceptable manner.
If you have questions on disposal, please contact your point of sale, our Help Desk or obtain
information at: www.fujitsu-siemens.com/recycling
Preparing for use
Unpacking and checking the delivery
The display surface of the device is sensitive to pressure and scratches. Always hold the
device by the casing!
!
►
Unpack all the individual parts.
►
Check the delivery for damage incurred during transportation.
►
Check whether the delivery agrees with the details in the delivery note.
The complete device package includes:
–
–
–
–
–
–
–
one LCD TV
one power cable
one remote control
two batteries type AAA
one Warranty Booklet
one "Getting Started" manual (two volumes)
this operating manual (two volumes)
Should you discover that the delivery does not correspond to the delivery note, notify your local sales
outlet immediately.
i
We recommend that you keep the original packaging material. Keep it for future
transportation.
A26361-K1070-Z120-1-M119, edition 1
English - 5
MYRICA V40-1
Preparing remove control
Inserting batteries
i
►
Open the back cover of the remote control by
sliding it in the direction of the arrow.
►
Place the batteries supplied in the battery
compartment. Ensure correct polarity.
►
Close the battery compartment by sliding the
cover back on until you hear and feel it click
into place.
Remove the batteries when not using the remote control for longer periods.
Handle the remote control with care. Do not drop the remote control on the floor.
Do not expose the remote control to moisture, direct sunlight or high temperatures.
Replacing batteries
►
When the batteries are used up (indicator no longer lights up), replace them with two batteries
of the same type (type AAA).
i
Do not throw batteries or accumulators into the household waste. Batteries or
accumulators must be disposed of in accordance with local regulations concerning special
waste.
6 - English
A26361-K1070-Z120-1-M119, edition 1
MYRICA V40-1
Removing the foot (when using a wall bracket)
Before you can use a wall bracket, the foot must first be removed:
The wall bracket is not included in the consignment of the TV.
i
►
The foot is shown as an example in the following illustrations. The delivered foot may differ
from the illustration.
Carefully lay the TV on a smooth, clean work surface with the front facing downward. Ask
someone to help you.
Even small knocks can damage the device.
!
Make sure that no objects are lying on the work surface, as otherwise the frame or display
surface could be damaged.
1
A26361-K1070-Z120-1-M119, edition 1
►
Remove the four screws (1) that
secure the foot to the device.
►
Pull the foot away from the device.
►
Mount the wall bracket as described in
the wall bracket documentation.
1
English - 7
MYRICA V40-1
Installing LCD TV
Ventilation
!
To ensure sufficient ventilation, the intake and exhaust air openings of the device must
never be blocked.
When installing the TV in niches, maintain the minimum distance for sufficient ventilation of the
device: 10 cm from the side and back, 20 cm from the top.
8 - English
A26361-K1070-Z120-1-M119, edition 1
MYRICA V40-1
Connections on LCD TV
!
Observe the safety precautions in the "Important notes" chapter in this operating manual.
Do not cover the ventilation openings of the monitor.
Never open the housing of the power supply unit. There is extreme danger from an
electrical shock with the housing open. There are no components requiring cleaning or
repairs in the interior.
5
1
1=
2=
3=
4=
5=
6=
7=
2
3
4
5
6
7
8=
9=
10 =
11 =
12 =
13 =
14 =
RS-232 port
DVI port
AUDIO ports (LINE)
PC-IN port (VGA)
COMPONENT ports (2x)
Loudspeaker ports
SCART1 port (Half)
8
9
10
12
11
13
14
SCART2 port (Full)
S-VIDEO port
AV ports (OUT)
AV ports (IN)
ON/OFF switch
Antenna port
Power connector
The following devices can be connected to this LCD TV:
RS-232
(black)
Serial port
DVI IN
(white)
Connection for digital video input signals
AUDIO IN
Connection for audio input signals (LINE IN)
white (left)
e.g. for a PC or for HDTV devices
For customer service, e.g. for updating the firmware
e.g. a PC with a digital output (DVI-D) or for HDTV devices
red (right)
A26361-K1070-Z120-1-M119, edition 1
English - 9
MYRICA V40-1
PC IN
(blue)
Connection for analogue VGA input signals
COMPONENT 1
COMPONENT 2
Connections for component video and audio input signals
e.g. for a PC with an analogue output (D-SUB)
e.g. for HDTV decoder, HDTV video recorder or HDTV player
Y - green
Pb - blue
Pr - red
AUDIO
white (left)
red (right)
SPEAKER
Connection terminals for external loudspeakers
red/right/+
black/right/black/left/red/left/+
10 - English
SCART 1
Connection for AV (CVBS) and audio input signals
(Half)
e.g. for satellite receiver, DVD player, video recorder,
decoders or a gaming console
SCART 2
Connection for AV (CVBS, RGB) and audio input signals
(Full)
e.g. for satellite receiver, DVD player, video recorder,
camcorder or a gaming console
A26361-K1070-Z120-1-M119, edition 1
MYRICA V40-1
S-VIDEO IN
Connection for S-VIDEO input signals
e.g. for DVD player, video recorder or film camera with SVideo connection
AV:
Connections for video and audio input signals
VIDEO
yellow
e.g. for DVD player, video recorder, film camera with S-Video
connection or gaming console
AUDIO
white (left)
red (right)
TV-ANT.
antenna cable port
AC INPUT
Connector for the power cable
A26361-K1070-Z120-1-M119, edition 1
English - 11
MYRICA V40-1
Connecting LCD TV
Connecting antenna
►
Connect an antenna cable to the antenna
connection of the TV and to the TV antenna
socket.
►
Plug the power cable supplied into the power
connector of the LCD TV.
Connecting the power supply
You will find the power connector on the back of the
TV.
►
12 - English
Connect the connector of the power cable
supplied into a properly earthed mains outlet and
ensure a secure connection.
A26361-K1070-Z120-1-M119, edition 1
MYRICA V40-1
Switching LCD TV on/off
►
Press the ON/OFF switch at the left on the back of
the TV.
Switching LCD TV on/into standby mode
►
Press the Standby button at the right on the
underside of the TV.
From the indicator at the lower right on the front of the LCD TV you can recognise whether the
device is in operation, in the standby mode or switched off.
Green
=
The device is switched on.
Red
=
The device is in standby mode.
Dark
=
The device is switched off.
A26361-K1070-Z120-1-M119, edition 1
English - 13
MYRICA V40-1
Setting language of the OSD menu
After switching on the device, set the language of the OSD (On Screen Display) menu according to
your needs. According to the country variant, either German or English is preset as the default
setting. If you want to use a different language, change this setting with the OSD menu.
►
Switch the LCD TV on with the ON/OFF switch.
►
Press the POWER button.
►
Press the MENU button to open the OSD menu.
button.
►
Choose the Setup menu item using the
►
Press the MENU button to activate the menu item.
►
Choose the Advanced menu item using the
►
Press the MENU button to activate the menu item.
button.
►
Choose the Language menu item using the
►
Press the MENU button to activate the menu item.
button.
/
.
►
Select the language to be shown in the OSD menu with the buttons
►
Press the Menu button. The OSD menu will be changed over to the selected language.
Carrying out programme search
A programme search must be carried out to put the LCD TV into operation. Use the supplied remote
control.
►
Switch the LCD TV on with the ON/OFF switch.
►
Press the POWER button.
First the signal source must be set to the TV mode.
►
Press the SOURCE button.
►
Choose the TV option using the
►
Press the MENU button to activate the menu item.
button.
Then you automatically start the programme search.
►
Press the MENU button to open the OSD menu.
button.
►
Choose the TV menu item using the
►
Press the MENU button to activate the menu item.
14 - English
A26361-K1070-Z120-1-M119, edition 1
MYRICA V40-1
►
Select the Auto Scan menu item using the
button.
►
Press the MENU button to activate the menu item.
►
Select your country with the
►
Press the MENU button to start the programme search.
button.
Wait until the programme search is completed. Then the device shows the first programme found.
i
The programmes will be entered in the programme list in the order in which they are found.
However, you can change the order of the programmes later (see "Arranging
programmes").
Adjusting programme settings
After the programme search, you can change various programme settings later, e.g. the order of the
programmes in the programme list, the programme names or the frequency of a channel. The
following sections contain a description of how to change the settings.
►
Press the MENU button to open the OSD menu.
►
Choose the TV menu item using the
►
Press the MENU button to activate the menu item.
►
Choose the Edit menu item using the
►
Press the MENU button to activate the menu item.
button.
button.
The programme list will be displayed with the first 8 programmes found. If a programme name was
detected during the programme search, it will be displayed.
A26361-K1070-Z120-1-M119, edition 1
English - 15
MYRICA V40-1
Arranging programmes
With the OSD menu you can rearrange the order of the programmes according to your personal
preferences.
Moving programme
►
Select the programme you want to move with the buttons
►
Press the INSERT button (yellow) to mark the programme to be moved.
/
.
/
.
►
Select the position at which you want to insert the programme with the buttons
►
Press the INSERT button (yellow). The programme will be inserted at the selected position.
Swapping position of two programmes
/
.
►
Select the programme you want to move with the buttons
►
Press the REPLACE button (blue) to mark the programme to be swapped.
►
Mark the programme with which the programme is to be swapped with the buttons
►
Press the REPLACE button (blue). The selected programmes swap their positions.
/
.
Changing programme properties
You can change the following properties of a programme:
●
Change the programme name displayed in the programme list
●
Set the channel of a programme
●
Select or automatically assign a different TV standard
●
Select the sound standard
●
"Hide" a programme in the programme list
●
Select a programme as a favourite
i
All changes are stored automatically.
Changing programme name
Five characters are available for the programme name.
►
Select the programme for which you want to set the name with the buttons
►
Mark the position for the character you want to change under Name with the buttons
►
Select the desired character at this position with the buttons
/
/
.
/
.
.
Repeat this procedure until you have entered the desired programme name.
16 - English
A26361-K1070-Z120-1-M119, edition 1
MYRICA V40-1
Setting channel of a programme
This function is used when a programme is transmitted on a new station frequency.
►
Select the programme for which you want to set another channel with the buttons
►
Mark the property CH with the buttons
/
►
Select the desired channel with the
/
/
.
/
.
.
buttons.
Selecting TV standard
►
Select the programme for which you want to set the TV standard with the buttons
/
.
►
Mark the property Picture with the buttons
►
Select the desired TV standard with the buttons
(Pal, Secam, Auto) automatically.
/
or assign the suitable TV standard
Selecting sound standard
►
Select the programme for which you want to set the sound standard with the buttons
.
/
/
.
►
Mark the property Sound with the buttons
►
Select the desired sound standard (B/G, D/H, L, I, Auto) with the buttons
/
.
Hiding programme in programme list
If you want to hide a programme in the programme list (SKIP=Yes), the programme is skipped when
you change the programmes with the buttons
/
.
/
►
Select the programme you want to hide in the programme list with the buttons
►
Press the SKIP button (green). The selected programme is hidden in the programme list.
.
Selecting programme as favourite
In the TV mode it is possible to change directly to programmes marked as favourites by pressing the
FAVORITE button.
►
Select the program you want to select as a favourite with the buttons
►
Mark the property FAV with the buttons
/
►
Select the value Yes with the buttons
/
A26361-K1070-Z120-1-M119, edition 1
/
.
.
.
English - 17
MYRICA V40-1
Deleting program
►
Select the programme you want to delete with the buttons
►
Press the ERASE button (red). The selected programme is deleted from the programme list.
/
.
Selecting signal source
Selecting signal source for main display
►
Press the SOURCE button in the upper section of the remote control.
►
Choose the signal source you require using the
►
Press the MENU button to activate your selection.
button.
Selecting signal source for PIP display
►
Press the ON/OFF button to activate the PIP mode.
►
Press the SOURCE button in the lower section of the remote control (in the PIP field).
►
Choose the signal source you require using the
►
Press the MENU button to activate your selection.
button.
Changing programme
►
Press the
button to change to the next programme in the programme list.
►
Press the
button to change to the previous programme in the programme list.
18 - English
A26361-K1070-Z120-1-M119, edition 1
MYRICA V40-1
Operation
Controls are provided on the device and the remote control for operating the LCD TV.
Operating elements on the device
The operating controls of the LCD TV are located in the underside of the device. With the buttons
you can operate the basic functions of the TV.
1=
2=
INPUT SELECT button (SOURCE)
for selecting the video input source
VOLUME buttons (volume)
3=
4=
5=
ON/OFF switch for the standby mode
Indicator
Infrared receiver
The VOLUME S button opens the menu for
setting the volume.
With the VOLUME T button you can
change the programme in the TV mode.
A26361-K1070-Z120-1-M119, edition 1
English - 19
MYRICA V40-1
Changing the device settings with the buttons of the control
panel
With the buttons on the control panel, you can make the following settings directly:
Selecting picture signal source
►
Press the INPUT SELECT button. A list of the signal sources is displayed.
►
Choose the signal source you require using the VOLUME S/T buttons.
►
Press the INPUT SELECT button to activate the signal source.
Adjusting the volume
►
Press the VOLUME S button to open the volume menu.
►
Set the volume as required with the VOLUME S/T buttons.
The volume menu automatically disappears again after a short time.
Changing programme
►
Press the VOLUME T button to prepare changing.
►
Change to the next or previous programme in the programme list with the buttons
VOLUME S/T.
20 - English
A26361-K1070-Z120-1-M119, edition 1
MYRICA V40-1
Remote control
1 = POWER - switches the device on or into
the standby mode.
1
2
4
5
7
8
10
11
13
17
20
3
6
9
12
2 = INFO - information
You display the current settings with this
button.
3 = MUTE - switches the sound on and off.
4 = PICTURE
With this button you select the picture mode.
5 = V.SIZE
With this button you select the picture format.
6 = SOURCE
With this button you select the signal source.
14
15
7 = SOUND
With this function you activate the sound
mode.
16
18
19
8 = S.MODE - You select the audio channel
with this button.
9 = STILL
With this button you stop the displayed picture
(still image) or switch back into the normal
playback mode again.
10 = DIGEST - With this button you display
the programme overview of all channels.
11 = Pre.PR - Changes back to the
programme previously set
12 = SLEEP - Sleep timer
By pressing this button several times, you set
the time after which the device is
automatically switched off.
13 = TEXT - Switches Teletext on or off
14 = EXIT - Closes the submenu or the OSD
menu
15 = PR S - Changes the main display to the
next programme in the programme list
16 = MENU - Opens the OSD menu
17 = VOL W - Decrease volume
18 = VOL X - Increase volume
19 = PR T - Changes the main display to the
previous programme in the programme list
20 = 0 - 9
With this button you select the programme
directly.
A26361-K1070-Z120-1-M119, edition 1
English - 21
MYRICA V40-1
Teletext
With button 13 you switch Teletext on or off.
With the buttons 21, 23, 24 and 25 you
navigate in the Teletext function.
Buttons for editing programme
list
The detailed description of editing the
programme list is provided under "Adjusting
programme settings".
21 = ERASE (red) - Deletes the selected
programme from the programme list
13
23 = SKIP (green) - The marked programme
is skipped when changing programmes with
the buttons PR S and PR T
24 = INSERT (yellow) - Moves programme
see "Arranging programmes"
25 = REPLACE (blue) - Exchanges
programmes, see "Arranging programmes"
22 = FAVORITE - Switches over to the
programme set as a favourite.
26 = No function
PIP (Picture in Picture)
21
22
27 = ON/OFF - Activates the PIP mode
23
24
25
28 = SOURCE
Press this button to select the signal source
for the PIP mode.
29 = SIZE
Press this button to select the picture format
for the PIP mode.
26
27
28
30
31
34
32
30 = POSITION
Press this button to change the position of the
PIP window.
33
31 = SWAP - The displays of the main and the
PIP window are exchanged.
29
32 = PR+ - Changes to the next programme of
the programme list in the PIP window
33 = PR- - Changes to the previous
programme of the programme list in the PIP
window
34 = POP - Main display and PIP window are
shown in the same size next to each other
22 - English
A26361-K1070-Z120-1-M119, edition 1
MYRICA V40-1
Changing device settings with remote control
You can open and operate the integrated OSD (On Screen Display) menu with the remote control.
To set the OSD menu, perform the following steps:
►
Press the MENU button to open the OSD menu.
►
Mark the desired menu item with the
►
Press the MENU button to activate a menu item.
/
buttons.
In the individual menus, the buttons available to you in each case are shown in the footer.
►
Mark the option you want to change.
►
Set the desired value or activate the desired function.
►
Press the EXIT button to return to the main menu from a submenu or to exit the OSD menu.
All changes are stored automatically.
Description of menus
i
The OSD menu is available in different languages. The English menu names are used in
the following description (default setting).
Different menus and different options are available to you depending on the set signal
source. The menus and options not available are not shown in the OSD menu.
The following main menus are available to you in the OSD menu:
Picture
Here you set the picture mode, the colour temperature and the picture format.
Sound
Here you set the sound of your LCD TV.
Setup
Here you set the advanced settings (transparency of the OSD menu, picture in picture
mode, child lock etc.).
Time
Here you set the various time functions.
TV
Here you start the automatic programme search and adjust the programme settings to
meet your needs.
A26361-K1070-Z120-1-M119, edition 1
English - 23
MYRICA V40-1
PICTURE menu - picture settings
►
Press the MENU button to open the OSD menu.
►
Mark the Picture menu item with the
►
Press the MENU button to activate the menu item.
/
buttons.
The buttons available to you for setting the options are shown in the menu footer.
Mode
With this function you set the picture mode.
The contrast, brightness, colour and focus of the picture are set to optimum
values depending on the picture mode.
Possible values: Standard, Vivid, Mild, User.
After the User option is selected, a further submenu appears:
Temperature
Contrast
This function increases or decreases the contrast.
Brightness
With this function you set the picture brighter or darker.
Color
With this function you set the colour saturation.
Sharpness
With this function you set the sharpness of the picture.
Recall
With this function you reset all parameters of this menu
to the factory settings.
With this button you set the colour temperature.
Possible values: Cool2, Cool1, Normal, Warm1, Warm2.
Video NR
With this function you switch the picture correction (Noise Reduction) on or
off.
Possible values: On, Off
Screen form
With this function you set the picture format.
Possible values: 16:9, PANORAMA, ZOOM1, ZOOM2, 4:3.
24 - English
A26361-K1070-Z120-1-M119, edition 1
MYRICA V40-1
Geometry
(in PC mode only)
With these functions you set the position and the synchronisation of the
picture display.
To set the picture display, first use the Auto function and correct the picture
display and, if necessary, then with the other functions.
These functions are only available when PC is selected as the signal
source.
H Position
With this function you set the horizontal picture
position.
V Position
With this function you set the vertical picture position.
Phase
With this function you fine-tune your display to
eliminate picture interference.
Auto
With this function you optimally set the picture display
automatically.
SOUND menu - sound settings
►
Press the MENU button to open the OSD menu.
►
Mark the SOUND menu item with the
►
Press the MENU button to activate the menu item.
/
buttons.
The buttons available to you for setting the options are shown in the menu footer.
Balance
With this function you set the balance between the left and the right
loudspeaker.
Sound Mode
With this function you activate the sound mode.
The bass level and frequency of the sound are automatically set to
optimum values depending on the sound mode.
Possible values: Standard, Movie, Music, News, User.
Spatial Effect
With this function you switch the Surround sound mode on or off.
Possible values: On, Off
A26361-K1070-Z120-1-M119, edition 1
English - 25
MYRICA V40-1
AVC
(Automatic Volume Control)
With this function you switch the automatic volume control on or off.
Possible values: On, Off
INTERNAL
With this function you change from the internal loudspeakers to the external
ones and vice versa.
Possible values: On, Off
MTS
(Multi Tone System)
With this function you set the audio channel.
Possible values: Mono, Stereo, Language A, Language B, Language AB
26 - English
A26361-K1070-Z120-1-M119, edition 1
MYRICA V40-1
SETUP menu - advanced settings
►
Press the MENU button to open the OSD menu.
►
Mark the Setup menu item with the
►
Press the MENU button to activate the menu item.
/
buttons.
The buttons available to you for setting the options are shown in the menu footer.
Translucent
With this function you set the transparency of the OSD menu
Possible values: Off, 1 - 7
PIP
(Picture In Picture)
With this function you switch the PIP mode on or off.
Possible values: On, Off
When the PIP mode is activated, the following options are available:
Size
Here you set the picture format for the PIP display.
Resource
Here you set which signal source is displayed in the
PIP display.
Picture Swap
With this function you exchange the signal sources of
the main display and the PIP display.
Position
Here you set the position of the PIP display.
A description of the PIP mode is also provided under "PIP mode (Picture in
Picture)" and "Selecting signal source for PIP display".
A26361-K1070-Z120-1-M119, edition 1
English - 27
MYRICA V40-1
Advanced
Here you configure the advanced settings.
ID
Here you set an ID number for service purposes.
Possible values: 0 - 99
Backlight
With this function you set the intensity of the
background lighting.
Possible values: 0 -100
Burn Clear
With this function you can regenerate burned-in
areas of the screen in some cases.
Possible values: On, Off
Blue Back
With this function the screen background is shown in
blue when there is no input signal.
Possible values: On, Off
Language
With this function you set the language of the OSD
menu.
Possible values: English, German, French, Spanish,
Italian, Portuguese, Dutch
Setting the child lock
With this function you switch the child lock on or off.
When the child lock is activated, it is not possible to
operate the TV with the operating buttons on the
device.
Possible values: On, Off
28 - English
A26361-K1070-Z120-1-M119, edition 1
MYRICA V40-1
TIME menu - time settings
►
Press the MENU button to open the OSD menu.
►
Mark the Time menu item with the
►
Press the MENU button to activate the menu item.
/
buttons.
The buttons available to you for setting the options are shown in the menu footer.
Time Set
With this button you set the current time.
Format: Hour:Minute
On Time
With this function you set the time at which the device is to be automatically
switched on.
Format: Hour:Minute
To activate the function, set the selection to On after setting the time.
To deactivate the function, set the selection to Off after setting the time.
On Channel
With this function you set the program to be displayed after automatic
switch-on.
On Volume
With this function you set the volume to be used after automatic switch-on.
Off Time
With this function you set the time at which the device is to be switched off
automatically.
Format: Hour:Minute
To activate the function, set the selection to On after setting the time.
To deactivate the function, set the selection to Off after setting the time.
Sleep
With this function you set the number of minutes after which the device is
automatically switched off.
Possible values: Off, 10, 20, 30, 60, 90, 120, 180
A26361-K1070-Z120-1-M119, edition 1
English - 29
MYRICA V40-1
TV menu - programme settings
►
Press the MENU button to open the OSD menu.
►
Mark the TV menu item with the
►
Press the MENU button to activate the menu item.
/
buttons.
The buttons available to you for setting the options are shown in the menu footer.
Auto Scan
With this function you start the automatic programme search.
The automatic programme search must be carried out when you want to
use your LCD TV for the first time following installation.
The programmes will be entered in the programme list in the order in
which they are found. However, you can change the order of the
programmes later.
A detailed description is provided under "Carrying out programme
search" and "Arranging programmes".
Manual Scan
With this function you search for a new programme starting from the
frequency of the current channel. When the next programme has been
found, you can select whether or not the programme found is to be added
to the programme list.
To start the search manually, press the
button.
To add the programme found to the programme list, press the MENU
button. If you want to search for additional programmes, you must restart
the manual search.
To continue the search, press the
button.
Fine Tune
With this function you manually set the frequency of an individual
channel.
Edit
With this function you set the order of the programmes in the programme
list and the properties of the individual programme.
The set values remain unchanged until an update is carried out.
A detailed description is provided under "Adjusting programme settings".
30 - English
A26361-K1070-Z120-1-M119, edition 1
MYRICA V40-1
Display modes
Main display mode
►
Press the SOURCE button on the remote control or the INPUT SELECT button on the
underside of the TV to select the source from which the signal for the main display is to come.
For the main display you can select one of the following signal sources:
●
TV
●
SCART1
●
SCART2
●
S-VIDEO or CVBS (AV)
●
Component 1 (YPbPr)
●
Component 2 (YPbPr)
●
VGA (PC)
●
DVI
By pressing the INFO button you display the designation of the currently selected signal sources in
the upper left corner of the screen.
A26361-K1070-Z120-1-M119, edition 1
English - 31
MYRICA V40-1
PIP mode (Picture in Picture)
The LCD TV can also display a sub-video signal in addition to the main video signal. The sub-video
signal is shown as a "PIP display" in a window on the main display.
The following buttons of the remote control are available for setting the PIP mode.
►
Press the ON/OFF button to activate the PIP mode.
►
Press the SOURCE button to select the source from which the signal for the PIP display is to
come.
►
Press the SIZE button to set the size of the PIP display.
►
Press the POSITION button to set the position of the PIP display.
►
Press the SWAP button to exchange the size and position of the main display with those of the
PIP display.
►
Press the POP button to display the main display and the PIP display in the same size next to
each other.
►
If a TV signal is displayed in the PIP display, you change to the next programme in the
programme list with the PR+ button, and to the previous programme in the programme list with
the PR- button.
Depending on which source the signal for the main display comes from, you can use certain sources
for the signal of the PIP display.
The following combination options are available to you:
Signal
sources
Main display
TV
AV
SV
AV
-
-
SV
-
-
SCART 1
SCART 2
VGA
DVI
YPbPr
VGA
-
-
-
DVI
-
-
-
YPbPr
-
-
-
PIP display
TV
SCART 1
SCART 2
32 - English
-
A26361-K1070-Z120-1-M119, edition 1
MYRICA V40-1
Technical data
MYRICA V40-1
Screen:
Size (diagonal)
40'' (101.5 cm)
Visible picture (HxV):
885.17 mm x 497.66
mm
Number of pixels
(HxV):
1366 x 768
Pixel spacing:
0.648 mm x 0.648 mm
Viewing angle:
Typical > 178°
Number of colours:
16.7 mio
Picture format:
16:9
Horizontal frequency:
21.9 - 82 kHz
Refresh rate:
55 - 75 Hz (analogue)
55 - 60 Hz (digital)
Maximal resolution
(PC):
1280 x 1024 / 60 Hz
(analogue)
1280 x 1024 / 60 Hz
(digital)
Synchronisation:
Separate:
H / V TTL, P or N
Composite:
H / V TTL, P or N
Green synchronisation:
Composite 0.3 Vp-p, negative
Video 0.7 Vp-p, positive
Video signal:
0,7 Vp-p / 75 Ohm
Colour system:
PAL / SECAM
Sound system:
BG, DK, I, L
Video format:
CVBS, S-VHS
HD TV:
YpbPr / DVI
480i/p 60 Hz, 576i/p 50 Hz, 720p 50/60 Hz, 1080i 50/60 Hz
SCART 1:
Video input/output
1.0 Vp-p @ 75 Ohm
Audio input/output
0.5 Vms
A26361-K1070-Z120-1-M119, edition 1
English - 33
MYRICA V40-1
MYRICA V40-1
DVI:
Power supply (AC):
TMDS ( DVI-D)
100 - 240 V (50/60 Hz)
1.3 A / 240 V
3.0 A / 100 V
Power consumption:
Typical: 290 W
Standby < 3 W
Dimensions:
Width x Depth x Height:
581 x 969 x 97 mm
(without foot)
633 x 969 x 240 mm
(with foot)
Weight:
approx. 28 kg
packed approx. 36 kg
Audio:
Audio input:
DVI / PC, Video 1,
S-Video,
Component1/2,
(SCART 1, SCART 2)
Audio output:
Loudspeaker output:
RS-232:
RCA connection (L, R) 0.5 Vms
0.5 Vms at 1 kHz
approx. 2 x 8 W (8 Ohm)
For Service only
Standard certificate:
Security:
EMC:
TÜV-GS ,CE
TV mode: EN55020 class B, EN 55013, EN 61000-3-2/-3 (see CE)
PC mode: EN55022 class B, EN 55024, EN 61000-3-2/-3 (see CE)
Environment:
Condensation must be avoided.
Temperature:
Operating: +15 ° to +35 ° C
Storage: -15 ° to + 60 ° C
Change: 1.5 ° C/minute maximum
Humidity:
Operation: 20 - 85 % without condensation
Pressure:
Operation : 800 - 1,114 hPa (height: 0 - 2000 m)
Storage: 20 - 85 % without condensation
Storage : 600 - 1,114 hPa (height: 0 - 4500 m)
Accessories:
Manual, remote control, battery
Power supply cable: 1.8 m
Foot with mounting screws
34 - English
A26361-K1070-Z120-1-M119, edition 1
MYRICA V40-1
VESA-DDC-compatible VGA interface
Your LCD TV is equipped with a VESA-DDC-compatible VGA interface and a DVI-D interface.
VESA-DDC (Video Electronics Standard Association, Display Data Channel) is used as the
communications interface between the LCD TV and the computer. If your computer is equipped with
a VESA-DDC-compatible VGA interface, it can automatically read the data for ensuring optimum
operation from your LCD TV and select the appropriate settings.
Preset operating modes (PC)
The following are the most frequently used of the preset operating modes:
Resolution
Refresh rate
640 x 350
70 Hz
640 x 480
60 Hz, 72 Hz, 75 Hz
800 x 600
56 Hz, 60 Hz, 72 Hz
1024 x 768
60 Hz, 70 Hz, 75 Hz
1280 x 720
60 Hz, 75 Hz
1280 x 768
60 Hz, 75 Hz
1280 x 1024
60 Hz
Power consumption
To save energy when the device is temporarily not in use, the LCD TV can be switched into the
standby mode with the remote control (POWER button) or the STANDBY button.
Switched on
i
Standby mode
Power indicator
lights green
lights red
Function
Device operates normally
the screen is dark
Power consumption
normal < 320 W
reduced to < 3 W
If the device is switched into the standby mode, a power consumption of up to 3 W is
maintained to enable operation with the remote control.
To completely switch off the power consumption, switch off the device with the ON/OFF
switch (see "Switching LCD TV on/off")..
A26361-K1070-Z120-1-M119, edition 1
English - 35
MYRICA V40-1
PC Analogue (D-SUB)
1
5
6
10
15
11
Pin
Meaning
Pin
Meaning
1
Video input red
9
+5 V (DDC)
2
Video input green
10
Sync. earth
3
Video input blue
11
Earth
4
Earth
12
DDC-Data
5
Earth
13
H. sync
6
Red video earth
14
V. sync
7
Green video earth
15
DDC Clock
8
Blue video earth
PC Digital (DVI-D)
1
9
17
Pin
Meaning
Pin
Meaning
Pin
Meaning
1
TMDS Data2-
9
TMDS Data1-
17
TMDS Data0-
2
TMDS Data2+
10
TMDS Data1+
18
TMDS Data0+
3
TMDS Data 2/4
Shield
11
TMDS Data 1/3
Shield
19
TMDS Data 0/5 Shield
4
not connected
12
not connected
20
not connected
5
not connected
13
not connected
21
not connected
6
DDC Clock
14
+5V Power
22
TMDS Clock Shield
7
DDC Data
15
Earth
23
TMDS Clock-
8
Analogue Vertical
Sync
16
Hot Plug Detect
24
TMDS Clock+
36 - English
A26361-K1070-Z120-1-M119, edition 1
MYRICA V40-1
SCART (Half/Full)
Pin
Meaning
Pin
Meaning
Pin
Meaning
1
Sound (R) output
8
Changeover voltage
15
2
Sound (R) input
9
Green earth *)
16
Red *)
Blanking *)
3
Sound (L) output
10
Not assigned
17
Video output earth
4
Sound signal earth
11
Green *)
18
Video input earth
5
Blue earth *)
12
Not assigned
19
Video output **)
6
Sound (L) input
13
Red earth *)
20
Video input
7
Blue *)
12
Blanking earth
21
Shield earth
*) Not used with SCART (Half)
**) TV-Out for SCART (Half); current picture signal for SCART (Full)
S-Video
Pin
Meaning
1
GND
2
GND
3
Luminance (Y)
4
Chrominance (C)
A26361-K1070-Z120-1-M119, edition 1
English - 37
MYRICA V40-1
Colour and transmission system by country
Country
TV
Colour
Albania
B/G
PAL
Austria
B/G
PAL
Azores
B
PAL
Bahrain
B
PAL
Belgium
B/G
PAL
Bulgaria
D
SECAM
B
PAL
Canary Islands
Croatia
B/H
PAL
Cyprus
B
PAL
Czech Republic
D/K
SECAM / PAL
Denmark
B
PAL
Egypt
B
SECAM
Faroe Islands (DK)
B
PAL
B/G
PAL
France
E/L
SECAM
Germany
B/G
PAL
Gibraltar
B
PAL
Greece
B/G
PAL
Hungary
B/G & D/K
PAL
Finland
Iceland
B
PAL
Iran
H
SECAM
Ireland
Stereo
Subtitles
FM-FM
Teletext
Nicam
Teletext
Nicam
Teletext
Nicam
Teletext
Teletext
FM-FM
Teletext
Nicam
(Budapest
only)
I
PAL
Nicam
Teletext
Israel
B/G
PAL
Nicam
Teletext
Italy
FM-FM
Teletext
Nicam
Teletext
B/G
PAL
Jordan
B
PAL
Kenia
B
PAL
Luxemburg
Madeira
Malta
B/G
PAL
B
PAL
B/G
PAL
Marocco
B
SECAM
Monaco
L/G
SECAM / PAL
38 - English
A26361-K1070-Z120-1-M119, edition 1
MYRICA V40-1
Country
TV
Colour
Stereo
Subtitles
Netherlands
B/G
PAL
FM-FM
Teletext
Norway
B/G
PAL
Nicam
Poland
D/K
PAL
Teletext
Portugal
B/G
PAL
Teletext
Rumania
G
PAL
D/K
SECAM
Russia
Saudi Arabia
B
SECAM
Slovakia
D/K
SECAM / PAL
Slovenia
B/H
PAL
South Africa
Spain
I
PAL
B/G
PAL
Nicam
Teletext
Sweden
B/G
PAL
Nicam
Teletext
Switzerland
B/G
PAL
FM-FM
Teletext
B
SECAM
Tunesia
Turkey
United Arab Emirates
United Kingdom
B
PAL
B/G
PAL
I
PAL
A26361-K1070-Z120-1-M119, edition 1
Teletext
Nicam
Teletext
English - 39
MYRICA V40-1
Troubleshooting
Should an error occur, first check the following points. If the distortion is still not eliminated, the LCD
TV should, if possible, be checked on another signal source and/or with another data cable.
If you are unable to solve the problem, please inform our help desk.
Having this problem?
Check the following points:
No display (power indicator does not light)
►
Display becomes darker
The phosphorous illumination has a limited
lifetime. If your screen display should become
too dark, it will have to be exchanged.
Permanently unlit or lit pixels
The standard of production techniques today
cannot guarantee an absolutely fault-free
screen display. A few isolated constant lit or
unlit pixels may be present. The maximum
permissible number of this kind of defective
pixels is dependent on the resolution:
►
Check whether the power cable of the
device is properly plugged in and the
ON/OFF switch on the back of the device
is switched on.
Please contact our help desk.
6L / 10D / 10T
L = light, D = dark, T = total
No picture (power indicator glows orange)
The remote control does not work.
40 - English
►
Switch on the TV on the device or with
the remote control.
►
Check the setting of the picture signal
source.
►
Check whether the batteries in the remote
control are still sufficiently charged.
►
Make sure that the sensor for the remote
control on the LCD TV is not exposed to
strong light.
A26361-K1070-Z120-1-M119, edition 1
MYRICA V40-1
Troubleshooting in TV mode
Having this problem?
Check the following points:
No sound
►
Check the volume setting.
►
Check whether the device is muted.
►
Check that the antenna cable is correctly
connected.
No picture, only static
Reception may be poor.
The picture is fuzzy.
►
Check that the antenna cable is correctly
connected.
Reception may be poor.
The picture has dark interference lines and a
strong humming sound can be heard.
There may be an interference signal on the
antenna cable.
►
Have the installation checked.
A sheath current filter from the accessories
trade can provide a remedy.
The picture has shadows or ghost images
►
Check the antenna cable.
Use a directional antenna instead of an
omnidirectional antenna.
The picture shows interference, false colours or
line and picture shaking.
A26361-K1070-Z120-1-M119, edition 1
►
Check whether the TV is set to the correct
TV system (PAL or SECAM).
English - 41
MYRICA V40-1
Troubleshooting in PC mode
Having this problem?
Check the following points:
Message:
►
Check the setting of the picture signal
source.
►
Check whether the antenna or data cable
is correctly connected.
No Signal / Keine Eingabe
Message:
Out of range
The input signal (horizontal frequency and
refresh rate) at the displayed input does not
correspond to the technical LCD TV data.
►
Picture position is not correct
Adjust the video frequency range using
the computer software (see
documentation for your computer or your
graphics card).
The LCD TV recognises an undefined mode
(see "Preset operating modes (PC)").
►
Use the OSD function Geometry/Auto to
carry out the self-adjustment of the TV.
►
Set the picture position with the OSD
menu.
These functions are only available when PC is
selected as the signal source.
Picture is shaking
42 - English
►
Check whether the data cable for the LCD
TV is correctly attached to the monitor
port on the computer.
A26361-K1070-Z120-1-M119, edition 1