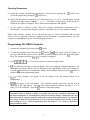
1
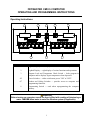
CMIII.5 Computer
Operating & Programming Instructions
Dean, a member of the Commercial Food Equipment Service Association, recommends using
CFESA Certified Technicians.
24-Hour Service Hotline 1-800-551-8633
Price: $6.00
819-5893
04-02
Frymaster CMIII Computer
Operating & Programming Instructions
TABLE OF CONTENTS
Page #
OPERATING INSTRUCTIONS
1
EQUIPMENT SETUP AND SHUTDOWN PROCEDURES
2
Setup
Shutdown
Operating the Fryer
Checking Temperature
2
2
2
4
PROGRAMMING THE CMIII COMPUTER
Boil Feature
Fryer Recovery Time Check
Temperature Selection—Fahrenheit to Celsius
Constant Oil Temperature Display Mode
i
4
5
6
6
6
FRYMASTER CMIII.5 COMPUTER
OPERATING AND PROGRAMMING INSTRUCTIONS
Operating Instructions
1
4
6
3
8
2
5
7
ITEM
1
DESCRIPTION
Lighted Display — left display of various functions and operations.
2
Lighted Display — right display of various functions and operations.
3
Program Lock and Temperature Check Switch -- locks program in
computer and/or displays frypot temperature when depressed.
4/5
Power Switches — either switch turns power "ON" or "OFF".
6/7
Product and Coding Switches — provides access to computer and
programming functions.
8
Programming Switch — used when reprogramming the computer
memory.
WARNING
Before turning on computer, ensure the fryer is filled with cooking oil/shortening or
water. NEVER allow water to enter the filtration system (if applicable).
1
Operating Instructions
Equipment Setup and Shutdown Procedures
Setup
WARNING
Fill the frypot to the bottom OIL LEVEL line with vegetable oil before pressing the
ON/OFF switch
to the "ON" position. Failure to do so could damage the frypot.
1. Fill the frypot with vegetable oil to the bottom OIL LEVEL line located on the rear of the frypot.
This will allow for oil expansion as heat is applied. Do not fill cold oil any higher than the
bottom line; overflow may occur as heat expands the oil. If solid shortening is used, pack solid
shortening into the cool-zone of the frypot. Continue to pack shortening in frypot to the bottom
OIL LEVEL line.
2. Ensure that the power cord(s) is/are plugged into the appropriate receptacle(s). Verify that the
face of the plug is flush with the outlet plate, with no portion of the prongs visible.
3. Ensure that the vegetable oil level is at the top OIL LEVEL line when the vegetable oil is at its
programmed cooking temperature. It may be necessary to add vegetable oil to bring the level up
to the proper mark, after the oil has reached the programmed cooking temperature. If solid
shortening is used, the MELT cycle MUST be used to melt the shortening. It may be necessary
to add solid shortening to bring the level up to the proper mark after the packed shortening has
melted. DO NOT DISABLE OR CANCEL THE MELT CYCLE UNTIL ALL SOLID
SHORTENING HAS MELTED.
Shutdown
1. Press the ON/OFF switch
to the "OFF" position (the display will show "OFF").
2. Filter vegetable oil (if applicable) and clean fryers.
3. Place the frypot covers on frypots.
Operating the Fryer
A. Turn the computer on by pressing the
switch.
1. One of the following displays will appear:
a.
, indicating that the burners are operating in the melt-cycle mode. Fryer will
remain in the melt-cycle mode until it reaches 180°F (82°C) or is canceled manually.
b.
, indicating that the pot temperature is 21°F (12°C) or higher than the setpoint.
c.
, indicating that the pot temperature is 21°F (12°C) or lower than the setpoint.
2
Equipment Setup and Shutdown Procedures (cont.)
d. "
" indicating that the fryer temperature is in the cooking range. NOTE: For best
results, do not cook product until the display reads "
".
e.
, indicates a heating problem.
f.
, indicates that the pot temperature is more than 410°F (210°C) [395°F (202°C) for
CE (European Community) fryers].
g.
, indicates that the computer has detected a problem in the temperature measuring
circuits, including probe.
NOTE: "." decimal point between digits 1 and 2 in either display area indicates that the computer is
cycling the burners "ON".
B. Melt-Cycle Cancel Feature (built-in computers only).
CAUTION
Do not cancel the melt cycle mode if using solid shortening.
The computer will display
during melt-cycle operation. To cancel melt cycle on a full pot,
depress the "R" button
. To cancel the melt cycle on a split pot, use the "L" button
for leftside pot and the "R" button
for right-side pot.
will be replaced by
. The decimal point
between digits 1 and 2 will illuminate indicating that the computer is cycling the burners "ON".
C. Cook-cycle operation is initiated by pressing the product switch:
1.
The basket lift (on fryers so equipped) will lower the product into the cooking oil/
shortening.
2.
The display will indicate the programmed cook time and begin countdown.
3.
If shake time is programmed, you will be notified to shake the product "X" seconds after the
cook cycle begins (X= amount of time programmed). An alarm will sound and the display
will read
and the product number selected. If no shake time is programmed
will
not appear during the cook cycle.
4.
At the end of cooking cycle, an alarm will sound;
will be displayed and the
associated product switch indicator will flash. To cancel the cook alarm, press the flashing
product switch.
5.
At this time, the hold time will be displayed (if programmed greater than 0) and countdown
will begin. When the hold time counter reaches 0, an alarm will sound.
and the
product number selected is displayed. The hold alarm is canceled by pushing the
switch.
If display is in use, hold time will count down invisibly until display is free.
3
Checking Temperature
A. Check the cooking oil/shortening temperature at any time by pressing the
Check the setpoint by pressing the
switch twice.
switch once.
B. During the idle periods, when the fryer is on but not in use, "
" should appear on both
displays on a single frypot computer. "
" will appear on the display of the side that is
turned on in a split-vat computer. If not, check actual temperature and setpoint.
C. If you suspect a defective probe, check the cooking oil/shortening temperature with a
thermometer. Verify that the computer readout is reasonably close to your measured reading.
NOTE: The electronic circuitry can be affected adversely by current fluctuations and electrical
storms. If for no apparent reason the computer does not function or program properly, reset the
computer by unplugging the power cord and plugging it back in.
Programming The CMIII.5 Computer
1. Activate the computer by pressing either
switch.
2. To enter the program mode, first press the
switch.
will appear in the left display. If
you have pressed this switch in error and do not wish to program, press the
switch again.
Note: The computer will flash
if cooking is in progress.
3. Press
(1 6 5 0) in that sequence to enter the program mode.
4.
(Setpoint) will appear in the left display. This is for setting the cooking temperature. The
temperature previously selected will be displayed in the right display. Enter new temperature.
Press the
switch to lock in temperature setting. If the setting is correct, press the
switch to
advance to the next programming option.
5.
(Select Product) will appear in the left display. Press the product button to be
programmed.
6.
will appear in the left display. The sensitivity number previously selected will be
displayed in the right display. Enter the new desired sensitivity number, the range is 1 to 9.
Enter "0" for no sensitivity. Press the
switch to lock in the setting.
Sensitivity adjusts computer-cooking time to compensate for the drop in cooking oil/shortening
temperature when a basket of product is placed into the fryer. Sensitivity decreases or
increases cooking time to counterbalance variances in product density, basket-load size, and
initial temperature. A proper sensitivity setting will ensure a high quality product. For example:
four ounces of fries can be programmed to cook to the same quality as two pounds. A good
initial setting is 4 or 5. Some experimenting with the range of 1 to 9 may be required to
achieve optimum quality.
4
Programming The CMIII.5 Computer (cont.)
7.
will now appear in the left display. A previously entered cook-time will appear in the
right display. If that time is correct, press the
switch. If you wish to change the time, enter
the desired time in minutes and seconds. (The new time will be displayed in the left display.)
Press the
switch to advance to the next option.
8.
now appears in the left display. The previous shake time (if any) will appear in the right
display. If a product requires shaking during the cooking process, set the shake time by pressing
the number of minutes to cook before shaking. Press the
switch to advance to the next
option. If no shake time is required, press "0" and press the
switch. Example: Total cook
time 3:00 minutes, shake after cooking 1:00 minute.
At the end of 1:00 minute, a beeper will sound and the product button indicator will flash for
three seconds.
9.
will now appear in the left display. Set the time to hold the cooked product from 13
seconds to 60 minutes. Press the
switch. If you do not wish to use the hold time, enter "0"
and press the
switch.
10.
will appear in the left display. If you desire to program more products, return to Step 5.
If no more programming is required, lock in program by pressing the
switch.
14.
will now appear in the left display. A previously entered cook-time will appear in the
right display. If that time is correct, press the
switch. If you wish to change the time, enter
the desired time in minutes and seconds. (The new time will be displayed in the left display.)
Press the
switch to lock in the setting.
Boil Feature
CAUTION
Do not drain water or boil-out solution into the filtration system (if applicable). Irreparable
damage will result and void the warranty.
1. Before switching the fryer "ON", close the frypot drain valve. Fill empty frypot with mixture of
cold water and detergent. Follow detergent instructions when mixing.
NOTE: When the computer is configured for a split-vat fryer, Boil Mode will not turn on both sides
of the computer. Each side will have to be turned on and placed in Boil Mode separately.
2. To program computer for Boil Feature, press either
2. Press the
switch.
switch.
will appear in the left display.
5
Boil Feature (cont.)
4. Enter
(1 6 5 3) in that sequence. The right display will read
. The
temperature is automatically set for 195°F (91°C). The fryer will attain this temperature and
remain there until either
switch is pressed, which cancels the boil-out mode. In high-altitude
locations, constantly monitor the fryer for boil-over conditions. If boil over occurs, turn off fryer
immediately, allow to cool, and re-enter boil-out mode.
Fryer Recovery Time Check
1. To check recovery time, press the
3. Enter
displays for 5 seconds.
switch.
will appear in the left display.
(1 6 5 2) in that sequence. The recovery time will appear in both
Temperature Selection—Fahrenheit to Celsius
1. To change the computer temperature from Fahrenheit to Celsius or Celsius to Fahrenheit, press
either
switch.
2. Press the
switch.
will appear in the left display.
3. Enter
(1 6 5 8) in that sequence. The computer will automatically convert the
temperature from Fahrenheit to Celsius or Celsius to Fahrenheit.
4. Press the
switch to display the temperature in the newly selected mode.
Constant Oil Temperature Display Mode
1. To program constant temperature display, press the
2. Press the
switch.
switch.
will appear in the left display.
3. Enter
(1 6 5 L) in that sequence. The cooking oil/shortening temperature will
display constantly in the right display on a full-pot and in both displays on a split-pot.
NOTE: During the product cooking process, the cooking time will not be displayed but timing will
be taking place.
4. To remove the constant oil-temperature display and display the cooking time, repeat Step 2 and
Step 3.
6
Dean, 8700 Line Avenue, PO Box 51000, Shreveport, Louisiana 71135-1000
Shipping Address: 8700 Line Avenue, Shreveport, Louisiana 71106
TEL 1-318-865-1711
PRINTED IN THE UNITED STATES
FAX (Parts) 1-310-327-3343
SERVICE HOTLINE
1-800-551-8633
FAX (Tech Support) 1-318-219-7135
Price: $6.00
819-5893 04-02